==============================================================================
======= === ======= === === === ======= === === ======= ======= =======
¦ ¦ ¦ ¦ ¦ ¦ ¦ ¦ ¦ \ ¦ ¦ ¦ ¦ ¦ ¦ ¦ ¦ ¦ ¦ ¦ ¦ ¦ ¦
== == ¦ ¦ == == ¦ ¦ ¦ ¦ \ ¦ ¦ ¦ === ¦ ¦ ¦ ¦ ¦ ¦ ==== ¦ ==== == ==
¦ ¦ ¦ ¦ ¦ ¦ ¦ ¦ ¦ ¦\ \¦ ¦ ¦ ¦ ¦ ¦ ¦ ¦ ¦ ¦ ¦ ¦ ¦ ¦ ¦ ¦
¦ ¦ ¦ ¦ ¦ ¦ ¦ = ¦ ¦ ¦ ¦ ¦ ¦ ¦ ¦ ¦ ¦ ¦ ¦ ¦ == ¦ ==== ¦ ¦
¦ ¦ ¦ ¦ ¦ ¦ ¦ ¦ ¦ ¦ ¦ ¦ \ ¦ ¦ ¦ ¦ ¦ ¦ ¦ ¦ ¦ ¦ ¦ ¦ ¦ ¦ ¦
¦ ¦ ¦ ¦ ¦ ¦ ¦ = ¦ ¦ ¦ ¦ ¦ ¦ ¦ ¦ ¦ ¦ ¦ ¦ ¦ == ==== ¦ ¦ ¦
¦ ¦ ¦ ¦ ¦ ¦ ¦ ¦ ¦ ¦ ¦ ¦ \ ¦ ¦ ¦ ¦ ¦ ¦ == ¦ ¦ ¦ ¦ ¦ ¦ ¦
¦ ¦ ¦ ¦ ¦ ¦ ¦ ¦ ¦ ¦ ¦ ¦ ¦ ¦ === ¦ ¦ ¦ ¦ ==== ==== ¦ ¦ ¦
¦ ¦ ¦ ¦ ¦ ¦ ¦ ¦ ¦ ¦ ¦ ¦ \ ¦ ¦ ¦ ¦ ¦ ¦ ¦ ¦ ¦ ¦ ¦
=== === === === === === == =====\ \ ====== ======= ======= ===
==
- I.M.M.O.R.T.A.L T.H.R.O.N.E -
==============================================================================
Copyright Mister Sinister, 2007
==============================================================================
This guide is dedicated to my beloved partner, Martyn "Shelfy" Owen
==============================================================================
CHAPTER 1 - Introduction to the Game
CHAPTER 2 - Choosing your Character
CHAPTER 3 - Basic Controls
CHAPTER 4 - Schools of Training
CHAPTER 5 - Main Walkthrough
================
ACT ONE - GREECE
================
SECTION 1.0 - Road to Helos
SECTION 1.1 - A Troubled Village
SECTION 1.2 - Spartans At War
SECTION 1.3 - The Words of an Oracle
SECTION 1.4 - The Source of the Monsters
SECTION 1.5 - The Battle for Athens
SECTION 1.6 - The Order of Prometheus
SECTION 1.7 - Under the Labyrinth
SECTION 1.8 - The Blindness of the Gods
GREEK EPILOGUE
===============
ACT TWO - EGYPT
===============
SECTION 2.8 - The Blindness of the Gods
SECTION 2.9 - The Invocation
SECTION 2.10 - A Telkine in Egypt
SECTION 2.11 - The Sickle of Kronos
EGYPTIAN EPILOGUE
======================
ACT THREE - THE ORIENT
======================
SECTION 3.11 - The Sickle of Kronos
SECTION 3.12 - Hunt for the Sickle
SECTION 3.13 - Journey to the Jade Palace
SECTION 3.14 - Under Wusao Mountain
ORIENTAL EPILOGUE
=========================
ACT THREE - MOUNT OLYMPUS
=========================
SECTION 3.15 - Olympus
MOUNT OLYMPUS EPILOGUE
================
ACT FOUR - HADES
================
SECTION 4.16 - A Mysterious Message
SECTION 4.17 - Medea's Price
SECTION 4.18 - The Road to Hades
SECTION 4.19 - Judgment of the Living
SECTION 4.20 - The Battle for Elysium
SECTION 4.21 - The Immortal Throne
HADES EPILOGUE
CHAPTER 6 - Skills of the Schools
CHAPTER 7 - Relics
CHAPTER 8 - Monster Charms
CHAPTER 9 - Arcane Formulae
CHAPTER 10 - Shrines
CHAPTER 11 - Hero Monsters
CHAPTER 12 - Side Quests
CHAPTER 13 - Tips and Tricks
CHAPTER 14 - Playing on Epic and/or Legendary
CHAPTER 15 - Acknowledgments
==============================================================================
C H A P T E R O N E CHAPTER 1
==============================================================================
I N T R O D U C T I O N T O T H E G A M E
==============================================================================
Hello and welcome to my Titan Quest: Immortal Throne FAQ and beginning-to-end
walkthrough. I hope that you're able to glean some helpful information from
this guide, as I certainly enjoyed writing it. If you do have any helpful
comments or suggestions, please feel free to get in touch with me by
e-mailing me at
[email protected]. Please note, however, that I DO
MEAN "helpful" - if you have nothing nice or productive to say then my advice
is to say nothing at all - it'll save BOTH of us a lot of hassle, cheers.
So then my cheeky monkeys, let's get stared shall we ?? First, a brief
overview of the game ...
Titan Quest (and its Immortal Throne Expansion Pack) are simple-interface,
third-person perspective hack 'n slash game, which could best (without wanting
to sound like it is a clone or similar) be alikened to any of the Diablo
games, but with better levels of animation throughout. If you like Diablo
or the Diablo series, I'd bet my bottom dollar you'll love this game.
The focus of the game is on arcade-style hack 'n slash fun, with you being
thrown IMMEDIATELY into the fray, so if you're expecting something even
REMOTELY similar to Elder Scrolls IV: Oblivion ? STAY AWAY !! If you're into
simple interfaces and hours of guttural laughter from slaying troops en masse ?
GO GET A COPY NOW !!!!!! :)
You begin by customising your character from a limited number of options, or
importing a previously saved character if you have already played through
Titan Quest, and just installed the Immortal Throne Expansion Pack, and
set off on the road to fame, fortune and glory, travelling the ancient world
and stopping off at the holiday hotspots such as Delphi, Athens, the Nile,
Giza, and the Great Wall of China.
Naturally you will be meeting all manner of beasts and characters from the
myths of the ancient world along the way, and one of the most refreshing
things about Titan Quest is the fact that anybody that's read up on any of a
number of myths of the ancient world, will find something they find familiar
in this game AND, it must be said, something which has been given an
appropriate level of attention by the game's developers. EVERYTHING in this
game is graphically beautiful.
So ! Without further ado, let's get crackin' !!
==============================================================================
M A I N M E N U
==============================================================================
The main menu of Titan Quest (and Immortal Throne, although from this point
on I am going to make life easier and just refer to it as "Titan Quest")
provides you with the following options :-
* Play Titan Quest
Begins a Titan Quest "Main" Game (i.e. the game's main storyline)
* Play Custom Quest
Starts a Titan Quest "Custom" Game (e.g. a map created by a third party)
* Options
Tweak a number of graphics, sound and gameplay options amongst others
* Credits
Plays the game's credits (but you get cooler music if you beat the game)
* Updates
Checks for (and downloads) any updates/patches etc.
* Exit
Returns to Windows
I am going to take it as read that you are going to be pressing the Play Titan
Quest button ... as that's what I'm about to do.
==============================================================================
C H A P T E R T W O CHAPTER 2
==============================================================================
C H O O S I N G Y O U R C H A R A C T E R
==============================================================================
So ! We're ready to begin a Titan Quest "Main" Game eh ? Fair play !
Whilst it would only be natural to draw comparisons between this game and its
peers (mainly the Diablo series), I am going to avoid doing so, on the basis
that you as a reader might not have played any of the Diablo games - therefore
the Diablo commends stop NOW, ok ? I mean it now - no more ... :)
If you click on the "Create" button, you will be taken to the character
creation screen.
The options for customising your character are initially really quite limited,
which you may find to be a bit stifling, but stick with it - it does get MUCH
much better.
To start with, you get a choice of :-
1) What you want your character's name to be (up to 14 characters);
2) Whether you want a male or female character; and
3) What colour you want your character's tunic to be. You can pick from
either:- White, Tan, Teal, Grey or Rose
You can also see on the right-hand side of the screen that you have a couple
of options for the TYPE of game you'd like to play ... you can play a Single
Player game (which is what we are going to do together ... if you want of
course ...), or you can either join, or host, a multi-player game.
==============================================================================
C H A P T E R T H R E E CHAPTER 3
==============================================================================
B A S I C C O N T R O L S
==============================================================================
So ! Once you've started the game you will very very quickly realise just how
simple it is to play your character in the game. Very simply put, the control
method is as follows :-
==============================================================================
M O U S E C O N T R O L S
==============================================================================
Nb "left-attack" and "right-attack" are whatever attacks or commands have
been mapped to the corresponding buttons on the mouse, and you WILL wind up
changing these periodically as you play - however, to begin with they are :-
Left-click - Move/Attack target with left-attack/Pick up item
Right-click - Use right-attack at given location
==============================================================================
K E Y B O A R D S H O R T C U T S
==============================================================================
Alt - Highlights all undamaged items on the ground
C - Calls up the Character Screen
D (with item) - With an item raised, D drops the item on the ground
Q - Calls up your quests screen with details of all current quests
S - Calls up your skills screen
W - Changes your active weapon from 1 to 2 (and back if hit again)
Z - Highlights all damaged items on the ground
==============================================================================
D I R E C T I O N S
==============================================================================
I have given directions throughout this guide in accordance with the way that
was prevalent when I was a child - i.e. go north-west of this, or south-east
of that ...
Therefore I am going to draw you a little compass, just to make sure that we
are all familiar with which way I consider north on the screen to be. This
may sound childish, but as the game is angled, it will make your life a lot
easier, believe me ;)
NORTH
NORTH-WEST ^ NORTH-EAST
. /¦\ .
. ¦ .
. ¦ .
. ¦ .
WEST <--------------- YOU ----------------> EAST
. .
. ¦ .
. ¦ .
. \¦/ .
SOUTH-WEST V SOUTH-EAST
SOUTH
==============================================================================
C H A P T E R F O U R CHAPTER 4
==============================================================================
S C H O O L S O F T R A I N I N G
==============================================================================
Once you reach level 2, you can choose a school of training. Consider this a
character class for your player. There are NINE schools of training to pick
from - eight in regular Titan Quest, and nine in Immortal Throne.
Once you have chosen a school, however, you CANNOT undo it (without cheating).
You can pick a SECOND school of training at level 8, and it is your choice of
training schools which determines your ultimate character class, as you can
either stick with the one school, or pick up a second one at level 8 or any
point thereafter.
There are MANY classes to choose from, and a full list follows. To begin with
however, here are the nine schools of training :-
1) STORM
The Storm School handles two main elements - air and water. Its skills
include the ability to slow or freeze enemies, call lightning, summon
a wisp, fire shards of ice, interrupt other spellcasters and so on.
2) EARTH
The Earth School handles two main elements - fire and earth. Its
skills include the ability to burn and surround yourself in rock for
better defence, fire blasts and bombs of fire, create volcanoes under
your enemies, summon a golem to aid you, and so on.
3) WARFARE
The Warfare school represents absolute mastery in hand-to-hand combat.
Its students learn how to wield two weapons at the same time, as well
as how to channel their rage into their attacks, augmenting their
strength, accuracy, power and so on.
4) SPIRIT
Necromancy, plain and simple - the Spirit-master's powers focus on
causing pain and sorrow, attacking the minds and souls of their foes.
They can summon the powerful Liche King, as well as a Spirit-creature
of sorts, called the Outlander.
5) DEFENCE
Defence students are taught the most effective use of armour and
shields. They have a couple of skills that are similar to those of
the warfare school, including how to funnel their rage into their
strikes, but their dominant focus is on safety and defence, rather
than offensive power.
6) NATURE
Those that walk the path of nature are skilled in healing, and
communing with nature's beasts. They can summon wolves and the fierce
and reliable nymph to their aid, and can augment their power in combat
through auras.
7) HUNTING
Hunting focuses almost exclusively on the effective use of a bow and
arrows to target and eliminate enemies. Skills include augmenting
the character's arrows so that they penetrate enemies and strike those
behind them, or shatter upon impact to do burst damage.
8) ROGUE; and
The rogue is a master of stealth and cunning, relying on powders,
poisons, traps and assassin-style attacks for their strikes. Their
ability to coat their weapons with venom enables them to do more
damage, and their lethal strike power lets them HUGELY increase the
power of a single attack ... fire it up and watch for yourself !!
9) DREAM
Whilst this may sound rather biff, being able to control dreams DOES
have a number of advantages. You could dream kinky dreams, or dream
you win the lottery every night !! Ok sorry I know ... the Dream
school enables you to dominate the minds of your enemies, so it gives
you powers like sending your enemies to sleep (no joke), bending time
to increase your reflex-speeds, creating auras to augment your power,
summoning a nightmare to aid you, teleporting to strike your enemies,
and so on.
Here is a short list of the possible character classes that you can create, by
mixing different spheres of training :-
===============================================================================
Sphere 1 + Sphere 2 = Character Class .¦. Sphere 1 + Sphere 2 = Character Class
=======================================¦=======================================
¦
STORM - STORMCALLER ¦ DEFENCE - DEFENDER
STORM DEFENCE PALADIN ¦ DEFENCE NATURE GUARDIAN
STORM NATURE DRUID ¦ DEFENCE HUNTING WARDEN
STORM HUNTING SAGE ¦ DEFENCE ROGUE CORSAIR
STORM ROGUE SORCERER ¦ DEFENCE DREAM TEMPLAR
STORM DREAM PROPHET ¦ DEFENCE SPIRIT SPELLBINDER
STORM SPIRIT ORACLE ¦ DEFENCE WARFARE CONQUEROR
STORM WARFARE THANE ¦ DEFENCE EARTH JUGGERNAUT
STORM EARTH ELEMENTALIST ¦ DEFENCE STORM PALADIN
¦
=======================================¦=======================================
Sphere 1 + Sphere 2 = Character Class .¦. Sphere 1 + Sphere 2 = Character Class
=======================================¦=======================================
¦
EARTH - PYROMANCER ¦ NATURE - WANDERER
EARTH STORM ELEMENTALIST ¦ NATURE HUNTING RANGER
EARTH DEFENCE JUGGERNAUT ¦ NATURE ROGUE ILLUSIONIST
EARTH NATURE SUMMONER ¦ NATURE DREAM RITUALIST
EARTH HUNTING AVENGER ¦ NATURE SPIRIT SOOTHSAYER
EARTH ROGUE MAGICIAN ¦ NATURE WARFARE CHAMPION
EARTH DREAM EVOKER ¦ NATURE EARTH SUMMONER
EARTH SPIRIT CONJURER ¦ NATURE STORM DRUID
EARTH WARFARE BATTLEMAGE ¦ NATURE DEFENCE GUARDIAN
¦
=======================================¦=======================================
Sphere 1 + Sphere 2 = Character Class .¦. Sphere 1 + Sphere 2 = Character Class
=======================================¦=======================================
¦
WARFARE - WARRIOR ¦ HUNTING - HUNTER
WARFARE EARTH BATTLEMAGE ¦ HUNTING ROGUE BRIGAND
WARFARE STORM THANE ¦ HUNTING DREAM HARUSPEX
WARFARE DEFENCE CONQUEROR ¦ HUNTING SPIRITBONE CHARMER
WARFARE NATURE CHAMPION ¦ HUNTING WARFARE SLAYER
WARFARE HUNTING SLAYER ¦ HUNTING EARTH AVENGER
WARFARE ROGUE ASSASSIN ¦ HUNTING STORM SAGE
WARFARE DREAM HARBINGER ¦ HUNTING DEFENCE WARDEN
WARFARE SPIRIT SPELLBREAKER ¦ HUNTING NATURE RANGER
¦
=======================================¦=======================================
Sphere 1 + Sphere 2 = Character Class .¦. Sphere 1 + Sphere 2 = Character Class
=======================================¦=======================================
¦
SPIRIT - THEURGIST ¦ ROGUE - ROGUE
SPIRIT WARFARE SPELLBREAKER ¦ ROGUE DREAM DREAMKILLER
SPIRIT EARTH CONJURER ¦ ROGUE SPIRIT WARLOCK
SPIRIT STORM ORACLE ¦ ROGUE WARFARE ASSASSIN
SPIRIT DEFENCE SPELLBINDER ¦ ROGUE EARTH MAGICIAN
SPIRIT NATURE SOOTHSAYER ¦ ROGUE STORM SORCERER
SPIRIT HUNTING BONE CHARMER ¦ ROGUE DEFENCE CORSAIR
SPIRIT ROGUE WARLOCK ¦ ROGUE NATURE ILLUSIONIST
SPIRIT DREAM DIVINER ¦ ROGUE HUNTING BRIGAND
¦
===============================================================================
¦ Sphere 1 + Sphere 2 = Character Class ¦
=========================================
DREAM - SEER
DREAM SPIRIT DIVINER
DREAM WARFARE HARBINGER
DREAM EARTH EVOKER
DREAM STORM PROPHET
DREAM DEFENCE TEMPLAR
DREAM NATURE RITUALIST
DREAM HUNTING HARUSPEX
DREAM ROGUE DREAMKILLER
I shall go into considerably more detail on each school when you get to
Chapter Six: Skills of the Schools.
==============================================================================
C H A P T E R F I V E CHAPTER 5
==============================================================================
M A I N W A L K T H R O U G H
==============================================================================
================
ACT ONE - GREECE
================
===========================
SECTION 1.0 - ROAD TO HELOS
===========================
We begin the game on the road to Helos. Where is Helos you might ask ?
Buggered if I know I might answer ...
The first time you do any of a given number of actions in Titan Quest, a
very helpful little side panel will swing onto your screen from the right-
hand side, to tell you a little bit about what you need to do. The first
thing that will happen if you move towards Corythus the Boat-hand, who is
standing beside you, is the game will tell you about :-
=======================
INTERACTING WITH PEOPLE
=======================
Whilst diplomacy is not a hugely important factor in wielding a sword and
cutting the heads off monsters, there are a number of times when it is
both appropriate AND wise to speak to people. To help you discern the
worthwhile from the chav, you can see which characters you are able to
interact with, by looking for either a golden exclamation mark, or a golden
rhombus above their heads. The exclamation mark denotes a quest character,
i.e. somebody that will either have information for you relating to the
ongoing MAIN quests of the game, or who may have a side-quest to give you,
or update you on. ALWAYS TALK TO THE PEOPLE WITH THE EXCLAMATION MARKS.
The people with the rhombuses are just going to talk a lot of plop to be
honest, but it's nice to speak to one or two of them from time to time, as
they do have the odd story to tell.
Once you have exhausted the dialogue opportunities with any of the peeples
you meet in the game, the respective icon above their heads will go grey.
Continue down the road aways, and you will meet Timaeus, the Poor Farmer.
As you will see, Timaeus has an exclamation mark over his head, as would I
if I was wearing clothes like THAT, but hey ! Who cares.
If you speak to Timaeus you will get your first quest. This is the start
of the main quest in the game, and it goes a little something like this ...
================================
SECTION 1.1 - A TROUBLED VILLAGE
================================
Timaeus (a poor farmer) says that his village, Helos, is having trouble
dealing with a group of monsters that assail it. First and foremost
however, he appears to be having trouble with his horse, which a group of
monsters are about to slay. The plough-horse is his only possession, and
without it he cannot make a living. OK OK ! I get the picture !! We'll
save your bloody horse.
Head into the adjacent field and kill the ravenous boar and two satyrs
that are trying to kill the horse. They won't attack you (just to make
sure your first few kills are easy enough) ;)
================
PICKING UP ITEMS
================
Once you're done with the monsters, hold the ALT key on your keyboard and
you will see that they've dropped some items. Pick up whatever they've
left and, if it's a weapon, call up your character screen by pressing the
C button, and click on the little green "II" above, and to the right, of
your current weapon. This will activate your second set of weapons. Just
drop whatever weapon you've picked up (if any) into this second weapon
slot, and then you can chop-and-change between your two different sets of
weapons by pressing the W key on your keyboard.
====================
ROAD TO HELOS CONT'D
====================
Once Timaeus has been reunited with his plough-horse, you can continue
on down the road to Helos. Once you arrive, dispose of the five satyrs
that are assaulting the town's militia at the entrance to Helos, and then
head on in.
Incidentally, five is a very significant number in Titan Quest, as five is
generally-speaking the number of monsters that form what I shall be
referring-to from this point on as a "group" of monsters.
====================
THE VILLAGE OF HELOS
====================
Once you enter the village of Helos you will encounter your first
rebirth fountain.
================
REBIRTH FOUNTAIN
================
Rebirth fountains are REALLY cool - all you need to do is walk NEAR
one - not even right up to it, and it will activate itself. A rebirth
fountain is effectively a marker which serves to respawn your character
in the ... hopefully unlikely but possible event of their death.
If you find another rebirth fountain in the wilderness or another city,
and you will I assure you, then just walk up to it, and it will replace
the previous fountain (or marker) as your latest respawn point.
Just remember AT ALL TIMES that revisiting areas you have already been
to CAN be a bit of a pain in the arse, ESPECIALLY if you have already
activated a rebirth fountain further on in the game, as if you have
missed a rebirth fountain in an earlier part of the game, you stand a
chance of activating it if you come close to it, and this would see
your *later* rebirth fountain overwritten by this earlier one ...
... and that would suck ...
... a lot ...
That being said, once a rebirth fountain has been overwritten by another
one, it can only be REactivated by clicking on it with the left-mouse
button.
One other thing I should mention about dying and being respawned, is
that you WILL lose some experience points if you die and come back.
The higher your level, the more XP you will lose when you are brought
back to a rebirth fountain after death. HOWEVER, when you die (in
Immortal Throne at least - this doesn't happen in plain old Titan Quest),
a gravestone will appear at the site of your death. If you click on the
gravestone, it will sink into the ground and you will regain SOME of the
experience points you lost when you died. HOWEVER, if you are really
quick you can click on the gravestone AS IT IS SINKING, to gain 2, 3 or
even sometimes FOUR times the experience you might have lost ... this
is a glitch in the game, and one I expect you to exploit to the MAX, ok ??
In the village of Helos you will find :-
=====================
NON-QUEST INHABITANTS
=====================
MIDIAS - a villager who explains the function of rebirth fountains for
your benefit ... if you HAVEN'T been paying attention that is.
AESON - Guard Captain - distressed that the Shaman leading the tribe
of monsters that dwell nearby is overrunning the defences of
the town and destroying its farmlands.
IOLAUS - Storyteller, who recounts the tale of Herakles and many of his
twelve labours.
EUMOLPUS - Old Farmer, whom you cannot speak with at the outset. He does
congratulate you for saving Helos' farms and the livelihoods of
its citizens, once you have completed Diomedes' quest, however.
HESIONE - a villager who is, to be honest, a bit of a pessimist. She
is upset about the wholesale destruction of the town's crops
and begs you to speak with Diomedes.
LACHES - a villager who explains the function of portal shrines, which
we will get onto in a few moments.
LYERSES - Lookout, who will allow you to leave the town, but urges you
to speak with Diomedes (if you have not already done so) to
sort out the problems in Helos, before moving onwards.
=================
QUEST INHABITANTS
=================
DIOMEDES - Elder of Helos. Diomedes is the head honcho in the little
village of Helos, and proud of it. Unfortunately, however,
he has a problem. His village is being overrun by monsters
led by a satyr shaman. He says they have nobody to defend
them against the monsters, and he implores you to help him.
Diomedes updates your main quest with a call for you to
"find and defeat the satyr shaman".
For the sake of consistency, I'm going to finish exploring
the town of Helos before helping Diomedes in his quest.
Incidentally, as soon as you have spoken with Diomedes, a group
of satyr's rushes the bridge to his north, so you should help
the villagers fend them off before exploring further.
==================================================
MERCHANTS, ENCHANTERS, MYSTICS AND CARAVAN DRIVERS
==================================================
A quick word or two about merchants. They come in three fruity flavours
First off we have Blacksmiths, who specialise in weapons and armour.
Then come Arcanists, who focus on selling items that are of use to the
mages amongst you, and then you find Traders, who are quite happy to sell
whatever they can get their hands on.
When you are dealing with a merchant, you can move the mouse over any
item he or she is selling. If the mouse cursor changes to a red no go
sign over a purse, it means you cannot afford to purchase the item with
the amount of gold you currently possess. If the item is depicted on a
red background, you cannot use it for one of a number of possible
reasons, including :-
Your character is not of a high enough level;
Your character is not strong enough to wield the item;
Your character is too stupid to understand HOW to use the item; or
Your character is a clutz, and wouldn't be able to wield it anyhow.
Helpfully, when wanded, the game will automatically provide you with a
description of the item you are interested in, and how it compares with
any item/s you are currently carrying that might be replaced by it. E.g.
If you wand a necklace, the stats for that necklace are brought up on
screen, as are the stats for any necklace that you are currently wearing.
Another REALLY cool thing about merchants is that you can buy and sell
from them at the same price during a given transaction, MEANING if you
inadvertently sell them something and think "Sh!t !! I didn't mean to
sell that - I NEED IT BACK oh PLEASE sell it to me PLEASE", then rather
than turning around to you and saying "Sure !! AT THREE THOUSAND TIMES
ITS PURCHASE COST MUAHAHAHAAAAAAAAAAAAAR", the merchants in Titan Quest
will just turn around and say "hokay", and will sell you whatever, at
the same price it was when the original transaction took place.
Similarly, items which you sell are placed in a separate screen, meaning
that you can easily see what you've sold the merchant, and can buy it
back from them quickly and easily ...
If you quit the merchant screen and come back, however, you will have to
pay full-whack for whatever you have parted with.
Problems arise where you're selling HEAPS of stuff to a merchant (which
will happen later on in the game), as the amount of space they have to
store the stuff YOU sell them will wind up being less than the amount
of space you have to sell them items from, and so items in their "what you
have sold me" screen will be overwritten.
... confused ? I have more !! STICK AROUND ;)
ENCHANTERS are another additional type of character that are only present
in Immortal Throne and not Titan Quest, but as there are none in Helos,
we shall come to them in due course.
MYSTICS are a further type of character that are only present in Immortal
Throne and not Titan Quest. As with Enchanters, there are none in Helos,
so I shall discuss them at an appropriate time.
CARAVAN DRIVERS are KICKASS. They will hold items for you, so that you
don't have to carry them around with you all the time, and so that you
don't run the risk of losing them by leaving them on the ground. You can
purchase additional space from caravan drivers in two blocks. First block
you get for free - the first ADDITIONAL block you buy will cost you 10,000
GP, and the SECOND additional block of space you buy will cost you 500,000
GP.
Caravan Drivers also give you access to what is called a "Transfer Area".
You can use the transfer area to transfer items between ANY character in
Titan Quest, and your character. So if you pick something up and think
"I can't really use this, but character (x) can", then put it in the
transfer area, load up character (x), go to the nearest caravan driver and
voila !!
Caravan Drivers are only present in Immortal Throne, not Titan Quest.
In the village of Helos you will find the following merchants and caravan
drivers :-
CARCINUS - Trader
ERATODES - Caravan Driver
If you venture to the south of Carcinus and Eratodes, you will find the
villager Laches, standing beside a set of steps leading up to a circular
platform, encircled by statues. This is what is called a
=============
PORTAL SHRINE
=============
Portal Shrines are designed to enable you to quickly travel to areas that
you have been to previously. Similar to rebirth fountains (and Sharon
Stone), all you need to do to turn one on is walk up to it, and the rest
will happen for you. Once activated, Portal Shrines can never be turned
off, and you will be able to teleport back to this location whenever you
wish.
======================
PERSONAL TELEPORTATION
======================
Once you have activated your first portal shrine, you may press the L key
on your keyboard AT ANY TIME during play to call up a personal teleport
gate, which you can use to travel to any of the portal shrines you have
activated in the entire game.
Once you are done in whatever town/s you travel to, you may teleport back
to the exact location you created the teleport gate in. HOWEVER, if you
are slain, your teleport gate is automatically closed, which is a REAL
bugger, but nevermind.
So ! Now that we have explored Helos, let's go and sort out Diomedes'
problem, shall we ?
Head from Diomedes northwards, over the bridge, taking note that the two
torches on either side of the bridge light up as you pass by them. This is
another significant thing in Titan Quest, as torches like this, which light
up when you pass them ? Are a sure sign that you are going the right way.
Always remember that, as otherwise there are times when you might get a
tad lost exploring, and not know which way to go - it's happened to me
before I must admit !!
So, back to the plot. Once over the bridge, keep heading to the north,
through the Helos Farmlands and into the Helos Woods, slaying the satyr's,
crows and boar that you encounter en route. Left-click on any chests you
may find on the way and pilfer their contents, and REMEMBER to keep using
the ALT key to pick up those items that your enemies drop.
If (and it is very unlikely this will happen, but if) you fill your whole
inventory during this mission, press the L key and teleport back to Helos.
Sell your unwanted items to Carcinus, and then use the portal shrine in
Helos to teleport back to where you were and carry on.
If you encounter any obelisks in the wilderness - they may take a number of
forms, from crumbling blocks of stone to warped sculptured pieces of marble,
(but all of them will have a glowing light above them), these are called
=======
SHRINES
=======
Shrines give temporary benefits to the player once they are activated. A
full list of shrines can be found in Chapter Ten: Shrines. For now all you
need to know is that some shrines give immediate bonuses, such as full
health recharge, and others give duration-based bonuses, such as better xp
gains from kills for a given period of time, or the ability to slow down
your enemies with frost, giving you substantial benefits in combat.
Simply left-click on a shrine to use it. Some shrines recharge themselves
over time, but there is no point in waiting around for one to do so, trust
me ;)
Once you find the Shaman you will see that he immediately begins to bombard
you with magic spells from afar. He has two main types of attack :-
A) A fiery blast which he unleashes from his staff - it looks like a little
red flaming arrow; and
B) A flaming bomb which he lobs at you.
Stick and move - avoid his attacks whilst despatching his followers, who
are a combination of satyr archers and regular satyr's, and then close in
for the kill once those have been despatched.
Ordinarily there are two shrines in the area occupied by the Shaman - one
to the west, and one to the south - use those if you need to.
Once he has fallen to your might, open the chest behind him, grab the loot,
and either portal back to the town if you cannot carry it all in one go, or
walk back to town if you can.
Speak with Diomedes to earn your reward - 1000 GP, and 150 XP (on normal
difficulty), and a further plea for you to go and plead with General
Leonidas of Sparta to despatch a small platoon of soldiers to help protect
Helos against further assault.
I AM NOT YOUR ERRAND BOY !!!!! *Sinister pouts when he realises that he
cannot cleave Diomedes' arms from his body for the IMPUDENCE of his request*
=============================
SECTION 1.2 - SPARTANS AT WAR
=============================
And so we're off ! Helos having been spared a sure thrashing at the hands
of the satyr shaman and his horde, we can carry on in search of Sparta.
The Main Quests screen tells us that we will need to travel through Laconia
in order to get to Sparta, so what are we waiting for ??
As you leave Helos a shepherd named Nicostratus will come running towards
you and pause for breath, the weight of the exclamation mark on his head
obviously too much to bear. Speak with Nicostratus, and he will tell you
that his friend Tellis has been kidnapped by monsters whilst the two of them
were leading their flocks home, and that he now resides in a cave by the
road. You have just picked up the Monstrous Brigands Quest (your first
side quest).
Side quests are incidental quests that are not necessary in order for you
to continue through the main quest. They do, however, very often lead to
your receiving MASSIVE bonuses for completing them, so I shall guide you
through each of the side quests in the game, and show you how to complete
each one in the most expedient manner possible. Please note that, as with
the main quest, I shall detail what you get as a reward for completing
the quest on normal difficulty. For details of your rewards on Epic and
Legendary difficulties, please see Chapter Twelve: Side Quests.
==================
MONSTROUS BRIGANDS
==================
To find tellis, simply follow the road from Helos aways, and you will come
to a cave with two Satyr Trappers standing outside it. As you approach,
they will leg it inside. Follow them, slay ALL in the cave, and at the
back you will find tellis, huddled in a corner poor lad. He's the one
with his knees knocking together, just in case you WEREN'T sure ;)
Speak with tellis to gain your reward - a piece of magical jewellery, and
300 XP.
If you wish, you may go back to Helos (I would suggest teleporting there),
to speak with Nicostratus - however all he has for you is a thank you.
======================
SPARTANS AT WAR CONT'D
======================
Leave the cave where tellis is, and head further down the road. You will
pass a rebirth fountain and a set of torches as you go.
You are now entering the Laconia Woods. Stay on the road, and follow it
to the north-east. You will find that you walk past a battered cart and
by a rudimentary gate that leads into a clearing with a load of sawn trees
piled up high. Go in there, and slay the satyrs there. You will find
they are attacking a man who stands alone, cowering under their assault.
Once you have freed the man, speak with him. His name is Lycus, the
Labourer, and he is most grateful to have been freed.
================
THE CORNERED MAN
================
Having saved Lycus, you have earned yourself 300 XP, and 1500 GP. Well
done !! You'll be saving up for that pension in NO time.
======================
SPARTANS AT WAR CONT'D
======================
Return to the main road, and keep following it to the north. Keep going
all the way to the north, past another set of torches and to the next
rebirth fountain.
Just past that rebirth fountain you will see a traveller named Euphadimus,
who is standing scratching his head, next to his two oxen. Speak with him.
=================
MEDICINES WAYLAID
=================
Euphadimus is trying to get precious medicines to his hometown of Tegea, to
help combat a strange illness that afflicts the people there. However, his
path north is blocked by a satyr brute, and his entourage who are attacking
any who pass.
Head to the north and despatch this group of ruffians, taking special care
with the satyr brute, as he has considerably more health than his lower-
ranking satyr counterparts.
Once you have slain them and raided their bodies, return to Euphadimus for
your reward, being 350 XP, three lesser health potions and the full
restoration of your health and energy.
======================
SPARTANS AT WAR CONT'D
======================
Follow the road to the north again, and keep following it as it turns 90
degrees to the east. You will come upon Theages - a Spartan Peasant, who
appears to have something important to say. Speak with him.
==============
THE LOST DOWRY
==============
It turns out that Theages' daughter's wedding dowry has been stolen by a
group of monsters who trashed his cart and pegged it. A hit and run !!!
Travel to the north-east of Theages and into the Natural Cave that you
can see on your compass - it's a black hole in a red circle ?
Once inside, explore and retrieve the dowry necklace from the monster
that is holding it.
Return the necklace to Theages and you will earn, not only his gratitude,
but also 400 XP, and a random essence.
=========================
RELICS AND MONSTER CHARMS
=========================
You have just been given, quite possibly your first relic. Relics are
shards of a God's power, which you will only ever encounter in pieces.
Three pieces make one complete relic. On normal difficulty these
pieces are called "essences", such as the Essence of the Valour of
Achilles, or the Essence of Zeus' Thunderbolt.
Each relic can be used, even if you only wield 1/3 or 2/3 of a completed
one, by infusing its power with whatever type of weapon or armour the
relic purports to work with, so for example the Essence of Archimedes'
Mirror will only work on shields, whereas the Essence of Artemis' Bowstring
will work on bows only.
To use a relic, and PLEASE bear in mind that once used it can only be
retrieved by visiting an Enchanter (and Enchanters are only available in
Immortal Throne - NOT regular Titan Quest), simply right-click on it, and
then left-click on the item you wish to attach the relic to.
If you have attached, say, 1/3 of a relic to an item, and you them come
upon another 1/3 of the same relic, you can add that to the same item, to
make the relic in the item 2/3 of the completed relic, and so on.
The more pieces of a relic you combine, the stronger the relic becomes.
Three pieces of a relic make it a completed relic, giving you an ADDITIONAL
bonus (woohoo !!)
Monster Charms function exactly the same as relics, but they have to be
assembled in groups of FIVE rather than THREE.
You can either keep the relic you have just received, or use it to
augment the power of something you are carrying.
For a complete list of relics and their powers, see Chapters Seven: Relics
and Eight: Monster Charms.
======================
SPARTANS AT WAR CONT'D
======================
Continue north, and follow the road as it curves north-west, until you
reach the next rebirth fountain and set of torches. The wayfarer
Parmenides is standing by the roadside, and if you talk to him, he will
tell you that you are on the right road to get to the Spartan War Camp,
which is just a bit further on.
Cheers mate !!
Cross the bridge and you come to "Spartan Road", which you should follow
to the north until you get to the Spartan Camp. Be warned that straying
from the road will get you attacked by skeletons, who are buried near
the Spartan Road.
As you approach the Spartan War Camp you will see a small army of Satyrs
and Satyr Brutes set upon the Spartans.
Have you watched 300 ? These monkeys don't stand a CHANCE, but I'm sure
it might endear you to the Spartans to help them out a bit if you fancy
it.
============
HELPFUL HINT
============
Situations like this are generally very useful ones, as your enemies are,
for the most part, more interested in what they are doing (i.e. attacking
the Spartans at this time) than fighting you, making them easy pickings
for bows and magic-users. Easy XP ;)
Once you have helped fend off the attack on the camp, go in.
====================
THE SPARTAN WAR-CAMP
====================
* There is a rebirth fountain in the Spartan War-Camp
* There is a Portal Shrine in the Spartan War-Camp
=====================
NON-QUEST INHABITANTS
=====================
PARALUS - Spartan Soldier who tells you that Leonidas is in the camp, but
that he doesn't speak with those who are not invited. Hmmmmm.
CLEIPPIDES - Spartan Veteran who says that the monsters you are facing are
arguably more fearsome than the Macedonians and the Persians the
Spartans have faced before, as they yield only to death.
CEPHISUS - Young soldier who only joined the Spartan Army today, bless
him. He seems eager for combat.
AGATHON - Spartan Watch. You cannot speak with him at the present time.
You WILL, however, be able to speak with him once Leonidas and
Brasidas have moved off for Athens in a lil while, and he will
direct you to Athens if you wish to speak with them again.
DASCYLUS - Spartan Soldier who has the utmost faith in General Leonidas,
but who worries that the Spartans may not be able to defeat their
beastly enemies.
=================
QUEST INHABITANTS
=================
BRASIDAS - Leonidas' Guard. Brasidas has a task for you to complete
before he will let you speak with his master Leonidas. You
must find and slay the Centaur Nessus, to demonstrate your
worth.
LEONIDAS - Spartan General. Much like his portrayal in the OH so cool
300, Leonidas doesn't have time to waste with those people that
are not worthy of his audience.
EUTHYCLES - Melancholic Spartan who is concerned for his friend and great
idol Hippias. Hippias has wandered off and not returned since
morning, and Euthycles is worried that something may have
happened to him. He asks you to go in search of him.
================================================
MERCHANTS, ENCHANTERS, CARAVAN DRIVERS & MYSTICS
================================================
TERES - BLACKSMITH
PHALIUS - ARCANIST
NICANOR - ENCHANTER
==========
ENCHANTERS
==========
Enchanters are the first new type of businessmen that I referred to earlier
on in this guide. They are only available for treating with in the
Immortal Throne Expansion Pack, and serve TWO very useful functions.
Firstly, Enchanters are the only people that can craft Artifacts for you.
You see on your character portrait screen the inventory slot in the bottom
left-hand side ? That is for an Artifact - an item of great power that
you can only wield one of at a time, but which will give you BIG bonuses.
For full details of Artifacts and artifact creation, see Chapter Nine:
Arcane Formulae.
Secondly, Enchanters can separate items and relics, so if you have put a
relic in an item and later decide that you want it, or the item, back,
you can ask an Enchanter (upon payment of usually a RATHER large sum of
money) to separate them. HOWEVER there is a catch, as you can only
retain either the item, or the relic, so choose very carefully ;)
================================
QUESTS FROM THE SPARTAN WAR-CAMP
================================
==================</pre><pre id="faqspan-2">
THE ANCIENT OF WAR
==================
This is the quest you get from Euthycles, and it is deceptively simple.
All you have to do is to leave the Spartan War-Camp by heading due east
of Euthycles, and keep heading east until you reach an impassable mountain
face. Head north (through a satyr encampment) and follow the mountain
around to the east and you will find Hippias, who is resting, sitting
on a rock, surrounded by dead bodies (don't forget to loot them - just
because you didn't kill them doesn't mean you can't benefit from their
slaughter - muahahahahahaaaaaar).
Once you have spoken with Hippias you will need to return to the Spartan
War-Camp to let Euthycles know that he is alright - however I personally
always take out Nessus first, so that I can return to the War-Camp and
kill two birds with one stone, so-to-speak. However, once you DO go and
speak with Euthycles, you will be rewarded 2000 GP, and 500 XP.
===============
SPARTANS AT WAR
===============
Brasidas asks you to despatch the Centaur Nessus, as the Spartans do not
have the resources to send after him at the present time. He says that
Nessus runs wild in the Pellana Valley, and that slaying him is the only
way you will be able to gain an audience with General Leonidas.
Nessus isn't running wild at all - he's actually staying put to the north-
west of Hippias. If you have found Hippias before going to find Nessus,
you will actually see a marker directing you to Nessus on your compass
from where Hippias is. Nessus is identified at the yellow circle with the
black exclamation mark in it ;)
Nessus is NOT an easy boss to fight - however I am going to teach you a
============
HELPFUL HINT
============
ALL bosses in Titan Quest and the Immortal Throne Expansion Pack are
limited insofar as how far from their starting point they are able to
move. If you are finding any boss particularly difficult to slay, simply
(I hate to say retreat so I'll say) fall back until they stop, turn around
and go back towards their starting point.
You can then walk towards them again, and they will turn around and move
towards you again. Step back again and they will turn around and move
away again. You can use this dizzying tactic to easily despatch most of
the bosses in the game. Yes, it may be BIFF, but trust me when you're
fighting Cerberus on Legendary Difficulty, you WILL thank me ;)
So ! Nessus is difficult for three reasons :-
1) He's a centaur, so he can run like he's in the Grand National;
2) He's got a small contingent of centaurs to help him out, so he has
safety in numbers; and
3) As a boss, he's really quite tough !!
Once Nessus has been slain (and please do remember my dizzying tactic, as
it will save you no end of desk-slamming and monitor-headbutting in the
long-run), investigate the rest of his encampment before returning to the
Spartan War-Camp to speak with Brasidas (and, hopefully now, Leonidas).
There is a Majestic Chest behind where Nessus was standing, which will
be FILLED with goodies. There are also three further chests to the north
of where the Majestic Chest lies.
============
HELPFUL HINT
============
Sometimes if you come back after completing the game to battle old bosses
like Nessus, you will find that the programmers have put in (I do not know
whether this is intentionally or by mistake) duplicate Majestic Chests,
so you get DOUBLE the goodies - all random of course, but double the
goodies nonetheless !! :)
Once you have done raiding the Centaur Camp, TELEPORT (don't walk) to the
Spartan War-Camp and speak with Brasidas who, true to his word, will now
allow you through to speak with General Leonidas.
Leonidas praises your skill in battle, and agrees to send a few of his
warriors to defend Helos. He says that he is not impressed that it is
those people that once mocked his army that now cry for their help.
He suggests that you venture to Delphi to consult the Oracle there, to
learn where the monsters are coming from. He tells you to stop at
Megara and speak with his friend Timon, who will help you locate a proper
offering to give to the Oracle, in order to secure an audience.
=====================================
SECTION 1.3 - THE WORDS OF THE ORACLE
=====================================
It would appear our business with the noble Spartans is done for now.
If you teleport back to the Centaur Camp, and head, not back into the
camp, but north outside the camp if that makes sense - i.e. north of the
entrance gate, but outside the camp, then you will pass between two rocks.
Continue north, and you will see a pair of torches, and the Spartan Sentry
Aeacus standing by them. Speak with him to learn that you are now on the
right road to reach (ultimately) Delphi. He says you must pass through
Megara, and head up the coast to reach Delphi. Result !! :)
Follow the road to the north and, when you run out of road, head north-
west towards the rebirth fountain that you will see on your compass.
From the rebirth fountain, keep heading north until you reach a set of
satyr encampments, and then head from there, see that rebirth fountain
on your compass ? The one in the north-east ? Well you're actually
going to have to go SOUTH-east to get to it, so follow the rudimentary
path around and to the south-east of the satyr encampments, and you will
enter the Mycenean Ruins. You do not need to explore the Mycenean Ruins,
you need merely to get through them, which you can do by hugging the
mountain wall that leads to the north - however if you DO choose to
explore the Mycenean Ruins, then I would ask you to please BEWARE, as
it is a burial ground, and it is CHOCK-FULL of undead bad guys.
Since they are almost all buried, you won't see them until you get close
enough for them to try and ambush you. Sinister says try and avoid
running into the ruins - take things step-by-step, and take out your
enemies wave-by-wave if you wish to explore the area.
At the back of the Mycenean Ruins (through the horde of undead warriors)
is a single-level ancient tomb for you to explore.
================================
OPENING SEPULCHRES INSIDE A TOMB
================================
This sound REALLY specific, but it applies to any type of tomb that you
may encounter inside a burial chamber.
When you open a tomb, sepulchre, or whatever it is called in the burial
chamber you are exploring, you will hear one of TWO noises. The first
is a noise which sounds like a stone slab being slid off the top of a
burial casket. This noise means the sepulchre is not trapped, and you
may take whatever is inside it.
If, however, you hear a noise which sounds like a clicking noise ? Like
a switch being depressed ? RUN AWAY. You have activated a trap, and
should stand well clear of the sepulchre until the trap has gone off.
There are four types of trap you can activate in Titan Quest :-
A) Gas Trap (longest duration - stay WELL back or be poisoned)
B) Frost Trap (does frost damage - stand back)
C) Fire Trap (does burning damage - stand back)
D) Lightning Trap (does lightning damage - stand back)
Sorry for the rather imaginative descriptions of those traps, but they
ARE pretty self-explanatory (!!).
Once you have either circumvented or explored the Mycenean Ruins, head
north to the rebirth fountain, and torches, and past them into the
Spartan Woods.
From entering the woods, head west-north-west and keep going up until you
reach the entrance to the Village of Tegea.
====================
THE VILLAGE OF TEGEA
====================
* There is a rebirth fountain in the Village of Tegea
=====================
NON-QUEST INHABITANTS
=====================
HAGNON - Storyteller who regales you with the details of the tale of
the Goddess Artemis and the mortal Actaeon. He tells you of how
Actaeon, a great hunter, chased his quarry to a stream where
Artemis was about to take a bath. P!ssed off that a mere mortal
had seen her in the buff, she turned him into a Stag, and he
was chased away by his own prey.
CLINIAS - Aging Farmhand who speaks to you of how news from Greece
confirms that the monsters are rampaging over all the lands. He
is worried that the Spartans may not be able to protect all the
Greeks (and he's right to worry).
=================
QUEST INHABITANTS
=================
OLORUS - Young Tegean. Olorus gives you the task of finding the source
of pollution of the town's water supply, and the Poisoned Spring
quest.
================================================
MERCHANTS, ENCHANTERS, CARAVAN DRIVERS & MYSTICS
================================================
PIRRO - Trader
================================
QUESTS FROM THE VILLAGE OF TEGEA
================================
===================
THE POISONED SPRING
===================
Head west of Olorus, out of Tegea and into the Tegea Forest. From here,
head immediately due west and follow the shoreline to the north-west until
you find the Water Nymph (aka Naiad) Pegaea. She will tell you that she
knows why the water has become tainted - it's because of all these
bleedin' spiders that have moved into her cave !!
Head into the cave to the north of Pegaea, and clear it of spiders. You
needn't kill them all - only the ones with the glow around their legs,
which is quite a few of them. I would suggest slaying them all for the XP
personally.
Once you have cleansed the cave, return to Pegaea for your reward: a
permanent +75 Health, 1500 XP and your health and energy fully restored !
Well worth it that one eh !! :)
From the Naiad, head back to the Village of Tegea, and this time leave
via the north, into Arcadia.
From entering Arcadia, follow the path as it winds north, and then when
the path ends, head north-west until it recommences. From there, follow
it up and into the hills (it will wind a bit), until you see a rebirth
fountain off in the distance on your compass.
Head north and into the Megara Bluff, and keep to the path as this will
lead you to the rebirth fountain.
From there, head north and wipe out the Maenad Encampment.
======
MAENAD
======
Maenad are quite dangerous, and you are reasonably likely to die at least
once until you work out how best to tackle them. They are cat-like women
with high dexterity and speed who attack with bow and arrow, poisoned
spear and needle traps, and who's spellcasters are storm-adepts, so watch
out for poison, blade and lightning attacks from this little lot.
The best way to deal with the Maenad (unless your character is just a
walking wall of muscle) is to take them on, as I suggested with the
undead in the Mycenean Ruins, in waves, step-by-step. If you get
overwhelmed, just fall back and try again once you've healed up. Heading
face-first into a conflict with the Maenad is folly.
Once you have slain the Maenad, head north and out through the two
torches onto the Megara Coast.
Once you get onto the Coast (ah, the beach at last), you should follow it
west, where you will encounter a set of new villains, the most significant
of which are the Coastal Ichthians.
Ichthians in ANY form are dangerous lizard-men - however their most
dangerous units are their spellcasters - their Shamen. Ichthian Shamen
can cast spells at quite a speed, and should be the first units you
attack in any Ichthian group. Later on you will encounter the Lords of
the Deep, who should ALSO be the first Ichthians you attack in any group.
Keep following the coast as it bends round ... as coasts do ... past two
torches and into the City of Megara.
==================
THE CITY OF MEGARA
===================
* There are two rebirth fountains in the City of Megara
* There is cool music in the City of Megara
* There is a portal shrine in the City of Megara
=====================
NON-QUEST INHABITANTS
=====================
EURYSTHEUS - Market Gossip who tells of how afraid he is of having to
raise his family in hiding should the monsters ultimately win.
XENOCLIDES - Storyteller who has a tale of the battle between the Gods
and the Titans. He tells of how the Titans ultimately lost to
the Gods, and all but one were banished to the pit of Tartarus.
The one Titan that was not banished to Tartarus was shackled to
the base of a mountain as a gesture of revenge by the Gods.
IPHITUS - Aged Fisherman who claims to be as comfy on the sea as you are
on land.
=================
QUEST INHABITANTS
=================
NIREUS - Citizen of Megara, who gives you the Skeleton Raiders quest - a
quest to help free Megara from the undead hordes that ravage its
gates on a daily ... or rather NIGHTLY ... basis.
ANTOR - Sailor who tells you of the cargo (treasure chests and so on) of
a mighty warship bound for Athens itself has washed ashore in the
area. Apparently siren song drove the crew mad, and they ran
aground. He gives you the News of a Shipwreck quest.
AUTOLYCUS - Master Artisan who gives you an update on the Skeleton Raiders
quest. He tells you that he knows that they are pouring forth
from the ancient city of Old Eleusis. You should also speak with
Meikiades for more information.
MEIKIADES - Young Artisan whom you cannot speak until you have spoken to
Autolycus, but who confirms that Old Eleusis (the spawning place
of the undead hordes assailing Megara) is the resting place of
three undead brothers - Princes who were cursed by the God Apollo
to never enter the afterlife, but to remain in this world as the
waking dead.
TIMON - Oligarch of Megara. Timon tells you that the Oracle requires an
offering (which we knew already). He recommends you take the
Oracle a branch from the sacred olive tree which lies in a grove
on the road to Delphi (north of Megara), above the Helicos Pass.
Timon updates your main quest, gives you the A Proper Offering
side quest, AND gives you your first INVENTORY BAG.
=============
INVENTORY BAG
=============
Timon has just given you the ability to carry additional goods on your
person. If you call up your character screen you will see additional
inventory slots have appeared on the right-hand side of the screen for
you. Isn't that sweet ? As you progress through the game you will pick
up a second, and ultimately a THIRD inventory bag as well, meaning you
will ultimately be able to carry THE WORLD on your shoulders !! Hahaha.
================================================
MERCHANTS, ENCHANTERS, CARAVAN DRIVERS & MYSTICS
================================================
PELLICHAS - BLACKSMITH
TIMANOR - ARCANIST
PIANKH - CARAVAN DRIVER
DADACES - ENCHANTER
==============================
QUESTS FROM THE CITY OF MEGARA
==============================
================
SKELETON RAIDERS
================
Skeletal armies are assailing Megara in waves ! The source of this
scourge is the ancient and now dilapidated city of Old Eleusis, wherein
reside three Prince-Brothers - accursed enemies of the God Apollo.
Leaving Megara by the north, follow the road through the two torches and
into the Megara Outskirts. Continue north and through the ramshackle
town that remains (wholly inhabited by undead creatures I might add), and
leave via the two torches to the north, into Kerata Forest.
Head north through the trees and you will come to Old Eleusis. Be
forewarned, however, that as with the Mycenean Ruins, Old Eleusis is
REPLETE with undead warriors, and more than likely a Hero Monster or
two, so be careful.
=============
HERO MONSTERS
=============
Hero Monsters are monsters of special note, who you will see on-screen
as having golden stars above their heads. They ALL display powers over
and above their usual brethren, and I have tried to make notes as best
I can as to where you are likely to find them and what their powers are,
in Chapter Eleven - Hero Monsters.
Once you have reached the entrance to Old Eleusis (a smashed marble path
leading north-east), follow it and enter the Ancient Ruins of the once
great City.
There is a smashed wooden door leading into the floor which you should
enter, to gain access to the labyrinth that houses the three Prince-
brothers.
============
HELPFUL HINT
============
The three Prince-brothers are ALWAYS in exactly the same locations, so
I shall point them out as we go around if you like.
For your information, the three Prince-brothers are :-
1) Polypas, Prince of the Blade
2) Aristeus, Prince of the Storm; and
3) Menon, Prince of the Bow.
From where you enter their labyrinth, take a left and head north-west.
Polypas, Prince of the Blade, is in the first room on your left.
Polypas is surrounded by weak enemies, and is, in my humble opinion, the
weakest of the three brothers. He should fall pretty easily to you to be
quite honest.
Leave Polypas' room after you have slain him, and head north-west again,
following the corridor as it turns 90 degrees to the north-east, and then
again 90 degrees to the south-east.
In the north-eastern end of this great room is Aristeus, Prince of the
Storm. He is, in my opinion, DEFINITELY the most powerful of the three
Prince-brothers, as he is a mage with expertise in Storm Magic.
Best way to despatch him is to take out the traps and lesser monsters in
the area, and only to focus on him when he is the last enemy left. Avoid
AT ALL COSTS the aura which he will attempt to create at your feet as its
icy damage will kill you in mere seconds, guaranteed.
Once he has fallen to your skills, do a 180 and head south-west, and then
follow the room as it turns 90 degrees to the south-east.
Enter the room to your north-east, and then follow the corridor that runs
south-east. Menon, Prince of the Bow, is in the room to your south-west
as you are heading south-east.
Menon is quick with his bow, and he gives an aura-bonus to those enemies
who are with him (who are also mainly bow-wielders), so he is a challenge
to be sure - however he is no way NEAR as powerful as Aristeus.
Once Menon has been disposed of, head through the door to the south-west
of his room, and then through the next room, and back into the main hall
where you started. It's just a quick 90 degree turn to your north-west,
and then the exit back to the outside world is to your south-west.
You will not complete this quest until you return to Megara and speak with
Autolycus, who will reward you with 2500 XP.
===================
NEWS OF A SHIPWRECK
===================
If you leave Old Eleusis and head north-west, you will pass through two
torches and over a bridge, whereupon you will see a small contingent of
Spartan soldiers (who are about to be DECIMATED), rushing north-west
to attack the Cyclops Polyphemus.
FIGHT !! *rolls up his sleeves*
Polyphemus is a VERY powerful adversary, and will be able to destroy you
easily, unfortunately. He, like all cyclops, has three primary attacks,
only two of which you need to concern yourself with :-
1) Club Swipe (you can all but disregard this one - it's easy to avoid);
2) Bellow (a cone-shaped noise attack that will daze you and make you
very easy for him to splat into the ground); and
3) Earthquake (he bashes his club to the ground, and a wall of energy
rips up the earth in a straight line - AVOID AT ALL COSTS)
Polyphemus is best dealt with at range, but just for your information,
whilst he can cross the bridge that leads back towards Old Eleusis, he
cannot travel much beyond it, so remember my dizzying tactic here ;)
You can use the Spartans as cannon fodder (which isn't very nice, but
they are next to useless in this fight), which will buy you a few seconds
but not much more unfortunately =./
Once Polyphemus has fallen, investigate the Majestic Chest behind him, and
the small cave behind that for loot.
West and then north of the cave where Polyphemus was residing will lead
you to another set of two torches that take you onto the beach of the
Halcyon Coast.
From where you set foot on the beach, head due west and then south-west
to uncover the loot that Antor was telling you about. Take care though,
as it is well-guarded by a contingent of Wraiths. You gain 1000 XP and
complete the quest once the last wraith has fallen.
==============================
THE WORDS OF THE ORACLE CONT'D
==============================
Once you are done with those two quests, follow the beach of the Halcyon
Coast to the north-west and up the hill until you reach the rebirth
fountain, and two torches that take you into Boetia. Boetia is a forest-
area filled with satyr's, centaur and the like - nothing you haven't seen
already really.
Follow the path as it snakes in an S-shape northwards, and when you exit
the Dark Satyr encampment, head north-north-west until you reach a bridge
that crosses the river to the north.
Cross that bridge and you enter the Ambrossos Farmlands, whereupon you
should continue heading due north until you reach a field of wheat.
At the northern edge of that field you will find the Centaur Chiron, who
is doing a really weird "I could really do with a backscratcher" kinda
motion, with a big exclamation mark over his head. Perhaps he's realised
that it is going to very difficult for him to scratch his back when he
has the hindquarters of a horse behind him - WHO KNOWS.
================
THE GOOD CENTAUR
================
Speak with Chiron and he will explain that whilst his centaur brethren
have become pain freaks, he himself has remained quite normal, and that
Ino, a Maenad Priestess, has stolen his bow and run into the caves to his
north, and he feels unable to retrieve it.
Head north (over the bridge) and enter the cave, to retrieve Chiron's Bow
from the FREAKB!ATCH Ino - IDEALLY over her dead body ;) Be advised,
however, that if you do not kill her outright, Ino will continually
retreat from one room to another in the cave that is her lair, leading
you into progressively harder sessions of combat. Not that a seasoned
warrior like yourself has THAT much to fear from her but still, 'tis a
bit of an annoyance all the same.
With Ino fallen and Chiron's Bow safely in your possession, return to him
and return the bow to him. He will reward you with 2 Attribute Points, and
3000 XP - WICKED !! :)
From where Chiron stands, head due west through the field of wheat, and
up to the bridge leading north-west into the Village of Ambrossos
========================
THE VILLAGE OF AMBROSSOS
========================
* There is a rebirth fountain in the Village of Ambrossos.
=====================
NON-QUEST INHABITANTS
=====================
MELESIPPUS - Brooding Man who mourns for the losses Greece has suffered to
its harvests and families
ELACATAS - Loitering Villager who tells you that the olive grove lies just
down the road aways.
=================
QUEST INHABITANTS
=================
ADMETUS - Simple Villager who gives you the a Master Blacksmith quest. He
tells of how, apparently, rumour has it that Termerus the
Blacksmith was taught by the God Hephaestus himself !!
ASIMIDES - Merchant Trader who tells you that he had to abandon his goods
whilst en route to Delphi to trade as he had inadvertently set up
his camp near a Skeleton hideout !! He is happy for whoever finds
his goods (which is going to be us ;)) to have them. Woohoo !!
================================================
MERCHANTS, ENCHANTERS, CARAVAN DRIVERS & MYSTICS
================================================
LAOMEDON - Trader.
====================================
QUESTS FROM THE VILLAGE OF AMBROSSOS
====================================
=================
A PROPER OFFERING
=================
Strictly-speaking, this is a quest you pick up in Sparta, but which looks
like it's for Delphi (because that is where you complete it) - however you
cannot do so without picking something up from the Olive Grove just outside
the Village of Ambrossos. Can you remember what that was ??
THAT'S RIGHT !! Well done !! An olive branch from the sacred tree in the
grove.
This will be the first mission we undertake upon leaving Ambrossos, so I
have put it here for good measure.
So ! Here we go. From the Village of Ambrossos, leave by the north-west,
and rid the two fleeing villagers of the harpy in pursuit. From there, head
north north-west, passing through a Satyr Encampment, and you will come to a
bridge that leads north-west across a valley below.
This takes you to the Helicos Pass, where you will see Eurytimus, the Olive
Farmer, standing by the roadside bowing his head in shame. Speak with him
to learn that his grove (where you need to go to get the olive branch) is
ON FIRE !!!!! He tells you that you might get to the tree you seek to find
it is unharmed, but that you will have to fight your way there.
OUR SPECIALITY !! ;)
However we're not STUPID are we ... we're going to activate that rebirth
fountain to the left of where Eurytimus is standing BEFORE we go up the hill
into the grove AREN'T we ... yeeeeeeeeeeeeees, that's right :)
So, now head up the hill slaying the spiders as you go, and you will
ultimately get to the top. Now, when you see the yellow circles with the
black exclamation marks in them I want you to STOP. Kill any enemies in
the immediate vicinity and MAKE SURE that you are at full health and ready
for a tough battle. The Olive Grove's sacred olive tree is being guarded
rather jealously by Arachne, the Spider Queen, who is a MASTER of poison
damage let me tell you.
Her primary attacks are :-
1) Spit venom which poisons an area of the ground for a few seconds;
2) Sword strike;
3) Summon Web Crawlers; and
4) Lob Venom, which does poison damage direct to you for a few seconds.
Don't forget to keep healing during combat, as you can actually - it sounds
stupid but it isn't - keep health points temporarily in reserve ? For
example, if your character has, say, 150 health points, and you consume a
potion that restores 200 health points when you were at 50 health points ?
Then you would have 200 + 50 = 250 health points. Obviously your maximum
health is 150, so the game very kindly allows you to continually regenerate
up to 150 for a few seconds until the potion wears off, or the 100 surplus
points you had from drinking the potion are spent.
Fortunately if she DOES kill you, you will rematerialise at the bottom of
the olive grove rather than back at the Village of Ambrossos, because you
took my advice and activated that rebirth fountain, didn't you ;)
Once Arachne has died her WELL-EARNED death, open the chests (three
Primitive and one Majestic) and take their contents, together with the
Sacred Olive Branch which you will need to present to the Oracle in Delphi
upon your arrival there.
===============
GOODS ABANDONED
===============
Head back down the path from the top of the olive grove to where Eurytimus
is standing, and then follow the path down to the south-west.
Keep following the path as it turns 90 degrees to the south-east, and then
as it turns north-east, head south-west and keep going south-west until you
reach a small army of skeletons, zombies and other nastiness. Slaughter the
LOT of them, and the treasure that Asimides was telling you about is all
yours for the taking !!
===================
A MASTER BLACKSMITH
===================
You pick up this quest either by speaking with Admetus (a name you will
become rather familiar with by the time the game is ultimately over) in the
Village of Ambrossos, or by simply finding him yourself. To get to Termerus
you will need to head north-east of the abandoned goods in the Helicos Pass
until you reach the rebirth fountain adjacent to the Phocian Swamps.
Head east, and every so slightly south of the rebirth fountain and you will
find two pre-lit small torches leading you across a marshy path, and from
there head north-east until you find another such path heading north.
Take that path, and then follow the path to the east north-east into Lower
Delphi. When the path turns 90 degrees to the south-east and crosses a
bridge, keep heading north-east and you will find Termerus (and a small
group of centaurs and satyrs) in a woodland clearing just off the road.
Finding Termerus completes the mission, and earns you 1500 XP.
Termerus lives up to his reputation, and sells (generally-speaking) some
very decent clobber, not to mention the OH so cool BLACK DYE for your tunic
should you choose to avail yourself of it. At 15000 GP it's not cheap, but
you know fashion !!!!! ;)
==============================
THE WORDS OF THE ORACLE CONT'D
==============================
Once you are done with Termerus, head south-west and then cross the bridge
to the south-east and follow the path as it winds eastwards through the
Crisaeos Falls and up to the rebirth fountain on the roadside.
Once you have gotten there, head east and then south-east into the Delphi
Highlands, and follow the path as it ultimately turns to the north, and then
leads north-west and winds into the City of Delphi. Beware the Maenad
contingent that assail the city, however - some of them are quite hard to
spot - ESPECIALLY the Maenad Rogues !!
==================
THE CITY OF DELPHI
==================
* There is a rebirth fountain in the City of Delphi
* There is a portal shrine in the City of Delphi
=====================
NON-QUEST INHABITANTS
=====================
EUMACHUS - Guard Captain who complains that their God, Apollo, has done
nothing to protect them from the onslaught of the monsters at the
city's gates.
EURYNOME - Wealthy Citizen who speaks of the refugees in the city, and of
the Oracle.
PELIAS - Storyteller who goes through the tale of the War of Troy.
=================
QUEST INHABITANTS
=================
IODAME - Grieving Widow who mourns the loss of her late husband - one of the
original defenders of Delphi who fell to a great boar/man. She
gives you the Grieving Widow quest.
ASTYOCHE - Temple Attendant who takes the Olive Branch from you and bids
you enter to speak with the Oracle of Delphi. For giving her the
branch you complete the a Proper Offering quest, and earn a
permanent +5% cold resistance for your character.
DELPHIC ORACLE OF APOLLO - Speak with her to have a prophesy given to you,
and the main quest updated to "The Source of the Monsters" (and
2000 XP)
================================================
MERCHANTS, ENCHANTERS, CARAVAN DRIVERS & MYSTICS
================================================
ARISTONUS - Blacksmith
DEON - Caravan Driver
IPHITOS - Enchanter
LYCON - Arcanist
PAUSANIAS - Mystic
=======
MYSTICS
=======
FINALLY we get to introduce those elusive Mystics !! Mystics are the final
type of businessmen that you will encounter in Titan Quest.
Mystics only serve one function, but it is a very, VERY useful one. You
can visit a mystic to buy back any skill points you want to re-allocate.
Doing this is a costly exercise, as the points become ever-increasingly more
expensive to buy back (until they reach a ceiling of 45000 GP per point).
To give you an idea of how much of a mark-up that is, the first point you buy
back costs you a paltry 250 GP !!
You cannot use a mystic to drain all your points in a school and to pick a
new school unfortunately, as you cannot decrease your mastery points in a
given school - however for individual skills this is a GREAT function -
provided you have the cash of course.
==============================
QUESTS FROM THE CITY OF DELPHI
==============================
==================
THE GRIEVING WIDOW
==================
This quest is actually completed as part of going through the main quest,
so I shall not speak of it for now, but I will bring it up at the right time,
have no fear.
========================================
SECTION 1.4 - THE SOURCE OF THE MONSTERS
========================================
Now that we have been directed further, we can leave Delphi through its
eastern gate (just travel south-east of Pausanias the Mystic and you will
find it no problem).
Continue heading up the hill (south-east), and you will come to two torches
which you should go straight through and carry on south-eastwards until you
get to the entrance to the Parnassus Caves.
In the Parnassus Caves, head down the set of steps at the back-end of the
first chamber you come to, and activate the rebirth fountain at the foot of
the stairs.
From the rebirth fountain, head east-south-east and you will find a way out
of this main chamber and into another area of the caves.
As you enter this new area, you will walk past two pre-lit torches (just
flaming sticks in the ground really), and from here you should head due
north (and a tiny bit east) to find
==================
THE GRIEVING WIDOW
==================
Cepharis - Master of the Flame. You remember him ? He is the nasty
boarman that slew the husband of Iodame - the Grieving Widow in Delphi.
Take care when you face him, as he has some mastery of earth (and fire)
magic. He is, however, quite a clumsy enemy, and should not pose a MAJOR
problem for you to defeat.
Once he has fallen, search the three chests (one of which is ornate) in his
cave for goodies, and create a portal to take you back to Delphi to deliver
the news of his downfall to Iodame, and she will reward you with 3000 XP.
=================================
THE SOURCE OF THE MONSTERS CONT'D
=================================
Hokay so, back on the road to Parnassus :) Leave the tiny chamber where
Cepharis was holed up by the south, and then head due east until you find
another corridor that leads you out and into the next chamber.
Once you are in THIS chamber, follow its northern wall as it travels south-
east, then east, and then take the corridor on the northern wall that leads
to the north-east.
At the end of this corridor, on the eastern wall, is the way out of these
dank and nasty caves. Hurrah !
You come straight out into the Parnassus Hinterlands, right beside a
rebirth fountain which you should activate immediately.
The path you need to take to get to the next main point - the Parnassus
Portal Shrine - is a bit weird, but here goes. Head south-east of the
rebirth fountain, and then follow the track as it curves to go north-east.
A fair way off it may be, but you will come (after a fair few encounters
with those pesky Maenad-fweeks) to a stone bridge that leads you to a
rebirth fountain, the Parnassus Portal Shrine, and Pelanis - a Satyr
Trader !
Once you are done dealing with Pelanis (who doesn't really say a whole
hell of a lot, but who is kinda sweet), you need to head due east of the
rebirth fountain, through a whole hell of a lot of Mountain Satyr's in
camps, to get to the next bridge that will lead across a span of water and
into the
==============
LOWER WAR-CAMP
==============
Yes friends, it appears we have pretty much found the source of the monsters.
There is an entire bloody WAR-CAMP of them !!!!! Time to get our hands
dirty !! :)
There are a number of different routes you can take to get through this
area of the war-camp (as I'm sure you must have guessed that, this being the
LOWER war-camp there must logically be an UPPER war-camp as well ?? *raises
his eyebrow knowingly*), but the easiest is probably to just batter your
way directly east until you come to a large set of stone steps and two
VERY widely-spaced torches.
As you enter this area you come across a small contingent of exhumed skeletal
soldiers, all with a glow around their feet. As I'm sure you will have no
doubt noticed by now, you must destroy anything that has such a glow, as it
more often than not signifies that the creature/s in question have some plot-
driven significance.
Once these boys have been taken care of, Hylas - a cowering vagabond - crawls
out from under some rocks nearby and proudly shows his exclamation mark for
all to see.
Speak with him, and he will babble on almost incoherently about an army of
centaurs, harpies, satyrs and other monsters marching off from here to who-
knows-where. He says a few of them have remained here, and that the WORST
of those that remain can ... wait for it ... yes, that's right ... *clears
his throat* ... TURN YOU TO STOOOOOOOOOOOOOOOOOOOOOOOOOOOOOOOOOOOOONE !!!!!
Pop question. Which Greek Mythological Monsters had the ability to turn
men to stone ? Answers after the break !!
Just to the north-east of Hylas is another rebirth fountain, which is a good
thing as this battle is only going to get harder ... and harder ... and
more harder ... heh.
Continue down the steps to the north-east, and take note that you are now in
the Upper War-Camp, but please be prepared for me to give you some VERY
specific directions as to which way to go - the upper war-camp is a large
area, and it is easy to wind up doubling-back on yourself if you aren't
careful.
From this first set of steps (the ones by the rebirth fountain), head due
north. This will take you up, and then almost immediately back down, a
set of steps that is very near to the rebirth fountain.
Keep heading due north of this position, and you will come upon a further
set of steps, which curve up and to the north-east. Take those steps and
you will see a large bonfire alight in front of you.
From here head to the north-east, and then follow the steps as they lead
down, and curve to the south-east before ending on a large expanse of
dark earth with isolated weeds here and there.
Head north-east of this set of steps, and you will see a petrified Cyclops
followed by ... a petrified set of humans ... followed by a pair of pre-lit
torches.
Yes, we're about to fight a boss ... *cracks his knuckles*
Enter the building ahead of you and you will step into the Pythian Caves.
Oddly the first enemies you encounter in these caves are the toughest for,
straight out of Greek Mythology I am proud to present you with ...
... THE GORGON SISTERS ...
YES friends these beauties might look like Miss World Contenders, but rest
assured their minds are NOT on winning beauty pageants this time around.
They're more interested in your ... ass ...
============
HELPFUL HINT
============
Whenever you enter a boss fight that requires you to go through a bigass
door to get into it ? The door WILL lock itself behind you once you are
inside. You CAN, however, stand just inside the threshold of the door, and
be quite safe from it locking. This obviously means that you can, in many
of the room-based boss fights on Titan Quest and Immortal Throne, avoid a
total asswhuppin' by using THIS technique which I shall dub the "doorstep"
technique, to maintain an escape route should you need it ;)
The THREE Gorgons you must fight in this boss fight are, true to Greek
myth :-
1) Sstheno
2) Medusa; and
3) Euryale.
All three have different attacks.
Sstheno is armed with a spear, and consequently likes to attack you up
close and personal.
Medusa is armed with a bow and arrows, and has the ability to petrify
you from afar (that's the large purple blast she fires at you from time
to time, WHICH YOU SHOULD AVOID in case that bit isn't obvious) ;)
She fires flaming arrows at you as well.
Euryale is also armed with a bow and arrows, and she is able to charge her
strikes with cold and lightning energy.
============
HELPFUL HINT
============
NONE of the gorgons is able to leave their cave, which is a good thing as
you cannot open the door to get back out once you are inside. If you are
a master of the Storm school, and have chosen the lightning and chain
lightning skills, you may be able to draw the gorgon sisters to you by
launching a lightning bolt so that it strikes the ground in the uppermost
corner of the screen near them. If they take damage from the strike - even
if it is just the tiniest sliver of damage - they WILL come to find out who
threw the lightning bolt at them, and you can use this in conjunction with
my dizzying attack to sort them out proper.
Once they have all fallen to your might, HEED MY WORDS and take care when
picking up the items they drop. Make sure you have enough space in your
inventory to carry them, as if you do not, and your character drops them
in disgust ? They may well just fall into the HUGE BLACK HOLES on either
side of the narrow bridge you have to cross to get to where the gorgons
were.
If this DOES happen, run to the very bottom edge of the room and you might
find that you are able to select the items from there - it's kooky logic,
but the game seems to work on a number of different planes to gauge where
you are in relation to objects in-game.
After you have raided their bodies, crack open the Majestic Chest and three
Primitive Chests that they were guarding, and then speak with the (now de-
petrified) Feiyan, who expresses her incredulation at how the gorgons got
the better of her. She then goes on to recount the tale of the Telkine.
It transpires that a Telkine is a "great sorcerer who can summon beasts and
monsters to raid and destroy" ... hmmmmmmmm ... sounds like another BOSS to
me ... anyhow, this "Telkine" of which she speaks attacked Feiyan's village,
slaying everybody there but her. Feiyan is pursuing the Telkine and is
sure that he is on his way to attack Athens itself.
WICKED !! This should be fun !! :) Err ... I mean ... OH NO ! How AWFUL !
===================================
SECTION 1.5 - THE BATTLE FOR ATHENS
===================================
With those B!ATCH gorgons taken care of, we can now leave through the north-
western door that Feiyan very kindly opened for us, and enter the Pythian
Caves proper ... and ... ooh what's this !?!?! MORE gorgons ???
Yup, the Pythian Caves are a veritable BREEDING GROUND for gorgons it seems.
There are FIVE main types of gorgon that you will encounter in these caves,
being :-
1) Gorgon Guards (armed with spears - a-typically Hastas)
2) Gorgon Archers (shockingly, armed with bow and arrows)
3) Gorgon Slayers (who can best be though of as more accurate and more
powerful Gorgon Archers - they are usually light blue in colour)
4) Gorgon Profaners (who are flame-red in colour and can attack you with
flaming arrows, and more annoyingly cause the ground underneath your
feet to burst into flames for a period of time, doing you HUGE amounts
of damage); and
5) Gorgon Geomancers (who are not QUITE as annoying as the Profaners, but
who are not far off it to be honest. The Geomancers have the ability to
strike you with poisoned arrows, and to cause the ground beneath your
feet to erupt in a noxious poisonous cloud doing poison damage for a few
seconds (and a lot of it, at that !!)).
Head north-west until you reach the rebirth fountain, and activate it.
From here, head north-east and when you enter the next main chamber (right
through the archway basically), head south-east and then follow the southern
wall around, and to the south-west to find the exit. If you're getting
stuck check out your compass - the exit is shown on that as a black hole
in a red circle.
As soon as you get outside the Pythian Caves, you enter the Athenian
Passage. Activate the rebirth fountain by the cave's exit, and trade your
surplus goods with the Trader Damaskenos, who has a cart and two horses
nearby.
Fortunately there really is only one way to go to get through the Athenian
Passage, and that is east, then south-east, then north-east of Damaskenos'
position. However, be warned that both this Passage, and the Valley beyond,
are VERY well inhabited by Centaurs and their Elders, so tread carefully.
Once you reach the next rebirth fountain, cross the bridge that it stands
beside, to enter Kephisos Valley. As with the Athenean Passage, there are
many Centaur (and Boar) here, so be wary.
From where you enter the Kephisos Valley, follow the shoreline to the north
until you find Pausanias the Spartan Captain, and Isarchus the Spartan
Soldier. Both have quests for you.
====================
TRAPPED IN THE RUINS
====================
Pausanias and his contingent of Spartan Warriors have managed to trap a
Giant Limos (a Life-Eater) in the ruins to your immediate north-west. They
have suffered losses at the hands of the Limos, however, as three of their
warrior have already been injured by the beast.
Gather your weapons, muster your arms, it's time to kick some ass.
The Giant Limos IS a tough enemy if you are not prepared for him. You will
undoubtedly have already crushed many of his lesser brethren in your quest
this far into the game, but he is much more dangerous.
The Giant Limos has THREE primary attacks :-
1) Clawed hand-strike;
2) Life-steal (where he replenishes his own life at the cost of yours);
3) Poison Gas Bomb (with Shrapnel add-on).
In case you're curious, this places him at about a level 24 Rogue in terms
of his mastery of the Rogue School of Training. NOT BAD EH - so BE ...
CAREFUL !!
Once he has fallen to you, return to Pausanias and earn your reward :-
3000 XP and a random magic weapon (tasty !!).
=============
SPARTANS LOST
=============
Isarchus - the Spartan Soldier who stands just to the east of Pausanias - is
looking for somebody to seek out a scouting party who were recently sent up
into the swamps nearby, but who have not reported back to the main group in
some time. He wants you to go and check up to make sure they are alright.
To do this, follow the shoreline as it leads east of Isarchus' position,
until you reach a bridge leading north-west. Cross the bridge to get into
the Monster Encampment, and then head north (and a TINY bit west), to get
into the Athens Marsh.
From here, hug the western wall and follow it north-east, until you reach
Eryx, the Spartan Scout and his scouting party.
Eryx says that he and his party are all fine, but they are just a little
lost, and so it would be COOL if you could please tell the rest of their
troop that they are safe and sound.
Head back to Isarchus and deliver this message, to complete the quest and
earn yourself 4000 XP.
===========================
NOTE ABOUT THE ATHENS MARSH
===========================
Be VERY careful when wandering through the Athens Marsh on the Legendary
difficulty setting, as there is a seven-headed Hydra - the Lernean Hydra -
camped on the eastern side of the marsh. This Hydra is one TOUGH mutha,
with the ability to bite using its multiple heads, as well as being able
to spit fire, frost and poison breath attacks at you. The Lernean </pre><pre id="faqspan-3">
Hydra is guarding four Primitive Chests, and one Majestic Chest.
Many thanks to Michael Kier for pointing this out to me !!
============================
THE BATTLE FOR ATHENS CONT'D
============================
Once you are done with Isarchus and the wayward Spartan Scouting Party,
head back across the bridge that leads you into the Monster Encampment,
and from there head north-west until you reach a really quite large ...
wait for iiiiiiiiiiiiiit ... MONSTER ENCAMPMENT !! Shocking isn't it.
Follow the path as it winds through the Monster Encampment - it will go
north-west, then north-east, north and then north-east again, and you will
(upon clearing the encampment) find a rebirth fountain which you should,
of course, activate immediately.
Once activated, head east-north-east aways, and you will enter the
Athenian Battleground. What is happening, in case you haven't noticed,
is that the monsters (led by the Telkine) ARE mounting an offensive
against the legendary great city of Athens, and WE ... yes my friends
you, and I, are going to stop them.
Oh yes, we are.
So ! From your starting point I would like you to head north-west and into
the town. Just follow the road as it curves to the north-east, and then
back to the south-east. However, as it draws level with a field of wheat
to the north, turn and head due north-east, through the field, across a
path, through another field (just keep heading north-east), and then carry
on heading north-east until you reach a brick wall. THAT is the wall of
Athens, and you will find General Leonidas standing at the gate to Athens.
==================
THE CITY OF ATHENS
==================
* There is a rebirth fountain in the City of Athens.
* There is a Portal Shrine in the City of Athens.
=====================
NON-QUEST INHABITANTS
=====================
BRASIDAS - Leonidas' Guard who has made the journey with him from the
Spartan War-Camp all the way to Athens to help defend it from the
hordes of monsters preparing to bring it down. En route they were
joined by the Tegeans and the Corinthians, with the Thebans already
there ahead of them.
ANAXOGORAS - Storyteller who regales you with the tale of the Mountain
Nymph Maia, and how she gave birth to Hermes by the God Zeus. He
goes on to tell of how Hermes created the first Lyre, which he used
to pacify the God Apollo (he actually NEEDED to, as Apollo was on
the warpath to avenge the theft of some of his cattle BY Hermes !!).
MELETUS - Angry Citizen who just wants to know WHY the monsters have chosen
to attack Athens.
CLEANTHES - Philosopher who quite rightly comments that it is most often
when united by a common threat that old enemies become each others
protectors ... of course for how long ... who knows ??
EVANDER - Athenian Guard that can backup what Kyros tells you, and who also
confirms that the Athenian Guard are in the process of fighting
their way up to the Acropolis as you speak.
=================
QUEST INHABITANTS
=================
LEONIDAS - Spartan General (as always). Leonidas recounts how in the
Spartans hubris, they refused aid from their Greek counterparts -
a decision they bitterly regretted later on, as they suffered
many losses to the hordes of monsters they had to face on their
own.
Sparta marched to join forces with the other Greek factions,
united in the common defence of the great city of Athens.
He tells you that the Telkine of which you speak disappeared during
the battle in Athens, which gave the other factions the chance to
drive the monsters back, and has led them to their present
situation. Finally, he says that he has heard tales of battles
already going on within the city, but that he cannot spare a runner
to go and see what is going on. He wants to know if you could go
and see what is going on (and gives you 2500 XP and restores all
your health and mana as a gesture of his goodwill).
KYROS - Panicked Man who says that his leader is trapped by monsters in the
heart of the catacombs under the Acropolis, and who begs you to
save him by venturing beneath the Parthenon.
================================================
MERCHANTS, ENCHANTERS, CARAVAN DRIVERS & MYSTICS
================================================
ANTIPHON - Mystic
DEMODOCUS - Blacksmith
NICIAS - Arcanist
ENDIOS - Enchanter
KONON - Caravan Driver
==============================
QUESTS FROM THE CITY OF ATHENS
==============================
No specific ones - just a continuation of the main quest really.
=====================================
SECTION 1.6 - THE ORDER OF PROMETHEUS
=====================================
Kyros has let slip (totally intentionally) that the leader of their Sect -
the Order of Prometheus - is trapped in the Athenian Catacombs, and that he
needs your help otherwise he will surely perish.
Time to rip off your shirt and reveal that Superman undershirt you've got
on. C'mon I know you do ... eeeeeeeeeeeeverybody does ;)
If you would care to head up the MASSIVE flight of stairs due north-east of
where Kyros is cowering (and to help the Athenian Guard slay the large
number of ratmen that are coming DOWN at the same time), then you will find
the Acropolis at the top.
From where you enter the Acropolis, please head to the north-easternmost
corner, and up the flight of steps, through the archway. Then north-east
and up two more flights of stairs to get an update to the Order of
Prometheus quest, and access to the Parthenon.
At the backend of the Parthenon you will find a smashed wooden door, with
steps leading down into the Athens Catacombs.
================
ATHENS CATACOMBS
================
This is a FIVE-LEVEL Dungeon basically, with your objective being to get
down to the fifth level. There are rebirth fountains strategically-placed
throughout, and a HORDE of undead monsters and gorgons lurking on each
level, so please take things slow, and steady. We wouldn't want you to poke
an eye out with whatever weapon you're holding now WOULD we !!
First off, activate the rebirth fountain on the first level. I am going
to very (almost insultingly) simplistically write out in shorthand the
quickest way to get through each level, so here we go :-
----------------------------
ATHENS CATACOMBS - LEVEL ONE
----------------------------
> North-east through the archway between the two blue Athenian Standards
> North-west into the next room
> North-west into the next room
> North-west into the next room
> North-east into the next room
> Descend the steps on the south-eastern wall to get to
----------------------------
ATHENS CATACOMBS - LEVEL TWO
----------------------------
> North-east into the next room
> North-west into the next room
> North-west into the next room
> South-west into the next room (a VERY long room)
> South-east into the next room
> North-east into the next room
> South-east into the next room
> South-east into the next room
> South-west into the next room
> Descend the steps on the north-western wall to get to
------------------------------
ATHENS CATACOMBS - LEVEL THREE
------------------------------
> Activate the rebirth fountain
> North-west into the next room
> North-west into the next room
> North-east into the next room
> Descend the steps on the south-eastern wall to get to
-----------------------------
ATHENS CATACOMBS - LEVEL FOUR
-----------------------------
> South-west into the next room
> North-west into the next room (a very small one)
> North-west into the next room
> South-west down the narrow corridor, into the next room
> Descend the steps on the south-eastern wall to get to
-----------------------------
ATHENS CATACOMBS - LEVEL FIVE
-----------------------------
> South-west into the next room
> In the south-eastern portion of this room, open the EIGHT sepulchres,
but beware of traps ;)
> South-east into the next room
Once you are in this room, see that door on the north-eastern wall ? The
beautifully ornate one inbetween the two lions ? Behind THAT door is a
boss, so GET READY.
============================
ALASTOR - SCOURGE OF ACHERON
============================
Alastor is a powerful wraith who has the ability to command up to six
desecrated dead warriors at a time, so you should do your best NOT to
get locked into the room with him, or your battle will become considerably
more difficult.
Here are Alastor's attacks :-
- Flaming arrow
- Poison arrow
- Summon three Desecrated Dead Soldiers
- Summon three Desecrated Dead Frost Liches
Once three of his Desecrated Dead followers have fallen in battle, he will
summon another three, which gives rise to the following tactics :-
1) Kill TWO of his Desecrated Dead Soldiers, and TWO of his Desecrated
Dead Frost Liches, and then focus ALL your attacks on him, and avoid
hitting the remaining soldier and frost liche, as this will prevent
Alastor from respawning them.
2) WEAVE. Strike and dodge, strike and dodge.
3) If you CAN avoid getting into the room with him, DO SO. Since the
complexity of this boss-fight depends largely on whether you have the
room to manoeuvre, or whether you are trapped in the same room AS him,
being able to move about freely can make all the difference.
Once you are done with Alastor and his lackies, open the Majestic Chest,
Ornate Chest, and two Quality Chests, before speaking with the recently
liberated Phaedrus (the Aged Philosopher).
Phaedrus identifies himself as the head of the Athens Chapters of the Order
of Prometheus - a secret society charged with the safe-keeping of the
mortal realm - arch-nemesis of the Telkine (Lesser Titans).
It transpires that mortal legend erroneously believed that the Telkine
were banished with the rest of the Titans when the Gods won the great war
between themselves and the Titans. This is obviously NOT the case, as the
Telkine that was up until recently in Athens, has now moved off towards
Knossos on the isle of Crete.
The Order of Prometheus is afraid that it is his intention to destroy a
sacred artifact they use to keep in contact with the realm of the Gods,
and they have no way of knowing what would happen if he were to succeed.
Phaedrus asks you to travel to Knossos and to put a stop to the Telkine's
evil plot at all costs. He says that there is an agent of the Order of
Prometheus who is waiting for you at the Athens Docks, to arrange your
safe passage to Knossos.
With that, you earn a magical item (I earned a random green necklace),
together with 5000 XP, and an update of the main quest to ...
=================================
SECTION 1.7 - UNDER THE LABYRINTH
=================================
Once you are done speaking with Phaedrus, leave through the door in the
north-eastern wall of the room, and keep heading north-east, until you are
able to leave the corridor via a small set of steps to the south-east.
As soon as you leave the corridor, you enter the Athens Docks, and should
(of course) immediately activate the rebirth fountain by the steps.
From there, head to the south-west and slay all the gorgons you find en
route, and keep going south-west until you find the familiar face of Feiyan
whom, it NOW appears, is your contact with the Order of the Prometheus !!
So THAT was the "business" she just HAD to attend to. Did a bang-up job of
sorting THAT one out didn't you love !?!?!
Speak with Feiyan and she will express EQUAL shock that YOU are the hero
Phaedrus has elected to send to Knossos to do battle with the Telkine. To
her defence, all she wants is a crack at the monster that slew her family
and friends, but for reasons best known to himself, Phaedrus has seen fit
to despatch her to the Far East on another mission.
Once you have spoken with her, and the main quest has been updated, speak
with Isarchidas - the Ship Captain who stands beside her, and elect to
travel to Knossos.
Do not worry - you can come back here if you REALLY feel the need ;)
=============
KNOSSOS BEACH
=============
Ah here we are at last. RIGHT. You go find a windbreaker whilst I go
grab us a couple of ice-creams and some suntan lotion ok ?? Synchronise
your watches aaaaaaaaaaaaaaaaaaaaaaand GOGOGOGOGOGO !!
Ok ok I'll get on with it.
Head south-west of your starting location, leaving Isarchidas behind (he
never says much - just takes you back and forth between Knossos and the
Athens Docks should you ever want to go back there), and keep going up the
beach until you reach the Village of Herakleion
=====================
VILLAGE OF HERAKLEION
=====================
* There is a rebirth fountain in the Village of Herakleion
* There is a Portal Shrine in the Village of Herakleion
=====================
NON-QUEST INHABITANTS
=====================
DIACRITUS - Storyteller who tells you the tale of the great builder Daedalus.
He tells of how Daedalus built the Labyrinth of Crete at the behest
of King Minos of Crete, to contain the fearsome Minotaur. He goes
on to detail Daedalus' waxen wings - how he made two sets of such
wings for himself and his son Icarus, and how Icarus couldn't read
the manual properly, and melted his by the heat of the sun.
ALCMENE - Hearty Matron who warns you of the existence of the Minotaur under
the Palace ... like you didn't know that already !! *Slaps her
silly*
ANTIOPE - Shepherdess who confirms that something very powerful AND evil
entered Knossos last night ... and nope, it wasn't looking for
a bed and breakfast.
=================
QUEST INHABITANTS
=================
HIPPOCOON - Brooding Villager who gives you the Xanthippus the Healer quest.
Basically he tells you that Xanthippus is up taking a break (and
perhaps an olde worlde kit-kat) in the hills, and they really need
him back here to help combat the sickness that has been left as a
result of the Telkine passing through.
DIOTIMUS - Peasant who tells you about the Tyrant Leucus - a former usurper
of the throne of Knossos who's reign of terror came to an end when
he was poisoned by one of his own servants. It appears, however,
that he has risen from the dead and is now holed up in Tritons
Ridge.
================================================
MERCHANTS, ENCHANTERS, CARAVAN DRIVERS & MYSTICS
================================================
POLYMEDES - Blacksmith
MENO - Arcanist
PARAEBATES - Enchanter
PHILOCTEDES - Caravan Driver
=====================================
QUESTS FROM THE VILLAGE OF HERAKLEION
=====================================
=====================
XANTHIPPUS THE HEALER
=====================
Xanthippus, the resident healer of the Village of Herakleion, has been up
in the hills since the vicious Telkine passed through the Village, and they
desperately need him to return and cure the survivors of the sickness that
has beset them.
Xanthippus, like Leucus, is on Tritons Ridge, and that is a fair way away,
so I am going to proceed with the main quest walkthrough, and come back
to this quest when the time is right.
=================
THE UNDEAD TYRANT
=================
Rumour has it that the long-fallen spirit of the evil tyrant Leucus has
arisen again, and made a lair for itself on Tritons Ridge. Leucus was a
former usurper of the Throne of Knossos, who took it by force, and was later
poisoned to death by a servant there.
As with the Xanthippus the Healer quest, I shall disregard it for now, as
Tritons Ridge is a fair way off, but we shall come back to it when the time
is right.
========================================
SECTION 1.7 - UNDER THE LABYRINTH CONT'D
========================================
So ! From the Village of Herakleion, leave via the eastern path, making
sure to activate both the rebirth fountain AND the portal shrine to its
north-west before going.
Once you are in the Herakleion Highlands, head due north until you reach,
and go through, the two torches.
Once through the torches, hug the edge of the cliff to your west, and
follow it north until you reach the stone bridge that least westwards.
Cross that bridge and you enter the Omphalion, where you should activate
the rebirth fountain in front of you IMMEDIATELY - there is a pronounced
Maenad presence here - most of whom are archers, and they ARE going to
rain on your parade if you aren't very careful.
It is also possible that you may encounter your first Minotaur here. As
with the Gorgons in the later part of the Pythian Caves, there are many -
however, UNLIKE the Gorgons, you will encounter the weaker Minotaurs BEFORE
you reach their Master, so that at least gives you some time to prepare
yourself, to learn how they attack and so on.
You must walk to your south-west to get into the thick of Omphalion, and as
soon as you are able (i.e. after you have passed the first barracade to
your north), head due north into another Maenad Encampment, and then from
there (you will know exactly where "there" is because you will be standing
before a VERY large Maenad War-Banner, on a tattered brown sheet), head
north-east until you reach two torches and a bridge that will lead you out
of Omphalion and onto Tritons Ridge.
AT LAST !!
Tritons Ridge is a bit of a weird shape, and as you already know you must
go to TWO different locations to complete the two side quests you picked
up in the Village of Herakleion.
No sense in wasting time - let's get cracking !!
=====================
XANTHIPPUS THE HEALER
=====================
Since this is the first quest I picked up, I figure it's not unreasonable
to make it the first quest we solve here.
From entering Tritons Ridge, head south-east, and keep an eye on your
compass to gauge where Xanthippus is. He is essentially DUE south-east
of your starting position. Avoid going due south, as that leads into a
small but powerful Maenad Encampment. There is a clump of rocks that
blocks you going DIRECTLY south-east to him in one straight line, so you
must move around those, but he is to your south-east, trust me.
Once you find Xanthippus you may take his kit-kat and eat it for yourself.
After this, you may speak with him, and he opens up to you and says that
whilst he was picking medicinal mushrooms (shyeah RIGHT monghead - he was
picking magic mushrooms !!) in the nearby cave, when a monster snuck up on
him. Alarmed, he dropped his magical staff and fled to the safety (!!!) of
Tritons Ridge. He says without his staff he will be unable to do anything
for the villagers in Herakleion, and so you are going to have to go in and
get the staff back for him.
Sounds to ME like he was drugged up to the eyeballs, tripped out his skull,
and saw a VISION of this monster ... *spits on his hands and rubs them
together* let's go kick some BUTT guys !!
Be forewarned that the cave contains all manner of spidery beasties ;)
Enter the cave beside where Xanthippus is standing, and head east-north-
east, circumventing a small hole in the ground. You will find an Ornate
Chest (which is locked), being guarded by Runelord K'kin'zir - an Arachnos
Hero who will not let you take its contents until he has fallen to you.
K'kin'zir is not an overly tough opponent, who's attacks are mainly close-
quarters sword strikes. He should pose no serious problem to you, but he
is quite quick on his feet (it helps him having EIGHT of them I guess), so
he might be able to score a couple of quick strikes against you if you do
decide to fall back, so keep that in mind.
Once Runelord K'kin'zir has died, the chest can be opened and its contents -
the Staff of Xanthippus - retrieved. Give the Staff back to Xanthippus, and
he will reward you with :- 5 Greater Energy Potions, 5 Greater Healing
Potions, the full restoration of your health and energy bars, and 5000 XP !
NOT BAD !!!!!
=================
THE UNDEAD TYRANT
=================
Well that's 1 down, 1 to go by my count ! From the now elated Xanthippus,
head north-north-west, and then follow the path to the north-west aaaaaall
the way up until you find a set of steps descending into the ground.
Go down these steps to enter an Ancient Tomb, which is shaped like a big,
symmetrical, rectangular doughnut, so it doesn't matter whether you go
east or west when you get in here, you will wind up following the path
around to the final room all the same.
This Ancient Tomb contains a horde of undead warriors, PLUS a fair few
gorgons to keep you occupied.
Leucus has bated a trap for you in the room he occupies, which is the north-
westernmost room in the structure. You will see it as being two rooms
due north-west of the room you start in.
DO NOT GO IN THERE unless you want a SERIOUSLY difficult fight.
These easiest way to handle this combat is to fire an arrow or something
at Leucus, to lure him out into the adjacent room, and deal with him there.
The trap he has set (which is a set of EIGHT skeletons - a combination of
archers and regular soldiers - that will spring forth from the ground once
you get sufficiently close to the treasure they are protecting) will still
be activated when you go into the room, but at least by THAT stage you might
have been able to defeat Leucus.
==========================
LEUCUS I - TYRANT OF CRETE
==========================
Leucus is, I believe, a Defence (and possibly Warfare) Master. He has
access to the Shield Charge and Onslaught Skills, and uses both to great
effect during combat. He can RAPIDLY close the gap between you and he,
and his sword strikes are both strong and unrelenting.
You might well fall a couple of times in your battle with him, which is
VERY annoying considering the distance to the last rebirth fountain, so I
would suggest taking PLENTY of health potions into your battle with him
if your finances allow.
However you destroy him, once he has fallen, the reward is truly worth it.
You will gain 6000 XP for his death, plus access to the treasure he and his
cronies (whom you may or may not have yet despatched ?) were protecting -
Three sepulchres and a Majestic Chest.
========================================
SECTION 1.7 - UNDER THE LABYRINTH CONT'D
========================================
Once you have SMOTE the Tyrant of Crete, leave his ancient tomb by the same
way you came in - the stairs - and then head to a bridge due south of you.
In order to get to this bridge, you will have to go south, and follow the
path as it forces you to go east, and then arc back on yourself to the west
by going through the dead trees, and then walking just a few steps (truth be
told it's only a few steps from the ancient tomb to this bridge ANYWAY) to
the south-west to get to the bridge.
Crossing the bridge takes you to the Kairatos Bluff, and you should activate
the rebirth fountain as soon as you cross the bridge, as is by now I am sure
a reflex anyway.
Head due west into the Maenad Encampment, and then leave to the north of the
Maenads, and cross the bridge there. This will lead you to another rebirth
fountain, and Oles the Trader, with whom you can do business should you
wish. Yes, I'll allow it ... go on ... *shoos you off*
All done ? Okey DOKEY !! :) So from Oles, head north-east, up through the
two torches, and you will find a set of steps to your north leading into
the Knossos Palace.
The Palace is quite heavily guarded - on the OUTSIDE by skeletons, plague
birds and various automatons (animated suits of armour that you will not,
as yet, have come across, but which are not OVERLY powerful with one
exception that we shall come to in due course). Obviously, according to the
legends, a BIG Minotaur lives underneath Knossos Palace, held within a
labyrinth constructed by the great Greek builder Daedalus.
There are a couple of ways of getting through the Palace Grounds, and I am
going to give you a very quick run-through of how I do it ...
======================
KNOSSOS PALACE GROUNDS
======================
> From where you get the words "Knossos Palace" appear, head north-west,
and keep going north-west until you reach a large L-shaped courtyard.
> Follow the courtyard around to the left, and keep heading south-west now
until you reach a set of stairs leading down to the north-west.
> Take these stairs, and then in the next courtyard (where you start to
battle the Automatons), head north-east, and then up another flight of
steps.
> Turn and head north-west, and then take the flight of stairs directly
ahead of you, to the north-east.
> Continue heading north-east, and take the flight of stairs directly in
front of you.
> Turn and head south-east, but hug the northern wall of this area (the
wall with the columns, the roof over which is covered with leaves) and
keep heading south-east until you find a small crack of a passage that
leads to the north-east. Take it, but be EXTREMELY cautious and keep
your ears open if you are playing on either Epic or Legendary difficulty,
as you will have to do battle with an EXTREMELY powerful Automaton who
is hellbent on preventing you gaining access to the Court of King Minos.
His name, in case you are curious, is Talos. You might have heard of him
before - he's been in a famous movie ;)
For more information about THIS creature, see the
In the north-western wall of this courtyard, inbetween the two pre-lit
torches, is the entrance to
=======================
THE COURT OF KING MINOS
=======================
Simply head down the steps at the north-western end of the Court of King
Minos to gain access to
====================
THE MINOAN LABYRINTH
====================
Tempting though it is to simply say "it's a labyrinth, work it out yourself"
that WOULDN'T be very friendly of me now would it ... noooooooooooooo kids.
I experimented with no less than FOUR different ways of detailing the
labyrinth for you. I drew each room out, I mapped each room out in squares,
I wrote a lengthy guide as to "go north-east until you hit a wall, then
turn south-east and continue", but none of them did the Labyrinth justice,
as you would have wound up having to follow them step-by-step, and to be
honest whilst the Labyrinth is ... well ... labyrinthine and winding and
confusing in places ? If you were to follow a "now take three steps
forward" guide, you would go BANANAS.
No my friends, you deserve only the finest. Therefore, in what is sure to
go down in history as one of THE most shameless plugs for my own web-site
combined with a bid to help you out, I have combined the graphics for each
of the rooms into one single image that you can view here :-
http://www.share-the-knowledge.com/david/tqit-minoan-labyrinth.jpg
THAT should see you through the Labyrinth no problem at all, but if it
DOESN'T for any reason ? Then I have done another one where I have even
drawn out the path to follow to get there quickly !! That one is here :-
http://www.share-the-knowledge.com/david/tqit-minoan-labyrinth-path.jpg
============
HELPFUL HINT
============
Make sure you kill ALL the enemies in far-right room, as there is a boss
fight immediately afterwards, and if you lure the boss INTO that room ? And
you HAVEN'T cleared it of enemies ? You're just going to make your life a
WHOOOOOOOOOOLE lot harder than it needs to be, trust me ;)
Once you have FINALLY made it all the way through the Minoan Labyrinth you
will, at last, come to a beautiful golden door with a familiar sign
embossed upon it. Yup - it's a boss door, and will lead you straight into
a fight with the Minotaur Lord, and FOUR (yep, 4) Frost Traps.
Therefore before entering this fight, I would strongly recommend teleporting
back to one of the towns in Greece and visiting either a Trader or an
Arcanist to obtain whatever magic scroll you believe may help you (you will
only have enough time to use one during the coming combat), as well as
ensuring you have an AMPLE supply of health and energy potions, and are
prepped with your finest equipment and skills at the ready.
Once you believe yourself adequately armed, go back to the Minoan Labyrinth
and enter the gate, but do not step too far inside just yet.
If you are able to, I would suggest drawing the Minotaur Lord to you with
a ranged attack, as if you can get him to fight you outside the room he is
in, so much the better. I say this because the Minotaur Lord is both
extremely strong AND very quick, and the Frost Traps have OBVIOUSLY been
placed in the room with him so as to slow YOU down, to make you easier
pickings for him. Wrong-foot him by bringing him back into Room Six ;)
If you are either unwilling or unable to do this for any reason, I would
suggest making the Frost Traps your first victims, so that you are freer to
move around.
Consider using whatever scroll you have here and now, but be forewarned
there is another big combat session coming up after this one is over and
done with, so if you are strapped for cash, make sure you are happy that the
time is right before firing it off ;)
So ! Onto ...
=================
THE MINOTAUR LORD
=================
The Minotaur Lord is a Master of Warfare. He has onslaught available to
him, and strikes with twin axes doing HUGE amounts of damage to lower-level
characters (and a damned good thwack to higher-level ones too !!).
He does also have access to an earthquake power which he uses periodically
during the combat - however he is more likely to use this at range (he
prefers to get in up close and personal ASAP bless him).
Stick and move and HEAL repeatedly (obviously).
Once he has fallen to your power, open up the two Primitive Chests, and the
Majestic Chest he was looking after, teleport to the town and trade with
whomever takes your fancy.
PLEASE PLEASE PLEASE, however, make sure you stock up JUST as well as you
did for your fight with the Minotaur Lord, as he was just a sub-boss,
guarding the REAL boss fight which is about to come ...
YES my friends - it is time for us to fight ...
=====================
THE TELKINE OF GREECE
=====================
FINALLY we get a crack at this MUTHA. We've been high-tailing it all over
Greece, and it's come down to this. You and him ... and boy is he UGLY !!
The Telkine fight takes place in a number of phases :-
Phase One - The Room of the Conduit
===================================
You must begin the fight sequence by going down the stairs on the north-
western wall of the room the Minotaur Lord was in. Go all the way to the
north-west, and you will see the Telkine attacking the artifact that
Phaedrus asked you to protect at all costs. However when you draw near
to the Telkine he raises a protective shield to prevent you from getting
at him, and simultaneously launches four balls of energy which creep
across the floor, heading towards the four statues on the walls - two
on your left, two on your right.
Phase Two - The Inhabited Statues
=================================
As all four balls of energy reach the four statues at the same time, all
four statues become "inhabited statues", and immediately move to attack
you whilst the Telkine continues his assault on the artifact.
The Inhabited Statues are reasonably quick, but have one fatal flaw which
I outlined right up at the top of the guide ... what's that please ??
That's right !! They have an upper-limit on their range of movement !!
Since they have good damage with the spears they carry, I would try and
fall back to the entrance to the Room of the Conduit, and you will find
they reach a point that they cannot pass, and turn and head back towards
their starting point. Use the dizzying tactic I taught you earlier to
bring them down in short order.
Phase Three - The Telkine of Greece
===================================
Once all four of the inhabited statues have been destroyed, the Telkine
realises he is on his own, drops the shield, and joins the party in
person !
Megalesios - the Telkine of Greece - has (as you would expect) a large
number of attacks at his disposal, namely :-
A) Swirling pinky/red energy bolt (AVOID !!)
B) Potion to summon two Limos
C) Storm Surge
D) Life Drain
E) Thunderball
Like the other bosses, there is a limit to Megalesios' movement as well,
however in order to try and make the game a BIT more challenging for you,
he can summon two Limos who can pretty much chase you anywhere :(
A word of warning - Megalesios has the power to turn your summons
against you, so if you think it's a good idea to summon ... say ... your
Ancestral Warriors as a Warfare Master ? I would think very carefully
before so doing if I were you ;)
============================
TIP FOR DEFEATING MEGALESIOS
============================
Dragon Peter has been in touch to confirm that, if you have a bow with energy
leech damage, you can fire shots through Megalesios' Energy Barrier and,
whilst the shots won't do any health or physical damage, you can still use
them to leech all his energy before he casts the spell to animate the
statues ! This will mean the statues don't come to life at all !!
He says that this trick only works with a bow though, NOT with a staff ;)
However you slay him, once Megalesios falls, he drops his Telkine's Veil
and his Telkine's Seal, and disappears leaving his life essence in a nice
little blue ball called a "Mystic Orb", which you can open like a regular
chest.
Kyros has entered the chamber from the door to the north-west so you should
go and speak with him - however on your way to doing so, take note that the
Telkine was actually successful in destroying the sacred artifact DAMN him !
*GRRRRRRRRRRRRRRRRRRR*.
Nevermind. Perhaps we can buy them a replacement before they notice ??
Nope - no mas. Kyros has spotted it ... bummer !! He says that you should
travel to Egypt, to seek out a man named Imhotep - a Sage of the Order of
Prometheus, who will be able to give you advice concerning the Conduit which
was just shattered. He says Imhotep can be found in the City of Rhakotis,
and that you can take his ship to get there.
Your reward for besting the Telkine is a random essence, together with an
update of the main quest, 7500 XP, a SECOND Inventory Bag *GRINS*, and the
neverending gratitude of Kyros and the Order of Prometheus.
=======================================
SECTION 1.8 - THE BLINDNESS OF THE GODS
=======================================
Leave the Room of the Conduit by the passageway that Kyros took to come IN,
and you will come out at the Knossos Landing. Activate the rebirth fountain
as you enter this area, and then head to the dock to the north, and speak
with Apollodorus the Ship Captain, to secure passage to Rhakotis, and Egypt.
==============
GREEK EPILOGUE
==============
Well we tracked our enemy (Megalesios) the Telkine across all of Greece,
piecing together his plan as we went. Although it is not clear to us WHY
Megalesios would want to destroy the Conduit that acted as a communications
device between the Gods and the Mortal Realm, we do know that it was a
deliberate and calculated act, and so must (we assume) form part of some
greater scheme that we are yet to uncover.
Kyros has directed us now to Egypt, and to the Sage Imhotep (a fellow
member of the Order of Prometheus) whom, we hope, might have some answers
for us.
Congratulations !! You have completed Act One. NOW it's on to Act Two ;)
===============
ACT TWO - EGYPT
===============
=======================================
SECTION 2.9 - THE BLINDNESS OF THE GODS
=======================================
You arrive in the City of Rhakotis at the dockside beside Apollodorus, the
Ship Captain who brought you here from Knossos. Walk north-west of him to
enter ...
====================
THE CITY OF RHAKOTIS
====================
* There is a rebirth fountain in the City of Rhakotis
* There is a Portal Shrine in the City of Rhakotis
=====================
NON-QUEST INHABITANTS
=====================
APOLLODORUS - Ship Captain who can take you back to the Knossos Landing
should you wish to go back there.
HAMUT - Refugee who remarks with surprise that monsters are in Greece TOO ?
He says that surely it isn't possible that things could be worse
there than they are here in Egypt ? (Great !!)
KHERHEB - Vagabond who tells you that a TELKINE was seen heading from the
City of Rhakotis up the Nile. Wait a minute ... ANOTHER one ??
Didn't we just KILL one of those little sh!ts ? *sigh*
AMENI-AMEN-A - Storyteller who recounts the tale of Atum-Ra, God of the Sun,
and Apep, the Giant Serpent that has existed since time immemorial.
He tells of Atum-Ra's daily travels (the path of the Sun), and how
Apep tries to devour him on a daily basis - greedy SOD !!
=================
QUEST INHABITANTS
=================
IMHOTEP - Order of Prometheus Sage who greets you upon your arrival in
Rhakotis. Imhotep tells you of how Egypt is also being besieged
by monsters and other weird creatures. The Pharaoh has fled his
Palace and now cowers in hiding ... but all is not lost, as he
(Imhotep, not the Pharaoh) has a plan to enable you to contact the
Gods even WITHOUT the conduit. He tells you that you must seek out
the Great Library of Rhakotis and find the Scroll of Invocation.
He says that once you are in possession of the Scroll you are to
take it to him in Sais, as he has pressing business that draws him
there. More pressing than THIS !?!?! Why doesn't he just wait here
for us - we'll only be a minute I'm sure !!
He says he's now off to the Temple of Ptah. Yeah. Ptah to you as
well mate !!
ANHERRU - Noble Warrior who is WELL unhappy that he has lost his family's
sacred sword. He stands with his exclamation mark VERY well hidden
by the torch behind him, so you might have to look quite carefully
to find him ... unless of course you're using the map or your
compass ;)
================================================
MERCHANTS, ENCHANTERS, CARAVAN DRIVERS & MYSTICS
================================================
HENKU - Enchanter
AHMOSE - Blacksmith
XUTHUS - Caravan Driver
ANKHTIFI - Mystic
AY - Arcanist
================================
QUESTS FROM THE CITY OF RHAKOTIS
================================
================================
THE BLINDNESS OF THE GODS CONT'D
================================
Speak with Imhotep as he stands on the Rhakotis Docks, and he will tell you
(as I have detailed above) that the whole of Egypt is plagued with monsters,
and that things have gotten so bad that the Pharaoh himself has fled his own
Palace and is now in hiding, fearing for his life. Not to worry though, as
trusty old Imhotep (who is NOTHING like his portrayal in the Mummy before you
even GO there) has a plan ... a very CUNNING plan to be precise.
Imhotep believes he has come up with a way for you to re-enter communication
with the Gods, even without the conduit that you so carelessly allowed to
get destroyed by Megalesios back in Knossos (I know it wasn't your fault, but
DAMN !!).
To put his plan into action, you must enter the Great Library of the City of
Rhakotis and find the Scroll of Invocation somewhere within. Imhotep would
stop off and wait, but he is late for a tea-party that's taking place at the
Temple of Ptah in Sais - it's one of those "movers and shakers" things, and
he just can't get out of it, so you are going to have to deliver the scroll
to him there.
We will proceed with this quest, but first of all we should help out poor
Anherru to retrieve that lost sword methinks.
===================
THE FAMILY HEIRLOOM
===================
From where you speak with Anherru, head north-west and exit the main part
of the City, taking just a second to make sure that you have activated the
rebirth fountain before you go.
The City is largely overrun by scorpions and jackalmen, none of which are
INSANELY hard to tackle. Head north-east and through the wooden doors (the
only way out of this courtyard without going back into Rhakotis proper).
This will take you into the Rhakotis Slums. Laugh gleefully as you watch
the jackalmen chasing the poor inhabitants of this area around, and slay a
few of the former to thin out their numbers.
MY house ;)
Once you reach the end of this street you must choose to either go north-
west, or south-east. It matters not which way you go, as both come back
on each other behind the building in front of you, and the path onward lies
north-east of that, so just move around the building in front of you, and
take the north-eastern exit behind it.
Activate the rebirth fountain, and take the doorway leading to the north-
west, through another doorway, and into the sandy courtyard. Slay the
Scorpions, ESPECIALLY THE Colossal one/s, and take out the Sandwings for
good measure. B!tches.
Take the western exit and head due west until you see a small exit leading
northwards. Head in here and clear out the area - more often than not, this
is where you will find a Jackalman Elite Berzerker with a glow around his
feet. Once HE has fallen (whether he be here or in the Great Library of
Rhakotis which is his other favourite haunt), he will drop the Family Sword
of Anherru, which you should immediately return to Anherru, by teleporting
back to Rhakotis.
He will be most grateful, and will reward you with 6000 XP, and a random
Essence.
================================
THE BLINDNESS OF THE GODS CONT'D
================================
ASSUMING you find the Family Sword of Anherru where I have just described,
head back to that main thoroughfare you just left to enter the alley, and
then head south-west.
If you did NOT find the Family Sword of Anherru there, we will get to it in
a bit ;)
Keep following this alleyway as it head north-west, and then south-west
again, and keep heading south-west until you reach the area where the sand
on the ground dissipates in favour of tiles. This denotes that you are
getting near - VERY near - to the Great Library of Rhakotis, and the Scroll
of Invocation. Yay !! :)
Once you can pretty much not go any further south-west, head north-west and
up the stairs nearby, and into
================
RHAKOTIS LIBRARY
================
If you failed to find the Family Sword of Anherru elsewhere in Rhakotis,
then this is where it should be. If you fail to find it here, then assume
that the Elite Berzerker has gone walkies, and hunt him down - he IS in
Rhakotis, and this and where I described previously ARE his two main haunts.
If all else fails and you cannot find him, you can always save, exit and
then reload your game as this will put him back (somewhere) in Rhakotis.
Once inside the Rhakotis Library, head due north-west, and keep going until
you find Neb-ka-n-ra - the Head Librarian who is cowering like the WIMP he
is. Speak with him, and he will praise you for saving him, and confirm that
the monsters have started to turn the library upside down, burning and
destroying everything they come across. He implores you to kick a little
tail and sort them out.
Sure ! I think we can do that, right guys ??
*The monsters are kicking up a fuss in the library, dog-earing pages, not
putting books back in the right place ... all of a sudden the doors FLY
open and Sinister spirals into the room, decapitating three Jackalmen as
he enters. The monsters growl in anticipation of the combat to come, as
Sinister puts a finger to his lips and goes "Shhhhhhhhhh. This is a
LIBRARY" !!*
Head through the door in the north-western wall, and head down the steps
and into the Library Archives.
Whilst it is no way NEAR as complex as the Minoan Labyrinth, the Great
Library of Rhakotis is a bit of a maze in itself.
Therefore, in order to try and help you get through it as quickly as
possible, I am going to give you some simple step-by-step instructions as
to how to move through it quickly. Here we go !!
> Down the steps and into the Rhakotis Library (just in case you forgot !!)
> Activate the rebirth fountain and go through the north-western door
> North-west
> North-west
> North-east
> North-east
> North-west
> North-east
> South-east
> South-east
> South-east
> North-east
> South-east
> South-east
> South-west
> South-west
> Descend the steps to get to the Library Vault
Once you are in the Library Vault you will encounter some new types of enemy
that may be new to you (they won't if you thoroughly explored Rhakotis, but
they WILL if you followed my guide and went the most direct way) -
specifically Scarabs, and Worms. Scarabs are VERY difficult to see in most
of the areas they inhabit - arguably the best camouflaged creatures in the
whole of the game in fact. They are quick, do good damage and attack in
force. BEWARE the Scarabs. They flutter their wings to gain lift, and then
strike with their mandibles. At least these ones do - there are other
varieties which we shall come across later.
Worms are very slow - some are huge and gob gloop that slows you down -
others are small and spit poisonous gunk at you. They deal high damage,
especially the large ones if they get close-enough to you - and have good
health, so watch out for BOTH of these enemies.
From where you enter the Library Vault (which is the lowest floor of the
Library you may or may not be pleased to hear), head through the door in the
north-western wall, and take out the Crypt Worms (the acid-spitters).
See that "Mysterious Door" in the north-eastern wall ? Well what do you
think lies behind that ? THAT'S RIGHT !! ANOTHER Boss Fight. You are, no
doubt, getting quite used to those by now, yes ? Well this one is with a
giant scarab that is a MASTER of poisons, so be warned, this is NOT going to
be easy !!!!!
==========================
SCARABAEUS THE DESERT KING
==========================
Scarabaeus is a VERY powerful Scarab who is able to generate followers to
aid him in his fights, and who has an EXTREMELY powerful poison attack to
back him up.
In addition to this, he is quick and has plenty of health, so if I were
you I would try and draw him as near to the door as possible. I am not
sure whether he can fit through the door - I have my doubts - and I do know</pre><pre id="faqspan-4">
that his bone scarabs can rush through the door to do battle with you in
the other parts of the library vault, but it can make the battle easier
if you are able to dominate the terrain ;)
Scarabaeus can :-
> Create groups of four bone scarabs at a time - he is NOT limited to
creating one group and waiting for it to die - he can summon multiple
groups !!
> Spit Poison
> Mandible Bite
> Pincer Strike
Once Scarabaeus has fallen, open up the two coffers, the large coffer, and
the Majestic Chest, and take their spoils, and then head through the door
in the north-eastern wall to grab the Scroll of Invocation from the statue
that holds it, and reveal a secret door in the north-eastern wall.
Follow the stairs up and out into the Hathor Basin, which lies due west of
the Rhakotis Library.
Activate the rebirth fountain, and then head due north and pass between
two large piles of rocks, and keep going north until you reach a pile of
rocks that lies directly in front of you. From here turn and head north-
west, and keep heading in that direction until you pass between two torches
that lead into the Wadjet Canyons.
Here you should definitely speak with Seba - the Desert Trader - who gives
you the Beast of Legend quest. His comrades Metjen the Old Camel-hand and
Astennu the Desert Trader simply whinge about the state of things, and pass
comment as to the likelihood of this "Beast" of which people speak being
truth ... or falsehood ...
===================
THE BEAST OF LEGEND
===================
From this rabble, head due north and keep going inbetween two piles of
rock, and then to the left of a third pile of rock. Once you reach the
remnants of a former structure - might have been a temple - there are
broken pillars for sure - head north-west and once you are down the very
short slope, head north-east (around the pile of rocks), and keep going
north-east until you reach, and enter, the cave there.
Remember your brief encounter with the Scarabs back in the Rhakotis
Library ? Well you're about to meet some of their relatives - the Fire
Beetles. They are the same as the basic scarabs, but they spit little
fireballs. They will flutter their wings to get into attack range, and
then pelt you with these irritating fireballs, so keep on your toes.
They also bring with them Magma Beetles which, if you've ever watched
Starship Troopers, are reminiscent of those HUGE beetles that breathe
flame, only on a much smaller scale - they spit large flows of lava at
you, but must get very close to do so.
In the north-east of this cave is the
===============
BEAST OF LEGEND
===============
The Beast of Legend is the first of an entire RACE of such creatures that
you will encounter as this Act progresses - they are called the Scorpos, and
resemble a cross-breed between a man and a scorpion (wouldn't like to have
been around for THAT !!). The Beast of Legend is more powerful than most
of them are, as he is an ANCIENT Scorpos, and is adept at both Nature and
Defence Schools.
He has the following attacks :-
> Tail-strike
> Mace-strike
> Plague
> Heart of Oak (not an attack, but bolsters his life-force, and that of his
allies)
> Rally
He is quick on his feet, and can deal out lots of damage in short-order.
Best way to defeat him is to get him on his own - i.e. dispose of those
enemies that he can benefit with his Heart of Oak power before taking him
on face-to-face.
Once he has fallen, you complete the Beast of Legend quest, and earn
yourself the VERY tasty reward of 2 additional Skill Points, and 7500 XP.
Wasn't that worth it !! :)
==================================
THE BLINDNESS OF THE GODS - CONT'D
==================================
Exit the cave and head south-west, following the northern ridge until you
find the bridge heading to the north-west. Cross the bridge (and don't be
afraid to fall back over the bridge a few times to try and force any enemies
that rush you into a slight bottleneck), and then keep heading north-west,
between the two torches, and down in the Nile Floodplain.
Once you enter this area, activate the rebirth fountain, and head north,
and then follow the path north-west and past the single torch.
From here (at the single torch and broken caravans), head north-west, and
keep going north-west until you can go no further, and JUST to the north
of this location is another set of two torches, which you should go
through.
Now head west, and follow the western rock face as it heads west-north-west
until finally it too comes to a set of two torches, this time leading
north.
Go north through the torches, and you will enter
===================
THE VILLAGE OF SAIS
===================
Take the path that leads to the north-west (NOT the north-east), and follow
it until you find two humans guarding a gate that leads west. Go in, and
you will be in the Village of Sais proper.
* There is a rebirth fountain in the Village of Sais.
* There is a Portal Shrine in the Village of Sais.
=====================
NON-QUEST INHABITANTS
=====================
KHETI - Poor Farmer who goes through the rise, and fall, of the Nile - a
bit of a geography lesson for you perhaps !! Pity we can't kill
him really, as payment for being so USELESS !!
=================
QUEST INHABITANTS
=================
ANPU - Nile Farmer who explains that things have become REALLY hard for the
inhabitants of the Village of Sais (who are effectively totally
defenceless) since the Reptilian Monsters have started to stage
attacks on their small village, stealing children and livestock.
He gives you the "Plight of the Nile Farmers" Side Quest.
NEDJEMIB - Young Farmer who confirms what Anpu has already told you - that
the Reptilian Monsters have started attacking the Nile Farmers
farmlands. He says they came up from the marsh along the river.
MAKARA - Nile Farmer that you cannot initially speak with, but who will
give you the reward for completing the Plight of the Nile Farmers
Side Quest, once you have tamed the Reptilian Horde.
================================================
MERCHANTS, ENCHANTERS, CARAVAN DRIVERS & MYSTICS
================================================
PETUBASTI - Trader
===============================
QUESTS FROM THE VILLAGE OF SAIS
===============================
==========================
PLIGHT OF THE NILE FARMERS
==========================
I didn't have anything against these Reptilians until I heard that they
ate kids, and that SUCKS so I think they deserve a damned good THRASHING,
don't you ??
Head south-west of the Village of Sais, and then follow the marshy coastline
as it curves south-east. Kill the 14 Reptilian Warriors of various ranks
(the 2 you find before you enter the marshland, and the 12 that are there
for now, and en route to the Village of Sais), and then return to the
village. You should speak with Makara - the Nile Farmer who was previously
unavailable for you to chat to - and she will reward you with a random
Monster Charm, and 8000 XP (together with the gratitude of all her mates).
==================================
THE BLINDNESS OF THE GODS - CONT'D
==================================
You will have had to activate the rebirth fountain beside Makara in order
to speak with her, so head north-east through the two torches, and keep on
heading north-east until you get to Petubasti and the Portal Shrine.
Activate the Portal Shrine, and trade with Petubasti if you like ... once
you are done you should head north-west and up to the Temple of Ptah - where
Imhotep said he would be.
Carry on north-west until you reach Thuti of the Order of Prometheus, who
stands beside a smouldering heap of rubble (which I think it's probably safe
to say is ... or rather WAS ... the Temple of Ptah !!).
Thuti says that Imhotep asked him to keep a watch out for you, and that the
Temple of Ptah was fully upright as of yesterday, but then a Telkine came
by and levelled it to the ground.
Turns out that Imhotep fled the scene when the Telkine arrived, taking some
of the village's most sacred texts with him. He has left a message with
Thuti for you, which is that he has gone to the City of Memphis up the
Nile, and is waiting for you there.
This updates the main quest, and you should now head north-west of Thuti,
and into the Lower Nile.
Keep going north-west until you reach the shoreline, and make sure that you
are FULLY replenished insofar as your health and energy are concerned, as
you are about to come upon another new type of enemy.
Once you reach the shoreline head north just a tiny bit and you will find
a large structure standing ahead of you. Setting foot on it causes you to
enter the Old Kingdom Ruins. You need to get around it to the west, but
it is not going to be easy to do so without fighting at least SOME of the
undead enemies that reside there.
Should you decide (as I am reasonably confident you will) to eradicate ALL
the enemies that are standing in this ruin, you will encounter some "Dark
Obelisks" - these are generators for skeletal warriors (both hand-to-hand
and ranged) called "Hideous Phasma", and they are proximity-sensitive.
Basically as you draw near to a Dark Obelisk (and they have quite a range
for detecting you - sometimes they will activate before you even fully
appreciate they are there !!), they will summon FOUR Hideous Phasma
skeletons, who will rush forward to attack you. Once all four of those are
defeated, four more will be spawned at the Dark Obelisk, and so on, and so
forth.
You can keep killing these Hideous Phasma creatures to gain the XP they
give you when they die, or you can go straight for the source (since they
will be re-spawned indefinitely until the Dark Obelisk is taken out), and
strike the Dark Obelisk itself.
Once the Dark Obelisk has fallen, all the Hideous Phasma it was sustaining
are automatically destroyed.
Once you are done with the Old Kingdom Ruins, head around them to the west,
along the shoreline, and then head due north and hug the eastern wall,
following it as it curves north-west and going through TWO monster camps -
one filled with Jackalmen, the other with Dune Raiders and their ilk. Slay
ALL these monsters to make sure you are not disturbed, and then speak with
Inen of the Order of Prometheus, and help her figure out why she has a
huge exclamation park pinned to her forehead.
=======================
A PROMETHEAN SURROUNDED
=======================
Inen thanks you for saving her for the tight spot she seemed to have gotten
herself into, saying that ordinarily she can defend herself, but that in
this particular instance, she was most grateful for the assist. For helping
her out of her little jam, you have earned yourself 7500 XP, and a random
yellow magic item (mine was a necklace).
==================================
THE BLINDNESS OF THE GODS - CONT'D
==================================
From Inen, head south-east to exit the Dune Raider camp, and then south-west
until you get to the water again. From here, turn and head north-west,
through the two pre-lit torches and then stay on the path as it curves up
to the north, through a jackalman encampment, and then curves around to the
west, through another two pre-lit torches, and up to a rebirth fountain.
Activate the rebirth fountain, and head north-west, through the two torches
and into the Memphis Outskirts.
Memphis is a HUGE city - really quite massive - probably as big as Athens -
and it is going to take us a little longer to get to it ... as with most big
cities, it is surrounded by outlying areas, and as you FULLY anticipate I
am sure, these are REPLETE with monsters that are hellbent on making your
day that little bit worse, and your life that little bit shorter.
ONWARD !! ;)
To get to Memphis proper, you need to head in a north-westerly direction.
I personally just follow the sandy path from north of where you are standing
right now up until it opens out into a derelict town area, and from there it
is literally just a few steps further north-west to get into Memphis -
however you may wish to explore the fields to either side of the sandy path
of which I speak, as there are plenty of diseased vultures and hyena beasts
there, some of which may yield precious monster charms for you, and a fair
few of which are guarding bone piles.
Your call.
Whichever you choose, BEFORE you enter Memphis proper, as in as soon as you
see the steps leading INTO Memphis, please head north-east and into a
ramshackle area of town called the Beggars Quarter. It's a real DUMP, and
can be accessed by a small wooden doorway in the north-eastern wall from
the previous area.
Speak with Merab - the Aged Beggar, who will plead with you to venture into
their dismal little grotto, and rid them of the monsters that have taken
over their homes. He gives you the "Lowest of the Low" Side Quest.
=================
LOWEST OF THE LOW
=================
Before you go any further with this mission let me give you a tiny bit of
a warning about the enemies you are about to face. They don't hide IN the
shadows - they ARE the shadows. They are patches of dark energy that you
will see on the floor moving about the place. They are called
Shadowstalkers, and as soon as they spot you they will attack you. It is
VERY difficult to strike them with a bow-and-arrow or magical staff whilst
they are in motion, as they are literally no taller than the floor - however
once they reach striking distance of you, they will materialise from their
shadowy state, and strike at you. It is during THIS time that they are
both strongest AND most vulnerable, and they can be easily skirmished if
you are playing a ranged character, by allowing them to pop up, and falling
back whilst they are between states.
Of course if you are a hack 'n slash character, just chop them to bits !!
Go north-east of Merab, and wipe out EVERY single Shadowstalker (there are
16 of them) that resides in the Beggars Quarter. Once all of them have been
disposed of, your quest will be updated and you should return to Merab for
your reward - a Powerful Ring, and 8500 XP.
==================================
THE BLINDNESS OF THE GODS - CONT'D
==================================
Once you have liberated the Beggars Quarter, head south-west of Merab,
and then north-west, up the steps and into Memphis proper.
===================
THE CITY OF MEMPHIS
===================
* There is a rebirth fountain in the City of Memphis
* There is a Portal Shrine in the City of Memphis
=====================
NON-QUEST INHABITANTS
=====================
SIHATHOR - Storyteller that recounts the tale of Set and Osiris, and how
Osiris (the first Pharaoh) was betrayed, murdered and his body
rended into 13 pieces and scattered throughout the lands by his
jealous and vengeful brother Set. Isis - Osiris' wife - travelled
the lands finding pieces of her late husband's body in the hopes
of restoring him, but ultimately was only able to find 12 of the
13 fragments. Therefore she used wax and cast spells to recreate
the 13th part of his body, and used magic to enable Osiris to
properly enter the Land of the Dead, where he now reigns.
BATA - Cleric who muses over what it was like in his old life - as a priest.
PEN-DUA - Soldier who insultingly suggests you should join the Pharaoh's
army. Mate we are a 1-man (or woman) army in ourselves !! We
don't NEED an army !!!!!
=================
QUEST INHABITANTS
=================
TATHARI - Young Noble-woman who is looking for her brother Unas. She gives
you the "Missing Brother" Side Quest. Can you guess what she
would like you to do for her ?
IMHOTEP - Order of Prometheus Sage. Once you speak with him (FINALLY), he
explains that, unfortunately, things have only gone from bad to
worse since last you two saw each other. He says that the Order
of Prometheus was TERRIBLY badly prepared to do battle with this
SECOND Telkine (shocker, considering what a bang-up job they did
of combating the FIRST one), and he then goes ON to tell you that,
in order to actually complete the ceremony of which he has spoken
to you previously, you will require (IN ADDITION to the Scroll of
Invocation which you carried all the way here) two further items -
the Eye of Chaos (which is somewhere beyond the Fayum Oasis), and
the Hand of Balance (which is in Giza).
ZAZAMANKH - High Priest of Memphis (second in power only to the Pharaoh
himself), who gives you the "High Priest's Request" Side Quest.
Zazamankh fears that the people are losing confidence in the
leadership of their betters, and is keen to see this restored as
soon as possible.
================================================
MERCHANTS, ENCHANTERS, CARAVAN DRIVERS & MYSTICS
================================================
PIANKH - Caravan Driver
TEFIBI - Arcanist
HOREMHEB - Enchanter
TEHUTI-NEKHT - Blacksmith
===============================
QUESTS FROM THE CITY OF MEMPHIS
===============================
===================
THE MISSING BROTHER
===================
Tathari is searching for her brother Unas. It turns out that he has gone
to Giza in the hopes of awakening an ancient family guardian in order to
have it fight the monsters. We are to travel to Giza to explain to him
just WHY that is as commendable as it is foolish. We will come to Unas as
part of our travels, so I shall revert to this quest at the appropriate
time.
=========================
THE HIGH PRIEST'S REQUEST
=========================
Given to you by the High Priest of Memphis - Zazamankh - we are to travel
to Giza and recover the Staff of Khufu from the Pharaoh's Sarcophagus
beneath the Pyramid, and return it to him here in Memphis. As with the
Missing Brother quest, we will get to this when we get to Giza, so I shall
come back to it when the time is right.
============================
SECTION 2.9 - THE INVOCATION
============================
Once you have spoken with Imhotep you complete the "Blindness of the Gods"
portion of the main quest, and are rewarded 8000 XP and two random magical
items - mine were a yellow ring and a green ring.
You must now make a choice - since you have TWO main objectives - the
recovery of the Eye of Chaos and the Hand of Balance - you must choose which
one you want to get first.
If you want to find the Eye of Chaos you must travel to the Fayum Oasis.
If you want to find the Hand of Balance you must venture to Giza.
Since we can complete three side quests AND a portion of the main quest by
hitting Giza, I suggest we go there first, but the choice is entirely up
to you.
Head north of Imhotep and you will be given a choice of two gates to go
through, to get out of Memphis.
In order to be as consistent as possible, I will do both Giza AND Fayum,
as if you started in Memphis both times.
====
GIZA
====
The Gate of the Sphinx - the one leading out of Memphis to the north-east -
is the path that leads to Giza and, consequently, the path we shall take
first (if you wish it). Going through the gate takes you straight to a
rebirth fountain, and into Outer Giza.
Head north-east of the rebirth fountain, and pass through the two torches
to enter a large expanse of desert. The way out of Outer Giza is to travel
north-east, and then if you hit the northern wall, follow it as it heads
east, and if you hit the eastern wall, follow it as it heads north. There
is a rebirth fountain and two torches to signify that you have reached the
exit, but beware the two large Temples which stand in Outer Giza, and which
have become something of a breeding ground for the undead - PARTICULARLY
their Archers.
Once you exit Outer Giza to its east, you enter the Giza Plateau, which is
where you want to be :)
=============
!! WARNING !!
=============
On the Giza Plateau you will find another new type of enemy - the
Sandwraith. Wraiths have always been my personal favourite undead warrior
class - they have a certain mystery to them which I find appealing from a
certain perspective. SANDWRAITHS, however, have all the mystery and appeal
of getting sand in the crack of your BUTT. They are EXTREMELY annoying,
proximity-activated and INSANELY powerful in hand-to-hand combat. You will
never see them until they are upon you, as they ALWAYS lie in ambush -
usually around bone piles and chests - and wait for you to draw near. They
have four hands each, and can attack with either a single-claw strike, a
spinning-claw strike (their most powerful attack BY FAR), or by throwing
sand at you which causes you to slow down quite considerably.
They are very quick to move, but stupid. If you fall back far enough they
will return to their original location, but they cannot go back into the
sand so they will just mope around. Be VERY very careful when attacking
Sandwraiths.
My advice is to use the split-second it takes them to materialise to RUN !!
If you have not already done so, you may very well also encounter another
new type of enemy in this region - the Ant Lion. They come in two fruity
flavours - Burrower and Tunneler, and both are VERY large (compared to you)
insects that live in the sand, and which materialise when you draw close-
enough to them. They attack with their mandibles, and are no way NEAR as
dangerous as Sandwraiths, although they do do quite a bit of damage it must
be said.
Anyhow - my apologies for going off at a bit of a tangent - back to the
PLOT !!
Although the Hand of Balance is actually physically the closest item to
you when you enter the Giza Plateau, I am going to complete both the side
quests first if that is ok with you, SO ! If you would care to head due
EAST of the rebirth fountain and two torches you have just activated, you
will come to a stone obelisk bound tightly to a long block of wood (used to
carry it no doubt), and a path of stone leading north-east (partially
covered by the sands). Follow the pathway north-east, ignoring the branch
that leads south-east for now. I would like you to follow the path as it
winds north-west, and then north-east again, to activate the Giza Portal
Shrine. Do not waste any time looking for traders or the like here - Giza
is a barren and desolate place, and the only thing you will find in the
immediate vicinity is this Portal Shrine.
===================
THE MISSING BROTHER
===================
From the Portal Shrine, head due east (not towards the cave that you will
be able to see on your compass as that is the Fayum Passage, and we do not
need to bother visiting it - it's just a cave that connects Giza and Fayum,
but I have a better plan). No - instead just head due east, and then just
a TINY bit south-east so that you can descend the nearby steps and enter
the decrepit crypt there.
As with previous such structures, I am going to give you room-by-room
guidance, which is as follows :-
(from coming down the steps)
> North-east and into the next room
> South-east and into the next room
> North-east and into the next room
> North-west and into the next room
> North-east and into the next room
> North-east and into the next room
This will lead you into a room where Unas - Tathari's brother - is standing
by a massive stone door, with an exclamation mark over his head. Speaking
with him will reveal that he has succeeded in summoning the creature he had
sought to use but that, shockingly, it isn't obeying him !! Perhaps he
forgot to bring treats ? Time to clean house boys and girls !!
Beyond the Massive Stone Door (which interestingly DOESN'T close behind you)
is Hesy-su-neb-ef - an Ancestral Guardian of Unas and Tathari's family. It
is a giant undead pooch, draped in bandages - which has presumably been
mummified in the past. Interestingly this is a LUDICROUSLY easy fight, as
he cannot leave the chamber you find him in, and the door remains open the
whole time, meaning if you want a breather - just step outside the room !!
Hesy-su-neb-ef has the following attacks :-
> Immolate self (bursts into flames causing burn damage to you if you are
too close to him)
> Bite
Once he has fallen, he dissipates into nothingness, and you are free to
take the contents of the Majestic Chest he was protecting.
Speak with Unas after filling your pockets, and he will recount how the
beast appeared as if driven to madness by some spell or magic. I guess we
have our friend the Telkine to thank for that ??
Anyhow - teleport from Unas (either back to Memphis to complete the side
quest NOW or back to the Giza Plateau so that we can complete the second of
the three things we can do here. Personally I would only bother going back
to Tathari now if you are very near levelling-up. I am going to do the
other two quests, and then go back to her but it's your call) back to the
Giza Plateau Portal Shrine.
=========================
THE HIGH PRIEST'S REQUEST
=========================
From the Giza Portal Shrine, head south-west, and then follow the path
south-east, and then south-west again, and this time TAKE the branch that
leads to the south-east. You will come upon a great many undead warriors,
archers, shades and sandwraiths who are swarming around a poor man named
Tekenu the Desert Nomad. Once you have liberated him from this veritable
SEA of filth, speak with him, and he will tell you that you should head
into the pyramid IMMEDIATELY, to stop the monsters that have broken in from
defiling the Pharaoh's Sarcophagus as if you do not, terrible things will
happen. He then gives you the "Khufu's Curse" Side Quest.
LOOK AROUND YOU MAN !! TERRIBLE THINGS ARE HAPPENING ALREADY !!!!!!!!!!!!
=============
KHUFU'S CURSE
=============
It transpires that the Pharaoh's mummy is cursed to spread a plague through
the lands if it is disturbed. Tekenu is afraid that in their stupidity,
the monsters may well inadvertently release the plague.
Technically since we have to go into the Pyramid of Khufu to complete both
of these side quests, it is just as easy to roll them in together.
That being said, head into Pyramid to get access to the Tomb of Khufu.
I am going to give you some very simple instructions for the completion
of each quest, so here goes :-
=========================
THE HIGH PRIEST'S REQUEST
=========================
(From entering the Tomb of Khufu)
> North-east up the slope (but BEWARE THE SCARABS !!)
> South-east when you reach the top of the slope
> North-east through the massive stone door at the end of the corridor
> Keep heading north-east and go up up up up up until you find a great
chamber at the end, with Khufu's Sarcophagus contained therein.
Open the sarcophagus (after destroying the two Dark Obelisks and associated
monsters of course), to pick up the Staff of Khufu - however be warned that
doing so will activate an ambush-trap of four GIANT Skeletal Mages who will
hammer you with their ranged attacks. They are :-
1) Gilded Dead Warlock who attacks with Poison and Fire
2) Desecrated Dead Flame Liche who attacks with Lightning and Fire
3) Gilded Dead Warlock who attacks with Lightning and Poison; and
4) Desecrated Dead Flame Liche who attacks with Ice and Fire
Once you have the Staff of Khufu, carry it with you - we shall return to
Memphis and give it to Zazamankh upon our return (or you can, of course,
do so now if you prefer).
=============
KHUFU'S CURSE
=============
(From obtaining the Staff of Khufu)
> South-west and go down down down down down until you reach the main
corridor running north-west to south-east, that you were in previously.
> North-west until you reach and passage that leads south-west and back to
the Giza Plateau.
> Instead of heading south-west, head north-east and through the ornate
stone door and head down the ramp. Keep going until you find
==========================
SADIKI, CHAMPION OF ANUBIS
==========================
Sadiki is the leader of a band of Jackalmen who have staged the raid on the
Pyramid of Khufu, and who BADLY need to be taught a lesson in humility.
He is a spellcaster, and master of the Earth School of training. His
attacks are :-
> Flaming Arrow
> Volcanic Orb
He isn't INSANELY difficult - little more of a problem than his kin to be
brutally honest - and once he has fallen to you, the Khufu's Curse quest
is automatically completed, and you are awarded 12500 XP ... which is nice !
Just beyond Sadiki is the Pharaonic Sarcophagus he was about to open - the
poisoned one ? You can open it if you like, but I would recommend AGAINST
so doing, as it does unleash a very nasty cloud of poisonous gas which
does NOT dissipate, and this can hamper the ease with which you get to the
Majestic Chest on the north-western wall (and I know how much you love
those !!).
Once you are done here, teleport back to the Giza Plateau's Portal Shrine.
=====================
THE INVOCATION CONT'D
=====================
NOW it is time for us to obtain the Hand of Balance, and complete our work
here in the Giza Plateau.
So ! From the Giza Plateau's Portal Shrine, head south-west, then south-
east, and then south-west again to get to the obelisk - the one that's
strapped to the block of wood ? From here head north-west - literally just
a handful of steps, and you will be a) ambushed by some zombies, and b) at
the entrance to the Lair of the Sphinx.
Descend into the Great Sphinx, and activate the rebirth fountain in the
first room you enter.
Simple directions to reach your destination are as follows :-
(From the room with the rebirth fountain)
> North-east into the next room
> North-west into the next room
> South-west into the next room and around the gaping hole in the floor
> North-west into the next room
> North-east into the next room
> North-east into the next room
> North-east into the next room
> North-east into the next room
> South-east into the next room, and follow it as it winds southwards
> South-east into the next room
> South-east into the next room
> South-east into the next room, and follow it as it winds north-east, up
up up up up until you reach a massive stone door.
Ensure that you are adequately prepared for what awaits you, which is a
RATHER tough boss fight against potentially four bosses at once, plus a
regenerating horde of support-monsters.
Enter the Massive Stone Door (which will close behind you if you venture
too far in), and you will be presented with a large room, FOUR seated
statues (called the Pharaoh's Honour Guard) and FOUR Canopic Shrines, which
look very similar to the Dark Obelisks you have encountered elsewhere
previously.
The Canopic Shrines generate (as with their Dark Obelisk variations on a
proximity-basis) Embalmed Dead Adepts, which throw little balls of lightning
at you from afar. Each Canopic Shrine generates two Embalmed Dead Adepts,
and as soon as one dies, another rises to take its place. In addition to
this, two Desecrated Dead Tainted Revenants are generated, and these are
VERY powerful units in hand-to-hand.
The four Canopic Shrines should therefore be your primary targets - however
when one falls, one of the seated Pharaoh's Honour Guard rises to take its
place.
The four Canopic Shrines are as follows :-
1) Canopic Shrine of Imset
2) Canopic Shrine of Daumutef
3) Canopic Shrine of Kabechsenef; and
4) Canopic Shrine of Hapi
My advice is therefore to adopt one of the following two strategies :-
EITHER
A) Rush in and destroy all four Canopic Shrines, thus activating all four
of the Pharaoh's Honour Guard. You will most likely die, but when you
come BACK to this area, you should be able to use my enticement trick
to draw the Honour Guard to you, thus making the fight a whole lot
easier ...
OR
B) Destroy the Canopic Shrines one at a time, taking out the Honour Guard
ONE AT A TIME. This will take a while as you will spend quite a bit of
time hiding behind pillars and dodging the attacks of the Embalmed Dead,
but it will most likely be well worth it in the long run.
The Honour Guard have good health, and can strike by either stomping on
you, or striking you with one of their hands in a large, excessive slap
move. Both give you ample time to plan a response, and a fair chance of
avoiding them truth be told, so they themselves are not the hardest part
of the battle by far.
However you destroy them, once they have fallen, you may exit this chamber
through the north-eastern doorway, and claim not only the Hand of Balance,
but also the contents of the Coffer, Large Coffer, Royal Coffer AND Majestic
Chest that SURROUND the Hand of Balance.
Cool eh !!
Once you have had your fill, teleport back to Memphis.
In Memphis, visit Piankh the Caravan Driver and deposit the Hand of Balance
with him (as Imhotep will not take it off you without the Eye of Chaos being
in your possession as well), and then talk to Tathari to complete the
Missing Brother Side Quest and earn yourself a Powerful Ring and 10000 XP,
and speak with Zazamankh too, to earn a random essence, and 9000 XP.
You can speak with Imhotep should you wish, but he will just tell you to
bugger off and bring him the other item - the Eye of Chaos - as well.
=====
FAYUM
=====
The Gate of the Palm - that which exits Memphis to its north-west - is the
gate of choice for those of you looking to visit Fayum. You cross a small
wooden bridge and go straight into the Artisan's Quarter, meeting first and
foremost a rebirth fountain, which you should of course activate
immediately.
Go north-east, then north-west and then north-east from the rebirth fountain
to exit the Artisan's Quarter and enter the Desert Waste - an area replete
with Scorpos, Scorpions and other nastiness.
The way through the Desert Waste is north-east of your starting location.
It is in the north-easternmost corner that the pathway leading out and into
the Sobek Plateau can be found. Therefore if you head north-east, and hit
the northern wall, follow it east, and if you hit the eastern wall, follow
it north ! Both ways will lead you to a rebirth fountain, and through two
unlit torches to the Sobek Plateau.
From where you enter the Sobek Plateau, head north-east - through or
around (your choice) the Jackalman Encampment, and keep going north-east
until you reach another two torches which will lead you into the Canyon of
Isis.
The exit from the Canyon of Isis is in the north-easternmost corner of the
zone so, as with the Desert Waste, head north-east and if you hit the
northern wall, head east, and if you hit the eastern wall, head north !!
Once you reach the exit to the Canyon of Isis (denoted by a rebirth
fountain and two torches), you enter the Fayum Desert.
From just inside the Fayum Desert you will see cart tracks in the sands
leading northwards. Follow these, and they will lead you to
===============
THE FAYUM OASIS
===============
* There is a rebirth fountain in the Fayum Oasis
* There is a Portal Shrine in the Fayum Oasis
=====================
NON-QUEST INHABITANTS
=====================
SENNEMUT - Villager. Surprisingly useful for a NON-quest inhabitant, as he
tells you about not only the Temple of Osiris, which he says is
located just outside the walls of the Fayum Oasis and was attacked
just last night by monsters - but also that there is ANOTHER
temple built into a cliff far off in the desert (Note: THIS is the
location of the Eye of Chaos !!).
WENI - Villager who is, quite simply, just happy to meet you.
A'O-PEKHTY - Storyteller who tells you of the former Kingdoms of the Upper
Nile (ruled by Horus) and the Lower Nile (ruled by Set). He tells
of the great battle between the two, and how Set was banished to
the Desert when he lost (not the Dessert as I had originally typed.
The thought of being banished to a gigantic banana split doesn't
sound TOO bad to me !!), and how whilst the Desert is barren and
infertile (reflecting the wound Set sustained at the hands of Horus)
the Moon's light is paler than that of the Sun (representing how
Horus' left eye - the Moon - was gouged by Set during the fight,
making it weaker than his right eye - the Sun).
=================
QUEST INHABITANTS
=================
MENEMNAKHT - Caravan Trader who tells his tale of woe about Dune Raiders
attacking his caravan just outside the Fayum Oasis - he gives you
the "Caravan Woes" Side Quest.
PA-NEB - Village Elder who tells you that the leader of the group who has
been attacking the caravans in the desert is a Dune Raider named
Iznu.
ASRI - Scamp who babbles on about how he once stumbled upon a secret cache
of treasure deep in the desert - down a flight of stairs. He says
that he was chased away by monsters and gives you the "A Hidden
Treasure" Side Quest for good measure.
================================================
MERCHANTS, ENCHANTERS, CARAVAN DRIVERS & MYSTICS
================================================
HOREMHEB - Trader
===========================
QUESTS FROM THE FAYUM OASIS
===========================
============
CARAVAN WOES
============
Leave the Fayum Oasis by the western door, and follow the cart tracks to the
north. Just as they round off FROM heading north TO heading west, head
north-west, and you will find the ruins of an old building. Head east of
this building to find another. Iznu will be wandering around between the
two.
Iznu is a powerful Dune Raider, who has a number of attacks and who is very
quick to move about, owing to the fact that he rides a Hyena Beast. There
are LEGIONS of Dune Raiders about, so try and avoid running away from him
into areas you have not yet explored, if the going gets tough.
He has the following attacks :-
> Flaming Arrows
> Meteor Strike
And since he wields a bow-and-arrow, he attacks at range ONLY. Therefore
if you rush into hand-to-hand combat with him, he will ride off to try and
get a better shot at you.
Focus on ensuring you have a clear field of play within which to manoeuvre,
and then get up-close-and-personal with this FREAK.
Once he has fallen, your Caravan Woes Side Quest is updated, and you may
open the four Coffers that were previously locked (they are scattered
around where Iznu was originally standing). Once you have taken all that
they have to offer, TELEPORT - do NOT walk - back to the Fayum Oasis and
speak with Pa-neb to get your reward - 12000 XP !! :)
=================
A HIDDEN TREASURE
=================
Return to where you fought Iznu (as in where the Coffers are - where Iznu
was originally standing), and head north-west until you find the set of
steps that Asri was talking about. Head down and into the compound below.
There are many ways to get around this compound, but the quickest, and
easiest way to get to the treasure Asri was describing is to head through
the massive stone door in the north-western wall, and to deal with the
TWO ambush parties (one of zombies near the massive stone door as you enter
and the other composed of TWO Dark Obelisks and a group of Shades (Fallen
Generals and Fallen Sorcerers) located nearer the set of chests against the
north-western wall.
Once you approach the chests, you will complete the A Hidden Treasure Side
Quest and earn yourself 9000 XP, together with the contents of the chests,
which are :- two Coffers, one Large Coffer, one Royal Coffer, one Majestic
Chest.
Teleport back to the Fayum Oasis as it will save you the walk - we won't be
coming back this way again.
=======================
THE INVOCATION - CONT'D
=======================
From the Fayum Oasis, head out the north-eastern gate, and travel due east
until you find the steps leading down into the Sandswept Cave. You can
venture into the cave and clear it out should you wish (although be
extremely careful on Epic and Legendary Difficulties as a Manticore resides
on the lowest-level, and it's QUITE a walk to get back to him once he's
slain you let me assure you), and head due NORTH of those steps, past the
Jackalman Encampment, and keep going north, hugging the eastern wall as you
go, until you pass the two torches and gain access to the Temple of Atum.
The Temple of Atum is that Temple which Sennemut spoke of in the Fayum
Oasis - it is carved into a cliff-face, and is the residence of the guardian
of the Eye of Chaos (and the Eye itself !!), so please make sure that you
take the time to fully heal-up before ascending the steps to do battle with
===========================
NEHEBKAU - THE SCORPOS KING
===========================
Nehebkau is a VERY dangerous adversary if you just wade on in and try and
take him out hand-to-hand. He is MASSIVE, with one clawed hand and one
hand that is a giant pair of pincers. He is a master of the Rogue school,
with the following attacks :-
> Pincer strike
> Mace strike
> Tail strike
> Poison Gas Bomb (with Shrapnel)
> Summon 3 Stygian Scorpions
You MIGHT be able to lure him to the gate before going through (my entice
bosses hint) and this would make the combat easier for you. I have never
been able to get him to leave the sanctity of his Temple - not least
because I do not think he would be able to fit through the gate !!
Standard rules apply re: the generation of his Stygian Scorpions - kill 2
and he will not be able to generate another set of 3 until the third has
died.
Once he has fallen, raid the 2 Coffers, Large Coffer and 2 Majestic Chests,
grab the Eye of Chaos and teleport back to Memphis - there is absolutely
NO need to walk !!
Once you reach Memphis, visit Piankh to pick up the Hand of Balance, and
then head north-west to speak with Imhotep who is now standing atop the
stairs beside Zazamankh.
Imhotep will tell you that the two artifacts you have brought him combine
to form the Sceptre of Eternity, and that he is now in a position to
complete the ceremony.
He rewards you with a random essence, 10000 XP and 2 Attribute Points =D
... he walks up to the statue of the pyramid ...
... he holds his hands aloft and the ritual begins ...
... there is light ...
... there is magic !! ...
... there is ... the SH!TTEST end-result I have ever seen !!!
Standing there scratching his head, Imhotep demonstrates a COMPLETE
inability to perform the ritual !!
Speak with him again, and he will express his shock and bewilderment at
the fact that the ritual failed. He feels that this is a sure sign that
the Gods cannot help, and that mortals are on their own. He ponders
the Telkine's recent assaults on buildings that are protected by the Order
of Prometheus, and how this can only be because the Telkine is searching
for one of the artifacts that the Order has been safeguarding.
Since there is only one such site that the Telkine has yet to strike,
it must be that very site which he is bound for now. Imhotep foolishly
disregarded it as a potential target because he believed that the Gods
would intercede and put a stop to the Telkine's madness once and for all.
It appears he was very, VERY wrong.
He tells you that you must venture to the Tomb of Ramses (remember that),
in the Valley of the Kings. To get there you must head up the Nile to
Thebes, and from there to the Valley of the Kings (don't worry about
remembering this - I brought a map with me), and from there into the Tomb
of Ramses.
With that, he opens the Gate to Thebes which lies before you, and you may
proceed on your journey.
=================================
SECTION 2.10 - A TELKINE IN EGYPT
=================================
Head down the steps to the north-west through the Gate to Thebes, and you
will enter Dahshur.
Simply cross the wooden bridge to your north-west, and activate the rebirth
fountain. There is only one way out of Dahshur (aside from going back to
Memphis), and that is via a small gate leading through two torches, to the
north-west. Go there and you will exit Dahshur and enter the Upper Nile.
From there, stay on the path and follow it as it winds north-westwards,
and keep following it north-west (ignore the branch that leads north-east)
until you pass through another two torches, and into the Thebes Outskirts.
Activate the rebirth fountain, and then follow the path as it leads north
and then north-west and through two pre-lit torches, to enter a crumbled
building which has become the home of a few groups of jackalmen. Kill them
and follow the path that start just north of their encampment, and heads
west, then north and then finally north-west inbetween two torches and
two HUGE statues. Stay on the tiled path, as this will lead you straight
to a heavy wooden door which is the entrance to the Temple of Seti. That's
in Thebes, just in case you were in any doubt ;)
Activate the rebirth fountain as soon as you enter the Temple.
==================
THE TEMPLE OF SETI
==================
* There is a rebirth fountain in the Temple of Seti
* There is a Portal Shrine in the Temple of Seti
=====================
NON-QUEST INHABITANTS
=====================
MENNA - Citizen of Thebes who confirms that the Telkine has already passed
through Thebes on his way towards the Valley of the Kings.
HENEN-NI-SUT - Aging Scholar who says that the Monsters were sent by the
enemies of the Gods.
TI - Citizen who says that the "Master of Beasts" was here (he just means
the Telkine - woo).
HAPUSENEB - Storyteller who tells you of what happens in Egyptian lore when
a person dies. He explains how, after travelling through Duat -
the land of the Dead, they will encounter Osiris, Lord of the
Underworld, who will weigh their heart on the scales of justice.
On one side will be the heart, and on the other the feather of
truth. If the heart weighs more than the feather, you get gobbled
up by Ammut, the Devourer of Souls (this would happen if you were
BAD in life). If, however, the heart weighs less than the feather
(which would obviously happen if you were GOOD in life), then you
are given a second life in Duat - the Land of the Dead.
=================
QUEST INHABITANTS
=================
AMEN-NAHTE - Young Priest who explains how, when the Telkine did pass
through Thebes, all but the Head Priest of their order (Neb-kemi)
fled in terror. Neb-kemi stood alone against the Telkine, who
easily overpowered him with the strength of his magic alone, </pre><pre id="faqspan-5">
turning the Head Priest's enchantments back upon himself. As a
demonstration of his power, the Telkine converted Neb-kemi into
one of his demonic followers. He gives you the "Corrupted Priest"
Side Quest.
================================================
MERCHANTS, ENCHANTERS, CARAVAN DRIVERS & MYSTICS
================================================
SINON - Caravan Driver
MERUITENSA - Enchanter
ABANA - Arcanist
KYSON - Blacksmith
MASAHARTA - Mystic
==============================
QUESTS FROM THE TEMPLE OF SETI
==============================
====================
THE CORRUPTED PRIEST
====================
Since the Telkine battered the CR@P out of Neb-kemi, I feel it is only
right that we release his soul from the torment he must be suffering.
You may, or may not feel the same way, but there IS a nice reward in it
for you, so LET'S GO PEEPS :)
Leave Thebes and the Temple of Seti via the archway to the north-east, just
past Masaharta the Mystic, and keep going north-east past the two torches
and the rebirth fountain (which you should activate), and into the Highland
Pass.
Head immediately EAST until you find a pathway leading up a hill that takes
you into the Meretseger Ridge. From entering this area, head north-east,
and descend the steps at the top to gain access to the Mysterious Tomb
where Neb-kemi awaits you.
To reach Neb-kemi, simply head north-east once you enter the Tomb. He is
in the last room, standing against the back wall looking away from you.
========
NEB-KEMI
========
Generally-speaking you can pick him off at range without him ever
retaliating - however if you feel you MUST entice him into combat, he has
the following attacks :-
> Flame Arrow
> Ternion Attack
> Life Drain
> Deathchill Aura
As you may have guessed, Neb-kemi has become a Master of the Spirit School
since he was reformed to serve the Telkine.
He is protected by three Sandstone Guardians, whom I would suggest you
despatch before you attack him. They are very slow, and quite easily
despatched at range, but can make it a bit more awkward to fight him if
they are not taken care of in advance.
Once Neb-kemi's soul is released (which is a nice way of saying once you
have ATOMISED his ass), teleport back to Thebes, and speak with Amen-nahte
to give him the good news. He will reward you with (his thanks, and) a
Magical Weapon and 15000 XP.
To be truthful with you, it is just as quick for you to walk from Thebes
back towards the Valley of the Kings as it is for you to teleport back to
the Mysterious Tomb of Neb-kemi and then walk, so I would walk back out
of Thebes via the north-east (past Masaharta the Mystic), and this time
as soon as you get to the two (now lit) torches and rebirth fountain, head
due north-east, and then through the two torches that lead north and up
onto a raised plateau from which you can see the roof of a nearby building
and some Zombies. Follow the pathway north-east and through the two small
pre-lit torches, and keep heading north-east, travelling through another
two small pre-lit torches, and a little way further to the next rebirth
fountain. Activate this rebirth fountain, and then keep following the path
as it goes north-east, and then south-east, and then north-east again
through two torches. You will now have entered the Place of Truth.
=============
!! WARNING !!
=============
PLEASE be careful as there are MANY many sandwraiths in this area !!
From entering this area, head due north-east (you will find a temple set
deep into a crevasse that you must move around) and keep heading north-
east, past the temple I just described, until you reach two torches and
the Valley of the Kings.
=======================
THE VALLEY OF THE KINGS
=======================
The Valley of the Kings comprises a Portal Shrine, a rebirth fountain,
Ilu-iqisha the Trader, and eight Tombs, being the following (I shall
list the name of the Tomb, together with the colour of the base of the
serpent statues at its entrance, and the depiction that stands above
the entryway) :-
1) The Tomb of Thutmes (Purple Serpents and a picture of a Scarab)
2) The Tomb of Amenhetep I (Grey Serpents and a picture of an Ankh)
3) The Tomb of Amenhetep II (Pink Serpents and a picture of an Ankh)
4) The Tomb of Amenmeses (Orange Serpents and a picture of a Scarab)
5) The Tomb of Merenptah (Green Serpents and a picture of a Scarab)
6) The Tomb of Seti I (White Serpents and a picture of an Ankh)
7) The Tomb of Thuyu (Yellow Serpents and a picture of a Scarab); and
8) The Tomb of Ramses (Light Blue Serpents and a picture of an Ankh)
In order to get to Ilu-iqisha, the Portal Shrine and the rebirth fountain,
just head north-west of your starting position. Nobody should attack you
until you get past them.
Since we are only concerned with the Tomb of Ramses, I shall spare you an
in-depth breakdown of each of the other tombs - however I will tell you
the following :-
A) The Tomb of Thutmes is a dead-ended tomb with a LOT of worms in it
B) The Tomb of Amenhetep I is a dead-ended tomb
C) The Tomb of Amenhetep II is a dead-ended tomb
D) The Tomb of Amenmeses is a dead-ended tomb
E) The Tomb of Merenptah is a dead-ended tomb
F) The Tombs of Seti I and Thuyu are linked - you can go in one and
come out the other.
Once you come at last to the Tomb of Ramses, descend and make sure you
clear out each and every room on your way through, for reasons which will
become apparent in a little while.
At its most simplistic, all you need to do to move through the Temple of
Ramses is to head in a straight line to the north-west, clearing out the
rooms to your south-west and north-east each time you find them, and keep
heading north-west (it goes on quite aways) until you cannot continue in
that direction. Once you get to this point, turn and head north-east, and
keep going that way until you reach an Ornate Stone Door, which is the door
that will lead you into the Boss Fight with the Telkine
====================
THE TELKINE OF EGYPT
====================
Aktaios, the Telkine of Egypt, is CONSIDERABLY harder than his Grecian
counterpart was. For starters I would STRONGLY recommend you do your very
best to lure him out of the room he stands in, as this will make your life
considerably easier - and quite possibly LONGER. I say this because Aktaios
cannot activate one of his primary attacks unless he is in the room he
starts in.
As with Megalesios, Aktaios is a snappy dresser (it's probably quite easy
to get in and out of clothes if you have no legs, but that's a moot point).
His primary attacks are as follows :-
> Volcanic Orb
> Summon two Tomb Guardians
> Create two Mirror Images of himself (which can battle you on their own)
> Sunfire. This attack is the one which he cannot activate unless he is in
the room he starts in. It causes beams of sunlight to stream in from the
skies above and scorch the ground, doing EXTREMELY huge amounts of damage
to anybody that is caught in their path.
> Sandstorm (in his immediate vicinity)
As you would anticipate, Aktaios is a capable combatant, but he is MUCH much
easier to defeat if you are able to lure him out of his initial chamber, as
you can skirmish and dizzy him, and he WON'T be able to burn you to a little
crispy version of you by using that VERY annoying sunfire attack he has.
Once Aktaios has fallen, take the Cuneiform Tablet he drops, and crack
open his Mystical Orb to take his goodies.
Return to Thebes and speak with Imhotep, who will take the Cuneiform Tablet
from you, pat you on the head, and open the gate to the north-west - the
Gate of Hatshepsut - which leads you onwards to the Temple of Hatshepsut.
He says that the Cuneiform Tablet details the location of the Sickle of
Kronos, which rests in the Temple of Marduk in the Hanging Gardens of
Babylon. Since he is aware that a THIRD Telkine (wtf !! These guys must
be breeding somewhere) is already assaulting Babylon, he surmises that
this third Telkine must be looking for the Sickle, and MUST be stopped
at ALL costs.
After he has done babbling, he rewards you with the Sceptre of Eternity,
12000 XP and 2 Skill Points.
===================================
SECTION 2.11 - THE SICKLE OF KRONOS
===================================
Head north-west and out onto the Hatshepsut Path, making sure to activate
the rebirth fountain as you go. Simply follow the path to the north-west,
and then to the north-east, and keep going through the two torches and
into the Temple of Hatshepsut.
Once you reach the Temple of Hatshepsut, follow the path north-east and
up the first, and then the second set of steps.
Enter the Temple of Hatshepsut proper, activate the rebirth fountain by
the entryway, and then keep heading north-east and through the two sets of
Massive Stone Doors, down the steps and into the Halls of Prometheus.
Aaaaaaaaaaaaaaaaaaaaall the way north-east, down the steps, and through
the Massive Stone Door at the end.
Before entering the SECOND Massive Stone Door, however, prepare yourself
for another Boss Fight.
=========================================
SAND WRAITHLORD - NIGHTMARE OF THE DESERT
=========================================
The Sand Wraithlord is the Lord of ALL Sandwraiths, and as such he CAN be
one tough cookie, so be prepared for this fight as best you can.
The Sand Wraithlord's primary attacks are as follows :-
> Volcanic Orb
> Summon 4 Sandwraiths
> Sandblast - slows you down
> Sandstorm
> Four-claw strike
> Spinning-claw strike
If you can lure the Sandwraith (as with previous bosses) towards the door,
then you don't need to enter his chamber which gives you a DEFINITE edge
during this combat which can mean the difference between kicking the Sand
Wraithlord's @SS or suffering REPEATED frustration at his hands.
Once he has been destroyed, check out the contents of the four Coffers and
Majestic Chest, and then head north-east into the next chamber, and click
on the Eternity Altar to use the Sceptre of Eternity and open the portal
to Babylon.
=================
EGYPTIAN EPILOGUE
=================
Well, we defeated Aktaios and kicked the Sand Wraithlord to the curb, but
we have learned that a third Telkine is already assaulting the City of
Babylon in search of the Sickle of Kronos - an artifact of great power that
they are after for some dark purpose we have not, as yet, been able to
quite put our finger on - although I'd expect if you take a minute to think
it through, you'll be able to work it out ;)
Anyhow - on the plus column, at least we know what the Telkine are AFTER,
AND we know that we have already destroyed TWO of their number. We don't
know how many of them are left, but there can't be THAT many more, surely ?
======================
ACT THREE - THE ORIENT
======================
===================================
SECTION 3.11 - THE SICKLE OF KRONOS
===================================
==============================
THE HANGING GARDENS OF BABYLON
==============================
* There are MANY rebirth fountains in the Hanging Gardens of Babylon
* There is a Portal Shrine in the Hanging Gardens of Babylon
=====================
NON-QUEST INHABITANTS
=====================
NAME - TEXT
=================
QUEST INHABITANTS
=================
ZAKIR - Order of Prometheus Agent who tells you that the Telkine is already
forcing his way into the sacred chamber of the Temple of Marduk,
and who urges you to make all haste there, to prevent the Sickle
from being stolen.
================================================
MERCHANTS, ENCHANTERS, CARAVAN DRIVERS & MYSTICS
================================================
AZIZI - Trader
==========================================
QUESTS FROM THE HANGING GARDENS OF BABYLON
==========================================
====================
THE SICKLE OF KRONOS
====================
Head south-east and follow the Babylonian Guards as they rush over the
bridge to do battle with a horde of Ichthians. Take note that these are
NOT the same Ichthians you did battle with all the way back in Greece - oh
no - these are their bigger, buffer cousins - the Tidal Ichthians (but they
fall just the same) ;)
Keep going south-east over the next two bridges, fighting off the Tidal
Ichthians as you go, and you will then encounter another type of new enemy
in this third act - variations of your a-typical spiders - Tropical Spiders
and Tropical Widows. Tropical Spiders look like spindlier versions of
their bulky Grecian counterparts, but make NO mistake they are QUITE
capable of taking you out if you're not careful.
The next bridge is actually a set of two, side-by-side. It doesn't matter
which one you go over, but when you do you will have to do battle with
YET ANOTHER type of new enemy - the Mantids. They are human-sized preying
mantis, that can run like the CLAPPERS and do SHEDLOADS of damage so watch
out - think of them as being like the Scorpos in the previous act, but
much quicker :(
South-east over the next bridge, and keep going south-east until you have
to take a turning to your north-east.
Keep going north-east over two more bridges and then up a flight of stairs
that turns back on itself to go north-west, and then south-west and onto
the next level of the Hanging Gardens.
From here, head south-west to encounter another two new types of enemy -
the Jungle Creep, and the Quill Vine. Jungle Creeps are huge lummoxes
which travel very slowly and look like little hills with plants growing
out of them. They can strike you with their earthen claws, or by
gobbing out large quantities of poison at you (NOT nice). Quill Vines are
unable to move, but are not without their defences - they spit out little
quills (the clue was in the name c'mon), at high speeds to damage you from
afar. There is a third enemy that you will encounter with Jungle Creeps
and Quill Vines later - the Bog Dweller (which is just a STUPID-looking
monster with really long arms and legs that runs at you like a MUPPET).
Keep heading south-west and over two bridges and you will then be forced
to turn north-west and continue onwards.
Activate the rebirth fountain which you will find very close by, and then
head north-west, crossing five bridges and then up the flight of stairs
against the north-easterly wall, and keep going up as it doubles back
on itself, turning north-east and then south-east.
Activate the nearby rebirth fountain, and then head south-east, crossing
three more bridges and then up the set of stairs against the north-eastern
wall, keeping going as they turn to the north-east, and then the north-west.
From here, head up the flight of steps that you can see just to your north,
and you will FINALLY have reached the Temple of Marduk.
The entrance to the Temple proper is just to your north, and you will have
to slay the various Tidal Ichthians that block your path before you will
be able to get in.
================
TEMPLE OF MARDUK
================
Enter the Temple between the two statues, and then head north-east and
go through the broken seal in the floor to access the Temple of Marduk -
Level 1.
I shall give you some quick directions to help you move through the Temple
of Marduk, but I must forewarn you that you are going to encounter some
old enemies (Ratman *spit spit spit* and others), together with some
more new ones (fire sprites (but fortunately they are weak and look really
cute as they run towards you - just DON'T be tempted to cuddle them OK ??)
and others).
TEMPLE OF MARDUK - LEVEL 1
==========================
(From entering via the staircase leading down from the broken seal)
> Activate the rebirth fountain and then head north-west into the next
chamber.
> Take out the creeping slime and watch out for their ranged attacks - they
spit portions of their own goop at you which will poison you AND slow you
down at the same time - NICE !! Then north-east into the next chamber.
> Turn and follow the corridor north-west and into the next chamber.
> South-east and into the next chamber.
> Descend the steps on the north-western wall to get to
TEMPLE OF MARDUK - LEVEL 2
==========================
> Activate the rebirth fountain and then head south-west and into the next
chamber.
> Head south-east and into the next chamber.
> Head south-east and into the next chamber.
> Head south-east and into the next chamber.
> Head south-east and into the next chamber.
> Head north-east and into the next chamber.
> Descend the steps on the south-eastern wall to get to
TEMPLE OF MARDUK - LEVEL 3
==========================
> Activate the rebirth fountain and head north-east into the next chamber.
> Head north-west and into the next chamber.
> Head north-west and then take the first entrance to the south-west, to
get into the next chamber.
> Head south-west and into the next chamber.
> Head south-west and into the next chamber.
> Watch out in this room - there are a LOT of enemies to face, not the least
of which is the EXTREMELY irritating Djinn with their squall powers. Head
north-west and into the next chamber to your north-west (ignore the exit
that leads to your north-east).
> Head north-west and into the next chamber.
> Head north-east and into the next chamber.
> Head south-east and into the next chamber.
> Head north-east and into the next chamber.
> This is the antechamber that leads down (past innumerate enemies and four
Traps) to a boss fight with a Chimera (another Beast of Legend) :)
We love the Chimera - the Chimera ROCKS - but it is definitely NOT to be
underestimated in combat, so you should stock up well on all the regular
accoutrements before venturing down the steps on the north-eastern wall to
do battle with
===========
THE CHIMERA
===========
The Chimera, for those of you that are not familiar with it AS a beast of
legend, is a three-headed beast with the body of a lion, tail of a snake,
and with its three heads being a goat, a snake and a lion.
Whilst the Chimera is sometimes depicted with wings, in Titan Quest it has
none, making THAT element of combat easier to deal with.
Its attacks are as follows :-
> Snake Head Only - Fire Breath with INSANE range, but does not turn to
follow you - stands still and breaths in a direct line.
> Snake Head Only - Bite
> Goat Head Only - Lightning Blast - creates a field of lightning around
the Chimera, which extends in a straight line at
whatever angle the Chimera chooses from the beast aways.
> Lion Head Only - Bite
There are two ways to do battle with the Chimera :-
1) The BIFF way. Hang around on the steps and lure the Chimera to you,
falling back as it gets too close so as to avoid its breath. It can't
get through the gate and will walk away if you go back up the steps.
Simply rinse and repeat and you shouldn't even need to use a single
health OR energy potion !! Just rely on ranged attacks obviously ;)
- or -
2) The MANLY way. Run in through that gate, let it slam shut behind you -
LET it shut you in with that insane caged beast - and then go toe-to-toe
with it for three rounds ... go on ! I've got your back *he says,
reaching for the white towel just in case*.
The biggest drawback of fighting the Chimera hand-to-hand is that its
attacks are largely difficult to predict until they are upon you. Whilst
you can unload a BOATLOAD of strikes whilst the Chimera is breathing flame
at you (if it misses of course), you are going to have to fall back pretty
damned quickly when she goes for her lightning attack ... and as this ISN'T
a hydra situation (as in you cannot kill one head to remove it from play),
you must defeat the Chimera as one single beast in order to continue ...
... tough cookie !!
However you slay the Chimera, once she is down, head to the north-eastern
corner of the room to find a Basket, an Ornamented Chest and a Majestic
Chest, all of which are yours for the taking !! Once you are down with
those, head through the archway to the north-east and stand on the symbol
in the centre of the ground to activate a FANTASTICALLY cool secret
passageway. Proceed to the north-east, and speak with the injured Feiyan
who is lying on the ground to your north-west.
She confirms that, regrettably, she failed to stop the Telkine (and that,
more specifically, he struck her down with ONE BLOW !!!!!), meaning that
he now possesses the Sickle of Kronos.
........................................................... BUGGER !! And
I thought this was going to be the EASY act as well !! ;)
She tells you that you must chase after him, and that to do so you need
only follow the path of destruction he has wrought (check out the mess
he made of the north-eastern wall !!).
For your troubles you are rewarded with a third (your final) inventory bag,
together with 15000 XP, a random essence and an update to the main quest.
==================================
SECTION 3.12 - HUNT FOR THE SICKLE
==================================
So ! He's got the item he and his brothers have been looking for eh ??
Odds are stacking up against us rather rapidly eh ?? GOOD GOOD - I'm on
for that :)
Head out through the gaping hole in the north-eastern wall, and out into
the Babylon Outskirts.
From entering this area, head south-east a little, until you reach the
merchants
=================
BABYLON OUTSKIRTS
=================
* There is a rebirth fountain in the Babylon Outskirts
* There is a Portal Shrine in the Babylon Outskirts
=====================
NON-QUEST INHABITANTS
=====================
ILU-ELATTI - Storyteller who regales you with the tale of Ninsun, and how
she bore the mighty warrior Gilgamesh into the world, and how Anu,
God of the Sky, created a companion for him called Enkidu - a wild
and untamed man. Whilst they fought upon meeting at Babylon,
Enkidu was unable to defeat Gilgamesh, and so the two became the
best of friends, travelling together and doing great deeds
together. He goes on to speak of just one of their missions - the
slaying of Humbaba in the Cedar Forest.
=================
QUEST INHABITANTS
=================
APPA - Farmer who confirms that he saw the Telkine pass through here, with
a horde of monsters. Anybody that did not flee his terrible
wrath was cut down by the sickle on the spot !! Nasty pig !!!!!
IMMERU - Farmer who runs across the bridge as you set foot on it, hotly
pursued by two Coastal Ichthians. He begs you to save his farmland
from the monsters who are destroying it as you speak, and gives
you the "Seeds of Destruction" Side Quest.
================================================
MERCHANTS, ENCHANTERS, CARAVAN DRIVERS & MYSTICS
================================================
JANGBU - Blacksmith
TASHI - Arcanist
=================================
QUESTS FROM THE BABYLON OUTSKIRTS
=================================
========================
THE SEEDS OF DESTRUCTION
========================
Help Immeru by ridding his farmlands of the Coastal Ichthians that are
destroying his livestock and crops. There are approximately 30 Coastal
Ichthians to slay in the various fields that form Immeru's farmlands, just
to the east of the merchants across the bridge, and once they have all been
purged, you should return and speak with Immeru to receive your reward -
18000 XP.
==========================
HUNT FOR THE SICKLE CONT'D
==========================
From the grateful Immeru, head (back) over the bridge to the east, and
follow the pathway that runs through his farmlands east (it's perhaps
easier to view it on the compass), and as it exist his farmlands (as in,
as it leads south and just starts to go south-east of his last field),
head south-east and you will find a path that leads out of the Babylon
Outskirts, through two torches and into the Parthian Highlands.
Follow the path as it leads north-east, and up to a rebirth fountain and
two torches. Keep going north-east on the path, and follow it east, past
two more torches, and over a wooden bridge leading north-east.
Watch out for the Chitinous Mantids - they are even worse than their
regular Mantid counterparts, and attack in groups just like the others so
be warned. Follow the path northwards as it winds up up up up up, and
then curves to the east before going through two torches and over another
wooden bridge.
Once you cross the bridge you will be on the Silk Road, and from here you
should activate the rebirth fountain to your north, and speak with at
least Minani the Seasoned Journeyman to get information on the Telkine
and, if you are feeling particularly nice, Nur-Sin the Journeyman, who
tells you that if you want to follow the Telkine, you need just stay on the
yellow brick road (sorry no that's the OTHER story ... follow the SILK
road - THAT'S right - sorry), although he does warn you that it is quite
treacherous at this time of year though =./
Follow the path as it heads north-east through two torches, and keep going
on the same path as it leads up and up and up. You can tell it must be
getting cooler, as you start to see snow on the ground. Shortly after
this discovery (and of COURSE taking time to make snowcones, have a snowball
fight and build a VERY modest snowman), keep on following the path through
two torches and into the Bactrian Woods.
Follow the path (which is now the road lying inbetween the snow on either
side) north-east, through two torches and over the snowy bridge, and head-
first into your first encounter with the Peng.
Peng are tiny winged imp-like creatures that you will doubtless have seen
in other games of this ilk. Ice Peng, which are the first type of Peng
you will encounter, are snidey little buggers who attack in groups (like
almost all other monsters in Titan Quest), and who fly towards you, closing
the gap between you and them quite quickly. Not as quickly as Mantids it
must be said - those things are like greased LIGHTNING - but quickly all
the same.
Peng attack with their claws.
Keep following the dirty snow path north-east, through two torches and into
the Amdo Region. Again, keep heading to the north-east and you will come
at last to civilisation !!
==================
SHANGSHUNG VILLAGE
==================
* There is a rebirth fountain in Shangshung Village
* There is a Portal Shrine in Shangshung Village
=====================
NON-QUEST INHABITANTS
=====================
RIMUT - Caravan Trader who says that he and his group are about to make the
trek up to the Natu La Pass. They had expected to be in the east
by now, but they have found the journey rather tough going.
LHAK-PA GYAL-TSHEN - Storyteller who shares with you the tale of the
eighteen kingdoms, and how they are collectively ruled from the
Silver Palace of Garuda Valley a long way to your south. It is
said that Garuda Valley is Shambhala - the Land of Happiness, and
that tales of the Valley are relayed to the people by their Dongba,
or Shamen.
=================
QUEST INHABITANTS
=================
PASANG DO-MA - Villager that tells tale of a HUGE Yeti that lives in the
ice caverns of the Chumba Valley. He gives you the "A Gargantuan
Yeti" Side Quest.
KILU TEM-BA - Shangshung Man who is worried that his son has gone off and
has not been seen in days. With the increase in Neanderthal
attacks of late, he fears for his son's safety, and gives you the
"Mystery in the Mountains" Side Quest.
================================================
MERCHANTS, ENCHANTERS, CARAVAN DRIVERS & MYSTICS
================================================
ZHUAN ZHU - Enchanter
GUAN ZHONG - Caravan Driver
O YE ZI - Trader
HSIANG HSIU - Mystic
==============================
QUESTS FROM SHANGSHUNG VILLAGE
==============================
=================
A GARGANTUAN YETI
=================
Given to you by Pasang Do-ma - a villager in Shangshung Village, you are
to track down a GINORMOUS Yeti in the ice caverns of the Chumba Valley,
and put an end to its life *slams his fist into the table*. Since we will
come to the Chumba Valley as a matter of course, I shall come back to this
quest at the appropriate time.
========================
MYSTERY IN THE MOUNTAINS
========================
This quest is given to you by Kilu Tem-ba - a Shangshung Man who wants to
find out where his son is. As with the Gargantuan Yeti Side Quest, we will
get to him at the appropriate time, so I shall come back to this mission
when the time is right.
==========================
HUNT FOR THE SICKLE CONT'D
==========================
Leave Shangshung Village to the east, passing through the two torches and
over the bridge. This will take you into the Natu La Pass, and you should
head northwards up the slope and keep heading up as the slope curves to the
north-west, and then follow the bridge that leads to the west.
Through the two torches and then head northwards again, and take the
bridge at the very northernmost point of this section, heading north-east.
This will take you into the Natu La Ridge.
==================
CARAVAN IN TROUBLE
==================
From entering this area, immediately activate the rebirth fountain and then
head to your north-east and follow the path as it goes north, and then
down and north-east, before turning east and into an ice sprite ambush.
Kill the ice sprites and then carry on heading east, but instead of going
north and through the two torches, head south-east towards Gong Li the
Caravan Trader who has appeared on your compass.
As you approach Gong Li, he will run away and promptly be set upon by a
group of FIVE Rime Sprites.
Once you have slain them all, speak with Gong Li (you cannot speak with
him until they are all slain), and he will give you, and then complete for
you, the "Caravan in Trouble" Side Quest, your reward for which will be
a random magical item (mine was a random green amulet), and 18000 XP.
Not bad for a random encounter's worth of loot eh !!
==========================
HUNT FOR THE SICKLE CONT'D
==========================
From where you speak with Gong Li, head north-west and then north and
through the two torches. Keep following the path northwards, and then
to the north-east and up to the rebirth fountain, which you should activate.
Follow the path to the east and stay on it as it turns north-east, then
south-east and winds down towards the plateau beneath.
Keep on the path and follow it through the two torches and into the Chumbi
Valley. Stay on the path and follow it as it winds down a loooooong slope,
first going eastwards and then curving and ultimately heading northwards
until you pass through two torches.
Activate the rebirth fountain and breathe a sigh of relief that you are no
longer in those NASTY snowy covered bits where it's hard to see where
you're going.
Follow the path north-west and then north-east, past the two torches and
over the wooden bridge to another beautiful section of verdant green lush
landscape. Stay on the road as it does a horseshoe shape, and then leads
north-east back ... up .... into ..... the ...... BLOODY SNOW !!!!!!!!!!!!
Grrrr and brrrr. Ok.
========================
MYSTERY IN THE MOUNTAINS
========================
Through the two torches and into the Tsongmo Peak. Follow the path north-
east a little bit and you will bump into Da-wa Phu-ti - the Young
Shangshung Lad - off the northern side of the road. Speak with him, and
he will confirm that the neanderthals have taken his cache of weaponry,
and their chances of winning a battle against the people of Shangshung
Village are SIGNIFICANTLY increased.
Looks like we'll have to resume ownership of that cache eh !! STUPID
boy *slap slap slap*
From Da-wa Phu-ti, head east, down into the clearing to the north, and make
a mental note of the location of the cave to the north-west. We will be
coming back here in a few minutes but first I would like you to go to the
EAST, activate the rebirth fountain that is just a few seconds away, in the
Tsongmo Ice Caverns just to the east of Sang-gye Dorje the Old Man, and
THEN return to the clearing and enter the Mountain Cave to the north-west
of the clearing.
From here, head due north-west and down the steps at the north-western
end of the cave.
On the first level you have a sub-boss to fight (and his neanderthal
minions). His name is Yurg Rattlebone, and he rides a Saberlion. He
attacks with a pike, and were it not for his speed and the fact that he
is surrounded by his entourage ? He would be easy prey for your might.
If you are finding him at all difficult, retreat back up the steps - that
will give you an advantage as you can skirmish him backwards ;)
Once he is down, keep heading north-west of the steps that brought you to
this level, and follow the next set of steps down.
On this second level down, you must fight another Neanderthal Hero - Tor
Skullcrusher, who is also mounted on a saberlion, and who attacks (as
with his partner in crime) with a pike.
As with Yurg Rattlebone, if Tor Skullcrusher gives you any cause for concern
just peg it backwards and skirmish him to pieces ;)
Once you are done with him, head north-west and down the steps in the north-
western corner of the cave, to reach the third level down. Head west from
your starting location and you will venture out onto a plateau.
This is going to be a VERY tough fight make no mistake.
On the plateau, try and stay as close to the entrance as possible and lure
as many of the neanderthals to you as possible. The main boss on this
level cannot come out as far as the steps so you will be safe there for
the time being - however the third of his sub-bosses - Korat Bearkin - CAN.
Korat Bearkin is like the other two sub-bosses - a Neanderthal Hero mounted
on a saberlion, who attacks with a pike. Once he and the other neanderthal
warriors have fallen, we can concentrate on the boss proper.
==================================
BARMANU - NEANDERTHAL HIGH WARLORD
==================================
Without a doubt, Barmanu the Neanderthal High Warlord is THE toughest
Neanderthal you will EVER encounter in Titan Quest. His main attacks are
as follows :-
> Avalanche - he causes blocks of ice to cascade down from the heavens and
strike you. These things will almost CERTAINLY slay you on
the spot, so watch out for them. When he raises his arms ?
BE SOMEWHERE ELSE !!
> Twin Mace Strike
> Shriek - A debilitating power that does MASSIVE amounts of damage, and
slows you down, making you easy pickings for his other powers.
Remember Polyphemus the Cyclops in Greece ? Same attack ;)
> Two separate Mace Strikes in quick succession
Barmanu is quick, has LOADS of health, and can kill you pretty much with
two hits. FORTUNATELY you listened to me and activated the nearest rebirth
fountain before you came down here didn't you ;) PHEW. Otherwise you
would have had QUITE a walk let me tell you !!
I would suggest teleporting back to a town like Shangshung Village, and
trying to buy a scroll that might help you during combat. Don't waste your
time going for something he can smack like the Harpies - go for something
that either benefits YOUR skills in combat, or which he will have a hard
time focusing his attacks on.
Also, DO NOT FORGET that Barmanu cannot venture as far as the steps, so if
you take even a SINGLE hit from him, FALL BACK and heal up as quickly and
fully as possible before stepping back into the fray with him.
Once he has fallen, take the contents of the Majestic Chest he was guarding
and teleport back to Kilu Tem-ba in Shangshung Village for your reward,
which is 22000 XP.
==========================
HUNT FOR THE SICKLE CONT'D
==========================
Return to Sang-gye Dorje the Old Man beside the Tsongmo Ice Caverns (if you
can't remember how to get there, just head back up each level of the cave
you were in before your big boss fight by going north-east on each level to
reach each set of stairs leading up, and then east from the cave, up a tiny
little slope and there you have it !!), and speak with him to have him
prattle on about how you must now venture through the caves to make forward
progress.
Thanks.
A lot.
Muppet.
=================
A GARGANTUAN YETI
=================
Head into the Tsongmo Ice Caverns, past that rebirth fountain which will,
in all likelihood, be QUITE familiar to you by now, and head north-east,
over the narrow icy bridge, and then north-west and down the steps against
the north-western wall to the second level.
From the stairs, head north-east and then north-west and down the stairs
against the north-western wall, to get to the third level.
On the third level, head north-west and you will find yourself face-to-face
with your next boss ... being the
===============
GARGANTUAN YETI
===============
The Gargantuan Yeti ... the clue's in the name really isn't it ... this boy
is HUGE !! He is very powerful but slow and sluggish, so unfortunately for
HIM, this SHOULDN'T prove to be too daunting a fight (which is good since
the only rebirth fountain is on the highest level of the caves).
His attacks are as follows :-
> Frost Breath - good range, and can freeze you SOLID for a period of
time, allowing him to close the gap and pummel you
> Frost Nova - icy projectiles fly off in multiple directions (all
around him to be precise) - easily avoided at range
> Single hand slap - either left, or right hand.
Once he has fallen, you complete the "Gargantuan Yeti" quest, and earn
yourself 20000 XP in the process (plus the chance that the Gargantuan Yeti
drops yeti fur of course), PLUS the contents of the three Primitive Chests
and the Majestic Chest that he was overseeing.
After you have filled your pockets to capacity, leave via the north-western
set of stairs to get down to the final level of the Tsongmo Ice Caverns.
From exiting the staircase, head due north-east, and keep heading north-
east until you find a passageway on the south-eastern wall. Take this
passageway, and you will emerge in the Khantai Mountains.
==========================
HUNT FOR THE SICKLE CONT'D
==========================
If you head just a little ways down the mountainside to your east, you will
find the Eastern Silk Road Portal Shrine, together with Kap-kye the Trader,
and Sang-gye Dorje - the Old Man who was sitting at the entrance to the
Tsongmo Ice Caverns. If you speak with him, he will tell you that you
should "follow the blade" but "beware the master" ...
He's just chock FULL of helpful suggestions isn't he !! *Sinister pushes
him off the cliff and chuckles as he falls to his death*
So !! Trade with Kap-kye if you like, and then head north-east of him,
activating the rebirth fountain as you go.
Follow the path that leads down the slope, through the two torches and then
north, then east and then north-east. Just keep following the path as it
leads east - past the Neanderthal Dwelling and inbetween the two torches,
and then east-north-east to the next set of two torches (this little trip
takes you through Orkhan Valley).
As soon as you pass by THESE two torches, you enter Outer Mongolia.
North-east up the slope and activate the rebirth fountain, then keep going
east-north-east until your first encounter with the Razorclaw Peng. There
isn't really a whole lot I can say about them except that they are MUCH
bigger than their little Peng brothers, and they are also stronger, quicker
and RED in colour.
Head through the two torches to your east, to descend into the Mongolian
Plateau.
From here head north, activate the rebirth fountain, and then wipe out
the Tigerman Village, and exit via the north, staying on the path and
bopping to the Halo-style musical interlude. The path leads you off in
many directions, but I would like you to head due north, and then to wipe
out the next Tigerman Encampment for good measure - it's just down a little
slope, and between two pre-lit torches.
From that village, head south-east until you enter the Village of Ghanzhong
and your first encounter with the comparatively VERY powerful Yerren.
Think of the Yerren as Neanderthals on steroids - they are STRONG and
BIG, and have a good reach with their polearms, and speed with their bows.
Be VERY careful when fighting the Yerren as they can slay you in seconds
when their archers pin you down.
Once you enter the Village of Guanzhong, slay the Yerren and keep making
your way eastwards until you encounter Chang Er - the Young Mother. Speak
with her to acquire the "Child and the Raptor" Side Quest - a very simple
quest to free Chang Er's little daughter from her impending death at the
jaws of a rather snap-happy Raptor.
========================
THE CHILD AND THE RAPTOR
========================
Simply head east of Chang Er to encounter the Raptor, which IS stronger
than its lesser counterparts, but which shouldn't really give you too much
grief.
Once the Raptor is dead, the daughter will skip back to Chang Er (with
whom you should speak to gain your reward - a random magical item (I got
a random yellow ring), and 23000 XP).
==========================
HUNT FOR THE SICKLE CONT'D
==========================
Exit the Village of Guanzhong via the path leading out of its south-eastern
corner TO the south-east, and head up the hill to reach the Great Wall
Ascend the Great Wall via the broken area (taking care when deciding
whether or not to help the besieged guards, as if you open fire on the
Yerren they WILL attack you en masse, and even though the guards will TRY
and help you, the Yerren are, as I have explained previously, VERY tough),
and speak with Wen Shong - Captain of the Guard, who will explain that
just yesterday an army of beasts overran the guard and passed onward into
the mainland. He says that even now they are still struggling to clear the
wall of the remnants of this army.
Head north-east along the wall, activate the rebirth fountain and speak to
Zi Chan - the Young Captain, who will tell you that whilst his troop's
orders are to clear the wall, his men have refused to fight a Giant Peng
that is perched further along the wall. He is waiting for reinforcements
*leans over to him and whispers "they've arrived", pointing at you*
=============
PENG PROBLEMS
=============
Head under the archway and keep going north-east along the wall, staying
with it as it ducks and dives, turns and wheels. Ultimately you will
reach Xiao, the Colossal Peng
====================
XIAO - COLOSSAL PENG
====================
Xiao is a BIG boy, but not THAT much bigger or meaner looking than the
Razorclaw Peng. There are a couple of differences in his attacks, however.
Xiao's primary attacks are :-
> Scream - just like the Cyclops Polyphemus and Barmanu the Neanderthal
High Warlord, Xiao's scream can really screw you over in battle
so be VERY wary of your distance to him, especially as his is
a much further-reaching scream than his predecessors ;)
> Speed - Just something he has at his disposal all the time - Xiao is
BLINDINGLY quick when he gets his skates on
> Single-claw strike
> Double-claw strike
> Summon three Highland Peng to do his bidding.
============
HELPFUL HINT
============
Xiao's greatest weakness is one of the first he exhibits using his amazing
speed, if you fall back you will VERY quickly realise that he cannot go
as far as the top of the steps to the west of where you first meet him.
Use THIS to your advantage, and you will soon have him BEGGING for mercy.
Show him none - slay him summarily.
Once he is no more, continue along the wall, plundering the Majestic Chest
in the tower for good measure, and carry on quite aways, past the rebirth
fountain and ultimately into our old friends the Tigermen. Kill them all,
and then descend the steps leading out of the last tower to enter the
Shaanxi Province, and speak with Bai Li Xi - Commander of the Troop sent
to purge the Great Wall. He is pleased to hear that their men (THEIR men ?
Without us there would have BEEN no victory !! *spits in Bai Li Xi's face*)
are handling things. This completes the "Peng Problems" Side Quest and
gives you as a reward 23000 XP and a random magical weapon - I got a random
yellow weapon.
==========================
HUNT FOR THE SICKLE CONT'D
==========================
From Bai Xi Li and his spit-covered face, you need to head south BUT BEFORE
YOU DO I would like you to please ENSURE that you are fully healed-up, and
at MAXIMUM strength powers-wise, because you are about to encounter a race
that will almost certainly kill you more times than any other you have
met to date ...
... they are ...
... the Dragonians ...
... and they're horny too.
The Dragonians come in a variety of flavours - you have your bog-standard
fighter units (the Elder Dragonian Headhunters), then you have your ELITE
fighter units (the Ancient Dragonian Ravagers), and then after that you
have your EXTREMELY powerful spellcaster units (the Elder Dragonian Wrym-
Mages), and then you have your archer units (the Elder Dragonian Firetalons)
ALL of which can easily slay you.
Of PARTICULAR interest is that their ranged units are MUCH more powerful
than their hand-to-hand units, so whilst it is very possible that you will
fall in combat with the Headhunters and Ravagers, it is almost DEFINITELY
going to be the case that you WILL fall to the Wrym-Mages and Firetalons.
The best way to deal with the Dragonians is that as soon as you HEAR them,
because you will hear them a second or two before you see them, STOP. Stop
IMMEDIATELY and fall back a couple of steps. Imagine it being like a hunt.
You've caught scent of your prey and now you must stalk them. Move with
care - don't go too fast, and DON'T make too much noise, and you might get
the drop on them. Just do not let them attack you at range en masse or I
guarantee you will die :(
The Wrym-Mages attack with two main types of spell - a regular projectile
(ordinarily fire or lightning), and then a multi-ball lightning spell,
which will destroy you very quickly - possibly with a single hit. They
alternate 1-2-1-2-1-2, however, so ordinarily you will be able to predict
what they are going to do next ;)
==========================================================================
IMPORTANT NOTE
</pre><pre id="faqspan-6">
Athena has made contact with me (not the Greek Goddess - a player by that
name) to confirm that the Dragonian Melee Units appear to have a combat
technique that I had not observed, commenting as follows :-
"Just when you thought the Dragonians weren't annoying enough after IT
they've added an extra special power. For those of us, who are seasoned
Diablo players, it's a skill we all remember with dread. Remember the
yellow sparks around your head, and the fact that your health bar went
down with an alarmingly fast rate? YES Iron Maiden (IM) is back, beware
all of you melee characters! For those of you not playing Diablo, Iron
Maiden hurt you as much as you hurt you enemy :( Hopefully you've got a
bigger health bar than your enemy, but even so beware. If there are more
than 2 Dragonians, you can very fast end up with a tombstone and a long
walk back.
"The Dragonians are now an even bigger pain in the arse. As well as being
fast and powerful the melee guys now also suck out your health. Nothing to
worry about for the mages among us :) but for all of you hack'n'slash boy
and girls out there, beware!!"
Thanks Athena !! :)
==========================================================================
Follow the path to the south-east and take out the Dragonians and Tigermen
you will encounter en route, coming at last to a stone bridge leading
south-south-east, and into the Village of Zhidan.
=====================
THE VILLAGE OF ZHIDAN
=====================
* There is a rebirth fountain in the Village of Zhidan
* There is a Portal Shrine in the Village of Zhidan
=====================
NON-QUEST INHABITANTS
=====================
SONG YU - Storyteller who goes into detail about Sun Wukong the Monkey King
and how, when he was invited by the Jade Emperor (the greatest of
all the Chinese gods) into the heavens, it was assumed he would
behave, but he did not. It is argued that his misbehaving was as
a result of his not having been invited to their royal banquet.
He caused quite a ruckus, eating sacred fruit and picking fights
with the occasional entire ARMY, until eventually the other gods
caught up with him, and punished him by imprisoning him underneath
an entire mountain (where he resides as at the time of the story
being told).
LIXUE - Villager who is pleased to see a COURTEOUS guest to the Village of
Zhidan. She says the only other 'guests' she has encountered
recently have been monsters, and they are brutes that don't make
the bed in the morning or tip well.
=================
QUEST INHABITANTS
=================
FAN YE - Old Villager who can update your main quest by confirming that the
Telkine swept through the Village of Zhidan from the Great Wall,
and ventured off into the Jingyang Woods towards Chang'an.
LU BUWEI - Wealthy Villager who is looking for a certain ... item ... which
he is willing to pay over the odds for. He says it can be found in
a cave in the Jingyang Woods, near here. He gives you the "Wealthy
Collector" Side Quest.
BAO ER - Simple Peasant who tells you that there is a terrible beast that
walks the road leading to Chang'an, and that you should be very
careful. He gives you the "Stalker in the Woods" Side Quest.
================================================
MERCHANTS, ENCHANTERS, CARAVAN DRIVERS & MYSTICS
================================================
XIAO NING - Arcanist
MENG TIAN - Blacksmith
=================================
QUESTS FROM THE VILLAGE OF ZHIDAN
=================================
=====================
THE WEALTHY COLLECTOR
=====================
Leave the Village of Zhidan by its eastern gate, and follow the path that
leads into the Jingyang Woods. If you imagine the initial portion of this
path as forming the first three-quarters of a letter "m", I would like you
to start at the top of the first stroke and then head south-east, then
north-east, and then where you would expect to head south to complete the
"m", I would like you to head south-east, and keep heading south-east until
you reach a cave entrance.
Enter this case and head north-east, down the steps and secure the Mahogany
Chest to recover the Jade Figurine that Lu Buwei is looking for.
Teleport (don't walk) back to the Village of Zhidan (which you will find is
itemised as the Great Wall on your Portal Shrine List) and give the figurine
to Lu Buwei, who will complete the "Wealthy Collector" Side Quest, and
reward you with 25000 XP and a random magical item - I got a random yellow
ring.
====================
STALKER IN THE WOODS
====================
From Lu Buwei in the Village of Zhidan, return by the Portal Shrine to the
natural cave you were just in, and then leave and return to the Jingyang
Woods.
As you exit the cave, head due north and keep going until you pass the two
pre-lit torches, and then as you pass them make an immediate turn to the
east, and head south-east, and hug the southern wall moving eastwards,
around a rocky outcropping, and then to the south-west. THIS is where you
will come across the Stalker. His name is Bloodfang, the Tropical Arachnos
Warlord, and he is accompanied by FOUR of his minions. Bloodfang himself
is NOT a very tough villain in spite of his reputation, and aside from
being marginally quicker than his lesser brethren, he will fall easily
to your weapons.
=====================================
BLOODFANG - TROPICAL ARACHNOS WARLORD
=====================================
Bloodfang is a larger, greener version of a regular Tropical Arachnos
Warrior whom, were it not for the glow at his feet, you might not even
NOTICE let alone bother to combat.
His main attacks are :-
> Energy blast - a single ball of energy that has poor speed and range,
but which will explode if it hits you, and will slow
you down as well, but only for a couple of seconds :)
> Mace-strike
> Life-steal - he has a limos-style attack whereby he can drain your
life and add it back onto his own. I am not sure if
his energy-style attack has to glob onto you before he
can use his life-steal, but this does not appear to be
the case.
Once Bloodfang has bitten the bullet (narf narf), the quest is completed
and you earn yourself the reward of 27000 XP points.
==========================
HUNT FOR THE SICKLE CONT'D
==========================
With Bloodfang down, head due north-east of where you found and fought him
until you reach a small path leading inbetween two rock faces, and past two
pre-lit torches.
Once you are through this narrow pathway, head due north to the water's
edge, and battle off a small horde of Ichthians before speaking with Yao
Li - the Harried Warrior. Yao Li will tell you that he has lost his will
to do battle with the monsters, and had hoped he would die nobly at their
claws.
===================
A LESSON IN DESPAIR
===================
Just keep speaking with Yao Li (once you have killed the Ichthians in his
immediate vicinity) to get him to come around in terms of his outlook.
After a few chats, he will be ready to resume his duties protecting his
people, and you will have completed the quest - easy huh ? Your reward
for so doing is 25000 XP too, which isn't to be sniffed at !! :)
==========================
HUNT FOR THE SICKLE CONT'D
==========================
Head east of Yao Li (taking great care when moving around the Chitinous
Mantids as they will attack you), and then north, over the stone bridge,
to the rebirth fountain - which you should of course activate immediately.
From here I would like you to hug the southern bank of the river you have
just used the bridge to cross, and head east until you reach another
bridge that leads to the south.
Cross that bridge and then hug the northern bank of the river and head
east, and follow the bank as it shoots up to the north, and over another
bridge, into the Shaanxi Fields, and up to another rebirth fountain.
Follow the path to the north as it enters a very large Tigerman Compound.
Slay the Tigerman (including their pesky spellcasters and pack leaders),
and follow the path as it heads to the east, then south-east, and then
on eastwards, past the field to the south where the Ichthians are, and
onward, through a few more Ichthians and the north and into the Chang'an
Outskirts.
Upon entering the Chang'an Outskirts, you will see Huan Yue - a citizen
with an exclamation point above her head, whom you should speak with to
learn that a woman asked her to give you a message (gee I wonder who THAT
might be !!), the message being that she (the woman) is waiting for you
in the centre of Chang'an, but that you need to tread carefully, as the
Emperor's Terra Cotta Soldiers have come to life and all but overrun the
once great city !
Sounds like a job for ... SUPER-(enter your character's name hiar) !!
From Huan Yue, follow the path leading east-north-east of her, past the
courtyard to the south which contains a large bell in a wooden housing
that you can attack but not destroy (does anybody perhaps know the
significance of this bell ??), and stay on the path as it curves north-east
up some steps and over a bridge to enter
====================
THE CITY OF CHANG'AN
====================
* There is a rebirth fountain in the City of Chang'an
* There is a Portal Shrine in the City of Chang'an
=====================
NON-QUEST INHABITANTS
=====================
QU YUAN - Storyteller who regurgitates for you the tale of Nuwa, the mother
of all mortals, who created us (in Chinese legend) from clay, once
she was done making the animals, amongst other great, noteworthy
deeds.
CHEN SHOU - Scholar who comments that Confucius taught us that ritual and
virtue would combine to perfect the world - however he does not
know what good that doctrine is against the enemies that attack
their way of life. My thought would be that if Confucius' spiel
were written in a very large book, then it might be CATAPULTED at
the monsters, thus flattening them !! RESULT !! :)
FAN LI - Citizen that wastes his time contemplating what will become of the
world once the monsters take over. Little does HE know that this
will NEVER come to pass, for WE have our finger on the mighty
power-switch of PC-world-destruction plus 13 !! ;)
JING KE - Guard who patrols the Forest of the Ancients Gate in Chang'an,
and who would very much like to be reassigned to a less dangerous
job ... like stamp-collecting, or toad-licking ... eeew !!
=================
QUEST INHABITANTS
=================
MA FEIBAI - Captain of the Guards who says that in spite of his guards'
best efforts, it is proving hard to take back the city of Chang'an
as not only do they have to content with the usual contingent of
monsters, but also the Emperor's Terra Cotta Guard, who have come
to life, and overrun the city (which we already knew, but it's nice
to have MORE than one person tell you you're needed, don't you
think ??) =) He gives you the "The Emperor's Clay Soldiers" Side
Quest.
WAI ZHEN - Deputy whom you can only speak to after talking with Ma Feibai
about the Terra Cotta Warriors problems they seem to be having.
He will tell you that the MAIN problem with them is that the City
Guard are afraid of them, not that they are harder to slay than
the Monsters (trust me, they are - he's talking CR@P !!). He
gives you the "Terra Cottas At Large" Side Quest.
FEIYAN - Order of Prometheus Agent who says that she just arrived by boat,
and that whilst they know the Telkine was here, he appears to have
mysterious disappeared. She says that their order's scholars have
been researching their most ancient scrolls to try and fathom why
the Telkine would come here, and they have found that it appears
that the last of the Titans to fall in the battle between Titans
and Gods was not banished to the Pit of Tartarus with his brethren,
but was instead imprisoned here on earth - NEAR CHANG'AN !!
Naturally Feiyan and the Order are somewhat apprehensive that the
Telkine may attempt to free this Titan, and I have to agree - it
does seem rather doubtful that the Telkine is simply here to
catch some rays and write a few postcards whilst supping a few
cocktails on the beach, non ?
In any event, Feiyan tells you that you need to travel to the Jade
Palace and speak with the Yellow Emperor, as he will know the
exact location of the Titan. His gaff is located on the top of
a white mountain that they believe to be Mount Qiyun, to the west
of Chang'an beyond the Jinghe Valley. As a reward for making it
this far, she gives you an update to the main quest, 10000 XP,
and the full restoration of your health and energy.
================================================
MERCHANTS, ENCHANTERS, CARAVAN DRIVERS & MYSTICS
================================================
LU MENG - Caravan Driver
XUE JUZHENG - Enchanter
LI BAIYAO - Blacksmith
JIA YI - Arcanist
PE-LU - Mystic
================================
QUESTS FROM THE CITY OF CHANG'AN
================================
===========================
THE EMPEROR'S CLAY SOLDIERS
===========================
Given to you by Ma Feibai, Captain of the Guards, your objective in this
quest is to find, and put a stop to, the source of the Terra Cotta Warriors
Power, which they know to be emanating from the Mausoleum in the City
itself. To get to the Mausoleum, head through the doors to the west of
the rebirth fountain in the main Chang'an Plaza, and prepare to do battle
with the Terra Cottas, but please do take note that, whilst the Terra
Cotta Warriors may LOOK stupid, and whilst NONE of them boast ranged
attacks, they move quickly, and attack en masse. They are bound by a range
of movement (as seems to be everything else in this game), so you can
always run away like a little sissy and regroup - don't worry - I had to
do just that MANY many times ;).
So ! Head north-west, up the stairs and over the bridge, clearing out all
the Terra Cotta Warriors en route. I would strongly recommend destroying
all the Terra Cotta Warriors on both sides of the bridge after you get
over it, and then once you are done with those, head up the stairs and
clear that courtyard, before heading over one final bridge and getting
access to the Chang'an Palace.
Do not go in immediately - you are about to have another boss fight - no,
instead MAKE SURE you have destroyed all the Terra Cotta Warriors from
the rebirth fountain to this point, as you might wind up falling back here
during the boss fight, and it would be a shame to have to deal with the
boss and any more Terra Cotta Warriors than you have to, believe me ;)
Once you are happy with your pacification of the area, enter the Chang'an
Palace, and head up the stairs (on either the left or right hand side -
your call as it makes NO difference whatsoever), to do battle with
Bandari, the Terra Cotta Sorcerer.
==============================
BANDARI - TERRA COTTA SORCERER
==============================
Bandari looks like one of the Zombies from Greece, clad in some sort of
stylised Dragon Armour (and actually that is exactly what he is) - he is
a powerful spellcaster, and is responsible for the coming to life of the
Terra Cotta Warriors that are assailing Chang'an. Killing him will,
unfortunately, NOT wipe out all those Terra Cotta Warriors he has spawned
and we will have to clean those up later - however we must kill him to
complete the current objective.
His main attacks are :-
> Fire projectile
> Teleport - not an attack per se, but he can use it to get away from
you in a hurry, THAT much is certain
> Terra Cotta Backup - when he teleports away from you, it is in a bid
to lure you into rushing after him, which causes him to
avail himself of some of the backup he has in stock - being
a LARGE number of Terra Cotta Warriors - usually five-in-a-
row - who will walk slowly towards you and then rush you
when they get close enough to you. There is a finite limit
to the number of Terra Cotta Warriors, but that will exceed
the time this combat takes I have NO doubt.
> Blast of purple energy which has a chance of slowing you down, and
drains your life.
> Eruption
> Flight - again, not an attack - just a comment that he floats when
he moves ...
============
HELPFUL HINT
============
You can very VERY easily lure Bandari out of the Chang'an Palace and
back into Chang'an proper. He will even follow you down some of the
causeways (not all, but some), and this can make the battle much easier-
going for you, as you won't have to do battle with wave-after-wave of
Terra Cotta Warriors AS WELL as this very powerful spellcaster. Your
call, but I wish I'd have known it the first time I played through !!
Once Bandari has fallen, keep heading north-west and speak with the Spirit
of the Great Emperor who stands beside the corpse that sits on the throne,
and he will thank you for liberating his Terra Cotta Warriors from the
ancient evil that had corrupted them. He rewards you with 2 Attribute
Points (bonus !!).
Open up the Basket, Ornamented Chest and two Majestic Chests that are
lying on either side of the throne, fill your pockets and then teleport
back to Chang'an - there isn't really much point in walking as we don't
need to come back this way again.
Once back in Chang'an, speak with Ma Feibai to earn your reward of a random
magical item (I got a random green talisman), and 30000 XP, and the
completion of this quest.
======================
TERRA COTTA'S AT LARGE
======================
Unfortunately this is one of those slightly fiddly quests, as it must be
done in parts. Basically your objective upon receiving this quest from
Wai Zhen is to destroy all the Terra Cotta Warriors that are within the
walls of the Chang'an City, so that the guards can resume control of the
city.
The problem lies in the fact that the Terra Cotta Warriors are located in
small clusters, so I figure if I list the cluster-locations, that should
be all you need to know to go and sort them out, yes ? Rather like I
might say "deal with" when I mean assassinate and don't bore me with the
details, yes ?? ;)
So !! I would like to "deal with" the following clusters of Terra Cotta
Warriors in Chang'an :-
1) Through the Heavy Wooden Door to the north of Wai Zhen;
2) Through the Heavy Wooden Door to the south-east of Wai Zhen;
3) Through the Heavy Wooden Door to the south-east of Qu Yuan;
4) Through the Heavy Wooden Door to the south-east of Xue Juzheng.
Please note that 3) and 4) can be accessed through either door, as there
is a doorway in the wall that will enable you to go in one and come out
the other, should you choose.
After clearing a cluster, guards move in to secure the area so you know
that you can move on from there.
Once all four clusters have been waporised, head back to Wai Zhen to
complete the quest and earn yourself a random magical weapon (I got a
random green sword), and 26000 XP.
=========================================
SECTION 3.13 - JOURNEY TO THE JADE PALACE
=========================================
Head due south-east from Qu Yuan the Storyteller, down the long corridor
and through the broken section of wall in the south-eastern wall of the
City of Chang'an to get into the Chang'an Farmland, and a very tasty
rebirth fountain which you should activate now please.
No ... RIGHT NOW please ...
Thanks :)
From the rebirth fountain, head a few steps up the hill to your south-east,
and then through the field eastwards, hugging its southern edge until you
find the entrance to the field below it.
Once in THAT field, again hug the southern edge, but this time head west
until you find the exit from the field on the western side.
You will enter a small farm homestead. Simply follow the path that leads
back eastwards, underneath the field you have just come through, and stay
on that path as it leads ultimately south-east, out of the Chang'an
Farmlands and into the Quinba Bamboo Forest.
Heading southwards, take the western fork in the road so that you stay
closer to the trees on the western-side, and the path will curve around
and up to a man named Rang Ju - the Pensive General. Speak with him -
just in case you couldn't follow my directions, he's actually due south
of the southernmost field I described above, but you can't head there in
a direct line - you have to curve down to him.
Rang Ju is a bit of a muppet to be honest - he says that he was once a
powerful general who got a bit too egotistical, and paid the price for his
hubris by having to endure the shame of FAILING to defeat the monsters
he sought to slay. He rejected his path to come here to the woods to
reflect on his own nature, in order to better learn theirs.
Basically ? He's a hippie.
In any event, speak with him again to get the "A General in Repose" Side
Quest, which we shall complete in a little while. To cut a long story
short, he threw all his gear and other gubbins into a cave near here, so
that his reflection wouldn't be hindered.
Like I said - he's a muppet. Give me a sword over the 800lb Confucius
Tome of Knowledge ANY day ;)
===================
A GENERAL IN REPOSE
===================
From Rang Ju, you need to follow the rocky outcropping to his immediate
south, by going south-west, and then due south. You will find it curves
back to allow you to go south-east, and then due east towards what is
marked on your map as a "Woodland Cave". Take GREAT care when you are
walking this route, as there are numerous Mantid Hivelords (which can
be considered greater Chitinous Mantids) lurking around with their lesser
brethren.
Once inside the Woodland Cave you should head north-east to enter the
first main chamber, then north-west into the next chamber, then pass
north-east to get into the next chamber after that, and from there head
down the steps in the north-eastern wall to enter a chamber that is
ALMOST shaped like an hourglass of sorts. Head north-east, then south-
east, then north-east and up the stairs to proceed.
You will come to a chamber with three Mahogany Chests (and a bunch of
Fire Sprites and Djinn waiting in ambush), and you should slay them all
and plunder the treasure. Simply walking up to the Mahogany Chests will
complete the side quest, and earn you 26000 XP.
=======================
THE SHRINE OF ZHONG KUI
=======================
[Thanks to Michael Kier for this information]
If you continue north-east of the three Mahogany Chests you will eventually
reach an exit from the cave. This takes you to the Shrine of Zhong Kui.
From entering the Shrine, head north-west and keep following the path as it
snakes to the north-east and north-west, and you will eventually reach a
fight with ...
=====================================
THE DRAGON LICHE - LORD OF THE UNDEAD
=====================================
A VERY angry and VERY powerful monster is this one - right up there with
the Creatures of Legend (the Manticore, Hydra and Chimera). The Dragon
Liche is a huge undead dragon that stalks you around the Shrine of Zhong
Kui, and attacks with a number of different attacks, including :-
- Bite
- Claw Swipe
- Beat Wings (this does a hefty amount of damage and slows you down)
- Ice Breath (freezes you and does sustained cold damage)
- Poison Heart (creates a poisonous cloud that drains your life force)
All I can say is DO NOT UNDERESTIMATE this enemy - he is very powerful,
and can even turn your own pets against you, such is his power !!
Once he has fallen, head to the north-west of where you first saw him, and
raid the four Primitive Chests and the Majestic Chest for goodies.
After you've had your fill, head back from the Shrine through the cave,
back past the Mahogany Chests, and all the way back to Rang Ju for good
measure.
You do not need to speak with him, as you have already completed his quest,
but he serves as a handy placemark for my next set of directions ;)
From Rang Ju I would like you to head due west until you reach the bank
of the river, and from there I would like you to head due south, along
the bank of the river, TAKING GREAT CARE as there is a large group of
Dragonians to deal with (including archers and spellcasters *spit spit*),
and to keep heading south a LOOOOOONG way until you reach ...
=====================
THE VILLAGE OF BINXAN
=====================
* There is a rebirth fountain in the Village of Binxan
* There is a Portal Shrine in the Village of Binxan
=====================
NON-QUEST INHABITANTS
=====================
BAN GU - Storyteller who has the tale of Lao Tzu and Confucius to regale
you with. It appears that Confucius was able to learn a great
deal from Lao Tzu when they spoke at length at the Imperial
Library, and that Lao Tzu was asked by one of the guards of the
city to document his thoughts before heading westwards into the
Desert, and that these teachings are now enshrined in the form of
the Tao Te Ching.
XI KANG - Villager who rather sagely says that the monsters too are "part
of the way" (meaning the circle of things), and that the wise man
accepts this, studies it, and then fights without fear or desire.
=================
QUEST INHABITANTS
=================
XIAO YISHAN - Warrior who tells you of the existence of a Taoist Mage who
lived in the Jinghe Valley, not far from Qiyun, and who used to
visit the Village of Binxan on a regular basis (every new moon as
it happens) for milk and cookies. Unfortunately this mage (who
was reputed to be very powerful) has not appeared in accordance
with his usual timetable, and this concerns the citizens of the
Village. He gives you the "Hermit Mage" Side Quest.
================================================
MERCHANTS, ENCHANTERS, CARAVAN DRIVERS & MYSTICS
================================================
XUE FANG - Trader
Hands down, this guy is my favourite Trader in the entire game. His first
greeting ROCKS !! "Oh very good come stranger ..." - I LOVE IT !! :)
=================================
QUESTS FROM THE VILLAGE OF BINXAN
=================================
===============
THE HERMIT MAGE
===============
Since we shall pick up and sort out a further side quest before tackling
the Hermit Mage side quest, I will come back to it ;)
Leave the Village of Binxan via the south-west, activate the rebirth
fountain and cross the bridge. This will take you into the Jinghe River
Valley.
From crossing the bridge, hug the northern shoreline and head south-east,
until you come to a small farm. Speak with Liu Xu the Farmer, who will
tell you that his ancestors (who have for ages been laid to rest in a
small cave behind the waterfall of the Jinghe River Valley) are no longer
at peace because their cave has become infested with Spirits. He wants you
to sort it out for him, and gives you the "Behind the Waterfall" Side Quest.
====================
BEHIND THE WATERFALL
====================
If you would be so kind as to head due west of Liu Xu's farm, and through
the Tigerman Encampment, slaying them all as you go, then you will come to
a mountainside. Keep heading west (travel to the south of the mountainside)
and you will find a small slope heading north-west, which you should take.
Kill the Ichthians at the entrance to the small cave to the side of the
Waterfall, and then enter.
This cave is called the Mortuary Cave, and all you need to do (he says) to
complete the current side quest is to head all the way north-west to the
back of the cave, and to destroy the five Shade Fallen Archmagi who are
residing there.
Once you do, you are told to return to Liu Xu and give him the good news.
Whilst we do not need to come back this way, the Jinghe River Valley is a
VERY dangerous place, so rather than sending you into unchartered territory
by teleporting back to the Village of Binxan and walking back to Liu Xu,
I would just retrace my steps from the mortuary cave, back eastwards
through the Tigerman Encampment and to Liu Xu's Farm if I were you - but
you can, of course, do whichever you prefer !!
Liu Xu is most grateful, and gives you a random magical item (I got a
random yellow talisman), and 28000 XP. This completes the "Behind the
Waterfall" Side Quest.
=========================================
SECTION 3.13 - JOURNEY TO THE JADE PALACE
=========================================
From Liu Xu, head back (and I can only apologise for this, but it is a much
safer way to travel than to randomly venture off into the forest) back to
the little slope that leads to the north-east to the mortuary cave ? But
instead of going UP that slope, head south-east and follow the shoreline
until you get to two torches and a bamboo bridge leading south.
Traverse the bridge, and activate the rebirth fountain.
As you enter this area, I would ask that you keep going south, but hug the
western shoreline as you do. You will come to a large Tigerman Encampment
which you should OBLITERATE, and then carry on heading (now west-south-
west) along the shoreline, until you reach a slope that heads up and past
two torches, into the Qiyun Ascent.
===============
THE HERMIT MAGE
===============
As soon as you see the words "Qiyun Ascent" appear on the screen, STOP. Go
back down the slope, and hug the treeline to the south and follow it to
the south-east. You will come upon an abandoned homestead comprising
three Mahogany Chests, and this will automatically complete the quest,
giving you 28000 XP. Please note, however, that your side quests panel
will glitch at this point (only minorly), insofar as you will get a tick
in the list of quests at the top, but at the bottom instead of saying
"Rewarded" it will still say "You Will Receive" ... but you HAVE now
completed this quest, hokay ?
=========================================
SECTION 3.13 - JOURNEY TO THE JADE PALACE
=========================================
So from the Hermit's Place, head north-west along the path you just took,
until you reach the Qiyun Ascent ... again ... :)
From here, follow the path as it winds north and then north-east and over
a wooden rope bridge to a rebirth fountain, and Yi Shan - a Serene Young
Woman, who has an exclamation mark over her head.
Speak with Yi Shan to learn that you are now in Qiyun Mountain, and she
will give you the "Three Sisters" Side Quest.
From Yi Shan, head north-east and follow the little path as it curves
back on itself, to come back west and over another wooden rope bridge.
Head west, and then north up onto a little path that winds first north,
then west, south and then west again, where it widens out. Stay on the
little path that leads west-south-west, and go through the two torches
and over the next rope bridge onto Mount Qiyun, and a further altercation
with some of our old enemies - the Peng.
From here, travel south-south-west, and take the next rope bridge that
leads south-west, and then follow the little path that leads to the west,
and up to the NEXT rope bridge. I think this place should be renamed to
Jungle Jim's rather than Mount Qiyun with all these bleedin' bridges,
don't you ?
Do NOT rush over this bridge - take your time, make sure you are fully
healed, and prepared for the boss fight you are about to engage in, as
this mutha is TOUGH ... in many cases ... but you have me to back you
up, so we'll muddle through ;)
============================
YAOGUAI - ANCIENT DEMON BULL
============================
Yaoguai is the guardian of the Yellow Emperor's Palace. He is a very
strong, quick and powerful bull who has the following main attacks :-
> Summon 5 Shadowstalkers - he gores the ground before he calls them,
so you have a couple of seconds to prepare yourself.
> Buck and Kick
> Stomp - an attack which creates a HUGE flaming aura around him,
doing MASSIVE amounts of damage.
> Headbutt
For all his power and MASSIVE amounts of health, Yaoguai cannot follow
you back across the rope bridge, and this boss fight is not a lock-in,
so you can always draw back if he starts to batter you (which is what I
did ... many, many MANY times). Do not forget, however, that he can just
summon a batch of Shadowstalkers who CAN follow you back over the rope
bridge, so be wary of that.
Once Yaoguai has fallen, take the contents of the three Primitive Chests,
and the Majestic Chest that are near him (on the northern edge of the
mountain), but PLEASE take care to make sure you have enough space in your
inventory before picking up the items, as otherwise your character might
just toss them over the edge of the mountain by mistake and that WOULD suck
wouldn't it !!
Cross the long bamboo bridge leading to the north-west, to enter the Jade
Palace, and then just keep heading north-west (there are no enemies in the
immediate area), and up until you get to an audience with the Yellow
Emperor.
The Yellow Emperor praises your destruction of the first two Telkine -
Megalesios and Aktaios, but stopping the third, he says, is going to be
much harder, and unless you DO manage to stop him, he will undoubtedly free
Typhon - the last Titan - from his imprisonment under Wusao Mountain nearby.
He tells you that you should leave via the passageway below his chambers
in the Jade Palace, and gives you 25000 XP, full health and energy
restoration, and a random magical item (I got a random green ring) for
your troubles. He also updates the main quest for you.
===================================
SECTION 3.14 - UNDER WUSAO MOUNTAIN
===================================
First of all, teleport back to Chang'an and speak with Feiyan to get
further information and directions at to how to reach the Wusao Mountain.
She will restore your health and energy, and then free up the lock on the
Forest of the Ancients Gate beside Jing Ke in Chang'an.
You now have a choice to make. You can either teleport back to the Jade
Palace and continue along with me to complete a couple of side quests and
explore some very expansive areas of the Orient, or you can simply leave
via the Forest of the Ancients Gate, and skip the next bit, to reach the
climactic conclusion of this Act. Your call.
I am going to teleport back to the Jade Palace, but if you choose not to,
do a keyword search in this document for (*) - there are only two
instances of it - one is here, the other is where you should go to if you
chose to skip the next bit.
Activate the rebirth fountain east of the Yellow Emperor's Throne, and
then leave his Chamber via the steps to the north-east, and head down
through the various chambers, the stairs leading down on each floor being
located in the :-
(From the Jade Emperor's Throne Room) North-eastern wall
North-western wall
North-eastern wall; and
North-western wall (and through the gaping hole in the wall to enter a
natural cave)
In the natural cave, head north-east and then north-west to reach a set
of stairs descending to the next level down. From there, head due north
to reach the next set of stairs going down, and take them.
From here, head north-east, through the gap and down the stairs in the
north-eastern wall.
And finally, in this last room (taking care of the three ambushes awaiting
you - one ice sprites, two fire sprites with some corpulent Djinn thrown
in for good measure), head due north-east, and then take the exit in the
south-eastern wall to get out and into the Jinghe Wetlands.
Follow the path as it leads down to the north-east, and up to the rebirth
fountain.
From the rebirth fountain head due north-east, and through the two pre-lit
torches (which are quite a way away - if you reach a lake, they are to the
east of it - if you reach a Tigerman Encampment, they are to the north of
it), and head east through the low-waters to do battle with some Deadwater
Ichthians, and once you have slain them, head north of where they were
when you found them, and up to Li Hua - a Fair Young Woman, who is waving
her arms about her head trying to bat away the attacking exclamation mark.
=============
THREE SISTERS
=============
Just to refresh your recollection of this particular side quest, you spoke
with Yi Shan on Qiyun Mountain to get this quest originally, and whilst she
didn't really have a lot to say for herself, you were able to gather for
your side quests panel that she was one of three sisters, and that she
did not fear to walk the mountain, as the monsters there could not harm
her in any way. Puzzling, but ok.
Speaking with Li Hua now, you learn that their third sister's "charm"
has broken, and that she is now under attack by monsters and needs help
BADLY.
In order to reach her, you must travel south-east of Li Hua, and keep
travelling south-east until you reach an impenetrable line of trees. From
there, head north (hugging the trees) until you find a pathway through
the trees leading east, and into a Tigerman Encampment.
Slay ALL the Tigerman in this Encampment to automatically receive an update
to the Three Sisters Side Quest, and then speak with Ru Zhao, the third
sister, to learn that she inadvertently broke the enchantment that was
protecting her from the monsters.
She goes on to explain that ages ago, the Great Sage Lao-Jun disguised
himself as a beggar, and wandered through the land occupied by the three
sisters and their village. Nobody would care for him or give him rice or
aid, except these three Sisters. As a gesture of his gratitude, he gave
each of the three Sisters a magical seed, and said that if they each ate
their respective seed, no harm would befall them, as long as they did not
harm anybody else.
They did, and since then they have been effectively immortal. That is,
until Ru Zhao slew a Tigerman today, as she saw him about to kill a deer
and flew to its defence. This naturally lifted the enchantment she was
under, and she has been chased by monsters since then.
Head back to Li Hua and deliver her the news, to complete this rather odd
side quest, and earn yourself a random magical item (I got a random yellow
ring) and 30000 XP.
===================================
SECTION 3.14 - UNDER WUSAO MOUNTAIN
===================================
So - back to the main quest ... leave Li Hua and head east just a few steps
until you reach the rocky outcropping that forms the boundary of her
abode, and forces you to walk to the south-east for a couple of steps.
Instead of heading back to the east towards Ru Zhao, head due north, and
keep going north until you find a stone bridge leading north-east. Cross
that bridge and slay the Yerren in the village that you enter before
leaving via the north-east. Activate the rebirth fountain you come to, and
re-enter the City of Chang'an via the open archway in its wall to your
north.
If for ANY reason you find that the Jinghe Valley Gate is locked, and
cannot be opened ? Just teleport back to Chang'an and leave via the
Forest of the Ancients Gate beside Jing Ke.
(If you teleported back to Chang'an after visiting the Jade Palace and did
not go on to explore the Jinghe Wetlands, you should start here (*))
============
HELPFUL HINT
============
Clear the large courtyard of the innumerate Tigermen, which you can
actually do BEFORE opening the door by attacking through it if you position
yourself just right, and then leave Chang'an (again) by the hole in north-
eastern wall, activating the rebirth fountain as you go.
You are now in the Forest of the Ancients, and you need to travel due east
until you reach what is marked on your map as a "Cave Entrance", and then
rather than entering it (although you can of course explore it should you
wish), you then need to travel north-east until you reach a fallen tree
that forms a bridge over a river, and cross it.
Activate the rebirth fountain on the other side, and then head due north
and follow the light grey path you come upon as it heads north-east, and
through two torches into the Wusao Barrens.
BEWARE !! 'ere be DRAGONS ... LOADS of Dragonians to be precise, and they
are WELL cheesed off, so watch your step.
Head east along the path once it permits (you must walk a few steps to
the north first), and then keep going east until you reach the Wusao
Portal Shrine, which you should activate.
From the Wusao Portal Shrine, head north-west and through the canyon that
is filled with Gilded Dead Adepts, Warriors, Archers and Spirit Liches,
and follow it northwards and into Wusao Caverns.
This automatically updates the main quest to "Find Typhon's Prison" - so
you know you're close ;)
Activate the rebirth fountain and head north as soon as you can, and keep
going north until you find steps leading down in the north-western wall,
which you should take.
From here head north-west through the first chamber into the second, then
north-east into the third chamber, and then south-east into the fourth
chamber.
Leave the fourth chamber by head north-east, and keep heading north-east
until you find the steps leading down to the next level, which you should
follow.
Keep heading north-east and down the next set of steps, and then just keep
on heading north-east and through a small archway onto a huge rocky slope
that leads downwards. Keep an eye out for Fire Sprite ambushes whilst you
are on this slope, and follow the slope down to the south-east, and keep
going down down down down down until you enter a tunnel, and the Obsidian
Halls.
In these halls you will encounter many old adversaries - Fire Sprites,
Dragonians and Undead to name but a few, but you will ALSO come across a
NEW type of enemy - the Sepulchral Wyrm. It looks like a dragon made of
magma, and stomps towards you breathing fire from a reasonable distance.
It is not overly intelligent, not overly difficult to slay, and cannot
travel beyond a certain distance from its starting location, so it is by
far from the most dangerous of enemies, but its initial impression can
cause one to wet one's pants a little ;)
In this first room of the Obsidian Halls, hug the northern wall and follow
it around to the east and then the south to get out via a long tunnel
leading south-east in the eastern wall.
Activate the rebirth fountain, and then (bear with me because this room is
a bit of a pain in the @rse), head east and then south-west to get around
the first little oblong-shaped pit of lava you encounter just beside the
rebirth fountain, and then head south of the southern tip of that lava
pit, and the east and then north-east inbetween two longer rivers of lava,
and keep heading north-east to get to
===============
TYPHON'S PRISON
===============
... and guess what ...
... that's right ! WE'RE TOO LATE !! ...
The Telkine is already here, standing beside his master Typhon who wrestles
with his shackles. As you descend the slope, Ormenos (the third Telkine),
equipped with the Sickle of Kronos, breaks the bonds holding Typhon to the
rock, and Typhon escapes via a nearby Portal, whilst Ormenos readies
himself to do battle with you.
=========================
THE TELKINE OF THE ORIENT
=========================
Ormenos, the Telkine of the Orient, is (as you would expect) quite a pain
in the backside. He is, in MY opinion, actually less of a problem to deal
with than Aktaios was back in Egypt, but he is still a very dangerous foe
who should be treated with extreme care.
============
HELPFUL HINT
============
For a change, do NOT under ANY circumstances lure him away from the area
he stands in, as that is the one place you have the most room to manoeuvre.
Luring him onto the slope that leads down to the rock is a REALLY bad idea,
as I have tried this before, and it makes the fight about 1000% more time-
consuming, AND difficult.
Ormenos' main attacks are as follows :-
> Summon 4 Magma Sprites - he throws 2 Volcanic Orbs at you, from which
4 Magma Sprites rise (2 from each Orb).
> Single Life-drain - an attack which does MASSIVE amounts of damage
> Double Life-drain - an attack which means you CAN kiss your butt
goodbye !!
> Double Flame arrow
> Earthquake - this causes chunks of rock to fall from the ceiling of
the enclosure, and land on the ground. This attack also
destroys any rocky shards that were previously left on
the ground.
> Telekinesis - once he has caused an earthquake, Ormenos can enter a
prayer-like stance where he clasps his hands together
and telekinetically seizes, raises up and throws one
of the shards of rock at you.
To slay Ormenos, keep your distance. Always wait until he has launched a
life-drain attack at you and avoid those at ALL costs, and then just stick
and move ... he is at his most vulnerable whilst he is selecting which of
the rocky shards he wants to throw at you, as his telekinetic powers are
rather time-consuming for him to use, and leave him open to multiple
attacks during this time.
Once Ormenos has fallen, you are rewarded with 25000 XP, the main quest
is updated to "Olympus", and you can raid Ormenos' Essence to fill your
pockets to bursting.
After doing so, head through Typhon's Portal in the north-eastern wall to
chase after Typhon.
=================
ORIENTAL EPILOGUE
=================
Well we have finally found and slain the third Telkine, Ormenos - however
we did not do so in time to stop him from completing his objective and
freeing his master Typhon, whom it transpires has now fled his prison
chamber and made his way to Olympus to do battle with the Gods themselves.
We MUST chase after him, as whilst it is more than likely that the Gods
would be able to collectively overpower him (as he is the strongest of the
Titans, but he is still only one Titan), I get the feeling they will be
needing our help ;)
=========================
ACT THREE - MOUNT OLYMPUS
=========================
======================
SECTION 3.15 - OLYMPUS
======================
</pre><pre id="faqspan-7">
As soon as you arrive in Olympus the rebirth fountain to your north-east
is activated for you, but already we can see that Typhon has been through
here - there are crumbled pillars, and the sound of distant thunder, and
that ISN'T cool at all.
Head north-east and up the stairs to do battle with :-
Gilded Dead Brigands
Gilded Dead Adepts
Ancient Limos Life Eaters
Ancient Limos Soul Stealers
Carry on up the stairs to the north to fight :-
Gilded Dead Assassins, and more of the enemies you fought further down
the steps
Follow the path to the north-east, up the stairs and as it turns north
again you will fight :-
Masterwork Automatoi Champions
Masterwork Automatoi Warriors
Beware the Champions as they will explode in multiple cascading fireballs.
As the path curves to the north-east you will face more of the same, but
then as it turns northwards again, you will have to deal with :-
Elder Minotaurs
And then a little way further up (as the path turns to the north-east
again)
Elder Minotaurs
Elder Minotaur Lords
Pass under the covered area and through the badly mangled doors to do
battle with more Minotaurs and Minotaur Lords, and then take the steps
to the north-west to face
Cyclops Elders
More of whom are waiting for you as the path turns to the north-east and
carries on.
When you hear Typhon's laugh you are almost upon him, so ready yourself
with your most powerful skills, and get ready to do battle with the most
powerful of the Titans
======
TYPHON
======
Typhon was VERY easily defeated in the original version of Titan Quest,
but in Immortal Throne he has been beefed up considerably, given more
powers, greater attack speed and smarter AI it seems.
He starts off in the centre of the courtyard in the Olympus Summit (which
is just up the stairs to your north-east). He will NOT come down the steps
to do battle with you, so you CAN play the skirmishing game with him if you
want to biff him to death, or you can just jump right in there to kick his
@ss to the curb - your call.
His main attacks are :-
> Huge Lightning Spear
> Flaming Breath - this has a LONG range so watch out
> Poison Projectile
> Energy Steal - this replenishes his own energy
> Life Steal - this replenishes his own life
> Cascading Shower of Rocks from the Skies
> Thorns - he can cause thorns projectiles to come out of his body,
increasing his hand-to-hand damage.
Around the arena you will find Shrines that can help you out. They are,
in order from west moving clockwise :-
- Shrine of Thorns
- Battle Marker
- Frostbite Shrine
- Regeneration Shrine
- Energizing Shrine
- Shrine of Mastery
Use them wisely as they are pretty-much one-shot wonders for this combat.
Easiest way to defeat Typhon is to MAXIMISE your use of the Shrines -
especially Battle Marker, Frostbite, Regeneration, Energizing and Mastery,
to watch his body-movements to avoid getting caught out by surprise, to
time your attacks so that you avoid one of his and counter-attack, avoid
and counter-attack, and to never EVER think that he cannot reach you.
He cannot summon creatures to his aid, but he can bounce those rocks of
his down the stairs after you if you're not careful, so BE WARNED.
Once Typhon has fallen to your might, you complete the Olympus Main Quest
and earn yourself 30000 XP and Typhon's Essence for good measure.
As you open Typhon's Essence, Zeus speaks to you from on high, saying :-
"Hail, mighty hero! I am Zeus, king of the Olympian gods. We are eternally
thankful for your aid in stopping Typhon. No one would ever have thought
that a human could defeat a Titan. The epic heroes would kneel before you,
and perhaps they shall.
The conduit between our realms was destroyed. You have proven that men
are ready to become the masters of their own fates. Your mortal world is
not yet safe, but the responsibility is now yours. Go, greatest of heroes,
there is much left to be done."
======================
MOUNT OLYMPUS EPILOGUE
======================
Well I was right - it looks like the Gods DID need our help in stopping
Typhon after all. Now that we have put things to right - at least here
in Olympus - we have earned the love and favour of the Gods, and can move
on to somewhere new to seek fame and glory for ourselves.
Take everything from Typhon's Essence (teleport back to Chang'an or
somewhere else to do the hard sell if need's be), and then when you are
done, head through the Mysterious Portal to the north-east to complete
the REGULAR version of Titan Quest and enter
================
ACT FOUR - HADES
================
We begin Act Four in the Temple of Apollo. I had hoped that Zeus would
teleport us to some sort of sex den where we would be fed fruit on gold
laurel leaves by sexy people and could earn a WELL-DESERVED BREAK, but NO.
Fine !! FINE. Why are we here ... let's find out !! :)
Head down the stairs to your north-east, and speak with Tiresias - the
Projection of a man who stands before you. He will tell you that your
deeds above have created strife below (BOO HOO !! We just saved Olympus !!
HERROOOOOOO ??), that you must "find your way to where all men are
destined" (which can only mean Hades - the Greek Underworld in Grecian
Myth), and that to DO that, you will need to find the Sorceress of the
Ixian Wood, to show you the way.
===================================
SECTION 4.16 - A MYSTERIOUS MESSAGE
===================================
Head down the steps to the north-east past Tiresias, and follow them as
they lead east and then north, down and into the City of Rhodes.
==================
THE CITY OF RHODES
==================
* There is a rebirth fountain in the City of Rhodes
* There is a Portal Shrine in the City of Rhodes
=====================
NON-QUEST INHABITANTS
=====================
STRABO - Citizen of Rhodes who says that all the damage done to Rhodes has
come to it TODAY !!
TEUKROS - Storyteller who regales you with the tale Orpheus - the son of
Morpheus, Greek God of Music and Song. He tells of how Eurydice
won Orpheus' heart, but that on the day of their wedding, she was
dancing for him in a grove with nymphs, and a snake bit her on the
heel. She died from the wound, and Orpheus, stricken with grief,
withdrew to Aornum in Thesprotis, singing his dirge as he went.
Charon the Ferryman wept as he rowed his boat across the River
Styx, and even Cerberus laid down to let Orpheus pass into Hades.
Hades and Persephone were moved by Orpheus' plight, and said that
he could take Eurydice out of Hades on condition that he did not
turn around until he was back on living soil. He couldn't help
himself as he started to doubt he was leading her out of Hades,
and turned around, and Eurydice was drawn back into Hades as was
the arrangement. Poor ... USELESS ... I-D-I-O-T !!!!!
LEUKOS - Citizen of Rhodes who says that his dreams of late have been
plagued with visions of the dead.
AEGINA - Citizen of Rhodes who says that as soon as the road leading to
Ixia is safe again, she will venture there to visit her beloved
Katina, who has been gone for almost a year, and whom she misses
dreadfully.
=================
QUEST INHABITANTS
=================
EURYMACHUS - Nobleman who tells you that Medea (Lady of the Ixian Woods)
came to the Ixian Woods many years ago, and that she is now known
simply as "The Sorceress". He says that those that venture forth
to visit her, however, risk inciting her wrath as well ... perhaps
because she was jilted many moons ago by Jason - leader of the
Argonauts (hence her dislike of "heroes").
MAERA - Mother of a poisoned child whom Medea has agreed to help on
condition that she is given the tome of (some ancient queen or
other - THANKS luv - VERY helpful !!), as payment for the service.
Procne, one of Medea's students, tried to help but was reassigned
to other duties by the Sorceress. Maera gives you the "An
Impossible Task" Side Quest to complete.
ARION - Sailor who tells you that a HUGE shelled monster - big as a Trireme,
came ashore in Damatria, and that the only real way to get there
do sort it out is to venture through the Cave of Orthea. He gives
you the "A Crab Story" Side Quest.
================================================
MERCHANTS, ENCHANTERS, CARAVAN DRIVERS & MYSTICS
================================================
GYLIPPOS - Blacksmith
CRETHEUS - Arcanist
EPICLES - Caravan Driver
PYLARTES - Mystic
LAPHANES - Enchanter
==============================
QUESTS FROM THE CITY OF RHODES
==============================
==================
AN IMPOSSIBLE TASK
==================
This is a multi-part side quest which we shall come back to when the time
is right - for now, you need to know that we must venture to the Ixian
Woods to find Procne.
============
A CRAB STORY
============
Head down the steps from the City of Rhodes to the east, and onto the
Coastal Asomata. This is basically a beach, and you will encounter some
very dangerous crabs here. They come at you in two different varieties -
Karkinos Sand Runners (who are nippy little buggers who can attack in
small groups and do good damage in VERY quick order), and Karkinos Wave
Crashers, who are larger and move slower, but who do more damage.
Thankfully, Wave Crashers come in smaller groups - usually 1-2.
Beware the ambushes that the Sand Runners will lay for you too - they can
bury themselves in the sand (or, as you will see later, mud), so watch
out !!
Hug the northern wall and follow it east, and then north through some
Anouran (basically big frogs that, in terms of their combat-skills, can
closely be alikened to the Tigermen you fought in the Orient), and up into
the Cave of Orthea.
In the cave, head north, then north-west, then south-west and exit to get
to Damatria.
If you head a little to your south-west, you can speak with Deinias the
Fisherman who tells you that Karkinos have swarmed the beach, and that he
for one is DEFINITELY not going back down there until it is safe, no matter
how much Proteas gets in a strop about it.
Proteas the Head Fisherman is to the east of Deinias, and he tells you
that crabs as big as boats have come up on the beach, and that one of
them took Dimitri's foot of at the ankle !! He bemoans the fact that his
fellow fishermen are not doing their jobs as a result, and surmises that
if the largest of the Karkinos were to fall, they could deal with the
rest.
Head down the slope to the east of Proteas, and onto the beach, to engage
in your first Act Four Boss Fight WITH *fanfare*
===================
GARGANTUAN KARKINOS
===================
Yep, this is one HEAUUUUUUUUUUUUUUUUUUGE crab - that's for sure !!
It moves at a decent speed given its size, and its main attacks are :-
> Sand-crawl - it buries itself in the sand in one location and
resurfaces in another - kinda teleporting, but I guess
we are to infer that it has travelled under the sand.
> Single-pincer strike
> Double-pincer strike
============
HELPFUL HINT
============
He cannot go all the way up the slope, so you can use this to your
advantage - just take care to ensure that he does not use his sand-crawl
power to get behind you and cut you off though - he is usually quicker
than you are ;)
Once he has fallen (at least we ASSUME it's a he - how do you sex a crab ?)
you should return and speak with Proteas to complete this side quest, and
earn yourself a relic shard and 30000 XP.
Return through the Cave of Orthea (please), and back to the Coastal Asomata.
Now I would like you to head south and hug the southern shoreline, and
keep following it eastwards until you find Abderus the Foreman, who tells
you that they need to light the beacon to tell merchant ships that the
harbour is once again safe to dock in, but that every time they try and do
so, they are swarmed with monsters. He gives you a "strapping lad" (uh-
huh ?) to accompany you to the beacon and light it, but you must keep him
safe. Don't worry - if he dies you can just come back and get another !!
You also acquire the "Torch-Lighter's Gauntlet" Side Quest
============================
THE TORCH-LIGHTER'S GAUNTLET
============================
From Abderus, head east along the beach, still hugging the shoreline, and
keep heading east until you encounter the VAST number of wraiths and
drowned sailors that lurk near the wrecked ship in the bay.
Once you have put their souls to rest, head north and then up the stairs
that lead to the north-east, to enter the Camirus Bluff.
Carry on up the steps to the north-west, and clear out the landing before
heading up the steps to the north-east and allowing the Torch-lighter to
start his attempt to activate the beacon.
During this time you MUST protect him, as all the wraiths which appear
in the two waves of attacks will attempt to take him out. Focus your
attacks on the ranged units first, as they pose the most immediate danger
to his safety, and then take out the hand-to-hand units afterwards.
As I said above, if he DOES die, you can always return to Abderus and
get another, but I don't like to see innocent people die TOTALLY without
reason, so please do try and keep him alive as long as possible ? Ta.
Once he has succeeded, return to Abderus to complete this side quest, and
claim your reward - an Arcane Formula, and 30000 XP.
From Abderus you should head due north until you reach the rebirth fountain
which marks the entrance to the Ixian Woods.
Head due north upon entering the Ixian Woods, and keep going north until
you reach Chrysis the Scout who runs up to you calling "Help us, PLEASE
HELP US !!" - something tells me he's a bit needy ... and yes !! Look !!
He TOO has been assaulted by those pesky exclamation marks.
Speak with Chrysis and he will tell you that his sergeant has sent him
back to get reinforcements for their outpost which has been besieged by
monsters. He asks you to head to your left and help them out. He says
he will follow you. He will then give you the "Outpost in the Woods" Side
Quest.
====================
OUTPOST IN THE WOODS
====================
Do as Chrysis has asked and head westwards and repel the Nightstalker
attacking force. Once they have fallen, speak with Teisias - Sergeant of
this outpost, who thanks you for your aid but says that the battle is not
yet over as another wave will soon be upon them. He says that they all
spill forth from a waterfall nearby, and that they are led by a HUGE
Anteok of great power. His warriors Amphytrion and Iodemicus are unable
to wield their swords, and that the monsters are relentless and will soon
overrun them. He asks for you to venture into the waterfall cave and slay
their leader.
Leave their outpost via the eastern path, and follow it as it heads north-
north-west and up towards the Den of the Anteok (which you will see on
your compass ahead of time).
En route you will encounter two varieties of another new type of enemy -
the Hydradon. They are twin-headed small lizard/dragon-style creatures
that come as either Scorchers (who shockingly breathe fire) or
Blacktongues, who gob glue-like balls of gunk at you which slows you down
a fair bit for a few seconds.
Once inside the Den of the Anteok, you must head west-north-west, and then
north-west, south-west, north-west and finally north-east to get to the
next main chamber.
In this chamber, head north-west and up the stairs to do battle with a
rather mean sub-boss
=====================================
SURRYLN THE BELLIGERENT - ANTEOK HERO
=====================================
So THIS is the guy that's been causing all the problems - I seeeeeeeeeeee !!
He lives up to his reputation in combat - he is a dirty brawler with the
ability to use the following main attacks :-
> Poisoned darts (shoot out in multiple directions)
> Axe-strike (left-hand)
> Axe-strike (right-hand)
> Double-strike - a one, two combo-attack with his twin axes that sends
out two MASSIVE straight-line shockwaves - think of
the ones Polyphemus does, only quicker and there being
TWO of them instead of just the one !!
My advice is to try and use the terrain to your advantage. His shockwaves
can travel down the stairs so don't think they will run over your head as
that won't work, but I mean keep your distance - his poison darts are VERY
easy to dodge if you don't get too close to him, and his room is large
enough for you to nimbly avoid his attacks if you are smart with the space
you manoeuvre in ...
Once he has died, raid the Majestic Chest in his chamber, and then return
to the Ixian Woods Outpost and speak with Teisias again to complete this
side quest and earn your reward - a suit of magical armour and 30000 XP.
==========================================
SECTION 4.16 - A MYSTERIOUS MESSAGE CONT'D
==========================================
Once you have complete the "Outpost in the Woods" Side Quest, head north
until you cannot venture any further that way, and then follow the rock-
and-thicket blockade around to the east, to the start of a nice path (which
you should follow) that takes you from almost just outside the cave with
the waterfall north, and then west to two torches, and a path leading
north-west.
Follow that path and keep going northwards until your main quest is
updated to "Defeat the Sorceress' Sentinels", and enter a battle with two
Ascacophus Gate Keepers. The Ascacophus are basically living trees that
can walk after you, stomp on you, strike at you with either open palms or
closed fists, and cast spells on themselves to big-up their combat
attributes.
Like the vast majority of the bosses, however, they are proximity-based,
so this combat is deceptively easily, as you can dupe them into following
you and then use my dizzying tactic to bring them down VERY easily.
Once they have fallen head north, and through the massive wooden doors
into Medea's Grove
=============
MEDEA'S GROVE
=============
* There is a rebirth fountain in Medea's Grove
* There is a Portal Shrine in Medea's Grove
=====================
NON-QUEST INHABITANTS
=====================
HEBE - Acolyte who tells you that Medea is beyond.
PHILEA - Acolyte who recounts how she arrived in Medea's Grove when she was
only sixteen years of age, and that within a year the Monsters
had already arrived, but that Medea, fantastic Sorceress that she
is, fought them off.
KATINA - Young Acolyte that says she hasn't learned a great deal as yet,
but that they study lots of things at the Grove, including
healing, poisons, commanding plants and animals, making balloon
animals, shape-shifting, divination and summoning. Quite a
repertoire !!
ALOPE - Storyteller who gives you more information on Medea. It transpires
that Medea DID fall in love with Jason - Leader of the Argonauts -
upon his arrival in Colchis (back when he was searching for the
Golden Fleece). Medea gave Jason the balm he needed to protect
himself from the fire-breathing oxen, taught him how to get the
men that grew from the dragon's teeth to fight amongst themselves,
and put down sleeping herbs in front of the dragon that guarded
the Golden Fleece.
She fled Colchis with Jason and married him shortly thereafter,
but he proved to be a disloyal husband and absconded, taking as
his bride the Princess Glauce. Medea was beside herself with
rage, and sent the bride a wedding gift - a beautiful dress to
wear, but one which was lined with poison on the inside. Glauce
died as a result, but that was not enough to sate Medea's rage.
She wanted to ruin Jason and everything he loved, so she took
each of the children she had borne him, and killed them one-by-
one. A very, very sad tale indeed.
KRANTOR - Hunter who says that things in the Grove are safe "as long as you
watch your step" - I think I know what he means by THAT *snip
snip ... snippy snippy snip squeal AAAAAAAAARGH*, don't you ?????
=================
QUEST INHABITANTS
=================
MEDEA - Sorceress of the Ixian Wood who says, rather fittingly, that she
should turn our blood to OIL for having slain her guards and THEN
seen fit to ask for her aid (it is rather gung-ho - my bad), and
who then gives you the task of recovering the single eye of the
Weird Gray Sisters who live at the end of the path Medea will set
you on. She says that they will not part with it willingly, and
I can't say I blame them - one eye between three sisters is hardly
a surplus to begin with, non ?? Medea then updates your main
quest, and gives you 18000 XP as a bonus.
SEMELE - Headmistress of Medea's Grove who is deathly afraid of the wrath
she will face at Medea's hands when she learns that Semele has
lost a sacred Sigil - the Sigil of the First Apoktisis. Turns
out that she was ambushed by Formicids whilst out in the woods,
and that they took it from her. She gives you the "Stolen Sigil"
Side Quest.
LAMPIDO - Acolyte who says that she can make you up a potion that will
grant you remarkable powers, but that she requires three active
ingredients to enable her to do so. She gives you the "Lampido's
Potion" Side Quest.
PROCNE - Acolyte who gives you a bit more information for your "An
Impossible Task" Side Quest, namely that the tome which Medea
wanted was the Tome of the Liche Queen Kallixenia. Medea must
have known that there was no way the poor woman would have been
able to get the tome in one piece, as Kallixenia is a VERY
powerful Liche Queen. In any event, Procne gives you the Waking
Stone - an item which will need to be placed on Kallixenia's Altar
in order to summon her. She says the altar is in the Tsakonian
Ruins, and that Kallixenia will not part with the book willingly.
This updates your "An Impossible Mission" Side Quest. If you
speak with her again, she will tell you that the Tsakonian Ruins
lie within the Soronis Swamp, and that the quickest way to get
there is via the Ampelian Caves (which is EXACTLY what we are
going to do).
CARME - Acolyte (just up the steps from the main plaza area of the Grove)
who tells you about the former Great City of Propontis, which has
now fallen into a swamp. She says that the Tsakonian Kings ruled
Propontis, and that each hid a fortune in their palace. The
Legends tell that the greatest of the Tsakonian Kings - Dorus -
has not yet had his treasure found, and that whilst many have
tried to find it, none have returned with it, many of them not
returning at all. She gives you the "Wealth of Ancient Kings"
Side Quest.
================================================
MERCHANTS, ENCHANTERS, CARAVAN DRIVERS & MYSTICS
================================================
EUTROPIOS - Trader
=========================
QUESTS FROM MEDEA'S GROVE
=========================
================
THE STOLEN SIGIL
================
Leave Medea's Grove via the north-east and pass through the two torches,
entering the Ixian Outlands. Keep heading north-east, and down the stairs
that lead into the Ampelian Caves.
In the Ampelian Caves, activate the rebirth fountain, and then head north-
east, and to your first battle with the Formicid - basically ANTS !! Yes,
ants. And like their real-life counterparts they are caged in carapace,
and attack en-masse. Fortunately, however, in Titan Quest Immortal Throne,
they fall PRETTY easily :)
Follow the path as it curves 90 degrees to the south-east, and then follow
the path to the south-west, taking the branch that leads south-east as soon
as it becomes available to you.
As this area pans out, into a large cave leading off to both the north-east
and south-west, head north-east and into battle with
================================
QUEEN YCHT'SSK'L - FORMICID HERO
================================
Queen Ycht'ssk'l is the Formicid B!ATCH that is holding the Sigil that
Semele needs back badly.
She is a spellcasting ranged attacker, who's primary attacks are :-
> Mini ball of Lightning
> Multiple blasts of Lightning
Once she has fallen to your MIGHT, pick up the Sigil of the First Apoktisis
and then open the Ornate Chest in the back of the room, line your pockets
and teleport back to Medea's Grove to give the Sigil to Semele, which will
complete this side quest and earn you the reward of a Magical Staff and
30000 XP.
================
LAMPIDO'S POTION
================
Just as a quick re-cap ...
Lampido - an Acolyte in Medea's Grove - requires three active ingredients
in order to craft you a potion of GREAT power, being :-
A) A bit of Cybe Mushroom;
B) Some Aestivus Root; and
C) The Petal of a Night Blossom
She says that if you bring her the three ingredients, she will make her
potion up for you.
Teleport back to the Ampelian Caves from Medea's Grove, and then head
south-west all the way to the very south-westernmost corner of the cave
(it makes a proper right-angle), and then turn and head due north-west,
up up up until you can exit the Ampelian Caves via the stairs in the north-
eastern wall.
Do so, and you will emerge in Soronis, right beside a rebirth fountain.
=============
!! WARNING !!
=============
PLEASE take care in this area, as you are about to encounter another new
type of adversary - the Lamia - and if you are not careful they WILL slay
you very quickly, and if they have traced you back to the rebirth fountain
you may wind up losing a TRUCKLOAD of XP as you die, are reborn, die, are
reborn and so on, without being able to get to your headstone :(
The Lamia are similar to centaurs, but instead of having the hindquarters
of a horse, they have the hindquarters of a cat, enabling them to move
with grace and speed. They can do HUGE amounts of damage given their
comparatively small size, and will outpace all but the quickest of
characters in no time, so BE CAREFUL.
From the rebirth fountain you need to head due north, and keep going
north until you can go no further. Just to your north-east is a set
of two torches and steps leading up into a proper structure with tiles and
EVERYTHIN' !! :)
Head north-west and activate the rebirth fountain, and then keep going
north-west and you will see two yellow icons with black exclamation marks
appear on your compass - the first (and nearest) is off to your west -
the Nightblossom, and we shall go there first.
============
NIGHTBLOSSOM
============
Only a fool would think nature did not have its defences, but I could
EASILY forgive anybody that was not expecting to have his or her @ss handed
to them on a plate by a plant.
The Nightblossom is a DANGEROUS little beast let me assure you - much like
that cute rabbit from Monty Python's Quest for the Holy Grail - do NOT
underestimate it.
It is basically a giant quill vine, which attacks by spitting out five
poisonous barbs at a time. The poison is, in most cases, deadly, and the
rate of fire is RELENTLESS and rapid, so watch your step please !!
Once the Nightblossom has fallen, take the petal it drops, and head north-
west and into a large Anouran Enclosure, and then due north of there to
get the Cybe Mushroom (which will be yielded WITHOUT a fight I'm sure you
will be pleased to here - although that mushroom DOES look like it would
be VERY tasty smeared with goat's cheese and other niceness) :)
Head south and exit the Anouran Encampment, and then turn and head north-
east, PAST the two pre-lit torches, through the Anouran Camp, and then east
and over the tiled bridge that leads to the north-east. You will be able to
see the Aestivus Tree on your compass as another yellow circle with a black
exclamation mark in it, so head over to it, wiping out all the Anouran
SCUM as you go.
The Aestivus Tree will yield its root without a fight.
Now that you have all three ingredients for Lampido's Potion, teleport back
to Medea's Grove and give them to her.
Lampido will tell you to go away and come back (just speak to her again),
and she will then give you the potion (which you will automatically drink)
which gives you +6 Strength, +80 Health (and 30000 XP for completing the
quest).
===========================
THE WEALTH OF ANCIENT KINGS
===========================
Once you have teleported back to the Aestivus Tree, head south-west, back
over the bridge, and then west, and finally north-west, inbetween the two
pre-lit torches and over the bridge.
Do not follow the pathway that leads to the north-east just yet - instead
head due north-west and follow the treeline as it gently guides you up and
into the Tomb of Tsakonian Queens.
From entering the Tomb of Tsakonian Queens, head (room-by-room) :-
North-west
North-east and down the steps to the second level
... on the second level, head ...
North-west
... and straight into battle with Queen Alkiste.
==============================
QUEEN ALKISTE - CORRUPTED SOUL
==============================
Queen Alkiste is an Archer through-and-through. She is very quick to move
into position, and does not mind getting up-close-and-personal if that is
how you want to play things ... just don't give her a kiss - bleurgh !!
Her main attack is to fire three flaming arrows at you simultaneously.
Naturally this does a LOT of damage, but once you are used to dodging it,
you will be able to take her down with little problem.
Once she has fallen, pick up the Ancient Moon Key that she drops, and leave
her Tomb (south-east, up the stairs in the south-western wall, then south-
west and south-east to the exit from the room where she starts in).
Once you are back outside, head south to the pathway you left to get here,
and then follow the broken portions of the pathway as they head off and
up to the north-east, coming at last to a rebirth fountain, which you
should as always activate immediately, and passing through two torches
and over a tiled bridge to get into the Tsakonian Ruins.
From entering the Tsakonian Ruins, turn and head north-west, and then
north-east, down some steps and onto darker stones (which are underwater).
Keep heading north-east until you travel through a set of pillars that
from a square (loosely) around you, with the north-eastern and south-
western sections missing - i.e. you can run straight through it.
JUST BEYOND that is a vine which hangs overhead. When you get to the vine,
turn and head north-west, ignoring the yellow circle with the black
exclamation mark on it which points you on your compass to the Altar of
Kallixenia, as we will come back to HER in a little bit.
Keep heading north-west, until you go up some steps and out of the water.
Follow the steps as they lead to the south-west (two flights of steps), and
then descend the steps to your north-west, to get into the Great Tomb of
Aegimius.
Once you are inside the Great Tomb of Aegimius, head (room-by-room) :-
North-west
South-west
North-west
In this last room you will do battle with King Aegimius ...
==============================
KING AEGIMIUS - CORRUPTED SOUL
==============================
King Aegimius is a hand-to-hand sort of fellow, which works to your
advantage since he slumps towards you at quite a sluggish pace. His main
attacks are :-
> Onslaught
> Single-Axe Strike
Once he falls, he drops the Ancient Sun Key, which you need to pick up.
Once you have slain King Aegimius, head (again, room-by-room) :-
South-east
South-west
South-east
Slay the Undead Warriors (Members of the Tsakonian Court who would have
been in the service of King Aegimius), and a young woman named Nysa will
call out to you. Go over and speak with her, and she will explain that
she is most grateful for your having saved her, but she would like very
much for you to do the same for her brother, who was wounded by the
monsters before escaping. She gives you the "Treasure Hunters" Side
Quest.
=====================
AN IMPOSSIBLE MISSION
=====================
Leave the Great Tomb of Aegimius (north-west, north-east, north-east,
south-east of your present location), and then head north-east, down the
two flights of steps, then south-east and down the steps back into the
water.
Keep heading south-east, past the statue of the man bearing a shield who
is looking north-east, and then up the stairs to your north-east, and
inbetween the two pre-lit torches.
Head north-east, and then south-east, and take the stairs leading up to
your north-east when the opportunity presents itself.
Follow your compass to the north-west and up to the Altar of Kallixenia.
Click on the Altar of Kallixenia to place the Waking Stone upon it. This
will automatically summon Kallixenia the Liche Queen, and she will start
attacking you without mercy IMMEDIATELY.
========================
KALLIXENIA - LICHE QUEEN
========================
Hokay, I would like you to imagine fighting a Liche Queen, like the many
Liches you have fought in the past, but not a NORMAL one ... OH no ...
imagine instead fighting one armed with a MACHINE GUN. THAT is what
fighting Kallixenia is like.
Kallixenia is VERY fast, attacks like (as I've said) an AK47, has GREAT
range and can slay you in SECONDS so WATCH OUT !!
Her main attacks are :-
> Rapid-fire Poison Projectiles - Great Range and Shocking Speed
> Soul Energy Cascade - Summons blasts of soul energy from the heavens
to rain down upon you.
> Soul Energy Surge - Like Flame Surge but with Soul Energy instead.
> Life-steal - A power which she uses to restore her own health.
I can only suggest being EXTREMELY quick on your toes, and using scrolls
and other enchantments to bolster your fighting skills when facing her
in combat. She is just SO quick that this almost feels a bit unfair to
be honest !
But nevermind - she will, I have no doubt, fall to your powers, and you
will have the satisfaction of beating that b!atch DOWN !! :)
Once she has fallen, speak with her and she will express nothing short of
HORROR at the fact that you have awoken her from her undead slumber just to
nick what is, to her, little more than a book of recipes ! She says that
she hopes you screw up the incantations and go straight to Hades for your
IMPUDENCE. Fair play luv - might see you there then !! *whacks her on the
head and walks off*.
Teleport back to Medea's Grove and give the Tome of the Liche Queen
Kallixenia to Procne, who will use it to fashion a Curative Elixir which
she asks you to take to Maera in Rhodes so that she can administer it to
her son. Procne rewards you with an Arcane Formula as a gift.
Use the Portal Shrine (DON'T TELEPORT !!) back to Rhodes to give Maera the
gift of life for her son, and she will ALSO reward you with 35000 XP, and
the completion of this LONG overdue Side Quest !!
====================
THE TREASURE HUNTERS
====================
Use the Portal Shrine in Rhodes to return you to your Personal Portal in
the Tsakonian Ruins and, from the Altar of Kallixenia, head south-west,
and then up the stairs to your north-east, past the pre-lit torch.
Head north-east, through the pathway that leads between the Corinthian
Pillars, and then turn and head up the stairs to the north-west. From here
head due north-west, and then through the pathway beside the pre-lit torch
to your north-west, where you should turn and head north-east, and then
just keep on going north-east until you bump into Herodion - a young man
who is standing about doing ... not a lot really.
Herodion is Nysa's brother, and he thanks you for saving his sister. He
says that they only came to the Great Tomb of Aegimius because Carme - one
of the Acolytes from Medea's Grove (in case you'd forgotten) told them that
she needed some crucial information about King Dorus from that location.
Speaking with Herodion completes the Treasure Hunters Side Quest, and
earns you a well-deserved 25000 XP.
==================================
THE WEALTH OF ANCIENT KINGS CONT'D
==================================
From Herodion, head south-east as far as you can go, and then turn and
go south-west, taking the steps to your south-east when you are able.
Take the entryway to your north-east, and then head south-east down the
several sets of steps until at last you come to a rebirth fountain.
From the rebirth fountain, head north-east and down the steps into the
watery area. WATCH OUT FOR KARKINOS MUD RUNNER AMBUSHES - there are two
in this area. Head north-east and then north and up the stairs to get
out of the watery area, and back onto some nice, cleanish tiles.
Head north-east and then south-east and keep going south-east until you
can see the icon for the Great Tomb of Dorus appear on the right-hand side
of your compass. Travel to it (you need to take the steps leading DOWN
from the courtyard with the statue in it - NOT the steps leading UP as
those lead to a dead-end), and then enter the Great Tomb of Dorus once
you are ready.
I shall give you simple room-by-room instructions so as to enable you to
get around this rather strange building as quickly as possible :-
From entering the Great Tomb of Dorus ...
North-east
South-east (into the room with the two sets of four statues)
North-east (into the room with the single statue of an archer)
Open the Ancient Lock - Moon Sign using the Ancient Moon Key you picked
up from the corpse of Queen Alkiste
North-west, and activate the Ancient Lever
South-east (into the room with the single statue of an archer)
South-west (into the room with the two sets of four statues)
North-west
North-east
North-west (through the now unlocked Ancient Wooden Door)
Open the Ancient Lock - Sun Sign using the Ancient Sun Key you picked
up from the corpse of King Aegimius
North-west, and activate the Ancient Lever
South-east
North-west (through the now unlocked Ancient Wooden Door) and into
battle with
===========================
KING DORUS - CORRUPTED SOUL
===========================
King Dorus is a greedy little Spellcaster who has absolutely NO intention
of allowing you to walk away with his well-guarded and elaborately
protected treasure.
His main attacks are :-
> Lightning Blast from his Staff (rapid-fire)
> Thunderball
He is slow to move, and should not prove to be TOO great a problem for you
to defeat.
Once he is no more, head through the north-eastern tunnel to get access
to his hidden treasure, which comprises 2 Quality Chests, 2 Ornate Chests,
and a Majestic Chest, AND the completion of this Side Quest which gives
you 40000 XP !!
============================
SECTION 4.17 - MEDEA'S PRICE
============================
FINALLY we get back to the main quest !!
Leave the Great Tomb of Dorus (south-west, south-east, south-east, south-
west, south-west of his treasure chamber), and head back up the stairs to
the Tsakonian Ruins.
Head up the stairs to the south-west, and then turn and head north-west,
and keep heading north-west in virtually a direct line from the courtyard
with the statue in the area adjacent to the Great Tomb of Dorus, all the
way up until you see the sign for the Temple of the Gray appear on your
compass.
Follow the compass point to reach the Temple of the Gray, and then enter
the rather ominous-looking structure.
As soon as you enter, you will hear one of the sister remark that she
senses something is coming. NOT good - they know we're here !!!!!
The main antechamber in the Temple of the Gray is nothing more than a
small room with a set of stairs leading down.
Going down those stairs will send you straight into the next boss fight
which is with, as you have already been made aware ...
======================
THE THREE GRAY SISTERS
======================
This is a VERY difficult boss fight, rather predictably because you have
to take on THREE bosses at once, each of which could quite possibly beat
you down repeatedly on their own. The three sisters are Pemphredo, Deino
and Enyo.
All three of the sisters have exactly the same main attack - a snaking
bolt of blue energy which travels fast and does good damage to you.
However, only TWO of the three Sisters will ever be using this attack at
any given time. It is the one that has the eye that you need to be most
cautious of, as the eye gives the sisters additional powers over and above
their usual ones.
Whoever is holding the eye (which hovers above their heads) has the ability
to create a field of life-draining energy beneath your feet which does
INSANE amounts of damage to you if you don't get out of the way IMMEDIATELY
and the regular blue snaking energy bolts become much larger and more
powerful snaking bolts of red energy.
In addition, the wielder of the eye becomes more resilient to damage.
Focus your attacks on one of the two sisters that does not have the eye.
If she picks it up from her sisters, focus on another one. The best way
to win this combat is not to kill two and force the third to wield the eye,
but instead to whittle down the health of all three so that whichever one
is left with the eye when the other two die has so little health they fall
easily.
So, for example :-
Pemphredo starts with the eye
Sinister attacks Deino
Pemphredo gives the eye to Deino
Sinister attacks Enyo
Deino gives the eye to Enyo
Sinister attacks Pemphredo
Just try and keep things balanced like that - it will make your life
simpler in the long run.
An alternative strategy would be to focus all your attacks on bringing any
ONE of the sisters down, and then chopping and changing between the other
two so that you whittle the two of them down. This does have the advantage
of not having to dodge THREE projectiles at the same time.
Once all three of the Weird Gray Sisters have fallen, take their eye, and
plunder the 3 Chests and Majestic Chest that litter their abode, and then
teleport back to Medea's Grove (we don't need to come back here again).
==========
EASTER EGG
==========
Did you notice how the Temple of the Gray is shaped like an eyeball with
an optic nerve ?
Once you are back in Medea's Grove, hand the eye over to Medea, and she
will use it in an incantation to open a portal to Epirus, together with
updating the Main Quest and rewarding you with 30000 XP and a set of THREE
Scrolls (bless her !!)
================================
SECTION 4.18 - THE ROAD TO HADES
================================
Medea directs you to travel through the Portal she has just created to the
Refugee Camp of Epirus.
=====================
EPIRUS - REFUGEE CAMP
=====================
* There is a rebirth fountain in the Epirus Refugee Camp
* There is a Portal Shrine in the Epirus Refugee Camp
=====================
NON-QUEST INHABITANTS
=====================
POLYPEMON - Refugee who describes the attack on his city that drove him
into becoming a refugee.
ARCHYTUS - Storyteller who tells the tale of ... you !! :)
MULIUS - Upset Refugee who feels that the Gods having abandoned man is
actually man's fault, and that we are now entering a new age -
The Age of Beasts !
THESSALA - Grieving Refugee who sagely comments that if you could follow
the path of the Shades of all the people that died last night,
that would lead you to Hades.
=================
QUEST INHABITANTS
=================
EPIGENES - Guard who recounts how he and his comrades tried to escort as
many of the civilians out of the City as they could, but the
monsters descended upon them so quickly there was little time.
He says he sent Theogenes and a platoon of men back to find
any stragglers, but that they could really use the aid of a good
strong fighting arm (meaning us). He gives you the "Among the
Ruins" Side Quest.
PISISTRATUS - Healer who is looking for his young aid Admetus, whom he
sent back to the City to recover supplies (food and medicine).
Pisistratus regrets having sent him as he has taken an extremely
long time to travel there and back, and Pisistratus cannot tend
to the wounded without the supplies, so he is in something of a
quandry. Pisistratus gives you the "A Dangerous Mission" Side
Quest.
PYTHES - Guard who speaks of the Monster's Captain Proseia. He says that
she is responsible for the speed, strength and completeness of
the monster's victory over the City, and that if she were to
fall, he is sure they would be able to mount a reasonable
comeback. He gives you the "Enemy's Captain" Side Quest.
================================================
MERCHANTS, ENCHANTERS, CARAVAN DRIVERS & MYSTICS
================================================
HELIODORUS - Trader
=================================
QUESTS FROM EPIRUS - REFUGEE CAMP
=================================
===============
AMONG THE RUINS
===============
Follow the path that leads out of the Epirus Refugee Camp to the north,
and leads north-west, then west and then north-west again, and keep going
north-west and into the City of Paseron.
As you enter the City of Paseron, activate the rebirth fountain, and speak
to Theogenest the Guard, who tells you that if you can send him the groups
of hiding survivors, he will guide them back to the Refugee Camp, but he
says you might find it rather difficult to find them as they will be either
trapped, or hiding in terror from the monsters that swarm the City.
Head up the stairs to the north-west, and into the City of Paseron proper.
I shall direct you from your starting location to each group of survivors,
who will NOT make a break for their freedom until the monsters in their
area are slain. Once they are liberated, they will make their own way back</pre><pre id="faqspan-8">
towards the entrance to the city - however they will not go more than a
certain distance towards it unless you are with them, so a very modest
degree of chaperoning will be called for.
SO ... from entering the City of Paseron's main plaza ...
> North-east of the Statue and up the stairs
> South-west back down the stairs, and then north-west up the stairs
and keep heading north-west into the dilapidated building
> South-west back to the main path leading south-west to north-east
from the top of the stairs, and then head south-west, and finally
south-east to the next set of survivors
> North-west of the previous set (although you must travel ever-so-
slightly to your north-east to get back to the main pathway first)
> North-west of that previous set
Once you have saved the final set, return to Theogenes, and he will give
you a magical item (I got a random yellow charm), and 32000 XP. This
completes the "Among the Ruins" Side Quest.
===================
A DANGEROUS MISSION
===================
From Theogenes, head north-west and into the main plaza of the City of
Paseron, and then exit via the stairs in the north-eastern corner which
head north-west.
At the top of the stairs turn to the south-west, and follow the tiled
path south-west, and then north-west as it reaches the corner of the
crumbled building, and then north-east as it goes around another corner
of the same building. Keep heading north-east up the stairs and into
your first combat with the Empusa.
======
EMPUSA
======
Empusa are winged female demons that come in four different varieties.
Empusa Venomancers - Masters of Poison
Empusa Pyromancers - Masters of Fire
Empusa Frost Reavers - Masters of Ice
Empusa Soul Carvers - Masters of Spirit
Kill the Venomancers and then turn and head north-west and up two small
sets of stairs. Simply keep heading north-west up the next flight of
steps and then down a couple of barely noticeable steps and you will find
Admetus ... dying !!
Speak with him and he will tell you that he was wrong to think that he
could do this quest on his own. He gives you the supplies he had, and
asks you to take them back to the camp. He feels as long as his death
has not been in vain, it does not matter that he dies.
Poor guy !!!!! :( Remember the name Admetus, for he is a man of honour
and worthy of our respect ...
Teleport (do not walk) back to Epirus, and give the Medicinal Supplies to
Pisistratus, who mourns Admetus' passing, and gives thanks for your having
return the supplies to him by giving you 65000 Gold and 32000 XP, together
with the completion of this side quest.
===================
THE ENEMY'S CAPTAIN
===================
Do you recall Pythes' having spoken to us about Proseia ? The Captain of
the Forces leading the assault on the City of Paseron ? Well it's time to
pay that BITCH a little visit - SINISTER style ;)
Teleport back from Epirus to Admetus, whom we can no longer speak with, and
head from him south-east, up and then down the first set of steps. From
here turn and head north-east down two small flights of steps, and then
keep going north-east until you cannot go any further, your path being
blocked by loads of rubble.
From here turn and head south-east, and assist the Paseron City Guard in
their battle at the archway with the Keres. After the Keres here have
fallen, head north-east through the archway, and into a large amphitheatre.
From here, head north-east under the archway and up to the rebirth
fountain, which you should of course activate.
Continue north-east past the rebirth fountain, and when you can go no
further north-east, turn and head north-west up the stairs nearby. Then
turn and head south-west, and then north-west again once the opportunity
presents itself.
Once you reach the small courtyard with steps leading south-west, north-
west and north-east, take the steps to the south-west, and keep heading
west-south-west down the stairs, past the Paseron City Guard who are doing
battle with the Keres and Empusa (help them if you feel so minded - I
would as it's always good to have LIVING allies on-side), and take note of
the yellow icon with the black exclamation mark inside which denotes
Proseia the Daemon Captain, on your compass.
To do battle with Proseia, simply head west into the courtyard and she
will oblige you !!
========================
PROSEIA - DAEMON CAPTAIN
========================
Proseia is an Empusa Soul Carver, so expect a LOT of spirit attacks from
her. She is far from the most dangerous opponent you will have faced
thusfar in your campaign, however, and should fall reasonably easily.
Her primary attacks are :-
> Spirit Projectile
> Circle of Power (which will do LOTS of damage to you VERY quickly,
so be somewhere else when she casts this !!).
Once Proseia has fallen, teleport back to Epirus and speak with Pythes who
will grimly assess the situation, and say that even though the situation
remains grim, with Proseia dead, their chances at retaking what is theirs
by rights have improved. He gives you a random magical weapon (I got a
random yellow weapon), and 32000 XP (together with the completion of this
side quest).
Teleport back to Proseia and head over the stone bridge and out into the
Paseron Outskirts. From here, head a short ways along the path to find
and activate the rebirth fountain, and then simply follow the main path
as it leads north-west and then takes a sharp turn to go north-east and
into the Pindos Mountains.
Follow the path down the long set of steps into the Passage of Souls,
and descend down, down, down into
==================
HADES - DARK GROVE
==================
So THIS is what Hades is like ... hey ! LOVING those purple flowers by
the way !!
Not bad at all ... a bit dark and ... well ... it IS the Land of the Dead
I suppose =./
Ho-hum !! =)
Head from the stairs north-west and up to the rebirth fountain, and please
take note that rebirth fountains in Hades do NOT look like they do in the
Land of the Living ;)
From the rebirth fountain, head due north and through the two torches,
which will light up blue as you pass (COOL !!).
From the torches, head north-east and keep going north-east until you
reach the River Styx, which automatically updates the Main Quest - "The
Road to Hades".
==============
THE RIVER STYX
==============
Definitely one of the MAJOR points of interest for me as a boy when I was
studying Greek Mythology at primary school was the River Styx. It
FASCINATED me !!
* There is a rebirth fountain at the River Styx
* There is a Portal Shrine at the River Styx
=====================
NON-QUEST INHABITANTS
=====================
UCALEGON - Shade who seems rather confused that nobody has come to ferry
them over the River Styx. He doesn't know whether they should try
and make their own way across, or whether the Ferryman should be
coming back or what ... =./
VETTIAS - Storyteller Shade who stands on Charon's Dock, and tells you the
tale of King Sisyphus who did everything he could to get back out
of Hades. Sisyphus was wise and cunning, but SERIOUSLY annoyed
Zeus, who sent Hades to take him to the underworld. Hades arrived
with menacles, and Sisyphus asked him how they worked, so Hades
put them on, and Sisyphus locked them !! For days nobody could
die, until Ares showed up to help Hades out. Sisyphus asked his
wife NOT to bury him, so that when he arrived at Hades, he was
able to speak with Persephone, and beg to be returned to the Lands
of the Living that he might be buried properly. Ultimately the
Gods grew EXTREMELY weary of his treachery, and sent Hermes after
him to bring him back to Hades, where as punishment for his
tricks, he was to push a boulder up a ramp over and over and over,
only to have it roll back down again once he had done.
Interestingly, I thought Sisyphus was actually cast into Tartarus
to perform this task, but it is of little consequence to the tale.
GLAUCON - Shade who says that it is wrong that he should have to wait here
with the rest of this shade rabble (RABBLE ??), and who DEMANDS
that you venture off to find Charon and compel him to do his job.
WTF !?!?! We ought to kick this MUPPET into the River ourselves !!
KLEIO - Shade that is sad because she won't get to see her husband or nine
children unless she is ferried across the River Styx, and into
Hades.
=================
QUEST INHABITANTS
=================
ARCHETIMAS - Confused Shade who asks whether you know where Charon has
gone, or how to row the boat in his absence. He says he and his
fellow shades want to cross the River Styx, but they have no means
to do so without Charon (the Ferryman). He updates the "Road to
Hades" Main Quest.
ANTIGENES - Shade who says that they do not know what to do, as Charon has
abandoned his post at the boat, and left them with no way to cross
the River Styx ! Hipparchus, one of the shades who was here,
tried to gather together a crew to main the boat, but he was taken
away by the ever-mysterious "them" ... and now nobody else has
even tried to row the boat. He gives you the "One Who Would Lead"
Side Quest.
COPREUS - Hunter Shade who informs you that he has seen a Beast in the
Stygian Marsh that devours shades whole !! He says that it dwells
in the waters of the river, and has started to come ashore,
emboldened by the large numbers of shades passing through and into
Hades. He says he would have fought the beast himself, as in life
he was a capable hunter, but he has not got the necessary weaponry
to be able to do so here in the afterlife. He gives you the
"Stygian Lurker" Side Quest.
================================================
MERCHANTS, ENCHANTERS, CARAVAN DRIVERS & MYSTICS
================================================
None.
==========================
QUESTS FROM THE RIVER STYX
==========================
==================
ONE WHO WOULD LEAD
==================
Head east-south-east of Copreus the Hunter Shade, and through the two
torches.
Stay on the dirt path (which you will see easier on the compass than the
main screen), and follow it south-east, and then sharply north-west up the
very well carved stairs and onto the Shrine of the Golden Bough.
From entering the Shrine, turn and head south-east, and then descend the
steps leading south-east, through the two torches and back down to the
River Styx.
Head to the east, and follow the shoreline of the River Styx southwards,
coming slightly inland and down to the rebirth fountain.
From there, head south-west and into a large Pale Formicid Encampment,
slaying ALL the Pale Formicid you encounter there, and heading over to
a prison made of bone in the south-western corner, wherein Hipparchus is
contained. BEWARE, however, as Hipparchus is protected by Orok
Skullcracker - a Troglodyte Hero of considerable power, who is standing
under the covered hut just to the north-east of Hipparchus.
=================
OROK SKULLCRACKER
=================
Orok Skullcracker is a tough mutha, who moves fast for a Troglodyte, and
whom is, I believe, a Master of the Rogue School of Training.
His primary attacks are as follows :-
> Calculated Strike - makes a large green tear on-screen, which I take
to be the onset of poison damage.
> Earthquake - small radius but good damage, plus it can stun you
> Hammer Strike - a blow with a lightning-enchanted hammer
Once Orok Skullcracker falls, Hipparchus - the Stalwart Shade - is
automatically released from his imprisonment, and you should nip down to
where he was (as he will stand around just outside his prison) and speak
with him, to learn that he is not content to just be freed himself - NO !
He wants to make the way to Hades safe once again for ALL shades (bravo my
good man, bravo). He wants you to travel on and wrestle Charon's Oar from
the Ferryman, and return it to him at Charon's Dock by the River Styx, so
that he can pilot the boat himself, and take the shades that are waiting
to cross the river there, to Hades itself.
He updates the "One Who Would Lead" Side Quest for you, and you should now
make your way east-south-east, and keep heading in that direction until
you can go no further. You may have to go north and south a little to GET
to that point, but you will at last come to a totally impassable wall that
spans the entire eastern direction, north and south.
Follow the wall as it leads northwards, and you will reach the Unfinished
Bridge.
As you approach the bridge the "Road to Hades" Main Quest is automatically
updated, and Charon calls out to you, telling you that you should leave
NOW, or be destroyed.
Get ready - this is going to be a tough boss fight !!
=============================
CHARON - FERRYMAN OF THE STYX
=============================
First of all, this is a lock-in fight, and one with a really rather
irritating glitch at that. SAVE THE GAME BEFORE YOU FIGHT CHARON PLEASE.
To activate the boss fight, just head to the north-east, over the
unfinished bridge, and Charon will seal the way south-west from you, so
that retreat becomes impossible. HOW does he do this ? Well he IS the
Ferryman of the River Styx mes amis - he simply raises a gigantic wall
of water behind you of course !!
Charon attacks in two forms - first of all as a hooded man, and then once
that form has been destroyed, in his true form.
Charon's attacks whilst in his Hooded Man Form are as follows :-
> Ball of Water - He gesticulates with his right hand, and a ball of
water arises from the river (it can come from either
side), and drops itself down onto your location.
Keep moving around to avoid being smacked by these
balls.
> Oar Strike - He can mallet you upside the head with his oar.
> Summon 2 Fallen Shades Warriors - Charon can cause a ball of water to
rise from the river and be dashed to the ground on the
bridge, causing two Fallen Shade Warriors to arise and
do his bidding.
> Rising River - If he says "River ... RISE !!" and raises his oar
above his head ? Then avoid stepping on any
uncompleted area of the bridge, as it stands a chance
of a pillar of water rushing through it, high into the
air.
Once you have destroyed Charon's Hooded Man Form, he takes his true form,
which is that of a winged old man, the Oar still in his grasp.
Charon's attacks whilst in his Winged Form are as follows :-
> Ball of Water - As with his previous power.
> Tidal Wave - With a mighty flap of his wings, he causes what is
at first a small wave to start to move towards you
across the bridge. This wave will expand the closer
it gets to you, so move as rapidly to either side of
the bridge and as far away from it as you can. If
the Tidal Wave hits you, it will slow you down for a
time.
> Piledriver - He rises up into the air and then slams his Oar down
into the bridge, causing a circular ripple of water
to pour forth from the point of impact. If you see
him dart up into the air, fall back.
> Rising River - As with his previous power - however this time he
doesn't give you the "River ... RISE !!" warning - he
just lets rip !!
Charon is my favourite character from Greek Mythology - he ROCKS !! I have
always found the depictions of him as this skeletal character standing
quietly on his boat, never saying anything - just taking payment and
ferrying the souls of the dead over the River Styx - to be a really
striking image. I am pleased with the way in which he has been depicted
in Titan Quest: Immortal Throne, as the game's designers have not made
any effort to cheese him up - he is very reasonably portrayed (although
I'm not entirely convinced by the wings !!).
Charon cannot come back all the way to the entrance of the bridge, so you
can dizzy him - however it is hard to do so, as he has so many attacks
that he can hit you with. Your best bet is to stick and move down by the
entrance to the bridge - NEVER set foot on the uncompleted sections of
the bridge, and keep moving about to avoid his projectiles.
The glitch of which I spoke earlier is that if you die whilst fighting
Charon you will, of course, be resurrected at the rebirth fountain -
however unlike other boss fights, Charon does not let the door reopen to
allow you another crack at him - the wall of water he raised to keep you
IN when you first stepped onto the bridge to fight him is now keeping you
OUT !!
If anybody that reads this has come up with a fancy way of getting around
it I would love to hear it - I wound up running a trainer and using the
teleport function that comes with it to teleport back through the wall of
water, so that I could do battle with him again !! *sigh*
I do know that if you save the game and exit and then reload it, the wall
of water has dissipated, but you will only get one more crack at Charon
before the same glitch will hit you again !!
============
HELPFUL HINT
============
Whilst it didn't work for me, I have received word from Don Korrecta (aka
draktrax), who confirms that on HIS playthrough the game, he was able to
get Charon's Wall of Water to come back down by simply striking it with
his sword ... so that might work for you. Didn't for me, but it might
work for you =) Thanks draktrax !! =)
---------
It is nigh on impossible to dupe Charon into coming into combat range
before he raises the wall of water - he is too far along the bridge =./
Just be EXTREMELY careful when you face him, k ??
When he has fallen, take his Oar to update the "One Who Would Lead" Side
Quest, open his Essence, and then head over the bridge to the north-east,
activate the rebirth fountain, speak with Tiresias the Projection to learn
that Elysium itself seems to be under attack (and to earn yourself an
update to the main quest - "Judgment of the Living" together with 25000 XP
and the full restoration of your health and energy, and then FINALLY
teleport back to the River Styx, and give Charon's Oar to Hipparchus.
Hipparchus will reward you with a random essence, and 40000 XP. This will
complete the Side Quest.
==================
THE STYGIAN LURKER
==================
We shall come to deal with this foul beast in the fullness of time my
friends ... oh yes, we shall ;)
=====================================
SECTION 4.19 - JUDGMENT OF THE LIVING
=====================================
From Tiresias, head north-west a few steps, and then hug the north-western
wall and follow it north-east, and then north-west, and then finally north-
east again, before descending down and into the Stygian Marsh.
BEWARE THE KARKINOS SAND RUNNERS - they are RIFE in this area !!
Head north and under the bridge, hugging the right-hand side to activate
the rebirth fountain, and then follow the western mass of rock around to
the west, and then up the stairs leading south-west, through the two
torches.
Proceed eastwards, and over the bridge and past the rebirth fountain that
you just activated. Keep going eastwards, down the stairs. You can even
free the trapped shades from their prisons as you go if you like :)
Head north, then east and under the bridge, and keep going east, hugging
the southern rockface, to take the steps leading up and south-west, when
the opportunity presents itself, through the two torches.
Keep going west now, and then take the bridge leading north-west and
through the two torches.
Head west and then north, down another flight of stairs between two torches,
and past a rebirth fountain.
==================
THE STYGIAN LURKER
==================
Proceed north-west, and keep going until you find a set of stairs. Instead
of taking the stairs, however, head to the north-east of them by going
west of them, and there, amongst the bones and littered corpses of his
previous ... visitors ... you will do battle with ...
=====================================
SHADE FEASTER - STYGIAN HYDRADON HERO
=====================================
Shade Feaster is a NAUGHTY naughty boy. He gobbles up poor unsuspecting
shades WHOLE, and deserves to be given the SMACKDOWN.
He is a larger, blue version of a standard Hydradon, and FAR from tough
to defeat you will I am sure be glad to learn.
His primary attacks are :-
> Left-hand claw strike
> Right-hand claw strike
> Bite
> Breathe Flame
He cannot go further than a certain distance from his starting point, and
is easily dizzied. This should be a DECEPTIVELY easy fight !!
Once Shade Feaster has fallen, you are rewarded with 35000 XP and a
WHOPPING +4 to your Strength, Intelligence and Dexterity !! RESULT !!
============================================
SECTION 4.19 - JUDGMENT OF THE LIVING CONT'D
============================================
From Shade Feaster, head south-west and then up the stairs to the north,
following the path from the top of the stairs south-east, and then taking
the bridge that leads to the east. Keep going to the south-east, and then
take either of the two sets of stairs leading down to the north-east,
to enter the City of Lost Souls.
Activate the rebirth fountain by the northernmost set of stairs, and then
head north, through the archway and into the foreboding structure ahead
of you.
Head north-east, down the stairs and then north-east and finally south-
east to exit the structure, and step out into the Upper City of Lost Souls.
As soon as you enter this area, you SHOULD find that the rebirth fountain
nearby automatically activates - if it does not, help it out, before
crossing the bridge that leads north-east and following the path that goes
on from there to the south-east, taking the SECOND set of stairs that go
up and north-east, and then following the next set of stairs north-west,
before crossing the long bridge heading north-east.
Activate the rebirth fountain, and then head east and into the structure
nearby.
From entering this building, head north-west until you reach the north-
western wall, and then follow it north-east to take the stairs on leading
down and north-west.
In this next room, simply keep heading south-west until you exit the
structure, and come out in the Lower City of Lost Souls.
Follow the path to the south-east, under the bridge, slaying the large
numbers of Troglodytes as you go, past the statues (the path will curve
so that it eventually winds up going due south), and into the archway
marked "Tomb Entrance" on your compass - it is in the wall to the west
of you just after your fight with the Empusa Venomancers in this canyon.
Once you enter this tomb, head north-west, and keep going north-west until
you encounter a shade named Aristonymus, who speaks to you of Hades' VAST
wealth, and how the bulk of it lies just beyond the doorway to your north-
west !!! Unfortunately the door is HEAVILY protected. He gives you the
"Hades' Treasury" Side Quest.
===============
HADES' TREASURY
===============
In order to gain access to this treasury, you will need to obtain FOUR
keys, each of which is protected by a guardian. Since you cannot rush
your encounters with these four guardians, I shall refer back to this
side quest whenever you are about to find a guardian, and remind you
what it's all in aid of ;)
For your information, the four generals you need to find, and the keys
they hold, are as follows :-
1) Thyia of the Stygian Frosts, who holds the Frost Stone
2) Canace the Serpent Queen, who holds the Venom Stone
3) Metriche, who holds the Flame Stone; and
4)
============================================
SECTION 4.19 - JUDGMENT OF THE LIVING CONT'D
============================================
Exit the chamber Aristonymus is standing in by heading south-east, and
when you get back to the Lower City of Lost Souls, head east and then up
the S-shaped set of stairs leading northwards.
Enter the structure to your north and you will find yourself in
============================
THE UPPER CITY OF LOST SOULS
============================
* There is a rebirth fountain in the Upper City of Lost Souls
* There is a Portal Shrine in the Upper City of Lost Souls
=====================
NON-QUEST INHABITANTS
=====================
HYLAS - Shade who tells you that things have been really weird in these
parts recently ... first Charon goes missing, then the Judges stop
judging ... then new breeds of Daemon start marching through their
lands ... he just can't fathom where they are going ...
MARPESSA - Shade that tells you how the shades that inhabit the City of
Lost Souls were deemed by the judges to be neither pure enough for
Elysium, nor evil enough for Tartarus. She is perplexed that even
in their state of comparative peace and tranquility, they are now
beset by shades running around with sword and shield trying to be
the big heroes *wooooo*
NOEMON - Ancient Shade who recounts what it was like when Odysseus first
came to these parts. He wonders whether you are like that great
hero was.
AMATHEA - Shade who explains to you that the City of Lost Souls is where
every shade must travel in order to venture beyond and reach the
Tower of Judgment. It is in that Tower that they are judged, with
the wicked being sent to Tartarus, and then great going to
Elysium. All those that fail to go either way, return here.
=================
QUEST INHABITANTS
=================
LEDA - Priestess Shade who recounts the tale of how before the Great War
between Gods and Titans, Zeus got into a quarrel with a Titan, and
threw a thunderbolt at him which hit him so hard he was reduced to
ash. Prometheus took the ash and made the first humans from it,
placing the remainder into a sacred urn which has resided in the
Underworld, under the watch of a powerful guardian, for aeons.
Leda says that if you return the ashes to her, she will be able
to bestow upon you SOME of the power of the original titan.
She gives you the "Dust of a Titan" Side Quest.
EURYDICE - Shade that is pining for her beloved Orpheus. She says that
if you were to find her the Mirror of Psyche, which can be found
in the Cave of Whispers, she would be able to gaze upon his face
again ... and I'm guessing that would make her happy ;) She gives
you the "Eurydice and Orpheus" Side Quest.
CALLICRATES - Scoundrel Shade. Ah so it appears we have scoundrels in the
afterlife as well eh !! Fair enough. Callicrates wants you to
do him and the order he represents a small favour. He wants you
to destroy a Daemon Caravan of supplies in the Salt Flats, as it
would prove a serious blow to the Daemon Forces. He gives you the
"An Invitation" Side Quest.
PHYLEIDES - Noble Shade who says that, whilst he has TRIED to get to the
Elysian Fields, only those who are judged worthy by the three
Judges are allowed to pass there. He updates the Main Quest for
you.
OENOBIUS - Priestly Shade who tells you that he and his fellow shades did
TRY and tell the living what was happening here in the Underworld,
but that their cries fell on deaf ears. One of the first targets
the Daemons hit when they began their assault was the sacred
structure known as the Necromanteion - an Oracle structure, and
the only way for the shades to communicate with their descendants
in the Lands of the Living. Without being able to regain control
of the Necromanteion, the shades will not be able to warn the
living of the attack force that is building up against them, here
in the Underworld.
He gives you the "Necromanteion" Side Quest.
PYLADES - Rough Shade that you can only speak to after completing the
"An Invitation" Side Quest for Callicrates.
================================================
MERCHANTS, ENCHANTERS, CARAVAN DRIVERS & MYSTICS
================================================
CODROS - Enchanter
HOREMWIA - Caravan Driver
LASTHENES - Mystic
OROITES - Blacksmith
EPIZELOS - Arcanist
========================================
QUESTS FROM THE UPPER CITY OF LOST SOULS
========================================
============================================
SECTION 4.19 - JUDGMENT OF THE LIVING CONT'D
============================================
Leave the Upper City of Lost Souls via the archway in the north-eastern
wall just south of Pylades the Rough Shade, and you will step out onto the
Plains of Judgment. Activate the rebirth fountain nearby.
There are three shades in the immediate area that you can speak with if
you fancy it :-
1) Lysikles - a Shade who says that there is nothing good for you OR
him in the Tower, and that he would stay clear of it if
he were you.
2) LAMI - a Shade who speaks ill of Aristonymus. Apparently he says
that he was once a minor, but she swears he has never
wielded a pick in his life. She says he was nothing more
than a jewel thief in life, and that he continues to be
one in death; and
3) TROPHIMUS - a Skulking Shade that seems to almost WANT to be found
by the Daemons ... what a FREAKLIN !?!?!
Head off to the north-east, and straight into your first encounter with
some new enemies ... the Furies.
======
FURIES
======
Furies come in two MAIN varieties - Howlers, and their more powerful
cousins the Matriarchs.
They look like big bats. Howlers attack by flapping their wings and trying
to scratch you with their clawed feet, whereas Matriarchs can cast a wall
of sound at you, which ripples towards you very much like Charon's Tidal
Wave ability, aside from the fact that whilst THAT did a lot of damage to
you, THIS simply stuns you for a fair few seconds, making you reasonably
easy pickings for larger groups of monsters.
=============
AN INVITATION
=============
Head north-east of the Furies, and then turn and head north-west and into
the Salt Flats. You will be assailed by another new type of enemy - the
Odontotyrannus, which will come at you as either Brutes (the smaller, red
versions of this HUGE hulking monster), or as Behemoths (the larger, orange
and yellow varieties).
To be honest these guys AREN'T much to write home about - they are just
very strong and very slow. They have no ranged attacks per se, so you can
skirmish them to death with comparative ease EVERY time.
Head north-west from where you enter the salt flats (veering to the left
when you hit the rocky outcroppings), and you will come to a set of THREE
caravans with auras around them.
These are the THREE (NOT one as we had been led to believe) caravans that
Callicrates wants us to destroy so that his big brash message can be sent
to the Daemons loud and clear.
UNfortunately what he forgot to mention is that they are guarded. WELL
guarded to be truthful. As soon as you have destroyed the first caravan
you will be ambushed by a group of four Machae Wardens (VERY fast moving,
pike-wielding Daemon Warriors) from the Tent in the centre of this
clearing.
My advice would be to destroy the first caravan from afar and then LEG IT
back away from the Machae, as they will only travel so far and then turn
and return to their tent - however they are almost guaranteed to be much,
MUCH faster than you are, and so even skirmishing them there is a good
chance that they will catch up with you.
They cannot travel as far as the exit to the Salt Flats (from whence you
just came).
Once the Caravans have been destroyed, teleport (don't walk) back to the
Upper City of Lost Souls and speak with Callicrates to earn a random
magical item (I got a random yellow jewel), 25000 XP and a further side
quest - "An Inside Source" - a mission whereby Callicrates asks you to go
and speak with his associate Pylades, whom (if he deems you worthy) it
transpires might introduce you to their insider in the Daemon Camp - a
double-dealing Daemon named Keuthonymos.
================
AN INSIDE SOURCE
================
Head to the exit of the Upper City of Lost Souls - the one that takes you
out onto the slope which heads down to the Salt Flats - and speak with
Pylades, who is just to the north thereof.
Pylades will tell you that he does not share Callicrates' ideals, but that
if you want to help them out, you may go and speak with Keuthonymos. He
says you will be able to find him in the Lower Daemon Camp, and that he
should be easy enough to spot.
Teleport back to the Salt Flats, and head north, then north-east and
finally north again (when the opportunity presents itself) so that you can
head up the very well carved stairs leading northwards between the two
torches, and into the Hecatean Agora.
Head up the stairs to the south-west, and then follow the Hecatean Agora's
path as it goes south-west, north-west, north-east, north-west, and down
a set of steps to a rebirth fountain.
You should see a yellow circle with a black exclamation mark in it on your
compass. This denotes a sub-boss that you will be fighting in a little
while - Kondor the Mighty (he's a Troglodyte). Since we are not
technically due to encounter him quite yet, there are two ways to deal
with him. You can either pick him off with magic and other ranged attacks
from the Salt Flats NOW, or you can wait until you fight him face-to-face
LATER.
If you want to slay him now, head due north-west of the rebirth fountain
and keep firing up at him from the Salt Flats - he kinda hovers around
the ledge above you.
If you would rather wait and go hand-to-hand with him (which is what I am
going to do for this guide), head north-west of the rebirth fountain, and
then south-west, and up the slope that leads to the north-west and through
the two torches, to enter the Lower Daemon Camp.
As soon as you enter the Lower Daemon Camp, head due west, and you will
find Keuthonymos - the Neutral Daemon - standing by a few tents.
Speak with him and he will tell you what he wants you to do for him. It
transpires that there is an envoy who is carrying a message for Proseia
in the Overworld ... ((( didn't we already kill her ? I guess the envoy
doesn't know that yet !! ))). He says the envoy is en route to the Daemon
Army Camp, and you should be able to intercept it in the Vale of Mourning.
If you kill the envoy and return to speak with Keuthonymos, your quest will
be completed.
==========================
HADES' TREASURY - PART ONE
==========================
If you travel to the north-east of Keuthonymos, you will find the first of
the four key guardians - Thyia of the Stygian Frosts. She is an Empusa
Stygian Frost, with the following primary attacks :-
> Rapid-fire Frost Projectile
> Freezing Ball - an orb which she lobs at you which will freeze you on
the spot for a few seconds, as per the Freeze Spell.
She isn't THAT tough - just despatch her company of Empusa Venomancers, and
then focus all your attacks on her, and she will fall quite well. She is
also in a rather difficult position to strike you in at the outset, as she
is in an encampment that is hard for her to aim out of.
Once she has fallen, she will drop the Frost Stone, which you should pick
up and deposit with a Caravan Driver next time you are in a town.
=======================
AN INSIDE SOURCE CONT'D
=======================
Head north-east of where you fought Thyia, and you will encounter first two
fire traps - and then if you keep heading north-east, down the slope and
past the caravans that lie before you, you will find Kondor the Mighty.
Kondor the Mighty is a rather large Troglodyte, who is both swift and
powerful, and who has the following main attacks :-
> Hammer strike
> Flame Surge
> Earthquake - stomps on the ground and sends out a shockwave within
a small radius - stuns you if you are caught in it
He is, as I have said before, very quick on his feet for a Troglodyte, and
so you would do well to keep THAT in mind at all times when fighting him.
Once he has died, take out the rest of his entourage, and then free the
shades in the area where he was waiting for you, to find two of note :-
Andocides - Mad Shade who prattles on about how evil it is that the
Judges are refusing to do their jobs and how you must find
them; and
Admetus !! Releasing Admetus from his imprisonment earns you the
"Admetus Among the Dead" Side Quest, with instructions for you to speak
with Admetus to find out what the hell is going on ...
======================
ADMETUS AMONG THE DEAD
======================
Speak with Admetus and he will tell you that he actually came here to try
and free the captured shades, but that he failed and was himself captured.
He forlornly says that he has failed at EVERY attempt he has ever made to
be heroic (I don't know as much m'boy !!), and that whilst he would dearly
love to enter the Elysian Fields, he has thusfar been unsuccessful.
He is of the belief that there is another chance for him, however. He says
that with the Tower of Judgment being overrun by Daemons and Fiends, he
might have an opportunity to earn his spurs there - although he admits that
at the present time he has done little to demonstrate it.
He vows to repay your kindness in saving him.
Head west of Admetus, up the slope, slaying the Jailers and freeing
the trapped shades as you go.
Follow the path (it shows up better on the compass than on the main screen),
as it winds to the north-east, then the south-east, past a rebirth fountain
to the north, and then north-east again.
When you get to the caravans, turn and head north-north-west, up up and
into the Cave of Whispers
====================
EURYDICE AND ORPHEUS
====================
From entering the Cave of Whispers, head due north-west, and keep hugging
the western wall as it goes off on a side path, beside some cracked bone
prisons, and around a large pile of rocks. Beware the HUGE number of
Albino Spiders that you will encounter in this cave, as whilst they may
LOOK like peasy-ass white spiders, when they attack en masse they have the
ability to generate an energy attack by pooling their energy (during this
time a red energy band begins to connect a group of them together), and
deliver a large blast of light green energy to your character, doing good
damage, usually at critical times.
The larger albino spiders - the Albino Spider Queens - also have the power
to freeze you on the spot, making you easier pickings for them to attack as
a group.
Just keep hugging the western wall, and follow the path as it curves to
the north-east. Your target is the monster denoted on your compass -
The Bloated One, and when you have cleared a path TO the Bloated One, you
should enter into combat with it.
=============================
THE BLOATED ONE - SPIDER HERO
=============================
The Bloated One is, as its name suggests, a big fat bloated albino spider.
I am not a huge fan of spiders, but this one in particular creeps me out.
It is quick to move (it will almost CERTAINLY outpace you), strong, and
has the following attacks :-
> Summon a group of 6 albino spider minions
> Web - freezes you on the spot for a few seconds
> Bite
> Leg Swipe
The Albino Spider Minions which the Bloated One can summon are capable and
VERY willing to do their group power blast projectile as well, so be
careful of that - the RANGE on that thing is INSANE !!!!!
Fortunately the Bloated One cannot venture too far from its starting point,
so there is the opportunity to dizzy it - however PLEASE do not try and
dizzy it by going anywhere other than back towards the exit from the Cave
of Whispers, as it will easily be able to keep up with you if you venture
further into the Cave.
Once the Bloated One has fallen, head to behind where it was standing
originally, and open the Demonic Chest to get the Mirror of Psyche.
Teleport back to the Upper City of Lost Souls and give the Mirror of
Psyche to Eurydice, and she will use the Mirror to divine that Orpheus is
actually imprisoned ! It appears that Erato has cast him into a dark pit,
where he is being watched over by some Cyclops.
Eurydice uses the power of the mirror to open a passageway directly to
Orpheus, and the door to the west of Eurydice swings open. Head through
the archway and pass through the mirror beyond, to enter a Small Rocky
Cave.
There is only one way to go in this cave - south-west, then north-west
and finally north-east and into a chamber where Orpheus the FOP is being
held captive in a cage, and TWO cyclops are standing guard.
The cyclops - Brontes and Steropes - both have the same powers, with their
main attacks being as follows :-
> Bellow (as per Polyphemus back in Greece)
> Stomp
> Hammer Strike
I would suggest NOT rushing into the chamber, but rather enticing them into
combat with you one at a time. Of course if you ARE feeling rather gung-ho
(read: suicidal), then charging in all guns blazing is still an option !!
Once Brontes and Steropes have fallen, head over to Orpheus and release
him. He says you will have to lead him back to Eurydice, but he actually
then legs it without you ... however, as with the huddling survivors in
the City of Paseron, he will only go so far without you, so do not try
and outrace him to the mirror, as he will just stop and wait for you.
Once Orpheus and Eurydice have been reunited, speak with them both.
Orpheus (the Greatest Musician) tells of how the Muses took pity on him
when they heard how sad his song was, and bade Erato visit him to give him
solace and comfort ... however when he spurned the advances of the Goddess
of Love Poetry, she got MASSIVELY hacked off with him, and had him thrown
into a dark pit. He is MOST grateful to have been released, and even
though he is now a shade, and will never again see the living sun, he is
beside himself with happiness to have been reunited with his beloved
Eurydice.
Eurydice is just happy to have her man back, and rewards you by completing
this side quest, and giving you 34000 XP and a scroll in triplicate - I
was given the Scroll of the Sky's Rage.
=======================
AN INSIDE SOURCE CONT'D
=======================
Once you have completed the Eurydice and Orpheus Side Quest, teleport
back to the Cave of Whispers, and leave to return to the Upper Daemon
Camp. Head south-east, and when you come to the large track (best seen
on your compass), follow it north-east and then, when you see the rebirth
fountain ON your compass drawing near, nip to the south-east, activate
the rebirth fountain, and keep going south-east and through the two
torches.
You are looking for a Machae Hero named Envoy Kor-Lhrut. He will be
situated somewhere in the encampment you enter just to the south-east
of the torches. He stalks pretty much the entire of the camp, and be
forewarned he is NOT a nice man.
=============================
ENVOY KOR-LHRUT - MACHAE HERO
=============================
Envoy Kor-Lhrut is a Machae Warden. He moves with grace and great speed,
and is armed with a polearm and a shield. He has two primary attacks,
which are :-
> Polearm Swipe
> Screaming Strike - he hits you with his polearm, and a screaming
cone of energy echoes forth, very much like the
Cyclops' Bellow Power.
Once Envoy Kor-Lhrut has fallen, take the Daemon Scroll which he drops, and
run back to the Lower Daemon Camp to return it to Keuthonymos. Once you
do so, Keuthonymos will praise your skills, saying that the resistance will
be able to use the information to raid another of the Daemon's Supply Lines
AND that, even better, the information cannot be traced back to him, as it
was intercepted by a MORTAL, and rewards you with a random essence, and
34000 XP.
=================
THE NECROMANTEION
=================
Return now to where you fought Envoy Kor-Lhrut, and exit the encampment you
found him in by the south, to enter the Vale of Mourning.
The path through the Vale of Mourning leads south-east of Envoy Kor-Lhrut's
encampment, and then east, up a hill through two torches, and finally south-
south-east, down a looooooooong way up to a rebirth fountain and two
torches, which you should go through to enter Erebus.
In Greek Mythology, Erebus is that part of Hades through which all the dead
must pass immediately after dying. If you look closely as you are moving
around it, you will see some of them bobbing up and down in the oily black
waters ... niiiiiiiiiiiiiiiiiiiiiiiiiiiiice ...
The quickest way to get through Erebus is like this :-
RUUUUUUUUUUUUUUUUUUUUUUUUUUUUUUUUUUUUUUUUUUUUUUUUUUN !!!!! Ok ok I'm
kidding.
(From the rebirth fountain and two torches)
> South-east
> South-west
> South-east
> North-east and around the C-shaped structure
> North-east
> North-west and up the stairs leading north-east
> North-west and up the stairs against the north-western wall
Follow the pathway around to the north-west and then the north-east, killing
the Empusa as you go, to enter the Necromanteion.
The Necromanteion is a large multi-room structure - however I am going to
dispense with a detailed blueprint of the layout, as there is only ONE thing
you need to do here. You need to find, and slay, the Bonescourge Soul-
Feeder (basically a big skeletal dog - MUCH larger than the ones you faced
in Egypt), as it is making a mess and being a nuisance, and its owner isn't
cleaning up after it any longer.
To find the Bonescourge, simply head north-east upon getting into the </pre><pre id="faqspan-9">
Necromanteion, and you can't miss it !!!
=========================
BONESCOURGE - SOUL-FEEDER
=========================
My describing the Bonescourge as a big skeletal dog wasn't a random idea -
it really IS a big skeletal dog. It bounds after you at quite a pelt, and
has all the regular dog-style attacks (apart from weeing on you).
Its MAIN attacks are :-
> Bite
> Paw swipe
> Soul Projectile - a reasonably quick straight-line projectile with
good accuracy. My dog used to use his on me ALL
the time and it STINGS I'll tell you THAT for
nowt !!
Once it has been destroyed, head to the north-eastern wall of this room,
and find and speak with Podarge, the Temple Attendant. She will thank
you for having released the shades from the torment of this creature, which
it transpires was consuming them as sacrifices at the hands of the Daemons
that had taken over the Necromanteion - the PIGS !!
She will reward your skill in combat by giving you a scroll in triplicate
(mine was the Scroll of the Sky's Rage), and 34000 XP. Leave this place
once you are done.
============================================
SECTION 4.19 - JUDGMENT OF THE LIVING CONT'D
============================================
From the entrance to the Necromanteion, we now need to get out of Erebus,
so to continue my brief directions :-
(From the steps that lead you up from the north-western wall of Erebus
to the pathway into the Necromanteion)
> South-east, and up the stairs leading north-east
> North-west, and down the stairs leading north-east
> North-east (around the zig-zagged pond)
> North-west and down the two sets of steps to the north-west
Continue north-west until you head down a small slope up to a rebirth
fountain, and into the Far Plains.
===================
THE DUST OF A TITAN
===================
From entering the Far Plains, head as far to the north-west as you can go.
You will hit a rock face which looks back towards the Upper Daemon Camp.
From there, head north-east and duck into the Deep Caverns which are on
the northern rock wall.
Inside the Deep Caverns, simply head north (around the gaping hole in the
centre of the ground), and to the set of stairs leading down to the north-
west, in the northernmost corner of the room.
In the next room down there is one adversary, and he is
=================================
KROG THE TOOTHLESS - URN GUARDIAN
=================================
Yup - Krog the Toothless. He is the protector of the ashes of the Titan
that Leda told you about in the Upper City of Lost Souls, and it is HE that
you must destroy to gain control over those sacred ashes.
The EASIEST way to defeat Krog is to lure him to the bottom of the stairs,
as he cannot climb them, and pelt him with projectiles. However if you
would rather be manly about it, then his primary attacks are as follows :-
> Headbutt
> Claw Strike
> Earthquake - leaves a lightning aura around your head, and has a VERY
good range.
Unfortunately for him, aside from having a large number of health points,
Krog is neither overly intelligent NOR fast, and so poses only a modest
threat to even a moderate-level hero.
Once he has died, open up the mysterious urn he was guarding, and take the
ashen powder. Teleport back to the Upper City of Lost Souls, and give the
powder to Leda, who will complete the side quest for you, and reward you
with 2 Skill Points (BOSS !!!!!), and 34000 XP. She says that she will
keep just a pinch of the ashes for herself, and if the judges do not deem
her spirit worthy of entering Elesium, she will use the ashes to regain her
flesh, and return to the Lands of the Living. Clever Girl !!
============================================
SECTION 4.19 - JUDGMENT OF THE LIVING CONT'D
============================================
Exit the Deep Caverns to get back to the Far Plains. From the entrance to
the Deep Caverns, head south a few steps, then north-east. You will come
to a point where a group of shades appear around you, and calmly begin
walking to the north-east, up some steps. Head in that direction - you
don't have to be polite and wait for them - just barge them out of the
way and move onward ;)
You will enter the Dread Halls.
Room-by-room, this is how to move through the Dread Halls :-
(From entering the Dread Halls from the Far Plains)
> North-west
> North-east (since you can't head any further north-west as there is
a huge gap preventing it)
> North-east (and into your first encounter with a new type of enemy -
the Epiales. They are floating, poisonous creatures with
long tentacles that come at you as either the Slygoth (the
weaker variety), or as the Kalygoth (stronger, and with
the ability to throw out a number of poison bombs with a
delayed detonation - RUN FOR COVER as the poison cloud is
QUITE large). The Epiales all release poison clouds when
they die ... and die they shall ;)
> North-west
> South-west
> South-west and down the stairs in the north-western wall to the second
level.
On the second level, leave the building via the exit in the south-western
wall, activating the rebirth fountain that is just outside, and entering
the Dread Path.
Simply walk to your west, and then into the next Dread Halls structure.
In this SECOND structure, head :-
(From entering the structure from the Dread Path)
> North-west
> North-west and down the stairs in the north-western wall to the second
level
(Then, on the second level)
NB. Beware the Skeleton Ambushes on this floor ;)
> North-west
> North-east, and down the stairs in the north-western wall to the third
level
(Then, on the third level)
> North-west
> North-east, and down the stairs in the north-eastern wall to the fourth
level
(Then, on the fourth level)
> North-east, then north-west, and through the archway in the north-
eastern wall to get back to the Dread Path, and the rebirth fountain
and Portal Shrine that are there. You can trade your goods with
Scylas the Trader, who so very OBVIOUSLY has dealings with Daemons
it's UNREAL !!
Once you are done dealing with the traitorous trader Scylas, head down the
path to the east of him, and down down and into the Tower of Judgment.
=====================
THE TOWER OF JUDGMENT
=====================
The Tower of Judgment is a multi-level structure, the clue to that being
in the use of the word "tower", and we shall be entering it at the top,
and working our way down to the bottom.
It is in this structure that the Judges pass judgment on all shades that
are looking to move on, and send them either to Elysium or Tartarus ...
or, failing that, they just send them packing, back to one of the many
other areas of Hades where you have seen shades wandering around.
Unfortunately, of late it appears that the Judges have ceased judging,
which has meant an ever-increasing number of shades are unable to enter
either Elysium or Tartarus, and this is creating something of a bottleneck
in the Underworld.
We are here to find out what the HELL is going on, and to straighten out
the Judges, that they might do their jobs again.
From entering the Tower of Judgment I shall give you floor-by-floor
instructions as to how quickest to move from the start to the exit, as
well as anything that I think you might need, k ?
So ... head north-east to get into the Tower proper, and gape in AWE at
how cool the rock movement animation is. I love it !! :)
From the first proper room you enter ...
> North-west via the door in the northernmost point (beside the gaping
hole in the ground)
> North-east
> South-east
> North-east through the two torches
> Activate the rebirth fountain
> Open the door in the north-western wall, and take it to go down to
the Fifth Domain
============
FIFTH DOMAIN
============
From descending the stairs into the Fifth Domain ...
> North-west
> North-east
> North-west and through the door in the north-western wall, TO the
north-west
> North-west and through the door in the north-eastern wall, TO the
north-west
> North-east
> South-east
> South-west
> South-east and through the door in the north-eastern wall, TO the
south-east
> South-east and down the stairs in the south-eastern wall to enter
the Fourth Domain.
=============
FOURTH DOMAIN
=============
In the Fourth Domain you will encounter another new type of enemy - the
Melinoe. Think of them as being very similar to the Maenad, except (as
you have come to expect by now), stronger, quicker and tougher. The
Melinoe comprise Spear Runners (polearm-equipped warriors that charge you),
Blood Acolytes (spellcasters who attack with blood projectiles from afar),
and Blade Maidens (who are their most powerful units - VERY fast to enter
hand-to-hand combat, and able to execute a spinning attack that hits
multiple times, doing HUGE amounts of damage. To make matters worse, all
Blade Maidens are able to generate the Onslaught Power !! Avoid these
B!ATCHES like the plague !!
So !! From descending the stairs from the Fifth Domain ...
> Activate the rebirth fountain
> South-west
> South-east
> North-east
> South-east
> South-west
> South-west
> South-east
> South-east
==========================
HADES' TREASURY - PART TWO
==========================
Remember this quest ? Didn't think we'd forgotten about it, did you ? Oh
no ;) You're going to encounter Canace the Serpent Queen - another Empusa
Hero - in this room. She holds the Venom Stone, being the second of the
keys you need to unlock Hades' Treasury.
She has two primary attacks - a poison projectile which she can only fire
as a single-shot weapon, but of which the RATE of fire is really quite
impressive, and the ability to create a small, focused cloud of poison at
your feet.
Once Canace has fallen, take the Venom Stone and place it in your
inventory, and then continue onward.
> North-west
> South-west
> North-west
> North-west
> North-east and down the stairs in the north-western wall to the Third
Domain.
============
THIRD DOMAIN
============
From entering the Third Domain ...
> North-west
> North-west
> North-west
> North-east
> South-east
> South-east
> North-east (you will first have to go south-east before you can get
back up to the north-east - this room snakes around a large hole in
its centre)
> North-east
> South-east
> South-west
> South-east
> North-east and down the stairs to the Second Domain.
=============
SECOND DOMAIN
=============
Ok - before I get started I have to forewarn you that this Domain is a
LARGE one, ok ?
Righty-ho, let's go !!
From entering the Third Domain ...
> Activate the Rebirth Fountain
> North-east
> North-west
> South-west
> South-west
> North-west
> North-west
> North-west
> North-west
> North-west
> North-east
> North-east
> South-east
> South-east
> North-east (you will have to go south-east to get north-east, as just
like the Fourth Domain, there is a large gap in this room that you
will need to manoeuvre around)
> North-west
> North-east
> South-east
> South-east and down the stairs to get to the First Domain
============
FIRST DOMAIN
============
In the First Domain we are going to encounter a couple more new types of
enemies - namely the Arch-Limos. They are basically just super-powered
Limos like you fought all the way back in Greece - however, they have
either frost or fire powers (the Arch-Limos Frost Wardens and Arch-Limos
Flame Wardens). You might also find the occasional Bonescourges, such
as the one you faced in the Necromanteion.
From entering the First Domain ...
> Activate the rebirth fountain
> North-east
> South-east
> South-east
> South-east and into the next room (you'll need to go across a small
bridge to get there)
> North-east (you'll need to go around an L-shaped wall to get there)
> North-east (across a windy set of two bridges and an interconnecting
mass of tile), and into the next room
> North-east
> South-east (up to the door behind which Admetus is standing)
=============================
ADMETUS AMONG THE DEAD CONT'D
=============================
Admetus - how the HELL did he get in hiar !?!?! Head up to him and speak
with him to have him open the door and let you in. Admetus forewarns you
that Cerberus has been turned from his true purpose, and directed to guard
these very halls instead .......................................... sh!t.
That ISN'T good news.
Open the THREE Majestic Chests in the room with Admetus, take your fill,
and we shall be on our way ...
> North-west (from Admetus' room to the previous room)
> North-west
> Descend the stairs in the north-easternmost corner of this area (you
will need to head south-west of the door, then over a small bridge,
then to the south-west and then double-back on yourself and head
north-east of the stairs that lead down to a figure eight indentation)
to enter your boss fight with ...
==========================
CERBERUS - WARDEN OF HADES
==========================
Cerberus - the three-headed dog-guardian of the entrance to Hades - has
been redirected to the Tower of Judgment, and told to prevent ANYBODY
from directly communicating with the Judges. He is a very loyal dog,
which is going to make this a very tough fight indeed.
Add to that the fact that the rebirth fountain is aaaaaaaaall the way back
in the furthest corner of the floor above this one to where we are now, and
the potential annoyance factor of this boss fight is increased DRAMATICALLY.
It is for this reason that I have spent a LOT of time perfecting my biffest
tactics to date. These tactics are so biff that ANYBODY that sees you use
them will IMMEDIATELY lose ALL respect for you (but it might be worth it
just to see that dog DIE) !!
All you have to do to beat Cerberus without using a single potion or power,
is to lure him to the gate, and dizzy him. It's THAT simple. His fire
breath will twist with him as he moves away from you to go back to his
duties, and his poison projectiles are easily missed. If you get locked
in with him ? You are going to die - it's pretty much that simple. DO NOT
GET LOCKED IN !!
Of course if you choose NOT to heed my warning above, and to do the heroic
thing, more power to you !! YOU will need to know the following info :-
Cerberus' primary attacks are ...
> Triple-headed Bite - he bites you with all three heads at once !!
> Triple-headed Poison Breath - Cerberus' three heads can breathe their
toxic breath of death in sync !
> Ley-lines - see those cracks in the ground in Cerberus' Room ? Those
are best thought of as energy lines. Cerberus can howl, causing
energy to course through the lines and do damage to anybody that is
standing on them - much like Charon's power on the Unfinished Bridge.
> Spit Poison Ball - a Ball of Poison which Cerberus lobs at you, and
which remains on the floor for a little while.
BAD dog ... that's a VERY bad dog. If you choose not to use my biff-tactic
for defeating Cerberus, then your best bet is to avoid getting too close
to him wherever possible, as his bite and poison breath attacks will soon
chomp you down to size. ALWAYS avoid standing on the ley-lines, as those
will sap health from you needlessly, and keep an eye out for the lobbed
balls of poison he spits at you as you will want to avoid those. Lure him
AROUND the room to maximise the space you have available to manoeuvre in,
and make sure you're packing a TONNE of health and energy potions.
Best of luck !!
Once Cerberus has ceased to be a problem, raid the three Primitive Chests,
and the one Majestic Chest that are in the room, and move through the now-
opened door in the north-eastern wall.
Follow the path to the north-east, and then to the north, for your audience
with the Judges.
There are three Judges, and each will greet you separately as you enter
their Hall of Judgment.
They are, from left-to-right :-
1) Aeacus - Judge of the Dead
2) Minos - Judge of the Dead; and
3) Rhadamanthys - Judge of the Dead
You must speak with Minos first, who tells you that when the rest of the
Olympians fled, Hades refused to follow them, and elected to imprison the
Judges here, before sending his armies to do battle with the forces in
Elysium !
Minos feels that the Elysian forces have no hope against the vast armies
of Hades, and that they are fighting in the anticipation of YOUR arrival,
as has been prophesised by Tiresias, the Blind Seer. Minos judges you
worthy of entering Elysium (cheers mate !!), and suggests you speak with
Agamemnon - leader of the Elysian forces - upon your arrival there.
Minos opens up the portal to his right - that which leads to Elysium and
you will be rewarded with 34000 XP and a random Arcane Formula.
Your main quest will also be updated to "The Battle for Elysium".
You may remain and speak with Aeacus and Rhadamanthys if you like - Aeacus
tells you that Hades offered them command over his armies, and their own
kingdoms when his campaign was over if they helped him, but that they said
no to him because they were once human men themselves. He found new
generals to replace them, and imprisoned the Judges in the Tower of
Judgment for their defiance.
Rhadamanthys says that Hades' Palace has become a factory from which Hades
manufactures and churns out his army. He says that Hades has defiled his
own home in order to satisfy his insatiable greed.
When you are done speaking with the Judges, head through the doorway they
have created for you, to enter Elysium.
=====================================
SECTION 4.20 - THE BATTLE FOR ELYSIUM
=====================================
My my, isn't THIS beautiful !!
Head up the stairs to the north-west, and speak with Tiresias the Blind
Seer, who will tell you that he has foreseen your victory (basically),
and VERY importantly, that no shade can enter the Palace of Hades without
his permission.
=======
ELYSIUM
=======
* There is a rebirth fountain in Elysium
* There is a Portal Shrine in Elysium
=====================
NON-QUEST INHABITANTS
=====================
HESIOD - Epic Poet who recounts how it was when he was a man, living at
the foot of Mount Helicon in Boetia, that the Muses (the Nine)
who live in the Mountains, saw fit to bless him with the gift of
verse.
POLYXEINUS - Hero who tells you of the Battle of Troy, and the ten long
years it took to wage. The Greeks were unable to breech the walls
of Troy (walls built by Poseidon and Apollo), behind which King
Priam's people remained. However, Odysseus had a plan to get
around this - and under his guidance, the Trojan Horse was built.
They wheeled it up to the City of Troy, and left it there - a
small army of Greece's finest warriors resting therein - for the
Trojan Army to take the bait ... and they did ! They wheeled the
horse inside. The Greeks wait until nightfall, and then exit the
Trojan Horse, slaying the guard and opening the gates for the
invading Greeks to win the war.
PHAEDRA - Minoan Princess that muses how, whilst the odds against them are
indeed great, Elysium and its armies are comprised of the very
finest warriors that the Lands of the Living have to offer. Good
point luv !!
=================
QUEST INHABITANTS
=================
TIRESIAS - Blind Seer who completes his prophesy for you.
AGAMEMNON - King of the Mycenae, who says that whilst his armies are doing
their best, and fighting very bravely against Hades' hordes, they
cannot win the war, because they cannot enter his palace - hence
their need for a living warrior to do so for them. He says that
yesterday his armies lost Pentheus and Lycurgus, and today Priam
fell. He directs you to find Odysseus and his platoon, as their
guile has triumphed over brute force before, and Agamemnon
believes they may be able to help you find a way into Hades'
Palace.
ADMETUS - Hero (who only appears after you have spoken with Agamemnon).
So at last our dear friend Admetus DID get let into Elysium -
CAPITAL :) Speak with him to hear him say the rather apt words
"we meet again, in the happiest of places and in the bitterest of
times". I think Admetus should have been the poet - Hesiod's not
much cop ! Admetus will complete the "Admetus Among the Dead"
Side Quest (at last), and give you 34000 XP for your troubles.
================================================
MERCHANTS, ENCHANTERS, CARAVAN DRIVERS & MYSTICS
================================================
PERIPHAS - Arcanist
MYDON - Caravan Driver
DOROS - Blacksmith
SORANUS - Mystic
HERMIPPOS - Enchanter
===================
QUESTS FROM ELYSIUM
===================
======================
THE BATTLE FOR ELYSIUM
======================
Head through the beautiful gate to the north-west of Agamemnon (it will
open automatically when you are done speaking with him), and then down
the steps to the north-west, into the Aetolian Polis.
Clear out the gardens of FILTH as you venture north-west and up the steps.
At the top of the steps you will find Solon - a Warrior-Poet (with whom
you do not need to speak, but who will tell you that the forces of Elysium
CHOSE to fight in this war if you do), together with Alcinous the Hero,
who tells you that the enemy have a weapon called a "Siege Strider" and
that they are cutting down the Elysian warriors like chattel in the field
of battle. He asks you to destroy them if you can, and gives you the
"Siege Striders" Side Quest.
You can also speak with Nestor the Tactician, who will tell you that he
has been forced to rely on messengers since his chariot was taken from
him. He says their flank is in danger of being overrun, and Ajax will
need to adjust his forces accordingly. He is happy to give you a messenger
to take the message TO Ajax, but you will need to serve as his escort.
With this, Nestor will give you the "Flight of the Messenger" Side Quest,
and command over one of his messengers. It is a good idea to speak with
Nestor before proceeding, as even though I have no intention for us to
do his quest before the Siege Striders (as that would be out of sync with
the order we'll meet the enemies in), we can benefit from the additional
firepower the Messenger brings with him.
==================
THE SIEGE STRIDERS
==================
Head down the stairs to the north-west, and into Aneslasia. From here,
we are going to DECIMATE the Siege Striders that are causing problems for
the Elysian Forces.
Since the Siege Striders are able to move (hence their being of some USE
on the battlefield, I cannot give you precise directions as to how to get
to them - however what I CAN tell you is that there are five of them,
and that you will find their locations on your compass as each one is
helpfully highlighted as a yellow circle with a black exclamation mark in
it.
Insofar as how best to deal with the Siege Striders in combat is concerned,
you need to be aware of their two main attacks :-
1) An orb of flame which they lob at you, and which does burn damage
in an area on the ground; and
2) A randomly-aimed set of fireballs which are thrown out by the Siege
Strider, in an attempt to slay all enemies within a given radius -
usually used by the Siege Strider when enemies start to get a bit
too close for comfort.
Once all five of the Siege Striders have been destroyed, return to Alcinous
in the Aetolian Pass, and he will reward you with 35000 XP and FIVE copies
of a random scroll (I was given the Scroll of the Crushing Vortex), plus
the completion of this Side Quest.
=======================
FLIGHT OF THE MESSENGER
=======================
==============
IMPORTANT NOTE
==============
Should Nestor's Messenger fall at any point during this mission, you will
need to return to Nestor to pick up another.
From Nestor, head down the stairs to the north-west, and follow the path
to the north-west, and down the next set of stairs as well.
If you look at your compass, you will see that the path now forks. To the
north-west, the path is a thick, white path - to the south-west, two lines
like cart tracks. Follow the path to the south-west, and keep following
the cart tracks (for want of a better expression), and they will lead you
to the Delian Meadows.
Simply follow the path to the north of the Delian Meadows, and you will
reach Ajax (and a very welcome rebirth fountain). Speak with Ajax, and
he will tell you that unfortunately he cannot comply with Nestor's wish,
as he cannot spare the troops to support Menelaus, as he is having a tough-
enough time keeping the monsters coming out of the nearby caves at bay.
Ajax gives you a random magical item (I got a random green medallion), and
35000 XP for having brought the Messenger to him. He also gives you a
new Side Quest - "The Achaean Pass".
================
THE ACHAEAN PASS
================
Ajax suggests you speak with Idomeneus to get given a small platoon of
Elysian Soldiers to accompany you to Menelaus, where you might be able to
do what Nestor has asked yourself. He agrees with Nestor that the survival
of the camp where Menelaus is camped out is CRITICAL to their war-effort.
Head to the north of Ajax, making sure the rebirth fountain is activated,
and speak with Idomeneus, who will give you control over a group of four
Elysian Soldiers, all Archers, who are to accompany you on your quest to
help Menelaus.
Follow the path that leads to the north-west of Idomeneus, and then keep
to the cart tracks as they go north-west, and up a long flight of stairs
and into the Elysian Acropolis.
You need to head north-west to the central circle in the gardens, and from
there to the north-east, and upwards. There will be a fork in the path,
and it does not matter whether you go left or right, as both directions
double-back on themselves to meet in another garden further up.
From this garden, keep heading north-east, and up to the rebirth fountain.
From the rebirth fountain, head north-west, up the stairs and to the
Achaean Pass.
When you reach the camp at the Achaean Pass, you will find Menelaus - the
leader of the platoon that is trying to defend the camp here. Do not speak
to him until you are primed and ready to engage in a BIG boss fight, as
his dialogue kicks it off. He tells you that although he was wounded in
the last attack on this camp, his men will fight to their deaths as long
as the banner flies overhead. He believes that your presence will serve
to boost their morale.
Once Menelaus has done speaking, a wave of enemies attempts to storm the
camp. There are three waves in total, attacking (as waves do) one after
the next. You will have to fight Empusa, Melinoe, Siege Striders and
other nasty beasties in order to keep the camp secure. My advice for
this combat is to be reactive - see where the monsters seem to be doing
better than the Elysian Army, and aid them there. In doing this, you will
keep Menelaus' forces alive longer, and give them the opportunity to heal-
up a little bit.
Once the three waves of enemies have been repelled, speak with Menelaus
again to earn 35000 XP, and a random magical weapon (I got a random yellow
weapon).
============================================
SECTION 4.20 - THE BATTLE FOR ELYSIUM CONT'D
============================================
Leave the Achaean Pass Camp and cross the stone bridge that leads to the
north, to enter Celestia.
Cross the bridge leading to the west, and then head north again and up
the stairs that go to the north-west, to enter the Academy of Sophocles.
Head north-west a few steps, and activate the rebirth fountain. Then
keep heading north-west, down the steps and into the Fields of the Diadochi
which will serve as the site for one of the best battles in the game, I
guarantee it !!
Trundle off to the north-west, and you will see a HUGE purple wall of
energy cutting into the field ahead of you. Beyond this wall of energy
are the mainstay of the forces of Hades, and our destiny mes amis.
I am going to try and lead you on the most expedient route through Hades'
forces, but it is a BIT of a rabbit warren in there, so if you get lost
you might need to retrace your steps a bit (or just ignore me and wing
it !!).
Without entering the purple energy field, follow it westwards, and up a
flight of steps. Head due north a few paces and into the purple energy
field, and you will see three brown wooden platforms on your map. Follow
the path to the west of the westernmost of the three, and head north-west
on the path as it heads down a small slope, between two rocky walls.
From there, head to the north, through two small encampments of monsters,
and up onto the wooden scaffolding, at the top of which you should take
the wooden bridge to the south-west.
Head north-west at the intersection to enter the Philos Plateau, and keep
going north-west, until you have to turn to the south-west again.
Go south-west, and then north-west, then north-east and descend the wooden
scaffolding to get back down to terra firma.
============================
HADES' TREASURY - PART THREE
============================
It is in this clearing that you will find the third of the key guardians -
Metriche. She is a Pyromancer Empusa who holds the Flame Stone. As with
Thyia and Canace, she is very close to the rest of her kin, with her two
main attacks being :-
> Flame Projectile (fired in a straight line); and
> Flame Eruption (causes the ground under your feet to burst into flame).
Metriche is quite a tough adversary, and killed me a couple of times before
I got the better of her - however she isn't insurmountable by any means,
and once she has fallen, pick up the Flame Stone that she was holding, and
carry on.
============================================
SECTION 4.20 - THE BATTLE FOR ELYSIUM CONT'D
============================================
From the clearing where you fought Metriche, head north-east, and up the
wooden scaffolding on that side of the camp. On the top of the scaffold,
head south-east, then south-west, south-east and north-east before
descending to the ground once more.
When you are back on the ground, head south-east, down the steps and up to
the rebirth fountain (which you can see on your compass ahead of time).
From the rebirth fountain head north-east and take out the Siege Striders.
Continue east-north-east, and then finally north and up through the two
torches ... haven't seen many of THOSE in a while have we !?!?!
The path north takes you into the Eronian Highlands, and you should follow
it up to the two traps (one on either side of the road), and then to the
east, where you will find another rebirth fountain.
From the rebirth fountain, head south-east, and focus on following this,
the main path, to the exclusion of the camps to its south and north. By
this I mean you may have to clear out the camps on either side, but you
should return to this, as it is the main path leading you through the
Eronian Highlands. This path goes south-east, then north-east, then east-
south-east, to finally double-back on itself and turn and lead down a
slope to the south-west, and into Argolis.
As you enter Argolis, head south, hugging the eastern wall. You will
find Menestheus - King of Athens and his platoon doing battle to the
west with a group of Melinoe, and a rebirth fountain to the east.
Whilst the choice is entirely yours, I personally favouring heading to the
east and activating the rebirth fountain before helping Menestheus and his
group as that way, if you die, you will rematerialise closer and avoid
the hassle of walking all that way again ;)
Once Menestheus and his group have been liberated from their Melinoe
assailants, speak with him and he will tell you that they are on a mission
to create a diversion for Odysseus' platoon, by destroying an important
Daemon as loudly and brashly as possible. Her name is Leucothea, and she
is a Melinoe Blood Queen who commands this area of the battlefield.
Odysseus hopes that if her death is sufficiently attention-drawing, his
troops will be able to sneak up to their position undetected by Hades'
Forces.
Menestheus would like you to lead the charge against Leucothea, and gives
you the "A Noisy Diversion" Side Quest.
=================
A NOISY DIVERSION
=================
Menestheus assigns you SIX of his warriors - a mix of hand-to-hand and
ranged - who will not wait for you - they will charge immediately to
the south-east and then south, and run THROUGH the Melinoe warriors to do
battle with Blood Queen Leucothea and her entourage.
====================================
BLOOD QUEEN LEUCOTHEA - MELINOE HERO
====================================
Blood Queen Leucothea is surprisingly cr@p to be honest. She is just a
taller and slightly more powerful version of a bog-standard Melinoe Blood
Acolyte, with their standard powers, being :-
> Staff-swipe
> Blood Projectile - direct line but reasonably slow-moving
> Blood Nova - decent radius blood aura that erupts on the ground and
bleeds you of your health to restore her own.
Once she has fallen, open the Majestic Chest she was guarding, and then
return to Menestheus for your reward - completion of the Side Quest and
35000 XP.
============================================
SECTION 4.20 - THE BATTLE FOR ELYSIUM CONT'D
============================================
Head east of Menestheus and his platoon, through the two torches and down
the steps to the rebirth fountain, which you should activate if you have
not already done so.
From there, head north and then follow the main path inbetween the various
Machae, Melinoe and Troglodyte Encampments that leads to the north-east and
then turns to go due east, up to Odysseus and his platoon. Here you can
speak with Eurylochus - a hero who tells you that they have learned that
although he is able to create Daemons, Hades can only control them when
they are within his own kingdom. Therefore, in order to be able to retain
control over his Daemons when they set foot upon the Living Lands, Hades
has fashioned five Crystals - the Shards of Erebus - which enable him to
control his forces in the Lands of the Living. Eurylochus tells you that
if you were able to destroy the five Shards of Erebus, Hades' power over
his minions above would cease to have effect, and they would be like lambs
to the slaughter for the living forces. He then gives you the "Shards of
Erebus" Side Quest.
Speak then with Elpenor - another Hero who tells you that the replacement
generals whom Hades empowered to lead his forces when the three Judges
denied him are Machae under his command. The Elysian Forces fear that
even if the Shards of Erebus were to be destroyed, these three Machae
would have leadership enough to be able to rally Hades' Forces, and control
their campaign in Hades absence. Therefore they must also be destroyed.
Elpenor gives you the "Hades' Generals". Speak with him again to learn
the names of the three Generals :-
1) Dysnomion - General of Nightmares
2) Makaria - General of Wretched Death; and
3) Trophonios - General of Darkness
He says that when one falls, the others will become aware of this, so it
is best to slay all three as quickly as possible.
Once you are done with Eurylochus and Elpenor, speak with Odysseus - King
of Ithaca, who will reward your progress thusfar by updating your main
quest, restoring your health and energy, and giving you 20000 XP. Odysseus
tells you that his squad has made it to the outer gates of Hades' Palace,
and that they have ensured a way for you to gain access thereto.
With that, he walks northward and activates a well-positioned Ballista,
which fires down at the walls of Hades' Palace, and blows a passageway in
one of the walls for you to enter !
Speak with him again, and he will tell you that inside the Palace you
should find and speak with Persephone - Hades' wife, who will be your ally.
She is likely to be imprisoned, however =./
Odysseus will them update your main quest again, completing the "Battle for
Elysium" (phew !!), and replacing it instead with "The Immortal Throne".
==================================
SECTION 4.21 - THE IMMORTAL THRONE
==================================
Head south-west and then north of Odysseus and his platoon to get to the
Palace Wall. Enter Hades' Palace through the hole Odysseus' forces just
made for you (which is dubbed the "Secret Passage"), and then sneak into
the Palace.
... wait a minute ... did you hear that laugh ? Sounds like somebody is
expecting us !!
Hmmmmmmmmmm. Ok ... first and foremost, take note of the layout of the
room you are in at the moment. See that set of stone pillars in the centre
of the room ? See the beautifully carved Ornate Bronze Door in the north-
western wall ? Sense a boss fight coming ? OH yeah. A tough one too !!
Make sure you are replete with health and energy potions, and that your
skills are maxed to the full, because through that door you are about to
face a rather nasty trick Hades has in store for you ... being ...
=====================
TYPHON - UNDEAD TITAN
=====================
Y'know, I have absolutely NO idea why I didn't see this one coming, but I
was GENUINELY surprised when this happened to me. I mean ... Hades IS the
Lord of the Underworld ... so why WOULDN'T he have control over anybody
and everybody that you have slain in your quest so far ?? *slaps himself
in the head for being such a chowderbonce*.
Typhon's Undead Form is actually just as hard to defeat as he was in life
unfortunately. I would STRONGLY suggest that you try your best to lure him
BACK into the previous room (which of course means NOT rushing in and doing
battle with him, but trying to provoke him into stalking you back through
the doors). I say this because you can then use the central stone columns
in the previous room as a shield. His bone-attacks cannot penetrate it,
and this can mean the difference between a swift and horrifically painful
death, or just a nice quiet walk in the park.
Typhon has a completely different set of attacks this time around, being :-
> Bone Prison - he throws a skull at you which, if it touches you, will
form itself into a bone prison, holding you to the spot
until it is destroyed.
> Spirit Breath - a cone-shaped breath attack with good range.
> Needles - a set of needle-like bony projectiles which he throws with
good speed and range.
> Bone Wave - a direct-line, rapid-moving ground-based projectile which
causes a wave of bone - kinda like a spinal column, to
arise from the ground and rush towards you, doing a LOT
of damage.
> Claw-strikes
Once Typhon has fallen to you AGAIN, open the three Small Chests and the
Majestic Chest against the western wall to his chamber, and take your fill
of his goodies. When you are ready, leave through the open door in the
north-eastern wall, to find Persephone, chained to a couch by two Ancient
Locks. She calls for your aid, and you should release her by destroying
these Ancient Locks.
Speak with her, and she will tell you that Hades' delusions of grandeur are
what has led him to this. When Zeus commanded that the Gods depart, Hades
saw the opportunity to take it all for himself - EVERYTHING - and set about
his campaign of destruction and terror. When Persephone tried to leave him
so that she could accompany the other Gods, Hades (unable to stand the
thought of losing her) chained her to this place, hopeful that she would
come around when he ultimately won, and see things his way.
Persephone is the Breath of Spring, and not a warmonger. She cannot abide
what Hades has elected to do, and bids you proceed to do battle with him,
and restore balance to the worlds.
She updates your main quest and rewards you with three copies of a random
scroll - I got the Scroll of the Crushing Vortex.
Head to the north-west of the couch to activate the Hades' Palace Portal
Shrine, and then lead Persephone's Chamber via the north-east, through
the door she just opened for you, stopping to speak with her again on the
way through.
She says that you must be quick, for if Hades learns that she has been
freed, he will surely come for her, and his wrath would be a terrible thing
to behold.
Descend the stairs to the north-east to enter the Dark Processional. From
here, activate the rebirth fountain and move through the Ornate Bronze
Door to the north-east. This will once again update the main quest.
Follow the jagged path to the north-east, and then enter the open doorway
in the north-eastern wall, to get to the Aidonean Propylon.
Turn and head north, and then east and go through the door in the north-
eastern wall to your first encounter with your final new type of enemy in
Titan Quest: Immortal Throne - the Gigantes.
========
GIGANTES
========
Gigantes are gigantic, animated suits of armour that come in a variety of
levels of power and danger. The weakest of the Gigantes are Vanguard.
They are armed with a polearm, and function just like bog-standard infantry
really - they walk slowly, and swipe at you slowly.
Next most-powerful are the Armorite. Equipped with Axe and Shield, these
guys have the Shield Charge power, enabling them to compensate for their
slow-movement speed by rushing into combat with you. The first couple of
times you see this in action, it is likely to cause you some concern, and
quite rightly so !!
Next up come the Vindicators, who are armed with twin-axes. They are
quick in hand-to-hand, and can cause a wall of flame to rush towards you
across the ground. Since this is VERY quick, and almost certain to kill
you within a second or so, you should ALWAYS attempt to dodge this at ALL
costs. On higher difficulties the Vindicators are replaced with even more
powerful versions of themselves, but on normal, Vindicators are the most
powerful Gigantes you will encounter.
Head through the door in the north-western wall, and down the stairs. Then
go north-west, and in spite of the arrow-shaped hole in the ground, head
north and through the large mirror in the northern-area of this room, to
another chamber.
Activate the rebirth fountain in this room, and continue north, and then
north-east and down the stairs. See the gigantic crystal being protected
by the Gigantes on the rock mass to your north-west as you go down the
stairs ? That is one of the five Shards of Erebus, and we shall be kicking
it to pieces in just a moment ;)
====================
THE SHARDS OF EREBUS
====================
At the foot of the stairs, follow the path to the north-west and then down
another flight of steps. Head through the door in the north-western wall,
and down yet another flight of stairs.
In the north-eastern wall of this chamber, you will find another mirror
portal which leads you to your first of the five Shards of Erebus. Slay
the Gigantes in the area, and then turn your attentions to the Crystal,
breaking it into pieces and harvesting the first of the five Crystal of
Erebus Monster Charms for yourself ;)
Head south-west back through the mirror portal, south-east and up the steps
and then north-east and down the stairs to continue onward.
Through the door in the north-eastern wall to enter the Court of Kouloures.
Head as far as you can to the north-east in a direct line, and you will
find you are separated from the next Shard of Erebus by a chasm. Simply
move around this chasm - I prefer to go to the south-east, then the north-
east and then north-west myself - and destroy the Shard to gain your
second Crystal of Erebus Monster Charm, and be 2/5 up on the Shards of
Erebus ... good going so far !! :)
From the second Shard of Erebus, keep heading north-east, through the
Ornate Bronze Doors and down the stairs into the Winding Descent.
At the foot of the stairs, activate the rebirth fountain to the north, and
then head due east, and through the door in the north-eastern wall and down
the steps to do battle with your first of the three Generals of Hades'
Armies.
==========================
HADES' GENERALS - PART ONE
==========================
Dysnomion - General of Nightmares awaits you at the bottom of the stairs,
with his horde of Machae Archers.
At the bottom of the stairs, turn and head to the north-west - this is
where you will find Dysnomion.
=============================================
DYSNOMION - MACHAE HIGH GENERAL OF NIGHTMARES
=============================================
Dysnomion is a master archer, and student of the Spirit School, with his
primary attacks being :-
> Spirit Arrow
> Circle of Power
> Deathchill Aura
Using his circle of power skill to good effect means that if you are not
careful you will wind up losing your own health and energy to sustain his
during combat. Dysnomion plays much like a standard-archer, however, and
is not a huge fan of entering close-combat range. Simply stick and move,
and you should find he falls pretty easily - as long as you have slain his
troop first of course - otherwise you'll look like a pin-cushion by the
time this combat is over !!
=========================================
SECTION 4.21 - THE IMMORTAL THRONE CONT'D
=========================================
Once you are done with Dysnomion, return to the south-east, and then up
the stairs to the south-west.
Head to the south-west of the door which led you down to Dysnomion, and you</pre><pre id="faqspan-10">
will find a set of stairs leading down to the south-east. Take them, and
then zig-zag east and then south-west again to go down another set of
stairs.
At the bottom of these stairs travel west and then north-west and down the
next set of stairs.
Head through the door in the north-western wall, and down the steps to enter
the Prison of Souls, and an encounter with some familiar foes - the Albino
Spiders.
Notice how the cells to either side of the main corridor are locked ? We
don't have a key for them as yet, but when we ultimately get one, you might
like to come back and release the shades from their imprisonment - just be
careful if and when you do, for reasons I shall come to in a bit ;)
Head north-west, through the door and into the next room, where you should
activate the rebirth fountain immediately.
There are four exits from this room - back the way you came (which is NOT
an option - Spartans never retreat, remember ?) ;), south-west, north-west
and north-east.
==========================
HADES' GENERALS - PART TWO
==========================
We shall start by heading north-east, so head up the stairs and on the next
level, head through the closed door in the north-eastern wall.
Proceed through the mirror portal to the north-east, to enter your battle
with the second of Hades' Generals - Trophonios - the General of Darkness.
============================================
TROPHONIOS - MACHAE HIGH GENERAL OF DARKNESS
============================================
Like Dysnomion, Trophonios is an archer, and a very good one at that I
might add. He is a student of the Earth School, and can pelt you with a
number of very powerful attacks over a short space of time. His main
methods of attack are :-
> Flaming Arrow
> Pink Energy Projectile - can slow you down
> Eruption
Trophonios is CONSIDERABLY harder to defeat than Dysnomion was - however
using the same tactics as you did to waporise Dysnomion - i.e. stick-and-
move ? Victory SHALL be yours.
=========================================
SECTION 4.21 - THE IMMORTAL THRONE CONT'D
=========================================
Head south-west of Trophonios and through the Mirror Portal. Then continue
south-west and down the southernmost set of stairs, to get back to the
room with the rebirth fountain.
Technically-speaking, there is absolutely no need for us to head south-west,
so if you would care to take the door in the north-western wall please, we
can continue.
If I were to be 100% truthful, we didn't even need to come back this way -
you could have just taken the northern set of stairs descending to the
south-west in the room to your north-east now, but I prefer to hang around
the rebirth fountains wherever possible, as the walking can be a real pain
in the butt when you die - don't you find ??
SO !! Through the north-western door please.
There are FIVE exits from this room, and I shall describe each, just so
that you get a decent feel for exactly where you are :-
> South-east - leads you back to the room with the rebirth fountain
> South-west - leads you up to that room I said had no merit in being
explored, so it can be disregarded.
> North-west (on the western-side) - needs to be explored.
> North-west (on the eastern-side) - need not be explored.
> North-east - leads you up to the room adjacent to that in which you
fought Trophonios, so it can be disregarded.
If you would therefore head west of the door you used to enter this chamber
and then north-west, we shall go through the north-western door, on the
western side of the room.
============================
HADES' GENERALS - PART THREE
============================
Through this door you will enter your battle with the third and last of
Hades' Replacement Generals - Makaria - the General of Wretched Death ...
===============================================
MAKARIA - MACHAE HIGH GENERAL OF WRETCHED DEATH
===============================================
Makaria is arguably the second-toughest of the Generals, the hardest in my
opinion being Trophonios. Makaria is an archer (like his fellow Generals),
and a student of the Rogue School.
His primary attacks are :-
> Poison Arrow
> Poison Cloud - generates a small cloud of poisonous gas at your feet,
which remains for a few seconds.
> Petrify - just like Medusa, he has the power to freeze you for a few
seconds, during which time he can unload blast after blast
of poison into you - DEFINITELY avoid this one !!!!! At
least he doesn't turn you to stone though ;)
As with his fellows, use the hit-and-run tactics you used with Dysnomion
and Trophonios and Makaria will fall to your might in short-order.
Once he has fallen, this Side Quest is complete, and you will earn yourself
a well-deserved 45000 XP and +5% Total Damage for your character !! WICKED
WORK !! =)
=========================================
SECTION 4.21 - THE IMMORTAL THRONE CONT'D
=========================================
Head up the stairs to the north-east of Makaria, to enter the Polis Daemonai
which is the exact same area you would reach if you went through the north-
western door on the eastern side of the room I described above, hence my
having said that particular door did not need to be explored ;)
Go north a few steps, and then north-east and down the stairs. See the
yellow icon with the black exclamation mark on the compass ? That denotes
the Warden of Souls - the guy that has the key for ALL the cells that the
Shades are being held in. He will be our next target on our way to slay
Hades.
From the bottom of the stairs, follow the jagged path to the north-west
and then where it leads off to the north-east, stop. You will want to heal
up and make sure you are ready for what can be a reasonably tough sub-boss
fight with the Warden of Souls. Usually he is quite easy to defeat, but
if he is having a bad day, it can be quite a difficult battle.
===================
THE WARDEN OF SOULS
===================
The Warden of Souls is a MASSIVE Gigantes Warrior, armed with a Bactrian
Claw (a huge hammer), and an Akinakes (a large, curved blade). He has a
number of powers, the most important of which are as follows :-
> Sword-swipe - strikes at you with his Akinakes
> Hammer-thump - strikes you with his Bactrian Claw
> Soul Push - creates a cone-shaped blast of soul energy which moves
out towards you like the Earth School's Flame Surge
Power.
> Life Drain - just like the Spirit School Power of the same name.
UNfortunately for him, the Warden of Souls can only travel a certain
distance from his starting point, so retreat back towards the stairs you
took to get down here if you are finding him rather hard-going, and dizzy
him to get the upper-hand in this fight.
Once the Warden of Souls has fallen, take the Key of the Warden of Souls
which he drops, and you will find you are now able to open each and every
cell you come across in Hades' Palace.
======
BEWARE
======
PLEASE be careful, however, as I found that in one of the cells past the
area where the Warden of Souls was standing, I could open it and get inside,
but I could not then get OUT again afterwards !!!!! This was obviously
REALLY really irritating, as I had to save and close and then restart the
game, to then have to fight my way back through the bl**dy Prison of Souls
just to get back to this point ... PLUS I had to fight the Warden of Souls
again, as he is recreated when you save and exit !!
*sigh*
Anyhow - with him defeated, you can proceed. Head to the north-east of
where he was and through the door he was defending to get to a Mirror Portal
which you should go through.
===========================
THE SHARDS OF EREBUS CONT'D
===========================
Destroy the Shard of Erebus and large number of Gigantes on this platform
to pick up your third Crystal of Erebus Monster Charm.
Head south-west, through the Mirror Portal Shrine, and keep going south-west
until you get back to the main thoroughfare where you turned off to do
battle with the Warden of Souls.
===========================
HADES' TREASURY - PART FOUR
===========================
Turn and head north-west, and down the stairs to do battle with the fourth
key guardian for Hades' Treasury - The Night's Mistress - an Empusa Hero
who holds the Soul Stone.
The Night's Mistress is an Empusa Soul Carver, with the same powers as a
normal Soul Carver would have - just a bit better amplified. She therefore
attacks with the following powers :-
> Soul Projectile - direct line, and VERY impressive rate-of-fire.
> Circle of Power
First move is to take out her Gigantes Bodyguards, as they are a pain and
then, when they are gone and you can focus all your attacks on her ? Just
stick-and-move (I know you have been doing an awful lot of that recently),
and you should find that the battle with her is not as traumatic as it
could be ;)
IF she hits you with her Circle of Power, IMMEDIATELY fall back as she will
be leeching HUGE quantities of your life and energy to replenish her own,
as you are no doubt aware by now.
Once she has fallen you will be in possession of all four of the Keys you
need to unlock Hades' Vault and plunder HIS treasure for a change.
You now have a difficult decision to make. You are not far from completing
Titan Quest: Immortal Throne, and we have done all but two side quests
together - Hades' Treasury (which we can now finish), and the Shards of
Erebus, which we are going to finish in a moment.
You can teleport out of here to sort out Hades' Treasury if you wish, but
if you teleport from Hades' Treasury back to one of the towns (which you
WILL need to do as you will almost CERTAINLY not be able to carry all of
his loot in one fell swoop), your portal here will be lost, so that would
mean that after completing the Hades' Treasury Side Quest, you would have
to either teleport back to the Hades' Palace Portal Shrine and run back
down here, or save and exit the game to restart at the latest rebirth
fountain, but then you would have to FIGHT your way back here.
The alternatives are :-
1) Go and finish the Hades' Treasury Side Quest by teleporting from here
to the Upper City of Lost Souls, PILFER what you want from his
treasure and disregard anything you don't like the look of, then run
back to the Upper City of Lost Souls, do your trading and use the
Portal Shrine there to teleport back here; or
2) Complete Titan Quest: Immortal Throne, and then come BACK afterwards
to complete the Hades' Treasury Side Quest.
It's your call !! I am going to go for option number 1 ;)
===============
HADES' TREASURY
===============
Teleport back to the Upper City of Lost Souls, speak with Horemwia the
Caravan Driver to pick up the other three stones (if you deposited them
with any of the Caravan Drivers as I believe I may have suggested to you
earlier), and deposit all non-essential items with him, and then leave
via the south-western archway, heading south-east and down the winding
stairs, and then west at the foot of the stairs, and into the familiar
chamber where you met Aristonymus. Speak with him to peak his interest
in the stones you have in your possession, and the place the stones on the
four altars along the north-western wall (being, from left-to-right,
Frost, Flame, Soul and Venom - you don't need to know that - just click
on each one and the relevant Stone will be taken from your inventory),
to open the north-western door that leads to Hades' Treasure Vault.
Entering the vault and walking up to the treasure will complete the Side
Quest and earn you a WHOPPING 100000 XP (yep - ONE HUNDRED THOUSAND XP !!).
THAT is sure to come in handy eh !!
Raid the three Majestic Chests and two Otherworldly Chests, and take your
fill of his treasure.
When you are done, RUN back to the Upper City of Lost Souls, sell your
gubbins, pick up your stuff from Horemwia, and use the Portal Shrine
to teleport you back to the Polis Daemonai, and your impending battle
with the Lord of the Underworld himself ...
===========================
THE SHARDS OF EREBUS CONT'D
===========================
Head through the Ornate Bronze Door in the north-western wall and down the
stairs to get into the Crystalline Stellae.
Simply carry on heading north-west and through the doorway, and then in the
next room head north-west again and down the corridor, and through the next
doorway.
This next room is the final room in the game. To your east and west you
will see the two remaining Shards of Erebus, which you should promptly
destroy so as to sever Hades' control over his minions in the Lands of the
Living, and to pick up your fourth and fifth Crystal of Erebus Monster
Charms, completing this (not so useful, granted) Monster Charm, and adding
it to your collection. You will also gain 35000 XP for completing this
Side Quest.
Head a few steps to the north-west, and when you see the room ahead of you
(being a large, circular room), STOP.
Interestingly, scope out the map ... this room is shaped like ... well ...
I don't want to say, but ... I mean DAMN - if I were the boss, this is
what I'd shape MY throne room to look like ... LOL !!
So ... are you ready for your final boss fight ? This is going to be
tough, so be prepared. Stock up on healing and energy potions, max-out
your offensive skills, prime yourself, prep a couple of scrolls and ready
your most powerful weapons ... it's time to take on Hades himself.
=======================
HADES - GOD OF THE DEAD
=======================
To enter battle with Hades, head into his Throne Room. It IS possible to
lure him out of the Throne Room and back down towards the two now-ruined
Shards of Erebus, but to be honest it is just as easy to employ my very
carefully-designed technique in his throne room, so head on in.
Hades attacks you in a number of guises - THREE to be precise. I shall
go through each one in turn.
===================================
HADES - FIRST FORM - OLD HUMAN MALE
===================================
Hades' first form is that of an old human male, with white hair and armed
with a hooked blade. He is reasonably slow to move in this form, and his
primary attacks are as follows :-
> Spinning Blade-Attack - used when you get too close, Hades spins
around creating a blood-red aura around him
and doing great damage to you.
> Hades' Projectile - a direct-line fast-moving projectile, akin to the
vast majority of such powers you have seen from
other enemies in the past - the main difference
with this one appears to be the colour.
> Push - he can knock you with the shaft of his hooked weapon if you get
too close to him.
> Thrown Hades Projectile - he lobs a ball of energy into the air which
explodes in a multi-direction projectile
attack when it hits the ground - run away
from this one to make it easier to dodge
the smaller projectiles.
He isn't too too difficult to slay in this form - just keep your distance
at all times, and use a hit-and-run attack-style to do damage whilst
avoiding his two ranged attacks.
Once Hades has taken 50% damage in this form, he will change forms.
=====================================================
HADES - SECOND FORM - ARMOURED AND MUTATED HUMAN MALE
=====================================================
Hades' second form is a variation on the first - his right arm changes to
become a multi-tentacled version of its former human original, and his
body becomes protected by bone armour. He also gains a helmet, but he
holds the same hooked weapon he had in his first form.
In his second form his attacks change slightly, as follows :-
> Spinning Blade-Attack - as per his first form.
> Hades' Projectile - as per his first form.
> Thrown Hades Projectile - he now lobs multiple balls of energy in the
air, which will stun you for a few seconds
if they hit you.
> Hades' Vortex - he creates a vortex at his feet which he sends towards
you. The vortex is slow-moving, but you do NOT want
to get caught in it, so steer well clear of it at all
times.
> Hook Strike - a powerful hand-to-hand strike with the hooked weapon he
holds in his left-hand.
Hades is quicker-moving in this form, and this actually works to his
detriment, as he spends slightly longer getting into position for his
ranged attacks - in the first form he was a bit more "Oh sod it - I'll just
throw it from here" ;)
As with his first form, just stick-and-move to wear this one down.
When Hades has taken 100% damage, his second form will fall away and he will
change again.
===========================
HADES - THIRD FORM - SPIRIT
===========================
Once his physical forms have been destroyed, you must battle Hades as a
spirit. THIS is where my patented, tried-and-tested "Clock Technique"
comes into play.
All you have to do in order to defeat Hades really quite easily in this
form is imagine his chamber like a clock and, provided he is in the centre
of the room (which is where he seems to like to be in this form), strike
him, then side-step to move around either clockwise or anti-clockwise to
the next number on the clock if you will, thus dodging his attack, and then
strike him again - rinse, repeat, and he should fall quite easily.
There is only really one attack he unleashes which causes you to have to
abandon this technique (temporarily), and that is detailed below - it is
his Spirit Orbs attack. When he uses his Spirit Wall attack you have to
jump a couple of numbers around the imaginary clock instead of just one ;)
His main attacks are as follows :-
> Spirit Projectile - a fast-moving, straight-line spirit projectile.
> Spirit Wall - a HUGE cone-shaped wall of spirit energy that he throws
at you - fall away and to the sides to avoid this one.
> Spirit Beam - a thicker, slower-moving straight-line variation of the
spirit projectile attack.
> Spirit Orbs - he throws a set of five orbs up into the air, each one
shattering upon impact with the ground to send spirit
projectiles out in multiple directions - just fall back
away from him as far as you can to better gauge how to
dodge these attacks.
> Spirit Nova - a GIGANTIC ring of spirit energy that shoots out with
Hades at its centre.
Once Hades has finally been put to rest in all three of his forms, his
wife Persephone appears. Raid Hades' Essence, and then speak with her.
She says :-
"You have defeated both a Titan and an Olympian. From this day forward you
shall be known as Godsbane. We leave the Afterlife in the hands of your
human judges, for they have shown that they are just and merciful. Truly
the Age of Man has come, for now you govern both life and that which
follows. I give you my thanks and open the way, back to Greece or wherever
the Fates will lead you."
She will give you 32000 XP, and complete the main quest for you.
With that, she opens a portal in the north-western wall, which you can go
through to see the very cool credits !!
CONGRATULATIONS - you have now completed Titan Quest: Immortal Throne on
Normal Difficulty !!
HADES EPILOGUE
With Hades having been defeated, and the Gods withdrawing to leave the Fate
of Man to its own destiny, who knows what the future will bring for us ...
You are to be rewarded for your bravery, however, and may now proceed to
do the WHOLE thing again (should you wish) on Epic Difficulty ... woohoo !!
==============================================================================
C H A P T E R S I X CHAPTER 6
==============================================================================
S K I L L S O F T H E S C H O O L S
==============================================================================
As you already know, there are NINE different Schools of Training that you can
follow in Titan Quest - EIGHT in regular Titan Quest, and NINE in the Immortal
Throne Expansion Pack, yep ?
Well because I'm feeling generous, I think it's about time to go through, in
some more depth, the nine schools of training, each of their powers, what they
do and whether (in my opinion) they are worth their weight in gold, or plop.
Before we do so, however, I need to point out that even though I have played
the game many, many times, I have (for obvious reasons) not been able to play
every single combination of character class available and so, whilst I have
used all the skills in the game, I have not fully developed all of them, and
so whilst my thoughts are both genuine and sincere, you may not always agree
with them.
Therefore IF any of you read this and think "he's got that wrong, because xyz"
or what have you, then please do feel free to drop me a line. If you're
respectful and make sense, I'll happily include your thoughts in this section
and give you full credit (up to the point where it becomes more like a thread
than an FAQ !!).
So without further ado, let's get cracking !!
======= ======= ======= ======= === ===
¦ ¦ ¦ ¦ ¦ ¦ ¦ ¦ ¦ \ / ¦
¦ ==== == == ¦ --- ¦ ¦ --- ¦ ¦ \ / ¦
¦ ¦ ¦ ¦ ¦ ¦ ¦ ¦ ¦ ¦ ¦ \/ ¦
¦ ==== ¦ ¦ ¦ ¦ ¦ ¦ ¦ --/ ¦ ¦\ /¦ ¦
¦ ¦ ¦ ¦ ¦ ¦ ¦ ¦ ¦ \ ¦ ¦ \ / ¦ ¦
==== ¦ ¦ ¦ ¦ ¦ ¦ ¦ ¦ \ ¦ ¦ \/ ¦ ¦
¦ ¦ ¦ ¦ ¦ ¦ ¦ ¦ ¦ ¦\ \ ¦ ¦ ¦ ¦
==== ¦ ¦ ¦ ¦ --- ¦ ¦ ¦ \ \ ¦ ¦ ¦ ¦
¦ ¦ ¦ ¦ ¦ ¦ ¦ ¦ \ \¦ ¦ ¦ ¦
======= === ------- --- ----- ---
Game Description : Excels at dealing massive lightning and cold damage to
single opponents or small groups. The Stormcaller has
limited personal defences but can slow, freeze, and
stun enemies with frost and thunder attacks.
Sinister says : In my opinion Storm is one of the best schools in the
game. As with all schools it has offensive and defensive
skills, but it has two of what are, I believe, THE best
skills available - chain lightning and summon wisp.
There are some skills that you are generally quite
unlikely to use, however.
LEVEL 1 SKILLS
Skill Name : ICE SHARD
Description : Projects a deadly shard of ice at the target inflicting
cold damage and temporarily slowing them.
My Rank (/5) : 3
My Comments : Whilst ok as a low-level projectile, it quickly loses
out to skills like Lightning Bolt. You can augment it
at higher levels to increase the speed and number of
shards, but it's still not your handiest skill.
Other Ideas : [Viro Melchior says]
"I've played all the way through Normal and Epic, and up
through the end of Egypt with a friend (Hunter/Rogue) in
Legendary. I rely almost completely on Ice Shards for
damage."
Skill Name : STORM NIMBUS
Description : When active, the player is imbued with the power of the
storm, causing their attacks to strike with cold and
lightning damage
My Rank (/5) : 5
My Comments : VERY handy to have if you choose the Storm School, this
adds damage to EVERY attack you to. Unfortunately it
places what's called a reserve on your energy, meaning
a block of it becomes unusable whilst the skill is in
effect, but in my opinion this is a VERY handy low-level
Storm Skill.
LEVEL 4 SKILLS
Skill Name : SPELL BREAKER
Description : A pulse of negatively charged energy dispels hostile
enchantments on allies or, when cast on enemies, breaks
their beneficial enchantments and negates a portion of
their energy. This attack inflicts bonus damage when
used against Magical creatures.
My Rank (/5) : 1
My Comments : In my opinion this skill is not one you will use very
often. It's just easier to make spellcasters your
primary targets when you encounter them than faff about
dispelling their spells (although it CAN be quite fun if
you have the patience) ;)
Skill Name : THUNDERBALL
Description : Hurls a ball of electrical energy that damages and stuns
enemies in a small blast radius.
My Rank (/5) : 3
My Comments : Whilst it looks and sounds cooler than the Ice Shard, it
isn't THAT much better in my opinion. At higher levels
you have the option of adding mini Thunderballs to it, to
big-up the radius and stun-effect, but as with the Ice
Shard it's quite a slow-moving projectile, and sometimes
you will find your enemies just move away, which is quite
irritating.
Skill Name : HEART OF FROST
Must Have : STORM NIMBUS
Description : When Storm Nimbus is active, the air around the player
becomes icy cold and slows any attackers within its
perimeter.
My Rank (/5) : 5
My Comments : I think if you are going to sink points into Storm Nimbus
then there is absolutely NO reason not to big-up that
skill, by adding cold damage and slowness for your foes
with this skill (and lightning damage at higher levels
with another skill). Bear in mind this affects you
ALL the time, and whilst it does mean you have to give
up a bit more energy in reserve, I think it's worth it.
LEVEL 10 SKILLS
Skill Name : SPELL SHOCK
Must Have : SPELL BREAKER
Description : Inflicts energy burn damage and disrupts enemy spell-
casters' ability to use skills as their beneficial
enchantments are abruptly shattered by Spell Breaker.
My Rank (/5) : 1
My Comments : Whilst a nice add-on to the Spell Breaker skill, I don't
think it's genuinely worth sinking any more than 1 point
into this ability.
Skill Name : VELOCITY
Must Have : ICE SHARD
Description : Increasing the speed and damage of Ice Shard. Gives each
shard a chance to punch through its target and keep going.
My Rank (/5) : 3
My Comments : If you're REALLY serious about keeping the Ice Shard power
and maxing out its effects, then you will definitely want
to invest in this skill. I personally think it might be
worth sinking 1 point into, just to keep Ice Shard in
reserve (although I myself chopped the whole skill in
favour of higher-powered ones when I played).
Skill Name : SQUALL
Description : Creates a wind storm in the target area that decreases
the projectile attack accuracy of enemies caught within
it.
My Rank (/5) : 2
My Comments : Whilst it CAN be useful in rare situations - like when
you are absolutely swamped with a sea of archers or
spellcasters, it is rare that you will find a use for
the Squall power.
Skill Name : FREEZING BLAST
Description : Encases enemies in ice, immobilising them but also making
them more difficult to damage.
My Rank (/5) : 3
My Comments : Useful AND surprisingly satisfying. Like when Jean Grey
freezes Toad in midair in X-Men 1. Unfortunately you can
virtually FORGET smashing more powerful enemies to bits
though, as the ice protects them to some degree from
taking damage, making this a more flash-than-substance
power.
LEVEL 16 SKILLS
Skill Name : LIGHTNING BOLT
Description : Calls down a powerful bolt of lightning from the heavens
to decimate your target.
My Rank (/5) : 5
My Comments : YES !! Now THIS is what I'm talkin' bout !! With a
judicious use of the shift key, you can call down bolts
of lightning to strike target WAY outside your normal
range, and there is very little time between casting the
skill and the impact from the blast, which means it is
easier to target enemies that are on the move. Love it !
Skill Name : CONCUSSIVE BLAST
Must Have : THUNDERBALL
Description : Enhances the power of Thunderball causing sparks to leap
from the initial explosion. Each spark that hits an enemy
inflicts lightning damage and stuns.
My Rank (/5) : 2
My Comments : Useful ONLY if you are looking to use Thunderball on a
repeat basis, which is kinda doubtful. It does have a
satisfying effect insofar as it DOES stun enemies that
are close to the blast radius of the initial Thunderball,
but beyond that it is rather limited in its effect.
Skill Name : OBSCURED VISIBILITY
Must Have : SQUALL
Description : Reduced visibility inside the Squall makes it difficult
for enemies to effectively attack or defend themselves.
My Rank (/5) : 1
My Comments : Kinda the same effect as narrowing your eyes to slits
then yeah ? Thought so. Butt-useless unless you're
heavily reliant on the Squall effect.
Skill Name : STATIC CHARGE
Must Have : STORM NIMBUS
Description : Electrical energy builds inside the player while Storm
Nimbus is active and passes through enemy weapons that
come in contact, delivering a powerful shock.
My Rank (/5) : 4
My Comments : Since this is more a reactionary power than the Storm
Nimbus I can't really give it a 5 - however it is a very
useful addition, and keeps those sonsofb!tches that want
to hurt you really painfully at bay somewhat :)
Skill Name : ENERGY SHIELD
Description : Creates a shield of energy that will nullify all incoming
damage from electrical attacks.
My Rank (/5) : 4
My Comments : I think this is a VERY useful power to have as it protects
you from both lightning AND cold damage, and you will come
across PLENTY of that in the game. Unfortunately it does
nothing to protect you from physical hand-to-hand damage,
but it looks cool, AND you can cast it on other people
too !!
LEVEL 24 SKILLS
Skill Name : TORRENT
Must Have : ICE SHARD
Description : Increases the number of shards cast, sending a deadly
torrent at enemies.
My Rank (/5) : 4
My Comments : If you are dead set on keeping Ice Shard then this is a
MUST-HAVE skill for you, as it increases the number of
shards you can throw. At maximum level it adds another
4 shards to your arsenal, bringing the total you can
possible throw up to a whopping 5 !!
Skill Name : SUMMON WISP
Description : Summon an immortal Storm Wisp from the atmosphere to
battle your enemies.
My Rank (/5) : 5
My Comments : The Storm Wisp is one of the single greatest skills you
can master in the Storm School. Although the little
fella might not LOOK like much, if you check out his
stats you will see that he has a LUDICROUSLY high chance
of dodging any attacks (hand-to-hand and projectile alike)
which makes him THE bane of bosses and sub-bosses let me
assure you.
Skill Name : STORM SURGE
Description : When activated, each enemy hit has a chance of unleashing
a violent squall of storm energy
My Rank (/5) : 5
My Comments : Handy to keep on as it gives you a chance of countering
any hand-to-hand strike you suffer with a storm blast.
This does combined cold and lightning damage to your foes
AND stuns them for a split-second as well !! BONUS :)
LEVEL 32 SKILLS
Skill Name : CHAIN LIGHTNING
Must Have : LIGHTNING BOLT
Description : Causes electricity to leap from the target of your
Lightning Bolt skill and strike additional nearby enemies.
My Rank (/5) : 5
My Comments : The COOLEST Skill in the Storm School. Chain Lightning
causes a regular lightning bolt spell to chain to nearby
adversaries, causing MUCH hilarity and LOADS of damage.
GET ... IT ... NOW !! =)
Skill Name : EYE OF THE STORM
Must Have : SUMMON WISP
Description : A wisp ability that increases the lightning and cold
damage of all nearby allies for a duration and provides
protection from lightning and cold damage.
My Rank (/5) : 5
My Comments : Since your wisp is never going to be that far from your
side in combat, this is a VERY handy skill to add to your
repertoire. See how handy this little guy is !! :)
Skill Name : REFLECTION
Must Have : ENERGY SHIELD
Description : Gives Energy Shield the ability to reflect a portion of
enemy attack damage back at enemies who hit it.
My Rank (/5) : 5
My Comments : If you're going to go for the Energy Shield (which I did),
why not go for the Reflection Spell to fling some of that
damage back at your enemies ? Works for me !! ;)
Conclusions : The Storm School is great for those of you that like to
pummel enemies from afar with either spells or arrows,
and the Summon Wisp and Chain Lightning skills are LEGEND
in my opinion. This is a school well worth considering.
It lets itself down a little in hand-to-hand unfortunately
so anybody that is big into that type of fight should
consider their alternatives. The biggest drawback for
Storm for ME is that some of its best powers (it's going
to sound stupid to say) take a LONG time to get ahold of,
which CAN make it less gratifying than, say, the Earth
School where damage-dealing is THE main focus of play.
Sphere Rating /5 : 4
======= === ======= ======= === ===
¦ ¦ ¦ ¦ ¦ ¦ ¦ ¦ ¦ ¦ ¦ ¦
¦ ==== ¦ ¦ ¦ --- ¦ == == ¦ ¦ ¦ ¦
¦ ¦ ¦ ¦ ¦ ¦ ¦ ¦ ¦ ¦ ¦ ¦
¦ == ¦ = ¦¦ --/ ¦ ¦ ¦ --- ¦
¦ ¦ ¦ ¦ ¦ ¦¦ \ ¦ ¦ ¦ ¦
¦ == ¦ = ¦¦ \ ¦ ¦ ¦ --- ¦
¦ ¦ ¦ ¦ ¦ ¦¦ ¦\ \ ¦ ¦ ¦ ¦ ¦ ¦
¦ ==== ¦ ¦ ¦ ¦¦ ¦ \ \ ¦ ¦ ¦ ¦ ¦ ¦
¦ ¦ ¦ ¦ ¦ ¦¦ ¦ \ \ ¦ ¦ ¦ ¦ ¦ ¦
======= === ===--- -- === === ===
Game Description : Adept at raining down destruction over large hordes of
enemies. With most skills designed to deal damage, the
Pyromancer relies on a colossal Earth Elemental to hold
the attention of enemies.
Sinister says : If you like fire and earth then this is the school for
you, plain and simple. Its skills are, as the game says,
aimed almost solely at battering and damaging your foes
using magic, and so there isn't a whole lot of diplomacy
or subterfuge ... or subtlety for that matter ... involved
in studying this school.
LEVEL 1 SKILLS
Skill Name : EARTH ENCHANTMENT
Description : Imbues your weapons and the weapons of nearby allies with
the power of rock and flame.
My Rank (/5) : 5
My Comments : Adding luscious fire damage to your weapons AND those of
your allies early on in the game is a simple MUST-HAVE
skill for any serious pyromaniac. Get it !! ;)
Skill Name : FLAME SURGE
Description : Three jets of flame erupt from the caster's hands each
inflicting incinerating fire damage to enemies.
My Rank (/5) : 4
My Comments : Whilst this is far from your most devastating power, and
you will in all likelihood wind up downsizing it later
in the game, it is a good skill to pick up early on, and
offers you the chance to get the drop on multiple enemies
that are bound for hand-to-hand combat with you.
LEVEL 4 SKILLS
Skill Name : BRIMSTONE
Must Have : EARTH ENCHANTMENT
Description : Boosts the physical damage of attacks and provides a
chance of causing critical fire damage while under the
effects of Earth Enchantment
My Rank (/5) : 5
My Comments : If you, like most people, are going to be using Earth
Enchantment religiously during your campaign, then this
is another must-have power for you !!
Skill Name : HEAT SHIELD
Description : Casts a protective head shield on the target that absorbs
damage caused by fire.
My Rank (/5) : 5
My Comments : Annulling fire damage is a handy skill indeed. It will
help you with traps, flaming arrows, Flame Liches and all
sorts of other nastiness that you will encounter, PLUS you
can cast it on other people to help them out too ;)
Skill Name : RING OF FLAME
Description : Encircles you in a searing ring of flames burning all
enemies that come within its radius.
My Rank (/5) : 5
My Comments : A great power to have, as it has a good chance of burning
anybody that enters hand-to-hand combat with you, in
addition to which it looks kinda cool.
Skill Name : VOLCANIC ORB
Description : Lobs a burning orb of fiery brimstone that explodes when
it hits the ground inflicting fire and physical damage to
enemies in a small radius.
My Rank (/5) : 4
My Comments : The Volcanic Orb is a damned handy skill, marred only by
the fact that it must be lobbed, hence taking a little
while to get to its target area. It can be augmented at
higher levels making it more appealing, and should not
be overlooked as part of your arsenal. Use the shift key
whilst throwing it to increase your target-range on
screen.
LEVEL 10 SKILLS
Skill Name : STONE FORM
Description : An impervious layer of rock envelops you for a short
duration boosting regeneration but prohibiting movement
My Rank (/5) : 3
My Comments : This is one of those 50/50 powers in my opinion. It does
give you a FREAKY regeneration rate whilst it is in use,
but you are completely unable to move, meaning your foes
are able to get into better positions to batter you from
when the Stone Form is dropped. Used sparingly, it can
be a life-saver.
Skill Name : SUMMON CORE DWELLER
Description : Draws forth a powerful elemental guardian from the Earth's
fiery depths.
My Rank (/5) : 5
My Comments : A simple must-have power for anybody in this school in my
opinion - the Core Dweller is a fearsome beast to behold
and whilst he is slow to move, he can batter your enemies
good and proper, plus he can be augmented at higher
levels.
Skill Name : BARRAGE
Must Have : FLAME SURGE
Description : Reduces the recharge time of Flame Surge allowing it to
be cast more frequently and efficiently.
My Rank (/5) : 4
My Comments : If you're going to rely on Flame Surge than consider
popping some points into this skill. If, like me, you
downgrade your Flame Surge skill, then you should look
to bleed points from this skill first.
LEVEL 16 SKILLS
Skill Name : STONE SKIN
Must Have : EARTH ENCHANTMENT
Description : Tempers armour, increasing protection and fire resistance
while under the effects of Earth Enchantment.
My Rank (/5) : 4
My Comments : A very handy skill indeed - it will make you battle-ready
and able to withstand a greater pounding during combat
than you otherwise might be able to, REGARDLESS of what
type of armour you are wearing.
Skill Name : INNER FIRE
Must Have : SUMMON CORE DWELLER
Description : Increases the Core Dweller's speed and adds fire damage
to its attacks.
My Rank (/5) : 5
My Comments : Reducing the worst point of the Core Dweller's power - its
basic lack of speed - is surely a good thing. This is a
very handy skill to give the big dude, and at its best
level you will find he becomes really quite sprightly !!
Skill Name : SOFTEN METAL
Must Have : RING OF FLAME
Description : Intense heat from the Ring of Flame softens the metal of
enemy armour and weapons, decreasing their effectiveness.
My Rank (/5) : 3
My Comments : Handy insofar as it weakens the attack strength of those
people that are looking to batter you in hand-to-hand,
however the Ring of Flame will often strike those foes
before they strike you, and so this skill is more useful
for those of you that like to wade in rather than think
fights through before entering them.
Skill Name : CONFLAGRATION
Must Have : VOLCANIC ORB
Description : Increases the explosion radius of Volcanic Orb and causes
enemies hit by it to catch fire and suffer burn damage.
My Rank (/5) : 3
My Comments : A good skill if you are heavily reliant on Volcanic Orb,
however if you are not, then it is one to be avoided.
LEVEL 24 SKILLS
Skill Name : MOLTEN ROCK
Must Have : STONE FORM
Description : Adds retaliation fire damage to Stone Form.
My Rank (/5) : 1
My Comments : To be honest, this skill REALLY isn't worth putting any
more than one point in. At best it does 15 fire
retaliation damage, and that just won't make much of a
mark on your enemies by the time you come to do battle
with them at level 24. Best avoided unless you just HAVE
to have it ;)
Skill Name : WILDFIRE
Must Have : SUMMON CORE DWELLER
Description : Allows the Core Dweller to ignite an area of ground
causing severe burn damage to enemies within.
My Rank (/5) : 4
My Comments : A good move to give your Core Dweller, as it gives him
a ranged move to compliment your already brimming ... get
it ? Brimming ?? Arsenal of weapons ... hehehe.
Skill Name : FLAME ARCH
Must Have : FLAME SURGE
Description : Increases the damage and number of flame jets created by
Flame Surge
My Rank (/5) : 5
My Comments : If you keep Flame Surge on, then this is a MUST-HAVE add-
on for that skill. Even if you don't put many points in
it, it augments (as it says) both damage AND quantity of
flame jets ;)
Skill Name : FRAGMENTATION
Must Have : VOLCANIC ORB
Description : Causes the Volcanic Orb to violently explode on impact
sending out fragments of rocks that each inflict physical
damage to the enemies they hit.
My Rank (/5) : 5
My Comments : A SERIOUSLY impressive add-on for those people that want
to use Volcanic Orb. I personally only ever sink a few
points into it, but it really does mount up :)
LEVEL 32 SKILLS
Skill Name : VOLATIVITY
Description : Enhanced by the volatile energy of the Earth, your fire
attacks have a chance of inflicting greatly increased
damage.
My Rank (/5) : 5
My Comments : Worth sinking a couple of points into just for the chance
of doing a damage modifier, this is a cool skill that
boosts all your fire attacks' chances of doing more
damage, and that CAN'T be a bad thing, non ?
Skill Name : METAMORPHOSIS
Must Have : SUMMON CORE DWELLER
Description : Under tremendous head and pressure, the composition of
the Core Dweller hardens making it more resistant to
damage.
My Rank (/5) : 3
My Comments : To be honest I never put THAT much into this skill, just
because it's not that much more inconvenient to just
summon another Core Dweller when the first one dies than
it is to keep it in the fight longer. Sometimes summoned
creatures can be a BIT of a pain (particularly if they
are in a provocative mood) ...
Skill Name : ERUPTION
Description : Volcanic fissures form in the ground, emitting deadly
geysers of molten flame and fiery chunks of brimstone.
Each fragment inflicts physical and fire damage to the
enemies it hits.
My Rank (/5) : 5
My Comments : DEFINITELY a skill to pick up. You pick where you want
your miniature volcano to erupt (preferably right under</pre><pre id="faqspan-11">
the feet of some unsuspecting foe), and WHAMMO !! Toast.
You can increase your casting range by holding the shift
key when you use this power to make it even BETTER !!
Conclusions : With damage-dealing powers coming at you left, right and
centre, it's hard to see the drawbacks of the Earth school
unless, of course, earth and fire are NOT your favourite
elements (as was the case with me). The Core Dweller is
handy, but sluggish, and this school offers you benefits
in both hand-to-hand and ranged spells, so it's a good
damage-heavy school to follow for heavy-hitters.
Sphere Rating /5 : 4
=== === === ======= ======= === ======= =======
\ \ / / ¦ ¦ ¦ ¦ ¦ ¦ ¦ ¦ ¦ ¦ ¦ ¦
\ \ / / ¦ ¦ ¦ --- ¦ ¦ ¦ ¦ ¦ ¦ --- ¦ ¦ ====
\ \ / / ¦ ¦ ¦ ¦ ¦ --- ¦ ¦ ¦ ¦ ¦ ¦
\ \ / / ¦ = ¦¦ --/ ¦ ¦ ¦ = ¦¦ --/ ¦ ==
\ \ /\ / / ¦ ¦ ¦ ¦¦ \ ¦ -- ¦ ¦ ¦ ¦¦ \ ¦ ¦
\ \/ \/ / ¦ = ¦¦ \ ¦ ¦ ¦ = ¦¦ \ ¦ ==
\ / ¦ ¦ ¦ ¦¦ ¦\ \ ¦ -- ¦ ¦ ¦ ¦¦ ¦\ \ ¦ ¦
\ /\ / ¦ ¦ ¦ ¦¦ ¦ \ \ ¦ ¦ ¦ ¦ ¦ ¦¦ ¦ \ \ ¦ ====
\ / \ / ¦ ¦ ¦ ¦¦ ¦ \ \¦ ¦ ¦ ¦ ¦ ¦¦ ¦ \ \¦ ¦
=== === === ====== == === === ====== =========
Game Description : The Warrior excels at dealing out physical damage but
pays little heed to defence. With higher mastery levels
the Warrior can learn to deal damage to several
adversaries at once.
Sinister says : You can say THAT again !! In my opinion there is nobody
better at doing large amounts of hand-to-hand damage to
individuals or small groups of enemies than the Warrior
School ... with Dream and Rogue being hot on its heels.
Forget range - this is about close-quarters brutality,
pure and simple !!
LEVEL 1 SKILLS
Skill Name : WEAPON TRAINING
Description : Years of training with the sword, axe and club allow you
to attack faster and react quickly to enemy attacks.
My Rank (/5) : 5
My Comments : ANY skill that increases your attack speed is tops in my
book, but this one also increases your offensive ability
which increases your chances of doing critical strikes,
and general effectiveness in combat. Coolness :)
Skill Name : BATTLE RAGE
Description : Each enemy hit has a chance of sending you into a battle
rage that adds bonus damage to attacks and increases
Offensive Ability for a short duration.
My Rank (/5) : 2
My Comments : Were it not for the very low chance of activation (even
at its highest level you have a paltry 12% chance of using
this skill), I would give it a 4.
Skill Name : ONSLAUGHT
Description : When used as your default weapon attack, Onslaught charges
up as you hit enemies causing increased damage. The first
hit always charges Onslaught to the first level of the
skill and it continues to charge until it reaches your
current skill level. Onslaught dissipates rapidly when
not actively attacking. Apply this skill to your left
mouse-button.
My Rank (/5) : 5
My Comments : One of the handiest skills for the Warfare Master, and it
is available at level 1 !! You can one level of charge
for each level of skill you have in this ability, and
it can HUGELY affect the amount of damage you deal in
combat, so it is WELL worth purchasing.
LEVEL 4 SKILLS
Skill Name : DUAL WIELD
Description : Learn to effectively wield two weapons.
My Rank (/5) : 5
My Comments : It is a pity that only the Warfare School has this power
at its disposal, because it is SO very very very useful
it's unreal. Wield two single-handed weapons instead of
just a weapon and shield combo. This can MASSIVELY
increase your damage-dealing potential.
Skill Name : DODGE ATTACK
Description : Even the sturdiest armour has its chinks. The best way
to stay alive is to not get hit.
My Rank (/5) : 4
My Comments : Never a truer word spoke !! At maximum level, this power
will give you a 21% chance to dodge attacks, which is
quite decent really, and worth investing in.
Skill Name : IGNORE PAIN
Must Have : ONSLAUGHT
Description : Total focus in the heat of battle allows you to ignore
physical and piercing damage.
My Rank (/5) : 3
My Comments : Decent resistance (15% at maximum level) to both piercing
and regular damage is not to be sneezed at, but it isn't
as glamorous as some of the other Warfare skills by ANY
means.
Skill Name : WAR HORN
Description : The triumphant call of your war horn temporarily stuns
enemies
My Rank (/5) : 4
My Comments : Good, but the duration of the stun effect is unfortunately
random, and will range at maximum level from 1.5 - 6.5
seconds, which can be PLENTY of time to inflict massive
amounts of pain and damage in combat, or surprisingly
little, depending on how lucky you are really !!
LEVEL 10 SKILLS
Skill Name : HEW
Must Have : DUAL WIELD
Description : A Dual Wield technique that causes increased damage by
50%
My Rank (/5) : 5
My Comments : Definitely worth purchasing to compliment your regular
Dual Wield skill.
Skill Name : CRUSHING BLOW
Must Have : BATTLE RAGE
Description : Provides a chance for attacks to cause bonus damage while
in Battle Rage
My Rank (/5) : 4
My Comments : IF and ONLY if you are going to rely very heavily on the
Battle Rage power, then this is a VERY capable addition
thereto.
Skill Name : BATTLE STANDARD
Description : Throw down a mighty standard to embolden the hearts of
nearby allies.
My Rank (/5) : 4
My Comments : Battle Standard may LOOK plop at lower levels, but at
its highest level it gives you a SHEDLOAD of bonuses,
which can really help to turn the tide of battle for you
AND your allies.
Skill Name : WAR WIND
Description : Executes a devastating spinning attack that can damage
up to four enemies. Initially each hit is not as powerful
as a normal attack but the effectiveness increases every
level.
My Rank (/5) : 5
My Comments : At its highest level, you can hit up to 7 targets at the
same time, making this a real crowdpleaser of a skill.
Attach it to the right mouse button and use it sparingly
to maximise the movie-style fight quality of your scraps.
LEVEL 16 SKILLS
Skill Name : CROSS CUT
Must Have : DUAL WIELD
Description : A Dual Wield technique that can hit up to 2 enemies with a
cross-cutting scissor motion.
My Rank (/5) : 3
My Comments : Reasonably good, and definitely worth putting at least a
couple of points into as part of your AWESOME Dual Wield
skill.
Skill Name : HAMSTRING
Must Have : ONSLAUGHT
Description : An attack aimed at the enemy's legs reduces their ability
to run and increases their vulnerability for a short
duration.
My Rank (/5) : 4
My Comments : It slows your victims, and reduces their defensive ability
AND armour, making it worthwhile - especially considering
you don't actually have to independently select it - it
will just be a part of your regular Onslaught skill !!
LEVEL 24 SKILLS
Skill Name : COUNTER ATTACK
Must Have : BATTLE RAGE
Description : Provides a chance to counter attack an enemy after being
hit in Battle Rage.
My Rank (/5) : 1
My Comments : Maximum 15% chance to do a modest counter-attack ? I
think you can do MUCH better at this level, so I wouldn't
sink more than 1-2 points into this skill personally.
Skill Name : TRIUMPH
Must Have : BATTLE STANDARD
Description : Seeing the inevitability of your triumph, enemies lose
hope and the strength of their attack diminishes.
My Rank (/5) : 4
My Comments : Definitely one to add to the already impressive Battle
Standard, as at maximum level this baby will reduce the
amount of damage your enemies can inflict by 40% !!!!!
Skill Name : LACERATE
Must Have : WAR WIND
Description : Adds bleeding damage to War Wind and increases the
number of enemies hit. Requires at least one weapon be
a sword or axe.
My Rank (/5) : 3
My Comments : Decent attack that can hit up to 3 enemies at maximum
level, but which requires you to have a sword or axe in
your hand (which is POSSIBLE but not 100% certain given
your style of play obviously), reducing the appeal of
this power.
Skill Name : DOOM HORN
Must Have : WAR HORN
Description : Your War Horn heralds the doom of your enemies, shattering
their nerves and reducing their ability to defend
themselves.
My Rank (/5) : 3
My Comments : Since it gives you (at maximum level) a 25% reduction in
your enemies' health, PLUS reduced armour, I think it is
worth at LEAST 2-3 points personally. Assuming you have
the War Horn skill at any rate !!!!!
LEVEL 32 SKILLS
Skill Name : TUMULT
Must Have : DUAL WIELD
Description : A Dual Wield technique that hits up to 3 adjacent enemies.
My Rank (/5) : 3
My Comments : A good, firm attack that perfectly rounds off what is
without a DOUBT one of the Warfare Master's greatest
skills - Dual Wield. Definitely sink something into this,
even if it's just 1-2 points !!
Skill Name : ARDOR
Must Have : ONSLAUGHT
Description : You build momentum as you drive your attack forward,
attacking and moving more rapidly.
My Rank (/5) : 5
My Comments : As I have said previously, ANY skill that benefits your
attack speed gets two thumbs up in my book, and this one
works in conjunction with your Onslaught skill, meaning
that the more you hit people, the more powerful you
become AND the faster you move AND STRIKE !!!!! =)
Skill Name : ANCESTRAL HORN
Description : The ominous call on this ancient heirloom will summon
forth ghostly heroes of old from the Elysian Fields to do
battle once more.
My Rank (/5) : 4
My Comments : Whilst it is undoubtedly a very impressive skill, being
as it is in fact the ONLY summon-skill which the Warfare
Master has at his disposal, it is time-limited, which
SUCKS in my opinion. At maximum level you will benefit
from the assistance of 5 warriors for a paltry 24 seconds
so this skill, whilst powerful, MUST be reserved for
desperate situations. It is DEFINITELY worth having, but
use it wisely.
Conclusions : If you have ever wanted to be in the movie 300 ... or
Gladiator ... or ANY other similar movie, then this is
MOST DEFINITELY the School for you. It has virtually NO
ranged attacks, and can only work its wonders up-close and
personal, like a good warrior should ;)
Sphere Rating /5 : 5 if you like up-close and personal, 3 if you don't.
======= ======= === ======= === =======
¦ ¦ ¦ ¦ ¦ ¦ ¦ ¦ ¦ ¦ ¦ ¦
¦ ==== ¦ --- ¦ ¦ ¦ ¦ --- ¦ ¦ ¦ == ==
¦ ¦ ¦ ¦ ¦ ¦ ¦ ¦ ¦ ¦ ¦ ¦ ¦ ¦
¦ ==== ¦ -- / ¦ ¦ ¦ --/ ¦ ¦ ¦ ¦
¦ ¦ ¦ ---- ¦ ¦ ¦ \ ¦ ¦ ¦ ¦
==== ¦ ¦ ¦ ¦ ¦ ¦ \ ¦ ¦ ¦ ¦
¦ ¦ ¦ ¦ ¦ ¦ ¦ ¦\ \ ¦ ¦ ¦ ¦
==== ¦ ¦ ¦ ¦ ¦ ¦ ¦ \ \ ¦ ¦ ¦ ¦
¦ ¦ ¦ ¦ ¦ ¦ ¦ ¦ \ \¦ ¦ ¦ ¦
======= === === === ===== ===
Game Description : The Theurgist combines offence and defence with insidious
life stealing skills that leech enemies' vitality while
bolstering their own. At higher levels the ability to
summon a powerful Liche King dramatically increases
damage-dealing ability.
Sinister says : NICE !! This School boasts some of the most VICIOUS
skills in the game, with powers such as Cascading Life
Drain and Enslave Spirit. It is definitely NOT one for
the goodies two-shoes out there, and it is HEAVILY
reliant on range for its powers to take full effect,
so those that like to wade in might want to avoid it,
unless it is coupled with Warfare of course.
LEVEL 1 SKILLS
Skill Name : DEATHCHILL AURA
Description : A deathly chill radiates from the character slowing the
attack and movement of enemies as it diminishes their life
My Rank (/5) : 3
My Comments : A decent aura, and a very helpful one to have early on in
the game. You might wind up reducing it in favour of
other skills later on, but I would never want to be
totally without its benefit.
Skill Name : LIFE DRAIN
Description : Leeches life from an enemy to replenish your own.
My Rank (/5) : 5
My Comments : YES !! THIS is what it's all about. Not only does this
power enable you to bleed life directly from your enemy
from afar, but it transfers a portion of it back to you,
healing you in the process !! We LOVE it !! At maximum
efficiency, it converts 260% of the attack damage back
to you as health ;)
LEVEL 4 SKILLS
Skill Name : TERNION ATTACK
Description : This powerful wizard's trick causes your staff to shoot
three projectiles by channeling magical energy into it.
Initially each hit is not as powerful as a normal attack
but the effectiveness increases every level.
My Rank (/5) : 4 (if playing a wizard) 1 (if playing anything else)
My Comments : This skill is either great or worthless, depending on the
type of character you want to play. Basically, if you
are going to be using a staff ? Then it can (if you have
a HUGE bank of energy to draw from) level large groups
of monsters in no time flat. If you are playing ANY other
type of character (hand-to-hand, archer, assassin, etc.)
then it is UTTERLY worthless.
Skill Name : RAVAGES OF TIME
Must Have : DEATHCHILL AURA
Description : Accelerates the effects of time on adjacent enemies'
equipment causing weapons to dull and armour to crumble.
My Rank (/5) : 4
My Comments : If you are going to be retaining the Deathchill Aura, then
this is a REALLY cool skill to use to augment its power.
At its highest level, it will deal a whopping -36% damage
to your enemies when they get into hand-to-hand, and that
CAN'T be bad news for you.
Skill Name : VISION OF DEATH
Description : Assaults the minds of surrounding enemies with images of
their own death causing the weak-hearted to flee in horror
and more resolute foes to fight less effectively.
My Rank (/5) : 3
My Comments : Purely on the basis that fleeing enemies are still going
to return, I have to give this a 3. It may buy you some
time - perhaps time enough to destroy
Skill Name : SPIRIT WARD
Description : Casts a protective ward that will reduce the damage of
undead attacks on the player and nearby allies.
My Rank (/5) : 2
My Comments : Whilst it does its job well, and benefits both you AND
any nearby allies, at the end of the day all this power
actually does is protect you from Undead, so it's NO
use against other types of creatures.
LEVEL 10 SKILLS
Skill Name : CASCADE
Must Have : LIFE DRAIN
Description : Causes Life Drain to blast through the primary target
and hit multiple enemies.
My Rank (/5) : 5
My Comments : WICKED skill. This is the equivalent of Chain Lightning
to the Storm School, and you get it in a third of the
time !! Cascade makes Life Drain snake from one target
to another to another and so on (depending on the level)
which is VERY cool.
Skill Name : DARK COVENANT
Description : Mysterious otherworldly entities offer great power to
Spirit Masters who can commune with them. The cost,
however, is measured in life.
My Rank (/5) : 1
My Comments : To be honest the bonuses this skill imparts are poor
when contrasted with its cost. Any skill that bleeds
you of life to keep it running should be viewed VERY
sceptically in my eyes.
Skill Name : SUMMON LICHE KING
Description : In ages past, powerful sorcerers learned how to cheat
Hades and persist as undead liches long after death had
robbed their bodies of life. A dangerous practice of
Theurgists is to bind the souls of these ancient liches
to their will, thus acquiring their powers.
My Rank (/5) : 5
My Comments : This is the first of TWO summons which the Spirit School
has to offer, the other being the Outsider. The Liche
King is a ranged unit, but a DAMNED handy one, who is
heavily upgradable. Whilst he won't last long if he is
made the object of repeat enemy fire, he can dish out
PLENTY of damage considering his frail exterior, and
makes a worthy addition to your entourage in my opinion.
Skill Name : SPIRIT BANE
Must Have : SPIRIT WARD
Description : Adds damage against undead to the attacks of those under
the effects of Spirit Ward.
My Rank (/5) : 3
My Comments : If you're going to, then sink 1-2 points into this skill,
but think carefully before you put any more in, as in my
opinion it ISN'T all that useful.
LEVEL 16 SKILLS
Skill Name : ARCANE LORE
Must Have : TERNION ATTACK
Description : The magic practitioners of older civilisations devised
many insidious techniques to bolster the destructive
capabilities of their magical staves. Knowledge of these
methods will unlock the true power of your staff attacks.
My Rank (/5) : 4 (if you have a staff), 1 (if you do not).
My Comments : If you HAVE a staff and intend on relying on it almost
exclusively ? Then this is a REALLY cool skill. Its
only real drawback is the amount of energy that it takes
to cast, but this isn't so terrible at higher levels. If
you have no intention of using a staff, then you can and
SHOULD totally avoid this skill.
Skill Name : NECROSIS
Must Have : DEATHCHILL AURA
Description : Weakens the constitution of adjacent enemies making them
more susceptible to attacks that directly damage their
life such as vitality damage and life leeching.
My Rank (/5) : 4
My Comments : A healthy addition to the Deathchill Aura - why not sink
just a couplea points into it for good measure ? You
might as well, plus the benefits are quite good :)
Skill Name : ENSLAVE SPIRIT
Description : Slip through the barriers of your enemies' consciousness
and dominate their mind, binding them to your will. While
enslaved your enemy will be forced to obey your commands
but eventually they will regain control of their mind and
turn against you. Ineffective against monsters five or
more levels above you.
My Rank (/5) : 3
My Comments : I would have given this skill a 4 but the restrictions on
its use mean that you have to be dealing with characters
of your own level or only slightly higher (or much lower)
to get it to work, and later on in the game you will wind
up fighting beings that are CONSIDERABLY more powerful
than you are, which is when this skill comes a cropper.
It is DEFINITELY worth having, and it can get you out of
a LOT of jams ... but longer-term, think carefully about
it - you MIGHT want to reassign some points from it to
other skills.
Skill Name : DEATH NOVA
Must Have : SUMMON LICHE KING
Description : Emits a wave of death that will deplete life from any
living being it contacts.
My Rank (/5) : 5
My Comments : Even if you only sink a point into this skill, it adds
another death-dealing attack to the repertoire of the
OH so cool Liche King, and that cannot be a bad thing :)
LEVEL 24 SKILLS
Skill Name : UNEARTHLY POWER
Must Have : DARK COVENANT
Description : Draw upon even greater otherworldly powers to augment
yourself and allies in battle, but be wary of the cost
exacted from your own vitality.
My Rank (/5) : 1
My Comments : Again, it's OK insofar as it benefits you and your
buddies, but the cost is direct to you, so it cannot be
sustained indefinitely, and it will leave you vulnerable
to attack from others. Perhaps best used (if at all),
in the presence of powerful allies ;)
Skill Name : WRAITH SHELL
Must Have : SUMMON LICHE KING
Description : Allows the Liche King to diminish its corporeal presence
making it less vulnerable to all types of damage.
My Rank (/5) : 5
My Comments : This increases the life (or unlife) expectancy of your
Liche King, and that is a GREAT thing in my book. The
poor lad has a tendency of dying (again) prematurely
otherwise =./
Skill Name : CIRCLE OF POWER
Description : Creates a circle of power that protects allies from the
undead and damages any undead creatures that pass within
it.
My Rank (/5) : 5
My Comments : Compared with the Spirit Ward and its upgrade, I find
this to be a MUCH more useful power. You can target a
specific area for it to affect, and if you are in ANY
doubt about just how effective it can be, just do battle
with some Empusa Soul Carvers, and you'll see ;)
LEVEL 32 SKILLS
Skill Name : DEATH WARD
Description : Places a magical ward on the player that protects them
from death by granting additional life when their life
gets dangerously low.
My Rank (/5) : 3 (sceptical)
My Comments : This is going to sound REALLY stupid, but I couldn't seem
to get this skill to work ... I just ... died !! I think
that, in order for it to work, the person hitting you
must knock you down below the pre-defined level of health
(which is calculated on the basis of your level of skill
with this power). Take too much damage too quickly, and
you're screwed. I think it's worth a point just for the
odd time it saves your life, but as I say, for ME ? It
just didn't seem to want to work =./
Skill Name : SUMMON OUTSIDER
Description : Calls forth a powerful extra-dimensional entity from
beyond the ether. The link can only be maintained for
a short time.
My Rank (/5) : 5
My Comments : Although he is only available for a short period of time,
the Outsider can help you to turn the tide of battle in
your favour, as he is a BIG boy, quick, and reasonably
powerful to boot. At the very least he can act as
cannon fodder whilst your Liche King moves into a better
position to zap your enemies from afar ... and you just
throw your head back and cackle with glee !!!!! =)
Skill Name : ARCANE BLAST
Must Have : SUMMON LICHE KING
Description : Drawing upon ancient arcane craft the Liche King forms
deadly bolts of elemental energy and launches them at
enemies.
My Rank (/5) : 5
My Comments : BIG ... UP ... THE LICHE ... KING !! These things are
VERY cool, and have a good range to boot !! Multiple
blasts and at higher levels, really quite good damage.
Definitely one to outfit the dead dude with.
Conclusions : The Spirit School boasts some impressive and powerful
skills, but its reliance on magic over physical attacks
is sure to be its greatest pitfall. When paired with
something like Warfare or even Defence, it would be
quite interesting though !!
Sphere Rating /5 : 4
======= ======= ======= ======= === === ======= =======
¦ \ ¦ ¦ ¦ ¦ ¦ ¦ ¦ \ ¦ ¦ ¦ ¦ ¦ ¦
¦ ¦¦ ==== ¦ ¦ ¦ ==== ¦ ¦ \ ¦ ¦ ¦ ==== ¦ ====
¦ ¦\ ¦¦ ¦ ¦ --- ¦ ¦ ¦ ¦\ \¦ ¦ ¦ ¦ ¦ ¦
¦ ¦ \ ¦¦ == ¦ ¦ ¦ == ¦ ¦ ¦ ¦ ¦ ¦ ==
¦ ¦ ¦ ¦¦ ¦ ¦ -- ¦ ¦ ¦ ¦ \ ¦ ¦ ¦ ¦ ¦
¦ ¦ / ¦¦ == ¦ ¦ ¦ == ¦ ¦ ¦ ¦ ¦ ¦ ==
¦ ¦/ ¦¦ ¦ ¦ -- ¦ ¦ ¦ ¦ \ ¦ ¦ ¦ ¦ ¦
¦ ¦¦ ==== ¦ ¦ ¦ ==== ¦ ¦ ¦ ¦ ==== ¦ ====
¦ / ¦ ¦ ¦ ¦ ¦ ¦ ¦ ¦ \ ¦ ¦ ¦ ¦ ¦
======= ======= === ======= === == ======= =======
Game Description : The Defender specialises in surviving battles but offers
little in the way of offensive enhancements. Many skills
focus on utilising the shield to deflect attacks and
disable enemies.
Sinister says : Yyyyyyyyyyyyeah. Whilst this School of Training DOES
have SOME natty skills ? Like the Shield Charge ? For
me it is WAY too reliant on your having a shield. If
you like Eric from Dungeons and Dragons then this is
DEFINITELY the School for you - otherwise be VERY VERY
CAREFUL when picking it. You don't want to come a
cropper, especially since you can't undo it later ;)
LEVEL 1 SKILLS
Skill Name : CONCUSSIVE BLOW
Description : Adds a chance for attacks to stun enemies and increases
the duration of stun attacks when wielding a club type
weapon.
My Rank (/5) : 4
My Comments : Stunning is COOL because it gives you the opportunity to
inflict even MORE damage on hapless opponents as they are
staggering about in their stupored state.
Skill Name : BATTLE AWARENESS
Description : Enter a state of heightened awareness that allows you
and your allies to perceive and respond to attacks more
effectively.
My Rank (/5) : 3
My Comments : Granting a bonus to your Defensive Ability is never a
bad thing, and you must have this skill to be able to
benefit from its modifications further up the food chain.
I wouldn't sink TOO many skill points into it though ...
Skill Name : BATTER
Description : A shield attack that hits for increased damage and slows
enemies' attacks for a duration.
My Rank (/5) : 5 (if you rely on a shield), 1 (if you don't)
My Comments : A shield-only skill, but one which does have good
benefits. It is good being able to use what would
otherwise be a solely defensive tool for a bit of an
ass-whupping ;)
Skill Name : ARMOUR HANDLING
Description : Understanding how to properly adjust and move in armour
allows you to wear heavier armour and shields than an
untrained warrior of equivalent strength could manage.
My Rank (/5) : 5
My Comments : Good Armour = Good Defence; Good Defence = Less Dying.
The reasons for having this skill are mathematically
simplistic - get it !! ;)
LEVEL 4 SKILLS
Skill Name : ADRENALINE
Description : Each enemy hit has a chance of triggering an adrenaline
rush that boosts life regeneration.
My Rank (/5) : 5
My Comments : Fair play whilst I don't really like the Defence School,
I DO love this skill. They hit you and it makes you heal
quicker ? BRING IT ON !!!!! =)
Skill Name : RALLY
Description : The resolute call of your horn can turn the tide of
battle, inspiring all in its range to fight with renewed
vitality.
My Rank (/5) : 5
My Comments : A decent skill which promotes your health regeneration
for a given period. Since it benefits your allies as
well as yourself, it can really help to turn battles in
your favour.
Skill Name : QUICK RECOVERY
Description : A strong shield arm allows you to block multiple attackers
with amazing speed when necessary but it can only be kept
up for a short time.
My Rank (/5) : 4
My Comments : Considering that you lack range with Defence Mastery, you
could benefit from being able to block physical attacks
in multiples, and at high speeds. Therefore this skill
is well worth studying.
Skill Name : SHIELD SMASH
Description : A shield fighting technique that inflicts damage with both
the weapon and the shield.
My Rank (/5) : 5
My Comments : Turn the shield into a WEAPON ?? BONZA !!!!! Definitely
one to invest in, even if only a couple of points.
LEVEL 10 SKILLS
Skill Name : RESILIENCE
Must Have : ADRENALINE
Description : Increases how often an Adrenaline rush can be triggered.
My Rank (/5) : 5
My Comments : Big-up the number of times you can use the Adrenaline
Rush in a given period of time ? YES PLEASE !!
Skill Name : FOCUS
Must Have : BATTLE AWARENESS
Description : Focus allows you and your allies to react quickly to
enemy attacks increasing the chance of a successful
shield block.
My Rank (/5) : 5 (if you rely on a shield), 1 (if you don't)
My Comments : Another very useful skill if you are going to be relying
on a shield. If not then it's one to avoid really !!
But then if you AREN'T going to be relying on a shield,
why the HELL did you choose Defence Mastery !?!?! :)
Skill Name : SHIELD CHARGE
Description : A running attack that slams into the enemy with your
shield causing bonus damage and stunning them.
My Rank (/5) : 5
My Comments : This skill is definitely one of the best the Defence
School has to offer. It enables you to close the gap
between you and your enemies rapidly, and to slam into
them causing damage and stunning them. It is also one
of the most visually impressive skills in the Defence
repertoire.
LEVEL 16 SKILLS
Skill Name : INSPIRATION
Must Have : RALLY
Description : Gradually restores lost energy to allies allowing them
to continue the fight.
My Rank (/5) : 5
My Comments : I like this skill. Using an aura to bolster the health
recharge rate of your allies is COOL, as whilst they are
alive they WILL keep fighting for you. TO THE DEATH !!
Skill Name : REND ARMOUR
Must Have : BATTER
Description : Increases the effectiveness of Batter causing it to hit
three targets with enough force to dent their armour.
My Rank (/5) : 5 (if you rely on a shield), 1 (if you don't)
My Comments : As I have said repeatedly of these types of skills, if
you HAVE an intent to rely on a shield in combat in
general ? Then this is a cool skill to have, DEFINITELY.
If you do NOT ? Then why waste the points !!
Skill Name : DISABLE
Description : A fighting technique that utilises the shield to crush
foes and throw them off-balance.
My Rank (/5) : 3 (if you rely on a shield), 1 (if you don't)
My Comments : To be honest I think this skill arguably loses out to
Shield Charge - however it does give decent slow effects
at higher levels ... even if the damage isn't really
there.
Other Ideas : [Viro Melchior says]
"Disable is amazing. You are comparing it to Shield
Charge, but Disable (and the other two abilities on the
right hand edge of the Defender menu) are passive.
There is a chance every time you attack that they are
used, for ZERO energy. Plus they all add your shield
damage into the equation, which later on gets to be +100
damage or more (my Defender/Pyro has a purple shield
that hits for 199 damage)."
LEVEL 24 SKILLS
Skill Name : DEFENSIVE REACTION
Must Have : ADRENALINE
Description : Increases damage and attack speed during an adrenaline
rush
My Rank (/5) : 5
My Comments : Adrenaline Rush is one of your handiest skills, so if I
were you I would kit it out with additional powers at
every possible opportunity. This skill should get MORE
than a 5, as it increases your attack speed and you KNOW
how much I love that ;)
Skill Name : IRON WILL
Must Have : BATTLE AWARENESS
Description : Grants allies the resolve to hold out against great
adversity.
My Rank (/5) : 2
My Comments : To be honest, I'm not a huge fan of this power. It gives
stun resistance, reduces entrapment duration, reduces
freeze duration and gives skill disruption protection ...
but it's like Han Solo said ... it's no match for a
Blaster at your side ;)
Skill Name : DISRUPTION
Must Have : SHIELD CHARGE
Description : Increases the shock effect of Shield Charge, startling
adjacent enemies and disrupting spell use for a time.
My Rank (/5) : 5 (if you rely on a shield), 1 (if you don't)
My Comments : I think this is a really handy skill to have to be honest.
I SERIOUSLY rate the Shield Charge skill, and being able
to increase the number of people that you hit is ALWAYS
a good thing ... BRING THE NOISE !! :)
LEVEL 32 SKILLS
Skill Name : DEFIANCE
Must Have : RALLY
Description : A percentage of all damage inflicted by enemies will be
revisited back upon them for a short time after using
Rally.
My Rank (/5) : 4
My Comments : Using this skill you gain increased elemental resistance
and can reflect some damage back at your enemies. At
maximum level 60% of it to be precise !! However the
effects are transient, and don't last too long ...
Skill Name : COLOSSUS FORM
Description : Assume the form of a towering Colossus and lay waste to
your enemies.
My Rank (/5) : 4
My Comments : Whilst I really do love this power ... and I do ... as
I cannot HELP but utter the words "Magic Sceptre ... make
my Monster GROW" every time I use it ... and it is REALLY
good for enabling you to cover distance very quickly and
to smite your enemies LIKE the Colossus ? Try going
through a door ... or down a flight of stairs, and you
will very quickly learn its shortfalls. It's CR@P at
that sorta thing !!
Skill Name : PULVERISE
Description : A fighting technique that utilises the shield to slam
into enemies, knocking them senseless.
My Rank (/5) : 4
My Comments : This power gives you the ability to strike multiple foes
causing damage, reducing their offensive ability, and
creating a skill disruption effect. In short, ruining
their day. It's not fantastic, but it ain't half bad ;)
Conclusions : Of the 20 skills in this School, 9 of them rely on you
having a shield in your possession, so if you are not
planning on using one, forget this school. Also, think
VERY CAREFULLY before pairing Warfare and Defence. They
may SOUND like they go hand-in-hand, but you will be
sacrificing almost all your ranged powers, PLUS you will
have to have two weapons on your primary, and a weapon
plus a shield in your secondary, to make full use of the
combined powers of both Schools. Defence is a handy
school, so don't think I'm being TOO harsh with it, but
for me it just doesn't cut the mustard.
Other Ideas : [Thomas Graham has gotten in contact with me to give you
guys a different perspective on the Conqueror (Warfare+
Defence Mastery), as he loves it. He says]
"(The Conqueror) was my very first character ... and
he's currently my strongest. Basically I gave him a
shield and grabbed all the shield attacks from Defence
and buffed him up with all the other melee power from
Warfare - completely ignoring dual wield/war wind/
ancestral horn. I took War Horn though, as it's useful
for running out of trouble. I also ignored Concussive
Strike from Defence as maces are really slow as to not
really make it worth it (As I also prefer to hit as fast
as possible, gives me more chances to get a shield
attack in).
"I always keep a bow handy in the second slot. I use it
for overly tough boss fights (Typhon on Normal, the bull
on epic and legendary etc) and for pulling out groups of
monsters in rooms where it'd be suicide to go Shield
Charging in. Generally he can wipe the floor with most
monsters and with Armour Proficiency, Ignore Pain and
all those other skills, he soaks it up very nicely too.
Not to mention that Warfare and Defence have the most
Health bonuses of all the schools as you level them up.
I also keep Shield Charge handy for getting rid of those
pesky archers and casters (Especially Machae Archers),
and even using it in melee range to just pummel some
monsters.
"The slowing effect on Batter is great, it really
reduces the amount of pain coming your way and as a
general rule I find my shield does more damage than my
weapons. This also makes it great for Disable, Pulverize
and Shield Bash. The slowing effect on Disable is too
chancey to rely on, but I only max it out because it's
another chance of hitting with my shield instead (Which
tends to deal a FAIR bit more damage than my main
weapon.) He also has Onslaught which powers him up
quite considerably. With +Speed and skills like Weapons
Training and Ardor, I seem to have hit some kind of
Weapon Speed cap =(. Nothing I do can make him strike
any faster than now - not even activating a Battle
Shrine!"
[He also points out that, if you check out the bonuses
gained from levelling up your masteries, Defence gives
the most health of all of them).]
Sphere Rating /5 : 2
=== === === ======= === === ======= =======
¦ \ ¦ ¦ ¦ ¦ ¦ ¦ ¦ ¦ ¦ ¦ ¦ ¦ ¦ ¦
¦ ¦ \ ¦ ¦ ¦ ¦ == == ¦ ¦ ¦ ¦ ¦ --- ¦ ¦ ====
¦ ¦\ \¦ ¦ ¦ ¦ ¦ ¦ ¦ ¦ ¦ ¦ ¦ ¦ ¦ ¦
¦ ¦ ¦¦ = ¦ ¦ ¦ ¦ ¦ ¦ ¦ ¦ --/ ¦ ==
¦ ¦ \ ¦¦ ¦ ¦ ¦ ¦ ¦ ¦ ¦ ¦ ¦ ¦ \ ¦ ¦
¦ ¦ ¦¦ = ¦ ¦ ¦ ¦ ¦ ¦ ¦ ¦ \ ¦ ==
¦ ¦ \ ¦¦ ¦ ¦ ¦ ¦ ¦ ¦ ¦ ¦ ¦ ¦ ¦\ \ ¦ ¦
¦ ¦ ¦¦ ¦ ¦ ¦ ¦ ¦ ¦ --- ¦ ¦ ¦ \ \ ¦ ====
¦ ¦ \ ¦¦ ¦ ¦ ¦ ¦ ¦ ¦ ¦ ¦ ¦ \ \¦ ¦
=== ===== === === ======= === =========
Game Description : The Wanderer can call on denizens of the forest to deal
damage and shield them from enemies. Healing and
defensive auras allow allies to survive longer and fight
more effectively.
Sinister says : Find me a RAINBOW !! Ok so it's not that bad really -
Nature Mastery DOES give you control over more creatures
than any other School - three in total - and it has a
healthy emphasis on healing and restoration which can
compliment other schools well - it just isn't that strong
as an offensive school unfortunately.
LEVEL 1 SKILLS
Skill Name : REGROWTH
Description : A wave of healing energy rapidly restores lost life to
the target ally.
My Rank (/5) : 5
My Comments : Basically ESSENTIAL maintenance for those times when you
get caught with no potions left ... and you will ;)
Skill Name : CALL OF THE WILD
Description : Summons a wolf companion to fight with you in battle. At
higher levels more wolves can be controlled at once.
My Rank (/5) : 5 to begin with ... 2 as the game progresses
My Comments : You can summon a wolf, which is cool because no other
School will give you a summon THIS quickly - however the
wolf is available at level 1 for a reason. At its best
level, this skill will enable you to summon 2 wolves -
however they are EXTREMELY prone to premature death -
especially when they face more powerful monsters later
in the game. Even when souped-up, they aren't all that,
unfortunately.
Other Ideas : [Viro Melchior says]
"I'd agree with (your ranking above) *until* you go to
Epic. All summoned monsters are given more hp and armor
at the Epic and Legendary thresholds. So while your
pets get ripped to shreds in the Orient and Hades of
basic difficulty, they are much tougher once you go up
to a harder mode. And because the "difficulty" scales
slower in these modes (along with your levels going up
slower), the pets remain useful in Orient + Hades on the
higher difficulties."
LEVEL 4 SKILLS
Skill Name : HEART OF OAK
Description : Bolsters the life-force of yourself and nearby allies.
My Rank (/5) : 5
My Comments : Boasting a steady increase to your health regeneration
rate, and extending same to nearby allies, this is a
COOL skill to have.
Skill Name : ACCELERATED GROWTH
Must Have : REGROWTH
Description : Allows Regrowth to be cast more frequently.
My Rank (/5) : 5
My Comments : Even if you only sink a couplea points into this skill,
being able to heal yourself more frequently means you are
likely to survive longer.
Skill Name : MAUL
Must Have : CALL OF THE WILD
Description : A gnawing attack that rends enemy flesh causing bleed
damage for a short duration.
My Rank (/5) : 5
My Comments : Whilst I would only learn this skill if you are SERIOUSLY
a dog lover, if you DO want to keep the wolves on, then
I would strongly recommend it be studied.
Skill Name : PLAGUE
Description : Plague afflicts nearby enemies with a debilitating ailment</pre><pre id="faqspan-12">
that reduces their health and quickly spreads to other
nearby creatures.
My Rank (/5) : 5
My Comments : Poison damage rocks - just ask the Rogue !! Being able
not only to poison your enemies, but also to see that
poison spread to their allies, is just plain fun :)
LEVEL 10 SKILLS
Skill Name : BRIAR WARD
Description : A protective grove of briars grows around you that
enemies cannot pass through.
My Rank (/5) : 1
My Comments : To be honest, most reasonably powerful enemies are just
going to smash their way through this, so it is of
SERIOUSLY limited use. It grows all around you, so you
cannot really use it to escape ... it is a PLOP power.
Skill Name : SURVIVAL INSTINCT
Must Have : CALL OF THE WILD
Description : An instinctual will to live is triggered whenever health
is low.
My Rank (/5) : 5
My Comments : Again - a seriously cool power but only for the hardcore
dog lovers out there. It allows your poochies to absorb
a percentage of the damage they inflict, and to do more
damage than usual ... unfortunately it usually won't be
enough to save their furry little hides =./
Skill Name : FATIGUE
Must Have : PLAGUE
Description : Saps the strength from diseases enemies causing them to
move more slowly and fight less effectively.
My Rank (/5) : 3
My Comments : Offering a myriad of nasty potential effects, this is
worth sinking at least a couple of points into as and
when you get the opportunity ... it can reduce enemies'
health, damage AND speed !!
LEVEL 16 SKILLS
Skill Name : TRANQUILITY OF WATER
Must Have : HEART OF OAK
Description : Provides a chance to use skills at 50% reduced cost while
under the effect of Heart of Oak.
My Rank (/5) : 3
My Comments : Giving you the POSSIBILITY (as even at maximum power it
is a reasonably modest 28% possibility) to use your other
powers at a 50% reduction to their energy cost is worth
taking a gamble on - even if it's just one point you
sink into it as a skill, non ?
Skill Name : DISSEMINATION
Must Have : REGROWTH
Description : Causes regrowth energy to disseminate from the initial
target and leap to additional nearby allies.
My Rank (/5) : 5
My Comments : VERY very useful when you are doing larger-scale combat
in Elysium later in the game. This is, in fact, the
power that the Elysian Warriors use to heal each other.
I definitely recommend getting at LEAST 2-3 points in
this power.
Skill Name : STINGING NETTLE
Must Have : BRIAR WARD
Description : Causes enemies who hit the Briar Ward to suffer poisoning.
My Rank (/5) : 2
My Comments : Ok so it makes the Briar Ward a little bit more manly,
but still - it's a bit naff. Stinging Nettle ? Paleeze.
Skill Name : SYLVAN NYMPH
Description : Summons a powerful forest Nymph who can bring down enemies
with her magical bow and cast enchantments to strengthen
allies in battle.
My Rank (/5) : 4
My Comments : She's quick, she's mean-tempered and she has a VERY
naughty laugh when she does things she knows she shouldn't
like shooting monsters in the eye from afar. Also, you
can choose where you want her to materialise (which is of
very little consequence, but a nice touch). The Nymph
has a high rate of fire, but skips (SKIPS) everywhere
she goes, which is really NOT good if you are trying to
play a manly character. She is the second (or third if
you sank loads of points into the Call of the Wild)
summon for this School.
LEVEL 24 SKILLS
Skill Name : PERMANENCE OF STONE
Must Have : HEART OF OAK
Description : Protects allies from the elements, reducing the damage
caused by elemental based attacks.
My Rank (/5) : 4
My Comments : Whilst it may SOUND naff, and even at its highest level
you get a maximum of 18% resistance, this is ELEMENTAL
resistance - i.e. resistance to ALL the elements and, as
such, it cannot be sneezed it.
Skill Name : STRENGTH OF THE PACK
Must Have : CALL OF THE WILD
Description : The howl of your wolves emboldens the hearts of those who
hear it causing them to fight more fiercely.
My Rank (/5) : 4
My Comments : I like this skill, as it enables the wolves to do
something for you and your other allies (if you have any)
for a change. You will benefit from increased damage and
speed, and you KNOW that added speed makes me go weak at
the knees ... heh.
Skill Name : OVERGROWTH
Must Have : SYLVAN NYMPH
Description : Allows the Nymph to create a living shield around allies
that absorbs damage and harms enemies that strike it.
My Rank (/5) : 4
My Comments : Another natty power - this enables the Nymph to give you
a level of protection from physical damage, PLUS it has
a chance to perform piercing retaliation against those
who would harm you whilst under its protection.
Other Ideas : [Viro Melchior says]
"Overgrowth is nearly useless. [The Nymph] doesn't cast
it often, and it isn't enough damage on any difficulty
to really make a difference considering how fickle she
is with it."
Skill Name : SUSCEPTIBILITY
Must Have : PLAGUE
Description : Weakens the constitution of adjacent enemies making them
more susceptible to physical and elemental damage.
My Rank (/5) : 4
My Comments : Giving negative modifiers to the Damage Resistance and
Elemental Resistance of those people standing around an
afflicted (poisoned) adversary, this just makes the
pleasure spread like wildfire through the ranks !! :)
LEVEL 32 SKILLS
Skill Name : REFRESH
Description : Substracts time from recharging skills allowing you to use
them more frequently.
My Rank (/5) : 5
My Comments : I think this is a MUST HAVE skill for the Nature Master,
as it can enable you to employ some of your most powerful
skills more often. At its highest level it reduces the
recharge time of skills by 52 seconds when used, and that
can mean the difference between life eternal and a quick
and painful death on the battlefield.
Skill Name : SANCTUARY
Must Have : BRIAR WARD
Description : The power of the grove revitalises those within and
reduces the energy consumed by skill use.
My Rank (/5) : 5
My Comments : If ever you GET Briar Ward to this level, then I would
seriously look to invest in this skill, as it boosts both
Health AND Energy Regeneration whilst you are within the
Ward and, since you cannot go anywhere whilst it's up ?
That sounds like a pretty sweet deal to me !!
Skill Name : NATURE'S WRATH
Must Have : SYLVAN NYMPH
Description : Imbues the Nymph's attacks with the power of the elements.
My Rank (/5) : 5
My Comments : Giving that tricksy little Nymph the power to fire arrows
through her enemies (a skill otherwise reserved for the
Hunting School Masters out there), and enhancing her
strikes with Elemental Damage is COO-WELL !! :)
Conclusions : Clearly NOT a School for those people that like to fight
in the front lines, unless backed up by something very
physical like Warfare or Earth, Nature can easily be as
much a hindrance as a help. HOWEVER, when paired up
intelligently with other schools (i.e. using Nature as
pretty much a supporting School), it can be put to VERY
good use and, if you are looking to become a Druid, then
this is the way to go !!
Sphere Rating /5 : 3
=== === === === === === ======= === === === =======
¦ ¦ ¦ ¦ ¦ ¦ ¦ ¦ ¦ \ ¦ ¦ ¦ ¦ ¦ ¦ ¦ \ ¦ ¦ ¦ ¦
¦ ¦ ¦ ¦ ¦ ¦ ¦ ¦ ¦ ¦ \ ¦ ¦ == == ¦ ¦ ¦ ¦ \ ¦ ¦ ¦ ====
¦ ¦ ¦ ¦ ¦ ¦ ¦ ¦ ¦ ¦\ \¦ ¦ ¦ ¦ ¦ ¦ ¦ ¦\ \¦ ¦ ¦ ¦
¦ --- ¦ ¦ ¦ ¦ ¦ ¦ ¦ ¦ ¦ ¦ ¦ ¦ ¦ ¦ ¦ ¦ ¦
¦ ¦ ¦ ¦ ¦ ¦ ¦ ¦ \ ¦ ¦ ¦ ¦ ¦ ¦ ¦ \ ¦ ¦ ¦
¦ --- ¦ ¦ ¦ ¦ ¦ ¦ ¦ ¦ ¦ ¦ ¦ ¦ ¦ ¦ ¦ ¦ ¦ ---
¦ ¦ ¦ ¦ ¦ ¦ ¦ ¦ ¦ ¦ \ ¦ ¦ ¦ ¦ ¦ ¦ ¦ \ ¦ ¦ ¦ \ ¦
¦ ¦ ¦ ¦ ¦ --- ¦ ¦ ¦ ¦ ¦ ¦ ¦ ¦ ¦ ¦ ¦ ¦ === ¦
¦ ¦ ¦ ¦ ¦ ¦ ¦ ¦ \ ¦ ¦ ¦ ¦ ¦ ¦ ¦ \ ¦ ¦ ¦
=== === ======= === == === === === == ====== ¦
/ ¦
/ ¦
===
Game Description : Master of bow and spear combat. Piercing attacks
penetrate enemy armour and high level bow skills will tear
through large groups of enemies. The Hunter must rely on
speed and range to stay out of the reach of enemies.
Sinister says : I really like this School. If you want to fashion your
character into an archer, then this is the way to go.
NOBODY wields a bow and arrow better than those that
follow the Hunting School ... NOBODY. Of course if you
want to get up-close-and-personal ? Then this is NEVER
going to be a school for you.
LEVEL 1 SKILLS
Skill Name : ENSNARE
Description : Casts a weighted net around the feet of an enemy holding
them in place but not preventing them from attacking if
you are within their range.
My Rank (/5) : 5
My Comments : This is quite simply one of the single best low-level
skills in the whole game. You can pin a single enemy,
whether a low-level grunt or even in some cases a boss,
in place for a given period of time, which gives you
(depending on the level of the skill) usually plenty of
time to riddle them with arrows or other attacks. Go
on ... tie it to your right mouse button and have a
Legolas moment ;)
Skill Name : TAKE DOWN
Description : A brutal thrust from your spear delivers devastating
piercing damage to enemies and diminishes a portion of
your enemy's total life.
My Rank (/5) : 5 (if you wield a spear regularly), 1 (if you do not)
My Comments : Only of any use if you wield a spear as a regular part
of your arsenal. I never do, so this skill is totally
lost on me.
Skill Name : WOOD LORE
Description : Central to survival in the wilderness is the ability to
hunt with bow and spear. Great familiarity with these
weapons allows you to wield them with exceptional speed
and precision.
My Rank (/5) : 5
My Comments : ANY skill that increases your attack speed is quite
simply a must-have in my opinion, and this is one of
those. Increased speed gives you increased damage-
dealing potential :)
LEVEL 4 SKILLS
Skill Name : MARKSMANSHIP
Description : Marksmanship skill allows you to create and fire arrows
that fly faster and increase pierce damage. Apply this
skill to your left mouse button.
My Rank (/5) : 5
My Comments : A very useful and improvable skill is Marksmanship. It
increases the effectiveness and damage of all your regular
arrow attacks, and as the Hunter you will be using PLENTY
of those !!
Skill Name : ART OF THE HUNT
Description : Hunting experience gives you the edge when facing familiar
quarry such as Animals and Beastmen.
My Rank (/5) : 4
My Comments : Whilst I heavily improved this skill during my playtime,
it is best implemented against animals and beastmen, and
so part of its effectiveness is lost when it is used
against tougher and more powerful enemies ...
Skill Name : HERBAL REMEDY
Description : Living off the land, you learn to identify and utilise
medicinal plants to create healing salves. When applied
it will fortify against poison and healing is accelerated
for the duration.
My Rank (/5) : 3
My Comments : It's good to be able to use a healing skill now and
again, and this one is reasonably cool because it also
helps protect you from poison damage. I have never ever
used it in-game to be truthful, largely because being a
ranged character you tend to try and avoid taking hits
wherever possible, but it's cool to know it's available
should you want to learn it :)
LEVEL 10 SKILLS
Skill Name : BARBED NETTING
Must Have : ENSNARE
Description : Barbed hooks on the hunter's Ensnare net tear into
enemies as they struggle causing them to bleed.
My Rank (/5) : 5
My Comments : Whilst I have never bothered to put any appreciable
number of points into this skill - I think I just put
one in for good measure - it is totally worth having,
as the opportunity to inflict additional damage on a
paralysed foe appealed to me ... and still does !!
Skill Name : CALL OF THE HUNT
Description : Those who answer the call of the hunt will fight with
increased speed and cunning.
My Rank (/5) : 5
My Comments : A GREAT skill which is only restricted by the time limit
imposed upon it - however at higher levels it runs for a
respectable amount of time, and can DRAMATICALLY improve
your fighting skills for the duration (as well as those
of your allies !!)
Skill Name : EVISCERATE
Must Have : TAKE DOWN
Description : Targeting vital weak-points on your enemy causes sustained
damage from bleeding.
My Rank (/5) : 5 (if you wield a spear regularly), 1 (if you do not)
My Comments : Again, if the spear is your weapon of choice, then this
is going to be a very popular skill for you. If, like
me, however, you virtually NEVER use a spear, then this
skill is NEVER going to make your highlight reel.
Skill Name : MONSTER LURE
Description : Drops down a decoy to attract the attention of nearby
monsters.
My Rank (/5) : 1
My Comments : To be honest I think this is the worst skill in the whole
School. It creates a dummy a VERY short distance away
from you, which lures monsters to it until they smash it
to pieces. Since it's very close to you to start with,
they are not guaranteed to spot it and might hit you a
few more times until it catches their eye, so this isn't
a fantastic skill by any means :(
LEVEL 16 SKILLS
Skill Name : STUDY PREY
Description : By observing your prey from a distance you may discover
its weakness, resulting in greater pierce damage.
My Rank (/5) : 3
My Comments : This is a skill which you can use to target a small area
of enemies at a distance, increasing the amount of
piercing damage they take for a little while. A green
eye appears over their heads - it's the same power the
centaurs use on you ALL the BL**DY TIME !!
Skill Name : PUNCTURE SHOT ARROWS
Must Have : MARKSMANSHIP
Description : Incorporating a more streamlined shaft into your arrows
allows them to pass through targets and hit additional
enemies in their path.
My Rank (/5) : 5
My Comments : I would give this ability MORE than 5 if I could - it is
DEFINITELY one to get if you use a bow-and-arrow. The
chance of penetrating the bodies of your enemies and
hitting the people behind them increases as the skill
improves, as does the satisfaction of using this skill !!
Skill Name : GOUGE
Description : A combat technique that uses the spear or bow to inflict
deep wounds that will result in prolonged bleeding.
My Rank (/5) : 4
My Comments : Increasing the amount of bleeding damage your spear OR
bow does, makes this a good skill to add to your
repertoire regardless of whether you prefer to use the
spear or the bow - I would recommend sinking at least
1-2 points into it personally.
Skill Name : FIND COVER
Must Have : ART OF THE HUNT
Description : Making use of available cover as you press your attack
allows you to avoid unnecessary damage.
My Rank (/5) : 3
My Comments : Since you are at range anyway, you should find you are
able to avoid the majority of attacks - just stick and
move and you will be able to avoid many projectiles. This
is one of those nice to have powers, but I wouldn't say
it is in ANY way mandatory for this School.
LEVEL 24 SKILLS
Skill Name : EXPLOIT WEAKNESS
Must Have : CALL OF THE HUNT
Description : Take full advantage of your enemy's mistakes and
vulnerable moments to inflict savage wounds.
My Rank (/5) : 5
My Comments : This skill enables you to inflict additional piercing and
bleeding damage when attacking. Consequently it is well
worth investing some pointage in ;)
Skill Name : TRAIL BLAZING
Must Have : ART OF THE HUNT
Description : Grants those who follow the hunt endurance to relentlessly
track their quarry, preventing even the most tangled
thicket from slowing pursuit.
My Rank (/5) : 5
My Comments : This skill doesn't benefit your attack speed per se, but
instead it increases your movement speed. This has
certain obvious advantages insofar as you can peg it away
from combat quickly, or take advantage of mistakes your
enemies make in double-quick time.
Skill Name : DETONATE
Must Have : MONSTER LURE
Description : Adds a hidden explosive charge to the monster lure causing
it to detonate when destroyed. In order to detonate the
lure must be at full energy.
My Rank (/5) : 1
My Comments : Ok ... whilst I admit that love almost EVERYTHING about
this School, THIS and Monster Lure I just really don't
get. What makes THIS power really pants in my opinion
is that whilst it can cause the Monster Lure to explode
when it reaches zero health, it doesn't always, as the
Monster Lure MUST HAVE full energy to discharge this
power !! Why bother !?!?! Just SHOOT your enemies -
don't wait in hiding for this thing to take them out ...
JUST ... SHOOT ... THEM !!
LEVEL 32 SKILLS
Skill Name : FLUSH OUT
Must Have : STUDY PREY
Description : Draw your enemies into the open, making them more
vulnerable to attack.
My Rank (/5) : 2
My Comments : If you're a big fan of using Study Prey, then this power
should go from a 2 to a 4. I never use it personally, so
this is rather lost on me. However I can tell you that
it does reduce both the Defensive Ability AND the
Elemental Resistance of those enemies it affects.
Skill Name : SCATTER SHOT ARROWS
Must Have : MARKSMANSHIP
Description : A secret of master fletchers is the ability to craft
special arrow heads that burst on impact sending out
razor-sharp fragments in all directions. Each shard
delivers piercing damage to the enemies it hits.
My Rank (/5) : 5
My Comments : ANOTHER power which I would cheerfully give more than 5
points to were I able ... this one gives you a chance to
have any given arrow you fire explode into a set of
smaller barbs, each of which does additional damage.
Using this with the other Marksmanship upgrades can level
large (and I do MEAN large) numbers of enemies in one or
two arrows - it's SO COOL !!!!! :)
Skill Name : VOLLEY
Description : A combat technique that uses the spear or bow to rapidly
strike three times in succession.
My Rank (/5) : 5
My Comments : YET ANOTHER kickass power for the Hunting School - THIS
little beauty enables you to fire three arrows (from
time to time - there is a percentage chance that it will
work), which means you do even MORE damage to even MORE
monsters with your bow and arrows ... YEEEEEEES !!!!! =)
Conclusions : If you are an archer or have even the SLIGHTEST liking
for Legolas from the Lord of the Rings, then you should
SERIOUSLY consider this school. Whilst its emphasis is
on wielding a bow and arrow, it does have some spear
skills available, and some modest healing powers should
you want to brush up on those, so it caters to pretty
much two main types of warrior - the Archer and the
Pikeman. The biggest drawback of this school is in its
total lack of summons, but apart from that I love it !!
Sphere Rating /5 : 4
======= ======= ======= === === =======
¦ ¦ ¦ ¦ ¦ ¦ ¦ ¦ ¦ ¦ ¦ ¦
¦ --- ¦ ¦ --- ¦ ¦ ==== ¦ ¦ ¦ ¦ ¦ ====
¦ ¦ ¦ ¦ ¦ ¦ ¦ ¦ ¦ ¦ ¦ ¦ ¦ ¦
¦ --/ ¦ ¦ ¦ ¦ ¦ ¦ ¦ ¦ ¦ ¦ ¦ ==
¦ \ ¦ ¦ ¦ ¦ ¦ ¦ ¦ ¦ ¦ ¦ ¦ ¦
¦ \ ¦ ¦ ¦ ¦ ¦ ¦ --- ¦ ¦ ¦ ¦ ¦ ==
¦ ¦\ \ ¦ ¦ ¦ ¦ ¦ ¦ \ ¦ ¦ ¦ ¦ ¦ ¦ ¦
¦ ¦ \ \ ¦ --- ¦ ¦ === ¦ ¦ --- ¦ ¦ ====
¦ ¦ \ \¦ ¦ ¦ ¦ ¦ ¦ ¦ ¦
=== ========= ====== ¦ ======= =======
/ ¦
/ ¦
===
Game Description : The rogue is unmatched at dealing rapid damage to single
opponents or wearing them down with poison and bleeding.
Reliant on hit-and-run tactics, the Rogue is less well
suited for handling hordes of enemies and must employ
trickery to avoid being overwhelmed.
Sinister says : Ooh ! NASTY. I love it !! I agree with the game - the
emphasis of this School is DEFINITELY on doing large
amounts of damage to very specific targets. Later on you
can pick up a couple of skills that will sort out larger
groups of enemies, but the mainstay of the skills
available in this School are for the Assassins out there.
People that single-out their targets and go for the
jugular.
LEVEL 1 SKILLS
Skill Name : CALCULATED STRIKE
Description : Used in place of your normal attack, every fourth hit
with calculated strike will deliver increased damage.
Apply this skill to your left mouse button.
My Rank (/5) : 5
My Comments : This is a GREAT skill to pick up early on in the game.
It doesn't matter what type of weapon you wield - every
fourth time you strike with this power it makes a cool
noise, and your enemy goes DOWN ... it's cool !! :) Of
course it stops being QUITE so cool when you're fighting
stronger adversaries later on in the game, but UP UNTIL
that point it rocks.
Skill Name : BLADE HONING
Description : While active, this skill ensures that the blades on the
swords or spears of yourself and allies will remain razor
sharp and inflict increased piercing damage.
My Rank (/5) : 3
My Comments : Similar to Marksmanship or Earth Enchantment, this power
can remain constantly active - however it is limited in
that you must be wielding either a sword or a spear for
it to remain on. Therefore even if your second weapon
is a bow and arrow, if you switch to it (i.e. away from
either a sword or spear), this power will automatically
switch itself off, which is a pain in the butt.
Skill Name : ENVENOM WEAPON
Description : Coats your weapon with deadly poison while activated.
My Rank (/5) : 5
My Comments : Adds poison damage to all your attacks, which is great !
BE an Assassin ... g'wan ... ;)
LEVEL 4 SKILLS
Skill Name : THROWING KNIFE
Description : Throw a piercing blade at your opponent capable of causing
prolonged bleeding.
My Rank (/5) : 5 at the outset - 2 later on in the game
My Comments : When you first use this power you will throw your head
back and laugh with glee - I virtually guarantee it.
It's one of those "you think you have me ? Well think
again !!" kinda powers - however when you're throwing
these beauties into the knees of a cyclops and he's about
to hammer you into the ground with his club ? You will
come to see its limitations =./
Skill Name : DISARM TRAPS
Description : Expertise with traps and magical devices allows the Rogue
to easily disable them and avoid their damage.
My Rank (/5) : 3
My Comments : Even if you just put a point onto this skill, its effect
is passive, so you never need to activate it, and it does
reduce the likelihood of traps going off in your face.
However if you have a good sense of hearing, reduce the
rating I have given this skill to 1 as you will be able
to get around traps that way.
Skill Name : NIGHTSHADE
Must Have : ENVENOM WEAPON
Description : Oils harvested from deadly Nightshade plants give your
Envenomed Weapons the ability to slow enemies.
My Rank (/5) : 5
My Comments : Since the poison effects you get from envenom weapon
work with your regular attacks, why not bolster them at
every opportunity ??
Skill Name : FLASH POWDER
Description : A magician's trick turned to more nefarious purposes,
flash powder blinds adjacent enemies impairing their
ability to hit with weapons and potentially disorienting
them.
My Rank (/5) : 1
My Comments : I LOVE this power, but it has all the practical use of
popping a balloon as a method of distraction. You throw
the powder down and BOOM - where's he gone !?!?! Oh
look !! He's RIGHT where he was to begin with !! GET
HIM BOYS !!!!! It's like that ;) It works great on
low-ranking enemies, so it might be worth a point or
two, but I wouldn't bother with any more than that ...
LEVEL 10 SKILLS
Skill Name : LUCKY HIT
Must Have : CALCULATED STRIKE
Description : Uncommonly good fortune provides a chance that calculated
strikes will slip past enemy armour causing tremendous
damage.
My Rank (/5) : 3
My Comments : Even if you just pop a point or two into this skill, it
actively increases the chances of calculated strikes
doing more damage. I can't do maths to save my life,
but it's an (x)% chance of doing more damage on every
1 in 4 hits ... which is kinda slim, but worth adding
for the crack ;)
Skill Name : OPEN WOUND
Description : Adds a chance that weapon attacks will inflict bleeding
damage when using a sword, spear, bow, or axe.
My Rank (/5) : 4
My Comments : Given that this skill can affect your bleeding damage
chances with no less than FOUR main weapon groups, I
think it deserves a high rating. Bleeding damage takes
a little while to slay your enemies, but it can weaken
them to the extent that they are like leaves on the
wind - pushovers in other words ;)
Skill Name : LAY TRAP
Description : Drops a mechanical bolt trap that will trip when enemies
draw near and rapidly fire out deadly bolts.
My Rank (/5) : 5
My Comments : GREAT when it comes to weakening larger numbers of enemy
troops (which as I have said before is something that
the Rogue School is a bit thin on the ground at doing
otherwise). It doesn't slay huge amounts as the bolts
are a bit hitty-missy, but it does its job well, PLUS
you can lob it ... use the shift key whilst aiming to
increase the range ;)
Skill Name : POISON GAS BOMB
Description : Lobs a bomb that will burst on impact releasing a cloud
of toxic gas that damages enemies and impairs their
attacks.
My Rank (/5) : 5
My Comments : Another lobbable weapon - this one causes a cloud of
toxic fumes to arise, poisoning all within the blast
area. Unfortunately it doesn't do huge amounts of
damage until higher levels, but it can be upgraded so it
is definitely worth putting at least a couple of points
into.
LEVEL 16 SKILLS
Skill Name : LETHAL STRIKE
Description : A single deadly hit that multiplies the damage of a normal
weapon attack.
My Rank (/5) : 5
My Comments : THIS skill is simply BEAUTIFUL. Think of it as focusing
your hatred and energy into doing just ONE hit ... JUST
one ... but that hit is usually going to be powerful
enough to slay the enemy you are aiming for. Simple,
effective ... just like an Assassin should be !
Skill Name : RAPID CONSTRUCTION
Must Have : LAY TRAP
Description : Expertise in assembling traps reduces the amount of time
it takes to create a new trap after one has been set.
My Rank (/5) : 4
My Comments : I think it's worth having even if just on a low-level,
as the quicker you can roll out your traps, the more
chance they have of damaging your enemies ... obviously !!
Skill Name : TOXIN DISTILLATION
Must Have : ENVENOM WEAPON
Description : Learn alchemical processes to distil natural toxins,
increasing the potency and duration of all poison attacks.
My Rank (/5) : 5
My Comments : Increasing power and duration of ALL your poison attacks ?
HELL YEAH !! BRING IT ON !!!!! :)
LEVEL 24 SKILLS
Skill Name : ANATOMY
Description : With a deep knowledge of anatomy, attacks can be directed
at vital points in the body increasing the chance and
effectiveness of bleed damage.
My Rank (/5) : 5
My Comments : Since poison and bleeding are two of the main weapons the
Rogue Master has at their disposal and, consequently, two
of the main areas which you should upgrade wherever the
opportunity presents itself.
Skill Name : MANDRAKE
Must Have : ENVENOM WEAPON
Description : Adds a chance for poison to cloud an enemy's mind, sending
them into a state of confusion.
My Rank (/5) : 5
My Comments : And here's another example of that ! With a chance of
sending your enemies loopy for a moment or two, you can
focus your attacks on those that are compus mentis, and
then pick off the stragglers afterwards. I love it !! :)
Skill Name : SHRAPNEL
Must Have : POISON GAS BOMB
Description : Packed with volatile liquid and metal scraps, the Poison
Gas Bomb will explode violently on impact showering the
area with deadly Shrapnel. Each fragment of shrapnel
inflicts piercing damage to the enemies it hits.
My Rank (/5) : 5
My Comments : Expanding on the damage potential of the already rather
cool Poison Gas Bomb, once that explodes, additional
smaller fragments spray out in all directions, causing
EXTRA damage, and making a really cool snapping sound.
LEVEL 32 SKILLS
Skill Name : MORTAL WOUND
Must Have : LETHAL STRIKE
Description : Stuns victims of Lethal Strike and greatly magnifies the
impact of poison and bleeding damage caused by the attack.
My Rank (/5) : 5
My Comments : Giving you a percentage modifier to both bleeding and
poison damage, this is YET ANOTHER must have skill for
the Rogues and Assassins out there.
Skill Name : FLURRY OF KNIVES
Must Have : THROWING KNIFE
Description : Learn to throw additional knives at once and cut down
enemies with a lethal flurry of razor-sharp metal.
My Rank (/5) : 5
My Comments : Being able to throw not just one, but a whole BUNCH of
knives has a fantastic appeal I must say. It's kinda
like the ultimate in goodbye fatalities ... however
as with the Storm Skill Torrent, there isn't really a
whole lot of control you can exert over the direction
the additional knives go, making this a less than ideal
skill. It also gives the knives additional piercing
damage ;)
Skill Name : IMPROVED FIRING MECHANISM
Must Have : LAY TRAP
Description : Modifications to the Bolt Trap increase the number of
bolts fired per round.
My Rank (/5) : 5
My Comments : Even if you don't like to set traps, I would sink at least
one point into this skill, as it will benefit any and
all traps you create. You never know when it might come
in handy, non ?
Conclusions : If you like the idea of being an Assassin, or just
focusing all your energy and attacking power into beating
your foes down, one at a time in devious and often brutal
ways ? Then this is a SERIOUS contender as a school for
you. If you like the wholesale slaughter of LARGE numbers
of troops at the same time ? Then consider looking at
other schools before plumping for this one.
Sphere Rating /5 : 4
======= ======= ======= === === ===
¦ \ ¦ ¦ ¦ ¦ ¦ ¦ ¦ \ / ¦
¦ ¦¦ --- ¦ ¦ ==== ¦ ¦ ¦ \ / ¦
¦ ¦\ ¦¦ ¦ ¦ ¦ ¦ ¦ ¦ \/ ¦
¦ ¦ \ ¦¦ --/ ¦ == ¦ = ¦ ¦ ¦\ /¦ ¦
¦ ¦ ¦ ¦¦ \ ¦ ¦ ¦ ¦ ¦ ¦ ¦ ¦ \ / ¦ ¦
¦ ¦ / ¦¦ \ ¦ == ¦ = ¦ ¦ ¦ \/ ¦ ¦
¦ ¦/ ¦¦ ¦\ \ ¦ ¦ ¦ ¦ ¦ ¦ ¦ ¦ ¦ ¦
¦ ¦¦ ¦ \ \ ¦ ====¦ ¦ ¦ ¦ ¦ ¦ ¦ ¦
¦ / ¦ ¦ \ \¦ ¦¦ ¦ ¦ ¦ ¦ ¦ ¦ ¦
======= === ============ === === ===
Game Description : Expand your consciousness to draw more deeply from the
power of the dream realm and exert your will upon
physical reality.
Sinister says : Ah yes, the NEWCOMER School. Dream wasn't available for
us to play about with in regular Titan Quest, and so it
is the one EVERYBODY that used to play Titan Quest wants
to explore. Is it worth it ? Read on ;)
LEVEL 1 SKILLS
Skill Name : SANDS OF SLEEP
Description : Puts enemies to sleep, rendering them immobile for a
duration or until awakened by an attack.
My Rank (/5) : 3
My Comments : Oh deary ... deary me. The first skill in this new school
and it's the power to send people to ... sleep ?? Truth
be told it's not THAT pants, but they will wake up as soon
as you hit them, which makes it more useful as a "let me
slip by" skill than a "now you DIE" skill. Having said
that, it does of course enable you to get a free hit in
before they can counter, so it's not THAT bad really !!
Skill Name : PSIONIC TOUCH
Description : Psionic energies focused within your weapons will create
a bone shattering resonance when they contact your
enemies. Apply this skill to your left mouse button.
My Rank (/5) : 5
My Comments : A skill which augments your regular attacks, enabling you
to do both Vitality Damage AND a percentage of additional
damage to boot ? FAIR PLAY !! The maximum you can do
using this skill is an additional 96% TOTAL Damage, in
3 charge levels. Pick it up !! PICK IT UP NOW !!!!! :)
Skill Name : DISTORTION WAVE
Description : A wave of force is projected outward that forms chaotic
ripples in the fabric of reality and delivers devastating
damage to the body and mind of enemies.
My Rank (/5) : 5
My Comments : This is the same power that the Cyclops Polyphemus uses
against you when you fight him - a direct-line attack
that sends a wave of force out towards your adversaries.
It's upgradable, and impressive, and should form a good
part of your arsenal early-on in the game.
LEVEL 4 SKILLS
Skill Name : TRANCE OF EMPATHY
Description : Force enemies to share the damage they inflict upon you
by forming a telepathic link to their minds that conveys
only pain and siphons life in retribution. Trance
Skill - Only one trance can be active at a time.
My Rank (/5) : 5
My Comments : The first of three Trance skills that are available to
you as a result of studying this school, none of which
are dependent on each other to exist. This is one of
the best of them in my opinion - it converts a percentage
of the damage you do to your enemies back into life for
you, AND reflects a portion of the damage they do to you
back against them. KILLER :)
Skill Name : LUCID DREAM
Description : Increased conscious control over your dream state enhances
abilities that derive power from the dream world.
My Rank (/5) : 5
My Comments : Even if you don't heavily upgrade it, this skill will
add damage, electrical burn damage AND vitality damage
to your dream powers (all as percentages - NOT fixed
numbers), so it's well worth having.
Skill Name : PHANTOM STRIKE
Description : Vanish from the waking world and reappear before a target
enemy to deliver a monstrous attack.
My Rank (/5) : 5
My Comments : AGAIN I find myself giving a 5 to a power in this school.
This is an AMAZING power to watch. You turn invisible in
a cloud of dream energy, and stalk your prey until you are
within striking distance, whereupon you decloak yourself
and hit them. If your enemies are closer to you than
their regular starting positions, they will try and fall
back to their regular starting positions which can help
or hinder you, depending on how many enemies stand by them
and where they started. Once upgraded sufficiently, you
can hit more than one person (six at the highest level)
with your strike. GET THIS SKILL RIGHT NOW DAMMIT !! :)
LEVEL 10 SKILLS
Skill Name : PREMONITION
Must Have : LUCID DREAM
Description : A precognitive sense of the imminent future allows you to
stay one step ahead of your enemies in combat.
My Rank (/5) : 4
My Comments : Giving you bonuses to both your Offensive AND Defensive
Abilities is less than awe-inspiring, but you should feel
the benefits in battle. It's worth picking up even if
you don't sink massive amounts of points into it.
Skill Name : SUMMON NIGHTMARE
Description : Calls forth a nightmarish phantasm from the dream world
to serve as your familiar.
My Rank (/5) : 5
My Comments : The only summon that you can have in the Dream School,
and he is QUITE the little devil bless him. He can be
upgraded later on to give him extra powers, some of which
are quite unique. You should definitely get this little
dude at your back.
Skill Name : PSIONIC BURN
Must Have : PSIONIC TOUCH
Description : Psionic energy within the target ignites and explodes
outward, burning through their material being and
inflicting severe damage to adjacent targets.
My Rank (/5) : 4
My Comments : There is absolutely NO reason not to get this skill. It
gives you additional Electrical Burn Damage AND a bonus
percentage damage against Demons. The only reason I
wouldn't give it a 5 is because the additional percentage
damage you get only affects Demons. The Electrical Burn
bit affects everybody though ;)
Skill Name : DREAM STEALER
Must Have : PHANTOM STRIKE
Description : Devastate your enemies and steal their power by ripping
the very dreams from their minds.
My Rank (/5) : 5
My Comments : Since Phantom Strike is such a cool skill, I would put
a few points into this skill as well. It gives you energy
leech potential, stun time and additional damage for your
enemies, so it's the icing on an already kickass cake.
Skill Name : CHAOTIC RESONANCE
Must Have : DISTORTION WAVE
Description : Amplifies the physical distortion effect, causing it to
shatter armour and break bones
My Rank (/5) : 5
My Comments : This skill increases the damage of the Distortion Wave,
and reduces the Armour Rating of your opponents. Another
cool skill for the Dream School !!
LEVEL 16 SKILLS
Skill Name : TRANCE OF CONVALESCENCE
Description : A restful state of mind causes increased life recovery
and damage absorption for the player and allies. Trance
Skill - Only one trance can be active at a time.
My Rank (/5) : 4
My Comments : Ah yes, the second Trance skill. This one increases
both your health and energy regeneration (but not to
insane levels), and gives you the ability to absorb a
percentage of the damage you sustain, which is nice. 15%
at its highest level.
Skill Name : HYPNOTIC GAZE
Must Have : SUMMON NIGHTMARE
Description : The mesmerising stare of the Nightmare is able to
dominate lesser minds and throw them into a state of
confusion, causing them to wander aimlessly and attack
phantom images.
My Rank (/5) : 5
My Comments : There is something very satisfying about a pet that is
able to think for itself. Your nightmare is quite the
little puppetmaster !! He can possess your enemies,
just as a Spirit Master might, and cause them to fight
at your side for a spell. Well worth having !!
Skill Name : DISTORTION FIELD
Description : A field of psionic power bends for fabric of reality
around the player, negating some of the damage from
enemy attacks and dealing retaliatory damage to enemies
that strike you.
My Rank (/5) : 2
My Comments : Warping the fabric of reality to both absorb some of the
damage that is dealt to you, and dealing damage to your
enemies in retaliation is all well and good, however at
its MAXIMUM level of power, there is a paltry 5% chance
that this skill will work ... which is MEGA plop. I'd
get it, but I wouldn't rely on it too heavily.
Skill Name : DISTORT REALITY
Description : Sends out a powerful ripple of distortion around the
player that tears the fabric of reality, causing severe</pre><pre id="faqspan-13">
damage to enemies caught within it.
My Rank (/5) : 5
My Comments : THIS is, in my opinion, the best skill in this School.
It sends out a circular shockwave of force from you at
the centre through your enemies. The amount of damage
that it inflicts is great at higher levels, and the
attack can be further upgraded so as to freeze those
enemies that it doesn't kill outright !! I LOVE IT !! :)
LEVEL 24 SKILLS
Skill Name : TEMPORAL FLUX
Must Have : LUCID DREAM
Description : A subtle acceleration of time around the player allows
them to move more quickly, anticipate attacks, and
negate the slowing effects of enemy skills.
My Rank (/5) : 4
My Comments : Giving you the powers of additional total speed, together
with a chance to avoid projectiles AND a resistance to
being slowed is NOT something to be sneezed at. It is
not the greatest of powers, but it can prove to be a VERY
helpful addition to your arsenal.
Skill Name : PSIONIC IMMOLATION
Must Have : DISTORTION WAVE
Description : Psionic energies ignite into a surge of electrical power
that causes horrific burning over a short duration.
My Rank (/5) : 4
My Comments : Causing massive amounts of Electrical Burning Damage,
together with a bonus modifier when used against Demons,
this skill is a GREAT add-on for your Distortion Wave.
LEVEL 32 SKILLS
Skill Name : TRANCE OF WRATH
Description : Waves of negative psionic energy emanate from the player,
disrupting enemy thoughts and burning through their
physical being. Trance Skill - Only one trance can be
active at a time.
My Rank (/5) : 4
My Comments : Interestingly this skill isn't so dissimilar to the Earth
skill "Ring of Flame", which is available at level 4. It
actively attempts to zap anybody that comes within a
certain distance of you, and can be maintained for as long
as you wish (or have the energy to support it). It takes
a barely noticeable amount of energy to use, and can help
ward off those pesky hand-to-hand warriors that get a bit
too close for comfort.
Skill Name : MASTER MIND
Must Have : SUMMON NIGHTMARE
Description : The Nightmare is able to speak to the minds of your other
minions and coordinate their attacks, making them more
effective in combat.
My Rank (/5) : 1-5, depending on what other School (if any) you pick !
My Comments : First off, this skill ONLY affects other pets, so don't
misread "minions" and think it means "allies". Therefore
if you pair Dream with either Hunting, Defence or Rogue
say ? FORGET this skill entirely as it will do you NO
good at all. If you are a Nature Master or a Storm or
Earth Master for example ? Then it's well worth it, as
it gives your pet/s bonus Damage and increased Health
and Energy Regeneration rates.
===============================================
ADDITIONAL THOUGHTS CONTRIBUTED BY JOHN JACKSON
===============================================
John Jackson has been in touch with me to point out that
the Master Mind Skill does increase the regeneration and
the damage of the Nightmare himself as well as his efforts
in training up your other minions, and additionally, the
level of regeneration it gives is PERCENTILE-based, rather
than integer-based, meaning (for example) that a standard
12hp/sec regeneration would, if this skill were cranked-up
to grant a 150% bonus, result in your pets recovering over
30hp/sec (when you take into account the standard recovery
rate), which isn't bad at all !! Thanks mon ami :)
Skill Name : TEMPORAL RIFT
Must Have : DISTORT REALITY
Description : Enhances the power of the distortion ripple, unleashing a
surge of psionic energy that causes massive damage to
enemies and temporarily freezes them in time.
My Rank (/5) : 5
My Comments : Petrifies those enemies that are not automatically slain
outright by the power of the Distort Reality skill, and
gives a great big fat Electrical Burn Damage bonus to
the latter as well. I HIGHLY recommend this skill.
Conclusions : Well I have to say I am VERY ... V-E-R-Y impressed with
the newcomer school. It has something for everybody
really. Phantom Strike is a GREAT hand-to-hand skill,
the Trances serve to benefit you and your allies, the
Nightmare is a very clever little pet, and can help out
other pets as well depending on what School (if any) you
pair Dream with, and your ranged attacks (both mid-range
as Distort Reality, and long-range as Distortion Wave)
are among some of the most powerful in the game. Bonza !
Sphere Rating /5 : 4
==============================================================================
C H A P T E R S E V E N CHAPTER 7
==============================================================================
R E L I C S
==============================================================================
Relics are shards of the power of a God. You will only ever encounter them
in pieces - never as completed items, and it is up to you to combine THREE
shards of each relic, to create a completed relic.
To use a relic, you right-click on it in your inventory, and then left-click
on whatever item you want to imbue with the relic's power. Do not worry if
you only have a one-third or two-thirds of a completed relic, as you can
always add the other shards of the same relic to the original later, thus
increasing the power of your enchanted items as you play through the game.
Ordinarily each third of a relic contains a third of the power of the whole
relic, which makes mathematical sense - however as an incentive to complete
each relic, once it IS completed, you get a "completed relic bonus" which
is randomly selected from a list that I have tried to flesh-out at the end
of the relics section for you.
Each relic is equipment-type-specific, so for example the Essence of Artemis'
Bowstring can only be used on bows, whereas the Essence of Archimedes' Mirror
can only be used on shields.
There is nothing wrong, of course, with holding onto a relic until it is
completed - I frequently do this - with a view to keeping it. Relics are
sometimes called for as ingredients in the creation of Artifacts.
If you decide that you have made a mistake and enchanted an item with a relic
that you would like to get back, you can visit any of the Enchanters in the
game (bearing in mind that this is not possible in Titan Quest - only in
Immortal Throne). Enchanters, as you are aware, can separate an item and its
corresponding relic - however you will only be able to retrieve EITHER the
item OR the relic, so choose carefully.
This is also an expensive process, so don't forget THAT either !!
One final thing to note is that there are three types of relic. There are
essences, which are the relics you will find on the normal difficulty setting,
there are embodiments, which are the relics you will find on the epic
difficulty setting, and finally there are incarnations, which are the relics
you will find on the legendary difficulty setting.
So in a bid to be helpful, I have listed as many relics as I have encountered
in Titan Quest (and Immortal Throne), together with what they look like in
terms of their depictions, what they can be used on, what level you must be
to use them, and what bonuses they confer.
Here we go !!
AMUN-RA'S GLORY
Amun-Ra, ruler of the sun, is the greatest of the Egyptian gods. Can
enchant all armour.
Appearance : The Sun
Required Level : 12 (Normal), 30 (Epic), 41 (Legendary)
ESSENCE (NORMAL DIFFICULTY)
1/3 - + 20 Health, + 20 Energy
2/3 - + 40 Health, + 40 Energy
3/3 - + 60 Health, + 60 Energy, completed relic bonus
EMBODIMENT (EPIC DIFFICULTY)
1/3 - + 40 Health, + 40 Energy
2/3 - + 80 Health, + 80 Energy
3/3 - +120 Health, +120 Energy, completed relic bonus
INCARNATION (LEGENDARY DIFFICULTY)
1/3 - + 60 Health, + 60 Energy
2/3 - +120 Health, +120 Energy
3/3 - +180 Health, +180 Energy, completed relic bonus
ANKH OF ISIS
Isis is queen of the Egyptian gods. Her symbol, the ankh, is associated
with healing and immortality. Can enchant rings and amulets.
Appearance : An Ankh - symbol of Isis' Power
Required Level : 12 (Normal), 30 (Epic), 41 (Legendary)
ESSENCE (NORMAL DIFFICULTY)
1/3 - +30 Health, +30% Health Regeneration
2/3 - +60 Health, +60% Health Regeneration
3/3 - +90 Health, +90% Health Regeneration, completed relic bonus
EMBODIMENT (EPIC DIFFICULTY)
1/3 - +60 Health, +35% Health Regeneration
2/3 - +120 Health, +70% Health Regeneration
3/3 - +180 Health, +105% Health Regeneration, completed relic bonus
INCARNATION (LEGENDARY DIFFICULTY)
1/3 - +100 Health, +40% Health Regeneration
2/3 - +200 Health, +80% Health Regeneration
3/3 - +300 Health, +120% Health Regeneration, completed relic bonus
ANUBIS' WRATH
Anubis, a jackal-headed god, is ruler of the Egyptian underworld. Can
enchant all weapons.
Appearance : A jackal-headed character with a rudimentary blade in hand.
Required Level : 12 (Normal), 30 (Epic), 41 (Legendary)
ESSENCE (NORMAL DIFFICULTY)
1/3 - 2% of Attack damage converted to Health
2/3 - 4% of Attack damage converted to Health
3/3 - 6% of Attack damage converted to Health, completed relic bonus
EMBODIMENT (EPIC DIFFICULTY)
1/3 - 3% of Attack damage converted to Health
2/3 - 6% of Attack damage converted to Health
3/3 - 9% of Attack damage converted to Health, completed relic bonus
INCARNATION (LEGENDARY DIFFICULTY)
1/3 - 4% of Attack damage converted to Health
2/3 - 8% of Attack damage converted to Health
3/3 - 12% of Attack damage converted to Health, completed relic bonus
ARCHIMEDES' MIRROR
Archimedes was one of the greatest of Greece's philosophers and
scientists. Can enchant shields only.
Appearance : A face looking into a mirrored reflection of itself.
Required Level : 3 (Normal), 27 (Epic), 38 (Legendary)
ESSENCE (NORMAL DIFFICULTY)
1/3 - 3.0% Chance of 50% Damage Reflected
2/3 - 6.0% Chance of 50% Damage Reflected
3/3 - 9.0% Chance of 50% Damage Reflected, completed relic bonus
EMBODIMENT (EPIC DIFFICULTY)
1/3 - 4.0% Chance of 50% Damage Reflected
2/3 - 8.0% Chance of 50% Damage Reflected
3/3 - 12.0% Chance of 50% Damage Reflected, completed relic bonus
INCARNATION (LEGENDARY DIFFICULTY)
1/3 - 5.0% Chance of 50% Damage Reflected
2/3 - 10.0% Chance of 50% Damage Reflected
3/3 - 15.0% Chance of 50% Damage Reflected, completed relic bonus
ARTEMIS' BOWSTRING
Artemis, the Greek goddess of the hunt, is renowned for her skill with the
bow. Can enchant bows only.
Appearance : A bow with a long, curling bowstring
Required Level : 3 (Normal), 27 (Epic), 38 (Legendary)
ESSENCE (NORMAL DIFFICULTY)
1/3 - 3 Piercing Damage, +2% Attack Speed
2/3 - 6 Piercing Damage, +4% Attack Speed
3/3 - 9 Piercing Damage, +6% Attack Speed, completed relic bonus
EMBODIMENT (EPIC DIFFICULTY)
1/3 - 8 Piercing Damage, +3% Attack Speed
2/3 - 16 Piercing Damage, +6% Attack Speed
3/3 - 24 Piercing Damage, +9% Attack Speed, completed relic bonus
INCARNATION (LEGENDARY DIFFICULTY)
1/3 - 14 Piercing Damage, + 4% Attack Speed
2/3 - 28 Piercing Damage, + 8% Attack Speed
3/3 - 42 Piercing Damage, +12% Attack Speed, completed relic bonus
BLADE OF THANATOS
Thanatos, the incarnation of death, carries a sword with the power to rend
the very souls of mere mortals. Can enchant all weapons
Appearance : A sword
Required Level : 24 (Normal), 36 (Epic), 46 (Legendary)
ESSENCE (NORMAL DIFFICULTY)
1/3 - + 3% Total Damage
2/3 - + 6% Total Damage
3/3 - + 9% Total Damage, completed relic bonus
EMBODIMENT (EPIC DIFFICULTY)
1/3 - + 4% Total Damage
2/3 - + 8% Total Damage
3/3 - +12% Total Damage, completed relic bonus
INCARNATION (LEGENDARY DIFFICULTY)
1/3 - + 5% Total Damage
2/3 - +10% Total Damage
3/3 - +15% Total Damage, completed relic bonus
CHILL OF TARTARUS
In the deepest pits of the underworld lies Tartarus. Cold as the grave and
swathed in darkness, it is here that punishment is meted out for those
mortals foolish enough to oppose the will of the gods. Can enchant all
weapons.
Appearance : A snowflake
Required Level : 24 (Normal), 36 (Epic), 46 (Legendary)
ESSENCE (NORMAL DIFFICULTY)
1/3 - 11 Cold Damage, 5% Slowed for 3.0 Seconds
2/3 - 22 Cold Damage, 10% Slowed for 3.0 Seconds
3/3 - 33 Cold Damage, 15% Slowed for 3.0 Seconds, completed relic bonus
EMBODIMENT (EPIC DIFFICULTY)
1/3 - 15 Cold Damage, 5% Slowed for 3.0 Seconds
2/3 - 30 Cold Damage, 10% Slowed for 3.0 Seconds
3/3 - 45 Cold Damage, 15% Slowed for 3.0 Seconds, completed relic bonus
INCARNATION (LEGENDARY DIFFICULTY)
1/3 - 20 Cold Damage, 5% Slowed for 3.0 Seconds
2/3 - 40 Cold Damage, 10% Slowed for 3.0 Seconds
3/3 - 60 Cold Damage, 15% Slowed for 3.0 Seconds, completed relic bonus
CODE OF HAMMURABI
Hammurabi, king of Babylon, was revered for bringing justice to his people
with his code of laws. Can enchant rings and amulets.
Appearance : Drawings on Slate
Required Level : 18 (Normal), 34 (Epic), 44 (Legendary)
ESSENCE (NORMAL DIFFICULTY)
1/3 - +6 Intelligence
2/3 - +12 Intelligence
3/3 - +18 Intelligence, completed relic bonus
EMBODIMENT (EPIC DIFFICULTY)
1/3 - + 9 Intelligence
2/3 - +18 Intelligence
3/3 - +27 Intelligence, completed relic bonus
INCARNATION (LEGENDARY DIFFICULTY)
1/3 - +12 Intelligence
2/3 - +24 Intelligence
3/3 - +36 Intelligence, completed relic bonus
CUNNING OF ODYSSEUS
Although not as strong or swift as the other heroes of legend, Odysseus'
formidable guile made him a match for any foe. Can enchant head armour
only.
Appearance : A scroll
Required Level : 24 (Normal), 36 (Epic), 46 (Legendary)
ESSENCE (NORMAL DIFFICULTY)
1/3 - +5% Intelligence
2/3 - +10% Intelligence
3/3 - +15% Intelligence, completed relic bonus
EMBODIMENT (EPIC DIFFICULTY)
1/3 - +7% Intelligence
2/3 - +14% Intelligence
3/3 - +21% Intelligence, completed relic bonus
INCARNATION (LEGENDARY DIFFICULTY)
1/3 - +10% Intelligence
2/3 - +20% Intelligence
3/3 - +30% Intelligence, completed relic bonus
DIONYSUS' WINESKIN
The drink of Dionysus, Greek god of wine and revelry, is a potent brew
indeed. Can enchant rings and amulets.
Appearance : A Wineskin
Required Level : 3 (Normal), 27 (Epic), 38 (Legendary)
ESSENCE (NORMAL DIFFICULTY)
1/3 - 2% Damage Resistance, + 15 Health
2/3 - 4% Damage Resistance, + 30 Health
3/3 - 6% Damage Resistance, + 45 Health, completed relic bonus
EMBODIMENT (EPIC DIFFICULTY)
1/3 - 2% Damage Resistance, + 40 Health
2/3 - 4% Damage Resistance, + 80 Health
3/3 - 6% Damage Resistance, +120 Health, completed relic bonus
INCARNATION (LEGENDARY DIFFICULTY)
1/3 - 2% Damage Resistance, + 75 Health
2/3 - 4% Damage Resistance, +150 Health
3/3 - 6% Damage Resistance, +225 Health, completed relic bonus
DJED OF OSIRIS
The Djed is the backbone of Osiris, lord of the dead. Can enchant all
weapons.
Appearance : A Djed ! :) It is a representation of the backbone of
Osiris - Osiris' body having been rended into pieces by
his brother Set, and scattered around the lands.
Required Level : 12 (Normal), 30 (Epic), 41 (Legendary)
ESSENCE (NORMAL DIFFICULTY)
1/3 - +8 Damage to Undead
2/3 - +16 Damage to Undead
3/3 - +24 Damage to Undead, completed relic bonus
EMBODIMENT (EPIC DIFFICULTY)
1/3 - +15 Damage to Undead
2/3 - +30 Damage to Undead
3/3 - +45 Damage to Undead, completed relic bonus
INCARNATION (LEGENDARY DIFFICULTY)
1/3 - +22 Damage to Undead
2/3 - +44 Damage to Undead
3/3 - +66 Damage to Undead, completed relic bonus
DOMAIN OF THE DRAGON-KINGS
The Dragon-Kings are the masters of water in China. Ocean, rain, lake,
and river - all are theirs to command. Can enchant all armour.
Appearance : A Dragon's Head, facing right
Required Level : 18 (Normal), 34 (Epic), 44 (Legendary)
ESSENCE (NORMAL DIFFICULTY)
1/3 - 8% Fire Resistance
2/3 - 16% Fire Resistance
3/3 - 24% Fire Resistance, completed relic bonus
EMBODIMENT (EPIC DIFFICULTY)
1/3 - 10% Fire Resistance
2/3 - 20% Fire Resistance
3/3 - 30% Fire Resistance, completed relic bonus
INCARNATION (LEGENDARY DIFFICULTY)
1/3 - 12% Fire Resistance
2/3 - 24% Fire Resistance
3/3 - 36% Fire Resistance, completed relic bonus
GOLDEN FLEECE
The Golden Fleece, sought after by Jason and his Argonauts, is rumoured
to hold great power as well as great beauty. Can enchant torso armour
only.
Appearance : A ram or sheep's head
Required Level : 3 (Normal), 27 (Epic), 38 (Legendary)
ESSENCE (NORMAL DIFFICULTY)
1/3 - -5% Energy Cost
2/3 - -10% Energy Cost
3/3 - -15% Energy Cost, completed relic bonus
EMBODIMENT (EPIC DIFFICULTY)
1/3 - -7% Energy Cost
2/3 - -14% Energy Cost
3/3 - -21% Energy Cost, completed relic bonus
INCARNATION (LEGENDARY DIFFICULTY)
1/3 - -10% Energy Cost
2/3 - -20% Energy Cost
3/3 - -30% Energy Cost, completed relic bonus
GUAN-YU'S GRACE
True to the tenets of Taoism, even Guan-Yu, the Taoist god of war, only
fights when all other options have been exhausted. Can enchant torso
armour only.
Appearance : A figure doing a tai chi-style move
Required Level : 18 (Normal), 34 (Epic), 44 (Legendary)
ESSENCE (NORMAL DIFFICULTY)
1/3 - +10 Defensive Ability, 2% Chance to Dodge Attacks
2/3 - +20 Defensive Ability, 4% Chance to Dodge Attacks
3/3 - +30 Defensive Ability, 6% Chance to Dodge Attacks, completed
relic bonus
EMBODIMENT (EPIC DIFFICULTY)
1/3 - +16 Defensive Ability, 2% Chance to Dodge Attacks
2/3 - +32 Defensive Ability, 4% Chance to Dodge Attacks
3/3 - +48 Defensive Ability, 6% Chance to Dodge Attacks, completed
relic bonus
INCARNATION (LEGENDARY DIFFICULTY)
1/3 - +20 Defensive Ability, 2% Chance to Dodge Attacks
2/3 - +40 Defensive Ability, 4% Chance to Dodge Attacks
3/3 - +60 Defensive Ability, 6% Chance to Dodge Attacks, completed
relic bonus
HECATE'S CRESCENT
Hecate is a mysterious Greek goddess associated with the moon, childbirth,
and magic. Can enchant rings and amulets
Appearance : A crescent moon
Required Level : 3 (Normal), 27 (Epic), 38 (Legendary)
ESSENCE (NORMAL DIFFICULTY)
1/3 - +4% Energy, +20% Energy Regeneration
2/3 - +8% Energy, +40% Energy Regeneration
3/3 - +12% Energy, +60% Energy Regeneration, completed relic bonus
EMBODIMENT (EPIC DIFFICULTY)
1/3 - +5% Energy, +30% Energy Regeneration
2/3 - +10% Energy, +60% Energy Regeneration
3/3 - +15% Energy, +90% Energy Regeneration, completed relic bonus
INCARNATION (LEGENDARY DIFFICULTY)
1/3 - + 6% Energy, + 40% Energy Regeneration
2/3 - +12% Energy, + 80% Energy Regeneration
3/3 - +18% Energy, +120% Energy Regeneration, completed relic bonus
HERAKLES' MIGHT
Herakles was the strongest of all the Greek heroes. Can enchant all
armour.
Appearance : A muscled arm, flexing its bicep
Required Level : 3 (Normal), 27 (Epic), 38 (Legendary)
ESSENCE (NORMAL DIFFICULTY)
1/3 - +4 Strength
2/3 - +8 Strength
3/3 - +12 Strength, completed relic bonus
EMBODIMENT (EPIC DIFFICULTY)
1/3 - +8 Strength
2/3 - +16 Strength
3/3 - +24 Strength, completed relic bonus
INCARNATION (LEGENDARY DIFFICULTY)
1/3 - +12 Strength
2/3 - +24 Strength
3/3 - +36 Strength, completed relic bonus
IRON WILL OF AJAX
Numbered among the greatest of the heroes of the Trojan war, Ajax was
known not only for the strength of his arm, but even more for his
indomitable spirit. Can enchant all armour.
Appearance : An Iron Gauntlet
Required Level : 24 (Normal), 36 (Epic), 46 (Legendary)
ESSENCE (NORMAL DIFFICULTY)
1/3 - 7% Stun Resistance, +2% Health
2/3 - 14% Stun Resistance, +4% Health
3/3 - 21% Stun Resistance, +6% Health, completed relic bonus
EMBODIMENT (EPIC DIFFICULTY)
1/3 - 10% Stun Resistance, 10% Slow Resistance, +2% Health
2/3 - 20% Stun Resistance, 20% Slow Resistance, +4% Health
3/3 - 30% Stun Resistance, 30% Slow Resistance, +6% Health, completed
relic bonus
INCARNATION (LEGENDARY DIFFICULTY)
1/3 - 13% Stun Resistance, 13% Slow Resistance, +2% Health
2/3 - 26% Stun Resistance, 26% Slow Resistance, +4% Health
3/3 - 39% Stun Resistance, 39% Slow Resistance, +6% Health, completed
relic bonus
JADE EMPEROR'S SERENITY
The Jade Emperor is the ruler of the Chinese gods. He is a contemplative
deity who rarely interferes with the affairs of god or man. Can enchant
all armour.
Appearance : A yin-yang symbol
Required Level : 18 (Normal), 34 (Epic), 44 (Legendary)
ESSENCE (NORMAL DIFFICULTY)
1/3 - 8% Lightning Resistance
2/3 - 16% Lightning Resistance
3/3 - 24%, completed relic bonus
EMBODIMENT (EPIC DIFFICULTY)
1/3 - 10% Lightning Resistance
2/3 - 20% Lightning Resistance
3/3 - 30% Lightning Resistance, completed relic bonus
INCARNATION (LEGENDARY DIFFICULTY)
1/3 - 12% Lightning Resistance
2/3 - 24% Lightning Resistance
3/3 - 36% Lightning Resistance, completed relic bonus
LI-NEZHA'S GUILE
Li-Nezha, a Chinese trickster god, is as nimble as he is crafty. Can
enchant all armour.
Appearance : A stylised face.
Required Level : 18 (Normal), 34 (Epic), 44 (Legendary)
ESSENCE (NORMAL DIFFICULTY)
1/3 - +6 Dexterity
2/3 - +12 Dexterity
3/3 - +18 Dexterity, completed relic bonus
EMBODIMENT (EPIC DIFFICULTY)
1/3 - + 9 Dexterity
2/3 - +18 Dexterity
3/3 - +27 Dexterity, completed relic bonus
INCARNATION (LEGENDARY DIFFICULTY)
1/3 - +12 Dexterity
2/3 - +24 Dexterity
3/3 - +36 Dexterity, completed relic bonus
MONKEY KING'S TRICKERY
The Monkey King, the most mischievous of all the Chinese gods, is also one
of the most powerful. His cunning has lured many an unwary foe to do his
bidding. Can enchant rings and amulets.
Appearance : A Monkey
Required Level : 18 (Normal), 34 (Epic), 44 (Legendary)
ESSENCE (NORMAL DIFFICULTY)
1/3 - 2 Reduced Resistance for 4.0 Seconds, 2% Elemental Resistance,
5% Skill Disruption Protection
2/3 - 4 Reduced Resistance for 4.0 Seconds, 4% Elemental Resistance,
10% Skill Disruption Protection
3/3 - 6 Reduced Resistance for 4.0 Seconds, 6% Elemental Resistance
15% Skill Disruption Protection, completed relic bonus
EMBODIMENT (EPIC DIFFICULTY)
1/3 - 3 Reduced Resistance for 4.0 Seconds, 2% Elemental Resistance,
8% Skill Disruption Protection
2/3 - 6 Reduced Resistance for 4.0 Seconds, 4% Elemental Resistance,
16% Skill Disruption Protection
3/3 - 9 Reduced Resistance for 4.0 Seconds, 6% Elemental Resistance
24% Skill Disruption Protection, completed relic bonus
INCARNATION (LEGENDARY DIFFICULTY)
1/3 - 4 Reduced Resistance for 4.0 Seconds, 2% Elemental Resistance,
12% Skill Disruption Protection
2/3 - 8 Reduced Resistance for 4.0 Seconds, 4% Elemental Resistance,
24% Skill Disruption Protection
3/3 - 12 Reduced Resistance for 4.0 Seconds, 6% Elemental Resistance,
36% Skill Disruption Protection, completed relic bonus
PERSEPHONE'S TEARS
Persephone, favoured daughter of the earth goddess Demeter, was forced into
marriage with Hades. She now shares rule of the underworld, yet it brings
her only sorrow. Can enchant all jewellery
Appearance : A single teardrop - perfectly formed.
Required Level : 24 (Normal), 36 (Epic), 46 (Legendary)
ESSENCE (NORMAL DIFFICULTY)
1/3 - + 15 Less Damage from Undead
2/3 - + 30 Less Damage from Undead
3/3 - + 45 Less Damage from Undead, completed relic bonus
EMBODIMENT (EPIC DIFFICULTY)
1/3 - + 40 Less Damage from Undead
2/3 - + 80 Less Damage from Undead
3/3 - +120 Less Damage from Undead, completed relic bonus
INCARNATION (LEGENDARY DIFFICULTY)
1/3 - + 60 Less Damage from Undead
2/3 - +120 Less Damage from Undead
3/3 - +180 Less Damage from Undead, completed relic bonus
PROMETHEUS' FLAME
Prometheus, son of the titan Iapetus, gave the gift of fire to mankind. Can
enchant all weapons
Appearance : Three flames licking upwards
Required Level : 3 (Normal), 27 (Epic), 38 (Legendary)
ESSENCE (NORMAL DIFFICULTY)
1/3 - 12 Burn Damage over 3.0 Seconds, +3% Fire Damage
2/3 - 24 Burn Damage over 3.0 Seconds, +6% Fire Damage
3/3 - 36 Burn Damage over 3.0 Seconds, +9% Fire Damage, completed
relic bonus
EMBODIMENT (EPIC DIFFICULTY)
1/3 - 30 Burn Damage over 3.0 Seconds, +3% Fire Damage
2/3 - 60 Burn Damage over 3.0 Seconds, +6% Fire Damage
3/3 - 90 Burn Damage over 3.0 Seconds, +9% Fire Damage, completed
relic bonus
INCARNATION (LEGENDARY DIFFICULTY)
1/3 - 48 Burn Damage over 3.0 Seconds, +3% Fire Damage
2/3 - 96 Burn Damage over 3.0 Seconds, +6% Fire Damage
3/3 - 144 Burn Damage over 3.0 Seconds, +9% Fire Damage, completed
relic bonus
RAGE OF ARES
Ares, the Greek god of war, is venerated and feared in equal measure. He
is cruel, vengeful, and nearly mad - only a fool would risk his wrath. Can
enchant armbands and bracelets.
Appearance : A diagonal red line (top left-bottom right), with a curve
beneath it.
Required Level : 24 (Normal), 36 (Epic), 46 (Legendary)
ESSENCE (NORMAL DIFFICULTY)
1/3 - 5.0% Chance of: 150 Damage, 3.0 second(s) of Skill Disruption
2/3 - 10.0% Chance of: 150 Damage, 3.0 second(s) of Skill Disruption
3/3 - 15.0% Chance of: 150 Damage, 3.0 second(s) of Skill Disruption,
completed relic bonus
EMBODIMENT (EPIC DIFFICULTY)
1/3 - 5.0% Chance of: 300 Damage, 3.0 second(s) of Skill Disruption
2/3 - 10.0% Chance of: 300 Damage, 3.0 second(s) of Skill Disruption
3/3 - 15.0% Chance of: 300 Damage, 3.0 second(s) of Skill Disruption,
completed relic bonus
INCARNATION (LEGENDARY DIFFICULTY)
1/3 - 5.0% Chance of: 450 Damage, 3.0 second(s) of Skill Disruption
2/3 - 10.0% Chance of: 450 Damage, 3.0 second(s) of Skill Disruption
3/3 - 15.0% Chance of: 450 Damage, 3.0 second(s) of Skill Disruption,
completed relic bonus
SET'S BETRAYAL
Set is the Egyptian god of evil. In an attempt to take control of the
throne of the gods, Set turned on his brother Osiris, brutally hacking
the latter's body apart and scattering the pieces across the land. Can
enchant all armour.
Appearance : Somebody about to be knifed in the back
Required Level : 12 (Normal), 30 (Epic), 41 (Legendary)
ESSENCE (NORMAL DIFFICULTY)
1/3 - +6% Pierce Damage, 33.0% Chance of 12 Piercing Retaliation
2/3 - +6% Pierce Damage, 33.0% Chance of 24 Piercing Retaliation
3/3 - +6% Pierce Damage, 33.0% Chance of 36 Piercing Retaliation, completed
relic bonus
EMBODIMENT (EPIC DIFFICULTY)
1/3 - +9% Pierce Damage, 33.0% Chance of 30 Piercing Retaliation
2/3 - +9% Pierce Damage, 33.0% Chance of 60 Piercing Retaliation
3/3 - +9% Pierce Damage, 33.0% Chance of 90 Piercing Retaliation, completed
relic bonus
INCARNATION (LEGENDARY DIFFICULTY)
1/3 - +11% Pierce Damage, 33.0% Chance of 50 Piercing Retaliation
2/3 - +11% Pierce Damage, 33.0% Chance of 100 Piercing Retaliation
3/3 - +11% Pierce Damage, 33.0% Chance of 150 Piercing Retaliation,
completed relic bonus
SHADE OF HECTOR
Hector, Prince of Troy, was renowned for his noble spirit and steadfast
nature. He fell defending his homeland, mourned even by his enemies. Can
enchant all shields.
Appearance : A shadow of a man
Required Level : 24 (Normal), 36 (Epic), 46 (Legendary)
ESSENCE (NORMAL DIFFICULTY)
1/3 - + 20 Defensive Ability, +2% Chance to Avoid Projectiles
2/3 - + 40 Defensive Ability, +4% Chance to Avoid Projectiles
3/3 - + 60 Defensive Ability, +6% Chance to Avoid Projectiles, completed
relic bonus
EMBODIMENT (EPIC DIFFICULTY)
1/3 - + 40 Defensive Ability, +3% Chance to Avoid Projectiles
2/3 - + 80 Defensive Ability, +6% Chance to Avoid Projectiles
3/3 - +120 Defensive Ability, +9% Chance to Avoid Projectiles, completed
relic bonus
INCARNATION (LEGENDARY DIFFICULTY)
1/3 - + 60 Defensive Ability, +3% Chance to Avoid Projectiles
2/3 - +120 Defensive Ability, +6% Chance to Avoid Projectiles
3/3 - +180 Defensive Ability, +9% Chance to Avoid Projectiles, completed
relic bonus
SHEN-NONG'S DARK MEDICINE
Shen-Nong is the Chinese god of plants and medicine. He is a master of
herbs - and not all are meant to cure. Can enchant all weapons.
Appearance : An open vial of liquid which is spraying out.
Required Level : 18 (Normal), 34 (Epic), 44 (Legendary)
ESSENCE (NORMAL DIFFICULTY)
1/3 - 42 Poison Damage over 6.0 Seconds, 4 Reduced Resistance for 6.0
Seconds
2/3 - 84 Poison Damage over 6.0 Seconds, 8 Reduced Resistance for 6.0
Seconds
3/3 - 126 Poison Damage over 6.0 Seconds, 12 Reduced Resistance for 6.0
Seconds, completed relic bonus
EMBODIMENT (EPIC DIFFICULTY)
1/3 - 60 Poison Damage over 6.0 Seconds, 5 Reduced Resistance for 6.0
Seconds
2/3 - 120 Poison Damage over 6.0 Seconds, 10 Reduced Resistance for 6.0
Seconds
3/3 - 180 Poison Damage over 6.0 Seconds, 15 Reduced Resistance for 6.0
Seconds, completed relic bonus
INCARNATION (LEGENDARY DIFFICULTY)
1/3 - 96 Poison Damage over 6.0 Seconds, 6 Reduced Resistance for 6.0
Seconds
2/3 - 192 Poison Damage over 6.0 Seconds, 12 Reduced Resistance for 6.0
Seconds
3/3 - 288 Poison Damage over 6.0 Seconds, 18 Reduced Resistance for 6.0
Seconds, completed relic bonus
UDJAT OF HORUS
The Udjat is the eye of Horus, hawk-headed god of the sky. It symbolises
protection and power. Can enhance all armour.
Appearance : The Eye of Horus
Required Level : 12 (Normal), 30 (Epic), 41 (Legendary)
ESSENCE (NORMAL DIFFICULTY)
1/3 - 4 Armour, +2% Armour Protection
2/3 - 8 Armour, +4% Armour Protection
3/3 - 12 Armour, +6% Armour Protection, completed relic bonus
EMBODIMENT (EPIC DIFFICULTY)
1/3 - 7 Armour, +2% Armour Protection
2/3 - 14 Armour, +4% Armour Protection
3/3 - 21 Armour, +6% Armour Protection, completed relic bonus
INCARNATION (LEGENDARY DIFFICULTY)
1/3 - 10 Armour, +2% Armour Protection
2/3 - 20 Armour, +4% Armour Protection
3/3 - 30 Armour, +6% Armour Protection, completed relic bonus
VALOR OF ACHILLES
Achilles was the greatest of all the greek warrior of the Trojan War.
His strength and speed in battle were legendary. Can enchant all weapons.
Appearance : A greek warrior's helmet with plumage atop
Required Level : 3 (Normal), 27 (Epic), 38 (Legendary)
ESSENCE (NORMAL DIFFICULTY)
1/3 - 5 Damage, +4% Attack Speed
2/3 - 5 Damage, +8% Attack Speed
3/3 - 5 Damage, +12% Attack Speed, completed relic bonus
EMBODIMENT (EPIC DIFFICULTY)
1/3 - 15 Damage, +5% Attack Speed
2/3 - 15 Damage, +10% Attack Speed
3/3 - 15 Damage, +15% Attack Speed, completed relic bonus
INCARNATION (LEGENDARY DIFFICULTY)
1/3 - 25 Damage, +6% Attack Speed
2/3 - 25 Damage, +12% Attack Speed
3/3 - 25 Damage, +18% Attack Speed, completed relic bonus
YEN-LO-WANG'S BLOODLETTING
Yen-Lo-Wang is a god of Death and the ruler of Feng-Du, the Chinese Hell.
Can enchant all weapons.
Appearance : Three droplets of blood
Required Level : 18 (Normal), 34 (Epic), 44 (Legendary)
ESSENCE (NORMAL DIFFICULTY)
1/3 - 27 Bleeding Damage over 3.0 Seconds, + 6% Bleeding Damage
2/3 - 54 Bleeding Damage over 3.0 Seconds, +12% Bleeding Damage
3/3 - 81 Bleeding Damage over 3.0 Seconds, +18% Bleeding Damage,
completed relic bonus
EMBODIMENT (EPIC DIFFICULTY)
1/3 - 39 Bleeding Damage over 3.0 Seconds, + 6% Bleeding Damage
2/3 - 78 Bleeding Damage over 3.0 Seconds, +12% Bleeding Damage
3/3 - 117 Bleeding Damage over 3.0 Seconds, +18% Bleeding Damage, completed
relic bonus
INCARNATION (LEGENDARY DIFFICULTY)
1/3 - 54 Bleeding Damage over 3.0 Seconds, + 6% Bleeding Damage
2/3 - 108 Bleeding Damage over 3.0 Seconds, +12% Bleeding Damage
3/3 - 162 Bleeding Damage over 3.0 Seconds, +18% Bleeding Damage, completed
relic bonus
ZEUS' THUNDERBOLT
Zeus is the mightiest of the gods of Olympus. The thunderbolt is his
weapon and symbol. Can enchant all weapons.
Appearance : A lightning bolt
Required Level : 3 (Normal), 27 (Epic), 38 (Legendary)
ESSENCE (NORMAL DIFFICULTY)
1/3 - +3% Lightning Damage, 1- 7 Lightning Damage
2/3 - +6% Lightning Damage, 2-14 Lightning Damage
3/3 - +9% Lightning Damage, 3-21 Lightning Damage, completed relic bonus
EMBODIMENT (EPIC DIFFICULTY)
1/3 - + 3% Lightning Damage, 5-15 Lightning Damage
2/3 - + 6% Lightning Damage, 10-30 Lightning Damage
3/3 - + 9% Lightning Damage, 15-45 Lightning Damage, completed relic bonus
INCARNATION (LEGENDARY DIFFICULTY)
1/3 - +3% Lightning Damage, 7-25 Lightning Damage
2/3 - +6% Lightning Damage, 14-50 Lightning Damage
3/3 - +9% Lightning Damage, 21-75 Lightning Damage, completed relic bonus
----------
With regard to the "completed relic bonuses" I referred to earlier, these can
range from bonuses to your attributes, damage, health, health regeneration,
energy, energy regeneration, offensive ability, defensive ability, armour,
resistances, or can include things like piercing retaliation and stun.
==============================================================================
C H A P T E R E I G H T CHAPTER 8
==============================================================================
M O N S T E R C H A R M S
==============================================================================
In addition to relics, you will find yourself coming into possession of a fair
few Monster Charms during your average session of Titan Quest. Monster Charms
are just like relics except, rather than being shards of a God's power, they
are fragments of the power of the animal or creature they are dropped by, so
you might come across things like turtle shells, bird feathers, crab shells,
vines, various goops and gels, and so on.
UNlike relics, however, you must combine FIVE fragments of a Monster Charm in
order to make a complete one.
Aside from that they function pretty much exactly like relics do. You can add
a portion (i.e. 1/5, 2/5, 3/5 or 4/5) of a monster charm to an item if you
like, and then add the rest of the monster charm later ... and you can get an
Enchanter to separate the monster charm and the item for you just as you would
a regular relic, should that be your preference (same rules apply though - you
will have to forfeit either the item or the monster charm in the process).
You will, as with a completed relic, get a completed monster charm bonus when
you assemble all 5 fragments of a monster charm, and I have put as many of
those bonuses as I could find at the foot of the monster charm list as well.
As with relics, I have listed the monster charm's name, what type of creature
drops it, what level you must be to use it, what type of item it can enchant,
and what powers it bestows, for each of the monster charms I have encountered
in Titan Quest and Immortal Throne.
Here you go :-
ALBINO SPIDER WEB
A sticky mass of webbing pulled from an Albino Spider abdomen. Can enhance
all armour.
Dropped by : Albino Spiders
Required Level : 24 (Normal), 36 (Epic), 46 (Legendary)
Bonuses :-
NORMAL DIFFICULTY
1/5 - 7.0% Chance of 180 Electrical Burn Retaliation over 3.0 Seconds
2/5 - 14.0% Chance of 180 Electrical Burn Retaliation over 3.0 Seconds
3/5 - 21.0% Chance of 180 Electrical Burn Retaliation over 3.0 Seconds
4/5 - 28.0% Chance of 180 Electrical Burn Retaliation over 3.0 Seconds
5/5 - 35.0% Chance of 180 Electrical Burn Retaliation over 3.0 Seconds,
completed item bonus.
EPIC DIFFICULTY
1/5 - 7.0% Chance of 300 Electrical Burn Retaliation over 3.0 Seconds
2/5 - 14.0% Chance of 300 Electrical Burn Retaliation over 3.0 Seconds
3/5 - 21.0% Chance of 300 Electrical Burn Retaliation over 3.0 Seconds
4/5 - 28.0% Chance of 300 Electrical Burn Retaliation over 3.0 Seconds
5/5 - 35.0% Chance of 300 Electrical Burn Retaliation over 3.0 Seconds,
completed item bonus.
LEGENDARY DIFFICULTY
1/5 - 7.0% Chance of 480 Electrical Burn Retaliation over 3.0 Seconds
2/5 - 14.0% Chance of 480 Electrical Burn Retaliation over 3.0 Seconds
3/5 - 21.0% Chance of 480 Electrical Burn Retaliation over 3.0 Seconds
4/5 - 28.0% Chance of 480 Electrical Burn Retaliation over 3.0 Seconds
5/5 - 35.0% Chance of 480 Electrical Burn Retaliation over 3.0 Seconds,
completed item bonus.
BAT FANG
Hollow fang of a Cave Bat. Can enhance all weapons.
Dropped by : Bats
Required Level : 3 (Normal), 27 (Epic), 38 (Legendary)
Bonuses :-
NORMAL DIFFICULTY
1/5 - 6 Life Leech over 3.0 Seconds
2/5 - 12 Life Leech over 3.0 Seconds
3/5 - 18 Life Leech over 3.0 Seconds
4/5 - 24 Life Leech over 3.0 Seconds
5/5 - 30 Life Leech over 3.0 Seconds, completed item bonus.
EPIC DIFFICULTY
1/5 - 18 Life Leech over 3.0 Seconds
2/5 - 36 Life Leech over 3.0 Seconds
3/5 - 54 Life Leech over 3.0 Seconds
4/5 - 72 Life Leech over 3.0 Seconds
5/5 - 90 Life Leech over 3.0 Seconds, completed item bonus.
LEGENDARY DIFFICULTY
1/5 - 27 Life Leech over 3.0 Seconds
2/5 - 54 Life Leech over 3.0 Seconds
3/5 - 81 Life Leech over 3.0 Seconds
4/5 - 108 Life Leech over 3.0 Seconds
5/5 - 135 Life Leech over 3.0 Seconds, completed item bonus.
BOAR HIDE
Toughened hide of a wild boar. Can enhance all armour.
Dropped by : Ravenous Boar
Required Level : 3 (Normal), 27 (Epic), 38 (Legendary)
Bonuses :-
NORMAL DIFFICULTY
1/5 - 2 Armour
2/5 - 4 Armour
3/5 - 6 Armour
4/5 - 8 Armour
5/5 - 10 Armour, completed item bonus.
EPIC DIFFICULTY
1/5 - 4 Armour
2/5 - 8 Armour
3/5 - 12 Armour
4/5 - 16 Armour
5/5 - 20 Armour, completed item bonus.
LEGENDARY DIFFICULTY
1/5 - 6 Armour
2/5 - 12 Armour
3/5 - 18 Armour
4/5 - 24 Armour
5/5 - 30 Armour, completed item bonus.
CRYSTAL OF EREBUS
A splinter from one of the Crystals of Erebus, the source of Hades' power
in the world of the living. Can enhance head armour only.
Dropped by : The Shards of Erebus
Required Level : 24 (Normal), 36 (Epic), 46 (Legendary)
Bonuses :-
NORMAL DIFFICULTY
1/5 - 2% Vitality Damage Resistance
2/5 - 4% Vitality Damage Resistance
3/5 - 6% Vitality Damage Resistance
4/5 - 8% Vitality Damage Resistance
5/5 - 10% Vitality Damage Resistance, completed item bonus.
EPIC DIFFICULTY
1/5 - 3% Vitality Damage Resistance
2/5 - 6% Vitality Damage Resistance
3/5 - 9% Vitality Damage Resistance
4/5 - 12% Vitality Damage Resistance
5/5 - 15% Vitality Damage Resistance, completed item bonus.
LEGENDARY DIFFICULTY
1/5 - 4% Vitality Damage Resistance
2/5 - 6% Vitality Damage Resistance
3/5 - 12% Vitality Damage Resistance
4/5 - 16% Vitality Damage Resistance
5/5 - 20% Vitality Damage Resistance, completed item bonus.
DEMON'S BLOOD
The dark blood of a fallen demon. Can enhance rings and amulets.
Dropped by : Eurynomus, Rime Sprites
Required Level : 5 (Normal), 27 (Epic), 38 (Legendary)
Bonuses :-
NORMAL DIFFICULTY
1/5 - 5% Vitality Damage Resistance, 5% Stun Resistance
2/5 - 10% Vitality Damage Resistance, 10% Stun Resistance
3/5 - 15% Vitality Damage Resistance, 15% Stun Resistance
4/5 - 20% Vitality Damage Resistance, 20% Stun Resistance
5/5 - 25% Vitality Damage Resistance, 25% Stun Resistance, completed
item bonus.
EPIC DIFFICULTY
1/5 - 7% Vitality Damage Resistance, 7% Stun Resistance
2/5 - 14% Vitality Damage Resistance, 14% Stun Resistance
3/5 - 21% Vitality Damage Resistance, 21% Stun Resistance
4/5 - 28% Vitality Damage Resistance, 28% Stun Resistance
5/5 - 35% Vitality Damage Resistance, 35% Stun Resistance, completed
item bonus.
LEGENDARY DIFFICULTY
1/5 - 10% Vitality Damage Resistance, 10% Stun Resistance
2/5 - 20% Vitality Damage Resistance, 20% Stun Resistance
3/5 - 30% Vitality Damage Resistance, 30% Stun Resistance
4/5 - 40% Vitality Damage Resistance, 40% Stun Resistance
5/5 - 50% Vitality Damage Resistance, 50% Stun Resistance, completed
item bonus.
DISEASED PLUMAGE
Feathers from a carrior bird. Can enhance all armour.
Dropped by : Carrion Crows, Diseased Vultures.
Required Level : 5 (Normal), 27 (Epic), 38 (Legendary)
Bonuses :-
NORMAL DIFFICULTY
1/5 - +2% Poison Damage
2/5 - +4% Poison Damage
3/5 - +6% Poison Damage
4/5 - +8% Poison Damage
5/5 - +10% Poison Damage, completed item bonus.
EPIC DIFFICULTY
1/5 - +3% Poison Damage
2/5 - +6% Poison Damage
3/5 - +9% Poison Damage
4/5 - +12% Poison Damage
5/5 - +15% Poison Damage, completed item bonus.
LEGENDARY DIFFICULTY
1/5 - +4% Poison Damage
2/5 - +8% Poison Damage
3/5 - +12% Poison Damage
4/5 - +16% Poison Damage
5/5 - +20% Poison Damage, completed item bonus.
FURY'S HEARTBLOOD
Blood drained from a Fury's still beating heart. Can enhance all weapons.
Dropped by : Furies
Required Level : 24 (Normal), 36 (Epic), 46 (Legendary)
Bonuses :-
NORMAL DIFFICULTY
1/5 - 7 Vitality Damage
2/5 - 14 Vitality Damage
3/5 - 21 Vitality Damage
4/5 - 28 Vitality Damage
5/5 - 35 Vitality Damage, completed item bonus.
EPIC DIFFICULTY
1/5 - 15 Vitality Damage
2/5 - 30 Vitality Damage
3/5 - 45 Vitality Damage
4/5 - 60 Vitality Damage
5/5 - 75 Vitality Damage, completed item bonus.
LEGENDARY DIFFICULTY
1/5 - 20 Vitality Damage
2/5 - 40 Vitality Damage
3/5 - 60 Vitality Damage
4/5 - 80 Vitality Damage
5/5 - 100 Vitality Damage, completed item bonus.
HAG'S SKIN
A scrap of skin from a Desert Hag. Can enhance all armour.
Dropped by : Sandwing Crones.
Required Level : 12 (Normal), 30 (Epic), 41 (Legendary)
Bonuses :-
NORMAL DIFFICULTY
1/5 - 6% Pierce Resistance, +2 Dexterity
2/5 - 6% Pierce Resistance, +4 Dexterity
3/5 - 6% Pierce Resistance, +6 Dexterity
4/5 - 6% Pierce Resistance, +8 Dexterity
5/5 - 6% Pierce Resistance, +10 Dexterity, completed item bonus.
EPIC DIFFICULTY
1/5 - 8% Pierce Resistance, +3 Dexterity
2/5 - 8% Pierce Resistance, +6 Dexterity
3/5 - 8% Pierce Resistance, +9 Dexterity
4/5 - 8% Pierce Resistance, +12 Dexterity
5/5 - 8% Pierce Resistance, +15 Dexterity, completed item bonus.
LEGENDARY DIFFICULTY
1/5 - 10% Pierce Resistance, +4 Dexterity
2/5 - 10% Pierce Resistance, +8 Dexterity
3/5 - 10% Pierce Resistance, +12 Dexterity
4/5 - 10% Pierce Resistance, +16 Dexterity
5/5 - 10% Pierce Resistance, +20 Dexterity, completed item bonus.
HYDRADON HIDE
A patch of rough, durable skin ripped from the flesh of a Hydradon. Can
enhance all armour.
Dropped by : Hydradon
Required Level : 24 (Normal), 36 (Epic), 46 (Legendary)
Bonuses :-
NORMAL DIFFICULTY
1/5 - +15 Health, +4% Less Damage from Beasts
2/5 - +30 Health, +8% Less Damage from Beasts
3/5 - +45 Health, +12% Less Damage from Beasts
4/5 - +60 Health, +16% Less Damage from Beasts
5/5 - +75 Health, +20% Less Damage from Beasts, completed item bonus.
EPIC DIFFICULTY
1/5 - + 25 Health, +5% Less Damage from Beasts
2/5 - + 50 Health, +10% Less Damage from Beasts
3/5 - + 75 Health, +15% Less Damage from Beasts
4/5 - +100 Health, +20% Less Damage from Beasts
5/5 - +125 Health, +25% Less Damage from Beasts, completed item bonus.
LEGENDARY DIFFICULTY
1/5 - + 35 Health, +6% Less Damage from Beasts
2/5 - + 70 Health, +12% Less Damage from Beasts
3/5 - +105 Health, +18% Less Damage from Beasts
4/5 - +140 Health, +24% Less Damage from Beasts
5/5 - +175 Health, +30% Less Damage from Beasts, completed item bonus.
LUPINE CLAW
A long, sharp claw. Can enhance all weapons.
Dropped by : Hyena Beasts.
Required Level : 12 (Normal), 30 (Epic), 41 (Legendary)
Bonuses :-
NORMAL DIFFICULTY
1/5 - 2 Piercing Damage
2/5 - 4 Piercing Damage
3/5 - 6 Piercing Damage
4/5 - 8 Piercing Damage
5/5 - 10 Piercing Damage, completed item bonus.
EPIC DIFFICULTY
1/5 - 4 Piercing Damage
2/5 - 8 Piercing Damage
3/5 - 12 Piercing Damage
4/5 - 16 Piercing Damage
5/5 - 20 Piercing Damage, completed item bonus.
LEGENDARY DIFFICULTY
1/5 - 6 Piercing Damage
2/5 - 12 Piercing Damage
3/5 - 18 Piercing Damage
4/5 - 24 Piercing Damage
5/5 - 30 Piercing Damage, completed item bonus.
MECHANICAL PARTS
The intricate inner workings of an automaton. Can enhance torso armour only.
Dropped by : Traps, Automatons
Required Level : 10 (Normal), 27 (Epic), 38 (Legendary)
Bonuses :-
NORMAL DIFFICULTY
1/5 - +1% Total Speed
2/5 - +2% Total Speed
3/5 - +3% Total Speed
4/5 - +4% Total Speed
5/5 - +5% Total Speed, completed item bonus.
EPIC DIFFICULTY
1/5 - + 2% Total Speed
2/5 - + 4% Total Speed
3/5 - + 6% Total Speed
4/5 - + 8% Total Speed
5/5 - +10% Total Speed, completed item bonus.
LEGENDARY DIFFICULTY
1/5 - + 2% Total Speed, + 2% Damage to Devices
2/5 - + 4% Total Speed, + 4% Damage to Devices
3/5 - + 6% Total Speed, + 6% Damage to Devices
4/5 - + 8% Total Speed, + 8% Damage to Devices
5/5 - +10% Total Speed, +10% Damage to Devices, completed item bonus.
PENG CLAW
Claw of a Peng. Can enhance all weapons.
Dropped by : Peng.
Required Level : 18 (Normal), 34 (Epic), 44 (Legendary)
Bonuses :-
NORMAL DIFFICULTY
1/5 - 3 - 7 Damage
2/5 - 6 - 14 Damage
3/5 - 9 - 21 Damage
4/5 - 12 - 28 Damage
5/5 - 15 - 35 Damage, completed item bonus.
EPIC DIFFICULTY
1/5 - 5 - 9 Damage
2/5 - 10 - 18 Damage
3/5 - 15 - 27 Damage
4/5 - 20 - 36 Damage
5/5 - 25 - 45 Damage, completed item bonus.
LEGENDARY DIFFICULTY
1/5 - 7 - 13 Damage
2/5 - 14 - 26 Damage
3/5 - 21 - 39 Damage
4/5 - 28 - 52 Damage
5/5 - 35 - 65 Damage, completed item bonus.
PRISTINE PLUMAGE
High quality feathers. Can enhance all armour.
Dropped by : Crag Harpies</pre><pre id="faqspan-14">
Required Level : 3 (Normal), 27 (Epic), 38 (Legendary)
Bonuses :-
NORMAL DIFFICULTY
1/5 - 4% Poison Resistance
2/5 - 8% Poison Resistance
3/5 - 12% Poison Resistance
4/5 - 16% Poison Resistance
5/5 - 20% Poison Resistance, completed item bonus.
EPIC DIFFICULTY
1/5 - 6% Poison Resistance
2/5 - 12% Poison Resistance
3/5 - 18% Poison Resistance
4/5 - 24% Poison Resistance
5/5 - 30% Poison Resistance, completed item bonus.
LEGENDARY DIFFICULTY
1/5 - 8% Poison Resistance
2/5 - 16% Poison Resistance
3/5 - 24% Poison Resistance
4/5 - 32% Poison Resistance
5/5 - 40% Poison Resistance, completed item bonus.
RAPTOR TOOTH
Sharp, jagged tooth torn from a Raptor's mouth. Can enhance amulets only.
Dropped by : Raptors.
Required Level : 18 (Normal), 34 (Epic), 44 (Legendary)
Bonuses :-
NORMAL DIFFICULTY
1/5 - +2% Damage, +1 Strength
2/5 - +4% Damage, +2 Strength
3/5 - +6% Damage, +3 Strength
4/5 - +8% Damage, +4 Strength
5/5 - +10% Damage, +5 Strength, completed item bonus.
EPIC DIFFICULTY
1/5 - + 2% Damage, + 3 Strength
2/5 - + 4% Damage, + 6 Strength
3/5 - + 6% Damage, + 9 Strength
4/5 - + 8% Damage, +12 Strength
5/5 - +10% Damage, +15 Strength, completed item bonus.
LEGENDARY DIFFICULTY
1/5 - + 2% Damage, + 5 Strength
2/5 - + 4% Damage, +10 Strength
3/5 - + 6% Damage, +15 Strength
4/5 - + 8% Damage, +20 Strength
5/5 - +10% Damage, +25 Strength, completed item bonus.
RIGID CARAPACE
The thick outer shell of an insectoid monster. Can enhance shields only.
Dropped by : Fire Beetles.
Required Level : 12 (Normal), 30 (Epic), 41 (Legendary)
Bonuses :-
NORMAL DIFFICULTY
1/5 - 4% Pierce Resistance
2/5 - 8% Pierce Resistance
3/5 - 12% Pierce Resistance
4/5 - 16% Pierce Resistance
5/5 - 20% Pierce Resistance, completed item bonus.
EPIC DIFFICULTY
1/5 - 6% Pierce Resistance
2/5 - 12% Pierce Resistance
3/5 - 18% Pierce Resistance
4/5 - 24% Pierce Resistance
5/5 - 30% Pierce Resistance, completed item bonus.
LEGENDARY DIFFICULTY
1/5 - 8% Pierce Resistance
2/5 - 16% Pierce Resistance
3/5 - 24% Pierce Resistance
4/5 - 32% Pierce Resistance
5/5 - 40% Pierce Resistance, completed item bonus.
SABER CLAW
The razor-sharp claw of a Saber Lion. Can enhance all weapons.
Dropped by : Saber Lions
Required Level : 18 (Normal), 34 (Epic), 44 (Legendary)
Bonuses :-
NORMAL DIFFICULTY
1/5 - 15 Bleeding Damage over 3.0 Seconds, + 5 Offensive Ability
2/5 - 30 Bleeding Damage over 3.0 Seconds, +10 Offensive Ability
3/5 - 45 Bleeding Damage over 3.0 Seconds, +15 Offensive Ability
4/5 - 60 Bleeding Damage over 3.0 Seconds, +20 Offensive Ability
5/5 - 75 Bleeding Damage over 3.0 Seconds, +25 Offensive Ability,
completed item bonus.
EPIC DIFFICULTY
1/5 - 21 Bleeding Damage over 3.0 Seconds, + 7 Offensive Ability
2/5 - 42 Bleeding Damage over 3.0 Seconds, +14 Offensive Ability
3/5 - 63 Bleeding Damage over 3.0 Seconds, +21 Offensive Ability
4/5 - 84 Bleeding Damage over 3.0 Seconds, +28 Offensive Ability
5/5 - 105 Bleeding Damage over 3.0 Seconds, +35 Offensive Ability,
completed item bonus.
LEGENDARY DIFFICULTY
1/5 - 30 Bleeding Damage over 3.0 Seconds, +10 Offensive Ability
2/5 - 60 Bleeding Damage over 3.0 Seconds, +20 Offensive Ability
3/5 - 90 Bleeding Damage over 3.0 Seconds, +30 Offensive Ability
4/5 - 120 Bleeding Damage over 3.0 Seconds, +40 Offensive Ability
5/5 - 150 Bleeding Damage over 3.0 Seconds, +50 Offensive Ability,
completed item bonus.
SPECTRAL MATTER
A wispy, glowing substance. Can enhance rings and amulets.
Dropped by : Sandwraiths, Shades (Thanks to Gintare for that !)
Required Level : 5 (Normal), 27 (Epic), 38 (Legendary)
Bonuses :-
NORMAL DIFFICULTY
1/5 - 12 Energy Leech over 2.0 Seconds, 10% Energy Leech Resistance
2/5 - 24 Energy Leech over 2.0 Seconds, 10% Energy Leech Resistance
3/5 - 36 Energy Leech over 2.0 Seconds, 10% Energy Leech Resistance
4/5 - 48 Energy Leech over 2.0 Seconds, 10% Energy Leech Resistance
5/5 - 60 Energy Leech over 2.0 Seconds, 10% Energy Leech Resistance,
completed item bonus.
EPIC DIFFICULTY
1/5 - 18 Energy Leech over 2.0 Seconds, 15% Energy Leech Resistance
2/5 - 36 Energy Leech over 2.0 Seconds, 15% Energy Leech Resistance
3/5 - 54 Energy Leech over 2.0 Seconds, 15% Energy Leech Resistance
4/5 - 72 Energy Leech over 2.0 Seconds, 15% Energy Leech Resistance
5/5 - 90 Energy Leech over 2.0 Seconds, 15% Energy Leech Resistance,
completed item bonus.
LEGENDARY DIFFICULTY
1/5 - 26 Energy Leech over 2.0 Seconds, 20% Energy Leech Resistance
2/5 - 52 Energy Leech over 2.0 Seconds, 20% Energy Leech Resistance
3/5 - 78 Energy Leech over 2.0 Seconds, 20% Energy Leech Resistance
4/5 - 104 Energy Leech over 2.0 Seconds, 20% Energy Leech Resistance
5/5 - 130 Energy Leech over 2.0 Seconds, 20% Energy Leech Resistance,
completed item bonus.
SPINY SHELL
The jagged shell of a Karkinos. Can enhance shields.
Dropped by : Karkinos
Required Level : 24 (Normal), 36 (Epic), 46 (Legendary)
Bonuses :-
NORMAL DIFFICULTY
1/5 - 4 Damage, +1% Shield Block
2/5 - 8 Damage, +2% Shield Block
3/5 - 12 Damage, +3% Shield Block
4/5 - 16 Damage, +4% Shield Block
5/5 - 20 Damage, +5% Shield Block, completed item bonus.
EPIC DIFFICULTY
1/5 - 8 Damage, + 2% Shield Block
2/5 - 16 Damage, + 4% Shield Block
3/5 - 24 Damage, + 6% Shield Block
4/5 - 32 Damage, + 8% Shield Block
5/5 - 40 Damage, +10% Shield Block, completed item bonus.
LEGENDARY DIFFICULTY
1/5 - 10 Damage, + 3% Shield Block
2/5 - 20 Damage, + 6% Shield Block
3/5 - 30 Damage, + 9% Shield Block
4/5 - 40 Damage, +12% Shield Block
5/5 - 50 Damage, +15% Shield Block, completed item bonus.
TORTURED SOUL
The agonised soul of a creature of darkness. Can enhance all jewellery.
Dropped by : Epiales
Required Level : 24 (Normal), 36 (Epic), 46 (Legendary)
Bonuses :-
NORMAL DIFFICULTY
1/5 - + 5% Damage to Demons
2/5 - +10% Damage to Demons
3/5 - +15% Damage to Demons
4/5 - +20% Damage to Demons
5/5 - +25% Damage to Demons, completed item bonus.
EPIC DIFFICULTY
1/5 - + 7% Damage to Demons
2/5 - +14% Damage to Demons
3/5 - +21% Damage to Demons
4/5 - +28% Damage to Demons
5/5 - +35% Damage to Demons, completed item bonus.
LEGENDARY DIFFICULTY
1/5 - +10% Damage to Demons
2/5 - +20% Damage to Demons
3/5 - +30% Damage to Demons
4/5 - +40% Damage to Demons
5/5 - +50% Damage to Demons, completed item bonus.
TURTLE SHELL
A large turtle shell. Can enhance shields only.
Dropped by : Turtles
Required Level : 3 (Normal), 27 (Epic), 38 (Legendary)
Bonuses :-
NORMAL DIFFICULTY
1/5 - +1% Shield Block, -5% Shield Recovery Time
2/5 - +2% Shield Block, -5% Shield Recovery Time
3/5 - +3% Shield Block, -5% Shield Recovery Time
4/5 - +4% Shield Block, -5% Shield Recovery Time
5/5 - +5% Shield Block, -5% Shield Recovery Time, completed item bonus.
EPIC DIFFICULTY
1/5 - + 2% Shield Block, -10% Shield Recovery Time
2/5 - + 4% Shield Block, -10% Shield Recovery Time
3/5 - + 6% Shield Block, -10% Shield Recovery Time
4/5 - + 8% Shield Block, -10% Shield Recovery Time
5/5 - +10% Shield Block, -10% Shield Recovery Time, completed item bonus.
LEGENDARY DIFFICULTY
1/5 - + 3% Shield Block, -15% Shield Recovery Time
2/5 - + 6% Shield Block, -15% Shield Recovery Time
3/5 - + 9% Shield Block, -15% Shield Recovery Time
4/5 - +12% Shield Block, -15% Shield Recovery Time
5/5 - +15% Shield Block, -15% Shield Recovery Time, completed item bonus.
VENOM SAC
Contains a deadly poison. Can enchant all weapons.
Dropped by : Spiders (of various sorts)
Required Level : 5 (Normal), 27 (Epic), 38 (Legendary)
Bonuses :-
NORMAL DIFFICULTY
1/5 - 18 Poison Damage over 6.0 Seconds
2/5 - 36 Poison Damage over 6.0 Seconds
3/5 - 54 Poison Damage over 6.0 Seconds
4/5 - 72 Poison Damage over 6.0 Seconds
5/5 - 90 Poison Damage over 6.0 Seconds, completed item bonus.
EPIC DIFFICULTY
1/5 - 42 Poison Damage over 6.0 Seconds
2/5 - 84 Poison Damage over 6.0 Seconds
3/5 - 126 Poison Damage over 6.0 Seconds
4/5 - 168 Poison Damage over 6.0 Seconds
5/5 - 210 Poison Damage over 6.0 Seconds, completed item bonus.
LEGENDARY DIFFICULTY
1/5 - 72 Poison Damage over 6.0 Seconds
2/5 - 144 Poison Damage over 6.0 Seconds
3/5 - 216 Poison Damage over 6.0 Seconds
4/5 - 288 Poison Damage over 6.0 Seconds
5/5 - 360 Poison Damage over 6.0 Seconds, completed item bonus.
VILE ICHOR
A disgusting glob of pus, blood, and bile. Can enhance rings and amulets.
Dropped by : Crypt Worms, Ant Lions
Required Level : 12 (Normal), 30 (Epic), 41 (Legendary)
Bonuses :-
NORMAL DIFFICULTY
1/5 - + 2% Vitality Damage, 5 Vitality Damage
2/5 - + 4% Vitality Damage, 5 Vitality Damage
3/5 - + 6% Vitality Damage, 5 Vitality Damage
4/5 - + 8% Vitality Damage, 5 Vitality Damage
5/5 - +10% Vitality Damage, 5 Vitality Damage, completed item bonus.
EPIC DIFFICULTY
1/5 - + 3% Vitality Damage, 10 Vitality Damage
2/5 - + 6% Vitality Damage, 10 Vitality Damage
3/5 - + 9% Vitality Damage, 10 Vitality Damage
4/5 - +12% Vitality Damage, 10 Vitality Damage
5/5 - +15% Vitality Damage, 10 Vitality Damage, completed item bonus.
LEGENDARY DIFFICULTY
1/5 - + 4% Vitality Damage, 15 Vitality Damage
2/5 - + 8% Vitality Damage, 15 Vitality Damage
3/5 - +12% Vitality Damage, 15 Vitality Damage
4/5 - +16% Vitality Damage, 15 Vitality Damage
5/5 - +20% Vitality Damage, 15 Vitality Damage, completed item bonus.
VINY GROWTH
A lump of dense plant matter. Can enhance all armour.
Dropped by : Jungle Creeps, Quill Vines
Required Level : 18 (Normal), 34 (Epic), 44 (Legendary)
Bonuses :-
NORMAL DIFFICULTY
1/5 - +0.5 Health Regeneration per second, +10% Health Regeneration
2/5 - +1.0 Health Regeneration per second, +20% Health Regeneration
3/5 - +1.5 Health Regeneration per second, +30% Health Regeneration
4/5 - +2.0 Health Regeneration per second, +40% Health Regeneration
5/5 - +2.5 Health Regeneration per second, +50% Health Regeneration,
completed item bonus.
EPIC DIFFICULTY
1/5 - +0.7 Health Regeneration per second, +15% Health Regeneration
2/5 - +1.4 Health Regeneration per second, +30% Health Regeneration
3/5 - +2.1 Health Regeneration per second, +45% Health Regeneration
4/5 - +2.8 Health Regeneration per second, +60% Health Regeneration
5/5 - +3.5 Health Regeneration per second, +75% Health Regeneration,
completed item bonus.
LEGENDARY DIFFICULTY
1/5 - +1.0 Health Regeneration per second, + 20% Health Regeneration
2/5 - +2.0 Health Regeneration per second, + 40% Health Regeneration
3/5 - +3.0 Health Regeneration per second, + 60% Health Regeneration
4/5 - +4.0 Health Regeneration per second, + 80% Health Regeneration
5/5 - +5.0 Health Regeneration per second, +100% Health Regeneration,
completed item bonus.
YETI FUR
The thick, coarse pelt of the Yeti. Can enhance all armour.
Dropped by : Yeti (bet you weren't expecting that one eh !!)
Required Level : 18 (Normal), 34 (Epic), 44 (Legendary)
Bonuses :-
NORMAL DIFFICULTY
1/5 - +5% Cold Damage, +4% Cold Resistance
2/5 - +5% Cold Damage, +8% Cold Resistance
3/5 - +5% Cold Damage, +12% Cold Resistance
4/5 - +5% Cold Damage, +16% Cold Resistance
5/5 - +5% Cold Damage, +20% Cold Resistance, completed item bonus.
EPIC DIFFICULTY
1/5 - +5% Cold Damage, +6% Cold Resistance
2/5 - +5% Cold Damage, +12% Cold Resistance
3/5 - +5% Cold Damage, +18% Cold Resistance
4/5 - +5% Cold Damage, +24% Cold Resistance
5/5 - +5% Cold Damage, +30% Cold Resistance, completed item bonus.
LEGENDARY DIFFICULTY
1/5 - +5% Cold Damage, + 8% Cold Resistance
2/5 - +5% Cold Damage, +16% Cold Resistance
3/5 - +5% Cold Damage, +24% Cold Resistance
4/5 - +5% Cold Damage, +32% Cold Resistance
5/5 - +5% Cold Damage, +40% Cold Resistance, completed item bonus.
----------
With regard to the "completed item bonuses" I referred to earlier, these can
range from bonuses to your attributes, damage, health, health regeneration,
energy, energy regeneration, offensive ability, defensive ability, armour,
resistances, or can include things like piercing retaliation and stun.
==============================================================================
C H A P T E R N I N E CHAPTER 9
==============================================================================
A R C A N E F O R M U L A E
==============================================================================
Arcane Formulae are another COOL addition that has been brought in for the
Immortal Throne Expansion Pack.
Only Immortal Throne characters can use Artifacts, being the very powerful
items that are created when the recipe contained in an Arcane Formula is
followed, and the inventory slot for equipping such an Artifact is beneath
the body armour, and to the left of the bracers and greaves.
In order to create an Artifact you must :-
1) Find the Arcane Formula for the Artifact you wish to create
2) Locate the three reagents (ingredients) for the recipe
3) Present an Enchanter with the Arcane Formula, Reagents and MONEY; and
4) Reap the rewards !! :)
There are LOADS and loads of Arcane Formulae in Immortal Throne, and they are
divided up into three ranks, or levels, effectively, being :-
1) Lesser Artifacts (available on All Difficulties)
2) Greater Artifacts (available on All Difficulties)
3) Divine Artifacts (available only on Epic and Legendary Difficulties).
It doesn't take a rocket scientist to work out that Divine Artifacts are the
BOMB, and boast some of the most amazing powers in the game.
In an attempt to be as complete as possible, I have written out those Arcane
Formulae that I, and those people that have assisted me by contributing to this
are of my guide, have encountered in the game, together with their requirements
and effects, the level you must be to use them, and their appearance in your
inventory screen (where we have made them into artifacts proper)
===============================================================================
HELPFUL HINT
===============================================================================
I am reliably informed by DaDennis that the following is a list of which
Arcane Formulae you will be able to find whilst playing on the three difficulty
settings of the game :-
In Normal:
LESSER: Amber Flask, Bloodrage, Chaos Cube, Cinderbolt, Crystal Tear,
Deathrattle, Leafsong, Molten Orb, Pale Moon, Razor Claw, Scroll of
Oneiros, Shroud of Eternal Night, Skyfire Pendant, Song of the
Serpent, Soul Shiver, Starheart, Sunstone, Touch of the Fool,
Wraithguard.
GREATER: Book of Dreams, Drudic Wreath, Eye of Heavens, Fury of Ages, Shadow
Veil, Soul Prism.
In Epic:
LESSER: Dark Cube, Earthen Talisman, Ebony Globe, Emerald Quill, Jade Totem,
Nexus of Insanity, Phylactery of Shadows, Raven's Shadow, Spirit
Blight, Summoner's Totem, Tome of Transfiguration.
GREATER: Crimson Viper, Dragontongue, Effigy of Skyfire, Final Breath, Hand of
Gaea, Blood Gem, Heart of Earth, Lionheart, Kingslayer, Sphere of
Eternity.
DIVINE: Blood of Ares, Crescent Moon of Artemis, Crosier of Osiris,
Demeter's Bounty, Knot of Isis, Might of Hephaestus, Poseidon's Net.
In Legendary:
LESSER: Effigy of the Panther, Ethereal Veil, Maiden's Kiss, Silverheart,
Thunderfist, Tongue of Flame.
GREATER: Arcane Mirror, Conqueror's Mark, Tyrant's Fist, Glorybringer, Symbol
of the Polymath, Elemental Rage.
DIVINE: Eye of Ra, Golden Eye of Sun Wukong, Ikon of Zeus, Lyre of Apollo,
Marduk's Tablet of Destiny, Morpheus' Dreamweb, Star of Ishtar,
Talisman of the Jade Emperor, Thoth's Glory, Sigil of Bast.
===============================================================================
I shall start with the lesser, and then work may way up to the divine,
however please note that this is not, at the present time, an all-encompassing
list of all the arcane formulae in the game, and so if you encounter any that
are NOT in my guide, please fill in the blanks (if you fancy), and I shall pop
the information into my guide, and (of course) give you full credit for your
contribution !! Cheers :)
=== ===== ===== ===== ===== =====
¦ ¦ ¦ _/ ¦ / ¦ / ¦ _/ ¦ . ¦
¦ ¦ ¦ ¦ ¦ -- ¦ -- ¦ ¦ ¦ --
¦ ¦ ¦ - ¦ ¦ ¦ ¦ ¦ - ¦ \
¦ ¦_ ¦ ¦_ -- ¦ -- ¦ ¦ ¦_ ¦ \
¦ ¦ ¦ \ \ ¦ \ ¦ ¦ \ ¦ ¦\ \
===== ===== ===== ===== ===== == ==
AMBER FLASK
===========
Requirements : Essence of Artemis' Bowstring
Pristine Plummage
Turtle Shell
75,000 Gold
Effects : 10 Piercing Damage
12% Poison Resistance
+10 Defensive Ability
+7% Attack Speed
+1 random completion bonus
Required Lvl : 10
----------
CHAOS CUBE
==========
Requirements : Essence of Dionysus' Wineskin
Venom Sac
Demon's Blood
75,000 Gold
Effects : 24 Poison Damage over 3.0 Seconds
7% Damage Resistance
15% Vitality Damage Resistance
20% Stun Resistance
+50 Health
+1 random completion bonus
Required Lvl : 15
Appearance : An orange globe with a cube in the center surrounded by
purple whirley lines
----------
CINDERBOLT
==========
Requirements : Essence of Amun-Ra's Glory
Hag's Skin
Rigid Carapace
75,000 Gold
Effects : +14% Fire Damage
8% Pierce Resistance
+12 Dexterity
+75 Health
+75 Energy
+1 random completion bonus
Required Lvl : 20
Appearance : An orange globe with the tip of an arrow on fire in the center
----------
CRYSTAL TEAR
============
Requirements : Essence of the Jade Emperor's Serenity
Saber Claw
Yeti Fur
75,000 Gold
Effects : 75 Bleeding Damage over 3.0 Seconds
+18% Cold Damage
+13% Lightning Damage
+18% Vitality Damage
50% Bleeding Resistance
+1 random completion bonus
Required Lvl : 25
Appearance : An orange globe with an eye covered by a silver drop
in the center
----------
DARK CORE
=========
Requirements : Embodiment of Zeus' Thunderbolt
Epic Rigid Carapace
Greater Scroll of Vengeance
150,000 Gold
Effects : +10% Pierce Damage
+10% Lightning Damage
12 - 35 Lightning Damage
30% Pierce Damage
+15% Intelligence
+5% Energy
+1 random completion bonus
Required Lvl : 35
Appearance : An orange globe with a segment sliced out of it to reveal a
dark (and quite possibly orange-flavoured) centre ...
----------
DEATHRATTLE
===========
Requirements : Essence of the Valor of Achilles
Spectral Matter
Scroll of Arcane Power
****-** Gold
Effects : 10 Damage
30 Poison Damage over 3.0 Seconds
+30 Health
+30 Energy
+15% Attack Speed
+1 random completion bonus
Required Lvl : 5
Appearance : A fiery golden orb with a skull inside it. The eyes glow a
bright yellow
----------
EARTHEN TALISMAN
================
Requirements : Embodiment of Prometheus' Flame
Epic Boar Hide
Epid Pristine Plumage
150,000 Gold
Effects : 54 Burn Damage over 3.0 Seconds
+10% Fire Damage
15 Armour
25% Poison Resistance
+15 Defensive Ability
+1 random completion bonus
Required Lvl : 35
Appearance : An orange sphere with a beautiful almost eye-shaped talisman
at its centre.
----------
EBONY GLOBE
===========
Requirements : Embodiment of Guan-Yu's Grace
Embodiment of the Rage of Ares
Epic Saber Claw
150,000 Gold
Effects : 90 Bleeding Damage over 3.0 Seconds
10.0% Chance of 5.0 second(s) of Skill Disruption
+30 Defensive Ability
7% Chance to Dodge Attacks
+1 random completion bonus
Required Lvl : 40
Appearance : A light golden orb with a dark, marbelised centre.
----------
EFFIGY OF THE PANTHER
=====================
Requirements : Incarnation of the Monkey King's Trickery
Legendary Boar Hide
Incarnation of the Cunning of Odysseus
500,000 Gold
Effects : +15% Poison Damage
15% Damage Resistance
6% Elemental Resistance
40% Skill Disruption Protection
+15% Attack Speed
-15% Dexterity Requirement for all Weapons
-15% Dexterity Requirement for Armour
+1 random completion bonus
Required Lvl : 45
Appearance : An orange orb with a red panther's head outlined in the centre.
----------
EMERALD QUILL
=============
Requirements : Embodiment of Artemis' Bowstring
Epic Diseased Plumage
Greater Scroll of the Earthquake
150,000 Gold
Effects : +13% Poison Damage
20 Piercing Damage
+18 Dexterity
+14% Attack Speed
+1 random completion bonus
Required Lvl : 35
Appearance : Two green quills on a black and orange background.
----------
ETHEREAL VEIL
=============
Requirements : Incarnation of the Djed of Osiris
Incarnation of the Chill of Tartarus
Incarnation of the Iron Will of Ajax
500,000 Gold
Effects : +20% Cold Damage
65 Cold Damage
100% Reduced Entrapment Duration
100% Skill Disruption Protection
+50 Dexterity
+50 Damage to Undead
+1 random completion bonus
Required Lvl : 45
Appearance : A light golden orb with a misty green centre.
5
----------
LEAFSONG
========
Requirements : Essence of the Golden Fleece
Pristine Plumage
Scroll of Arcane Power
75,000 Gold
Effects : 20% Poison Resistance
+30 Energy
+35 Defensive Ability
-6% Energy Cost
+1 random completion bonus
Required Lvl : 15
Appearance : An orange orb with a black musical note in the centre, resting
on a green leaf.
----------
MAIDEN'S KISS
=============
Requirements : Incarnation of Artemis' Bowstring
Incarnation of the Ankh of Isis
Incarnation of Guan-Yu's Grace
500,000 Gold
Effects : 35 Piercing Damage
+200% Health Regeneration
+35 Offensive Ability
+45 Defensive Ability
+15% Attack Speed
9% Chance to Dodge Attacks
+1 random completion bonus
Required Lvl : 45
Appearance : An orange orb with a red female face (side-on) looking to the
right.
----------
MOLTEN ORB
==========
Requirements : Essence of Prometheus' Flame
Boar Hide
Rigid Carapace
75,000 Gold
Effects : 11 Damage
36 Burn Damage over 3.0 Seconds
+6% Fire Damage
6% Damage Resistance
5% Fire Resistance
+1 random completion bonus
Required Lvl : 5
Appearance : An orange orb with flames and molten lava inside it.
----------
NEXUS OF INSANITY
=================
Requirements : Embodiment of Set's Betrayal
Embodiment of Amun-Ra's Glory
Embodiment of the Djed of Osiris
150,000 Gold
Effects : +10% Damage
33.0% Chance of 30 Piercing Retaliation
+40 Health
+40 Energy
+40 Damage to Undead
+1 random completion bonus
Required Lvl : 40
Appearance : An orange sphere with an atomic symbol at its centre.
----------
PALE MOON
=========
Requirements : Essence of Zeus’ Thunderbolt
Turtle Shell
Scroll of the Storm Witches
75,000 Gold
Effects : 6% Lightning Damage
8 Lightning Damage
+15 Intelligence
+1 random completion bonus
Required Lvl : 10
Appearance : An orange globe with a moon in the center
----------
PHYLACTERY OF SHADOWS
=====================
Requirements : Embodiment of Dionysus' Wineskin
Epic Bat Fang
Epic Spectral Matter
150,000 Gold
Effects : +15% Poison Damage
33 Life Leech over 3.0 Seconds
54 Energy Leech over 2.0 Seconds
7% Damage Resistance
30% Life Leech Resistance
+1 random completion bonus
Required Lvl : 35
Appearance : A yellow sphere with a dark, steely-grey 3d cube inside it.
----------
RAVEN'S SHADOW
==============
Requirements : Embodiment of Archimedes' Mirror
Epic Turtle Shell
Greater Scroll of the Djinn
150,000 Gold
Effects : +20% Poison Damage
20% Pierce Resistance
45% Stun Resistance
+12% Shield Block
14.0% Chance of 50% Damage Reflected
+1 random completion bonus
Required Lvl : 40
----------
RAZOR CLAW
==========
Requirements : Essence of Set's Betrayal
Lupine Claw
Scroll of the Stalwart Alliance
75,000 Gold
Effects : +5% Pierce Damage
15 Piercing Damage
33.0% Chance of 25 Piercing Retaliation
+5% Attack Speed
+1 random completion bonus
Required Lvl : 20
Appearance : An orange sphere with a large orange and burnt orange pawprint
inside. The pawprint has, slightly unusually, FIVE clawed
toes.
----------
SCROLL OF ONEIROS
=================
Requirements : Essence of Dionysus' Wineskin
Spectral Matter
Demon's Blood
75,000 Gold
Effects : 40 Energy Leech over 2.0 Seconds
+10% Sleep Damage
4% Damage Resistance
20% Vitality Damage Resistance
25% Stun Resistance
+1 random completion bonus
Required Lvl : 5
Appearance : An orange sphere with a white scroll within.
----------
SHROUD OF ETERNAL NIGHT
=======================
Requirements : Essence of the Valor of Achilles
Bat Fang
Venom Sac
75,000 Gold
Effects : 10 Damage
21 Poison Damage over 3.0 Seconds
40 Energy Leech over 2.0 Seconds
10 Piercing Damage
20% Vitality Damage Resistance
25% Stun Resistance
+60 Health
+10% Attack Speed
+1 random completion bonus
Required Lvl : 10
Appearance : An orange globe with a clear night's sky in the center
----------
SILVER HEART
============
Requirements : Incarnation of the Jade Emperor's Serenity
Incarnation of Persephone's Tears
Divine Scroll of the Arrow Dancer
500,000 Gold
Effects : +15% Cold Damage
+15% Lightning Damage
45% Lightning Resistance
45% Poison Resistance
+100 Less Damage from Undead
+100 Less Damage from Demons
+1 random completion bonus
Required Lvl : 45
Appearance : A light orange sphere with a black and silver heart in the
centre.
----------
SKYFIRE PENDANT
===============
Requirements : Essence of Zeus' Thunderbolt
Mechanical Parts
Spectral Matter
****-** Gold
Effects : +7% Lightning Damage
10 Lightning Damage
6 Vitality Damage
+4% Total Speed
+1 random completion bonus
Required Lvl : 15
Appearance : Orange sphere with blue sky inside, and a pendant on a chain
dangling in its centre.
----------
SONG OF THE SERPENT
===================
Requirements : Essence of the Udjat of Horus
Rigid Carapace
Scroll of Elemental Shielding
75,000 Gold
Effects : +6% Poison Damage
14 Armour
18% Pierce Resistance
25% Poison Resistance
15.0% Chance of 30 Poison Retaliation over 3.0 Seconds
+1 random completion bonus
Required Lvl : 20
Appearance : An orange orb with a green serpent in it - its tail at the
top, and its head at the bottom.
----------
SPIRIT BLIGHT
=============
Requirements : Embodiment of Hecate's Crescent
Epic Venom Sac
Greater Scroll of Unbroken Fortitude
150,000 Gold
Effects : 36 Poison Damge over 3.0 Seconds
+25% Vitality Damage
+60 Energy
+95% Energy Regeneration
+1 random completion bonus
Required Lvl : 35
----------
STAR HEART
==========
Requirements : Essence of Prometheus' Flame
Bat Fang
Scroll of the Warrior's Song
75,000 Gold
Effects : +4% Elemental Damage
30 Burn Damage over 3.0 Seconds
4% Elemental Resistance
+4% Total Speed
+1 random completion bonus
Required Lvl : 10
Appearance : An orange-and-red orb with a red-and-orange star in the centre.
----------
SUMMONER'S TOTEM
================
Requirements : Embodiment of the Ankh of Isis
Epic Hag's Skin
Epic Lupine Claw
150,000 Gold
Effects : +6% Pierce Damage
+15 Fire Damage
25 Piercing Damage
+15 Dexterity
+50% Health Regeneration
+1 random completion bonus
Required Lvl : 40
Appearance : An orange sphere with a purple banner inside.
----------
SUNSTONE
========
Requirements : Essence of the Domain of the Dragon-Kings
Essence of the Monkey King's Trickery
Raptor Tooth
75,000 Gold
Effects : +10% Damage
+10% Fire Damage
+10% Vitality Damage
25% Fire Resistance
25% Skill Disruption Protection
+1 random completion bonus
Required Lvl : 25
Appearance : An orange sphere with a sun inside.
----------
THUNDERFIST
===========
Requirements : Incarnation of Zeus' Thunderbolt
Incarnation of Yen-Lo-Wang's Bloodletting
Incarnation of the Rage of Ares
500,000 Gold
Effects : 108 Bleeding Damage over 3.0 Seconds
+9% Bleeding Damage
+15% Lightning Damage
90 Energy Leech over 3.0 Seconds
18-45 Lightning Damage
20.0% Chance of 5.0 second(s) of Skill Disruption
+1 random completion bonus
Required Lvl : 45
Appearance : An orange orb with a raised, clenched fist in the centre. The
fist emanates several beams of light, like it is clutching
something made of light ... or maybe ... thunder !?!?!
----------
TONGUE OF FLAME
===============
Requirements : Incarnation of Prometheus' Flame
Legendary Pristine Plumage
Divine Scroll of Armageddon
500,000 Gold
Effects : 90 Burn Damage over 3.0 Seconds
+15% Fire Damage
+15% Lightning Damage
40% Poison Resistance
+14% Intelligence
+10% Energy
+1 random completion bonus
Required Lvl : 45
----------
TOME OF TRANSFIGURATION
=======================
Requirements : Embodiment of the Udjat of Horus
Epic Vile Ichor
Greater Scroll of Vampirism
Effects : +15% Elemental Damage
10 Elemental Damage
25 Armour
+35 Strength
+25 Intelligence
+10% Attack Speed
+1 random completion bonus
Required Lvl : 40
Appearance : A book at the centre of a purple and cream vortex of energy.
----------
TOUCH OF THE FOOL
=================
Requirements : Essence of the Golden Fleece
Boar Hide
Scroll of the Breaking Wheel
75,000 Gold
Effects : 15 Armour
50% Skill Disruption Protection
+10% Energy
+30% Casting Speed
-5% Energy Cost
+1 random completion bonus
Required Lvl : 15
Appearance : A yellow orb with a hand pointing a finger inside it. The
fingertip of that finger is green.
----------
WRAITHGUARD
===========
Requirements : Essence of Archimedes' Mirror
Bat Fang
Scroll of the Ice Nova
75,000 Gold
Effects : 18 Life Leech over 3.0 Seconds
7% Vitality Damage Resistance
12% Chance of 50% Damage Reflected
+20 Offensive Ability
+1 random completion bonus
Required Lvl : 5
Appearance : A heraldic shield featuring a skull, emanating with green
light.
----------
===== ===== ===== /\ ===== ===== =====
¦ / ¦ . ¦ ¦ _/ ¦ ¦ ¦ ¦ ¦ _/ ¦ . ¦
¦ ¦ ¦ -- ¦ ¦ ¦ ¦ -. .- ¦ ¦ ¦ --
¦ ¦ ¦ \ ¦ - ¦ ¦ ¦ ¦ ¦ - ¦ \
¦ ¦-. ¦ \ ¦ ¦_ ¦ ¦¦ ¦ ¦ ¦ ¦ ¦_ ¦ \
¦ ¦ ¦ ¦\ \ ¦ \ ¦ ¦¦ ¦ ¦ ¦ ¦ \ ¦ ¦\ \
=== ¦ == == ===== == == === ===== == ==
/¦
===
ARCANE MIRROR
=============
Requirements : Silver Heart
Phylactery of Shadows
Incarnation of Archimedes' Mirror
750,000 Gold
Effects : 100% Life Leech Resistance
100% Energy Leech Resistance
15.0% Chance of 50% Damage Reflected
+22% Energy Regeneration
"Mirror Wall" (Activated upon taking damage)
A protective barrier appears around the player, reflecting
enemies' spells back at them for a duration.
12.0 Second Duration
150% Damage Reflected
+1 random completion bonus
Required Lvl : 45
Appearance : A blue sphere with a silver mirror in the centre. The mirror
faces towards the viewer and at an angle to the left, and has
a green centre to it.
----------
BLOOD GEM
=========
Requirements : Razor Claw
Emerald Quill
Cinderbolt
500,000 Gold
Effects : +10% Pierce Damage
40 Piercing Damage
33.0% Chance of 32 Piercing Retaliation
+6% Attack Speed
+1 to all skills in Hunting Mastery
"Blood Boil" (Activated on Low Health)
Makes the blood boil within the veins of all nearby
opponents, wounding them and magically replenishing
the player's own life at the same time.
6.0 Meter Radius
1170 Bleeding Damage over 2.0 Seconds
1000 - 1150 Vitality Damage
100% of Attack damage converted to Health
+1 random completion bonus
Required Lvl : 40
Appearance :
----------
BOOK OF DREAMS
==============
Requirements : Scroll of Oneiros
Shroud of Eternal Night
Scroll of the Sky's Rage
300,000 Gold
Effects : +10% Lightning Damage
+10% Electrical Burn Damage
+20% Sleep Damage
10% Damage Resistance
100% Sleep Resistance
50% Stun Resistance
+1 to all skills in Dream Mastery
+1 random completion bonus
Required Lvl : 25
Appearance :
----------
CONQUEROR'S MARK
================
Requirements : Ebony Globe
Jade Idol
Legendary Turtle Shell
750,000 Gold
Effects : 120 Bleeding Damage over 3.0 Seconds
16% Bleeding Resistance
40% Skill Disruption Protection
10% Chance to Dodge Attacks
-10% Energy Cost
+1 random completion bonus
Required Lvl : 45
Appearance :
----------
CRIMSON VIPER
=============
Requirements : Shroud of Eternal Night
Raven's Shadow
Epic Peng Claw
500,000 Gold
Effects : 15 - 35 Damage
+12% Pierce Damage
+20% Poison Damage
14% Poison Resistance
+1 to all skills in Rogue Mastery
"Serpent's Fang" (Activated upon taking damage)
Poisoned darts fire outward from the player in all
directions.
12 Projectile(s)
200 Bleeding Damage over 2.0 Seconds
200 Poison Damage over 2.0 Seconds
200 - 210 Piercing Damage
+1 random completion bonus
Required Lvl : 40
Appearance :
----------
DRAGONTONGUE
============
Requirements : Star Heart
Earthen Talisman
Greater Scroll of Vampirism
500,000 Gold
Effects : 60 Burn Damage over 3.0 Seconds
+13% Fire Damage
20 Armour
+26 Intelligence
+18 Defensive Ability
+1 to all skills in Earth Mastery
+1 random completion bonus
Required Lvl : 35
Appearance : A blue sphere with a coiled up black dragon in the centre. The
black dragon has a red tongue flicking out.
----------
DRUIDIC WREATH
==============
Requirements : Leafsong
Crystal Tear
Viny Growth
300,000 Gold
Effects : 25% Poison Resistance
+50% Health Regeneration
+45 Energy
+45 Offensive Ability
-8% Energy Cost
+1 to all skills in Nature Mastery
+1 random completion bonus
Required Lvl : 25
Appearance :
----------
ELEMENTAL RAGE
==============
Requirements : Tongue of Flame
Spirit Blight
Incarnation of Anubis' Wrath
750,000 Gold
Effects : +25% Elemental Damage
10% of Attack damage converted to Health
25% Elemental Resistance
+30% Energy Absorption from Attacks
"Elemental Chaos" (Activated upon taking damage)
Raw elemental forces of fire and ice are invoked, colliding
with each other in an explosion of terrific power.
12.0 Meter Radius
3300 Burn Damage over 2.0 Seconds
3300 Frostburn Damage over 2.0 Seconds
+1 random completion bonus
Required Lvl : 45
Appearance :
----------
EYE OF THE HEAVENS
==================
Requirements : Skyfire Pendant
Song of the Serpent
Tortured Soul
300,000 Gold
Effects : +10% Cold Damage
+10% Lightning Damage
10% Cold Resistance
10% Lightning Resistance
"Tidal Wave" (Activated on attack)
Smites your foes with three powerful jets of freezing water.
3 Projectiles
100.0% Chance to pass through enemies
280-300 Damage
400 Frostburn Damage over 2.0 Seconds
440-460 Cold Damage
50% Chance to Fumble attacks for 3.0 Seconds
+15% Damage to Demons
+1 random completion bonus
Required Lvl : 30
Appearance : A blue sphere with an eye in the centre. The eye has a blue
iris.
----------
FINAL BREATH
============
Requirements : Deathrattle
Phylactery of Shadows
Embodiment of the Djed of Osiris
500,000 Gold
Effects : +10% Damage
+15% Vitality Damage
30% Vitality Damage Resistance
+9% Attack Speed
+1 to all skills in Spirit Mastery
+38 Damage to Undead
+1 random completion bonus
Required Lvl : 40
Appearance : A blue sphere with a dark silver skull and crossbones inside.
----------
FURY OF THE AGES
================
Requirements : Amber Flask
Cinderbolt
Essence of the Shade of Hector
300,000 Gold
Effects : +16% Pierce Damage
10% Pierce Resistance
10% Poison Resistance
+5% Shield Block
+8% Attack Speed
+10% Chance to Avoid Projectiles
+1 random completion bonus
Required Lvl : 30
Appearance :
----------
GLORYBRINGER
============
Requirements : Effigy of the Panther
Silver Heart
Nexus of Insanity
750,000 Gold
Effects : 8% Elemental Resistance
-21% Dexterity Requirement for all Weapons
-21% Dexterity Requirement for Armour
+7% Increased Experience
+1 to all Skills
+28% Less Damage from Undead
+28% Less Damage from Demons
+1 random completion bonus
Required Lvl : 45
Appearance : A blue sphere with a Greek helmet inside. The helmet has red
plumage.
----------
HAND OF GAIA
============
Requirements : Leafsong
Jade Idol
Embodiment of the Shade of Hector
500,000 Gold
Effects : +13% Elemental Damage
+25 Defensive Ability
+15% Chance to Avoid Projectiles
-9% Energy Cost
+1 to all skills in Nature Mastery
+1 random completion bonus
Required Lvl : 40
----------
HEART OF EARTH
==============
Requirements : Sunstone
Molten Orb
Earthen Talisman
500,000 Gold
Effects : 30 - 60 Damage
+14% Fire Damage
25 Armour
30% Fire Resistance
+28 Defensive Ability
"Flame Strike" (Activated on attack)
Calls down flaming meteorites from the sky above.
2.0 Meter Radius
100 - 120 Damage
180 - 220 Burn Damage over 2.0 Seconds
190 - 210 Fire Damage
+1 random completion bonus
Required Lvl : 40
Appearance : A blue sphere with a red heart in the centre.
----------
KINGSLAYER
==========
Requirements : Song of the Serpent
Raven's Shadow
Embodiment of Archimedes' Mirror
500,000 Gold
Effects : 15 Damage
66 Bleeding Damage over 3.0 Seconds
9% Damage Resistance
40% Stun Resistance
+36 Strength
+1 to all skills in Warfare Mastery
+1 random completion bonus
Required Lvl : 35
Appearance :
----------
LIONHEART
=========
Requirements : Molten Orb
Tome of Transfiguration
Raven's Shadow
500,000 Gold
Effects : 15% Pierce Resistance
20% Poison Resistance
13.0% Chance of 50% Damage Reflected
+1 to all skills in Defense Mastery
"Lion's Roar" (Activated upon taking melee damage)
Let loose a mighty roar, greatly bolstering the combat
skills of the player and nearby allies for a short time.
10.0 Second Duration
10.0 Meter Radius
+50% Total Damage
+100.0 Health Regeneration per second
+150 Defensive Ability
+50% Attack Speed
50 Armor
+1 random completion bonus
Required Lvl : 35
----------
SHADOW VEIL
===========
Requirements : Deathrattle
Chaos Cube
Scroll of Frailty
300,000 Gold
Effects : 15 Damage
45 Poison Damage over 3.0 Seconds
+20 Dexterity
+30 Health
+18% Attack Speed
"Shadow Surge" (Activated upon taking melee damage)
A wave of pure darkness will blast outward from the player's
feet to wound all enemies in the vicinity.
5.0 Meter Radius
399 - 453 Damage
97 Vitality Damage
1.5 second(s) of Stun
+1 random completion bonus
Required Lvl : 30
Appearance :
----------
SOUL PRISM
==========
Requirements : Touch of the Fool
Sunstone
Essence of Yen-Lo-Wang's Bloodletting </pre><pre id="faqspan-15">
300,000 Gold
Effects : 66 Bleeding Damage over 3.0 Seconds
+15% Vitality Damage
25% Fire Resistance
+100 Health
-8% Energy Cost
"Necromancy" (Activated upon taking damage)
Summons forth three undead warriors to defend the player.
6 Summon Limit
Skeletal Minion Attributes:
Life Time 30.0 Seconds
850 Health
Skeletal Minion Abilities:
140-155 Damage
+1 random completion bonus
Required Lvl : 25
Appearance : A Blue Sphere with a light blue gemstone inside, and a ray
of blue light passing horizontally behind it
----------
SPHERE OF ETERNITY
==================
Requirements : Chaos Cube
Nexus of Insanity
Epic Bat Fang
500,000 Gold
Effects : +15% Damage
36 Life Leech over 3.0 Seconds
+20% Sleep Damage
30% Stun Resistance
+1 to all skills in Dream Mastery
+50 Damage to Undead
+1 random completion bonus
Required Lvl : 35
Appearance :
----------
=== === === === === == == =====
¦ \ ¦ ¦ \ ¦ ¦ / ¦ ¦ ¦ \¦ ¦ ¦ _/
¦ \ \ ¦ ¦ \ ¦ ¦ / ¦ ¦ ¦ ¦ ¦ ¦
¦ , ¦¦ ¦ \\ // ¦ ¦ ¦ ¦\ ¦ ¦ -
¦ / / ¦ ¦ \ . / ¦ ¦ ¦ ¦ ¦ ¦ ¦ ¦_
¦ / ¦ ¦ \ / ¦ ¦ ¦ ¦ ¦ ¦ ¦ \
=== === = === == == =====
BLOOD OF ARES
=============
Requirements : Lionheart
Fury of the Ages
Embodiment of the Valor of Achilles
1,000,000 Gold
Effects : 25 Damage
+20% Damage
+40% Bleeding Damage
+40 Offensive Ability
+15% Attack Speed
"Tears of Blood" (Activated upon taking damage)
Bloodfire tears of the god Ares rain down upon the Earth,
causing bleeding and fire damage on all who are struck.
8.0 Second Duration
8.0 Meter Radius
975 Bleeding Damage per Second
176 - 198 Burn Damage over 2.0 Seconds
+1 random completion bonus
Required Lvl : 50
Appearance :
----------
CROSIER OF OSIRIS
=================
Requirements : Soul Prism
Final Breath
Epic Spectral Matter
1,000,000 Gold
Effects : 50 Energy Leech over 2.0 Seconds
100% Vitality Damage Resistance
25% Energy Leech Resistance
"Soul Drain" (Activated on attack)
Attempts to drain the soul of an enemy, doing enough damage
to kill all but the strongest foes, and delivering their
health to the player.
100% Reduction to Enemy's Health
1000 Vitality Damage
500% of Attack damage converted to Health
+30% Damage to Undead
+50 Less Damage from Undead
+1 random completion bonus
Required Lvl : 50
Appearance : A purple sphere with a crosier in it. The crosier emits a
green glow.
----------
DEMETER'S BOUNTY
================
Requirements : Druidic Wreath
Hand of Gaia
Epic Viny Growth
1,000,000 Gold
Effects : 35% Poison Resistance
+85% Health Regeneration
-16% Energy Cost
"Demeter's Bounty" (Activated upon taking damage)
Quickly restores the player to full health and energy.
15.0 Second Duration
+50.0 Health Regeneration per second
+400% Health Regeneration
+50.0 Energy Regeneration per second
+400% Energy Regeneration
+50 Less Damage from Beasts
+50 Less Damage from Beastmen
+1 random completion bonus
Required Lvl : 50
Appearance :
----------
EYE OF RA
=========
Requirements : Dragontongue
Heart of Earth
Elemental Rage
2,000,000 Gold
Effects : +15% Damage
+60% Fire Damage
60% Fire Resistance
"Eye of Ra" (Activated on low health)
Blankets the area around you with scorching flames that hurt
only enemies.
15.0 Second Duration
6.0 Meter Radius
800 Fire Damage
+35% Damage to Insectoids
+35% Less Damage from Insectoids
+1 random completion bonus
Required Lvl : 55
Appearance :
----------
GOLDEN EYE OF SUN WUKONG
========================
Requirements : Crimson Viper
Shadow Veil
Symbol of the Polymath
2,000,000 Gold
Effects : +25% Pierce Damage
+10% Elemental Damage
+40% Poison Damage
+50% Stun Damage
+15% Total Speed
"Spirit Thief" (Activated upon taking damage)
Steals the energy of all enemies in the vicinity, harming
them for every bit of energy stolen.
10.0 Meter Radius
8000% Energy Drained (200% Energy Drained causes Damage)
+1 random completion bonus
Required Lvl : 55
Appearance :
----------
KNOT OF ISIS
============
Requirements : Druidic Wreath
Hand of Gaia
Embodiment of the Ankh of Isis
1,000,000 Gold
Effects : +30% Poison Damage
40% Poison Resistance
+150% Health Regeneration
+20% Chance to Avoid Projectiles
-10% Energy Cost
"Healing Cascade" (Activated on low health)
Restores the player and all nearby allies to full health.
1.0 Second Duration
15.0 Meter Radius
+10000.0 Health Restored
+1 random completion bonus
Required Lvl : 50
Appearance :
----------
IKON OF ZEUS
============
Requirements : Eye of the Heavens
Effigy of Skyfire
Elemental Rage
2,000,000 Gold
Effects : +30% Cold Damage
+60% Lightning Damage
+40% Stun Damage
60% Lightning Resistance
100% Stun Resistance
"Thunderstorm" (Activated upon taking damage)
Invokes a storm cloud above the player--even indoors--which
will rain down bolts of Zeus' lightning upon all enemies.
Affects up to 10 targets
6300 - 7700 Lightning Damage
+1 random completion bonus
Required Lvl : 55
Appearance :
----------
MARDUK'S TABLET OF DESTINY
==========================
Requirements : Final Breath
Soul Prism
Symbol of the Polymath
2,000,000 Gold
Effects : +40% Vitality Damage
+30% Life Leech
15% Elemental Resistance
+20% Intelligence
"Shield of Destiny" (Activated on low health)
Makes the player completely invulnerable to all forms of
damage for a short duration
10.0 Second Duration
300% Damage Absorption
300% Sleep Resistance
300% Stun Resistance
300% Reduced Entrapment Duration
300% Reduced Freeze Duration
300% Reduced Petrify Duration
300% Slow Resistance
+45 Damage to Magical
+1 random completion bonus
Required Lvl : 55
Appearance :
----------
POSEIDON'S NET
==============
Requirements : Eye of the Heavens
Effigy of Skyfire
Embodiment of Zeus' Thunderbolt
1,000,000 Gold
Effects : +15% Cold Damage
+15% Lightning Damage
25% Cold Resistance
25% Lightning Resistance
"Poseidon's Net" (Activated on low health)
Trap a large group of monsters with the power of
the sea god.
4.0 Second Duration
5.0 Meter Radius
800 - 900 Frostburn Damage per Second
-33$ Defensive Ability
+1 random completion bonus
Required Lvl : 50
----------
SIGIL OF BAST
=============
Requirements : Crimson Viper
Hand of Gaia
Incarnation of Li-Nezha's Guile
2,000,000 Gold
Effects : +18% Elemental Damage
+20% Strength
+20% Dexterity
"Avatar of Bast" (Activated on low health)
Summons the Avatar of Bast--a spectral Sabre Lion--to ravage
your enemies.
Avatar of Bast Attributes:
Life Time 30.0 Seconds
5000 Health
Avatar of Bast Abilities:
350 - 371 Damage
+40% Damage to Beasts
+40% Damage to Beastmen
+100 Less Damage from Beasts
+100 Less Damage from Beastmen
+1 random completion bonus
Required Lvl : 55
Appearance :
----------
STAR OF ISHTAR
==============
Requirements : Tyrant's Fist
Lionheart
Conqueror's Mark
2,000,000 Gold
Effects : 5.0% Chance of 70% Slowed for 3.0 Seconds
15% Damage Resistance
25% Elemental Resistance
+20% Strength
+20% Dexterity
"Scimitar Spirits" (Activated on low health)
Summons an invisible spirit armed with scimitars to fight
for the player.
Scimitar Spirit Attributes:
Life Time 30.0 Seconds
1183 Health
551 Energy
Scimitar Spirit Abilities:
406 - 431 Damage
+1 random completion bonus
Required Lvl : 55
Appearance :
----------
TALISMAN OF THE JADE EMPEROR
============================
Requirements : Kingslayer
Conqueror's Mark
Incarnation of the Jade Emperor's Serenity
2,000,000 Gold
Effects : 50% Elemental Resistance
+15% Strength
+50 Defensive Ability
-25% Recharge
"Jade Emperor's Mau-D'uyhn" (Activated on Attack)
Makes the player and all allies immune to elemental damage
and ranged weaponry for a duration.
10.0 Second Duration
15.0 Meter Radius
+100% Chance to Avoid Projectiles
300% Elemental Resistance
+1 random completion bonus
Required Lvl : 55
Appearance :
----------
==============================================================================
C H A P T E R T E N CHAPTER 10
==============================================================================
S H R I N E S
==============================================================================
There are a fair few Shrines that you will encounter in the wilderness in
Titan Quest and Immortal Throne - some of them have one-off benefits, such as
immediately recharging your health - some of them give you time-based bonuses,
such as increased experience from enemy kills for a given period of time, or
increased combat effectiveness for a given time window.
Here is a list of shrines and descriptions of their effects :-
Battle Marker (Orange Glow)
Attack speed and damage are increased. This is arguably the greatest
of the shrines in Titan Quest, as it LITERALLY transforms your character
into a Juggernaut. ALL your combat skills go through the roof and you will
DECIMATE large groups of enemies with relative ease. Rate of Fire, chance
of striking accurately, inflicting criticals, the WORKS. It's all good !!
Energizing Shrine (White Glow - there is only one - on the Olympus Summit)
Infuses the player with arcane power, dramatically increasing energy
regeneration.
Frostbite Shrine (Light Blue Glow)
The player's weapon is infused with the essence of frost, slowing enemies
greatly and causing small amounts of damage. This is one of the best
shrines in the game as it DRAMATICALLY slows down your enemies, giving you
HUGE amounts of time to inflict MASSIVE amounts of damage upon them. It is
particularly good for ranged-attackers, and spellcasters. Once frosted up,
your enemies will continue to sustain small amounts of damage until the
effects of the frostbite wear off, or they die.
Regeneration Shrine (Purple Glow)
Creates a regenerative circle around the shrine that lasts for approx. 45
seconds. Standing within the radius of this circle causes your health and
energy bars to refill constantly for the duration of the shrine's effect,
making it a VERY good place to stage a combat-session, if you are able to.
Shrine of Experience (White Glow)
You have been granted great wisdom and acuity of mind, significantly
increasing how quickly you can gain experience.
Shrine of Healing (Red Glow)
Grants full restoration of a player's health
Shrine of Mastery (Yellow Glow)
Grants the player improved proficiency with all skills.
Shrine of Thorns (Green Glow)
Jagged thorns sprout from the player's body, damaging any enemies foolish
enough to attack.
==============================================================================
C H A P T E R E L E V E N CHAPTER 11
==============================================================================
H E R O M O N S T E R S
==============================================================================
Hero Monsters are what I would call Captains, if the game didn't already have
a dedicated term for them. They lead their lesser-ranking allies into combat,
but ALWAYS have powers that set them above and beyond their counterparts.
Very often Hero Monsters can prove tough opponents - tougher in some cases
even than the bosses, as you are never expecting to bump into a Hero Monster -
they just hang around and you meet up with them, pretty much by chance.
Where possible I have attempted to give a description of the Hero Monsters I
have encountered whilst playing, including what type of monster they are,
where I bumped into them, and what special powers they exhibited whilst I was
fighting them.
ACT ONE - GREECE
================
Blastfang
Type of Monster : Flaming Orange Cave Bat
Can be found in : Athens Catacombs - Level One
Attacks :-
Swooping Bite
Comments :-
VERY noticeable, and probably quite safe when flying around dark
country lanes at night, you will be under NO illusions when you are
facing THIS guy.
Bonelord, the
Type of Monster : Giant Skeletal Warrior
Can be found in : Athens
Attacks :-
Sword Swipe, Earthquake
Comments :-
This dude is MASSIVE !! He stands at least 2 if not 3 times the height
of your character ... WOW !!
Cadmus the Golem King
Type of Monster : Automatoi
Can be found in : Knossos Palace, Minoan Labyrinth
Attacks :-
Electrify Sword, Giant Swing (rotates upper torso), Sword Strike
Comments :-
Cadmus is a bit faster than his normal Automatoi counterparts, and has
GREAT range with his Giant Swing attack.
Fernos Charskin
Type of Monster : Fire Clan Satyr
Can be found in : Lower Delphi
Attacks :-
Comments :-
Hesperos the Flameforged
Type of Monster : Automatoi
Can be found in : Knossos Palace, Minoan Labyrinth
Attacks :-
Sword Strike, Spinning Strike (upper torso spins 360)
Comments :-
Hesperos isn't that tough a captain really. The first time you see his
spinning strike attack you are likely to think WOAH !! But aside from
that he should fall pretty quickly to your powers. Don't stand too close
to him when you deliver the final stroke, however, as he explodes in a
ball of flame that scatters to the surrounding area.
Kaj Notchblade
Type of Monster : Minotaur
Can be found in : Minoan Labyrinth
Attacks :-
Comments :-
Keleos the Forktongued
Type of Monster : Gorgon Archer
Can be found in : Minoan Labyrinth
Attacks :-
Comments :-
Roughneck
Type of Monster : Snapping Turtle
Can be found in : Phocian Swamp
Attacks :-
Bite
Comments :-
Thrydos Darksoul
Type of Monster : Wraith Spellcaster
Can be found in : The Ancient Tomb of Leucus
Attacks :-
Lightning Blast, Ternion Attack
Comments :-
This guy can RAPIDLY fire blasts of lightning from his staff, and is a
low-ranking Spirit Master, as he has access to the Ternion Attack and
Deathchill Aura Skills.
Warchief Otos
Type of Monster : Dark Satyr Brute
Can be found in : Boetia
Attacks :-
Onslaught
Comments :-
Warchief Otos has a degree of Warfare Mastery, and uses the Onslaught
skill to great effect in close-quarters combat. He is quite slow to
move, however, and falls afoul of archers and mages rather easily.
Xerkos the Betrayer
Type of Monster : Noxious Zombie
Can be found in : Knossos Palace
Attacks :-
Traps (can create up to 2 Rogue Traps simultaneously), War Wind, Sword
Strike, Mace Strike
Comments :-
Although INSANELY slow to move, Xerkos is adept at both Rogue and Warfare
Masteries, meaning he is able to attack (by traps) at range, and up close
with some nasty twin-weapon attacks. He is armed with a sword and a
mace, and can use both with good accuracy. Attack him at range to make
this fight MUCH easier.
ACT TWO - EGYPT
===============
Faceless One, the
Type of Monster : Dune Raider (Mounted Marauder)
Can be found in : Wadjet Canyons
Attacks :-
Spear Strike, Ring of Flame, Meteor Strike, Charge
Comments :-
The Faceless One is a master of the Earth School. Being mounted on the
back of a Hyena Beast gives him great speed meaning he can close the gap
between you, himself, and his cronies rapidly. Add to this his ability
to call down meteor strikes AND use a ring of flame, and you have a
decent fight on your hands. Strike him from afar if you are able, or
look to finish him quickly if you prefer up-close-and-personal. Just
watch out for the meteor strikes !! First one rock, then a PILE of
them ;)
Najja the Parched
Type of Monster : Dune Hero
Can be found in : Fayum Desert
Attacks :-
Comments :-
Nathifa the Unblemished
Type of Monster : Sandwing
Can be found in : Nile Floodplain
Attacks :-
Comments :-
Reshelf, Undying King of Nubia
Type of Monster : Zombie
Can be found in : Tomb of Ramses
Attacks :-
Comments :-
ACT THREE - THE ORIENT (AND MOUNT OLYMPUS)
==========================================
Cenon Stormborn
Type of Monster : Coastal Ichthian
Can be found in : Babylon Outskirts
Attacks :-
Fast Thunderball Attack, Mace Strike, Aura (either lightning or frost -
I cannot be certain, but it swirls around his feet).
Comments :-
Cenon Stormborn is not a particularly dangerous adversary. His
projectile attacks are fast, no doubt about that, but he himself is not
overly dangerous. Just keep light on your toes and he should fall
quickly.
Jun Shan, Warrior-Monk
Type of Monster : Tigerman
Can be found in : Chang'an Farmland
Attacks :-
Comments :-
Sargoth Manbane
Type of Monster : Dragonian Wrym-Mage
Can be found in : Jinghe River Valley
Attacks :-
Lightning, Thunderball (with 3 Concussive Blasts), Lightning Aura
around his feet, Mini-ball of Lightning
Comments :-
This guys rate of fire is EXTREMELY fast, making him difficult to
take on alone, let alone with his entourage. Best advice I can give
you is to slay his lesser minions and then take him on from a distance.
Avoid a strike, send one back, rinse, repeat, and he will fall to your
superior tactics.
Tarthon Na'Arak
Type of Monster : Dragonian
Can be found in : Shaanxi Province
Attacks :-
Comments :-
ACT FOUR - HADES
================
Aberkios of the Ashes
Type of Monster : Lost Soul
Can be found in : Ossuary of the Thesproti
Attacks :-
Summon 2 Albino Spiders (but doesn't have to wait for the last 2 to die
before he summons 2 more), Lightning Blast from Staff, Thunderball
Comments :-
Akhlys
Type of Monster : Keres
Can be found in : Upper City of Lost Souls, Dread Halls
Attacks :-
Ice Storm (rains HUGE hailstones down from the sky to crush you)
Comments :-
Akhlys is a Master of the Storm School, however her (for I assume it
is female) prefers to rely upon the ice-side of the school rather than
the lightning side. Her Ice Storm power is VERY dangerous so you should
keep moving at all times to avoid getting swatted ;)
Anaplekte
Type of Monster : Keres
Can be found in : Hades - Dark Grove, Lower City of Lost Souls,
City of Lost Souls
Attacks :-
Teleportation (Phantom Strike), Throw multiple Traps in VERY quick
succession
Comments :-
Anaplekte ROCKS - wherever you find her, she is always sure to give you
a satisfyingly difficult fight. She can use Phantom Strike to teleport
up to you, making her difficult to predict, and she can throw LOADS
of traps which fire massive amounts of bolts at you very, very quickly.
She is very dangerous - beware !!
General Yrrt'ik
Type of Monster : Formicid
Can be found in : Ampelian Caves
Attacks :-
Comments :-
Hekaline the Outcast
Type of Monster : Melinoe
Can be found in : Fourth Domain, Eronian Highlands
Attacks :-
Comments :-
Helike, Dark Temptress
Type of Monster : Empusa
Can be found in : Hecatean Agora
Attacks :-
Comments :-
Hilaera Stonerunner
Type of Monster : Lamia
Can be found in : Soronis
Attacks :-
Flaming Arrow, Throw Flaming Boulder, Meteor Shower, Claw strikes
Comments :-
A powerful archer who can attack at range or up-close and personal.
Hilaera Stonerunner is an Earth Mistress, but fortunately she does
not have a huge amount of health.
Ironskin
Type of Monster : Hydradon Scorcher
Can be found in : Tsakonian Ruins
Attacks :-
Throw 4 Flaming Boulders, Breathe Flame, Single-Claw Strike, Bite
Comments :-
Mehrdad Coralskin
Type of Monster : Ichthian
Can be found in : Jingyang Woods
Attacks :-
Comments :-
Minkah
Type of Monster : Nightstalker
Can be found in : Den of the Anteok
Attacks :-
Phantom Strike, Dual Wield, Earthquake-strike
Comments :-
A giant, red-faced Nightstalker, Minkah is a very quick and powerful
character to do battle against, not in the least because he has the
ability to use the Dream School's Phantom Strike power to GREAT effect
during combat. He is a master of both Dream and Warfare Schools,
making him a Harbinger.
Nikias, Betrayer of Sparta
Type of Monster : Lost Soul
Can be found in : Ossuary of the Thesproti, Great Hall of Propontis
Attacks :-
EXTREMELY powerful Flurry of Knives, Ward of Crippling, Onslaught,
Sword Strike
Comments :-
Since we know Nikias has the Flurry of Knives Power (which is by far
his most deadly attack), we know he is a Level 32 Rogue. He is also
a Master of the Warfare School, making him an Assassin, which is in
keeping with his name after all. He is VERY slow to move, but do NOT
underestimate his power, as he can fell even tough heroes at range with
those knives of his. Just keep him at a distance and wear him down.
Nosos
Type of Monster : Keres
Can be found in : Upper Daemon Camp
Attacks :-
Comments :-
Queen K'kiitr
Type of Monster : Pale Formicid
Can be found in : The River Styx
Attacks :-
Comments :-
Queen Ycht'ssk'l
Type of Monster : Formicid
Can be found in : Ampelian Caves
Attacks :-
Comments :-
Sentinel Nok-hai, Guardian of the Necklace
Type of Monster : Machae
Can be found in : Second Domain, Fourth Domain
Attacks :-
Triple Poison Arrow, Spirit Nova (Shoots blasts of Spirit Energy (or
it COULD be poison, but I believe it is spirit) out in multiple
directions).
Comments :-
Sentinel Nok-hai is like greased lightning. His bow-and-arrow attacks
are VERY quick, and the additional poison damage he does can have you
on your knees in short order. Take out his allies first, and duck and
weave to avoid the mainstay of his attacks. Once he is on his own,
he is considerably easier to defeat.
Spinebreaker
Type of Monster : Pale Karkinos
Can be found in : Stygian Marsh
Attacks :-
Throw two sets of four flaming boulders (one far, one near), claw-snap
Comments :-
Spinebreaker is quite a quick, large, orange Pale Karkinos with blue
eyes and a SERIOUS chip on his shoulder. His primary attack is to
hurl two sets of four flaming boulders at you in quick succession - the
first set goes far, the second close. For a time I thought he was able
to summon a Pale Karkinos Sand Runner to aid him, but I think that was
just a random wandering enemy that sauntered by as it only happened
once. He is NOT insanely difficult, and cannot go further than a
certain distance from his starting position, so it should be quite
reasonable to take him out.
Thane Kaorak
Type of Monster : Troglodyte
Can be found in : Cave of Whispers, Erebus
Attacks :-
Comments :-
Theophrastos the Plump
Type of Monster : Shadow Skeleton
Can be found in : Epirus
Attacks :-
Comments :-
Tisiphone the Avenger
Type of Monster : Fury
Can be found in : Erebus, Delian Meadows
Attacks :-
Claw-strike, Dream Projectile (straight line), Dream Nova (reasonable
radius attack around Tisiphone)
Comments :-
Tisiphone is a Dream Master, but beyond that he is NOT that much more
powerful than his kin - he does not seem to use the standard wall of
sound attack that the Matriarchs use - instead he relies on his dream
powers, which are considerable but not really sufficient for you to
risk losing sleep over ;)
Tribal Shaman Schlilsh Toadskin
Type of Monster : Pale Anouran
Can be found in : Stygian Marsh
Attacks :-
Comments :-
Tribal Shaman Wood-Ear
Type of Monster : Anouran
Can be found in : Tsakonian Ruins
Attacks :-
Comments :-
Warrag Hammerfist
Type of Monster : Troglodyte
Can be found in : Cave of Whispers, Dread Halls
Attacks :-
Comments :-
==============================================================================
C H A P T E R T W E L V E CHAPTER 12
==============================================================================
S I D E Q U E S T S
==============================================================================
Whilst we have gone through each of the side quests in the game as a part of
my main walkthrough, in an attempt to be helpful so that you don't have to go
trawling through the whole guide just to find what you're looking for, I have
made a brief summary of each one here, together with confirmation of what
rewards I got for completing each mission.
I hope you find them useful.
==============================================================================
I M P O R T A N T N O T E B E F O R E W E B E G I N . . .
==============================================================================
I have been contacted by Jokerfiend, who has suggested I point out to all
you lovely peeples out there that the rewards you receive (in terms of the
ITEMS you get) are not fixed - a couple of times he has found legendary items
on Epic Difficulty where I have not, so please keep this in mind when you
are adventuring. Just because I found something plop, that isn't to say you
won't find something AMAZING ;) Thanks Jokerfiend !!
==============================================================================
SIDE QUESTS
ACT ONE - GREECE
================
HELOS
Monstrous Brigands
Speak with Nicostratus in the Village of Helos, and then find and free
his friend Tellis from the cave just off the main road leading out of
Helos, where you will find him a prisoner of a gang of Satyr.
- Normal = Random Yellow Ring, 300 XP
- Epic = Random Yellow Ring, 25000 XP
- Legendary = Random Yellow Ring, 55000 XP
The Cornered Man
Rescue Lycus, the cornered man, from his assailants in the log camp just
off the roadside in the Laconia Woods.
- Normal = 300 XP, 1500 GP
- Epic = 27500 XP, 60000 GP
- Legendary = 60000 XP, 600000 GP
Medicines Waylaid
Speak with Euphadimus on the main road leading to Tegea, and then clear
the route leading to Tegea so that he may pass with the precious
medicines he carries in his cart.
- Normal = 350 XP, Lesser Health Potion x 3, Health and Energy
Restored
- Epic = 27500 XP, Superior Health Potion x 3, Health and Energy
Restored
- Legendary = 60000 XP, Divine Health Potion x 3, Health and Energy
Restored
SPARTA
The Lost Dowry
Retrieve Theages' daughter's dowry necklace from a group of monsters in
the cave nearby ... the SWINE !!
- Normal = Random Essence, 400 XP
- Epic = Random Embodiment, 30000 XP
- Legendary = Random Incarnation, 65000 XP
The Ancient of War
Find Hippias on his rock to the east of the Spartan War-Camp, and deliver
news of his safety to Euthycles in the Spartan War-Camp.
- Normal = 2000 GP, 500 XP
- Epic = 70000 GP, 25000 XP
- Legendary = 650000 GP, 60000 XP
The Poisoned Spring
Purge the Fetid Lair behind the Naiad to the west of Tegea, in order to
restore the town's water supply to a consumable state.
- Normal = +75 HP, 1500 XP, Health and Energy Restored
- Epic = +150 HP, 30000 XP, Health and Energy Restored
- Legendary = +200 HP, 70000 XP, Health and Energy Restored
MEGARA
Skeleton Raiders
Kill the three Prince-brothers Polypas (Prince of the Blade), Aristeus
(Prince of the Storm), and Menon (Prince of the Bow) at Old Eleusis, to
liberate the City of Megara from their constant assaults. Old Eleusis
lies to the north of Megara.
- Normal = 2500 XP
- Epic = 35000 XP
- Legendary = 75000 XP
News of a Shipwreck
At the south-western edge of the Halcyon Coast, the treasure cargo of a
ship bound for Athens has washed ashore, and is RIPE for the taking ...
- Normal = 1000 XP
- Epic = 18000 XP
- Legendary = 40000 XP
DELPHI
A Proper Offering
A long quest which you pick up from General Leonidas at the Spartan War-
Camp, and which sees you travel all the way to the top of the Sacred
Olive Grove high atop the Helicos Pass north-west of the Village of
Ambrossos.
- Normal = +5% Permanent Lightning Resistance
- Epic = +7% Permanent Cold Resistance
- Legendary = +5% Permanent Elemental Resistance
A Master Blacksmith
The Master Blacksmith Termerus has set up shop away from prying eyes
at the bridge that leads to the Crisaeos Falls. Find him, and take full
advantage of his skills, as they may benefit you in the DARK times ahead.
- Normal = 1500 XP
- Epic = 20000 XP
- Legendary = 55000 XP
Goods Abandoned
Asimides the Merchant has had to abandon his goods outside Ambrossos, as
he foolishly set up his camp for the night right beside a Skeletal
hidey-hole !! Fortunately the dullard isn't concerned with who picks
up his loot (it's to the south-west of the Olive Grove).
- Normal = 1000 XP
- Epic = 18000 XP
- Legendary = 40000 XP
The Good Centaur
The Centaur Chiron stands in a field of wheat at the northern border of
the Ambrossos Farmlands, SERIOUSLY unhappy about the theft of his bow
by the Maenad Priestess Ino. Ino has fled into the nearby cave, and
should be taught a SERIOUS lesson in manners.
- Normal = 2 Attribute Points, 3000 XP
- Epic = 2 Attribute Points, 35000 XP
- Legendary = 2 Attribute Points, 80000 XP
The Grieving Widow
Iodame mourns the loss of her husband as he fell defending Delphi from
the first batch of its assailants, at the hands of Cepharis, Master of
the Flame - a Boarman that lives in the Parnassus Caves, to the north-
east of Delphi, up a biiiiiiiiiiiiiiiig hill. The boarman is in the
second (back) section of the cave, in the north-western corner.
- Normal = 3000 XP
- Epic = 35000 XP
- Legendary = 85000 XP
ATHENS
Spartans Lost
Isarchus needs help in finding a set of Spartan Scouts that are late in
delivering their report to the rest of the war party. They are lost in
the Athens Marsh. Find them and then report back to Isarchus.
- Normal = 4000 XP
- Epic = 37500 XP
- Legendary = 85000 XP
Trapped in the Ruins
Pausanias and his Spartan contingent have trapped a Giant Limos in a ruin
and require some aid in despatching the beast to Hades.
- Normal = 3000 XP, Random Yellow Magic Weapon
- Epic = 35000 XP, Random Yellow Magic Weapon
- Legendary = 85000 XP, Random Yellow Magic Weapon
KNOSSOS
Xanthippus the Healer
Xanthippus the Healer has been up in the hills above the Village of
Herakleion since the Telkine passed through, and they villagers really
need him to return so that he can tend to those of them that fell to a
virulent plague fog that followed the Telkine as he passed through.
Find Xanthippus in the hills on Tritons Ridge by heading due south-east
of the rebirth fountain that marks the entrance to Tritons Ridge, and
then recover his staff from the cave nearby.
- Normal = Greater Energy Potion x 5, Greater Health Potion x 5,
Health and Energy Restored, 5000 XP
- Epic = Superior Energy Potion x 5, Superior Energy Potion x 5,
Health and Energy Restored, 40000 XP
- Legendary = Divine Energy Potion x 5, Divine Health Potion x 5,
Health and Energy Restored, 90000 XP
The Undead Tyrant
Leucus I was a tyrant who took the Throne of Knossos by power MANY many
years ago. His reign of tyranny came to an abrupt end when he was
poisoned by one of his servants, and now it seems his souls has come
back from the dead and taken up residence in some ancient ruins due
north of Xanthippus (south-east and then north of the rebirth fountain
that marks the entrance to Tritons Ridge). Find him and DESTROY him to
avoid history repeating itself ;)
- Normal = 6000 XP
- Epic = 40000 XP
- Legendary = 95000 XP
ACT TWO - EGYPT
===============
RHAKOTIS
The Family Heirloom
Explore the City of Rhakotis to find a Jackalman Elite Berzerker with
a glow around his feet. Bring the Family Sword of Anherru which he
drops when you slay him to Anherru, the warrior adjacent to the rebirth
fountain in Rhakotis.
- Normal = Random Essence, 6000 XP
- Epic = Random Embodiment, 40000 XP
- Legendary = Random Incarnation, 95000 XP
LOWER NILE
The Beast of Legend
Slay the Beast of Legend - an Ancient Scorpos - in a cave to the north-
east of the Wadjet Canyon.
- Normal = 2 Skill Points, 7500 XP
- Epic = 2 Skill Points, 40000 XP
- Legendary = 2 Skill Points, 95000 XP
Plight of the Nile Farmers
Kill all the Reptilian Warriors that are marching through the marshes
to the south-east of the Village of Sais on their way to eat the kids
and steal the livestock (or maybe the other way around !!) in the
village proper.
- Normal = 8000 XP, Random Monster Charm
- Epic = 40000 XP, Random Monster Charm
- Legendary = 100000 XP, Random Green Magic Ring
A Promethean Surrounded
In an encampment further to the north of the Old Kingdom Ruins, Inen
of the Order of Prometheus is pinned down by enemies, and needs a bit
of a helping hand.
- Normal = 7500 XP, Random Green Magic Necklace
- Epic = 38000 XP, Random Yellow Magic Amulet
- Legendary = 95000 XP, Random Yellow Magic Charm
MEMPHIS
Lowest of the Low
The slums around Memphis have been taken over by Shadowstalker demons,
and the poor inhabitants of this ramshackle area are too afraid to go
back to their low-grade homes. Purge their homes of this infestation
that they may go back.
- Normal = Random Yellow Magic Ring, 8500 XP
- Epic = Random Yellow Magic Ring, 40000 XP
- Legendary = Random Yellow Magic Ring, 100000 XP
The Missing Brother
Tathari in Memphis is searching for her brother Unas, who has gone off
on some fool's errand to try and get their family's ancestral guardian
to defend them against the hordes of the Telkine. Find Unas in a crypt
to the east of the Portal Shrine in Giza, and put an end to his FOOLISH
plan.
- Normal = 10000 XP, Random Green Magic Ring
- Epic = 42000 XP, Random Yellow Magic Ring
- Legendary = 100000 XP, Random Yellow Magic Ring
The High Priest's Request
Zazamankh is afraid that the people are losing their faith in the ruling
classes ability to lead them in these times of turmoil and, to that end,
he wants you to find and bring him the Staff of Khufu from the Tomb of
Khufu, as a gesture of their ongoing power and stability in these dark
times.
- Normal = Random Essence, 9000 XP
- Epic = Random Embodiment, 42000 XP
- Legendary = Random Incarnation, 100000 XP
GIZA
Khufu's Curse
Slay Sadiki, Champion of Anubis in the Tomb of Khufu before he and his
minions can defile the Sarcophagus of the Pharaoh.
- Normal = 12500 XP
- Epic = 50000 XP
- Legendary = 125000 XP
FAYUM OASIS
A Hidden Treasure
Find the treasure of which Asri spoke, in the tomb to the north-west of
where you fight Iznu in the Caravan Woes quest (just outside the Fayum
Oasis).
- Normal = 65000 XP
- Epic = 30000 XP
- Legendary = 65000 XP
Caravan Woes
Just north-west of the Fayum Oasis is Iznu and his band of Dune Raider
SCUMS. They have been attacking caravans going to and from the Fayum
Oasis, and it is having a devastating effect on trade in the area.
They must be stopped ... the little sh!ts ...
- Normal = 12000 XP
- Epic = 45000 XP
- Legendary = 100000 XP
THEBES
The Corrupted Priest
Neb-kemi, the Head Priest of the Order that resides in the City of
Thebes in Egypt, lost BADLY in his battle with Aktaios, the Egyptian
Telkine. For his defiance, Aktaios turned Neb-kemi into a deformed
undead monster, and his soul now needs to be laid to rest. Look for
Neb-kemi in the Meretseger Ridge.
- Normal = Random Green Magic Staff, 15000 XP
- Epic = Random Green Magic Staff, 50000 XP
- Legendary = Random Green Magic Staff, 125000 XP
ACT THREE - THE ORIENT
======================
BABYLON
The Seeds of Destruction
Slay the Ichthian Invaders that have taken over Immeru's Farmlands, and
he will be MOST grateful.
- Normal = 18000 XP
- Epic = 50000 XP
- Legendary = 145000 XP
SILK ROAD
Mystery in the Mountains
Find Da-wa Phu-ti, son of Kilu Tem-ba in Shangshung Village, and make
amends for his foolishly having lost the cache of weapons his Village
might have been able to use to battle the monsters, by slaying three
Sub-Bosses (Yurg Rattlebone, Tor Skullcrusher and Korat Bearkin), PLUS
Barmanu, the Neanderthal High Warlord, by travelling through the cave
to the north-west of Da-wa Phu-ti.
- Normal = 22000 XP
- Epic = 55000 XP
- Legendary = 160000 XP
A Gargantuan Yeti
Find and slay the Gargantuan Yeti that is currently living in the
Tsongmo Ice Caverns.
- Normal = 20000 XP
- Epic = 55000 XP
- Legendary = 160000 XP
Caravan in Trouble
Defend Gong Li from the Rime Sprites that assail him, and he will be
EXTREMELY happy.
- Normal = Random Green Magic Amulet, 18000 XP
- Epic = Random Yellow Magic Ring, 50000 XP
- Legendary = Random Green Magic Talisman, 145000 XP
GREAT WALL
The Child and the Raptor
Save the daughter of Chang Er from being gobbled up by a powerful
Raptor that has entered their village.
- Normal = Random Yellow Magic Amulet, 23000 XP
- Epic = Random Yellow Magic Amulet, 55000 XP
- Legendary = Random Yellow Magic Seal, 170000 XP
Peng Problems
Clear all the Peng from the Great Wall of China, ESPECIALLY Xiao the
Colossal Peng, as he is making a nuisance of himself.
- Normal = 23000 XP, Random Yellow Magic Weapon
- Epic = 55000 XP, Random Yellow Magic Weapon
- Legendary = 175000 XP, Random Yellow Magic Weapon
Stalker in the Woods
Destroy Bloodfang, the Tropical Arachnos Warlord, where he lurks east
and then south-west of the Village of Zhidan.
- Normal = 27000 XP
- Epic = 70000 XP
- Legendary = 190000 XP
A Lesson in Despair
Find Yao Li, and speak repeatedly to him after slaying the monsters
were just about to turn him to mincemeat, to get him to acknowledge
that a pointless death would do little to help his loved ones.
- Normal = 25000 XP
- Epic = 60000 XP
- Legendary = 180000 XP
The Wealthy Collector
Find the jade statuette that Lu Buwei in the Village of Zhidan is
GAGGING to get his mitts on, in the cave to the east and south-east of
the Village.
- Normal = 25000 XP, Random Yellow Magic Ring
- Epic = 55000 XP, Random Yellow Magic Ring
- Legendary = 175000 XP, Random Purple Magic Ring
CHANG'AN
The Emperor's Clay Soldiers
Find and kill Bandari - the Terra Cotta Sorcerer - in the Chang'an
Palace to the north-west of the main Chang'an Plaza, and then report
back to Ma Feibai - Captain of the Chang'an Guard.
- Normal = Random Yellow Magic Talisman, 30000 XP
- Epic = 2 Attribute Points, Random Yellow Magic Pendant, 80000 XP
- Legendary = 2 Attribute Points, Random Green Magic Talisman, 200000 XP
Terra Cotta's At Large
Find and wipe out all the clusters of Terra Cotta Warriors dotted about
Chang'an to enable the City Guard to resume control over the City.
- Normal = 26000 XP, Random Blue Magic Weapon
- Epic = 60000 XP, Random Green Magic Weapon
- Legendary = 180000 XP
Behind the Waterfall
Clear the cave adjacent to the waterfall to the west of Liu Xu's farm,
so that he may once again pay his respects to his ancestors.
- Normal = Random Green Magic Talisman, 28000 XP
- Epic = Random Yellow Magic Pendant, 70000 XP
- Legendary = Random Green Magic Talisman, 190000 XP
QIYUN
A General in Repose
Find the cave to the east-south-east of Rang Ju the Pensive General,
and raid the contents of his Mahogany Chests to adorn yourself in
some of his finery.
- Normal = 26000 XP
- Epic = 65000 XP
- Legendary = 180000 XP
The Hermit Mage
Check out the now derelict home of the once present Taoist Mage to the
east of the Qiyun Ascent.
- Normal = 28000 XP
- Epic = 70000 XP
- Legendary = 190000 XP
Three Sisters
Save Ru Zhao from being slain by an entire encampment of Tigermen to
the east of her sister Li Hua, who herself is located to the east of
the Jade Palace.
- Normal = 30000 XP, Random Blue Magic Talisman
- Epic = 75000 XP, Random Yellow Magic Ring
- Legendary = 200000 XP, Random Yellow Magic Talisman
ACT FOUR - HADES
================
RHODES
An Impossible Task
A very long side quest to save the life of a little boy, which sees you
venturing as far as the Ixian Wood to speak with Procne - Acolyte of
Medea's Grove, to find out that you need to obtain the Tome of the Liche
Queen Kallixenia (who can be summoned from an altar in the Tsakonian
Ruins).
- Normal = 35000 XP, Random Blue Arcane Formula (Shadow Veil)
- Epic = 80000 XP, Random Purple Arcane Formula (Crosier of Osiris)
- Legendary = 220000 XP, Random Purple Arcane Formula (Sigil of Bast)
A Crab Story
Find and destroy the Gargantuan Karkinos in Damatria (you must travel
from the Coastal Asomata through the Cave of Orthea to get there).
This will enable the fishermen to once again ply their trade.
- Normal = 30000 XP, Random Essence
- Epic = 75000 XP, Random Embodiment
- Legendary = 200000 XP, Random Incarnation
The Torch-Lighter's Gauntlet
Take the strapping lad from Abderus on the shoreline of the Coastal
Asomata, and defend him in the Camirus Bluff as he re-lights the
Torch that will signal to passing ships that it is safe to dock in
Rhodes again.
- Normal = 30000 XP, Random Red Arcane Formula (Molten Orb)
- Epic = 75000 XP, Random Red Arcane Formula (Ebony Globe)
- Legendary = 200000 XP, Random Red Arcane Formula (Maiden's Kiss)
Outpost in the Woods
Defend the Outpost in the Ixian Woods from Nightstalker attackers, and
then find and slay their leader Surryln the Belligerent (an Anteok) in
the Den of the Anteok just beside the waterfall to the east of the
Outpost.
- Normal = 30000 XP, Random Green Magic Bracers
- Epic = 75000 XP, Random Yellow Magic Bracers
- Legendary = 200000 XP, Random Green Magic Helmet
IXIAN WOODS
The Stolen Sigil
Travel into the Ampelian Caves and slay Queen Ycht'ssk'l, who has
stolen the Sigil of the First Apoktisis from Semele in Medea's Grove.
- Normal = Random Green Magic Staff, 30000 XP
- Epic = Random Yellow Magic Staff, 75000 XP
- Legendary = Random Green Magic Staff, 205000 XP
Lampido's Potion
Recover three ingredients - the Petal of a Nightshade Plant, a piece
of Cybe Mushroom, and some Aestivus Tree Root, and bring them to Lampido
in Medea's Grove for her to make you a potion of considerable power.
- Normal = 30000 XP, +6 Str, +80 HP
- Epic = 75000 XP, +8 Str, +150 HP
- Legendary = 205000 XP, +10 Str, +200 HP
The Wealth of Ancient Kings
Recover the Ancient Moon Key from Queen Alkiste in the Tomb of Tsakonian
Queens, and the Ancient Sun Key from King Aegimius in the Great Tomb
of Aegimius, and use them to move through the obstacles that await you
in the Great Tomb of Dorus in the Tsakonian Ruins.
- Normal = 40000 XP
- Epic = 100000 XP
- Legendary = 270000 XP
The Treasure Hunters
Find Nysa in the Great Tomb of Aegimius, and her brother Herodion in
the Tsakonian Ruins.
- Normal = 25000 XP
- Epic = 60000 XP
- Legendary = 175000 XP
EPIRUS
Among the Ruins</pre><pre id="faqspan-16">
Slay the monsters that have pinned down several groups of survivors in
the City of Paseron, to enable them to make it back to Epirus, and the
Refugee Camp there.
- Normal = 32000 XP, Random Yellow Magic Medallion
- Epic = 77000 XP, Random Yellow Magic Medallion
- Legendary = 208000 XP, Random Yellow Jewel
A Dangerous Mission
Find Admetus - the young lad who had undertaken to venture back into
the City of Paseron to obtain food and medicines that Pisistratus needs
to tend to the wounded at the Refugee Camp of Epirus.
- Normal = 32000 XP, 65000 GP
- Epic = 77000 XP, 550000 GP
- Legendary = 208000 XP, 1100000 GP
The Enemy's Captain
Destroy the Daemon Captain Proseia, who is leading the assault on the
City of Paseron. She is at the exit to the City of Paseron, on the far
side.
- Normal = Random Yellow Magic Weapon, 32000 XP
- Epic = Random Yellow Magic Weapon, 77000 XP
- Legendary = Random Yellow Magic Weapon, 208000 XP
STYX
The Stygian Lurker
Find and slay the Giant Stygian Hydradon Hero "Shade Feaster" in the
Stygian Marshes - quite a way from the River Styx, and stop him from
gobbling up poor little shades on the sly.
- Normal = 35000 XP, +4 Points to Str/Int/Dex
- Epic = 80000 XP, +6 Points to Str/Int/Dex
- Legendary = 210000 XP, +8 Points to Str/Int/Dex
One Who Would Lead
Liberate Hipparchus from his imprisonment in the Monster Encampment to
the south-east of the River Styx. Beware Orok Skullcracker though, as
he lies in ambush awaiting your arrival ;)
- Normal = 40000 XP, Random Essence
- Epic = 80000 XP, Random Embodiment
- Legendary = 250000 XP, Random Incarnation
PLAINS OF JUDGMENT
Hades' Treasury
Find and despatch Thyia of the Stygian Frosts (in the Lower Daemon Camp),
Canace the Serpent Queen (on the Fourth Domain of the Tower of Judgement),
Metriche (in the Fields of the Diadochi), and the Night's Mistress (in
the Polis Daemonai). Retrieve the four stones they hold, and use them
as keys to open the door to Hades' Treasure Vault, in the Upper City of
Lost Souls (just south-west of the Portal Shrine there).
- Normal = 100000 XP
- Epic = 225000 XP
- Legendary = 600000 XP
The Dust of a Titan
Find the Deep Caverns in the Far Plains, and descend to the second level
to do battle with Krog the Toothless - the Guardian of the Urn which
holds the ashes of the Titan that Zeus obliterated with his Thunderbolt.
- Normal = 2 Skill Points, 34000 XP
- Epic = 2 Skill Points, 78000 XP
- Legendary = 2 Skill Points, 210000 XP
Eurydice and Orpheus
Recover the Mirror of Psyche from the Bloated One (a BIGASS Albino Spider)
in the Cave of Whispers, which is north of the Troglodyte Jailers, who
themselves are north-west of Kondor the Mighty. Bring the Mirror to
Eurydice, and she will direct you through a nearby mirror to find and
rescue Orpheus from the clutches of two Cyclops'.
- Normal = 34000 XP, Scroll of Elemental Shielding x 3
- Epic = 78000 XP, Greater Scroll of the Crushing Vortex x 3
- Legendary = 210000 XP, Divine Scroll of Magebane x 3
An Invitation
Find and destroy the three supply caravans in the Salt Flats, to hamper
the Daemon offensive but BEWARE the Machae that lie in ambush, awaiting
the destruction of the FIRST caravan ;)
- Normal = 25000 XP, Random Yellow Magic Medallion
- Epic = 50000 XP, Random Yellow Magic Weapon
- Legendary = 140000 XP, Random Yellow Magic Ring
The Necromanteion
In Erebus you will find a path on the western wall just over halfway
through which will lead you to the Necromanteion. In the Necromanteion
you should find and waporise the Bonescourge Soul-Feeder that is busy
on the prowl for shades to nosh on.
- Normal = 34000 XP, Scroll of the Sky's Rage x 3
- Epic = 78000 XP, Greater Scroll of Elemental Shielding x 3
- Legendary = 210000 XP, Divine Scroll of the Arrow Dancer x 3
An Inside Source
Callicrates in the Upper City of Lost Souls will direct you to Pylades,
who stands just around the corner from him. Pylades will tell you to go
and visit Keuthonymos in the Lower Daemon Camp for your orders, and
Keuthonymos will tell you that in order to complete this quest you must
find and stop (i.e. kill) Envoy Kor-Lhrut who is en route to the
Overworld with a message for Proseia (whom we have already slain, but
nevermind that). Envoy Kor-Lhrut is stalking around a monster camp in
the Upper Daemon Camp. Kill him and return to Keuthonymos for your
reward.
- Normal = 34000 XP, Random Essence
- Epic = 78000 XP, Random Embodiment
- Legendary = 210000 XP, Random Incarnation
Admetus Among the Dead
A long quest which starts with you finding Admetus (the lad who perished
during his quest to the City of Paseron to bring supplies and medicines
back to Pisistratus in Epirus), trapped in the Lower Daemon Camp. It
updates when you find him in the First Domain of the Tower of Judgment.
From there you will bump into him in Elysium (after speaking with
Agamemnon), and this will complete the quest.
- Normal = 34000 XP
- Epic = 78000 XP
- Legendary = 210000 XP
ELYSIUM
The Siege Striders
Find and destroy the five VERY well signposted Siege Striders in
Aneslasia.
- Normal = 35000 XP, Scroll of Frailty x 5
- Epic = 80000 XP, Greater Scroll of Frenzy x 5
- Legendary = 215000 XP, Divine Scroll of the Crushing Vortex x 5
Flight of the Messenger
Safely escort Nestor's Messenger (an Elysian Archer) to Ajax in the
Delian Meadows.
- Normal = 35000 XP, Random Yellow Magic Weapon
- Epic = 80000 XP, Random Green Magic Weapon
- Legendary = 215000 XP, Random Yellow Magic Medallion
The Achaean Pass
Help Menelaus defend the Achaean Pass Camp, with the aid of a small group
of Elysian Warriors that Idomeneus gives you (he's in Ajax' camp).
- Normal = 35000 XP, Random Yellow Magic Weapon
- Epic = 80000 XP, Random Green Magic Weapon
- Legendary = 215000 XP, Random Yellow Magic Weapon
A Noisy Diversion
Guide the forces of Menestheus in the destruction of Blood Queen
Leucothea - a Melinoe Heroine who is orchestrating the battle in the
Argolis Battlefield. This should enable Odysseus' Platoon to move into
their position with minimum hassle.
- Normal = 35000 XP
- Epic = 80000 XP
- Legendary = 215000 XP
PALACE OF HADES
The Shards of Erebus
Find and destroy the five Shards of Erebus - gemstones which enable
Hades to retain control over his forces as they ascend to the world
above. With their destruction, he will lose his hold over them and
they will be as lambs to the slaughter.
- Normal = 35000 XP, Completed Shard of Erebus (5/5)
- Epic = 80000 XP, Completed Shard of Erebus (5/5)
- Legendary = 215000 XP, Completed Shard of Erebus (5/5)
Hades' Generals
In Hades' Palace, find and end the daemonic lives of his three new
Generals - Dysnomion - General of Nightmares, Makaria - General of
Wretched Death, and Trophonios - General of Darkness.
- Normal = 45000 XP, +5% Total Damage
- Epic = 90000 XP, +5% Total Damage
- Legendary = 230000 XP, +5% Total Damage
==============================================================================
C H A P T E R T H I R T E E N CHAPTER 13
==============================================================================
T I P S A N D T R I C K S
==============================================================================
Ah yes, the Master Class. What lesson would be complete without a few tips
and tricks to help you get through the more irritating aspects of the game ??
These are things that I have observed whilst playing, that I think may be of
some help to you :-
DIZZYING BOSSES
---------------
When fighting bosses it is possible to almost dizzy them, as they can only
venture a certain distance from their respective starting points, and when
the player they are chasing strays beyond the upper-limit of their leash,
so-to-speak ? They turn around and head back towards their starting point.
You can dizzy them by retreating from where you first start to draw the
boss to you, to back outside their circle of movement and then, when they
turn and start to head back to their starting point ? Set foot back inside
their circle of movement and they will turn and charge back toward you
until they get to within striking distance of you. If you set foot back
OUTSIDE their sphere of movement, they will turn around and go back again.
Simply rinse and repeat until they have fallen !! It's biff, yes, but it
WORKS !! ;0)
PERSONAL TELEPORTATION LIMITATIONS
----------------------------------
Unlike certain other games *cough cough Diablo 2: Lord of Destruction
*cough* *cough*, if you think you can rapidly get back to where you were
before you died (which, let's face it, is GONNA happen) by creating a little
portal to a town, and then using the portal shrine there to get home ?
THINK AGAIN !!
Unfortunately in Titan Quest, when YOU die ? Any portal you have open is
shut too. Which sucks ... but just so's you know.
HIGHEST LEVEL
-------------
Your character cannot level beyond level 75 in the game, so keep that in
mind if you think you can just keep levelling-up and spending points like
they are going outta fashion. 75 = God-like Power ;)
ENTICE BOSSES
-------------
Fortunately whenever you are in a boss-fight, you generally do NOT have to
run up to the boss and punch them in the face to start the fight.
If you check your list of skills, you may well find you have something in
there that can aid you in drawing a boss to you - like the Lightning (and
Chain Lightning) skill from the Storm School, for example.
The REASON for using skills like this to draw the boss to you rather than
running up to THEM to start the fight, is because ordinarily boss fights
take place in ROOMS, and when you ENTER a room that a boss fight is going
to take place in ? The door shuts behind you, locking you in. This means
that you are immediately restrained insofar as the amount of space you have
to manoeuvre in is concerned. Drawing the boss OUTSIDE the rooms
immediately places THEM at a disadvantage, and can help swing the tide of
battle in your favour.
REGENERATION SHRINES
--------------------
Regeneration Shrines are, in my opinion, one of THE most useful shrines in
the entire game. Since they offer you approximately 45 seconds of health
AND ENERGY regeneration, if you see a horde of monsters and a regeneration
shrine buried somewhere in the thick of them, you can quite often survive
the battle (especially on the lower difficulty settings) by standing within
the effect radius of the regeneration shrine and battling your enemies from
there.
CANNOT CARRY ANY MORE
---------------------
If you cannot carry any more items, and want to try and squeeze that extra
one into your inventory before heading to the nearest town or merchant to
sell them all off, you can use the auto-sort buttons atop each of your
inventory bags or your main inventory to ... wait for iiiiiiit ... yes
that's right !! TO AUTOMATICALLY SORT YOUR INVENTORY TO MAXIMISE ITS
SPACE !! This is only available in Immortal Throne, but I do encourage
you to use it. ALSO, don't forget you have TWO weapon sets available to
you, so you might be able to fit, say, a shield onto your free arm on your
second weapon set if you've not considered that ?
DISBANDING PETS
---------------
If you find that your pet is becoming a liability (as they do sometimes),
then you can always right-click on its portrait and select the "disband pet"
option, which will remove them from play. If you want me to give you an
example of WHEN a pet might become a liability ? A pet on aggressive mode
will seek out and attack enemies in the distance if it feels able to, and
this means those enemies will become aware of YOUR presence, which can be
a real pain in the butt if you are trying to heal up or prepare spells or
equip a new weapon or what have you ... hence, disbanding the pet ;)
OPERATION: HUMAN SHIELD
-----------------------
There are times in the game when you have the luxury of backing up a set,
or sets, of warriors who go on ahead of you to do battle. Examples are
the Spartans -v- Polyphemus, and the Armies of Elysium -v- the forces
of Hades. In SOME of these instances you will find the warriors that you
are either backing up, or coming to the aid of, are really quite tough -
tougher than you even ! So make full use of the fact that (for a change)
it isn't JUST you that the monsters are attacking, and you will find that
you can win these battles a little easier ;)
RE-MAPPING KEYS
---------------
By default in Immortal Throne there is no key to switch between your first
and second set of skills. W will change your weapons from set 1 to set 2,
but as I say by DEFAULT there isn't one to change from skill set 1 to skill
set 2. I suggest you map the "`" key (the one underneath the escape key
on your keyboard), as this will enable you to rapidly switch between the
two sets of skills.
Whilst we are on the subject, I would suggest making keys 1 and 2 on your
second set of skills the health and energy restore potions, as that way
you can use ` to switch from primary to secondary, 1 (for say health) to
heal up during combat, and then ` to switch back to your skills.
That's what I do at any road.
SKIRMISHING FOR DUMMIES
-----------------------
If, like me, you have opted to play as either an archer or mage-style
character (i.e. somebody that attacks best at RANGE), then you will no
doubt get used to the skirmishing attack very, very quickly. For those
of you that do not know how to skirmish shame on you - it's very simple -
you just shoot, fall back, shoot, fall back, shoot, fall back and keep on
doing so until your enemy falls.
However, common sense dictates that you should NEVER skirmish and fall back
into an area you have not yet explored, as this is a sure-fire recipe for
disaster as you will wind up having MORE monsters on your tail than LESS.
Therefore only EVER fall back into areas that you have already explored ;)
SPROUTING FOUNTAINS
-------------------
Fountains will actually not just recharge over time (some of them will),
but actually pop up on the compass without warning ! This seems to happen
more often on the higher difficulties - perhaps as a way of trying to
balance the game out a little bit, but it can really prove advantageous
in certain situations - just pot luck really ;)
WATCH THE BIRDIE
----------------
ALWAYS keen at least a cursory eye on your compass. It will alert you to
the presence of the most important (and powerful) monsters, lairs and other
bits and bobs usually WELL in advance of your bumping into them, and can
seriously reduce the likelihood of your getting lost. It is even more
useful than your map !!
DUPING ITEMS
------------
Again, thanks to Michael Kier for this one !
This is apparently very tricky to get to come off, but this is how to do
it (and bear in mind this works with any item except the Overlord Key). I
am going to quote Michael verbatim as, again, I've not been able to get this
to work but I think it's worth sharing with you in case you can :-
1) If I have a sword that you want a copy of I open the trade window,
put the sword in and click on the trade tab.
2) I then type the number 1 and press enter in the chat window, then I
press 2, and when I type 3 I immediately close the chat window and
click on cancel in the trade window.
3) When you see the number 3 you immediately click on the trade button
in your trade window. If we both clicked on the buttons at the same
time we will both have the item.
ALTERNATIVE METHOD OF DUPING ITEMS
----------------------------------
I have been contacted by Viro Melchior with an alternative suggestion for
item duping, which works whether you are playing alone, or with somebody
else. Here we go :-
IF YOU ARE ALONE
Put any/all items you want duplicated onto a single character. Go to
My Documents/Documents/My Games/Titan Quest/SaveData/ and copy the
character (after saving). Put the copy in any directory of your choice.
For example I'll use c:\charcopy\. Start the game, put the items in the
caravan, and then pick them up with a different character. Close the game,
copy the "extra" copy of the character (out of C:\charchopy\) back into
the /SaveData/ folder. Start the game, and he'll have the items, as well
as your other character.
IF YOU ARE PLAYING WITH SOMEBODY ELSE
Instead of using the caravan, just join their multiplayer game, drop the
items, close out, and do the copy over as above.
CHANCE-ON-HIT ATTACKS ADDING CHARGES TO CHARGE-UP ATTACKS ??
------------------------------------------------------------
Thomas Graham has been in touch with the following comment :-
"It seems that whenever skills like the shield attacks and dual wield
attacks activate (The chance-on-hit ones) they seem to add an extra charge
when it comes to skills like Calculated Strike and Psionic Touch. Just
something I noticed. It makes sense really, since you're attacking with
two weapons, or your shield and weapon. Doesn't work for things like
Batter, War Wind and such of course as they're activated skills."
THE OVERLORD KEY
----------------
I am reliably informed that when you kill Hades there is a chance that he
will drop an item called the Overlord Key. It doesn't happen every time,
but apparently it does happen (I've just never had it happen to me), and
that key unlocks the gate on the Coastal Asomata - the one leading north
BEFORE the one that leads ultimately to Medea's Grove ? The one that's
locked by a guardian ;)
Apparently once through the gate you will face MANY enemies, including a
large eyeball which has the power to regenerate its fallen comrades.
I have heard from Redvirus who confirms that, in his experience, the
Overlord key has only ever been dropped on Normal Difficulty ... although
there seems to be the possibility of also getting it on Epic and Legendary
as this has later been confirmed by Phayreon.
I had originally said that I would be very interested in hearing from
anybody that got it to work, and I did !! Andrew has made contact with
me to confirm Michael's understanding is correct AND (very very kindly) to
provide me with a mini-faq which I can tack onto my guide, detailing what
you can expect to find in this new area !!
So ... without further ado, here is Andrew's mini-faq as to the contents
of the Secret Passage ...
Phayreon (who has added further insight into the Secret Passage)'s comments
follow after ...
=======================================================================
T H E S E C R E T P A S S A G E - F A Q B Y A N D R E W
=======================================================================
(The following below has only been documented to normal difficulty)
Things to note before entering this area:
1) You need the overlord key (a quest item) rare drop from Hades.
2) Monsters here are all mini-bosses/bosses, so be prepared.
3) At normal difficulty, they are all level 40. (which is around where you
should be after you beat normal difficulty in Immortal Throne)
4) Monsters here do drop items, but they immediately disappear. Hence, no
item drops.
5) You must kill every enemy in the prison cages in order to open the
Majestic Chest at the end.
6) Enemies here take the name of creators/developers of the game. The
background music is the same music being played at the ending when the
credits are rolling.
WalkThrough:
The entrance to this area is at in Coastal Asomata. To the left of the passage
that leads you to Ixian Woods.
Head there with the overlord key item in your inventory and the gate will
automatically open. Run through some narrow cliffs and enter the "Secret
Passage". You will encounter a lvl 1 eyeball monster named ~V~. Don't let his
level fool you! He is invincible! You can try to kill him, but good luck. (I
think I stood there for 3 minutes hacking away and he just keeps coming back.)
(These 2 enemies are optional. You can run past them if they are too hard.)
After you run past him down the stairs you will encounter your first enemy, a
turtle beast named Dave. Take him down and the gate opens. Proceed down the
stairs and keep walking. You will encounter a bat named Parnell. Watch out for
his cyclop like attack as it might kill you in one hit. (I was a lvl 53 champion
and it took 3-4k life off of me). Walk some more then up a flight of stairs and
you will find a beastman centaur archer named Dave. Take him out. He usually
casts study prey on you so wait for that to wear out before moving forward. Open
the
ornate door.
After some descending steps you will come across 4 prison cages similar to the
ones found in Hades Palace. The left cage will have an antler dude (beastman)
named Ben and a (demon) named Scott. Ben has an attack that slows you down. The
right cage will have Frazier (demon), 3 small flame dudes all named Shawn, a
centaur (beastman) named Arthur, and a skeleton named Nate. Try to lure them out
one by one to prevent them from attacking you all at once. After Arthur dies, he
spawns into Toxeus the Murderer (skeleton) where he is a bit deadlier so be
careful. In addition, Cory (a device) with relatively strong ranged fire attacks
will be patrolling so take heed not to draw his aggression. Nate the skeleton
has a ton of life, but he's a pushover that won't even retaliate when you are
hitting him.
Walk further down. The 3rd cage on the left is empty. The last cage will contain
Josh (jackal), a patch of grass (plant) named Tom, and Morgan, a mini 3 headed
hydra (magical). After taking them out, proceed to the final boss Chooch
(undead) guarding the majestic chest. This majestic chest seem to have the
highest probability of good items compared to all other majestic chests/
essences in the game. In normal difficulty, I usually get at least one blue
item drop and/or partial relics. More to add for epic/legendary difficulties.
Credits:
Thanks to Mister Sinister for his wonderful FAQ.
Thanks to Michael Kier for contributing about the overlord key.
========================================================
Thanks Andrew for that very comprehensive mini-faq !! :)
========================================================
As I mentioned above, I have also been contacted by Phayreon, who has the
following comments on the secret passage :-
"I wanted to share my experience with The Overlord key item (the little
turtle) and the secret passage section. I've now run the entire game up to
Rhodes in Act 4 on legendary, and have run the Secret Passage on all 3
difficulties (all solo, mind you). The Overlord item originally dropped on
normal difficulty for me, so I of course ran back to the gate to use it.
Subsequently, in Epic and Legendary, the first things I did as soon as I
reached Act 4 in each difficulty I ran the secret passage to see if it
changes or got any harder. My findings with the passage are as such:
"*All tests were run with a level Harbinger class (Warfare/Dream) with dual
wield, onslaught, phantom strike, trance of convalescence, war wind, and
battle standard being the skills typically used.
"Legendary difficulty tested as a level 59 Harbinger, so not max level yet.*
"Firstly, The Overlord item does NOT only drop in normal, I've personally had
it drop in both normal and epic difficulties, and have yet to test legendary.
Boss levels inside the passage are static, based on difficulty: 41 in normal,
61 in epic, and 78 in legendary(or around there). The behaviour of each
seems to vary slightly, but that may also be simply a time based factor, as
they live MUCH MUCH longer in legendary.
"In normal, each boss typically sticks to straight-up melee, using special
abilities rarely. In epic, this changes slightly with a couple of the
bosses: the Anteok boss uses his rejuvination more often and his stun wave
more often; at range the hydra boss will use breath attacks, fire cold and
poison; Tyreus the murderer (I think his name is, he spawns after Arthur the
satyr is killed) uses a full range of dream skills, including phantom strike,
distortion wave, and distort reality. In legendary, each boss' strength is
SIGNIFICANTLY ramped up, including their health and damage, and one boss
takes a major turn in attitude: Nate, the long-living but seemingly passive
boss, suddenly decides that, after around a solid minute of beating on him,
he should fight back, and each hit seems to deal right around 4000 damage.
He doesn't attack quickly, but fast enough to where just spamming potions is
often not enough to keep you alive (or me I should say). Otherwise it's just
a difficulty hike: each boss hits harder, lives longer, and is just generally
harder to kill.
"Now, the loot. Yes, the treasure chest at the end has great drop rates, but
there are a few things that are typically very consistent. Firstly, though
the chest does drop blue(epic) items, most of the blue items it drops are
part of what I call the "joke sets," which is a santa suit, a sherlocke
holmes suit, a pair of cowboy boots with hat, and a pirate suit. The santa
suit has 6 pieces, sherlocke has 5, the cowboy boots and hat are a 2 piece
(obviously...), and the pirate suit is a 3-piece set. Each is level 35 with
no strength/dex/int requirements, and have great stats, but your character
will never look less epic, trust me. In both epic and legendary, the chest
has a better-than-average chance for legendary gear, working at around the
same monster level loot basis as the bosses around it (with ramped up magic%
drop chance), however most epics and legendaries that drop seem to be between
35 and 50, with the latter being very rare indeed.
"Quick Note: Though the chest does have some great potential loot, in my
experience, you *will* have better luck running Hades himself in the same
difficulty you're running the treasure chest, unless you really want those
joke sets (GREAT twink items to gain some levels though). It may be a
GINORMOUS box of loot, but it's still a box, and not an end boss. That being
said, you may prefer the treasure chest run to Typhon, as a lot of Typhon
running involves dodging instant kill moves and attempting to wade through
20-25 minotaurs and ~10 cyclopes.
"In my experience, pretty much every boss but Tyreus and Nate(in legendary)
are laughably easy, and a very straightforward "I'm gonna hack'n'slash your
face" approach works well. Tyreus hits WAY too hard to usually be able to do
this, and you may need to employ some hit and run tactics to take him down.
Be careful, as his distortion wave and distort reality moves stack a hefty
electrical burn DoT which has every chance to kill you even after you've
killed him. Nate, once he finally decides to hit you, will also probably
require some hit-and-run tactics, but it's still nothing terrible.
"That should really cover it I think. Overall a fun and typically rewarding
alternative to boss running, but in my experience, you will still have better
overall luck with a real boss, and not a box. However, the metal remix of
the TQ song is very entertaining. =D"
Thanks Phayreon !! :)
So between the very helpful souls that have contributed that section of my
guide (as I STILL can't get it to work for me, so I'm going to go off in a
big old grump), you should be able to not only find your way around, but also
pick up some really handy hints to beat the bosses DOOOOOOOOOOOWN =)
==============================================================================
C H A P T E R F O U R T E E N CHAPTER 14
==============================================================================
P L A Y I N G O N E P I C A N D / O R L E G E N D A R Y
==============================================================================
As you would expect, the game on its higher difficulty settings is NOT just
a simple repeat of the normal game. OH no. The designers have thrown in a
fair few little odd's and sod's to keep you on your toes, the most noteable
of which are as follows :-
ON EPIC DIFFICULTY
==================
- Essences are replaced with Embodiments, and give greater bonuses;
- Monster Charms are replaced with Epic Monster Charms, and give greater
bonuses
ON BOTH EPIC AND LEGENDARY DIFFICULTY
=====================================
- Monsters are OBVIOUSLY considerably stronger and harder to kill;
- In Knossos Palace, the entrance to the Court of King Minos is defended by
an EXTREMELY powerful character called "Talos". Talos is a heauuuuuuuuuge
gigantic massively powerful automaton, who can be heard quite a way off
in the distance by the squeaking noise he makes ... poor lad needs oil !!
His powers include the obvious swipes you would expect from a creature of
his size, plus the ability to create a flamethrower-like blast of fire
that does (shock, horror) burn damage in addition to the damage you will
sustain from standing in its path.
- In the Sandswept Cave (on the lowest level), you can do battle with the
FEARSOME Manticore - a beast with the body of a lion, wings of a dragon,
head of a human male, and tail replete with spikes. The Manticore will
have you for breakfast REPEATEDLY, trust me, but the satisfaction you get
from slaying him DOES have a certain appeal. He is VERY very quick, as
he can fly to wherever you are. He can attack by striking you with his
tail, biting you with his maw of justice, pouncing on you like a cat
with his two front paws, throwing spiked barbs at you from his tail, or
using lightning breath on you. BE FOREWARNED he is VERY very very very
V-E-R-Y powerful.
- You will find both blue and purple items on both Epic and Legendary
difficulties, such as the following (random and rather WEIRD item, which
the stats on which have been contributed to me by Robin Kjellberg) :-
"The Imperator"
134-139 damage
10% Piercing
Speed:Fast
8% Attack damage converted to health
+8% Strength
+8% Dexterity
480 HP
+2.0 HP Regeneration per second
+50% HP Regeneration
+15% Attack speed
Grant Skill: Song of the Carrot
'Cries of impending doom possess enemies with terror'
(Activated on low health)
75 Energy cost
12m radius
2.0 - 4.0 sec of fear
30% Slower movment for 4.0 sec.
ON LEGENDARY DIFFICULTY
=======================
- Embodiments are replaced with Incarnations, and give greater bonuses;
- Epic Monster Charms are replaced with Legendary Monster Charms, and
give greater bonuses
- In the Athens Marsh (on the eastern side) lurks the Lernean Hydra, who
has made its nest there. A seven-headed Hydra is never a walk in the
park, and you're about to find out why. Armed with fire, frost and poison
breath attacks not to mention a whole HOST of biting attacks, you may
rest assured you are in for a SERIOUS fight when you reach it.
==============================================================================
C H A P T E R F I F T E E N CHAPTER 15
==============================================================================
A C K N O W L E D G M E N T S
==============================================================================
Thanks to Michael Kier for pointing out the existance of the Lernean Hydra,
the Shrine of Zhong Kui, and the Dragon Liche to me, and also for his hints
and tips contributions.
Thanks also to Jokerfiend to pointing out that the items you receive as
quest rewards ARE random, and it wasn't just me having crappy crap luck !!
Thanks go to Andrew for very kindly not only validating Michael's information
about the Secret Passage, but also composing his mini-faq on the same area !!
Cheers to Viro Melchior for contributing not only an alternative dupe method
that suits both single- and multi-player modes, but also for his critique and
suggestions on some of the skills. Much obliged :)
Thanks to Thomas Graham for his input into the Conqueror Character Class, his
comments on the Defence School, and his hint about chance-on-hit and charge-up
attacks.
Many, MANY thanks to DaDennis for having contributed MASSIVELY to my section
on Arcane Formulae (he provided the information for the Chaos Cube, Cinderbolt,
the Crystal Tear, Pale Moon and the Shroud of Eternal Night, together with
confirming which Arcane Formulae you should be able to pick up on which
difficulty settings - he ROCKS !! :)
Thanks also to Matt Richardson for helping to further flesh-out my guide, and
fill in yet more of the blanks (being the Lionheart, Wraithguard, Spirit
Blight, Emerald Quill, Amber Flask, Raven's Shadow, Tongue of Flame, Hand of
Gaia and Poseidon's Net). Cheers mate !! =D
Thanks to Azkadellia for confirming the Shroud of Eternal Night as well.
Thanks to Don Korrecta (aka draktrax) for his input into a possible way of
getting Charon's Wall of Water to fall.
Cheers to Robin Kjellberg for bringing me details of the Carrotsword (the
Imperator) =).
Many thanks to Athena for providing insight into the Dragonians' Melee Iron-
Maiden Curse Ripoff Attack *spits on the Dragonians* :)
Thanks to Redvirus for his insight into the difficulties on which the Overlord
key appears to be dropped.
Big thanks to Phayreon for his insight and comments into the Secret Passage
as well !
Thanks to Gintare for confirming that Shades, as well as Sandwraiths, drop
Spectral Matter.
Thanks to John Jackson for his insight into the Master Mind Skill of the Dream
School.
Thanks to Dragon Peter for his insight into defeating Megalesios as well !! =)
As I mentioned right at the start of this guide, I have chosen to dedicate it
as a piece of work to my wonderful partner Shelfy, without whom I would be a
considerably lesser man. Baby you mean the world to me, and I love you xxxxx
==============================================================================
Copyright Mister Sinister, 2007
==============================================================================
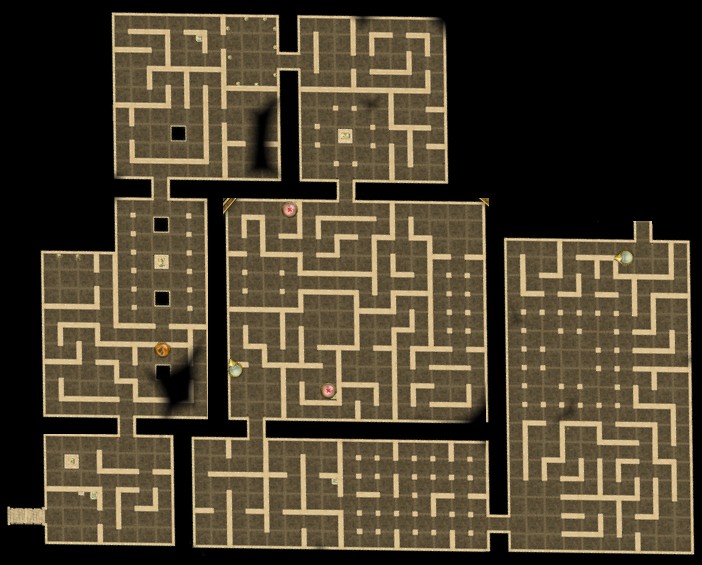
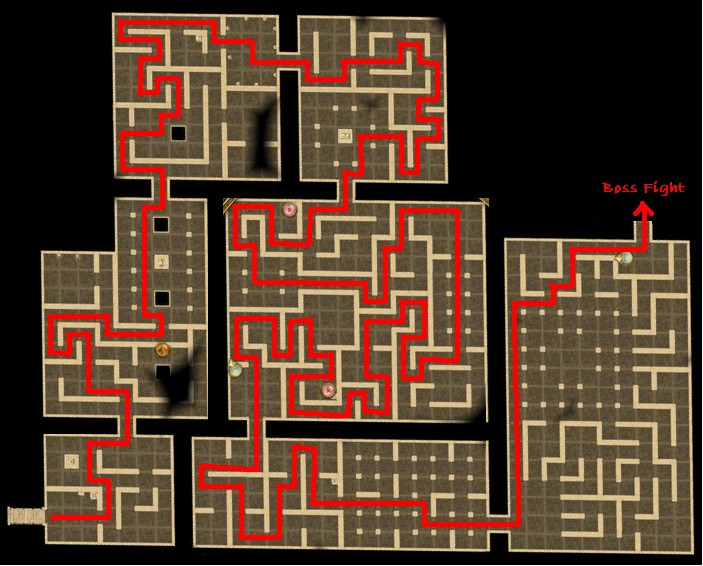