*******************************************************************************
* *
* Final Fantasy XIII *
* Reliable Techniques for Earning 5-Star Ratings on All 64 missions *
* Without Tier 3 Weapons, Shrouds, or Eidolons *
* *
*******************************************************************************
Version Completed
1.00 30 June 2010
1.10 28 July 2010
* Added section about Managing Your CP and finding gil for Upgrades.
* Fixed a couple of places where I mistakenly used secondary roles
prematurely.
* Replayed all Missions that were recommended for postgame play and
re-wrote the strategies to (hopefully) improve them.
* Begrudgingly acknowledged Sazh as a legitimate, contributing
member of the team and included him in some Missions.
* Added more information on Random: Instant Chain ability and
consolidated this information into a separate section.
* In particular, I added a strategy for 5-starring Mission 60
without using Deceptisol, thus avoiding its use altogether on all
64 Missions. Yay!
2.00 08 August 2010
* Finally got around to attempting Missions 1-14 and 17-26 before
the events in Oerba. The suggested strategies on these Missions
have essentially been completely re-written. I added information
about how to 5-star almost all of these Missions early in Chapter
11 and added MANY other tips and hints on these early Missions as
well as related topics such as managing CP, Accessories, and
sequencing Missions.
* Added LOTS of new hints on how to get Preemptive Strikes in
the first 26 Missions.
2.10 20 August 2010
* Did a "quality assurance" runthrough of all postgame Missions and
made many changes in addition to the ones described below.
* Described a less expensive way to make Sprint Shoes.
* Described a way to 5-star Mission 51 in Early Postgame play.
* Improved strategy for Mission 45, allowing the team to stay alive
longer while waiting for RIC to hit.
* FINALLY found and described a greatly improved strategy for
Mission 62 that works more often than not.
* Re-wrote Mission 61 to be consistent with Mission 29, since they
are essentially the same.
* Described how to get a Preemptive Strike in Mission 22.
* Modified the strategy for Mission 63 to improve chances of
surviving the big turtle's stomps.
* Added a method for getting a Preemptive Strike in Mission 9.
* Clarified the conditions that make the Long Guis appear.
* Expanded the Accessory list to include every Accessory recommended
for use in this guide.
3.00 11 December 2010
* Re-wrote Mission 7 strategy to detail the damage that the Mark can
do to you and how to deal with it.
* Revised suggestions for farming CP when you first arrive at the
Archylte Steppe and gave a specific example of CP and gil yields.
* Revised strategy for Missions 47, 51, and 54.
* Added specific information about secondary roles to prioritize
developing.
* Included information about Lightning's Axis Blade/Enkindler and
its ATB Charge synthesized ability.
* Finally made mention of the revered Aurora Scarf as a possible
Accessory to use.
* FINALLY found a strategy for Mission 62 that works virtually every
time, and described it. You never need dread this battle again!
* Re-worked Missions 2, 4, and 6 using Sazh as a Synergist instead
of Hope.
* Revised Mission 15 strategy to facilitate 5-starring this Mission
before going to Oerba.
* Revised strategy for Mission 25, cutting the battle time in half.
* Re-wrote Section IV in light of my diminished dependence on
shrouds.
* Fixed a mistake about the elemental weakness of Uridimmu in
Mission 19. (I can't BELIEVE that no one wrote to me about this!)
* Added some detail to recommended equipment for Mission 55.
* Re-wrote Mission 34 using Random Instant Chain to avoid having the
Tonberry heal itself.
* Revamped the strategy for Mission 51 for about the 600th time,
this time putting Hope as leader to minimize time lost on casting
worthless buffs.
* Re-wrote the strategy for Mission 47 to be consistent with the
strategy for Mission 62 (since the enemies are the same), and re-
wrote Mission 62 -- again -- to avoid repeating information
that I had already included in Mission 47.
* Added a method for 5-starring Mission 58 without using Random
Instant Chain.
* Purged all "Post-Oerba" information from early Missions, since
there is no earthly reason to wait until then to fight these
battles.
3.10 29 May 2011
* Added the Aurora Scarf to the list of possible Accessories to
equip.
* Added some detail to the section on farming CP before undertaking
Missions.
* Added some information about 5-Starring Mission 16 before Oerba.
* Added an alternate method for Mission 32 that uses a Preemptive
Strike.
* Added a note about the Flowering Cactuars near Mission 42.
* Added some notes about winning Mission 54 without using Random
Instant Chain.
* Added a tip for speeding up Mission 55 slightly.
* Undid the changes that I made to Mission 34 in the last revision.
(Sheesh! Why can't this guy make up his mind?)
* Added a low-level strategy for beating Zirnitras.
* Described use of the "High HP: Power Surge" ability in Mission
51.
* Added information about getting Uraninites for converting
Siltstone Rings to Gaian Rings.
* Updated map information necessitated by the disappearance of the
"Two Brothers and a Sister" web site.
3.20 30 June 2011
* Added some brief, general information to Section XII about the
Ci'eth Stones and Marks, since the previous source for this
information seems to no longer be available.
* Added a section about completing the Missions prior to unlocking
Stage 10 Crystarium.
* Added some information about Mission 64.
* Corrected one darned misspelling.
3.30 14 August 2011
* Revised Section X to accommodate an earlier upgrading of weapons.
* Described my choices of weapons to upgrade and provided a link to
a GameFAQs site that can provide additional information.
* Added some information to the character profiles, considering
qualities other than raw Strength and Magic.
* Added information about the primary and secondary rewards for
completing each Mission.
* Added comprehensive information to help the reader navigate from
one Mission to the next.
* Revised my position about the merits of using Strength and Magic
boosting Accessories.
* Revised my position about trying to debuff Neochu before casting
Death in Mission 55.
* Completely revised my strategy for Mission 54. Hopefully, this
will work more consistently.
* Added a strategy for Mission 54 that does not rely on RIC.
* Added some tips for readers having trouble with time on Mission 51
3.35 20 August 2011
* After spending countless hours fighting Mission 54 over and over
again, I scrapped my previous RIC and Sentinel strategies and
replaced them with a more straightforward method that is 90%
effective in postgame play. You need never dread this Mission
again!
* Made the necessary revisions to other Sections of this guide to
reflect the strategy change for Mission 54.
3.40 14 January 2012
* Added some information about defeating Zirnitras at low levels.
* Described my default team and Paradigm settings, despite my better
judgment that tells me that it will spur a plethora of emails in
which readers argue why their default setups are superior. I
console myself by resolving to ignore any such missives.
* FINALLY got a tip for reliably getting a Preemptive Strike on
Mission 09 and added a description of that technique.
3.50 25 March 2012
* Added an optional late postgame strategy for Mission 51.
* Added a detailed strategy for Mission 64 that incorporates
attacking as well as Poisoning.
3.51 05 August 2012
* Added a strategy for getting a PS on Mission 16, making this
Mission MUCH easier, especially at low levels.
* Corrected a couple of statements from version 1.00 that should
have been updated with version 3.30(but weren't) when I expressed
weapon preferences.
3.60 23 November 2012
* Added some information contrasting Libra to Librascopes.
* Added some general information about attempting Missions multiple
times.
* Corrected some mistakes that probably no one would notice except
me.
* Refined strategy for Mission 15 using Vanille instead of Hope.
* Re-wrote Mission 37 since it is SO easy to get a PS.
* Added a strategy for getting a PS in Mission 40.
* Added a note in Section XIII about getting at least one
Trapezohedron before completing the "Circle of Death."
* Re-wrote the strategy for Mission 60. This one seems to work
pretty much every time.
* Added a note about what triggers Dispelga in Missions 47 and 62.
3.61 05 January 2013
* Added a method of getting a Preemptive Strike on Mission 35, thus
precluding the need for using Random Instant Chain.
* Added a note about 5-Starring all Missions without ever using
Random Instant Chain.
3.62 28 February 2013
* Added a tip about upgrading weapons while farming Mission 07.
* Corrected a minor misprint on the lineup for Mission 09.
* Fixed a misstatement in the "Practical Approach" portion of
section XIII.
* Had too little to do one Sunday, so I added the names of all 64
Missions.
3.65 30 July 2013
* Re-wrote the strategy for Mission 13 to match the strategy for
Mission 15. I'm not too sure why I never did this before since
these two Missions are essentially the same battle.
3.70 20 March 2015
* Revised the strategy for Mission 24, perhaps unnecessarily since
this Mission isn't very challenging in the first place.
* Added some caveats and more realistic numbers about farming
Mission 24 for Gil.
* Described how to win Mission 55 without using Aegisol, thereby
allowing you to complete the game while using NO shrouds
whatsoever.
* Replaced the Imperial Armlets in Mission 55 with General's Belts,
since the attacks you need to survive are almost all physical.
* Rewrote the strategy to Mission 42 to include information about
Staggering the Marks.
* Added a note about the wisdom of repeatedly initiating Mission 63
in between Circle of Death Missions.
* Refined Mission 9 to Stagger the Mark more quickly, which is
important if you are at lower levels.
* Added a strategy for winning Mission 45 in a straight-up fight,
i.e., without Random Instant Chain or Death.
* Edited the strategies for Mission 58 to eliminate the totally
unnecessary use of Random instant Chain.
* Replaced my "brute force" strategy for Mission 49 with a more
elegant one that will work even at very low levels.
* Added more detail to winning Mission 41 by getting a Preemptive
Strike.
* Unnecessarily changed the battle plan for Mission 3 to establish
the preferred attacking pattern when getting a PS.
* Re-wrote Mission 30 to shave a few more seconds off the Battle
Time.
* Added a note about sequencing Missions 32 - 34 to minimize travel.
* Added an advisory on Mission 33 about timing your actions so that
the Mark's stomps do not disrupt them.
* Edited Mission 58 to get rid of some unnecessary history about my
early attempts to 5-star this Mission and focus on the preferred
strategy.
* Adding some equipment advice to Mission 59.
3.71 27 September 2015
* Changed the strategy for Mission 13 to allow a bit more time to 5-
star this Mission.
* Added some directions about finding the battle for Mission 30.
* Fixed a typo in Mission 58. Thanks to alert reader Edwin Ho for
finding this.
* Added a new strategy for Mission 35, courtesy of alert reader Jeff
Sun.
3.72 04 February 2017
* Fixed a typo in the paradigms for Mission 13.
* Corrected an inaccurate claim about the price of Perovskite.
* Changed the team and paradigms for Mission 12 to address the fact
that your team will be using Magic exclusively.
* Made a slight change in the strategy for beating Neochu using
Random Instant Chain in Mission 45.
Written by Bill Russell
Final Fantasy XIII is (c) 2009, 2010 Square Enix Co. Ltd.
This FAQ is copyright 2010 -- Bill Russell
This publication is protected by United States copyright law.
It may not be placed on any web site or otherwise distributed publicly
without advance written permission of the author. Use of this guide on any
other web site or as a part of any public display is strictly prohibited, and a
violation of copyright. If you wish to post this FAQ or any portion of it to
any other site, please write to me at the email address that appears in Section
XIV of this guide.
*******************************************************************************
* *
* Contents *
* *
*******************************************************************************
I. Introduction -- Why I Am Writing This [I01]
II. What This Is and What This Isn't [W02]
III. About YouTube [Y03]
IV. Shrouds, Instant Death, and Other "Cheats" [C04]
V. Who Should Be on Your Team [T05]
VI. Accessories and Weapons [A06]
VII. The Importance of Libra [L07]
VIII. A Couple of Quick Tips [T08]
IX. Random Instant Chain (RIC) [R09]
X. Managing Your Gil and CP [C10]
XI. Sequencing the Missions [S11]
XII. Numerical Listing of Missions [N12]
XIII. Adding Some Challenge [C13]
XIV. Conclusions and Credits [C14]
To access a specific Mission, simply search by the 2-digit Mission number
preceded by the letter "M". Thus, to go directly to Mission 8, search for M08.
*******************************************************************************
* *
* I. Introduction -- Why I Am Writing This [I01] *
* *
*******************************************************************************
The Ci'eth Stone Missions are essentially the only sidequest in Final Fantasy
XIII, and completion of these Missions can earn the dedicated gamer rich and
plentiful rewards. On my first run through the game, I was very much surprised
to find only one FAQ on GameFAQs dedicated to these Missions. So, when I
undertook these Missions myself, I found myself spending a lot of time
searching the Boards for more detailed information about how to beat certain
enemies within the given time limits. I also found that there seem to be as
many opinions about how best to complete each Mission as there are gamers
online. Some of these posted methods worked for me but others didn't.
Ultimately, I took what I thought to be the best elements from several
strategies and used them to synthesize something that would dependably work for
me.
Eventually, I managed to earn 5-star ratings on all of the Missions and
was feeling pretty good about myself. That feeling lasted until I faced these
same Missions on my second run through the game and found myself having the
same problems as before. It was then that I realized that perhaps it would
have been a good idea to write down some of my findings. I further reasoned
that if I took the time to articulate my findings in writing that I might be
able to allow other gamers to revel somewhat longer in their own
accomplishments. So, to facilitate my next passage through the games -- as
well as to ease the journeys of others -- I decided to invest the time
necessary to create this guide.
Each Mission description is the result of at least an hour or two of trying
and retrying that particular Mission. I tried to observe what the enemies were
doing, what my allies were doing, and how my actions were affecting the
enemies' health and actions. I would guess that I played through each Mission
at least 4 -5 times, trying different strategies and seeing how they influenced
the outcome. As much as possible, I tried to keep strategies simple and
repeatable and made minimal use of special weapons and accessories so that this
guide would be of use to as many FFXIII enthusiasts as possible.
I understand that a lot of these Missions are very easy to 5-star, especially
if you come back later in the game to undertake them. This might cause you to
wonder why I bothered describing these battles in such detail. At least in
part, this was to satisfy my own curiosity and to document my findings as I
played through these battles. However, spend a few minutes on the Final
Fantasy XIII boards and you will find questions about how to 5-star just about
each and every one of the 64 Missions. However obvious these answers may be to
you, rest assured that there are people out there who have questions that
hopefully are answered in this guide.
Let me say up front that I am neither the most skilled gamer nor the most
knowledgeable. I believe my personal strength to be the clear communication of
information. As I will emphasize throughout this guide, I do not claim that my
method is the only way or even necessarily the best way to achieve the desired
result. I only claim that it will work fairly consistently and that a gamer of
average skills should be able to read and understand my descriptions and
duplicate my results in at most a couple of tries. I hope that you find this
to be the case.
*******************************************************************************
* *
* II. What This Is and What This Isn't [W02] *
* *
*******************************************************************************
This guide does not pretend to cover everything that there is to know about the
Missions. Here are a couple of things that I am specifically NOT addressing:
* How Target Times are calculated and other inner workings of the game. If
you want this technical information, please refer to the excellent Game
Mechanics guide on GameFAQs:
http://www.gamefaqs.com/ps3/928790-final-fantasy-xiii/faqs/59246
In Section VIII, I will give you some important information that you need to
know about Target times, but if you are interested in the mathematical
manipulations behind battles, I promise that the above guide will tell you
everything that you want to know and then some.
* How to upgrade equipment to create the accessories that I recommend. There
are several very good guides available on this topic, my favorite of which
is
http://www.gamefaqs.com/ps3/928790-final-fantasy-xiii/faqs/59357
Having established what I am NOT trying to cover, let me now address what I AM
trying to cover.
* BRIEF descriptions of how to get from one Mission to the next. See Section
XII for details.
* Rewards earned for both the first and subsequent completions of each
Mission.
* Conditions that unlock each Mission. This information is generally brief
enough that I will include it in hopes of keeping the reader from having to
jump around quite so much.
* The name of each Mark and its strengths and weaknesses. In an effort to
keep things brief, these descriptions will be less than comprehensive. I
will merely present you with a quick summary of what I deem to be the
enemy's most annoying characteristics and leave it at that.
* A quick description of how to address the Mark's specific attributes.
* Detailed instructions that hopefully can be followed to get a 5-star result
by anyone with good familiarity with the game.
*******************************************************************************
* *
* III. About YouTube [Y03] *
* *
*******************************************************************************
On YouTube, you will find a multitude of videos showing how to defeat the
toughest enemies in FFXIII. If you are curious, I encourage you to watch
these, but I also caution you to take these videos with several grains of salt.
Personally, I have had limited success trying to duplicate the results that are
displayed in these videos, as many seem to represent the "best-case scenario"
rather than a typical one. An obvious example is one in which an enemy
succumbs to Vanille's Death spell in the first casting and the battle is over
in about 5 seconds. In over 200 hours of gameplay, I have never had the Death
spell work the first time. Never. While such a result is possible, I would
hardly deem it to be likely. I recall watching a video about defeating a
Shaolong Gui in about 2 minutes. After the opening Quake, the turtle only used
stomps and Ultima, so it went down with relatively little effort, making the
battle look easy. Imagine my surprise when I tried to mimic that battle and
got hit with Bay, Dazing my entire team. As I watched helplessly while Quake
and stomps swiftly and mercilessly wiped out my team, I quietly cursed the
person who posted that video for omitting a rather important aspect of the
battle.
My point is that YouTube videos can give you some solid ideas about strategies,
but trying to carbon copy their results can be a frustrating experience. The
methods that I describe in this FAQ are intended to be strategies that the
average gamer can use to get a 5-star rating on any Mission. It may take a
couple of tries, but I am confident that these strategies will ultimately lead
you to success.
*******************************************************************************
* *
* IV. Shrouds, Instant Death, and other "Cheats" [C04] *
* *
*******************************************************************************
In my original version of this FAQ, I went to great lengths in this section to
justify the use of shrouds on a few of the Missions. I have to admit that this
was because I wasn't very skilled at FFXIII, and at that point in my gaming
development I found the use of shrouds to be necessary to keep me from pulling
the disc out of my Playstation and pounding it with a sledgehammer out of
frustration.
In the past few months I have learned much about the game and now find that
all Missions can fairly easily be undertaken and 5-starred without using any
shrouds whatsoever. It is a point of pride for me that I have cast aside these
crutches from my past and can now stand up and fight these battles on my own.
This does not mean that you must follow my example. I will describe for you
how to 5-star each Mission without use of any shrouds (or Eidolons, for that
matter), and I hope that you will find my directions clear enough that you can
duplicate my success. If not, you are certainly free to use shrouds as you
deem necessary. If you do find yourself using shrouds, I would like to suggest
that you should make it a long-term goal to be able to master all Missions
without them. Believe me when I say that I am far from the most skilled gamer
in the community, and if I can win these battle without shrouds, then so can
you.
Sadly, I have not yet reached the point in my skills where I can do without
some other devices that might be deemed "cheating." I recommend the use of
Instant Death on one Mission; Random Instant Chain on 3 other Missions; and a
rather cowardly "Poison and Tank" strategy on Mission 64. In almost all cases,
I have won and 5-starred these 5 Missions without use of these devices.
However, doing so usually took considerable patience and many failures.
My purpose in writing this FAQ is to describe repeatable methods for earning 5-
star ratings on all Mission battles, and sometimes that means using relatively
obscure tools that the game makes available. If you are ethically opposed to
using these tools, then don't. I encourage you to use whatever devices your
conscience allows and to experiment and find your own ways of defeating
enemies. In fact, much of the fun in FFXIII is in experimenting with the
available tools and finding a new path to success. I encourage you to use your
imagination and find methods that work for you. However, if you are seeking a
method that works consistently in a certain battle, I believe that you will
find that I have one for you here.
*******************************************************************************
* *
* V. Who Should Be on Your Team [T05] *
* *
*******************************************************************************
For each Mission, I will suggest a team of characters to use. You should, of
course, feel free to experiment with different combinations of characters and
choose the team members that work best for you. You do, however, need to be
aware that since different characters learn different decks abilities, making
substitutions might undermine the specific strategy that I outline for you.
My default setup is the following team and set of paradigms:
*************************
* Hope * Fang * Light *
******************************
* #1 * Syn * Com * Com *
******************************
* #2 * Rav * Com * Rav *
******************************
* #3 * Rav * Com * Com *
******************************
* #4 * Med * Com * Rav *
******************************
* #5 * Rav * Sab * Com *
******************************
* #6 * Rav * Rav * Rav *
******************************
With a team of Hope, Fang, and Lightning, you have access to all 6 roles even
before developing secondary roles. Once Crystarium Stage 9 is opened, Hope
knows the all-important Haste ability in addition to the main offensive and
defensive buffs. Fang, your most powerful character, is primarily a Commando,
but she is also a decent Saboteur. Lightning works equally well as a Commando
and a Ravager. If necessary, Fang is also a Sentinel, but usually we will
bring in Snow to play that role when necessary. Thus, this team can buff,
debuff, Stagger enemies, and whittle away an enemy's HP very efficiently.
Here's a breakdown of why I like these particular paradigms:
Paradigm #1 gives you up-front buffing and attacking, and the presence of a
Commando will slow the depletion of the Stagger Gauge if there is a pause in
your attack. Paradigm #2 is good for Staggering and then Launching one enemy
at a time, and #3 gives you more attacking power against enemies that you
probably won't Stagger anyway. Remember, though, that if you are facing
multiple enemies, two Commandos will, by default, attack different enemies
rather than focus their attacks on a single enemy. If healing is necessary, #4
lets you recover HP while maintaining offensive pressure on a single enemy.
For enemies with a lot of HP, #5 provides simultaneous debuffing, attacking,
and elevating of the Stagger Gauge of a single enemy. Finally, #6 give you the
quickest method of Staggering an enemy. Although #6 requires developing one of
Fang's secondary roles, the CP cost is modest and well worth the investment.
Many Missions will require adjustments to the default team and Paradigms, but
this is my basic setup for just walking around and for many Missions as well. I
am not suggesting that the above represents a "best" setup, only that it is my
personal favorite. Please don't write to tell me what setup you prefer and
why. I'll preemptively agree with whatever you have to say on this matter and
spare you the trouble of writing.
Now let's examine the individual strengths and weaknesses of your six
characters.
Fang -- For most battles, Fang is an obvious choice. She has the highest
Strength stat of all the characters, and her Highwind attack is one of the most
devastating offensive weapons in the game. She can learn the best abilities in
the game, such as Haste, the four ramped-up buffs (Bravera, Faithra, Protectra
and Shellra), the fundamental debuffs (Deprotect and Deshell), and some special
abilities such as Slow. She is easily the best character in the game, and I
rarely enter a battle without her in the lineup somewhere.
Lightning -- Lightning is a good all-around character. Although her HP total
is a bit low, she hits hard and can learn most major Abilities, such as Haste
and Enfire. With good stats in both Strength and Magic, Lightning is possibly
your most balanced character.
Hope -- Before I started writing this guide, I generally preferred Vanille to
Hope as my Magic-slinger. However, the more thought I gave to the battles, the
more I see the advantages of Hope. In terms of primary roles, Hope is a
Synergist and Vanille is a Saboteur. With Fang on the team, you already have a
Saboteur, so a lineup of Fang, Hope, and Lightning has all 6 roles covered.
Hope knows most of the best Synergist abilities -- Haste, Bravery, Faith, and
best of all the En- spells to instill an elemental attribute to weapons.
Although he can't learn the more powerful Bravera and Faithra spells, the ones
that he knows will generally suffice. On the down side, his HP are the lowest
of any character, but he also has the highest Magic stat. Overall, if we're
considering the portion of the game prior to the point where your characters
move beyond their 3 primary roles, Hope seems to be the support member of
choice.
Vanille -- After Hope, Vanille is your best support person. Her strength is as
a Saboteur, and when constant debuffing is necessary she is your go-to person.
Vanille is a top-notch Medic, and she is the only character who can learn the
Death spell, for which there is no substitute. So, although I tend to use her
less than I use Hope, she can be an invaluable member of your team. Especially
in the first few Missions where your support person is only doing attacks
anyway, feel free to use Vanille and Hope more or less interchangeably.
Snow -- Snow's best function is as a Sentinel. He has more HP than any other
character, and he draws enemy attacks readily. In fact, his character is so
obnoxious that even I want to hit him. I call Snow off the bench when the
battle calls for a dedicated Sentinel, but his modest Strength and Magic stats
make him a poor candidate for a starter on the team otherwise.
Sazh -- In my initial version of this guide, I dismissed Sazh as essentially
useless because of his ridiculously low base stats. As I have learned more
about the game, I reluctantly have to admit that there are times that he is
useful. Early in Chapter 11 (before you have Sprint Shoes for your 3 main
party members), he is your best Synergist because he alone can cast Haste, and
he also knows the other useful buffs (the En- spells, Bravery, and Faith). So,
for Missions 2, 4, and 6, he is your go-to guy for buffing. Once everyone has
Sprint Shoes, casting Haste becomes less important, making Hope a better choice
because he can also act as a Medic and his higher Magic stat makes him a better
Ravager.
Sazh's indisputable claim to fame is his unique Cold Blood Ability. With it,
he can hit an enemy more times in one turn than any other character can.
Although each hit will do little damage, the number of hits per round is the
most desirable trait when using the Random: Instant Chain ability, and it is in
these situations where Sazh will be especially useful. On at least one
Mission, we will also make use of his particularly effective Blitz attack. So,
although Sazh will spend most of his time riding the pine, we will call him in
to help when the situation warrants use of his particular talents.
*******************************************************************************
* *
* VI. Accessories and Weapons [A06] *
* *
*******************************************************************************
Although the game offers an incredibly wide assortment of accessories, I find
that I can get by with a very few. Here is a short list of the accessories
that I recommend and the reasons that I use them.
Sprint Shoes -- For battles with a very short Target Time, these are absolutely
indispensable. They allow you to execute more actions in a fixed amount of
time without making you take the time to case Haste, and their use does not
lower the Target Time. This allows you to finish those easy battles quickly
enough to earn 5 stars. However, if the battle is going to take more than a
minute or so, the effects of the Sprint Shoes will wear off before the battle
is over, and you may need to cast Haste manually anyway. (Geez -- whatever
happened to Sprint Shoes that kept the wearer permanently in Haste?) In these
cases, you may have a better use for the Accessory slot. The bottom line is
that if the Target time is less than a minute, you should almost ALWAYS equip
Sprint Shoes.
For the record, you can get Sprint Shoes by upgrading and then dismantling
Tetradic Crowns and Tetradic Tiaras. I strongly recommend that as soon as you
reach the Archylte Steppe, you take the one Tetradic Crown that you have in
your inventory, max it out with a mere 1000 Exp and dismantle it. You will get
a pair of Hermes Sandals, which you can then convert to a pair of Sprint Shoes
with a mere 600 Exp and an inexpensive Perovskite. Equip them on Fang
immediately and watch how much faster your battles end.
You have two primary options for making Sprint Shoes early in Chapter 11. As
soon as you finish Mission 14, you can dig for Chocobo Treasure. On your 5th
and 10th digs, you will get a Tetradic Crown and a Tetradic Tiara which can be
converted to Sprint Shoes. Alternatively, you can repeat Mission 7 multiple
times for Tetradic Crowns (common drop) and Tetradic Tiaras (rare drop). The
Mission 7 Ci'eth stone and the Mark are so close together that this is quick
and relatively easy to do. (Thanks to alert reader David Hay who reminded me
of this source of Tetradic Accessories as well as the less expensive method for
getting Sprint Shoes described above.)
For what it's worth, repeating Mission 7 is not a bad way to farm some gil.
Including the time necessary to run to the Ci'eth Stone and back to accept the
Mission and fight the battle, 2 minutes or so per cycle is about all the time
necessary. Each battle win guarantees you 5 Bomb Cores that can be sold for
600 gil each, which is 3000 gil per battle for starters. You also have chances
for the Mark to drop Tetradic Crowns (15,000 gil each) and Tetradic Tiaras
(40,000 gil each). There are certainly gil-farming methods with higher gil-
per-hour production, but at this stage of the game, this really isn't that bad.
However, I digress -- back to Accessories.
Morale Talisman and Blessed Talisman -- I almost always equip the Morale
Talisman on Fang and the Blessed Talisman on my designated Magic-slinger. (The
Morale Talisman is made by upgrading a Hero's Amulet, which you should have
found in your wanderings. It can also be purchased at Magical Moments for a
paltry 5000 gil.) For relatively short battles (under a minute or so)
these accessories can be very helpful in lowering your battle time without
lowering the Target time (see items 2 - 4 in Section VIII of this guide for
more details.) When I first began playing FFXIII, I remember being irked that
the effects of these accessories wear off the same way that spells wear off.
However, as I spent more time with the game I realized that since most battles
are over quickly anyway, you will usually get the benefits of the Talismans for
the entire duration of a battle. Moreover, these accessories actually do more
to boost attack power than stat-raising accessories such as Kaiser Knuckles do
without the down side of decreasing Target time. Let me give you an example.
Suppose a character has a Strength stat of 1200, a fairly modest number after
Oerba. If you can somehow upgrade a Power Glove to Kaiser Knuckles (unlikely
at this stage of the game), that accessory will boost your Strength by +300 to
1500. It will also decrease battle Target times by roughly 7%, but let's
overlook that for now. Replace those Kaiser Knuckles with a Morale Talisman,
and your attack power is increased by a whopping 40%, effectively making your
Strength 1680 WITHOUT altering the Target times! Also, since the Talisman
increases attack power by a percentage rather than a fixed amount, it actually
becomes increasingly effective as your character powers up. The down side, of
course, is that the Bravery effect of the Talisman will wear off and can be
removed by especially obnoxious enemies, but in general the Talisman is one of
your best tools for boosting offense. The bottom line is that we will usually
be using these accessories, so it is worth your time and gil to make yourself a
Morale Talisman or two and keep it (them) and the Blessed Talisman close by at
all times.
Incidentally, in case this isn't obvious, if directions tell you to, "Have Hope
cast Brave and Enfire on both Fang and Lightning," you clearly don't have to
cast Brave on a character who is wearing the Morale Talisman unless, of course,
it is late enough in the battle that the effect of the Talisman have expired.
Power Glove -- First of all, don't EVER waste 840,000 gil buying a Dark Matter
to beef your Power Gloves up to Kaiser Knuckles. The difference is only +50
Strength, and you will get plenty of Dark Matters for free later on. Likewise,
do not buy Scarletites to upgrade Warrior's Wristbands to Power Gloves. You
will get plenty of Scarletites for free in Chapter 12.
Strength-boosting Accessories are probably the most over-used Accessories in
the game. Until Stage 9 of the Crystarium opens up, these can make a real
difference in battle times. When a character has a Strength stat of, say, 400,
a +120 Brawler's Wristband provides a 30% increase, and a +180 Warrior's
Wristband provides a 45% increase. However, later in the game when a character
has a Strength stat of 2000 for example, these increases shrink to 6% and 9%.
Even a maxed out Power Glove (+250 Strength) would only provide a 12.5%
increase. Keep in mind that ANY increase in Strength (assuming that the
character's Strength stat is higher than her Magic stat) is going to result in
a corresponding decrease in Target Time, which is never a good thing. My point
is this: The earlier in the game you are, the more benefit you are going to
received from Strength-boosting Accessories. However, once you have upgraded
your weapons and filled out Stage 9 of the Crystarium, you can probably find
better uses for those Accessory slots.
If you still have your doubts about this, try this experiment. Once you have
Stage 9 mostly filled in for primary roles, and have upgraded your weapons to
maxed out Tier 2, try a certain battle with and without stat-boosting
Accessories and compare your scores (NOT battle times -- scores.) You will see
that there is very little difference. For very short battles, you should see
your scores actually go up, especially if you give your two non-leaders Aurora
Scarves instead of stat-boosters.
Having said all of that, I alert you that you will encounter advice in this
guide that contradicts this philosophy. This will mostly be because I haven't
found and corrected all of those contradictions. All in good time.
Weirding Glyph -- Use these or their earlier versions to boost Magic in the
same way that Power Gloves are used to boost Strength. For details, see the
previous section on Power Gloves.
Aurora Scarf -- The Aurora Scarf can be a great assistance in battles with very
short Target Times. The Aurora Scarf is a cheap (350 Experience plus a
Rhodochrosite) upgrade from the Whistlewind Scarves that you find along the
way, and it gives the wearer a full ATB Gauge at the beginning of the battle.
This means that one character can execute a full queue of attacks while
everyone else is waiting for the ATB Gauge to charge. As you can imagine, this
can be a HUGE advantage. Also, when paired with another Accessory or weapon
with the ATB charge ability (such as Lightning's Axis Blade), it also acts like
a Lite version of Haste, causing the ATB Gauge to charge faster. Overall, for
Target Times of a minute or less, the Aurora Scarf is a highly efficient way to
get in more attacks per unit time without altering the Target Time. However,
don't waste an Accessory slot on the Aurora Scarf in battles in which you are
going to get a Preemptive Strike, since you begin those battles with a full ATB
gauge anyway.
Random Instant Chain Accessories -- These include Survivalist Catalogue,
Hunter's Friend, Speed Sash, Energy Sash, and Champion's Badge. Many of these
items are rewards for completing Missions, some are found in Treasure Balls,
and some can be purchased. For more information on how these items are used,
please refer to Section IX below. For now, just make a mental note not to sell
any of these Accessories because we will be using them.
Black Belt/General's Belt -- In situations where you are using a dedicated
Sentinel, it can be useful to equip him with a couple of these Accessories for
additional protection against physical attacks. They really aren't necessary,
so I would avoid spending a lot of money upgrading them. I certainly would not
spend the 220,000 gil each to buy Adamantites to turn them into Champion's
Belts. A maxed out Black Belt offers 20% protection, meaning two of them give
36% protection, which is plenty good enough. (In case you're wondering how
that math works, 20% reduction in damage means that you only take 80% of the
original damage amount. 80% of 80% of the damage would be 64% of the original
damage, which is a 36% reduction.) The next Upgrade from a Black Belt is a
General's Belt, which can be purchased for 12,000 gil, and a pair of General's
Belts will provide 44% reduction in damage. The best that you can hope to get
from 2 maxed out Champion's Belts is 51% reduction, which really isn't worth
the gil, especially since, as I mentioned before, you can do without these
Accessories altogether.
Witch's Bracelet -- Witch's Bracelets reduces damage from Magic attacks the
same way that Black Belts reduce damage from physical attacks. They will be
absolutely crucial to success in Mission 62, one of the most difficult Missions
in the game. However, we will use them to our advantage in Missions 47 and 64
as well, so keep them on your radar.
Genji Glove -- You will win your first Genji Glove in Mission 51, and we will
use it rarely. With the exception of the very toughest and longest battles, it
is rare that you need to -- or have the opportunity to -- inflict more than
99,999 damage to an enemy with a single hit. Most enemies will die long before
you Stagger them, and even those that you Stagger will generally die very
quickly after being Staggered even without the Genji Glove. I will notify you
when using this Accessory is appropriate, but otherwise leave it on the shelf
and fill your slots with the above-mentioned accessories instead.
Gaian Ring (Upgrade from Clay Ring and Siltstone Ring) -- Defeating the big
Turtles such as the one in Mission 63 is much easier when each team member is
equipped with a maxed out Gaian Ring. We will only use these Rings on this one
Mission, but you will find them equally useful when you start farming turtles
for Platinum Ingots, Trapezohedra, and Dark Matters. You will get the
necessary upgrading catalysts (Uraninite) from completing Missions 29, 30, 36,
and 57, conserve these and you can avoid buying them for 45,000 gil each.
There is also one in a treasure ball in Sulyya Springs, protected by the first
group on the left as you enter the area from Atomos.
Pain Deflector/Efflugent Cape -- Mission 54 will go a lot easier if you build
yourself 3 maxed out versions of each of these. These are upgrades from Pain
Dampeners and White Capes, a few of which you will find in your wanderings.
Others can be purchased for 3000 gil from B&W Outfitters. Each Deflector gives
60% protection from Pain, and each Cape gives 60% protection from Fog. In
Mission 54, this will be a huge plus. No hurry making them -- we'll only use
these Accessories once.
That's really it! Although we will tweak our equipment for certain battles,
the short list above will be sufficient to earn all 5-star ratings.
*******************************************************************************
Regarding weapons -- First of all, if you are interested in my personal
preferences for weapons that are worth upgrading to Tier 2, this information,
oddly enough, does NOT reside in this section on "Accessories and Weapons" but
rather in Section X, "Managing Your Gil and CP." Go figure.
If you have studied FFXIII at all, then you are aware that upgrading weapons is
one of the most expensive and time-consuming undertakings in the game,
especially if you want maxed out Tier 3 weapons. Let me assure you that in
terms of 5-starring all of the Missions, you simply don't need Tier 3 weapons.
In fact, in your attempts to 5-star all of the Missions, use of Tier 3 weapons
can be counterproductive. Allow me to explain.
We are all seduced by the incredible Strength and Magic boosts provided by Tier
3 weapons. However, the game designers went to great lengths to ensure that
raw power alone would not be sufficient to master the battles in this game.
Unless you get a Preemptive Strike, achieving a 5-star rating requires
completing the Mission within a time frame of 70% of the assigned Target time.
(If you get a Preemptive Strike, you can 5-star a Mission as long as your
battle time is no more than 92% of the Target time.)
If you use Tier 3 weapons, you can clearly complete most battles in less time,
but that does not necessarily facilitate a 5-star rating. It turns out that
you pay a double penalty for using a Tier 3 weapon. First, the extra Strength </pre><pre id="faqspan-2">
(or Magic) added by the upgraded weapon will always reduce the Target time.
While it is not strictly true that doubling your attack power cuts the Target
time by half, this is a pretty good approximation, especially for longer
battles. However, a less well-known formula in the game lowers the Target time
by an additional 7% (or so) based on the addition of another ATB segment. That
is, the Target time for a battle in which each team member uses a Tier 3 weapon
and has 6 ATB slots is roughly 7% less than it would be if each team member had
a Tier 2 weapon with identical stats and only 5 ATB slots! This assessment is
slightly misleading because there is a third factor to consider. It turns out
that this decrease in Target time is roughly offset by the fact that each ATB
slot fills about 15% faster when a Tier 3 weapon is equipped than when a Tier 2
weapon is equipped. I'm sure that you can see that the math gets rather
complicated quickly! My point is that those huge Strength and Magic increases
that you get from Tier 3 weapons ultimately don't make nearly as much
difference in your battle ratings as you might initially think.
One of my goals in writing this guide is to make the strategies accessible
without forcing the gamer to spend hours raising gil to purchase or upgrade
exotic equipment. No technique described in this guide requires any weapon to
be upgraded beyond Tier 2. Upgrading weapons to Tier 2 takes a little time and
effort, but compared to making Tier 3 weapons, this effort should be minimal.
You should be able to 5-star all 64 Missions without having to spend countless
boring hours grinding for gil or CP.
*******************************************************************************
* *
* VII. The Importance of Libra [L07] *
* *
*******************************************************************************
When fighting a new and powerful enemy, always remember to Libra the enemy
first. Since you are only able to control the Leader of the party, the actions
of the other two members are more or less random unless they have specific
intel on the enemy's weaknesses. For example, an enemy may be weak to Fire but
absorb Water. Before using Libra, your team may unwittingly cast Water spells
since they don't "know" any better. Once you scan the enemy with Libra (or a
Librascope), though, they will use the best spells -- in this case, Fire-based
ones -- thus optimizing the attack. Likewise, if an enemy is weak to a debuff,
your team will prioritize that spell as soon as it has been determined to be a
weakness. If an enemy is immune to a spell, your team won't waste time casting
it.
You should be aware that one casting of Libra will generally NOT give you full
information about an enemy. Enemies have built-in resistances to Libra in much
the same way that they have resistances, say, to debuffs. Therefore, two
castings may be necessary to get full enemy intel. If a particular battle
leaves you little time for repeated castings of Libra, use a Librascope
instead, as it will always give you full intel on an enemy with one use.
If you aren't sure how much intel you have on an enemy, you can always hit the
R1 button during battle to see what is known. If your teammates' AI seems to
defy logic, check and see how much information you have about the enemy. Libra
takes a few seconds to execute, but on difficult enemies it is always time well
spent for it helps you optimize your attack.
*******************************************************************************
* *
* VIII. A Couple of Quick Tips [T08] *
* *
*******************************************************************************
1. This may seem really obvious, but unless the Mission battle is very close
to its corresponding Ci'eth Stone, always use the Save point that is
closest to each Mission battle before attempting the battle. That way, if
you don't get 5 stars on your first try, you can start again from the Save
point rather than having to hike all the way back to the Ci'eth stone.
Always assume that you are going to have to try the battle more than once.
2. You need to become proficient at sneaking up on enemies for a Preemptive
Strike (PS). A PS leaves all enemies at 95% Stagger for a period of 10
seconds, making most enemies very easy to finish off. This is especially
useful if the enemy is difficult to Stagger or has a lot of HP or both.
When a Mission strategy depends on a PS, I will try to give you detailed
guidance on how to obtain a PS in that particular battle, but generally the
method is the same. You need to approach an enemy slowly from outside the
field of vision of all enemies in the battle so that you engage any one
enemy without being detected. If there is just one enemy, this is usually
not that difficult, but if you are approaching a team of 5 or 6 enemies, a
PS can be tricky to achieve. Often (but not always), use of Deceptisol
before battle will gain you an automatic PS, but if you can duplicate my
setups and results, use of Deceptisol should never be necessary.
3. Remember that getting a 5-star rating is all about how your battle time
compares to a Target time. For most battles, the magic number is 70%.
That is, to earn a 5-star rating (without getting a Preemptive Strike),
your battle time must be no more than 70% of the Target time. (If you get
a Preemptive Strike, that 70% figure climbs to almost 92%.)The calculation
of the Target Time involves a lot of variables, but you should be aware
that for each team member, only the larger of the two attack power numbers
(Strength and Magic) is one of these variables. For example, if a
character has Strength = 2000 and Magic = 1500, the 1500 will be ignored
and the 2000 will be used to determine Target time. The higher that number
is, the lower the Target time is. However ...
4. Bravery and Faith increase damage without changing Strength or Magic stats
and therefore do not affect Target times! The tradeoff is that it takes
time to cast these spells. Therefore, buffing your characters is generally
counterproductive if the Target time is especially low, but can often help
you win a higher star rating if the Target time is high (say, a minute or
more.)
5. Likewise, Haste gives you more actions per unit of time but does not factor
into the calculation of Target time. This is why Sprint Shoes are your
best accessory for short battles. In longer battles, Haste is almost
always beneficial but you are going to have to spend some time casting it.
However, I would be very reluctant to spend the time casting Haste if the
battle is about to end anyway.
6. Another item that will increase the number of actions per unit of time is
Lightning's Axis Blade/Enkindler. When equipped along with specific
Accessories such as Sprint Shoes and Aurora Scarf, this weapon will
actually reduce ATB charge time noticeably and give Lightning more actions
per minute. To see what I mean, equip Lightning as described above, put
her as the team leader, and watch how fast her ATB Gauge charges! The
tradeoff is that this weapon boosts Strength by less than some more obvious
choices (such as the Lionheart/Ultima Weapon), but it more than compensates
by giving Lightning more hits. Since this is a synthesized ability, it
lasts for the duration of the battle and cannot be removed by enemy actions
the way that Haste or Bravery can. On the down side, promoting this weapon
to Tier 2 requires an Adamantite which can only by purchased for an
exorbitant 220,000 gil. Even so, this weapon should be another of your
tools for increasing damage without reducing Target time, thus facilitating
5-star ratings.
7. Remember that Ravagers make the Stagger gauge rise more quickly but
Commandos generally do more damage per unit time. If your enemies are
going to die before or immediately after they are Staggered anyway, you
want to use Ravagers less and Commandos more. Use Ravagers against enemies
that, for one reason or another, need to be Staggered. However, remember
that a Chain Gauge that is elevated but doesn't reach the Stagger point
will still result in increased damage. For example, if the Stagger point
is 200, pushing the Chain Gauge up to 150 won't Stagger the enemy, but it
will cause each attack to do 50% more damage.
8. Finally, remember that although Commandos cause the Stagger gauge to rise
more slowly than Ravagers, their attacks also stabilize the gauge by making
it fall more slowly when you stop attacking to heal, buff, or debuff.
*******************************************************************************
* *
* IX. Random Instant Chain (RIC) [R09] *
* *
*******************************************************************************
Back in Section VI (Accessories) I made reference to this ability, but I
didn't really explain it. Random Instant Chain is a very useful "passive"
ability that will facilitate 5-starring several Missions, so let's take a
moment to examine what it is and how it works.
Certain combinations of equipment will give your characters the ability to fill
the Stagger Gauge of some enemies immediately. To impart this ability to a
character, you need to equip that character with at least two items (two
Accessories or one Accessory and a weapon) from the following lists:
Accessories: Survivalist Catalogue, Hunter's Friend, Speed Sash, Energy Sash,
and Champion's Badge.
Weapons: Hauteclaire*, Durandal*, Lionheart, Ultima Weapon, Rigels*, Polaris
Specials*, Procyons, Betelgeuse Customs, Unsetting Sun*, Midnight Sun*,
Alicanto*, Caladrius*, Heavenly Axis*, Abraxas*, Taming Pole*, Venus Gospel*.
******************************************************************************
* *
* Special Note: You will observe that the vast majority of these weapons *
* (those marked with a *) inherently have the seemingly contradictory *
* "Stagger Lock" ability. This means that although you can fill an enemy's *
* Stagger Gauge when this weapon is equipped, you cannot actually Stagger *
* him. The actual Staggering must be accomplished by a team member who is *
* NOT hampered by the Stagger Lock ability. Thus, when trying to employ *
* the RIC ability, you will never Stagger your enemy if all 3 team members *
* are equipped with weapons that have the Stagger Lock ability. That is, *
* make sure that at least one team member is actually able to Stagger the *
* enemy. *
* *
******************************************************************************
So, for example, if Fang is equipped with the Venus Gospel as a weapon and has
a Survivalist Catalogue in one of her Accessory slots, she will have this
ability. When you are on the Equipment screen, look at the list of "Passive
Abilities" on the right and you should see the words, "Random: Instant Chain."
Interesting observation -- A character equipped with RIC gear doesn't even have
to attack an enemy to fill its Stagger Gauge. You can get an RIC by casting
debuffs on an enemy as well!
The probability that RIC will work on any given hit is low (0.5%), but since
each character executes multiple attacks per round, it works far more quickly
than that 0.5% figure leads you to believe. In fact (quick math lesson): If
each of 3 team members attacks 5 times per round, the probability of an Instant
Chain in one round of attacks is 1 - 0.995^15 or about 7%, which doesn't
sound that bad! Here is a table of values for the probability of RIC working
as a function of the number of hits landed.
****************************** *
* # of hits | Probability *
*------------------------------*
* 10 | 4.9% *
* 20 | 9.5% *
* 40 | 18.2% *
* 60 | 26.0% *
* 80 | 33.0% *
* 100 | 39.4% *
* 120 | 45.2% *
* 140 | 50.4% *
* n | 100*(1-.995^n)% *
********************************
Notice that as the number of hits increases, the probability of success
approaches 100%. Although many battles are over in just a couple of rounds,
longer battles (like some Missions) will go many rounds. Hitting the target
over 100 times happens more often than you might think. Since more hits means
more chances of succeeding with RIC, you want to maximize the number of times
that you hit the enemy in each round to get the quickest possible Instant
Chain. This naturally suggests two characters' special abilities: Lightning's
Army of One (which hits 11 times per turn) and Sazh's Cold Blood (which lands a
whopping 17 hits per turn.) Personally, I have had very limited success
getting a RIC with Lightning's Army of One attack. It almost seems as if each
turn counts as 1 hit instead of 11. I say this because it has often taken 30 -
40 rounds or more to get RIC to hit. I will let you be the judge here, but
there will be no Missions in which I recommend using Army of One to get a RIC.
This leaves Sazh as the undisputed King of Random Instant Chain. However, this
does not mean that he is always the best choice when this method is needed.
Although Sazh lands a lot of hits, he lacks attacking power. He is a good
choice for battle in which you need a very quick Stagger and the enemy has
relatively few HP to shave off once it is Staggered. However, if the length of
time it takes to fill the Stagger Gauge is less important than what you do once
it is filled (for example, with an enemy with lots of HP that you need to kill
in one Stagger), your best option is generally to have a stronger team (i.e.,
include Lightning instead of Sazh) and have multiple allies equipped for RIC.
Please note that when RIC hits, it does not Stagger the enemy -- it only fills
the Stagger Gauge completely. The next hit after the one that fills the Gauge
should Stagger the enemy unless, of course, the character that does so is
equipped with a weapon that carries the Stagger Lock ability.
Random Instant Chain doesn't work on any enemy whose level is 50 or above, but
when it does work, it is a nifty ability that can make a seemingly impossible
battle manageable. In fact, since my default weapon for Fang is a Random
Instant Chain weapon and requires only one additional RIC item to activate this
ability, I often keep an RIC Accessory equipped on Fang pretty much all the
time. This will generally just mean equipping her with one less Power Glove,
but as I've mentioned multiple times, this will increase the Target time while
providing that chance -- however small it may seem -- of filling the enemy's
Stagger Gauge instantly.
*******************************************************************************
* *
* X. Managing Your Gil and CP [C10] *
* *
*******************************************************************************
When you first arrive in the Archylte Steppe early in Chapter 11, you may be
prepared mentally to undertake Missions, but your team is likely to be ill-
prepared to confront these tough enemies at this point. Thus, I strongly
recommend that you spend an hour or two farming CP before proceeding. Although
CP farming can be tedious and is generally a poor use of your time in FFXIII,
this is one of only a couple of places in the game where it makes a certain
amount of sense. There are two main reasons for this. First, you are going to
want that boost in stats before proceeding with the storyline anyway. Second,
these stat boosts will allow you to 5-star many Missions early in Chapter 11,
thereby preventing you from having to go back and re-attempt them later. This
will save you considerable time, especially considering that many of these
early Missions involve significant amounts of travel.
Having accepted the idea of dedicating some time to farming CP, the following 3
questions naturally arise:
1. How much CP should you farm before proceeding?
2. Where should you spend your CP once you have earned it?
3. Where can you earn maximum CP in minimum time with minimum tedium?
Before proceeding with the storyline, you will probably want to nearly fill
out Stage 8 of the Crystarium, but for undertaking Missions you can certainly
get by with less. My advice is to find the role in which each character gets
an additional Accessory slot and move towards that point in the Crystarium as
directly as possible. While you are doing so, you will get lots of good
upgrades in attacking power and HP, and that extra Accessory slot will give you
the opportunity to further improve your characters' readiness for battle. Once
each character has that third Accessory slot, you should be strong enough to
proceed. Any further CP you amass can be directed towards earning that fifth
ATB slot. The ATB slot is highly desirable because adding that 5th slot makes
each ATB slot fill roughly 20% faster, sort of like a weaker version of Haste
except that it cannot be Dispelled. You should also consider developing Fang
as a Saboteur until she learns Deshell -- it will come in handy in Mission 7.
When you finally fill out Stage 8, I would advise you to resist the temptation
to develop secondary roles for your characters. The CP cost is simply too high
compared to the increases in stats, and you will be able to get much better
returns on your investment towards the end of Chapter 11 when Stage 9 opens up.
The new nodes in Stage 9 will require roughly 1.2 million CP to activate, so
the more CP you have saved up for the event, the better.
This leaves the question of where to farm your CP. The traditional choices are
the Behemoth King that lopes around the southeast area of the Steppe (4000 CP),
and the Behemoth King/Megistotherian combination at the northern area (6600
CP). Both of these are guaranteed Preemptive Strikes, and to win these battles
you mostly need to be strong enough to finish the Behemoth King in one Stagger.
Doing so when you first arrive is easier said than done, but feel free to
attempt these battles if you wish. I find that fighting the exact same battle
over and over again gets very monotonous very quickly.
My personal choice is to proceed into the Mah'habara cave at the northern end
of the Steppe as if you were continuing with the storyline. There you will
meet basically two enemies -- Hoplites (mechanical guards) and Cryohedra
(bombs). The former are weak against Thunder, and the latter are weak against
Fire. Since Sazh is your best Synergist at this point, make him the leader
and have Fang and Lightning both act as Commandos. Have Sazh act strictly as a
Synergist, first casting the appropriate En- spell on both Commandos before
adding Haste and, if necessary Bravery, and watch how fast those enemies go
down! These battles will yield anywhere from 1500 CP to over 5000 CP, and most
are over in just a few seconds. As a plus, it is very easy to get Preemptive
Strikes on most of these battles, especially when approaching from the other
direction (going towards the Archylte Steppe) because the enemies' backs will
be towards you and Hoplites are not what I would call overly perceptive.
When you first get to the Steppe, you may be too weak to take on the Cryohedra.
I suggest that you follow the main path until you alert the Boxed Phalanx. You
don't want to fight him yet because he is definitely too tough for you at this
point. However, alerting him will cause the 4 Hoplites you just fought to
respawn. Fight you way back to the Save Point, spend your CP(prioritizing new
Accessory and ATB slots), and Save.
When you get a bit stronger, you can venture into the branch to the right after
alerting the Boxed Phalanx. After defeating the 5 Hoplites in the dead-end
room, there is a Juggernaut behind Door #3, and you really don't want to fight
it yet. For one thing, your team simply isn't up to the task, but perhaps more
importantly, if you beat the Juggernaut, all of those enemies you just wiped
out will not respawn, thus essentially defeating the purpose of this CP-
harvesting spree. So, what you want to do is walk up to the door, skip the
animation, and, when the battle begins, choose Retry. When the screen reloads,
the Juggernaut will be gone but the 5 Hoplites will be back for you to
slaughter again. Repeat until you get bored, then backtrack to the Save point
just past the first set of Hoplites. When you get back to the Save Point, cash
in your CP, Save, and repeat. At the very least, I would continue this process
until all 6 characters have earned a third Accessory slot and an additional ATB
segment. Planning ahead for Mission 07, I would also advise you to develop
Fang's Saboteur role until she learns Deshell. All of this leveling up can be
accomplished in an hour or two tops, and you'll be surprised at how much
stronger and better prepared for the challenges ahead your characters will be.
Although this method may (or may not) yield fewer CP per hour than the
traditional options, there is a big advantage to fighting Hoplites and
Cryohedra -- they drop Components that are actually worth using. You will
quickly accumulate Solenoids, which you can either use to upgrade equipment or
sell for 420 gil each. You will also get several Bomb Cores (which sell for
600 gil each) from the Cryohedra. Behemoth Kings, on the other hand, drop
nothing of value. Thus, fighting Hoplites is quicker and easier (especially
when you first arrive in the Steppe) and also addresses your needs for both CP
and gil.
Here is a quick example. When my team got strong enough to beat the Boxed
Phalanx, I made a round trip from the Save Point to the left branch, fought the
5 Hoplites, did a Retry on the Juggernaut battle to reset the Hoplites, fought
my way back to the branch, turned left and fought the Boxed Phalanx, and fought
my way back to the Save Point. This round trip took me just under 12 minutes.
The battles yielded 47,670 CP, and the combined value of the items dropped was
8340 gil. The CP gains are roughly equivalent to fighting the Behemoth
King/Megistotherian combination 7 times, meaning that to earn the same CP per
hour you need to be able to win those battles in 1:40 cycles (don't forget to
include the time that it takes to reset the battles!) Even if you can match
those times, you would not get anywhere near the gil that you can earn in the
cave (remember that the scarcest commodity in FFXIII is gil). Moreover, since
you are constantly moving and fighting different battles, the battles in the
cave don't seem nearly as repetitive.
Speaking of gil, while you are in Oerba, you should repair Bhakti and receive
items worth roughly 500,000 gil! This is a good time to upgrade a couple of
weapons. You can certainly build maxed out Tier 2 weapons for Fang, Hope, and
Vanille. Building a weapon for Lightning now is optional, as you may want to
wait until early Chapter 12 when you find her Lionheart. Snow doesn't really
need a weapon upgrade (since we use him mostly as a Sentinel), and Sazh doesn't
have many good options for weapons, so he can wait also. Upgrading weapons is
very expensive and is therefore a significant commitment. Before undertaking
this, I encourage you to refer to the following FAQ which does an excellent job
of outlining the advantages and disadvantages of each weapon:
http://www.gamefaqs.com/ps3/928790-final-fantasy-xiii/faqs/59331
I will summarize for you my weapon choices, but keep in mind that these are
personal preferences and that you should feel free to make your own decisions.
(I would like to give credit to Drogan13, who authored the above FAQ from which
I got the information below.)
******************************************************************************
******************************************************************************
Fang -- Taming Pole -- Yes, it carries the dreaded "Stagger Lock" ability, but
it also has the RIC ability, at least until it reaches Tier 3. This means that
you can endow the RIC ability on Fang while tying up only one of her Accessory
slots. At +921 (!) boosts to both Strength and Magic, this one is hard to
resist for your best offensive character.
Lightning -- Blazefire Saber -- It has no special abilities, but neither does
it have any liabilities. The Lionheart is a good choice, with its RIC ability,
but at Tier 2 it lags the Blazefire Saber by 110 points on both Strength and
Magic. Also, the Blazefire moves up to Tier 2 with an inexpensive Perovskite
instead of a more expensive (before Chapter 12) Scarletite. This is a close
call, but generally I get impatient and upgrade the Blazefire Saber so that I
can use it in Chapter 11.
Vanille -- The Belladonna Wand is the most natural choice for Vanille. It
gives your best Saboteur improved debuffing, and at Tier 2 it boosts her magic
by +335. Don't think too hard on this one -- just do it.
Hope -- Hawkeye -- The catalyst for Tier 2 is again a cheap Perovskite, and
maxed out at Tier 2 it boosts Hope's Magic by +506. It carries no adverse
abilities and seems a pretty obvious choice.
Sazh -- ?????? -- This is a tough one because almost all of Sazh's weapons have
liabilities. Sazh has two weapons with the RIC ability, and since RIC is his
primary offensive function, I looked there first. The Rigels are no good
because they have Stagger Lock which, paired with Fang's Taming Pole, make it
too hard to Stagger an enemy. The Procyons only give boosts of +94 Strength
and +49 Magic at Tier 1, and promoting to Tier 2 requires a ridiculously
inaccessible Dark Matter. One option is to max out the Procyons at Tier 1 and
just leave them there, accepting the reality that Sazh doesn't do much damage
anyway. Unfortunately, for Mission 60 you are going to want for Sazh to be
able to do some damage. This might push you towards the Deneb Duellers. They
have no adverse abilities and upgrade pretty easily to Tier 2 with a
Perovskite. Max them out and get +373 Strength and +636 Magic, which is pretty
good. The down side is that to equip Sazh with the RIC ability, you'll have to
use two of his Accessory slots for RIC Accessories. Then again, with the stat
boosts these guns provide, Sazh won't need Strength or Magic boosting
Accessories so much. It's a tough call, and I'll leave it up to you.
Snow -- Paladin -- The Paladin is the obvious choice for Snow. It gives
him the Improved Guard ability, which reduces damage by 8% when he acts as a
Sentinel, his usual role. If you upgrade this weapon to Tier 2, you can up
this damage reduction to 16% (!) In any Mission in which he is a Sentinel,
this can be helpful. However, since we don't want to increase Snow's Strength
or Magic stats any more than necessary (since this would decrease the Target
Times), upgrade this weapon to Tier 2 and then STOP. Don't add any more
Experience than necessary.
We now return you to your originally scheduled programming . . .
******************************************************************************
******************************************************************************
One specific step that you can take to conserve gil is to never EVER buy
Scarletites. Each Scarletite costs 100,000 gil, but if you can wait until you
get to Eden, you will fight enemies that drop them rather generously, and you
can get as many as you need for free. So, when upgrading your Strength
Accessories, hold off upgrading your Warrior's Wristbands to Power Gloves and
your Sorcerer's Marks to Weirding Glyphs. You can easily get by without doing
this last Upgrade, and you will be grateful later on when you need that gil for
other purposes. Perform these upgrades when the Sacrifices that you will fight
in Chapter 12 drop some Scarletites for you.
When you complete the events in Oerba, Stage 9 of the Crystarium becomes
available to you. Unless you squandered your CP on developing secondary roles
for your characters, you should have a good savings account of CP to spend. I
would advise you to use your CP to max out Stage 9 -- prioritizing the paths
that lead to each character's special attack, e.g. Vanille's Death spell -- and
then undertake some Missions (see Section XI below) before proceeding with the
story line. You will get some additional CP in the normal process of pursuing
these Missions, but if you feel the need for more immediate gratification, you
can always return to the Northern Highplain of the Archylte Steppe and fight
the Behemoth King/Megistotherian combination ad nauseum for 6600 CP per battle.
By now, these battles should be quick and easy. Since you are going to max out
the Crystarium LONG before you satisfy your need for gil, you probably want to
spend a minimum amount of time farming CP, but this is the one other time prior
to the end of the story line where it makes a certain amount of sense. The
stat increases that you will get from Stage 9 should get you through the end of
the game when Stage 10 opens up.
As you fight your way through Chapter 13 on your way to the game's end, you
will find yourself nearing your maximum capacity for CP, which is 999,999.
Since you have maxed out Stage 9 Crystarium for all of your characters'
primary roles, you are faced with a dilemma here. If you don't spend your CP,
you are going to exceed your storage capacity and basically lose the use of
some CP that you've earned. However, once Stage 10 opens up after the final
battle, you are going to be able to get much more bang for your buck spending
your CP there rather than developing secondary roles. Here's my advice.
Try to keep a reserve of about 750,000 - 800,000 CP as you fight through
Orphan's Cradle. If your CP total gets above 900,000 or so, spend about
100,000 of them on secondary roles. Item 10 in the next section will give you
some advice about prioritizing secondary roles to develop. Mostly, just keep
your CP total below 900,000 so that you don't lose any hard-won CP.
Once Stage 10 opens up, you are going to need roughly 700,000 CP to fill out
each primary role for each character. If you look at the nodes that you are
activating, you will find that the vast majority of Stage 10 CP go towards
increasing HP. Each character will get a little added Strength, a little added
Magic, and a bunch of HP. Oh, yes -- and one more very important ability -- an
extra Accessory slot. So, when you start spending all that stockpiled CP, be
sure to locate for each character the one primary role that has a node for a
new Accessory slot and fill out that role first.
You are now in the same situation that you were in Post-Oerba. You are ready
to take on new Missions, but you need a lot of CP to fill out your Crystarium.
Since you're mostly just getting HP from the Crystarium anyway, I advise you
to avoid farming CP and go directly to the Missions. Again, you will get CP
fighting your way to the Marks and fighting the Marks themselves, and you avoid
fighting the same enemy over and over again, which get boring. And repetitive.
And repetitive. And boring. You get the idea. Just keep your Growth Egg
Equipped, and you will be amazed at how quickly Stage 10 fills in for you.
Before embarking on postgame Missions, you are probably going to need some gil
To finish upgrading weapons and Accessories. There are certainly plenty of
ways to earn gil now, but I usually march through Eden to Leviathan Plaza and
back again. On the way, you can beat up on the following enemies: Sacrifices
(who drop Perfumes at 12,500 each and Scarletites at 7,000 gil each); Sanctum
Inquisitrix (who drop Credit Chips at 500 gil each and Perfumes); and Sanctum
Celebrants (who drop Credit Chips and Incentive Chips at 2500 gil each). You
probably want to avoid fighting the Juggernaut, but if you lure him out of his
hallway, you can get past him without a fight. Alternatively, he is pretty
easy to Preemptively Strike. The run takes a while, but it is a not-so-boring
way to earn the gil that you will want for Upgrading weapons. With the Growth
Egg equipped, a round trip can net you roughly 150,000 CP and over 100,000 gil.
By using my Bhakti proceeds sparingly and avoiding the purchase of Scarletites,
I had enough resources after one such run to do finish all 5 weapon upgrades as
well as upgrade all of my Warrior's Wristbands and Sorcerer's Marks.
By the way, doesn't it irk you that Scarletites sell for 100,000 gil each
earlier in the game, and now you have an overabundance of the things and can
only sell them for 7,000 gil each?
Anyway, when you return to the Archylte Steppe, you will find that you are now
prepared to beat the two Adamanchelids (big turtles with no tusks) that are
guarding Treasure Balls, each of which contains a Gold Nugget worth 60,000 gil.
If you need help beating them, look up Mission 33. There is also a third
Treasure Ball containing a Gold Nugget on a hill just above one of these
Adamanchelids. And, of course, if you are feeling really tough, you can start
trying to farm Platinum Ingots from the big turtles with tusks, but you are
probably going to need a Genji Glove before you can do that very efficiently,
and you won't get one of those until you complete Titan's Trials.
Once you max out Stage 10 Crystarium for all 6 roles for all 6 characters, you
can sell off your hard-won Growth Egg for 250,000 gil!
*******************************************************************************
* *
* XI. Sequencing the Missions [S11] *
* *
*******************************************************************************
The first Mission becomes available when you arrive at the Archylte Steppe in
Chapter 11. From then until the end of Chapter 13 (and beyond!) you can
undertake Missions. Most Missions can be 5-starred more or less immediately,
but a few are better postponed until your team is stronger. Here are a couple
of quick rules that I am including because I have received questions from
readers about these points:
* Missions cannot be undertaken until they are unlocked by meeting certain
conditions. Those conditions will be detailed in the description of each
Mission.
* However, once a Mission has been unlocked, it can be re-attempted at any
time thereafter, as long as your team is physically able to travel to the
Mission's location. (At the beginning of Chapter 12, for example, your
mobility is severely limited and therefore most Missions are unavailable.)
* When you undertake a Mission multiple times, only your highest score counts.
You must complete Missions 21 - 26 to advance the storyline, and you definitely
want to complete all Missions that activate Waystones before moving far beyond
the areas in which they reside. On my first run through the game, I was
unaware of the importance of activating the Waystones, and after completing the
events in Oerba I wanted to return to the Archylte Steppe to fill out the Stage
9 Crystarium. Believe me when I tell you that it was a LONG walk back and that
I'll not make that mistake again!
The following guidelines are not set in stone, but here is how I recommend that
you proceed:
1. When you first reach the Archylte Steppe, spend some time accumulating some
CP as described in Section X. I CANNOT OVEREMPHASIZE THE IMPORTANCE OF
THIS! This should give you enough oomph to complete Missions #1-17 and
earn 5-star ratings on every one of them. Missions #15 and 16 might be
iffy at this point, but 5-star ratings on them is definitely doable.
2. Prioritize making 3 sets of Sprint Shoes. You have at least two choices for
how to accomplish this. One possibility, as described earlier, is to farm
Mission 7 for Tetradic headwear. Alternatively, once you have completed
Mission 14 and can use chocobos, you can ride around the Archylte Steppe
long enough to do 10 successful digs. You will get a Tetradic Crown on
your 5th dig and a Tetradic Tiara on your 10th dig, and you already got a
Crown for defeating Cid Raines. Either way, you may need to buy some
Perovskites to complete the upgrades. Feel free to sell off all of your
Bangles, which you won't be needing any more. Believe me when I tell you
that no single item will make your life easier than having a set of Sprint
Shoes for each active team member.
3. If you choose to farm Mission 7 (which is definitely my recommendation),
you will receive 5 Bomb Cores for every battle you win. These make
excellent Upgrading components, and you might as well use them now. Since
you will probably have to fight this Mission 30 - 40 times, you will
probably accumulate more Bomb Cores than you can carry. Rather than let
the excess go to waste, you can and should use these to Upgrade weapons for
everyone except Fang (whose preferred weapon is not available until you
pass through Oerba. Upgrade weapons for everyone else until they are maxed
out Tier 1. Don't try to go beyond that -- we'll finish upgrading when we
reach Oerba and have the gil to do it properly. These upgrades will make
nominal but noticeable improvements in your weapons and will make the next
part of your journey significantly easier.
4. Continue with the storyline and complete Missions #18-26 inclusive as you
encounter them. All of these either activate Waystones or advance the
storyline. Again, if you took my advice and farmed some CP, you should be
able to 5-star all of these Missions now. You are going to want to skip
Mission 27 for now -- you simply don't have the HP to survive it -- but do
Mission 28 when you get to Oerba to activate the Waystone there. You
should have no trouble 5-starring it.
5. Repair Bhakti and upgrade some weapons as outlined in Section X of this
guide. After you beat Barthandelus, go to the rooftop of the schoolhouse
in Oerba to initiate Mission 55. Then use the Waystone in Oerba to warp
back to the Archylte Steppe. This is a good time to spend all of your
stockpiled CP (as per the guidelines in Section X) and to upgrade
Accessories, being as miserly as possible with the gil you made in Oerba.
Remember that it is not wise to buy Scarletites to upgrade Warrior's
Wristbands and Sorcerer's Marks.
6. Saddle up a chocobo and ride up to Aggra's Pasture to tackle Mission 55 in
hopes of earning a Growth Egg. It won't be easy, but it is definitely
possible. Once you have your Growth Egg, you can work on five-starring any
Missions on which you originally got less-than-perfect ratings from
Missions #1-17.
7. If you failed to 5-star any of the Missions in Taijin's Tower, return there
now and 5-star them. If you want some money to upgrade accessories, you
can do Mission 24 ad nauseum while you are there. If you do return to
Taijin's Tower, be sure to congratulate yourself for having the foresight
to activate the nearby Waystone, thus avoiding the tedium of walking all
the way there.
8. I would advise you to leave the rest of the Missions until postgame, at
which time you can complete them pretty much in numerical order. I can
tell you from personal experience that it is entirely possible to 5-star
all of the Missions in Chapter 11 (with the possible exception of Mission
64). However, there is generally little need to, and they are considerably
less frustrating when you have more HP and more abilities. When you
complete Chapter 13 and Stage 10 of the Crystarium becomes available, you
should have nearly a full 999,999 CP stockpiled. Spending these should max
out all of your characters in at least 1 of their 3 primary roles. This
will give you the extra HP and other stat boosts necessary to 5-star most
of the remaining Missions. Also, if you conserved your money as
recommended, the gil that you accumulated in Chapters 11 and 12 should be
enough to build a maxed out Tier 2 weapon for each of your 4 primary
characters which will also speed up future Mission battles.
9. Missions 51 and 62 - 64 inclusive are designated as "Late Postgame"
Missions, which means that 5-starring them is easier if you have those
extra few HP and abilities obtained by developing secondary roles. Mission
51 can be completed with only minor additions to your existing abilities
and HP, and doing so will earn you a Genji Glove. Once you have a Genji
Glove, you should consider doing some farming of the Big Turtles to earn
some gil (from Platinum Ingot drops) and CP (at 80,000 per victory) to fill
out your Crystarium. This can be done either in the Archylte Steppe or by
repeatedly battling the one Big Turtle in Leviathan Plaza of Edenhall.
10. Be aware that when you complete Missions 56 - 62 inclusive, all of the
relatively docile Big Turtles except two will be replaced by the much
stronger Long Guis and Shao Long Guis. Therefore, if you still have turtle
farming to do, you should postpone completion of at least one of these
Missions.
11. Since maxing out a character's 3 secondary roles requires a total of
roughly 7 million CP, it is likely that when you get to the last 3 Missions
your Crystarium will not yet be completed. Be sure to read the strategies
for these Missions to see the particular abilities and equipment
recommended for undertaking these especially challenging battles so that
you spend your CP from the "Early Postgame" Missions wisely. As of this
writing, the following are suggested as your priorities in developing
secondary roles:
a. Fang as a Ravager for Missions 51 and 63.
b. Fang as a Synergist for Missions 62 and 63. This can also expedite
Mission 51.
c. Vanille as a Sentinel for Mission 64.
d. Snow as a Saboteur for Mission 64.
e. Lightning as a Saboteur for Mission 63.
f. Snow as a Medic for Mission 64.
g. Fang as a Medic for Mission 64.
*******************************************************************************
* *
* XII. Numerical Listing of Missions [N12] *
* *
* To access a specific Mission, simply search by the 2-digit Mission number *
* preceded by the letter "M". Thus, to go directly to Mission 8, search *
* for M08. *
* *
*******************************************************************************
IMPORTANT -- PLEASE READ!
The following descriptions of how to 5-star individual Missions will be based
on the sequencing described in Section XI above. That is, I attempted Missions
#1-26 before reaching Oerba and after I had spent some time farming CP as
described in Section X. These are categorized as "Early Chapter 11" or
"En Route to Oerba." Missions #28 and 55 were undertaken after Oerba, hence the
name "Post-Oerba." All other Missions were attempted postgame. Postgame
Missions are divided into two categories -- "Early Postgame" and "Late
Postgame." Here are quick descriptions of default equipment and approximate
Crystarium advancement for each of these 4 categories:
Early Chapter 11/En Route to Oerba -- All characters have attained Level 3 in
all 3 primary roles and each character can equip 3 Accessories. Each
character is equipped with a non-upgraded Tier 1 weapon. (Since all base
weapons are more or less the same -- except for passive abilities -- it makes
little difference which weapons you choose.) As previously described in
Section VI, one of these Accessories for Fang is a pair of Sprint Shoes.
Otherwise, Accessory slots were generally filled with Blessed Talismans, Morale
Talismans, Brawler's Wristbands, Warrior's Wristbands, Shaman's Marks, or
Sorcerer's Marks, depending on what Accessories I found and could afford to
upgrade. These battles require only abilities available through Crystarium
Stage 8 in each character's primary roles.
Post-Oerba -- All characters are equipped with non-Upgraded Tier 1 weapons and
Sprint Shoes. Strength Accessories have been upgraded to Warrior's Wristbands,
and Magic Accessories have been upgraded to Sorcerer's Marks. Stage 9
Crystarium is partially filled in, and any CP gained is applied toward
advancing characters' primary roles. These battles require only abilities
available through Crystarium Stage 9 in each character's primary roles.
Early postgame -- Maxed out Tier 2 weapons on all characters and Stage 10
Crystarium mostly or completely filled for all characters' primary 3 roles.
Strength Accessories have been upgraded to Power Gloves, and Magic Accessories
have been upgraded to Weirding Glyphs. These battles require only abilities
that accompany each character's primary roles (well -- except for Missions 47,
51, and 60. I cheated a little on those three.)
Late postgame -- Accessories are the same as early postgame. Maxed out Tier 2
weapons on all characters and Stage 10 Crystarium nearly filled for all 6
roles for all 6 characters. This is only a requirement on 4 Missions (#51, 62,
63, and 64). Mission 51 is only in this list because Fang needs abilities that
are not available in her primary 3 roles.
Finally, please keep in mind that Target times are approximate and will vary
depending on where you are in the Crystarium and what equipment you are using.
However, the usual standard applies -- to 5-star a Mission, your battle time
must be no more than 70% of the Target time without a PS and no more than 92%
of the Target time with a PS.
*******************************************************************************
* *
* A Couple of Notes About Ci'eth Stone and Mark Locations *
* *
*******************************************************************************
It was my original intention to give detailed directions to each Ci'eth Stone
and Mission battle location, but ultimately I decided that we could make do
with less verbiage. A general map of all the Stone locations can be found at:
http://dl.gamesradar.com/photos/ffxiii_ciethstone_map_large.jpg
This map is sketchy at best, but it will provide a good starting point.
Remember that you can always use the game's map (accessed by pushing the Square
button) to help you. The Ci'eth Stone markers that are PULSING show the
locations of stones that activate Missions you have not yet completed. The
markers that are lit up SOLID represent stones for Missions that you have
already completed.
Once you undertake a Mission, a star will show up on your map. This star sort
of gives you the location of the Mark, but you have to take this information
with a grain of salt. If the Mark is in an entirely different area of Gran
Pulse, the star basically just shows you the DIRECTION that you need to go.
For example, the Ci'eth Stone for Mission 3 is in the Archylte Steppe, but the
battle itself takes place in the Yaschas Massif, many screens away. The star
will appear at the EXIT that you will need to take from the Archylte Steppe to
reach the Yaschas Massif. Once you exit from the Steppe, the star will show up
on the new map to indicate the general direction in which you need to proceed.
When in doubt, follow the star and/or read the directions I will give you.
Overall, I figure if you can find the Stone to activate a given Mission, you
should be able to find the battle itself. Therefore, I'll give you some basic
directions to the Stones (labeled, "Finding your way") and rely on you to use
the map to find the actual battles.
OK -- Let's get started!
*******************************************************************************
* *
* Mission 01 -- Pond Scum *
* Ectopudding [M01] *</pre><pre id="faqspan-3">
* *
*******************************************************************************
Finding your way -- The Stone for Mission 1 is right in front of you when you
first enter the Archylte Steppe.
Unlock condition -- Arrive at Archylte Steppe.
Reward (First Win) -- Energy Sash
Reward (Subsequent wins) -- Bomb Shell x 3
When to undertake -- Early Chapter 11.
The Problem -- Physical attacks aren't as effective as Magic.
The Good News -- He is very easy to Preemptively Strike. You can 5-star this
Mission right away.
Times -- Early Chapter 11 Target Time is about 30 seconds. With a PS, I
finished him off in 6 seconds flat for an easy 5-star.
Paradigms
*************************
* Fang * Van * Light *
******************************
* #1 * Com * Rav * Com *
******************************
The Battle -- It isn't very hard to get a Preemptive Strike, and with a PS you
can 5-star him without changing equipment or pushing the limits of the timer.
Walk a big circle around him, just outside of his radius of detection, so that
you are directly behind him. As long as you do not show up on his radar, he
shouldn't rotate or move. If you can do this without being detected, you can
just walk up behind him for a PS. If you get detected, just engage the Mark
and then Retry. If you are really lucky, he will be facing away from you when
the screen reloads and you can just walk (or run) up behind him for a PS. If
you are less fortunate and he is not facing directly away from you, stay
immobile and wait. Often he will turn away from you and give you a chance to
PS him. Once you get your PS, the rest is easy.
If you are having trouble getting him in a favorable position when the screen
reloads, try engaging him from different directions and see if that doesn't
affect his position relative to you.
For what it's worth, this is a decent place to earn gil early in Chapter 11.
Every time that you win this battle (after the first time), you will get 3 Bomb
Shells, which sell for a combined 1260 gil. This entails spending a certain
amount of time running back and forth to activate and then complete the
Mission, but the gil production is 100% dependable if a tad slow.
*******************************************************************************
* *
* Mission 02 -- Goodwill Hunting *
* Uridimmu (+ 4 Gorgonopsids) [M02] *
* *
*******************************************************************************
Finding your way -- The Stone for Mission 02 is right next to where you fought
Mission 01.
Unlock condition -- Complete Mission 01.
When to undertake -- Early Chapter 11.
Reward (First Win) -- Cobaltite
Reward (Subsequent wins) -- Bomb Shell x 3
The Problem -- Crowd control. All enemies are capable of inflicting Poison,
but who really cares?
The Good News -- The Gorgonopsids will go down quickly, allowing you to focus
on the Uridimmu.
Times -- Target time was just under a minute. Once I beefed up my characters a
little, I completed this in about half that.
Paradigms
*************************
* Sazh * Fang * Light *
******************************
* #1 * Syn * Com * Com *
******************************
* #2 * Rav * Com * Com *
******************************
The Battle -- Start with #1 and have Sazh cast Enfrost and Haste on both
Commandos. Uridimmu is immune to Ice spells, but you can still damage him with
an Enfrosted weapon. The girls will Blitz away the Gorgonopsids while Sazh is
buffing. Switch to #2 and finish off the Mark with time to spare.
*******************************************************************************
* *
* Mission 03 -- Massif Contamination *
* Ugallu [M03] *
* *
*******************************************************************************
Finding your way -- The Stone for Mission 03 is right next to where you fought
Mission 02. However, the next six Missions are NOT located in the Archylte
Steppe. After activating Mission 03, take the southern exit from the Steppe --
the one through which you first entered the Steppe near the Stone for Mission
1. From there, follow the star to locate the Mark.
Unlock condition -- Complete Mission 02.
When to undertake -- Early Chapter 11.
Reward (First Win) -- Platinum Bangle
Reward (Subsequent wins) -- Bomb Core x 3
The Problem -- Extremely short Target time necessitates a Preemptive Strike.
The Good News -- You can -- and should -- get a PS without Deceptisol.
Times -- Early Chapter 11 Target time was 0:42. Once I got the PS I was able
to finish him off in one Stagger and 5-star the Mission in 22 seconds.
Paradigms
*************************
* Sazh * Fang * Light *
******************************
* #1 * Rav * Sab * Com *
******************************
* #2 * Rav * Com * Com *
******************************
The Battle -- To get a PS, approach him from his right (the side with the
Waystone, NOT the side with the Save Point.) Walk very slowly, all the way up
against the side of the ledge and you should be able to sneak up to his
backside for a PS. From my experience, this method of getting a PS is
virtually foolproof -- my success rate on this is pretty much 100%. Once you
get a PS, use #1 for one round to get the Mark Staggered and debuffed. Switch
to #2 for the beat-down.
It is possible that when you enter the area, the Mark will leave his starting
position and come charging out after you. If this happens, just head over to
the Save point and wait. Eventually, he will return to his original place,
allowing you to get a PS as described above.
By the way, this attack pattern is going to be our SOP when getting a PS.
Stagger and debuff with a Ravager and a Saboteur, then hit hard and fast with a
pair of Commandos while keeping a Ravager to push up the Chain Gauge.
*******************************************************************************
* *
* Mission 04 -- A Hero's Charge *
* Adroa (x4 + Verdelet x2) [M04] *
* *
*******************************************************************************
Finding your way -- Your next Ci'eth Stone is in the same clearing where you
fought Mission 03.
Unlock condition -- Complete Mission 02.
When to undertake -- Early Chapter 11.
Reward (First Win) -- Pearl Necklace
Reward (Subsequent wins) -- Bomb Shell x 3
The Problem -- You start with a total of 6 enemies to take out. If you don't
take these guys out fast enough, they will Summon other enemies for you to
fight, including the Ugallu that you just fought in Mission 03 (who has about
as many HP as the other 6 enemies combined).
The Good News -- Even if the marks summon a Ugallu, you can 5-star the Mission
without a PS.
Times -- Target time was around 1:48. Even with no PS and having to kill of
the Ugallu, I flattened them all in around a minute.
Paradigms
*************************
* Sazh * Fang * Light *
******************************
* #1 * Syn * Com * Com *
******************************
* #2 * Rav * Com * Com *
******************************
* #3 * Rav * Com * Rav *
******************************
The Battle -- This is a perfect example of a Mission that is MUCH easier after
you boost your stats a bit. Before farming CP in Chapter 11, you have to be
very lucky to eliminate all 6 enemies before one of them can Summon. With the
boosts from Stage 9 Crystarium, it's a snap. Moral -- invest the time and
effort necessary to beef up your characters before undertaking the Missions.
It is time well spent.
You can get a PS about 50% of the time by just jumping up onto the ledge and
running up behind an enemy. If you do, there is a very good chance that you
can avoid dealing with a Summoned enemy, so you might want to give this a try.
Whether you go for a PS or not, start with #1 and have Sazh cast Haste and
Bravery on both Commandos while they Blitz their way through the masses.
Quickly switch to #2 to get Sazh involved in the fray. Somewhere in here,
there may be a successful Summon, but don't let that bother you. When
there is just one penguin left, switch to #3 so that all 3 team members attack
it. When it is dispatched, return to #1 and have Sazh cast Enfrost on both
Commandos, since Ugallu is weak against Ice. By the time you do this and
return to #2, Ugallu should be history.
After the battle, don't forget to open the Treasure Ball, which contains 2
nuggets of Millerite.
*******************************************************************************
* *
* Mission 05 -- Joyless Reunion *
* Edimmu [M05] *
* *
*******************************************************************************
Finding your way -- The Stone for Mission 05 is the one that you passed on the
way to Mission 04 (lower level, near the Save Point.)
Unlock condition -- Complete Mission 03.
When to undertake -- Early Chapter 11.
Reward (First Win) -- Sorcerer's Mark
Reward (Subsequent wins) -- Bomb Core x 5
The Problem -- The enemy hits quickly with status ailments such as Poison,
Imperil, and Deprotect. He evades physical attacks very effectively.
The Good News -- Magic seems to hit him reliably, and his HP total is low
enough that he doesn't last long.
Times -- Early Chapter 11 Target time was 1:40. That was a minute more than I
needed.
Paradigms
*************************
* Van * Fang * Light *
******************************
* #1 * Sab * Com * Com *
******************************
* #2 * Med * Com * Com *
******************************
The Battle -- First, remove any Accessories that increase Strength. You won't
be using physical attacks, and these will only reduce the Target time. You can
give your Magic-boosting Accessories to Fang and Lightning since Vanille won't
be attacking. Remember to Libra this Mark so that you don't waste time on
physical attacks that will miss. Starting with #1, have Vanille spam Imperil
and Deshell (Deprotect isn't an issue, since you won't be using physical
attacks.) Once she sticks both of those, switch to #2 and have her heal while
Fang and Lightning attack. I 5-starred the Mission without ever making Vanille
attack.
*******************************************************************************
* *
* Mission 06 -- No Place Like Home *
* Munchkin Maestro (+4 Munchkins) [M06] *
* *
*******************************************************************************
Finding your way -- The Ci'eth Stone for Mission 06 isn't on your map yet.
Backtrack towards where you fought Mission 04. When you get to the group of 3
Munchkins, you will see a path to your left. Follow that path to the end, and
you'll find the Stone for your next Mission.
Unlock condition -- Complete Mission 03.
When to undertake -- Early Chapter 11.
Reward (First Win) -- Fulmen Ring
Reward (Subsequent wins) -- Bomb Shell x 3
The Problem -- Five enemies to eliminate.
The Good News -- Four out of 5 have very few HP and will go down quickly. They
are usually clustered close enough to each other that Blitz will damage
multiple enemies.
Times -- Target time was 54 seconds. I took them out in 22 seconds.
Paradigms
*************************
* Sazh * Fang * Light *
******************************
* #1 * Syn * Com * Com *
******************************
* #2 * Rav * Com * Com *
******************************
The Battle -- You will notice that by default you target the Maestro last in
this battle. That is because if you kill off the Maestro first, one of the
Muchkins will "Rise to Power" and take his place, thus prolonging the battle.
Therefore, make sure that you wipe out the Munchkins before attacking the
Maestro.
All enemies are weak against Ice, so have Sazh cast Enfrost and Haste on both
Fang and Lightning before switching to #2 for all-out attack.
*******************************************************************************
* *
* Mission 07 -- Bituitus, the Pillager *
* Bituitus [M07] *
* *
*******************************************************************************
Finding your way -- The Stone for Mission 07 is in the ruins just past the Save
Point and the Stone for Mission 06.
Unlock condition -- Complete Mission 03.
When to undertake -- Early Chapter 11.
Reward (First Win) -- R&D Depot
Reward (Subsequent wins) -- Bomb Core x 5
The Problem -- The enemy moves fast, effectively evades physical attacks, and
slaps a bunch of pesky status effects (Poison, Deshell, Deprotect, and, worst
of all, Daze) on your entire team. A Preemptive Strike is not possible.
The Good News -- Deshell can increase the effectiveness of your Magic attacks.
His Daze wears off pretty quickly.
Times -- Target time (with equipment adjustments made) was a generous 2:36. I
was able to take him down in 45 seconds.
Paradigms
*************************
* Van * Light * Fang *
******************************
* #1 * Sab * Com * Com <------- OR Sab (see text)
******************************
* #2 * Rav * Com * Com *
******************************
* #3 * Med * Com * Com *
******************************
The Battle -- You will notice that as soon as you accept this Mission, all
other enemies in the area disappear. Use this opportunity to collect the 2
Treasure Balls on the upper level while they are unprotected, one of which
contains a Whistlewind Scarf. After the battle, you can access another
unprotected Treasure Ball in the lower area near where you fought the Mission
battle. This one contains a Rhodochrosite, which, perhaps coincidentally, is
precisely the catalyst necessary to upgrade the Whistlewind Scarf you just
found into an Aurora Scarf.
Remove all Strength-boosting Accessories and give Fang and Lightning Magic-
boosting Accessories and Blessed Talismans instead. Vanille won't be attacking
much, so you can equip her with Rune Bracelets for defense. Be sure to Libra
the Mark right off to avoid attempting fruitless physical attacks. If Fang has
learned Deshell, set her up as a Saboteur in Paradigm #1. This basically
doubles your chances of sticking Deshell on the Mark, which will greatly
expedite the process.
Before your team has a chance to act, the Mark will hit you with Miasma, which
inflicts some combination of Deprotect, Deshell, Poison, and Daze on your
entire team. There is no sense in trying to heal these afflictions, since the
Mark will recast them regularly, so I advise you to just live with them or, in
the case of Daze, wait for it to wear off. However, these debuffs make your
team very vulnerable to the ensuing attacks, so be sure to watch your health
meter carefully.
Have Vanille (and Fang, if she has learned Deshell) spam Deshell for a round or
two. If it doesn't stick after two rounds, move on to #2. You can win this
battle without Deshell, but if Deshell sticks, the battle goes much faster.
Stick with #2 for no more than 2 more rounds before switching to #3. The
combined effects of Poison and the attacks on your vulnerable team are going to
be steadily sapping your team's HP, so you have to be proactive about healing.
If the Mark lives long enough to perform Levinbolt (which he usually does after
6-7 rounds), your team may have trouble surviving if you are not near full HP.
Switch between #2 and #3 as necessary to stay alive while blasting the Mark
with enough Magic to finish him off. Once you learn how to survive, you will
almost certainly earn the 5-star rating.
Once you get enough gear to make Sprint Shoes for everyone, this battle is MUCH
easier. Of course, to get the Tetradic headwear you need to make Sprint Shoes,
you need to win this battle repeatedly, so this is one of those chicken-and-egg
situations.
If you haven't already done so, please read my suggestion in Section VI about
farming this Mission for Tetradic Crowns and Tetradic Tiaras to make two more
pairs of Sprint Shoes. Mission 13 in particular is going to be MUCH easier if
you do this now. Once you have 3 sets of Sprint Shoes, you might want to
rotate Sazh back to the bench and replace him with Hope, who is a much better
Ravager and Medic than Sazh.
*******************************************************************************
* *
* Mission 08 -- The Eleventh Hour *
* Rakshasa (+ Flans x3) [M08] *
* *
*******************************************************************************
Finding your way -- Use the Mission 06 Stone to teleport (you only have one
possible destination at this point). From there walk back toward the Vallis
Media Base Camp. You will see the next Ci'eth Stone on the left just where the
path splits.
Unlock condition -- Complete Mission 05.
When to undertake -- Early Chapter 11.
Reward (First Win) -- Collector Catalog
Reward (Subsequent wins) -- Bomb Shell x 3
The Problem -- If you don't kill the Flans quickly enough, they will merge into
a Dire Flan, which will take you much longer to terminate. The battle is a
LONG ways from a Save Point or the Ci'eth Stone, meaning that if you complete
the battle but fall short of a 5-star rating, it will take a while to attempt
it again.
The Good News -- The Mark itself is little or no threat to you.
Times -- Early Chapter 11 time (with equipment adjustment) was 1:22. I
finished them all off in 53 seconds (4 seconds to spare!)
Paradigms
*************************
* Hope * Fang * Light *
******************************
* #1 * Syn * Com * Com *
******************************
* #2 * Rav * Com * Com *
******************************
The Battle -- Again, Hope won't be attacking all that much, so I took off one
of his Magic-boosting Accessories to nudge the Target time up a few (4)
seconds. For me, this made the difference between a 4-star rating and a 5-star
rating. If you worked Mission 7 enough to make Sprint Shoes for everyone, you
should have plenty of time even with Hope's Magic boosted.
Rakshasa mostly debuffs you with spells like Deprotect, but you should have
enough HP that it isn't an issue. Your only worry is that two of the Flans
(with 28,800 HP each) will merge into a Dire Flan with 169,200 HP. You simply
won't have enough time to 5-star the Mission if that happens, so if the Flans
successfully merge, Retry the Mission. Oddly, the Flans only seem to merge
when their HP get low. If you leave them alone and don't hit them, they won't
merge. Of course, you can't leave them alone because you need to take them out
to complete the Mission. My point is that you need to give full attention to
any Flan that is getting low on HP, because that is when it is likely to try to
merge.
Have Hope cast Enfire on both Fang and Lightning. I have Lightning as a
Commando so that she will do maximum damage with her Enfired weapon. Remember,
though, that two Commandos will always attack different targets if possible.
Switch to #2 so that Hope can help out with the attack for a turn or two. When
there is just one Flan left, one Commando will attack it and the other one will
attack the Mark. When this happens, go back to #1 and cast Enthunder, first on
whoever is attacking the Mark and then on the other Commando when she finishes
with the Flan. Then return to #2 so that Hope can help finish off the Mark.
Completing Mission 8 gives you access to a handy Waystone near the Vallis Media
Base Camp.
*******************************************************************************
* *
* Mission 09 -- Heave-ho *
* Kaiser Behemoth [M09] *
* *
*******************************************************************************
Finding your way -- The Ci'eth Stone for Mission 09 is back in the Archylte
Steppe, on your left against the mountain wall just after you enter the area.
Unlock condition -- Complete Mission 04.
When to undertake -- Early Chapter 11.
Reward (First Win) -- Rhodochrosite
Reward (Subsequent wins) -- Bomb Core x 3
The Problem -- Besides disabling your Magic with Fog and Dispelling your buffs,
his Hurl attack flings one member of your team into the air, taking her out of
the attack for several crucial seconds. Like most Behemoths, when his HP get
down to about half, he will stand up, heal all of his HP (and then some!) and
become much more powerful.
The Good News -- With a little practice, you can get a Preemptive Strike and
finish the Mark off before he heals himself.
Times -- Early Chapter 11 Target time was 2:34. With a PS, the Mark went down
in 11 seconds.
Paradigms
*************************
* Fang * Hope * Light *
******************************
* #1 * Sab * Rav * Rav *
******************************
* #2 * Com * Rav * Com *
******************************
The Battle -- The whole trick here is getting that PS. Once you accomplish
that, the rest of the battle is pretty automatic. Historically, my problem has
been finding a repeatable way to get a PS. Initially, I didn't even think that
a PS was possible, but an alert reader with the colorful name "Wazzy" -- who
clearly is far more persistent than I am -- wrote and informed me that a PS is
indeed possible in this Mission. This motivated me to pursue the matter
further, and for the next year or so, I don't think any Mission has generated
more mail for me than this one. Readers sent me descriptions on how to get a
PS on this Mission, but I could never make their methods work reliably.
Finally (January 2012), I received an email from Derek Tower who accurately
described what I'm sure everyone else was trying to tell me all along. I got
Derek's method to work about half the time, which represented a major
improvement over my earlier efforts. However, in investigating his strategy, I
came across one that worked for me every single time. It is that method that I
present to you here, although I must give credit where credit is due and say
that without Derek's suggestion, I never would have discovered this.
Start by getting rid of the two nearby Gorgonopsids so that you don't
accidentally initiate battle with them at an inopportune moment.
The Behemoth is originally positioned with his back to the pond, facing away
from the water. You will not get a PS while he is standing there because there
is insufficient room behind him to engage him without being detected. What you
need to do is get him to move into a position that will allow you to approach
him from behind undetected.
To the Mark's left (your right as you face the water), there is a small ridge
that runs more or less perpendicular to the water's edge. Go over there close
to the water and jump up onto the ledge with the Mark. Move until he detects
you (look for the (!) above his head). As soon as this happens, immediately
jump back down from the ledge.
For now, STAY WHERE YOU ARE! The mistake that I made in the past was trying to
run around behind him too soon. Just stay put and be patient. Rotate the
camera so that you can keep a careful watch on what the Mark is doing.
Eventually, the (!) will go away, and the Behemoth will settle into a new
position. This will take about 10 - 15 seconds, and you will know that he is
settled in when you see him standing in place roaring. More often than not he
will be essentially facing you, but, from my experience, he rarely returns to
his initial position with his back to the pond. That is, he will almost
certainly be in a position that will allow you to get a PS. Simply run a WIDE
path around him (wide enough that you are not on his radar) until you are
directly behind him. In my experience, this never caused him to move, as long
as I stayed off his radar. Once you are DIRECTLY behind him, simply walk
towards him from behind for a PS.
Once you have your PS, use #1 for one round to Stagger the Mark as quickly as
possible, then switch to #2 and finish him off.
I tried this probably 20 times in a row, and this method worked for me every
single time. There is pretty much no way to go wrong as long as you stay put
until the Mark settles into his new position and you stay off his radar from
then on.
Completing Mission 9 gives you access to the Waystone that you will probably
use most often, located near the southern entrance to the Archylte Steppe.
*******************************************************************************
* *
* Mission 10 -- Hollow Hope *
* Ambling Bellows [M10] *
* *
*******************************************************************************
Finding your way -- The Ci'eth Stone for Mission 10 is very near where you
fought Mission 09, a little to the southeast at the base of a hill surrounded
by Flans.
Unlock condition -- Complete Mission 05.
When to undertake -- Early Chapter 11.
Reward (First Win) -- Superconductor x 4
Reward (Subsequent wins) -- Thrust Bearing x 3
The Problem -- Um, he's ugly? Seriously, he poses you very little threat at
all.
The Good News -- It is fairly easy to get a Preemptive Strike and 5-star this
Mission early on.
Times -- Early Chapter 11 Target time was 1:22. My team took him down in less
than 40 seconds.
Paradigms
*************************
* Fang * Hope * Light *
******************************
* #1 * Sab * Rav * Com *
******************************
* #2 * Com * Rav * Com *
******************************
The Battle -- This Ambling Bellows appears alone and is very easy to PS.
When you first engage him, he will probably be facing you and you probably
won't get a PS. However, when you Retry the battle, he will be turned sideways
and you should get an easy PS. From there, even a modestly powerful team can
5-star this Mission with a quick Stagger, Launch, and beat-down using only
Paradigm #2. A somewhat more elegant approach is to start with #1 and have
Fang Deprotect and Deshell the Mark before switching to #2 to finish it off.
For me, this cut the battle time roughly in half, but either way you should be
able to 5-Star this Mission easily. Of course, if Fang hasn't learned these
debuffs yet, this strategy isn't for you.
Since the PS is the key, keep Retrying until the Mark is positioned favorably
for a PS and the rest is more or less automatic.
*******************************************************************************
* *
* Mission 11 -- Pride Before a Fall *
* Adroa (x6) [M11] *
* *
*******************************************************************************
Finding your way -- The Ci'eth Stone for Mission 11 may not show up on your map
because you probably haven't explored there yet. It is north and east of the
Mission 10 battle, in a foggy area inhabited by Behemoths and Gorgonopsids. As
you return to the large open area after Mission 10, just follow the left wall
and you'll get there.
Unlock condition -- Complete Mission 05.
When to undertake -- Early Chapter 11.
Reward (First Win) -- Frost Ring x 2
Reward (Subsequent wins) -- Bomb Shell x 3
The Problem -- Crowd control issues, especially if they call for
reinforcements.
The Good News -- Each Adroa only has 21,600 HP, and a couple of good Blitz
attacks will take them out. A Preemptive Strike is quite easy to achieve.
Times -- Target time was 1:43. With a PS, I wiped them out in 3 seconds.
Even without a PS, the battle only took 18 seconds, but a PS is so easy, why
not use it?
Paradigms
*************************
* Fang * Hope * Light *
******************************
* #1 * Com * Rav * Com *
******************************
The Battle -- To get a PS, engage the enemies and then Retry. When the screen
reloads, you should have an Adroa directly in front of you and facing towards
you. For me, he always turned away within a couple of seconds, allowing me to
engage him from behind for an easy PS. My success rate on this was very nearly
100%. Once you get the PS, your Blitzing Commandos will finish them off tout de
suite.
*******************************************************************************
* *
* Mission 12 -- Geiseric, the Profane *
* Geiseric [M12] *
* *
*******************************************************************************
Finding your way -- The Ci'eth Stone for Mission 12 is the flashing symbol that
appears to be on a peninsula just a bit southwest of your last battle.
Unlock conditions -- Complete Missions 05 and 07.
When to undertake -- Early Chapter 11.
Reward (First Win) -- Royal Armlet
Reward (Subsequent wins) -- Bomb Core x 5
The Problem -- He has over 700,000 HP and hits pretty hard. Preemptive Strike
is not possible.
The Good News -- He is easy to debuff and is inherently weak to most elemental
Magic even without Imperil. All in all, he Staggers very easily and has a very
generous Target Time.
Times -- Early Chapter 11 Target time was 4:30 (!) I finished him off in one
Stagger in 1:10.
Paradigms
*************************
* Hope * Fang * Light *
******************************
* #1 * Syn * Sab * Rav *
******************************
* #2 * Rav * Sab * Rav *
******************************
* #3 * Rav * Com * Com *
******************************
The Battle -- Geiseric is a big, slow lug with a bunch of HP. Although many of
his attacks do a lot of damage to your whole team, they are few and far
between. Best of all, once you get him Launched, he can't do you any harm.
No one is going to attack him physically, but there's really no reason to
adjust your equipment. It's not like meeting the Target Time is going to be an
issue. Sprint Shoes, Aurora Scarves, and stat-boosting accessory of choice
will do nicely.
Start with #1 and have Hope cast Faith on everyone while Fang debuffs and
Lightning pushes up the Stagger Gauge. Switch to #2 and watch how quickly you
can Stagger this Mark! If you are fighting him early in Chapter 11, stick with
#2 for a full round after he is Staggered to push up him Stagger Gauge a bit,
allowing your Commandos to do more damage. Switch to #3 to finish him off
quickly while he is Launched and you're home free.
*******************************************************************************
* *
* Mission 13 -- Eternity Unpromised *
* Goblin Chieftain (+ Goblin x3) [M13] *
* *
*******************************************************************************
Finding your way -- The Ci'eth Stone for Mission 13 is at the base of a large
hill, just northeast of the "peninsula" where you found the Stone for Mission
12.
Unlock condition -- Complete Mission 12.
When to undertake -- Early Chapter 11.
Reward (First Win) -- Cobaltite
Reward (Subsequent wins) -- Bomb Shell x 4
The Problem -- The enemies hit hard and disrupt your actions. Combined, the 4
enemies have a lot of HP to deplete.
The Good News -- They tend to cluster, so Blitz damages multiple enemies.
Times -- Target time was 4:00. I finished off all 4 enemies in about 1:40.
Paradigms
*************************
* Sazh * Van * Light *
******************************
* #1 * Syn * Rav * Com *
******************************
* #2 * Rav * Sab * Rav *
******************************
* #3 * Rav * Rav * Com *
******************************
* #4 * Rav * Rav * Rav *
******************************
* #5 * Com * Rav * Com *
******************************
* #6 * Rav * Med * Com *
******************************
The Battle -- Goblins work very much like the Munchkins in Mission 6. If you
take out the big one first, one of the smaller ones will "Rise to Power" and
prolong the battle unnecessarily. Moral: Take out the little guys first.
Happily, they are the default targets.
Equip everyone with Sprint Shoes, give Sazh and Lightning Morale Talismans,
give Vanille a Blessed Talisman and give Lightning and Vanille Aurora Scarves.
Stat-raising Accessories really should not be necessary.
You can also save yourself the time of using Libra if you fight a batch of two
of the Goblins found in the Steppe on your way to this battle.
Time-wise, this one used to be really close for me, but the strategy outlined
here should give you plenty of time. Goblins have no elemental weaknesses, but
their Chain Resistance is only 30, meaning that they will Stagger really
easily. We just need to make sure that our buffs last until the end of the
battle.
Start with #1 and have Sazh case Haste and Bravery on himself and Lightning and
Haste and Faith on Vanille. The effects of Sprint Shoes only last about a
minute, and this battle is going to take longer than that. This first step
ensures that your buffs endure.
Switch to #2 to debuff and Stagger the first Goblin. As soon as he Staggers,
switch to #3 and finish him off. Repeat with the other 2 Goblins. When all 3
Goblins are dispatched, return to #2 to get some debuffs on the Goblin
Chieftain. Vanille will cast Deshell and Imperil first, but it would be nice
to get Deprotect to stick also. Once Deprotect sticks, switch to #4 to finish
Staggering the Chieftain (if necessary), then switch to #5 to finish him off.
Paradigm #6 is there just in case someone gets critically low on HP.
For what it's worth, if you Retry the fight you might get an advantageous
position for a Preemptive Strike, thus further expediting an already manageable
battle. I don't advocate this because your success doesn't depend on a PS, and
I was only able to make this work maybe one time out of 10. It can happen, but
it certainly isn't the easiest way to 5-star this relatively simple Mission.
Before moving on, you might want to consider doing Mission 17 now. The Ci'eth
Stone is very close to your current location (it is near the entrance to
Mah'habara and should be flashing on your map), and the battle itself is only
slightly out of your way, so you can save yourself a little bit of hiking by
undertaking this Mission now.
*******************************************************************************
* *
* Mission 14 -- Defender of the Flock *
* Sahagin (x2 + Certosaur x2) [M14] *
* *
*******************************************************************************
Finding your way -- The next Ci'eth Stone is on the south side of a small lake
in the northern part of the Steppe, just south of where you fought Mission 13.
Unlock condition -- Complete Mission 13.
When to undertake -- Early Chapter 11.
Reward (First Win) -- Gysahl Reins (Use of Chocobos)
Reward (Subsequent wins) -- Bomb Shell x 3
The Problem -- Four total enemies and a short Target Time. Sahagin can cast
Slow. A Preemptive Strike seems very unlikely.
The Good News -- None of these guys call for reinforcements.
Times -- Target time was 51 seconds. It took me half that.
Paradigms
*************************
* Hope * Fang * Light *
******************************
* #1 * Syn * Com * Com *
******************************
* #2 * Rav * Com * Com *
******************************
The Battle -- First of all, Save before you enter this new area. Once you
enter the clearing, you will automatically be thrown into the Mission battle.
Of course, you can always Retry if you need to set up your Paradigms, but you
cannot Save until after the battle.
Considering the reward for this Mission (access to chocobos), you would expect
a tough battle here, but in fact winning this battle is a breeze. All of the
enemies are weak against Fire, so have Hope cast Enfire on the two Commandos
before switching to #2 and attacking like crazy. You should have plenty of
time.
You can now use chocobos to traverse the huge Archylte Steppe, which is
definitely appreciated after all of the running around that you had to do to
complete the first 14 Missions!
*******************************************************************************
* *
* Mission 15 -- Tribal Warfare *
* Goblin Chieftain (+ Goblin x6) [M15] *
* *
*******************************************************************************
Finding your way -- The Stone for Mission 15 is on top of a hill just northwest
of the lake in the southeast portion of the Steppe.
Unlock condition -- Complete Mission 12.
When to undertake -- Immediately after the events in Oerba.
Reward (First Win) -- Survivalist Catalog
Reward (Subsequent wins) -- Bomb Shell x 4
Note: If you are so inclined, there is no reason that you cannot undertake --
and 5-star -- this Mission before departing for Oerba. The strategy is as
described below, and the Target time will be around 3.5 minutes. Your buffs
will run out, and the battle will seem to last forever, but the Target time is
generous enough that you should be able to 5-star it.
The Problem -- A lot of enemies to eliminate. If they spread out, you can't
Blitz them and have to deal with them one at a time, which takes time that you
may not have. The battle is long enough that you will lose your Haste.
The Good News -- In postgame, this is a breeze. Immediately after Oerba, it is
close. A Preemptive Strike is possible if you are willing to Retry multiple
times.
Times -- Before going to Oerba, Target Time was 3:45, and the battle took me
less than 2 minutes. Right after Oerba, the Target time is about 110 seconds
and you can do this in about a minute.
Paradigms
Before Oerba After Oerba
************************* *************************
* Van * Fang * Light * * Hope * Fang * Light *
****************************** ******************************
* #1 * Sab * Com * Com * OR * #1 * Syn * Com * Rav *
****************************** ******************************
* #2 * Rav * Com * Com * * #2 * Rav * Com * Rav *
****************************** ******************************
* #3 * Med * Com * Com *
******************************
* #4 * Sab * Sab * Rav *
******************************
* #5 * Rav * Com * Rav *
******************************
The Battle -- Remember (from Mission 13) that you need to kill off the Goblins
first, but the AI will take care of this for you. In fact, this battle is
essentially a repeat of the battle from Mission 13, so if this description
sound familiar, it's because, being too lazy too write a whole new description,
I simply pasted in the one that I already had. Open with #1 and have Vanille
cast Deprotectga on whichever enemy the AI chooses (in theory, it should choose
the enemy that has the most other enemies surrounding it.) Repeat with
Deshellga. Switch to #2 and let the AI control things until someone needs
healing. Switch to #3 for healing and then back to #2 and so on until only the
Goblin Chieftain remains. Switch to #4 to hit the Chieftain with Deprotect and
Deshell. Once those debuffs have stuck, switch to #5 to Stagger the Chieftain,
then return to #2 to finish him off.
If you undertake this Mission immediately after returning from Oerba, you may
find that it is faster to Stagger each Goblin individually, using the second
set of Paradigms listed above. In this case, trade one of Lightning's Power
Gloves for a Weirding Glyph and have Hope cast Faith on her instead of Bravery.
My scores for the two methods were pretty close to the same, but the enemy
forces seemed to be reduced faster (thus causing less damage to my team) using
the second method.
As with Mission 13, if you are willing to Retry repeatedly, you might begin in
a position that is advantageous to getting a PS, thereby making this Mission
much easier to 5-Star. However, you can certainly prevail without having to
resort to such monotony, so I do not advocate for this method.
*******************************************************************************
* *
* Mission 16 -- Surrogate Slayer *
* Sahagin (x2 + Ceratoraptor x 4) [M16] *
* *
*******************************************************************************
Finding your way -- The Stone for Mission 16 is atop a hill in the Eastern Tors
of the Archylte Steppe. It looks as if the entrances to this area are blocked
by big Turtles, but you can get past them without incident. The Stone can be
accessed without a chocobo. While you're up there, walk around until you get
introduced to Cactuars, and be sure to open the two Treasure Balls, which
contain a Cactuar Doll and a Clay Ring.
Unlock condition -- Complete Mission 12.
When to undertake -- Immediately after the events in Oerba.
Reward (First Win) -- Rhodochrosite
Reward (Subsequent wins) -- Bomb Shell x 4
The Problem -- Total pandemonium. Each Ceratoraptor will almost immediately do
a "Courtship Dance" which summons a Certosaur. That makes a total of at least
10 enemies to take out. Remember that Sahagin can cast Slow, something that
you really don't need in a battle this hectic.
The Good News -- The Ceratoraptors stagger easily, and the Certosaurs go down
easily with Blitz. All enemies are weak against Fire. Best of all, a PS is
not very difficult to achieve, making this Mission a virtual slam dunk, even at
low levels.
Times -- Before going to Oerba, the Target Time was nearly 4 minutes. I died
several times before somehow wiping out all the enemies in 46 seconds. After
Oerba, the Target Time was just over 2 minutes. Even taking time to heal, I
managed to 5-star it in 1:05. Once I learned how to get a PS, the battle was
consistently over in less than 45 seconds.
Paradigms
*************************
* Hope * Fang * Light *
******************************
* #1 * Rav * Com * Com *
******************************
* #2 * Syn * Com * Com *
******************************
* #3 * Med * Com * Com *
******************************
The Battle -- As you approach the Mark and its mignons, you will see a large
rock just to the right of the enemies. To the right of the rock is a group of
3 Sahagins and an Orobon. Start by eliminating this group of 4 enemies so that
they do not disrupt your attempts to get a PS.
Having eliminated that distraction, position your leader just to the right of
the rock. You will see a green fern-like plant that sticks out. Since you
cannot pass through this plant, make sure that your leader is to the right of
it so that it does not obstruct your movements. There should be one
Ceratoraptor near you while the rest of the mob awaits further back and to your
left. Watch the movements of the enemy nearest to you. It should bound back
and forth in a very predictable pattern. Inch as close to it as you can
without alerting the enemies to your presence. This will take some trial and
error, but if battle is initiated prematurely, just Retry. Keep half an eye on
the mob in the rear, because if one of those enemies is facing you, it can
perceive your movements and foil your attempt to get a PS.
Wait for a time when the nearest enemy just starts bounding away from you and
most of the mob is looking away. Quickly move in behind the near Ceratoraptor,
and if your timing is right you will get a PS. If not, Retry is probably your
best option. Once you get a PS, Staggering and eliminating 2 Ceratoraptors is
your top priority. Hope will immediately target one Ceratoraptor, and as soon
as he Staggers that one (it should only take one spell to do so), cancel his
actions (Circle button) and have him target another one. By default, your 2
Commandos will target different enemies, so they will Launch and eliminate
these two Staggered enemies pretty quickly. Once the second Ceratoraptor is
Staggered, cancel Hope's actions again and try to get a third one Staggered
before your PS Chain Boost wears off (about 10 seconds). Regardless of how
this last Stagger attempt turns out, switch to #2 and have Hope cast Enfire on
both Commandos. Once he does that, switch back to #1, and the battle should be
over quickly. Paradigm #3 is there in case the screen turns red, indicating
that someone needs to be Healed ASAP.
Special thanks to Andrew "Andy" Chestnut for describing for me how to get a PS
on this Mission. If you want to see how much his tip helps, try fighting this
battle in Chapter 11 without a PS, and you will see how easy it is to be
overwhelmed by the sheer number of enemies. With a little practice, you can
get a PS probably 2/3 of the time or more, so his strategy is as reproducible
as it is helpful.
*******************************************************************************
* *
* Mission 17 -- A Widow's Wrath *
* Pulsework Champion [M17] *
* *
*******************************************************************************
Finding your way -- The Stone for Mission 17 is just outside the entrance to
Mah'habara, the cave where we farmed CP when we first got to the Steppe.
Unlock condition -- Complete Mission 12.
When to undertake -- Early Chapter 11.
Reward (First Win) -- Perfect Conductor x 3
Reward (Subsequent wins) -- Piezoelectric Element x 4
The Problem -- You can't do much damage until he is Staggered, and he is hard
to Stagger. His attacks can knock you down and take you out of the fray for
several seconds.
The Good News -- It is pretty easy to get a Preemptive Strike. Once he is
Staggered, he goes down quickly.
Times -- Early Chapter 11 Target time was 1:15. With a PS, my team took him
down in 22 seconds for an easy 5-star.
Paradigms
*************************
* Fang * Hope * Light *
******************************
* #1 * Com * Rav * Rav *
******************************
* #2 * Com * Rav * Com *
******************************
</pre><pre id="faqspan-4">
The Battle -- Fighting this guy straight up, it just takes too darned long to
Stagger him. I got my best results starting with #1 until he was Staggered
before finishing him off with #2, but it took around 40 seconds -- too long for
a 5-star rating. With a Preemptive Strike, he went down in 13 seconds. Moral:
If you want to 5-star this Mission, you will need a Preemptive Strike.
To get a PS, you want a situation where his side or back is towards you and he
begins to move away from you. Walk up behind him and you're in. Don't move
when he is facing you or he will see you. If he starts chasing you, engage him
and Retry again because you won't get a PS. With a little practice, you can
get a PS almost every time. Once you do, just stick with Paradigm #2, and he
will go down in a hurry.
Completing this Mission will activate the Waystone at the north edge of the
Archylte Steppe at the cave's entrance.
*******************************************************************************
* *
* Mission 18 -- So Close, Yet So Far *
* Ambling Bellows (+ Hoplite x4) [M18] *
* *
*******************************************************************************
Finding your way -- The next Ci'eth Stone is in the Mah'habara cave on the way
to Oerba. It is on a platform with a couple of Hoplites, tucked away in a
corner behind some (boxes? machinery?)
Unlock condition -- Complete Mission 12.
When to undertake -- En Route to Oerba
Reward (First Win) -- Sorcerer's Mark
Reward (Subsequent wins) -- Piezoelectric Element x 4
The Problem -- You start with 5 enemies, and Ambling Bellows hits really hard
and can call other Hoplites to join in. Really low target time makes this one
tight but doable.
The Good News -- The Mark is susceptible to Pain. The Ci'eth Stone is very
close, so if your battle takes too long, it is relatively quick and easy to try
it again.
Times -- Attempting this on the way to Oerba, my Target time was 2:02, giving
me 1:25 to 5-star it. With a little practice, I consistently beat him in under
a minute.
Paradigms
*************************
* Van * Fang * Light *
******************************
* #1 * Sab * Com * Rav *
******************************
* #2 * Rav * Com * Rav *
******************************
* #3 * Rav * Com * Com *
******************************
* #4 * Med * Com * Rav *
******************************
The Battle -- It would be really nice if you could get a PS on this one, but I
was never able to do so. Instead, we have to do a straight-up fight and take
advantage of the Mark's weakness.
Lightning is going to be primarily a Ravager, so you want her Magic stat to be
greater than her Strength stat if at all possible. If not, at least make them
as close as possible by adjusting Accessories.
The biggest problem I had in this Mission was that the Bellows would ignore
Fang and Lightning, march right up to Vanille (my weakest character) and pound
on her until she died. His attacks disrupted Vanille's attempts to heal, so
even when Vanille was a Medic, she wouldn't survive.
I finally noticed that the Bellows is susceptible to Pain, which prevents him
from attacking and allows your team to go about their business. This is the
key to an easy 5-star.
Begin with #1 and have Vanille spam Pain onto the Bellows. Notice, however,
that the Ambling Bellows is NOT your default target -- you must choose it
manually. If Pain hasn't stuck after 2 full rounds, Retry. When it does
stick, have Vanille spam Deshell, which should stick very quickly. As soon as
it does, switch to #2 and pound the Bellows with Magic until he disappears.
With the Bellows out of the picture, your team is only being hit by the
numerous but relatively wimpy Hoplites, and you can conceivably accomplish all
of this without stopping to heal. Paradigm #4 is there if healing is needed,
but on a good day you won't need it. Once the Bellows is gone, switch to #3
and wipe out any remaining Hoplites.
Completion of this Mission activates the nearby Waystone, allowing you to
teleport to this point in the cave from now on.
*******************************************************************************
* *
* Mission 19 -- Triangle of Tragedy *
* Uridimmu (x4) [M19] *
* *
*******************************************************************************
Finding your way -- The Ci'eth Stone for Mission 19 is in Sulyya Springs where
you disembark from Atomos.
Unlock condition -- Complete Mission 18.
When to undertake -- En route to Oerba.
Reward (First Win) -- Cobaltite
Reward (Subsequent wins) -- Bomb Shell x 5
The Problem -- Getting to the Mark(s) is a pain in the neck because you have to
pass through all those darned Ceratoraptors.
The Good News -- Compared to the Ceratoraptors, the Marks are a breeze.
Times -- En route to Oerba, Target time was 1:07. I leveled them in 14
seconds.
Paradigms
*************************
* Hope * Fang * Light *
******************************
* #1 * Syn * Com * Com *
******************************
* #2 * Rav * Com * Com *
******************************
The Battle -- Each Uridimmu has only about 46,000 HP, and they are weak to
Thunder. Have Hope cast Enthunder on Fang and Lightning, then switch to #2.
Your Commandos will make short work of them, especially if they are close
enough together to get Blitzed. Seriously, you won't believe how quickly they
go down. Even without Enthunder, there is plenty of time to 5-star this one.
*******************************************************************************
* *
* Mission 20 -- Word Unspoken *
* Goblin Chieftain (+4 friends) [M20] *
* *
*******************************************************************************
Finding your way -- The Ci'eth Stone for Mission 20 is in the Palisades outside
of Taejin's Tower. You will pass it on your way, and it is hard to miss.
Unlock condition -- Reach Taejin's Tower.
When to undertake -- En route to Oerba
Reward (First Win) -- Rhodochrosite
Reward (Subsequent wins) -- Bomb Shell x 5
The Problem -- Multiple enemies with no common elemental weakness. A
Preemptive Strike isn't easy, but it is doable.
The Good News -- You shouldn't need to heal, so you can concentrate on offense.
Times -- En route to Oerba, Target time was 2:17, giving me 1:36 to 5-star the
Mission. My times ran from 50 seconds to about 1:15.
Paradigms
*************************
* Hope * Fang * Light *
******************************
* #1 * Syn * Com * Rav *
******************************
* #2 * Rav * Com * Rav *
******************************
* #3 * Rav * Com * Com *
******************************
The Battle -- You are battling a Munchkin, a Munchkin Maestro, two Goblins, and
a Goblin Chieftain. The usual rule applies -- kill the little guys first or
they will promote themselves and turn into the big guys, but the AI will take
care of that for you.
Since Lightning is mostly going to be a Ravager, switch out one of her Strength
Accessories for a Magic Accessory. Her Strength and Magic numbers should be
just about equal.
Start with #1 and make sure that Fang has Bravery and Hope and Lightning have
Faith. Switch to #2 and concentrate on one enemy at a time. Generally, you
should be able to Stagger them and then finish each off in a couple of hits.
Leave the Munchkin Maestro until last. He is weak against Ice, so if you want,
you can switch to #1 long enough to put Enfrost on both girls' weapons before
switching to #3 to finish him off.
For what it's worth, a PS isn't that hard to get. Just stand as close as
possible to the enemies and wait until they all turn their backs on you. You
can finish the fight in less than 30 seconds.
Completion of this Mission activates the nearby Waystone, allowing you to
teleport to Taijin's Tower Palisades from now on.
Finding your way -- The Ci'eth Stones for Missions 21 - 27 are all in Taejin's
Tower. In every case, the Stone for the next Mission is in the same area where
you fought the previous Mission. If you are ever uncertain about how to
proceed, simply press the Square button to bring up your map and proceed
towards the yellow exclamation point (!). Since navigating won't be a
problem,for the time being, I'm going to suspend giving directions. I'll
return when you actually need guidance again.
*******************************************************************************
* *
* Mission 21 -- A Tremulous Terror *
* Gelatitan [M21] *
* *
*******************************************************************************
Unlock condition -- Reach Taejin's Tower.
When to undertake -- En route to Oerba.
Reward (First Win) -- Speed Sash
Reward (Subsequent wins) -- Bomb Shell x 4
The Problem -- The enemy has a lot of HP (679,000+) and is difficult to
Stagger, and you aren't given much time.
The Good News -- It is relatively easy to get a Preemptive Strike.
Times -- En route to Oerba, the Target time was 1:52. With a PS, my team
finished him off in 35 seconds.
Paradigms
*************************
* Fang * Hope * Light *
******************************
* #1 * Sab * Rav * Com *
******************************
* #2 * Com * Rav * Com *
******************************
The Battle -- Only Fang is going to use physical attacks in this fight, so swap
out one of Lightning's Strength Accessories for a Magic Accessory. Once you
get a PS, you can just let your team Stagger Gelatitan and beat him down.
Now let's look at how to get a PS. When you enter the room where Gelatitan is,
he will probably be quite a ways away and will see you and chase you. Retreat
to the stairs, where he can't engage you. Eventually, he will turn his back
and slime away from you. As long as he is moving directly away from you, you
really don't even have to be that careful when getting behind him -- I've won a
PS approaching him with a full run. As usual, if you don't get a PS, you can
always Retry, but with a little practice, you can get a PS almost every time.
Once you get your PS, you can start with #1 and have Fang cast Deprotect while
Hope and Lightning stagger the Mark for a round. Switch to #2, Launch, and
beat the snot out of this slithering pile of goo. Paradigm #1 is actually
optional, but it makes the fight go a little faster.
*******************************************************************************
* *
* Mission 22 -- Infernal Machine *
* Ambling Bellows (+ Cryptos x2) [M22] *
* *
*******************************************************************************
Unlock condition -- Reach Taejin's Tower.
When to undertake -- En route to Oerba.
Reward (First Win) -- Particle Accelerator x 3
Reward (Subsequent wins) -- Electrode x 3
The Problem -- Ambling Bellows calls allies into the battle, so you can easily
get overwhelmed. He is also very difficult to Stagger.
The Good News -- The Ambling Bellows is still susceptible to Pain. With a
little practice, you can get a Preemptive Strike.
Times -- En route to Oerba, Target time was 1:54. After getting a PS, the
battle was over in about 15 seconds.
Paradigms
*************************
* Van * Fang * Light *
******************************
* #1 * Sab * Com * Rav *
******************************
* #2 * Rav * Com * Rav *
******************************
The Battle -- Keep your same equipment from Mission 21. All of these enemies
are weak to Thunder, but even if you put Enthunder on your Commandos' weapons,
they will choose Ruin over physical attacks against the Mark. Thus, you need
to emphasize Magic over Strength. At this point, I had two Blessed Talismans,
and I equipped one each on Vanille and Lightning.
Your first option is to fight this one just like we fought Mission 18 -- stick
Pain on the Bellows and everything else will fall into place. Have Vanille
spam Pain for 2 rounds. If it doesn't stick, Retry. (If you are attempting
this Post-Oerba with a shorter Target time, you may want to Retry if Pain
doesn't stick in the first round.) When it does stick, have Vanille cast a
round of Deshell before switching to #2. Pound the Bellows with Magic (while
it stands helplessly by) until it falls, then finish off the Cryptos. If you
can disable the Bellows within two rounds, this is an easy 5-star, and I would
consider this to be your primary strategy.
If you want to get a PS, stand in the entrance to the room and wait. The 2
Cryptos should be closer to you and marching toward you, and the Ambling
Bellows should be farther away. The Bellows apparently is nearsighted, because
it seems unaware of your movements here as long as you proceed with stealth.
When the Cryptos turn and begin marching away from you (hopefully in unison),
walk slowly up behind the one closer to you. The Cryptos march rather slowly,
and you should be able to engage it from behind for a PS. Once I got the hang
of this, it worked for me nearly every time.
Once you get your PS, have Vanille cast Deshellga on the enemies while Fang and
Lightning Stagger the Bellows. From there, it's just a 10-second beat-down.
Thanks to alert reader NEO102 who informed me that, contrary to what I
expressed in my original version of this FAQ, a PS can be had with repeatable
success.
*******************************************************************************
* *
* Mission 23 -- Natural Defenses *
* Gurangatch [M23] *
* *
*******************************************************************************
Unlock condition -- Reach Taejin's Tower.
When to undertake -- En route to Oerba.
Reward (First Win) -- Warrior's Wristband
Reward (Subsequent wins) -- Bomb Shell x 4
The Problem -- The Target Time is absurdly low for an enemy who must be
Staggered to be significantly damaged and who is so resistant to being
Staggered. A Preemptive Strike is your only hope.
The Good News -- With a couple of Retries, you can get a PS without Deceptisol.
Times -- En route to Oerba, Target time was 1:12. With a PS, my team took him
down in 20 seconds flat.
Paradigms
*************************
* Van * Fang * Light *
******************************
* #1 * Sab * Com * Rav *
******************************
* #2 * Rav * Com * Com *
******************************
The Battle -- Again, this is all about getting the PS, so let's look at how to
accomplish that.
To get a PS, watch the Mark's movements carefully. Get as close as you can
without setting off his radar (this is usually easiest on a Retry), and then
hold still. Eventually, he will turn away from you. You need to move
stealthily and as parallel to his motion as possible. This will take a couple
of tries, but keep in mind that getting the PS is really all there is to this
"battle."
Once I got the PS, I had Vanille cast a round of debuffs so that Fang and
Lightning could do more damage once the Mark was Staggered. It probably wasn't
necessary, but there was plenty of time, and she managed to stick 4 debuffs in
one round! From there, I just switched to #2, and the battle was over in 2
more rounds.
*******************************************************************************
* *
* Mission 24 -- A Potent Sting *
* Mushussu (+ Yakshini x2) [M24] *
* *
*******************************************************************************
Unlock conditions -- Complete Missions 21, 22, and 23.
When to undertake -- En route to Oerba.
Reward (First Win) -- Moonblossom Seed x 6
Reward (Subsequent wins) -- Moonblossom Seed x 1
The Problem -- This Mission lacks challenge.
The Good News -- You can easily 5-star this Mission the first time through
Taijin's Tower AND get a reward worth 6000 gil every time you win the battle!
Times -- En route to Oerba, Target time was 1:37. My team needed less than
half that time -- 47 seconds flat.
Paradigms
*************************
* Hope * Fang * Light *
******************************
* #1 * Rav * Com * Com *
******************************
* #2 * Rav * Sab * Rav *
******************************
The Battle -- The Yakshinis are weak against water, but Mushussu absorbs water
and most other elements. Therefore, it is especially important to begin by
throwing a Librascope so that you don't waste time casting spells that only
replenish the Mark's HP. Have Hope attack the Yakshini at the bottom of your
enemy list (from my experience, this is always the one that Lightning will be
attacking), and Fang should focus on the other Yakshini. Once they are down,
switch to #2 so that Fang can Dispel and Deprotect the Mark while Hope and
Light fill the Stagger Gauge. Once the Mark is Staggered, return to #1 and
pound it into submission.
Useful note about Mission 24 -- It is no secret that this Mission is one of the
most dependable ways to earn gil, even in postgame play. The Mark is easy,
there is very little distance between getting the Mission and fighting the
battle, and the reward of 6000 gil per battle is 100% guaranteed. With 1.5-
minute cycles (allowing 45 seconds for the battle and another 45 seconds to
restart the Mission), you can earn 240,000 gil per hour. It is really boring
and repetitive, but, as you probably know, the scarcest commodity in this
game is gil, and this is far and away the most productive source of gil up to
this stage in the game.
There are two drawbacks to farming this Mission for Gil. First of all, once
you complete this Mission you cannot undertake it again until you ascend to the
spire and defeat Dahaka. That is, you must leave this area, advance the story
line, then return here. Secondly, the path to this Mission is less than
direct. You need to take the main elevator to the Fourth Tier, make your way
to the smaller elevator that goes only to the Fifth Tier, and exit there to
undertake the Mission again. None of this is prohibitively time consuming, but
be aware that these limitations do exist.
*******************************************************************************
* *
* Mission 25 -- Spectral Haunt *
* Vetala [M25] *
* *
*******************************************************************************
Unlock conditions -- Complete Missions 21 - 24 inclusive.
When to undertake -- En route to Oerba.
Reward (First Win) -- Cobaltite
Reward (Subsequent wins) -- Bomb Core x 6
The Problem -- Un-Staggered, Vetala is immune to physical attacks and is
practically immune to Magic. In other words, you have to Stagger him to do any
significant damage to him.
The Good News -- Once he is Staggered, your Commandos will shave away his
480,000 HP pretty quickly.
Times -- En route to Oerba, Target time was just over 3 minutes. It took my
team just over half a minute to finish him off.
Paradigms
*************************
* Hope * Fang * Light *
******************************
* #1 * Rav * Sab * Rav *
******************************
* #2 * Rav * Sab * Com *
******************************
* #3 * Rav * Com * Com *
******************************
The Battle -- Open with #1 and have Hope cast Libra. Since Fang's physical
attacks won't push up the Chain Gauge much, have her cast debuffs (that won't
stick) to help Stagger the Mark while Hope and Lightning hit Vetala with Magic.
When the Mark does Stagger, change to #2 long enough for Fang to cast some
debuffs that WILL stick, then switch to #3 to finish off Vetala. Piece of
cake!
*******************************************************************************
* *
* Mission 26 -- So Shrill, the Cry *
* Penanggalan (+ Conchon x4) [M26] *
* *
*******************************************************************************
Unlock conditions -- Complete Missions 21-25 inclusive.
When to undertake -- En route to Oerba.
Reward (First Win) -- Diamond Bangle
Reward (Subsequent wins) -- Bomb Core x 6
The Problem -- Trying to figure out why a battle this easy is considered a
Mission.
The Good News -- You get to use your weapons again.
Times -- En route to Oerba, Target time was 1:34. I pushed the X button a few
times, and the battle was over in 37 seconds.
Paradigms
*************************
* Fang * Hope * Light *
******************************
* #1 * Com * Rav * Com *
******************************
* #2 * Com * Med * Com *
******************************
The Battle -- Don't worry that all the smoke and confusion make it difficult to
discern who is doing what to whom. Just trust your Commandos and the AI and
this battle will be over before you know what happened. Paradigm #2 is really
only in there in case Hope (your weakest team member) gets attacked
disproportionately and needs healing.
*******************************************************************************
* *
* Mission 27 -- Mithridates, the Lone *
* Mithridates [M27] *
* *
*******************************************************************************
Finding your way -- The Ci'eth Stone at the Apex of the Tower is for Mission
27, but you probably want to skip this Mission until you can fill in Stage 9 of
the Crystarium a bit. Proceed to the next Mission description for now.
Unlock condition -- Defeat Dahaka in Taejin's Tower.
When to undertake -- Early postgame.
Reward (First Win) -- Blaze Ring
Reward (Subsequent wins) -- Bomb Core x 6
Special note on Mission 27 -- To make the Mark appear, you have to ride the
central elevator nonstop all the way from the Apex to the ground tier. You
won't be able to do this until you activate the elevator to do so. Interact
with the statue on the Apex, and he will make a new elevator appear. Take this
elevator down to the Seventh Tier (the only place that it goes). Interact with
the stone statue there, and it will rotate the building, allowing the central
elevator to reach all tiers. Go to the inner ring on the seventh tier and you
can pick up a Collector Catalogue on your way to the central elevator, which
will take you back up to the apex. From there, ride all the way to the ground
tier and the Mark should engage you.
The Problem -- He hits you with bad status effects like Poison, Deprotect, and
Deshell. He is immune to debuffs. When you first get to Taijin's Tower, his
attacks are far too strong for your HP levels.
The Good News -- By early postgame, you won't need to worry about removing his
debuffs and can bring him down efficiently.
Times -- Early postgame time was around 2:40. I took him down in about 1:20.
Paradigms
*************************
* Hope * Fang * Light *
******************************
* #1 * Syn * Com * Med *
******************************
* #2 * Rav * Com * Rav *
******************************
* #3 * Rav * Com * Com *
******************************
* #4 * Med * Com * Rav *
******************************
The Battle -- Even your Commandos are going to use Magic exclusively, so if you
are having trouble with the Target time, you can use the setup from Mission 22
to de-emphasize Strength and get the Target time up. Start with #1 and have
Hope cast Faith and Barthunder on everyone. The latter will give your team
added protection against the Mark's Lightning-based attacks. Have Hope restore
Haste on anyone that got it removed, then switch to #2. Fill the Mark's
Stagger Gauge and then switch to #3 and polish him off. Use #4 as necessary
when you need to heal.
That sounds so easy, doesn't it? I have to admit that I had problems a couple
of times with the Mark attacking Hope almost exclusively and surprising me with
a "Game Over", which got really annoying after a while. However, once I
learned to have Hope cast Barthunder, I didn't have this problem again. There
is actually plenty of time to 5-Star this battle, so make sure that everyone is
prepared before you go on the offensive with Paradigm #2, and this battle will
go your way.
If you invested the very few CP necessary to make Fang a Ravager, have her take
on that role in Paradigm #2 to speed up the filling of the Mark's Chain Gauge.
This can speed up the battle considerably.
*******************************************************************************
* *
* Mission 28 -- Faded Glory *
* Ceratosaur (x10) [M28] *
* *
*******************************************************************************
Finding your way -- The Stone for Mission 28 will be in Oerba and is very
difficult to overlook. It is straight ahead just before you make a right turn
down some steps.
Unlock condition -- Reach Oerba.
When to undertake -- When you arrive in Oerba
Reward (First Win) -- Giant's Glove
Reward (Subsequent wins) -- Bomb Shell x 5
The Problem -- You are being attacked by TEN enemies.
The Good News -- None of them are Ceratoraptors, so the mob doesn't get any
bigger. All are vulnerable to Fire.
Times -- When I first arrived in Oerba, the target time was 56 seconds. Even
though Lightning died in battle, I still finished off all 10 enemies in 22
seconds.
Paradigms
*************************
* Hope * Fang * Light *
******************************
* #1 * Syn * Com * Com *
******************************
* #2 * Rav * Com * Com *
******************************
The Battle -- This is all about speed, and since the enemies are all weak to
Fire, it is worthwhile to Enfire your Commandos' weapons. You aren't trying to
Stagger anyone -- just go for maximum damage in minimum time. Start with #1
and have Hope put Bravery and Enfire on Fang and then on Lightning. Switch to
#2, and the battle will be over in another round or two. Easy!
A couple of notes before you proceed:
First of all, before fighting Barthandelus, you should repair Bhakti and
upgrade weapons for your 3 primary characters. It will make that battle
much easier.
Secondly, remember that after beating Barthandelus, you are not going to
undertake Mission 29, but rather Mission 55. Jump to the description of that
Mission now.
*******************************************************************************
* *
* Mission 29 -- Faltering Faith *
* Juggernaut [M29] *
* *
*******************************************************************************
Finding your way -- The Ci'eth Stone for Mission 29 is in the Mah'habara cave,
just beyond the 5 Hoplites that you fought repeatedly to earn CP at the
beginning of Chapter 11. You will need to defeat the Juggernaut behind the
wall to access the Stone.
Unlock condition -- Complete Mission 20.
When to undertake -- Early postgame
Reward (First Win) -- Uraninite
Reward (Subsequent wins) -- Mobius Coil x 3
The Problem -- You can debuff Juggernaut, but he can remove your debuffs. The
real problem is that he has nearly 1.6 million HP, he takes forever to Stagger,
and you have a relatively short Target time.
The Good News -- You can get a PS without using Deceptisol.
Times -- Early postgame Target time was 1:10. That gives you roughly 46
seconds to finish him off for a 5-star rating. Good luck doing that without a
PS.
Paradigms
*************************
* Van * Fang * Light *
******************************
* #1 * Sab * Com * Rav *
******************************
* #2 * Rav * Com * Com *
******************************
The Battle -- The key to success is getting a Preemptive Strike. Juggernaut
perceives you pretty readily, but he will only follow you so far before
stopping. Lure him to that limit and wait while standing right in front of
him. Eventually, he will turn around and stomp away. If he is walking
directly away from you, you don't even have to tiptoe -- you can run up behind
him and still get a PS.
Unfortunately, there is more to this battle than just getting the PS.
Juggernaut is very resistant to damage, and it is possible for him to survive a
Stagger. This is why I put Vanille in the lead -- I have her debuff him while
Fang and Lightning Stagger him. In one round, I got Vanille to stick him with
4 debuffs! Once he is Staggered and debuffed, switch to #2 and your Commandos
can easily finish him in one Stagger. For me, he went down in about 25 seconds.
*******************************************************************************
* *
* Mission 30 -- Syphax, the Insidious *
* Syphax [M30] *
* *
*******************************************************************************
Finding your way -- Return to Aggra's Pasture (where you fought Neochu for your
Growth Egg) and enter the passage at the far end, just past the Ochu. You will
reach a dead end with the Ci'eth Stone for this Mission.
Unlock condition -- Reach Sulyya Springs.
When to undertake -- Early postgame
Reward (First Win) -- Uraninite
Reward (Subsequent wins) -- Bomb Core x 6
Special note about Mission 30 -- The mark for Mission 30 is located in a branch
of Mah'habara that you may not be able to access. Remember when you first left
this place and proceeded to Sulyya Springs? You rode in an earth-digging
transport called Atomos. To access the area where the Mark resides, you have
to go back to Sulyya Springs and ride in Atomos back to Mah'habara. If you
completed Mission 19, you activated the Waystone in Sulyya Springs and can
simply warp there and ride Atomos back. Once Atomos returns to Mah'habara, it
will form a bridge across the gap that you need to cross in order to reach the
Mark, and you can proceed from there. Shortly after you pass the Save Point,
the path will fork. When it does, go to the right. From there, the path is
linear.
The Problem -- With accessing the Ci'eth Stone, retrieving Atomos, and hiking
to the Mark, you will walk a distance roughly equal to the circumference of
Jupiter doing everything necessary to complete this Mission. You have to kill
probably 30 enemies.
The Good News -- None of them except the Mark itself have many HP, and the Time
target is generous.
Times -- This was one of my first Missions postgame, and Stage 10 Crystarium
was a long ways from complete. My Target time was 5:13, and I cleaned out all
these flying pests in 1:33 for an easy 5-star. I also 5-starred this Mission
Post-Oerba with a Target time of 7:11 and a battle time of 1:17.
Paradigms
*************************
* Hope * Fang * Light *
******************************
* #1 * Syn * Com * Com *
******************************
* #2 * Rav * Com * Com *
******************************
* #3 * Rav * Sab * Rav *
******************************
* #4 * Rav * Rav * Rav *
******************************
The Battle -- When the battle begins, Syphax disappears immediately and calls
lesser bats for you to fight 5 at a time. Your Blitzing Commandos should make
short work of them since each only has 17,600 HP. While they are doing this,
have Hope cast Haste and Bravery on Fang and Lightning and Haste and Faith on
himself. Yes, they were equipped with Sprint Shoes, but Sprint Shoes only
maintain Haste for about a minute, and this battle is going to go beyond that.
You're going to want to rebuff eventually, so you might as well do so now.
Once the buffing is done, switch to #2 and keep swatting down bats until Syphax
appears.
When Syphax is ready to fight you himself, switch to #3 because he has enough
HP (about 2.2 million) that you are going to want to Stagger him. Debuffs don't
stick on him very easily, but stay with #3 until either the Mark Staggers or
both Deshell and Deprotect stick. If you have developed Fang as a Ravager and
the debuffs stick before Syphax Staggers, switch to #4 long enough to Stagger
him. Once the Mark is Staggered -- even if the debuffs didn't stick -- you can
switch back to #2 for the beat-down. Even in Chapter 11, you should be able to
finish him off in one Stagger.
I really couldn't believe that I trekked so far to fight such a ridiculously
easy battle! The only thing that made the trek worthwhile was finding a Moogle
Puppet on the way.
BTW, before you leave the area, remember to open the 2 treasure balls, both of
which contain very useful upgrading components. You might also consider Saving
and then resetting your game so that the enemies that you wiped out on your way
here will respawn, thus allowing you to gain some CP on the return trip.
*******************************************************************************
* *
* Mission 31 -- Newfound Purpose *
* Pulsework Champion (+ Seeker x3) [M31] *
* *
*******************************************************************************
Finding your way -- Completing Mission 30 unblocked the dead end from Aggra's
Pasture. Proceed from there into the next open area. The Ci'eth Stone is on
your left atop a small hill, guarded by a Strigoi (Ci'eth that looks like a
Vampire).
Unlock condition -- Complete Mission 30.
When to undertake -- Early postgame.
Reward (First Win) -- Perfect Conductor x 3
Reward (Subsequent wins) -- Crystal Oscillator x 2
The Problem -- As before, the Mark takes a while to Stagger and can't be
significantly damaged until he is Staggered. Insanely low Target time makes it
unlikely that you will get a 5-star rating without a Preemptive Strike or a
quick Random instant Chain.
The Good News -- As detailed below, you actually have 3 options for 5-starring
this battle. Oh yes, and the Seekers pose little threat to your team.
Times -- Even with most of my stat-boosting accessories removed, Target time
was only 41 seconds. That gives you 29 seconds to Stagger the Mark and
eliminate all 4 enemies. You are going to have trouble achieving that time
without some kind of advantage.
Paradigms
*************************
* Sazh * Hope * Fang *
******************************
* #1 * Rav * Rav * Com *
******************************
* #2 * Com * Rav * Com *
******************************
The Battle -- As mentioned, the Target time is absurdly short, especially
considering that the Mark's first attack "Headspin" knocks your entire team to
the ground and makes you lose at least 5 seconds recovering. Realistically,
for a 5-star rating, you only have 3 options here: Deceptisol, Preemptive
Strike, and Random Instant Chain. The first option is the easiest was, but
using Deceptisol makes me feel so guilty. We haven't needed shrouds yet, and I
see no reason to use them here because they just aren't necessary. Let your
conscience be your guide.
A Preemptive Strike is possible, but will probably take you several tries. You
would think that if you hide around the corner so that only the one Seeker is
in your line of sight that a PS would be easy. I was never able to get a PS
this way. It seems that the enemies can actually see through the wall. I
found it best to just run around the corner and get in the middle of them,
engage, and then Retry. When the screen loads, you have a decent chance (maybe
10% - 20%) of getting a quick PS, depending on the positions of the enemies.
When I did the battle this way, my Target time was 35 seconds and I finished in
16 seconds.
The third option is to make use the Random Instant Chain ability described in
Section IX. We haven't tried this one yet, so let's take it for a test drive
and see what you think.
So, start by getting at least Sazh equipped with gear to give him this
ability. If Fang is using the Taming Pole or any upgrade from it, she only
needs one other relevant Accessory, so you may be able to give her this ability
as well. This will probably mean unequipping some of your Power Gloves, but
remember that this is a good thing because it increases the Target time.
Now just run around the corner and engage the enemies. Have Sazh use his 17-
hit Cold Blood attack on the Pulsework Champion (who, you will notice, is NOT
the default target, so you need to select him manually.) If he is not
Staggered after one round of attacks, Retry. It shouldn't take more than a few
Retries before he Staggers in the first round. From there, the rest is easy --
your Commandos should make short work of the disabled Mark and his slimy
minions even with the pathetically weak Sazh involved.
Logistically, it makes sense to initiate the next 3 Missions in this order:
34, 33, and finally 32. You want to complete Mission 34 first to activate the
waystone and be able to teleport back here to the Haerii Archaeopolis. Next
initiate Mission 33 at the nearby Ci'eth Stone and go to the Archylte Steppe to
fight that battle. The Ci'eth Stone and the battle for Mission 32 will be
either in or fairly close to the Steppe. From there you can teleport back here
to the Haerii Archaeopolis.
August 2010 update -- I tried this battle again and had a lot of trouble
getting the RIC to hit. Even with both Sazh and Fang equipped for this
ability, I had to replay this battle at least 20 times before I Staggered the
Mark in time to meet the time limit. Meanwhile, without even trying, I managed
to get a Preemptive Strike (which led to an easy 5-star rating) at least 2 - 3
times. In retrospect, I'm beginning to think that the PS is the way to go. My
advice, then, is to equip yourself for the RIC and then keep Retrying until you
get either a PS or a timely RIC. Either will lead to an easy 5-star.
*******************************************************************************
* *
* Mission 32 -- And Then There Was One *
* Amam [M32] *
* *
*******************************************************************************
Finding your way -- Teleport to the Vallis Media Base Camp and head into the
small cave that leads back to the Steppe. You will see the Ci'eth Stone for
Mission 32 on your right. The closest teleport point to the Mission battle is
the Northern Highplain.
Unlock condition -- Reach Mah'habara.
Whe to undertake -- Early postgame.
Reward (First Win) -- Glass Buckle
Reward (Subsequent wins) -- Bomb Shell x 5
The Problem -- Enemy heals itself with HP it takes from your team. Its attacks
can disable a team member's Physical or Magic attacks temporarily.
The Good News -- You're never actually going to experience the Mark's attacks
because you can easily get a PS a beat it down before it takes a breath.
Times -- Target time was around 1:20. For me, the battle lasted about half a
minute.
Paradigms
*************************
* Fang * Hope * Light *
******************************
* #1 * Sab * Rav * Com *
******************************
* #2 * Com * Rav * Com *
******************************
The Battle -- I pretty much guarantee that after Amam's first attack, at least
one member of your party will either have Fog or Pain. For the most part, you
can just wait this out. If hit with Pain, your Commandos will just cast Ruin
while waiting for it to wear off. If the time limits were tight, this would be
a problem, but even in the worst case scenario, you shouldn't have any trouble
5-starring this one. So, you can actually just use Paradigm #2, wait out any
status ailments, and pound the Mark with time to spare.
If you are looking for a more elegant approach, it is very easy to get a PS.
The Mark's vision is actually very good, but you can approach from an angle
that prevents him from seeing you. Start at the north edge of the water and
slowly follow the pond's edge until you are directly behind Amam. Turn and
walk up behind him to get the PS. This worked for me nearly 100% of the time.
From there, if you start with #1 so that you can get the Mark Deprotected while
Hope and Lightning Stagger it, you can then switch to #2 to Launch and finish
off this bozo in roughly 10 seconds total. Much more satisfying, don't you
think?
*******************************************************************************
* *
* Mission 33 -- A Parent's Pledge *
* Adamanchelid [M33] *
* *
*******************************************************************************
Finding your way -- The Stone is in the Haerii Archaeopolis. Teleport there
and look in the nearest fallen structure. You will see the Stone among all the
Goblins.
Unlock condition -- Complete Mission 30.
When to undertake -- Early postgame
Reward (First Win) -- White Cape
Reward (Subsequent wins) -- Bomb Shell x 5
The Problem -- Relatively short Target Time. His stomping attacks damage your
entire party.
The Good News -- He is inherently weak to Ice.
Times -- Target time was 1:10, giving you 46 seconds to 5-star the Mission.
For me, he went down in less than 30 seconds.
Paradigms
*************************
* Hope * Fang * Light *
******************************
* #1 * Syn * Sab * Med *
******************************
* #2 * Rav * Com * Com *
******************************
* #3 * Med * Com * Com *
******************************
The Battle -- You should be getting the hang of this by now. Start with #1 and
have Hope cast Bravery and Enfrost on both Fang and Lightning. While he is
doing this, Fang is debuffing the Mark with Deprotect and Deshell and probably
Imperil, which you don't need. You are going to have to time Hope's buffing
very carefully. The enemy will stomp the ground rather frequently, and if you
try to take an action during one of those stomps, your actions will be
disrupted. Queue up the desired buff(s), wait for the Mark to stomp, then
press X to cast those buffs. Once your buffs and debuffs are in place, switch
to #2 and pound the round mound into the ground.
If you tackle this Mission in Chapter 11, you will probably need to switch to
#3 after the mark performs a Quake and continue healing for the remainder of
the battle.
Since you're already equipped to take on these baby Turtles, you might as well
head north and defeat the two Adamanchelids that are protecting Treasure Balls
containing Gold Nuggets.
*******************************************************************************
* *
* Mission 34 -- Zenobia, the Butcher *
* Tonberry [M34] *
* *
*******************************************************************************
Finding your way -- The Ci'eth Stone is in the Haerii Archeaopolis, just uphill
from the Teleport Stone.
Unlock condition -- Complete Mission 30.
When to undertake -- Early postgame
Reward (First Win) -- Hermes Sandals
Reward (Subsequent wins) -- Bomb Core x 7
The Problem -- He removes your buffs. If you don't finish him off quickly
enough, he will restore all of his HP.
The Good News -- Target time is insanely high for such an easy Mark.
Times -- Early postgame Target time was a whopping 8:22. If the battle lasts a
full minute, you're doing something wrong.
Paradigms
*************************
* Van * Fang * Light *
******************************
* #1 * Sab * Com * Rav *
******************************
* #2 * Rav * Com * Com *
******************************
* #3 * Med * Com * Com *
******************************
The Battle -- Notice that the Target time is ridiculously generous, largely
because Tonberry is ranked as level 49. The good news is that he has less than
800,000 HP, debuffs fairly easily, and has no attacks that are especially
damaging as long as you dispatch him fairly quickly.
I've gone back and forth several times on my strategy for this Mission. In the
end, I've decided that unless your levels are extremely low, the
straightforward approach is the best. If you let Tonberry linger overlong when
his HP are low, he will restore all lost HP, effectively making you start over.
However, except at very low levels, this should be avoidable.
I would keep Sprint Shoes (to get the team off to a good start), but don't
bother with Talismans (Talismen?) because Tonberry's Knife attack will remove
your buffs. Fill the rest of your Accessory slots with Warrior's Wristbands
and Sorcerer's Marks. It's not like you have to worry about lowering the
Target Time a little.
Start with #1 until Vanille sticks Deshell, Deprotect, and Poison. Switch to
#2 and pound away. Paradigm #3 is only there in case someone needs to be
healed, which should be unlikely.
*******************************************************************************
* *
* Quick interjection -- Missions #35 - 51 constitute a special set of *
* Missions known as Titan's Trials. They work slightly differently than *
* conventional Missions because of the unusual way that you have to access *
* them. The map that the is displayed when you access a Ci'eth Stone gives *
* you a good picture of how to navigate these Missions. Consequently, I *
* will suspend my "Finding your way" comments until Mission 52. *
* *
*******************************************************************************
Free advice: From here on, many Missions will proceed much faster if you spend
the few CP necessary to make Fang a Ravager. Everyone's primary roles should
be nearly filled out by now, so make this secondary role for Fang a priority.
*******************************************************************************
* *
* Mission 35 -- The Road Less Traveled *
* Gurangatch [M35] *
* *</pre><pre id="faqspan-5">
*******************************************************************************
Unlock condition -- Complete Mission 34.
When to undertake -- Early postgame
Reward (First Win) -- Witch's Bracelet
Reward (Subsequent wins) -- Bomb Shell x 5
The Problem -- The Target Time is absurdly low for an enemy who must be
Staggered to be significantly damaged and who is so resistant to being
Staggered. Getting a Preemptive Strike is tricky and requires some practice.
The Good News -- Preemptive Strike and Random Instant Chain are both legitimate
shroud-frees strategies for Staggering this Mark quickly.
Times -- Target time is around 35 seconds. That gives you 24 seconds to
Stagger him and shave away his nearly 250,000 HP. Good luck doing that without
Staggering him in the first round.
Paradigms:
Random Instant Chain Method Preemptive Strike Method
************************* *************************
* Sazh * Fang * Light * * Hope * Fang * Light *
****************************** ******************************
* #1 * Rav * Com * Com * * #1 * Rav * Sab * Com *
****************************** ******************************
* #2 * Com * Com * Com * * #2 * Rav * Com * Com *
****************************** ******************************
The Battle -- We fought this same enemy in Mission 23. From that battle you
may recall that you can't do much damage to this enemy unless you Stagger him,
and he is very resistant to Staggering.
This leaves us three choices (assuming that we're not going to "cheat" and use
Deceptisol.) In my earlier versions of this guide, I made the absolute
statement that a PS is simply not possible, and therefore Random Instant Chain
is your best option. Then in January, 2013, I received an email from alert
reader Renan Marcelo de Souza Cadamuro informing me that there is a YouTube
video posted by "alphafann" that shows one way of getting a PS in this Mission.
Then, in August, 2015, I got another email from Jeff Sun outlining a second
method for getting a PS.
Of the two methods for getting a PS, Jeff's method certainly looks a whole lot
easier. Personally, I haven't been able to make it work for me very reliably,
but that is probably because I haven't spent much time practicing it. The
"alphafann" method I have tried many times and can still only make work about
one try out of 10. There are YouTube videos on both, so if you want to try for
a PS, I advise you to watch those, try to duplicate their methods, and see what
works for you.
I will first give my original description of how to 5-Star this Mission using
RIC (since this will require less verbiage), and then I will describe both
methods of getting a PS. All 3 methods will require some patience. Where RIC
depends on luck, getting a PS depends on skill and is therefore going to
require some practice. I leave the decision up to you. (Note: In my counting
of strategies towards the end of this guide, I'm going to count this Mission as
being won by using PS rather than RIC. Both are possible but, for me, the
skill required for the PS method has more elegance than the randomness of the
RIC method.)
Random Instant Chain: Equip your team as described in Mission 31, bestowing
the RIC ability on all 3 characters if at all possible. This gives you roughly
a 13% chance of a Stagger in the first round. When you are equipped and ready,
just walk up to the Gurangatch and have Sazh execute Cold Blood. If the Mark
doesn't Stagger in the first round, Retry. If he does Stagger, switch to #2
(or just continue with #1) and just keep whacking him until he dies, which
should happen pretty quickly.
Preemptive Strike (both methods): Equip your team as usual -- Sprint Shoes on
everyone, Morale Talismans on Fang and Lightning, and Blessed Talisman on
Vanille. Do not add any stat-boosting Accessories. The Target Time is short
enough already.
(alphafann method -- YouTube link
https://www.youtube.com/watch?v=0JCW-KWs448):
The Mark's tendency is to stay as close as possible to his starting position.
If you lure him forward only slightly, he will just walk backwards to this
starting position, never turning his back on you to allow a PS. However, if
you lure him forward as far as he will go, then rather than walk backwards to
his starting spot, he will turn his back on you so that he can walk forwards to
this initial position. This will give you the opportunity that you need to get
a PS.
Luring him forward, however, is tricky. Gurangatch has terrible vision,
meaning that you have to get very close to him before you show up on his radar
thereby motivating him to pursue you. If you get too close, he will engage you
in battle, and you'll have to Retry. Moreover, you will probably have to lure
him forward 3 times to get him to move forward far enough, and these passes
must be fairly close together (timewise) or he will backtrack and you'll lose
any progress that you made. One final complication is that your own teammates
are going to get in your way as you try to run back and forth, luring the
monster to advance.
I got my best results by approaching the Mark from the left (his right), along
the tall rocky wall. You have to move in close enough to get on the Mark's
radar, move back out just enough to get off his radar, then move back in before
he loses interest and backtracks. Each time you do this, you have to get close
enough that the red "Mark" banner shows above his head and the star on your map
(the one indicating the Mark's location) flashes. If you do this correctly a
total of 3 times, he should be as far forward as he will go. When this
happens, retreat down either of the two paths behind you far enough that the
(!) above the Mark's head goes away. Turn around and head back towards the
Mark, and if you did everything correctly, he should turn his back and start
walking away. You are going to have to hurry, since he will face you again as
soon as he returns to his starting position. However, as you approach him,
remember to stay DIRECTLY behind him. If you approach even slightly from the
side, he will detect you and you will need to try again.
Once you get the PS, the rest is easy. Use Paradigm #1 to debuff and Stagger
the Mark, then switch to #2 for a quick beatdown. You can finish him in 10 -
15 seconds tops.
Even after watching the aforementioned video, it took me quite a few (probably
at least 20) tries to get a PS. Hopefully the information above will shorten
your learning time. Now that I have invested about an hour researching this
Mission, I can get this Mark to turn his back on me about 20% of the time, and
on about half of those occasions I can get a PS. One success out of 10 is
certainly better odds than you'll get with RIC, but, as previously mentioned,
getting the hang of it requires some trial and error.
(Jeff's method -- YouTube link
https://www.youtube.com/watch?v=JhAmieBnk4g&feature=youtu.be): The strategy
here is very similar to alphafann's, except that instead of luring the Mark as
far forward as possible, you back him into a wall to get him to turn around. I
don't think that I can improve on Jeff's description of his strategy, so I
refer you to his video and the comments he wrote to accompany it.
Overall, getting a PS could be considered to be a skill that is not worth
learning. Learning how to get a PS is difficult, annoying, and time consuming.
You only have to 5-star this battle once, and you can do so much quicker by
just using RIC and Retrying until it works.
For the record, you are going to have to fight this particular battle at least
7 times to complete all of Titan's Trials. However, keep in mind that you only
have to earn a 5-star rating once. After that, if you get a lower rating, the
records will still reflect your best result. So, in subsequent battles, don't
worry about your rating. Just Stagger Gurangatch the traditional way before
Launching and finishing him.
*******************************************************************************
* *
* Mission 36 -- Dark Deliverance *
* Amam (x2) [M36] *
* *
*******************************************************************************
Unlock condition -- Complete Mission 35.
When to undertake -- Early postgame.
Reward (First Win) -- Uraninite
Reward (Subsequent wins) -- Bomb Shell x 6
The Problem -- Enemies hit you with status ailments such as Pain and Curse.
Their Storm Conduction allows them to absorb the HP that you lose, making them
difficult to finish off.
The Good News -- Marks are weak to Ice. Rather long Target time makes for an
easy 5-star.
Times -- Target time of 2:40. This is generous -- a minute or so should be
enough.
Paradigms:
*************************
* Hope * Fang * Light *
******************************
* #1 * Syn * Com * Rav *
******************************
* #2 * Rav * Com * Rav *
******************************
* #3 * Rav * Com * Com *
******************************
* #4 * Med * Com * Com *
******************************
The battle -- This is the same enemy that you fought in Mission 32, except this
time there are two of them. Don't take these guys lightly. They look easy,
but since they constantly heal themselves with your HP, they hang around longer
than you expect.
Open with #1, but have Hope wait for a moment. The enemies' first move will be
Accursed Breath, which will more than likely make most (or all!) of your team
unable to attack or use magic. You can wait this out if you want, but I would
advise you to use the Displega technique instead. This will remove all of
those nasty status effects, but it will also remove all of your buffs. You can
now have Hope cast Haste on himself, and then Haste, Enfrost, and Bravery on
each of the ladies. This will take a while, but meanwhile Fang and Lightning
should be beating up on one enemy. After rebuffing, switch to #2 and finish
off the first Amam. You can now switch to #3 and make short work of the second
Amam. If Hope gets short on HP, you can use #4 to heal, but hopefully that
won't be necessary.
*******************************************************************************
* *
* Mission 37 -- Dying of the Light *
* Rafflesia (x5) [M37] *
* *
*******************************************************************************
Unlock condition -- Complete Mission 35.
When to undertake -- Early postgame.
Reward (First Win) -- Star Pendant
Reward (Subsequent wins) -- Bomb Shell x 5
The Problem -- The enemies can take away your buffs. You have to do a lot of
damage in a short period of time.
The Good News -- The enemies are vulnerable to Fire. It is very easy to get a
Preemptive Strike.
Times -- Target time was 45 seconds. It took me about half of that.
Paradigms:
*************************
* Hope * Fang * Light *
******************************
* #1 * Rav * Com * Com *
******************************
The Battle -- You can easily beat these chumps in a straight-up fight, but a PS
is so ridiculously easy to get that it's difficult to resist. These enemies
are apparently functionally blind and deaf because unless you run into one that
is facing directly towards you, you are virtually guaranteed a PS. Seriously,
you need only concern yourself with the enemies (probably 2 of them) closest to
you. As long as they are not pointed directly towards you, a PS is yours.
Hope will cast Firega, which will Stagger most of the enemies, and your
Commandos will make short work of the mob. Easy-peasy.
*******************************************************************************
* *
* Mission 38 -- Moonlit Madness *
* Verdelet (x3 + Adroa x1) [M38] *
* *
*******************************************************************************
Unlock condition -- Complete Mission 36.
When to undertake -- Early postgame.
Reward (First Win) -- Diamond Bangle
Reward (Subsequent wins) -- Bomb Shell x 5
The Problem -- If you are slow enough to let these things Summon, they will
bring a Juggernaut (!) into the battle. That will pretty much preclude a 5-
star rating.
The Good News -- That will only happen if you fall asleep. Actually, even if
you're asleep you could keep that from happening. This battle is that easy.
This is a Mission -- why?
Times -- The Target time was a ridiculously high 1:35. Without ever touching a
single button on the controller, my Commandos finished the battle for me in 5
seconds flat.
Paradigms:
*************************
* Hope * Fang * Light *
******************************
* #1 * Rav * Com * Com *
******************************
The Battle -- One person who undertook this Mission in Chapter 11 described it
as a game of Whack-a-Mole. As soon as you knock one enemy down, another is
summoned to replace him. Fortunately, in postgame play, this isn't an issue.
Besides Hope and Fang, it really doesn't matter who your third party member is
in postgame. Hey, bring in Sazh for once! You'll still get 5 stars unless
you're crazy enough to forget to put someone in an attacking role and you let
the Juggernaut appear.
Again, you may want to consider backtracking to the Save Point before
proceeding to the next area.
*******************************************************************************
* *
* Mission 39 -- Seeing Stars *
* Ochu (+ Microchu x2) [M39] *
* *
*******************************************************************************
Unlock condition -- Complete Mission 36 or 37.
When to undertake -- Early postgame.
Reward (First Win) -- Siltstone Ring
Reward (Subsequent wins) -- Moonblossom Seed x 2
The Problem -- Ochu calls allies into battle.
The Good News -- All enemies are weak to Fire.
Times -- My Target time was 2:00. Even dealing with the summoned Microchus, I
laid all enemies to waste in just over a minute.
Paradigms:
*************************
* Hope * Fang * Light *
******************************
* #1 * Syn * Com * Com *
******************************
* #2 * Rav * Com * Com *
******************************
* #3 * Rav * Com * Rav *
******************************
The Battle -- Starting with #1, have Hope cast Enfire on both Fang and
Lightning. (I am assuming that they are both equipped with Morale Talismans
and don't need Bravery. If this is not the case, give each of them Bravery as
well.) Switch to #2 and focus the attacks on Ochu. By the time I changed
Paradigms, my Commandos had wiped out all Microchus and they were attacking the
Mark. Ochu will probably do "Seed Dispersal" which will bring several
Microchus into the fray, but there doesn't seem to be much way to avoid it.
When he does, switch to #3 or your Commandos will waste time on the Microchus.
Keep everyone focused on the Ochu until it expires. When it does, you can
switch back to #2 and whittle away at the Microchus. With their Enfired
weapons, your Commandos will make short work of the mob.
If you have trouble with this Mission, try putting in a Med-Sab-Rav Paradigm to
allow Fang to Deprotect Ochu. He will fall much more quickly if you do this.
*******************************************************************************
* *
* Mission 40 -- Solar Power *
* Verdelet (x2) [M40] *
* *
*******************************************************************************
Unlock condition -- Complete Mission 37.
When to undertake -- Early postgame
Reward (First Win) -- Zealot's Amulet
Reward (Subsequent wins) -- Bomb Shell x 5
The Problem -- If you don't finish them off quickly enough, they will Summon
a Mushussu, prolonging the battle.
The Good News -- If you are sufficiently strong, they won't get a chance to
Summon.
Times -- The Target Time is 33 seconds. As long as neither enemy successfully
Summons, you should be fine.
Paradigms:
*************************
* Hope * Fang * Light *
******************************
* #1 * Rav * Com * Com *
******************************
The Battle -- Your Commandos will automatically attack different targets, so
have Hope wait and attack the first Verdelet to Summon. That way, there will
be minimal chance of a successful Summon and an almost guaranteed 5-star. Just
slash and stab and don't blink or you'll miss the whole battle. For me, it
lasted all of 6 seconds.
FYI, it is VERY easy to get a PS in this battle. Approach the enemies close
enough that they perceive you and begin to run after you. Backtrack to the
point beyond which they will no longer proceed. They will look at you for a
few seconds and then turn their backs and bounce away. Charge into the back of
one of them for an easy PS.
Free Advice: You might consider backtracking to the Save Point before
proceeding since there is not another one prior to your next challenge.
*******************************************************************************
* *
* Mission 41 -- Gaian Grudge *
* Tonberry (x3) [M41] *
* *
*******************************************************************************
Unlock condition -- Complete Mission 38.
When to undertake -- Early postgame
Reward (First Win) -- Doctor's Code
Reward (Subsequent wins) -- Tonberry Figurine
The Problem -- Their "Knife" attack removes your buffs. Their attacks get
increasingly powerful. They can heal all of their HP.
The Good News -- Generous target time. You only have to fight this battle
once.
Times -- I got a Target time of 24:42 -- WOW! All three went down in 2:29.
Paradigms:
Without PS With PS
************************* *************************
* Fang * Hope * Light * * Hope * Fang * Light *
****************************** ******************************
* #1 * Sab * Syn * Med * * #1 * Rav * Sab * Com *
****************************** ******************************
* #2 * Com * Rav * Rav * OR * #2 * Rav * Com * Com *
****************************** ******************************
* #3 * Com * Med * Rav *
******************************
* #4 * Com * Rav * Com *
******************************
The Battle -- I cannot count how many times I've fought this battle, and I'm
still guessing about a lot of what goes on with the AI of Tonberries. You will
forgive me, then, if some of my statements below prove to be less than 100%
accurate. I will also say that I have never lost this battle or failed to 5-
star it when undertaking it postgame.
Your buffs will do you minimal good since each time a Tonberry hits you, it
will remove one of your buffs. In light of this, you may as well ditch the
Sprint Shoes, Blessed Talisman, and Morale Talismans, since their effects won't
survive the first round. I gave each of the girls another Power Glove for some
extra attacking power, and a RIC Accessory to go with their RIC weapons as well
(see Section IX). Tonberry's level is 49, the maximum level that is vulnerable
to RIC, and I figured that equipping for that ability couldn't hurt. I tried
the battle equipped this way many times, and I never failed to instantly
Stagger at least one Tonberry. About half the time, I instantly Staggered 2
out of 3, which, as you can imagine, really speeds up the battle.
The key to this battle seems to be focusing your attack on one Tonberry at a
time. As soon as you attack one Tonberry, it shifts its attacks from the
relatively harmless Knife to the increasingly devasting Grudge attacks. So,
keep a close eye on which enemy Fang is targeting in every turn. For example,
if she sticks even one debuff on Tonberry C (the default target), the AI will
target a different enemy in the next turn unless you manually override this.
Likewise, once you start attacking, I would advise you to manually put in
"Attack" commands rather than defer to the AI, which might choose Blitz, an
attack which is likely to damage multiple enemies.
Start with #1 and have Fang debuff ONE Tonberry until you have Deprotect and
Deshell on it. Imperil is a plus, but it is probably not worth waiting for it
to stick if it hasn't already. Hope will be applying some buffs (that won't
last, but what the heck) while Lightning heals. Switch to #2 and pound that
Tonberry until it dies. Return to #1 and repeat this process, switching to #3
if healing is necessary. If you have 15,000+ HP, healing may not be necessary
as long as you don't tick off more than one Tonberry at a time. When the
second Tonberry goes down, go back to #1, debuff, and this time switch to #4.
With only one foe remaining, you don't have to worry about your Commandos
targeting different enemies.
I tried this battle using Hope as a Synergist in all paradigms except #3,
figuring that he could do more good by keeping Fang and Lightning buffed than
by pushing up the Stagger Gauge which will never fill up without a RIC anyway.
I was very much surprised to find that this method nearly doubled the battle
time. Even though the Stagger Gauge doesn't fill, everyone seemed to do more
damage with Hope constantly nudging it upwards.
Twice I observed a Tonberry that was nearly dead recovering all of its HP, but
I could not discern what caused it. One reader suggested that whenever a
Tonberry's HP get low (below about 25%), they automatically try to heal
themselves completely. Based on this, it is extremely important to focus your
attacks on one enemy at a time and to finish off a damaged Tonberry ASAP.
Finally, it isn't that hard to get an honest Preemptive Strike in this Mission.
Equip everyone as usual -- Sprint Shoes for all, Morale Talisman and Power
Glove(s) for the girls, and Blessed Talisman and Sorcerer's Mark for Hope.
Wait until all 3 Tonberries are facing away from you, then move in for the PS.
As soon as one Tonberry is Staggered, cancel your commands (Circle button) and
attack a Tonberry that is not yet Staggered. If the third one is not yet
Staggered, repeat so that all 3 are Staggered. Switch to #2. Fang and
Lightning will Launch separate enemies, finishing them off while the 3rd enemy
is still Staggered. Once that last enemy gets Launched, you are home free.
Even in Chapter 11, this strategy allows you to finish this Mission in less
than a minute.
*******************************************************************************
* *
* Mission 42 -- Antihero *
* Borgbear Hero (+ Borgbear x4) [M42] *
* *
*******************************************************************************
Unlock condition -- Complete Mission 38 or 39.
When to undertake -- Early postgame
Reward (First Win) -- Witch's Bracelet
Reward (Subsequent wins) -- Bomb Core x 7
The Problem -- Lots of enemies.
The Good News -- All of them are weak to Fire and Stagger easily.
Times -- Target time was 2:45. I finished them off in 1:10.
Paradigms:
*************************
* Hope * Fang * Light *
******************************
* #1 * Syn * Com * Rav *
******************************
* #2 * Rav * Com * Com *
******************************
* #3 * Rav * Com * Rav *
******************************
* #4 * Med * Com * Rav *
******************************
The Battle -- Just like you did with Munchkins earlier, you are going to
eliminate the lesser enemies first and save the Mark until last. If you don't,
then a Borgbear will Rise to Power and become the new Borgbear Hero. Overall,
the AI will take care of this for you -- just remember not to override it.
Borgbears are relentless physical attackers, but since their Chain Resistance
is only 30, they are ridiculously easy to Stagger. Our game plan, then, is
going to be to Stagger and Launch them one or two at a time.
Start with #1 and have Hope cast Bravery and Enfire on both Fang and Lightning.
Before the buffing is done, Lightning should have Staggered one enemy. Switch
to #2 and have Hope direct his attacks at a DIFFERENT enemy than the one that
is already Staggered. Since Commandos attack different enemies when possible,
Lightning should Launch this newly-Staggered enemy, thus taking 2 enemies out
of the fray. When Fang finishes off the first Borgbear, have Hope Stagger
another one for her to Launch. Continue this process until only the Borgbear
Hero is left. You can then switch to #3 long enough to Stagger the Hero before
returning to #2 to finish is off. With their Enfired weapons, the Commandos
will make short work of this Mark and earn you an easy 5-star rating. At very
low levels, you can use #4 to heal as necessary.
BEFORE MOVING ON: In the north and northwest branches of the area where this
Mission culminates you will find a total of 8 Flowering Cactuars, an enemy that
resides exclusively in this area. Each Cactuar that you can defeat will net
you 7500 CP (that's a whopping 15,000 CP each with the Growth Egg equipped!)
They can also drop Ribbons which, in any other Final Fantasy game, would be a
real prize. Sadly in FFXIII, the Ribbon is pretty much useless, but hey -- the
CP yield is still good, right? These prickly enemies are not that easy to
access or defeat, but every time you pass through here you should definitely
engage them in battle.
On the plus side, these enemies are weak against Fire and they Stagger very
easily. On the down side, you only have a few precious seconds to defeat them
before they flee from battle. Equip everyone with Sprint Shoes and an Aurora
Scarf so that you don't have to cast Haste or wait for the ATB Gauge to fill.
Set up an Aggression Paradigm with Hope, Fang, and Lightning, and hit them hard
and fast. You can probably average about 5 kills out of 8 enemies, for a total
of 75,000 CP -- not bad for a few seconds' work.
*******************************************************************************
* *
* Mission 43 -- The Hero Never Dies *
* Borgbear Hero (+5 other enemies) [M43] *
* *
*******************************************************************************
Unlock condition -- Complete Mission 39 or 40.
When to undertake -- Early postgame.
Reward (First Win) -- Speed Sash
Reward (Subsequent wins) -- Bomb Core x 7
The Problem -- Six different enemies with two different elemental weaknesses to
keep track of. The lesser enemies Rise to Power if you kill off their
corresponding Boss first.
The Good News -- The AI will generally attack the enemies in the proper order
for you.
Times -- Around 2:30. It took me just over a minute to take them all out.
Paradigms:
*************************
* Hope * Fang * Light *
******************************
* #1 * Syn * Com * Rav *
******************************
* #2 * Rav * Com * Rav *
******************************
The Battle -- This is kind of a "greatest hits" of this genre of enemy. You
get one each Goblin, Goblin Chieftain, Munchkin, Munchkin Maestro, Borgbear,
and, oh yes, Borgbear Hero. The first two have no elemental weaknesses, the
second two are weak against Ice, and the last two are weak against Fire. None
of the enemies are immune to Fire and the enemies that are weak to Fire have
the most HP.
Start with #1 and have Hope cast Bravery and Enfire on both Fang and Lightning.
The Enfire won't do any good against 4 of the enemies, but it won't do any harm
either. Switch to #2 and be sure to monitor what enemy the AI is having you
target. You will recall that you need to take out the little guys first, but I
encountered situations where the AI had me targeting the bosses first. You
will Stagger and finish off the enemies one at a time with time to spare as
long as you take them out in the correct order.
*******************************************************************************
* *
* Mission 44 -- The Old Ones Go to Rust *
* Corrosive Custard (+ Hybrid Flora + Monstrous Flan) [M44] *
* *
*******************************************************************************
Unlock condition -- Complete Mission 40.
When to undertake -- Early postgame.
Reward (First Win) -- General's Belt
Reward (Subsequent wins) -- Bomb Shell x 7
The Problem -- Three enemies with two different weaknesses and lots of HP each.
The Good News -- A Preemptive Strike is not easy, but it is possible.
Times -- My Target time was just under 2 minutes. Once I got a PS, I took them
out in 46 seconds.
Paradigms:
*************************
* Hope * Fang * Light *
******************************
* #1 * Rav * Com * Rav *
******************************
* #2 * Syn * Com * Rav *
******************************
* #3 * Rav * Com * Com *
******************************
The Battle -- The first trick is getting a PS. I had zero success trying to do
this from the side of the area where you begin. The enemies pick up on your
motion very easily, and instead of turning their backs on you, they back away
while still facing you, making a PS very difficult. As soon as you enter the
battle area, run towards the enemies and jog to the right and you will see a
passage that you can follow to get on the opposite side of the enemies. From
here, I got in a PS maybe one time out of 10, but that certain beats 0 out of
10. You don't have time to creep up on them, so you are going to have to make
your move quickly as soon as the screen reloads after the Retry. Again, it
will take several tries, but persevere until you get a PS. If you get
impatient you can always use a Deceptisol, but be aware that in this case it is
unnecessary.
Even with a PS, this battle is far from being a gimme. First have Hope use
Quake, which should Stagger all 3 enemies. Then have him direct his attack
towards the Corrosive Custard. We want to finish him off first since he has a
different elemental weakness (Thunder) than the other two, who are weak to
Fire. Having directed your team to finish off the Corrosive Custard, switch to
#2 and cast Bravery and Enfire on both Fang and Lightning. This will greatly
increase the damage that they can do to the red and yellow blobs. You can now
switch to #3 and help the girls finish off any remaining slime with plenty of
time remaining.
Free Advice: Before moving on, don't overlook the Cactuar Doll guarded by two
Borgbears at the end of the long narrow path.
*******************************************************************************
* *
* Mission 45 -- Emergent Evolution *
* Neochu [M45] *
* *
*******************************************************************************
Unlock condition -- Complete Mission 41.
When to undertake -- Early postgame (or late postgame if you don't want to use
any "tricks."
Reward (First Win) -- Hunter's Friend
Reward (Subsequent wins) -- Moonblossom Seed x 3
The Problem -- Neochu is a very tough enemy. His simple attacks knock one team
member in the air and out of commission for precious seconds; he has no
elemental weaknesses; his Pollen attack sticks you with a multitude of bad
status ailments; he can call in Pichochus to pester you; and his Screech attack
debuffs your entire team and damages them all. Need I say more?
The Good News -- He is susceptible to both Death and Random Instant Chain. He
will focus his attacks on a Sentinel.
Times -- Target time of about 12 minutes (!) Your time will depend on when RIC
connects.
Paradigms:
Using Random Instant Chain Straight-Up Fight
************************* *************************
* Sazh * Light * Fang * * Fang * Light * Snow *
****************************** ******************************
* #1 * Syn * Med * Sen * * #1 * Syn * Syn * Syn *
****************************** OR ******************************
* #2 * Rav * Med * Sen * * #2 * Com * Com * Com *
****************************** ******************************
* #3 * Com * Com * Com * * #3 * Sen * Sen * Sen *
****************************** ******************************
* #4 * Med * Med * Sen *
******************************
* #5 * Syn * Med * Sen *
******************************
* #6 * Com * Rav * Sen *
******************************
The Battle -- This is the same enemy that you fought in Mission 55 to earn the
Growth Egg. This time, Neochu begins alone without those annoying Picochus
helping him, but Neochu can call them into the battle. We're going to try to
finish him off before he has a chance.
In Mission 55, we beat Neochu by using Death. This time, let's try our Random
Instant Chain trick from Section IX. Because of his 17-hits-per-turn Cold
Blood ability, Sazh is the man for this job. Meanwhile, Fang will be our
Sentinel (who is waiting to Commando the Mark to an untimely demise as soon as
he is Staggered), and Lightning will be a Medic until the Mark is Staggered.
Start by equipping Sazh to have the Random: Instant Chain ability. Fill in all
other Accessory slots with Strength-boosting accessories like Power Gloves.
Target time isn't an issue, but we need to finish off Neochu in one Stagger.
Open with Paradigm #1, and have Sazh cast Haste and Bravery on everyone while
Lightning heals and Fang deflects the worst of Neochu's attacks. You need these
buffs to stick for a while, so you don't want to rely on Sprint Shoes or
Talismans. Once everyone is buffed, switch to #2 and have Sazh spam Cold Blood,
hoping for RIC to connect. Your course of action from here depends on when RIC
connects. If it connects early, go directly to #3 and pound Neochu to
submission.
If RIC takes a while to connect, Neochu will do a Screech. This will damage
everyone and remove all buffs. Since everyone should be near full health, your
team should survive and Lightning should be able to perform the necessary
healing. You can use #1 to restore Haste on Sazh and Lightning now if you
want, but very soon Neochu is going to do Pollen, which is going to inflict a
bunch of bad status ailments. The most direct solution to Pollen is Dispelga,
which will remove those status ailments, but it will also remove any buffs.
Thus, you may want to hold off rebuffing until after you Displega the effects
of Pollen. You can even be proactive and have Sazh cast Haste and Bravery on
all 3 team members, just in case RIC hits before the next Screech. When you
have done any rebuffing you choose to do, go back to #2 and continue to spam
Cold Blood. Once RIC connects, finish off Neochu with #3.
When RIC hit and Neochu was Staggered, I tried having Fang and Lightning attack
while Sazh buffed the team before joining in. Unfortunately, when I did this,
the Stagger ran out before Neochu's HP did, and as soon as Neochu hit the
ground, he did Seed Dispersal, which called EIGHT Picochus into the battle. At
this point, I decided to Retry rather than deal with those annoying enemies. My
point is that as soon as RIC connects, go directly to #3 and pound the Mark
with everything that you have. If you don't finish him off in one Stagger,
things are going to get ugly really fast. From my experience, Neochu only does
Seed Dispersal when he is very low on HP, so as long as you Stagger him early
and finish him off in one Stagger, you should be home free.
Special thanks to alert reader Gary James who outlined the basic plan detailed
above. Specifically, he suggested using a Sentinel to keep the team alive in
case RIC does not connect quickly, a solid idea which somehow had eluded me.
Fighting Neochu straight up:
If your characters are nearly maxed out, you can beat Neochu in a straight-up
fight using the alternate Paradigms above. I should point out that your
characters will need to have mastered many of their secondary roles, but in
Postgame play, this should not be a problem.
Load Fang and Lightning with a couple of Power Gloves each and fill in with a
General's Belt and Gaian Ring. Give Snow his Level 16 Winged Saint and fill his
Accessory slots with General's Belts.
Neochu has no elemental weaknesses; he is immune to all debuffs except Imperil;
and his Chain Resistance is 95, so you aren't going to raise his Chain Gauge
much. You're going to have to take him down with brute force.
Open with #1 and have Fang bestow Bravera on herself and Lightning while Snow
and Lightning are casting Haste. Switch to #2 as quickly as you can, and
whittle away as many of the Mark's HP as possible before he makes life
difficult for you. You should be able to get his HP below half before he does
his first Seed Dispersal. When he does, switch to #6 and continue to attack
only Neochu. Soon thereafter, he will do a Screech. When you see this coming,
switch to #3 to minimize damage, then to #4 to recuperate, then to #6 to
continue attacking Neochu. All of your buffs will be gone, but don't try to
restore them yet. Eventually, Neochu will do Pollen, which will inflict just
about every bad status effect in the book on your entire team. Use Dispelga to
remove these, and then you can switch to #5 to rebuff. Only stay with #5 long
enough to put Haste and Bravera on Fang and maybe Haste on Lightning. You will
probably get another Seed Dispersal, but don't let that bother you because Snow
will attract most of the Picochus' attention. Finish off Neochu before you
have to endure another Screech or Pollen, then whittle away at the Picochus.
Paradigm #4 (or Renew) is always available if more healing is necessary. When
only a couple of Picochus remain, you can go back to #2 to speed things up a
bit, but Fang's Blitz will make short work of them either way. This way took
me a hair over 3:00 on a Target Time of 9:33. Totally doable.
One final note -- Using this same basic strategy, you can 5-star this Mission
in Chapter 11. You will need to make one character a Med in Paradigms #1, 2,
and 6, and I'm not saying that this is an easy fight that you will win every
time. However, this is definitely a fun and worthwhile challenge to undertake.
Aside from Mission 31 (which can be won by getting a PS), this is the only
Mission for which I recommend RIC. Therefore, if you can win this battle
without using RIC, then you can remove RIC from your list of "cheats" necessary
to 5-star all of the Missions.
*******************************************************************************
* *
* Mission 46 -- On Silent Wings *
* Zirnitra [M46] *
* *
*******************************************************************************
Unlock condition -- Complete Mission 42.
When to undertake -- Early postgame.
Reward (First Win) -- Gilgamesh, Inc.
Reward (Subsequent wins) -- Bomb Core x 10
The Problem -- Zirnitra hits you with a bunch of nasty status effects (Slow,
Poison, Deprotect) and can hit pretty hard. He also does not allow Preemptive
Strikes.
The Good News -- He will focus his nastiness on a Sentinel, leaving the other
two characters free to prepare and pound. The mark is weak to Fire.
Times -- Target time is around 3 minutes. You can clip his ugly wings in just
over a minute.
Paradigms:
Postgame OR Chapter 11
************************* *************************
* Hope * Fang * Snow * * Hope * Fang * Snow *
****************************** ******************************
* #1 * Syn * Sab * Sen * * #1 * Syn * Sab * Sen *
****************************** ******************************
* #2 * Med * Sab * Sen * * #2 * Med * Sab * Sen *
****************************** ******************************
* #3 * Rav * Com * Sen * * #3 * Rav * Rav * Sen *
****************************** ******************************
* #4 * Rav * Com * Sen *
******************************
* #5 * Med * Com * Sen *
******************************
* #6 * Syn * Com * Sen *
******************************
The Battle -- I used to rely on Death to take these things down because I spent
so much time healing and removing status effects. I soon found, though, that
using a Sentinel makes this a relatively straightforward battle.
Equip everyone with Sprint Shoes. Give Snow his Tier 1 Paladin or Level 16
Winged Saint if you already upgraded it. If you upgraded your Black Belts for
Mission 55, equip those on Snow as well. Equip Fang with the Morale Talisman
and Power Glove(s) and equip Hope with the Blessed Talisman and Weirding
Glyph(s).
Start with #1 and have Hope cast Enfire on Fang. Switch to #2 and have Hope
use Esuna as necessary to remove adverse status effects on himself and Fang and
then have him heal Snow if necessary. All the while, Fang should be debuffing
the Mark and Snow should be taking the worst of the attacks. If necessary,
switch back to #1 to replace any lost buffs, then switch to #3 and go on the
offensive. With only one Ravager, you probably aren't going to Stagger the
Mark, but with her Enfired weapon, Fang should whittle away Zirnitra's HP
quickly and put the Mark down in a minute or two.
I tried this battle late postgame so that I could use Fang as a Ravager and
Stagger the Mark, but my final time was almost exactly the same. With Enfire
on her weapon, Fang can do a lot of damage and it just isn't necessary to
Stagger the Mark.
The most devastating thing that Zirnitra does is hit you with Deprotect and
then do a "Feeding Stoop" attack that hits your entire team for lots of damage.
Once your Sentinel makes Challenge stick and directs all attacks toward
himself, your other team members are safe from Deprotect as long as the
Sentinel stays alive. You can tip the odds in your favor if you build two
maxed out Ceramic Armbands and equip them on Snow. This will give him 84%
protections against Deprotect, thus making him require much less healing. This
is especially helpful if you are trying to beat Zirnitra at very low levels
(i.e., in Chapter 11).
In Chapter 11, Staggering the Mark also seems to work a bit faster. Using the
alternate set of paradigms listed above, start the battle as before. Once
Zirnitra is debuffed and Hope and Fang are buffed, switch to #3 until the Mark
is Staggered. (Please note that this requires that you develop Fang's
secondary Ravager role, but as mentioned before, this is well worth the CP
spent.) If Snow needs attention, you can switch to #5 and heal as necessary.
Paradigm #6 is there in case buffs wear off after the Mark is Staggered. Above
all, keep your Sentinel alive! If he dies, your other team members are going
to get spit on and debuffed, pretty much forcing you to try again.
By the way, this particular enemy is going to show up in 3 other Missions, so
remember how we won this battle.
*******************************************************************************
* *
* Mission 47 -- Unfocused Rage *
* Raktavija [M47] *
* *
*******************************************************************************
Unlock condition -- Complete Mission 42.
When to undertake -- Early postgame.
Reward (First Win) -- Mnar Stone
Reward (Subsequent wins) -- Bomb Core x 10
The Problem -- You can't make significant progress on the Mark's 2 million+ HP
until it is Staggered, and the enemy is VERY hard to Stagger. While you are
trying, the Mark is pelting you with very damaging Magic. When you finally
Stagger the Mark, there is a high probability that it will Dispel all of its
debuffs and all of your team's buffs, making it difficult to do much damage to
it.
The Good News -- The Mark is susceptible to Slow. The Target time is generous,
so even if you have to Stagger it twice, you can still 5-star the Mission.
Times -- The Target time is around 6 minutes. The battle can take anywhere
from 1.5 - 4 minutes, depending on whether you have to Stagger the Mark once or
twice.
Paradigms:
*************************
* Hope * Van * Fang *
******************************
* #1 * Syn * Med * Sab *
******************************
* #2 * Rav * Rav * Rav *
******************************
* #3 * Rav * Med * Rav *
******************************
* #4 * Rav * Sab * Com *
******************************
* #5 * Rav * Rav * Com *
******************************
* #6 * Syn * Rav * Com *
******************************
The Battle -- We need 3 Ravagers, so I'm suggesting that you invest the 24,000
CP necessary to make Fang a Ravager. Not only does she have more offensive
punch than Lightning, but she also knows Slow.
This battle is all about Magic. The Mark uses Magic attacks exclusively, so the
key to survival is equipping everyone with multiple Magic-protection
Accessories. You should have a couple of Witch's Bracelets in your inventory,
and you can purchase more for 12,000 gil each from B&W Outfitters. Get a total
of 9 of these (Yes -- you read correctly -- NINE!) and invest the 27,400 EXP to
upgrade each to the * level. Thirty-six Sturdy Bones followed by 12 Perfect
Conductors or 2 Particle Accelerators each will do the trick. Do NOT spend the
money to upgrade them to Magus' Bracelets. The Adamantite alone costs 220,000
gil each, and you only get an extra 5% protection for all that money. Nine
maxed out Witch's Bracelets will do fine, and the upgrades can be done
relatively economically (22,080 gil each). Equip 3 Witch's Bracelets on each
party member, which will reduce damage from Magic attacks by 58%. In addition,
give Fang a Power Glove, and give Vanille and Hope each a Weirding Glyph.
Having equipped the team for Magic defense, our next battle priority is to buff
the team and Slow the Marks' attacks. Start with #1 and have Hope give
everyone Haste and Shell while Fang Slows the Mark and Vanille heals. Before
beginning the attack, give Fang Bravery and cast Faith on both Hope and
Vanille. Now switch to #2 and pound the Mark with Magic. Fang's debuffing
will give you a good start on the Chain Gauge, which, you will notice, fills </pre><pre id="faqspan-6">
very slowly, and your 3 Ravagers will push it up as quickly as you possibly
can. When you need to heal, switch to #3 and have Vanille heal while Fang and
Hope continue their work on the Chain Gauge.
As soon as you Stagger the Mark, go immediately to #4 just long enough for
Vanille to stick Deprotect on him. Then switch to #5 and attack the Staggered
Mark. At this point, one of two things will happen. If you are very, very
fortunate, you will be able to relentlessly pound the Mark and finish it off
before the Stagger Gauge depletes. This is the best-case scenario, and it will
happen maybe 25% of the time.
It is much more likely that once the Mark is Staggered, it will cast Dispelga
(thus removing ALL of your buffs and ALL of its debuffs), and one or more
members of your team may get hit with Slow. You will not see the word,
"Displega" on the screen, but you will notice that one by one your buffs are
slowly melting away and Fang's attacks are doing considerably less damage. If
this happens, it is still possible to finish the Mark in one Stagger, but you
will have to act quickly. Switch to #6 long enough for Hope to restore Bravery
and Haste on Fang only. Then return to #4 long enough for Vanille to Deprotect
the Mark again before returning to #5 and doing all the damage that you can
before the Stagger Gauge empties. If the Mark survives, you will need to Slow,
Stagger, and pound it a second time to finish it off.
Overall, the key to this Mission is stacking on Witch's Bracelets to lessen the
enemies' attacks. Without the enhanced Magic protection of these Accessories,
the Mark's attacks are simply too devastating. If you can complete the
Mission, then you should be able to 5-star it. Originally, I was skeptical
about this strategy because I feared that without the extra punch of Power
Gloves, the team wouldn't have enough offense to kill the Mark. It turns out
that my fears were unfounded. Once you get the Mark Staggered and Deprotected,
Fang can whittle away his HP quite effectively, especially with two capable
magic-slingers pushing up the Stagger Gauge.
The most devastating action that the Mark can perform is Dispelga, and the Mark
only uses Dispelga when it is Staggered. Thus, the turning point in this
battle occurs when you Stagger the Mark. If you get hit with Dispelga
immediately, you are going to have trouble finishing the Mark in one Stagger.
If Dispelga gets cast late in the Stagger (or not at all!) then you are in good
shape. Generally, if you can survive, you should be able to 5-star the
Mission.
In Mission 62, you're going to have to fight TWO of these things, but we'll
cross that bridge when we get there. Hey, at least we'll get some more mileage
out of those 9 Witch's Bracelets!
*******************************************************************************
* *
* Mission 48 -- The Abyss Stares Back *
* Verdelet (x4) [M48] *
* *
*******************************************************************************
Unlock condition -- Complete Mission 43.
When to undertake -- Early postgame
Reward (First Win) -- Twenty-Sided Die
Reward (Subsequent wins) -- Bomb Shell x 10
The Problem -- If you don't finish them off quickly enough, they will Summon
a Tonberry, prolonging the battle.
The Good News -- If you are sufficiently strong, they won't get a chance to
Summon.
Times -- The Target Time for me was 9:28 (!). Clearly, this assumes that you
will not be able to stop the Tonberry Summons. If you can, the battle is over
in about 12 seconds.
Paradigms:
*************************
* Hope * Fang * Light *
******************************
* #1 * Rav * Com * Com *
******************************
The Battle -- Like the other Verdelet battles, this is just a matter of
stopping the Summons. If you made it this far, you should be able to take out
the 4 Marks before they make things complicated. Have Hope wait until you see
which enemy is trying to Summon, then have him attack that enemy. If the
Summons succeeds, you can just Retry, but the battle should be over WAY before
the Summon succeeds.
*******************************************************************************
* *
* Mission 49 -- Tyrannicide *
* Tyrant [M49] *
* *
*******************************************************************************
Unlock condition -- Complete Mission 43.
When to undertake -- Early postgame.
Reward (First Win) -- Particle Accelerator x 7
Reward (Subsequent wins) -- Crystal Oscillator x 2
The Problem -- Tyrant calls a Centaurion Blade, which will pound you physically
while you're trying to make progress on Tyrant.
The Good News -- Tyrant is vulnerable to thunder, and when he goes down, the
Centaurion Blade disappears. A Sentinel will attract most of the Blade's
attention.
Times -- Target time is around 1:40. For me, 40 seconds was enough.
Paradigms:
*************************
* Hope * Fang * Snow *
******************************
* #1 * Syn * Sab * Sen *
******************************
* #2 * Rav * Rav * Sen *
******************************
* #3 * Rav * Com * Sen *
******************************
* #4 * Med * Com * Sen *
******************************
The Battle -- Don't bother attacking the Centaurion Blade. If you defeat it,
Tyrant will just forge another one. The focus here is to take out Tyrant with
all due speed and be done with it.
First, if you haven't already cast Libra on one of these things, do so now.
Open with #1 and have Hope give himself Faith and then have him cast Bravery
and Enthunder on Fang (assuming that both are wearing Sprint Shoes.) While
Hope is buffing, Fang should have got Deprotect and Deshell to stick on Tyrant.
Switch to #2 until Tyrant is Staggered, then switch to #3 to Launch and beat
down the Mark. If your levels are very low, you may need #4 for healing.
In Chapter 13, you will encounter a beefed-up version of Tyrant called
"Immortal." This same strategy works quite well on it also. In fact, for this
entire class of enemies ("Centaurions"), use of a Sentinel greatly reduces the
annoyance factor caused by the Blade.
*******************************************************************************
* *
* Mission 50 -- Road to Predation *
* Humbaba [M50] *
* *
*******************************************************************************
Unlock condition -- Complete Mission 44.
When to undertake -- Early postgame.
Reward (First Win) -- Scarletite
Reward (Subsequent wins) -- Bomb Core x 7
The Problem -- Like the Kaiser Behemoth, when Humbaba loses about half of his
HP, he stands up, recovers all of his lost HP, loses all debuffs, and basically
forces you to start over on him.
The Good News -- He is weak against Fire. With good timing, you can defeat him
before he heals himself.
Times -- By adjusting equipment, I got the Target time up to 1:03 and finished
him off in 30 seconds flat, making it with 14 seconds to spare.
*************************
* Hope * Fang * Light *
******************************
* #1 * Syn * Sab * Rav *
******************************
* #2 * Rav * Sab * Rav *
******************************
* #3 * Rav * Com * Com *
******************************
The Battle -- The key to success here is to kill off the Mark before he heals
himself. This is largely a matter of timing, so this may take a couple of
tries. Start with #1 and have Hope cast Enfire on Fang and Lightning while
Fang debuffs the Humbaba. Switch to #2 and push up the Chain Gauge for a round
or two. The Humbaba will stand up when his HP are around half depleted, so
when he has lost about a third of his HP, switch to #3 and attack with
everything you've got. When the debuffed Humbaba with an elevated Chain Gauge
gets hit by two powerful Commandos equipped with Enfired weapons, he will lose
that last half of his HP in one round, faster than he can stand up and heal
himself. If he successfully heals, just retry. You should get the timing on
this within a couple of tries, probably faster than you could make RIC hit.
Once you get the hang of this battle, it is actually kind of fun. Try it!
For what it's worth, this works a little better if you are willing to use Fang
as a Ravager in Paradigm #2. Just make sure that she gets Deprotect to stick
when you are in #1. If you are having trouble with the Target Time, you can
take off all of Hope's accessories except his Sprint Shoes and his Blessed
Talisman, and give him the weakest Tier 1 weapon that you have. He isn't going
to do much damage anyway, and this will raise the Target time a little and give
you a bit more margin for error.
*******************************************************************************
* *
* Mission 51 -- Attacus, the Soulless *
* Attacus [M51] *
* *
*******************************************************************************
Unlock condition -- Complete Missions 35 - 50 inclusive.
When to undertake -- Late postgame, but see below.
Reward (First Win) -- Genji Glove
Reward (Subsequent wins) -- Bomb Core x 10
Special navigating note -- Mission 51 can be accessed from any of the 4 areas
that feed into the last area ("Titan's Throne.") Once you have completed all
of the other Missions and win the Mission battle in one of those next-to-last
areas, an additional Ci'eth Stone will be activated in the area you are
currently occupying. Thus, you may follow whichever path you choose to fight
Attacus -- just look for the flashing Ci'eth Stone icon after you complete the
Mission battle.
The Problem -- A relentless attacker with over 9 million HP who is resistant to
magic and physical attacks and is essentially impossible to Stagger. Oh, yes -
- he can also remove your buffs and his debuffs.
The Good News -- He will focus his attacks on a Sentinel.
Times -- Target time is around 20 minutes. This gives you around 14:00 to
finish the battle with a 5-star rating.
Paradigms:
Early Postgame Late Postgame
************************* *************************
* Hope * Fang * Snow * * Fang * Van * Snow *
****************************** ******************************
* #1 * Syn * Sab * Sen * * #1 * Syn * Sab * Sen *
****************************** ******************************
* #2 * Rav * Rav * Sen * * #2 * Rav * Rav * Sen *
****************************** ******************************
* #3 * Rav * Com * Sen * * #3 * Com * Rav * Sen *
****************************** ******************************
* #4 * Syn * Com * Sen * * #4 * Com * Sab * Sen *
****************************** ******************************
* #5 * Rav * Sab * Sen * * #5 * Com * Med * Sen *
****************************** ******************************
* #6 * Med * Com * Sen * * #6 * Syn * Rav * Sen *
****************************** ******************************
The Battle -- Attacus is a really tough enemy. He has fast, hard attacks, and
it is very difficult to damage him. If he were susceptible to Random Instant
Chain, this would go much faster, but unfortunately since he is Level 57, he is
immune to RIC. The good news is that if you set up Snow as a full-time
Sentinel, you should never have to spend time healing. Whatever attacks Snow
does not Evade, he will recover from quickly with his Mediguard ability, and no
one else should ever get hit. The problem, then, is one of inflicting
sufficient damage in the allotted time.
Give Snow his Level 16 Winged Saint and the Black Belts that you used in
Mission 55. Give Fang her maxed out Tier 2 weapon, but equip Hope with the
crappiest weapon he has. He isn't going to do much damage anyway, and keeping
his stats low will increase the target time dramatically. For Fang, you can
use a really nifty if obscure Synthesized ability by equipping her with 2 Iron
Bangles (or Mythril Bangles) in addition to a Weirding Glyph and a Power Glove.
The two Bangles will give her the "High HP: Power Surge" ability. As long as
Fang's HP are above 90%, she will get +20% (!) attacking power. Normally, this
won't do you much good because as soon as she takes damage, the ability
disappears. However, with Snow as a full-time Sentinel, Fang should take
essentially zero damage and will get this power boost throughout the battle.
Of course, should things go wrong and she takes damage, just switch to the
healing Paradigm long enough to get her HP back above 90%. (Thanks to alert
reader James Patrick who made me aware of the usefulness of this particular
ability in this battle.)
(Early postgame) -- Strictly speaking, this battle should be classified as
"Late Postgame" because Fang needs to be able to act as a Ravager, which is a
secondary role for her. However, if you are willing to invest the 24,000 CP
necessary for her to learn Fire as a Ravager, you can 5-star this battle in
Early Postgame.
Start with #1, have Hope give Haste to everyone and Faith to himself and Fang.
Meanwhile, Fang will be trying to debuff the Mark. If she does, that's great,
but it is no loss if she doesn't. Switch to #2 and start working on raising
the Chain Gauge. You won't Stagger Attacus, and this isn't going to do much
damage to Attacus, but it is essential to getting the most out of Fang's future
attacks. Boosting the Chain Gauge will pay dividends for the rest of the
battle, so it's worth a couple of minutes of your time. Stick with this
Paradigm until your team's buffs wear off. The Chain Gauge should be around
200.
Return to #1, except now have Hope give Fang Haste and Bravery and then Haste
only to himself. While Hope is buffing, Fang hopefully got Deprotect to
stick on the Mark. If not, switch to #5 until she does. Don't worry about
Deshell. Time is short, and most of your offense is going to come from Fang's
physical attacks anyway. Your time is better spent keeping Fang on the attack.
When your team is buffed and the Mark is Deprotected, switch to #3, which will
be your primary attacking Paradigm. When your team needs buffing, switch to #4
so that Fang can continue her attack while Hope restores necessary buffs
(Haste on himself and Fang and Bravery on Fang). When the Mark loses
Deprotect, switch to #5 long enough to restore it while Hope continues to raise
the Chain Gauge. Always take the time to change Paradigms when either Attacus
loses his Deprotect or when Fang loses Haste or Bravery, then return to #3 as
quickly as possible. The idea here is to score as many hits as possible when
Fang is buffed with Bravery and Haste and Attacus is Deprotected. The time can
be close on this one, but since you should rarely have to heal, you can
concentrate on keeping Fang buffed and Attacus debuffed. Paradigm #6 is there
just in case Snow is in danger of dying.
(Late postgame) -- Once you develop Fang's Synergist role to the point that she
knows both Haste and Bravera (an investment of over 600,000 CP), this Mission
gets much more manageable. With Fang taking over the minimal buffing duties
necessary, Hope can get benched and Vanille can handle the debuffing
responsibilities. This frees up Fang to spend more time attacking instead of
debuffing. As a plus, Fang's attack is boosted 80% (by using Bravera) instead
of the 40% that Bravery provides.
Equip Vanille with her Malboro Wand, even if it is maxed out at Tier 2. This
weapon enhances her debuffing abilities, making it easier to get Deprotect to
stick on Attacus.
Start with #1 and have Fang give herself Haste and Bravera. She should not
spend time buffing anyone else throughout the battle. She is in there for
attacking. Switch to #2 and run up the Chain Gauge until her buffs expire
(which will be rather quickly since the duration of Bravera is much less than
that of Bravery and she is a relatively unskilled Synergist at this point.) Go
back to #1 if Attacus needs to be Deprotected or #6 if he doesn't, then settle
in at paradigm #3. If healing is necessary, switch to #5. If Attacus removes
Deprotect, switch to #1 or #4, depending on the status of Fang's buffs. If
Fang's buffs expire but Attacus is still debuffed, switch to #6. When
everything is back to normal, return to #3 and pound away until Attacus is
toast.
Time-wise, this battle can be pretty close, so you have to use your time wisely
even though the Target time seems high. Since I KNOW that you saved at the
Save Point, you can always reload and try the battle again if your rating is
substandard. Overall, though, health isn't a big concern so you can
concentrate on the status of buffs and debuffs and making the most of your
attacks. Keep on top of those conditions and you can 5-star this Mission even
without any Tier 3 weapons or a Genji Glove (which, happily, you will receive
for completing this Mission.)
I have received a certain amount of mail from readers who are having trouble
defeating Attacus quickly enough to earn 5 stars. I have fought this battle in
early Postgame at least a couple of dozen times, and I assure you that the
above strategy will consistently lead to a 5-star Mission. If you are having
trouble 5-starring this Mission, it is most likely because of one or more of
these 3 things:
1. Fang is attacking Attacus when Deprotect has worn off or been removed. You
MUST keep Deprotect in place as much as possible. (In case you weren't
sure -- the Deprotect symbol is the red icon with a little shield on it.)
2. Fang is attacking when Brave(ra) has worn off. This buff is a 40% (or, in
the case of Bravera, 80%) boost in attacking power. You MUST replace it as
soon as it wears off. Brave(ra), FYI, is the blue icon with a sword on it.
3. Fang took an incidental hit and her HP fell below 90%, thus negating her
High HP: Power Surge ability. You can 5-star the Mission without this, but
it is a big plus for relatively little effort. Keep an eye on Fang's HP
and heal her when necessary.
Keep a very close eye on these three considerations, and a 5-star victory will
be yours.
If your characters are developed to the point where Lightning knows Haste, you
should consider the following setup:
*************************
* Light * Fang * Snow *
******************************
* #1 * Syn * Com * Sen *
******************************
* #2 * Sab * Com * Sen *
******************************
* #3 * Rav * Rav * Sen *
******************************
* #4 * Med * Com * Sen *
******************************
* #5 * Com * Com * Sen *
******************************
Lightning can then take on all buffing, debuffing, and healing
responsibilities, allowing Fang to attack full-time while Snow is a full-time
Sentinel. Open with #1 and have Lightning bestow Haste and Bravery on herself
and Fang. Switch to #2 long enough to stick Deprotect on the Mark. Switch to
#3 until the Chain Gauge reaches 150 or so. After that you can attack with #5,
switching paradigms only when Lightning needs to restore buffs or debuffs or
heal. Be sure to equip Lightning with 2 Bangles so that she gets the "High HP:
Power Surge" ability since she will be attacking as well. Using this strategy,
I got my best scores - over 16,000, compared to about 14,000 - 15,000 using the
team and strategies described earlier.
Special thanks to alert reader SakredEvil, who wrote me about some problems
with my original strategy and helped me find one that probably works more
consistently. Additional thanks to David Gooding who pointed out that for some
inexplicable reason, I originally suggested loading Hope up with stat-boosting
accessories, thus making the Mission much tighter time-wise than it needed to
be.
*******************************************************************************
* *
* Mission 52 -- Head in the Clouds *
* Zirnitra [M52] *
* *
*******************************************************************************
Finding your way -- The Stone for Mission 52 is in the northwest corner of the
Steppe, on the peninsula next to where you fought Mission 12. I'm sure you
remember where THAT is, right?
Unlock condition -- Reach Sulyya Springs
When to undertake -- Early postgame.
Reward (First Win) -- Gale Ring
Reward (Subsequent wins) -- Bomb Core x 7
This is the exact same battle as Mission 46. Please look there for the
particulars of 5-starring this Mission.
*******************************************************************************
* *
* Mission 53 -- Freedom from Fear *
* Zirnitra (+ Airaune x4) [M53] *
* *
*******************************************************************************
Finding your way -- The Stone for this Mission is deep within Mah'habara.
Teleport to the Twilit Cavern and take the path across Atomos as if you were
going to Mission 30. When the path first forks, go to the left and go all the
way to the dead end. You will need to defeat a Tyrant to get access to the
Stone, but if you can't beat a Tyrant, Zirnitra is going to make mincemeat of
you anyway.
This is probably the most remote Ci'eth Stone in the game. The round trip will
likely take half an hour, and there are no Save Points along the way, so allow
plenty of travel time.
Unlock condition -- Reach Oerba.
When to undertake -- Early postgame.
Reward (First Win) -- Blaze Ring
Reward (Subsequent wins) -- Bomb Core x 10
Times -- The extra enemies upped the Target time to about 3:20. It took me
more like 1:30 to complete the Mission.
Except for the presence of 4 Airaunes -- which really aren't going to slow you
down much with their 18,000 HP each -- this is the exact same battle as Mission
52, which was the exact same battle as Mission 46. Were the designers running
out of ideas at this point? I'd advise you to play this just like before
except open with #3 to get the Airaunes out of the way first. From there,
switch to #1 and proceed as before.
*******************************************************************************
* *
* Mission 54 -- The Bigger They Are . . . *
* Gigantuar [M54] *
* *
*******************************************************************************
Finding your way -- The Ci'eth Stone is in the far north corner of the Steppe,
just past the Save point in a small area with a bunch of Gorgonopsids.
Unlock condition -- Find a Cactuar.
When to undertake -- Late postgame.
Reward (First Win) -- Cactuar Doll
Reward (Subsequent wins) -- Chocobo Plume x 2
The Problem -- His frequent attacks each hit one team member for 10,000 HP AND
can inflict Fog and/or Pain AND can remove a buff. You cannot get a
Preemptive Strike, even with Deceptisol. This battle can end unhappily in just
a few seconds.
The Good News -- He is weak against Fire, is susceptible to Daze, and has very
few HP.
Times -- Target time is an absurdly low 2:05. You will either beat him within
about 1:10 or die trying.
Paradigms:
*************************
* Light * Fang * Snow *
******************************
* #1 * Syn * Sab * Sab *
******************************
* #2 * Syn * Syn * Syn *
******************************
* #3 * Com * Com * Com *
******************************
This can be one of the most difficult and annoying Missions in the game.
Gigantuar attacks viciously, and since he is only level 6, the Target Time is
very short. He can be defeated many different ways, but if your characters are
completely (or nearly completely) developed, the method that I am about to
suggest is probably the most reliable. It works less well the less developed
your characters are, and this method is iffy at best in Chapter 11, but let's
assume that you are in late postgame and see how to topple this huge annoyance
reliably in that situation.
His basic attack is 10,000 Needles, an attack that ignores resistances (meaning
that Black Belts will do you no good) and hits one ally for 10,000 HP damage.
In addition, there is a 90% chance it will inflict Pain, a 70% chance that it
will inflict Fog, and it hits with Dispel 3 times with probabilities of 70%,
50%, and 30% of connecting. His profile says that he is "susceptible to Daze."
This is a bit of an exaggeration, since he is 90% resistant to Daze, but it is
the only debuff to which he is vulnerable, and we are going to capitalize on
this Achilles heel to bring him down.
The worst thing about Gigantuar's attacks is the status ailments that they
inflict. We are going to reduce probabilities that his debuffs connect to level
the playing field somewhat and buy us enough time to take down the Mark before
he can kill our team leader.
You need to prepare by building a maxed out Pain Deflector (upgrade from the
Pain Dampener) and a maxed out Efflugent Cape (upgrade from the White Cape) for
each member of the team. The base Accessories can be purchased from B&W
Outfitters for 3,000 gil each, and the experience necessary is modest. The
most expensive part of this operation is that you need 6 Perovskites at 30,000
gil each to do the upgrades. Believe me when I tell you, this investment will
turn one of the toughest battles in the game into one of the quickest and
easiest.
Equip Fang and Lightning each with a maxed out Tier 2 weapon, and give Snow his
Level 16 Winged Saint. Give everyone Sprint Shoes, a Pain Deflector, and an
Efflugent Cape. You now have 60% protection from both Pain and Fog. This
means that Pain will only connect (40% of 90% =) 36% of the time and Fog will
only connect (40% of 70% = ) 28% of the time, and there is only about a 10%
chance that an attack will inflict both status ailments. In the actual battle,
the percentages seem somewhat lower than this. Don't equip any stat-boosting
Accessories (we don't want to lower the Target time), but I will make one other
suggestion. When fully developed, Lightning has exactly 20,000 HP and Snow has
exactly 30,000 HP. This means that Lightning will die the second time that she
is hit with 10,000 Needles, and Snow will die the third time he is hit.
Needle-less to say, we'd like to extend that, and you can do so by equipping a
Bangle -- any Bangle -- on both characters. You team can now withstand as many
as 2 + 2 + 3 = 7 attacks without anyone dying. This is going to be more than
enough.
Be sure to begin the battle by using a Librascope! This will alert your
Saboteurs that the Mark is susceptible to Daze. (Important note: Gigantuar is
resistant to Libra, which means that you have to cast it twice before the
"Susceptible to Daze" information is revealed. A Librascope will get the job
done in one turn. I'm pretty sure that Librascope will always give you full
information the first time, but you should probably hit R1 and check the Mark's
profile before proceeding.) While Fang and Snow are busy spamming Daze, have
Lightning cast Bravery and Enfire on any one character -- let's say herself --
and check for damage from the Mark's attack. If the person who was attacked
got Pain, ignore it; if they got Fog, throw a Mallet at them. You now need to
monitor the Mark to see when Daze sticks. With two Saboteurs casting it full
time, it should stick in one of the first two rounds, and you need to be ready
when it does. Daze is a very delicate condition. If you Daze the Mark and
then hit it with Daze again (or anything else, for that matter), the Daze can
be removed and the Mark will resume his attacks. We want the Mark to stand by
idly while we buff the team, so here's how you're going to monitor the
proceedings and accomplish this:
Cue up paradigm #2 (L1, then Down), but do NOT hit the Accept (X) button until
you see the Daze icon on the Mark. (Since he's only vulnerable to one debuff,
you'll recognize it when it appears.) As soon as it appears, hit X to switch
to #2. If you do this correctly, you can now spend a couple of turns buffing
without Gigantuar disrupting your rhythm with his attacks. Have Lightning give
the other two characters Bravery and Enfire while Fang and Snow restore Haste
on anyone who lost it and sling a bunch of other fundamentally useless buffs.
As soon as Lightning casts that last pair of buffs, switch to #3 and attack.
This is going to un-Daze the Mark, so you're going to have to monitor your
team's status after each of the Mark's attacks. Every time that Lightning
finishes her attacks, have her throw a Painkiller at anyone who got Pain. You
can ignore Fog since we aren't using Magic. Remember that her ATB Gauge will
continue to charge when she uses an item. If Fang or Snow dies, you can use
the Renew Technique, but usually you will be close enough to finishing the
battle that you're better off just leaving the deceased in the dirt for now and
continuing to pound away at the Mark. With Enfired weapons, your team should
finish the battle in 3 - 4 more rounds in addition to the 1 - 2 rounds that you
spent getting Daze to stick.
Your only real danger is that the Mark will attack Lightning 3 times before you
can finish him off. On the rare occasions when this happens, just Retry.
Fortunately, Gigantuar seems to be very judicious about spreading his attacks
evenly among your team. Even so, you are going to have to go through the above
process very quickly to 5-star this Mission, but with a little practice, you'll
get a feel for the timing of it and prevail.
I would guess that for a fully developed team, this method is 90% successful.
As such, it is far and away the most reliable of the many strategies that I've
researched. This percentage will decrease with your team's development. In
Chapter 11, you will be very fortunate indeed to get this method to work, and
that early in the game, I would recommend a different strategy, probably one
involving RIC. For late postgame play, I am convinced that this is the
strategy of choice, but you should feel free to experiment with other methods
and find the one that works best for you. Me -- I'm moving on to the
considerably less annoying Mission 56.
*******************************************************************************
* *
* Mission 55 -- Can't We All Just Get Along? *
* Neochu (+5 Picochu) [M55] *
* *
*******************************************************************************
Finding your way -- The Ci'eth Stone for this Mission is on the roof of the
schoolhouse in Oerba. You will see it (and 2 bobbing Treasure Balls) as you
descend the exterior stairs with a Vampire and 3 Seekers at the bottom. The
Mark is in Aggra's Pasture, an area up in the mountains on the East side of the
Steppe that is accessible only by chocobo.
Unlock condition -- Complete Mission 14 and defeat Barthandelus in Oerba.
When to undertake -- Immediately after the events in Oerba, although you might
need to fill out some of Stage 9 of the Crystarium first.
Reward (First Win) -- Growth Egg
Reward (Subsequent wins) -- Moonblossom Seed x 2
The Problem -- Where to start? Neochu's regular attacks can hit one ally for
about 4000 HP and knock them into the air and out of the battle for several
precious seconds. His Screech can wipe out your entire party. He is
surrounded by 5 count 'em FIVE Picochus, each of which has over 260,000 HP and
attacks relentlessly. There is no way to get a Preemptive Strike, even with
Deceptisol. The difficulty of the enemy is compounded by the desirability of
the reward, which tempts you to undertake this Mission when your stats are
really too low.
The Good News -- Neochu is susceptible to Death. The Target Time is huge.
Thank goodness!
Times -- Target time immediately after completing the events in Oerba is about
30-35 minutes. You will either die or complete the Mission in about 5 minutes.
Paradigms (Please read "January 2014 Update" below before proceeding.)
Without Using Secondary Roles Using Secondary Roles
************************* *************************
* Van * Light * Snow * * Van * Light * Snow *
****************************** ******************************
* #1 * Sab * Med * Sen * * #0 * Sen * Sen * Sen *
****************************** OR ******************************
* #2 * Med * Med * Sen * * #1 * Sab * Med * Sen *
****************************** ******************************
* #3 * Med * Com * Sen * * #2 * Med * Med * Sen *
****************************** ******************************
* #4 * Rav * Com * Sen * * #3 * Med * Com * Sen *
****************************** ******************************
* #5 * Rav * Com * Com * * #4 * Rav * Com * Sen *
****************************** ******************************
* #5 * Rav * Com * Com *
******************************
The Battle -- Your reward for completing this Mission is the Growth Egg, one of
the most desirable Accessories in the game, and you are going to have to work
to earn it. As much as I hate to rely on the Death spell, it is the only way
that I have been able to dependably win this battle at this stage of the game.
We are going to fight another Neochu using a different strategy later in
Mission 45, but we should be a little stronger and we won't have to deal with
the pesky Pichochus.
Be aware that you will have to Retry this Mission many times, and even
when you get Death to stick on Neochu, there is a very good chance of losing
this battle. Proceed with caution and patience, and victory will be yours.
If you are adamant about not using secondary roles for your characters, use the
above Paradigms and use an Aegisol prior to battle. Otherwise, it is literally
possible for Vanille to die before ever executing a single action. If you are
willing to invest a few CP to develop the Sentinel roles for Vanille and
Lightning, you can win this battle without using Aegisol. For that strategy,
please see the last paragraph in this section.
You should have two Black Belts in your inventory. Purchase 2 General's Belts
from B&W Outfitters and upgrade all of these Accessories to the * level. Do
NOT waste catalysts on these things -- just bump each up to the * level and
move one. Equip Snow with the two Black Belts and a General's Belt. He will
be taking the lion's share of the punishment, and this will give him 54%
protection from these physical attacks. Equip Vanille with the other General's
Belt, Sprint Shoes, and a Sorcerer's Mark, and equip Lightning with Sprint
Shoes, Sorcerer's Mark, and Warrior's Wristband. The Haste from the Sprint
Shoes will wear off LONG before the battle ends, but we only need it to last
until the Neochu dies. This setup gives Vanille maximum castings of Death
before Neochu Screeches and allows Lightning quicker and slightly more powerful
healing. Believe me, you'll need it!
Start with #1 and have Vanille cast a full round of Imperil, being aware the
Neochu will have to be selected manually as he is NOT your default target in
this battle. The probability that Death will connect is only 1%, but it
increases by 1% for every debuff that you can stick on Neochu. Although he is
immune to most debuffs, he is susceptible to Imperil, which Vanille can
reliably stick in one round. Thus, by using that first round to hit Neochu
with Imperil, you are effectively doubling the probability that Death will
connect. After the first round, have Vanille cast Death until Neochu or one of
your party members dies. Your party should survive until Neochu does a
Screech, which will happen right around the same time that you lose Haste.
Keep Retrying until Neochu dies with your party still intact. This might take
so long that you will start to believe that your particular Neochu is immune to
Death, but remember that Death only connects 1% of the time. This means that
the probability that you will try Death 20 times without success is 0.99^20 or
about 82%, so keep trying -- it will connect eventually.
When Neochu goes down, switch to #2 to heal, and then return to the offensive
with #3. With only one member of your team actually fighting and 5 crazed
Picochus hitting your Sentinel (and laughing at you!), it is going to take a
long time to knock out your first Picochu. Switch back to #2 as necessary to
heal. Be patient -- the emphasis now is on staying alive. The Target time is
generous, so you are in no hurry. When you are down to 3 Picochus, try #4 to
inflict more damage per unit time, returning to #3 to heal as necessary. When
only one Picochu remains, you can switch to #5 and hopefully finish this battle
and enjoy double CP from now until you max out your Crystarium.
Alert reader I.Khalaf points out that once Neochu is dead, you can speed up the
battle against the Picochus slightly by having Vanille use Quake. Each Quake
will do 7000 - 9000 damage to each Picochu, so if you use up all 5 of your TP's
you can shave off about 40,000 HP (or just under 20%) from each Picochu's life.
For me, this reduced my battle time by about half a minute. However, I hasten
to add that staying alive is still your primary objective. Do not use Quake
unless your entire team's health is near maximum. You really don't want to
repeat the process of getting Death to connect. Use this strategy as you see
fit, but make "Safety First!" your guiding motto.
January 2014 update -- For the record, I have learned to win this battle
without using Aegisol! There were several factors that were key to this
refinement -- investing CP in HP when Crystarium Stage 9 becomes available,
timely use of the Renew Technique, and equipping everyone with General's Belts
-- but the final piece of the puzzle was something so obvious that I should
have thought of it years ago -- spending some CP to give Vanille and Lightning
access to Sentinel roles. Starting the battle with all 3 characters as
Sentinels (Paradigm #0 in the alternate list above) allows you to withstand
Neochu's first attack. Follow that with Imperil, Death, and then Renew, and
you can generally survive until Haste wears off. If Death doesn't stick by
then, just Retry and proceed as described above. Again, this may take several
attempts, but this one minor adjustment can allow you to go through the entire
game without ever using a shroud which, IMHO, is an extremely worthwhile
objective.
*******************************************************************************
* SPECIAL NOTE -- Missions 56 - 62 constitute another special group of *
* Missions sometime referred to as the "Circle of Death," owing to the *
* configuration of the Ci'eth Stones. When all 7 of these Missions have *
* been completed, AND you reset the area, all of the big turtles in the *
* Archylte Steppe execept one will transform into much stronger and tougher *
* enemies ("Long Guis"). Resetting the area can be accomplished by either *
* Saving and reloading your game or by teleporting away from the Steppe and *
* then returning. Consequently, if you intend to farm the big turtles for *
* Trapezohedrons and/or Platinum Ingots, you might want to do so prior to *
* completing all 7 of these Missions. The one big turtle in Leviathan *
* Plaza in Eden will, however, remain unchanged and available for easy *
* farming even after completing these 7 Missions. *
*******************************************************************************
One additional note -- If you have completed all of the first 55 Missions, you
are probably about ready to start taking the down the big turtles with tusks
for gil and CP (80,000 each if you have the Growth Egg equipped.) That sounds
like a lot of CP, but it doesn't go very far when each node in the Crystarium
requires 60,000 or 120,000 CP to activate. To beat the turtles reliably, you
will need a bunch of HP, 3 maxed out Gaian Rings, at least one Genji Glove, and
a few secondary role abilities (Fang as a Synergist and Ravager, and Lightning
as a Saboteur.) For a detailed strategy for beating these big beasts, see
Mission 63.
Finding your way -- Since the Ci'eth Stones for Mission 56 - 62 inclusive are
all clustered together in one place (Eastern Tors of the Steppe), I'll forgo
giving directions for the time being. I'll meet you back at Mission 63. See
you there!
Before proceeding, consider this: Every time you complete a Circle of Death
Mission, it makes a certain amount of sense to teleport first to Sulyya Springs
to initiate Mission 63 before teleporting back to the Steppe to fight that
battle and begin the next Mission. The Ci'eth Stone for Mission 63 is
relatively close -- a mere "stone's throw" away -- from the teleport Stone, and
that battle is located in the Steppe where you are headed anyway. After you
complete Mission 63 once, successive victories yield a guaranteed Gold Nugget
(60,000 gil) plus the possibility of a Platinum Ingot (150,000 gil) or a
Trapezohedron. Your decision will depend on where you are in the game, but
this is a relatively quick way to line your wallet and, if necessary, earn some
CP (80,000 per battle with the Growth Egg.)
*******************************************************************************
* *
* Mission 56 -- A Toothy Grin *
* Ugallu (+ Munchkin x4) *
* *
*******************************************************************************
Unlock condition -- Reach Taijin's Tower.
When to undertake -- Early postgame.
Reward (First Win) -- Rhodochrosite
Reward (Subsequent wins) -- Bomb Shell x 5
The Problem -- Insanely short Target time and five enemies to down.
The Good News -- Sprint Shoes give you the necessary edge. Preemptive Strike
takes some practice but is entirely possible.
Times -- My Target time was 30 seconds. That gave me only 21 seconds to 5-star
the Mission. I did it in 16. Whew!
Paradigms:
*************************
* Hope * Fang * Light *
******************************
* #1 * Rav * Com * Com *
******************************
The Battle -- The easiest way to make the time limit is to get a PS. However,
getting one takes some creativity. The enemies are waiting for you on a raised
piece of land. As soon as you jump up there, they spot you and descend upon
you. If you Retry, you begin back before you made the jump, even if you
position yourself among the enemies before engaging them. Instead of using
Retries, then, we are going to jump back and forth between the two bodies of
land.
Jump up and try to get close enough to Ugallu to lure him towards you without
coming in contact with a Munchkin. You may recall from Mission 3 that Ugallu's
vision and hearing aren't that great, so you want to sneak up on him as opposed
to the Munchkins. When the enemies get close to you, jump back down, then turn
and see where they are. You want a situation where the Ugallu is the closest
enemy to you, and he has turned and is walking away from you. He doesn't have
to be moving directly away as long as he isn't backing away. When he is
walking away, jump back up, run up to his backside, and hope for a PS. If you
don't get it, just Retry. This is a little frustrating because it is tough to
get the camera pointing properly so that you can see what is going on. I also
had some problems with getting Ugallu to move out of his corner -- I kept
getting swarmed by the Munchkins before Ugallu got close enough to me. Once he
did move close to the jumping point, getting a PS was pretty easy. If you
choose to use this method, be sure to have Hope target Ugallu first even though
he is not the default target. (Special thanks to alert reader "Ryan" who
notified me that, contrary to what I wrote in the original version of this
guide, a PS without Deceptisol is indeed possible on this Mission.)
While a PS makes the battle easy, getting one really isn't necessary. The
straightforward approach works just fine. Go in with Aggression and let your
Commandos Blitz away all of the Munchkins first. From there, just hit the Mark
until he goes down. If you are having trouble making the time limit, try
equipping Hope with Sprint Shoes and Blessed Talisman only. He doesn't do much
damage anyway, and that may bring your Target time up enough to make the
difference.
Since all of the enemies are weak to Ice, I tried taking the time to put
Enfrost on Fang and Lightning. The battle took 2 seconds longer, suggesting
that in this case it isn't a good idea.
*******************************************************************************
* *
* Mission 57 -- What's Yours Is Brine *
* Sahagin (x3 + Airaune x2) [M57] *
* *
*******************************************************************************
Unlock condition -- Reach Taijin's Tower.
When to undertake -- Early postgame.
Reward (First Win) -- Uraninite
Reward (Subsequent wins) -- Bomb Shell x 5
The Problem -- Short Target time. It takes forever to walk all the way to
where the Mark is.
The Good News -- Easy enemies.
Times -- Figuring that the Target time would be low, I removed Hope's Weirding
Glyphs and got a Target time of 30 seconds. The battle was over in 11.
Paradigms:
*************************
* Hope * Fang * Light *
******************************
* #1 * Rav * Com * Com *
******************************
The Battle -- Hit the enemies quick and hard. That's about it. Your Commandos
should Blitz away the 3 Sahagins in one round and wipe out the Airaunes in the
second round. End of story.
I have to say that I'm puzzled that such an easy battle appears so late in the
Missions. I understand that the challenge is in meeting the time limit, but
even so this Mission is a joke.
*******************************************************************************
* *
* Mission 58 -- The Culler of Many *
* Humbaba (+ Pulsework Centurion) [M58] *
* *
*******************************************************************************
Unlock condition -- Reach Taijin's Tower.
When to undertake -- Early postgame.
Reward (First Win) -- Speed Sash
Reward (Subsequent wins) -- Bomb Shell x 5
The Problem -- You have a lot to do in a short period of time. If you don't
finish off the Humbaba before he stands up and heals himself, you essentially
have to start over. Preemptive Strike without Deceptisol is difficult at best.
</pre><pre id="faqspan-7">
The Good News -- With a little practice, it's pretty easy to finish the Humbaba
before he heals himself. There is a Save point right next to this battle if
you need to try more than once.
Times -- My Target time was 1:36, giving me 67 seconds to 5-star it. I
finished the battle in 40 - 50 seconds.
Paradigms:
*************************
* Hope * Fang * Light *
******************************
* #1 * Rav * Com * Rav *
******************************
* #2 * Syn * Sab * Rav *
******************************
* #3 * Rav * Sab * Rav *
******************************
* #4 * Rav * Com * Com *
******************************
The Battle -- The first thing I tried was getting an honest PS, but the game
designers seemed to rig some of these Missions (like this one) so that a PS is
highly unlikely. Try it for yourself if you don't believe me. I'm not saying
that it isn't possible -- I'm just saying that I've never been able to get one.
Since the Centurion is your default target anyway, start with #1 to Stagger and
finish him off first. This should take 2 - 3 rounds. Switch to #2 and defeat
the Humbaba as described in Mission 50.
As was the case with Mission 50, this works a little better if you are willing
to use Fang as a Ravager in Paradigm #1. Just make sure that she gets
Deprotect to stick when you are in #2.
*******************************************************************************
* *
* Mission 59 -- Two-Faced Fiend *
* Zirnitra (+ Ceratoraptor x3) [M59] *
* *
*******************************************************************************
Unlock condition -- Reach Taijin's Tower.
When to undertake -- Early postgame.
Reward (First Win) -- Energy Sash
Reward (Subsequent wins) -- Bomb Core x 6
The Problem -- The worst of both worlds -- a thoroughly obnoxious boss matched
with enemies that call companions ad infinitum.
The Good News -- For once, the Target time is semi-realistic. Zirnitra still
gives the bulk of his attention to a Sentinel.
Times -- I had a Target time of 4:25, which gave me 3:06 to 5-star it. My
times varied from 2:00 to about 2:55.
Paradigms:
*************************
* Hope * Fang * Snow *
******************************
* #1 * Syn * Com * Sen *
******************************
* #2 * Rav * Com * Sen *
******************************
* #3 * Med * Com * Sen *
******************************
* #4 * Syn * Sab * Sen *
******************************
The Battle -- Equipment-wise, Accessories that add buffs will be of minimal
help since Zirnitra will dispel most of those anyway. However, giving Fang a
Genji Glove can be helpful since she can hit the Mark for more than 100,000 HP
per blow. This will speed up the last portion of the battle considerably.
One of the most annoying things that can happen to you in this battle is having
Hope and/or Fang hit with Slow before Snow gets a chance to Provoke Zirnitra.
Slow is especially obnoxious because you have to cast Haste twice to undo it --
once to remove Slow and another to restore Haste. You can reduce the chances
of this happening by taking two Glass Orbs from your inventory (you can buy
them at B&W Outfitters for 6000 gil each if you don't have any), upgrading them
to maxed out Dragonfly Orbs, and equipping them on Hope and Fang. This will
give each of them 60% protection against Slow, which should make this Mission
go a bit smoother.
The battle itself is total pandemonium. You are really going to need to keep
an eye on everyone's HP and status. Start with #1 just long enough to cast
Enfire on Fang. Your first priority is to get rid of those stupid
Certoraptors, and having Fire on Fang's weapon really speeds that up (see
below). It is a nice coincidence that Zirnitra is also weak to Fire. Switch to
#2 and have Hope and Fang Stagger and then finish off the Certoraptors one by
one. If Snow's health gets low, you can switch to #3 long enough to heal while
still doing some damage. If Hope or Fang loses Haste or gets Slowed, switch
back to #1 and speed them up again. Once the Certoraptors are gone, you can
quickly get rid of the Certosaurs that they called. Finally, you can focus on
Zirnitra. Switch to #4 so that Hope can cast a fresh round of Haste on himself
and Fang as well as any lost buffs while Fang tries to stick debuffs on
Zirnitra. Back to #3 for one round so that you can heal Snow, and then back to
#2 to pound on Zirnitra. By the time you Stagger him, his HP will be nearly
depleted anyway, but Fang can finish him off quickly from there.
If Snow dies or if Fang or Hope gets hit with Zirnitra's first attack (which
can inflict Daze) you may need to Retry.
I tried this battle without doing the first step of casting Enfire on Fang, and
it took nearly another full minute to finish the battle!
One last note -- A PS is possible if you use Deceptisol, but I can't imagine
why you would want to. The battle is frantic, but you certainly have enough
time to get the job done without Deceptisol.
*******************************************************************************
* *
* Mission 60 -- Degela Vu *
* Gelatitan (x3) [M60] *
* *
*******************************************************************************
Unlock condition -- Reach Oerba.
When to undertake -- Early postgame.
Reward (First Win) -- Mnar Stone
Reward (Subsequent wins) -- Bomb Core x 7
The Problem -- Three enemies with high Stagger points and relatively short
Target time. They can stick you with Slow and Pain, thus either slowing your
attacks or stopping them altogether.
The Good News -- The enemies are weak against Thunder. For large targets like
these, Sazh can do a lot of damage with his Blitz attack.
Times -- Target time was 2:30, giving me just 1:45 to take out all 3. My times
went from about 1:10 to 1:50 or so. Usually, I got 5 stars, but sometimes I
went slightly over time.
Paradigms:
*************************
* Sazh * Fang * Light *
******************************
* #1 * Syn * Sab * Sab *
******************************
* #2 * Com * Com * Com *
******************************
* #3 * Syn * Com * Com *
******************************
* #4 * Com * Com * Sab *
******************************
I realize that Saboteur is a secondary role for Lightning, but she learns the
necessary debuffs (Deprotect and Poison) relatively early in the Crystarium,
so she can acquire these skills with a minimal investment of CP (OK -- it
actually takes 252,000 CP, but by Postgame, this isn't that much.)
The Battle -- If you can get an honest PS on this battle, then you are a better
person than I am. You can get the enemies to chase you to the limits of their
travel, but when they retreat they back away while still facing you. When they
finally turn their backs on you, they are hyper-aware of your movements and
moving stealthily will not cover ground fast enough to engage them before they
turn and face you again. You might be able to get a favorable position after a
Retry (like we did in Mission 31), but I tried probably 20 times and never got
a PS.
Before you start, make sure that you have some Painkillers in stock. If not,
go to the nearby Save Point and buy some for a paltry 100 gil each. You'll be
glad that you did.
This battle is mostly about inflicting maximum damage in minimum time. We are
going to equip for Random Instant Chain, but we're not going to depend on it.
You can 5-star this battle even if you never get a RIC, but if you do get one,
then so much the better. Give Sprint Shoes to everyone, and equip everyone
with RIC Accessories. If you have any Accessory slots left over, you can equip
General's Belts to protect again physical attacks or just leave them empty.
Don't add Power Gloves -- the Target Time is low enough already.
Start with #1 and have Sazh give Bravery and Enthunder to everyone. Watch
closely to make sure that he gets these buffs to stick, because the enemies'
initial physical attacks are going to disrupt some of his attempts. Persevere
until everyone has both buffs. While Sazh is buffing the team, Fang and
Lightning should get Deprotect and Poison (and the essentially useless Imperil)
on most of the enemies. The debuffs are important, but don't tarry over them
lest you exceed the Target Time x 0.70 standard. As soon as the buffing is
done, move on.
Switch to #2 and have Sazh Blitz twice in each turn. Always aim for the Mark
in the middle (to inflict maximum total damage on the 3 marks). If you notice
that you are attacking an enemy that is not Deprotected, you can switch to #4
long enough for Lightning to get Deprotect to stick, but unless the enemy has
nearly all of its HP remaining, you should probably just keep attacking. When
someone gets hit by Pain, administer one of those Painkillers that you just
bought. Remember that your ATB gauge will continue to fill while you are using
Items, so you really don't lose much time doing this.
Eventually, your Sprint Shoes will peter out either from time or from getting
hit by Slowga. When that happens, switch to #3 and have Sazh restore Haste
and, if necessary, Bravery. If you have enough HP, healing should not be
necessary, but if it is, use Renew. You simply won't have enough time to
remove an ally from the attack long enough to play Medic. Each of my
characters had 15,000 - 17,000 HP, and that was plenty to survive with no
healing.
Once everyone is buffed again, return to #2 and pound away until you are
victorious.
You are probably going to have to try this battle a few times before you get
the 5 stars. This is a relatively long battle with a fairly tight Target Time,
and there are a lot of things to keep track of. Happily there is a Save Point
right nearby and you can just reload your game and try again if you let the
battle play out and get less than 5 stars. If you get an early RIC, you will
be on Easy Street. Otherwise, the time should be close but doable. In the
end, your success may hinge how many debuffs you get to stick in the first
stage of the battle.
At very low HP levels (i.e., Chapter 11), you should forsake the RIC
Accessories. Instead, fill your 3 Accessory slots with Sprint Shoes, a Black
Belt, and a General's Belt for everyone to protect against the enemies'
physical attacks. Once the enemies start casting Waterga, you will need to
cast Renew once, but that should be sufficient healing to get you through to
the end.
Special thanks to alert reader Jared Livesey, who gave me the fundamental idea
for this strategy in response to my original claim that use of Deceptisol might
be necessary.
*******************************************************************************
* *
* Mission 61 -- I, Juggernaut *
* Juggernaut [M61] *
* *
*******************************************************************************
Unlock condition -- Reach Oerba.
When to undertake -- Early postgame.
Reward (First Win) -- Royal Armlet
Reward (Subsequent wins) -- Crystal Oscillator x 2
The Problem -- Low Target time means that you pretty much have to get a PS in
order to 5-star this Mission.
The Good News -- Juggernaut is by himself. A PS isn't that hard to accomplish.
Times -- Target time is about 1:10. Without a PS, that gives you 46 seconds to
earn 5 stars. Good luck with that. With a PS, you can take him down in about
25 seconds or less.
Paradigms:
*************************
* Van * Fang * Light *
******************************
* #1 * Sab * Com * Rav *
******************************
* #2 * Rav * Com * Com *
******************************
The Battle -- I really can't believe that you get to fight a solo Juggernaut
here. I was sure that there would be 2 of them or at least that this one would
have some kind of companion. Let's count our blessings.
As before, the key is to get a PS. After that, the rest is easy. Engage the
enemy and then Retry as soon as the battle begins. When the battle loads,
don't make a move of any kind until he is facing DIRECTLY away from you. His
peripheral vision is very good, but his hearing isn't. If he is not facing
directly away from you, he will readily perceive your movement and come after
you. If he is facing directly away from you, you can run up behind him -- you
don't even have to tiptoe -- and engage him for a PS. It may take a couple of
tries, but it really isn't all that difficult.
Once you get a PS, use Paradigm #1 to Stagger and debuff the Mark. On a good
day, Vanille can stick 4 debuffs in one round. Switch to #2 so that your
Commandos can Launch the Mark and finish the battle in another 2 rounds or so.
*******************************************************************************
* *
* Mission 62 -- Indomitable Will *
* Raktavija x 2 [M62] *
* *
*******************************************************************************
Unlock condition: Complete Mission 44.
When to undertake it -- Late postgame.
Reward (First Win) -- Genji Glove
Reward (Subsequent wins) -- Bomb Core x 10
Special note: You can only reach this battle via chocobo. Be careful about
moving around up there prior to engaging the enemy or you might fall down a
level. This won't hurt you, but you will have to go round up another chocobo
to return up to the battle site, which can be annoying. Always rotate the
cameras so that you are facing the Marks before moving when up here.
The Problem -- This can be one of the toughest battles in the game. Beating
one of these things was hard enough back in Mission 47. Now you have to defeat
two of them. You are facing essentially the same problems before, but you are
getting pelted with twice as many attacks.
The Good News -- You should now have almost twice as many HP as you had when
you fought Mission 47. The Marks are susceptible to Slow, which greatly
reduces the rate at which you take damage. Once the first one goes down, the
rest is relatively easy.
Times -- With maxed out Tier 2 weapons, Target time is around 12 minutes. Once
I figured out how to stay alive long enough to finish the battle, my times ran
from about 3 - 7 minutes.
Paradigms:
*************************
* Fang * Van * Hope *
******************************
* #1 * Sab * Med * Syn *
******************************
* #2 * Rav * Rav * Rav *
******************************
* #3 * Rav * Med * Rav *
******************************
* #4 * Com * Sab * Rav *
******************************
* #5 * Com * Rav * Rav *
******************************
* #6 * Syn * Rav * Med *
******************************
The Battle -- This is a seriously difficult battle. I have read literally
dozens of different ways to win this battle, and even with the benefit of so
many peoples' experience, it is only recently that I have become able to face
this battle fearlessly. The factors cited above definitely hamper your
offense, but the biggest problem seems to be defense. The enemies' Magic
attacks can hit your entire team for big damage and often knock you in the air
and out of commission for long, crucial periods of time. Healing the damage
inflicted by these attacks can take valuable time, so it seems that your best
offense here is a good defense.
Before I go any further, I would like to credit MasterLL for the basics of the
following strategy, which he illustrated in a YouTube video
http://www.youtube.com/watch?v=u5ktoPhrPMM
Please be aware that this is one of those "best case scenario" videos that I
described in Section III of this guide. The single most detrimental (and
not at all uncommon) thing that can happen is conspicuously absent from this
video, making this battle appear somewhat less difficult than it actually is.
Nonetheless, the overall strategy is solid, and I will try to give you guidance
on how to deal with this setback should it befall you in your battle.
Since this battle is all about Magic, I used Hope where MasterLL used
Lightning, but the strategy works with either character. Hope has stronger
Magic, but Lightning has more HP, so each has advantages.
Equip everyone pretty much as you did in Mission 47 -- 3 maxed out Witch's
Bracelets on each team member plus Weirding Glyphs on Hope and Vanille. The
one change that I recommend is to equip your one Genji Glove on Fang, since she
should now be powerful enough to do over 99,999 damage once a Mark is Staggered
and Deprotected.
Your battle procedure will be slightly different with Fang as the leader.
Start with #1 and have Fang spam Slow while Hope buffs the team and Vanille
heals. The only buff we really need right now is Haste, and Hope will cast
that first. Once the first enemy is Slowed, turn your attention to the second
enemy until both Marks are Slowed. Now switch to #2 and pound one Mark with
Magic. When you need to heal, switch to #3 and have Vanille heal while Fang
and Hope continue pushing up the Chain Gauge.
If you got Slow to stick quickly, Hope may not have buffed Fang with Bravery.
If this is the case, then just before the first Mark's Stagger Gauge fills,
switch to #6 long enough for Fang to give herself Bravera, then return to #2.
As soon as you Stagger the first Mark, go immediately to #4 just long enough
for Vanille to stick Deprotect on the Staggered Mark. Then switch to #5 and
attack the Staggered Mark.
If you do not get hit with Dispelga, then you should have no trouble finishing
the first Mark in one Stagger. You will notice that this is the case in
MasterLL's video, which is why the battle seems so easy. As before, if you get
hit with Dispelga it is still possible to finish the first Mark in one Stagger,
but you will have to act quickly. Switch back to #6 long enough for Fang to
restore Bravera and Haste on herself only. Then return to #4 long enough for
Vanille to Deprotect the Mark again before returning to #5 and doing all the
damage that you can before the Stagger Gauge empties. A Highwind at the end
might very well make the difference, which is one reason I advise you to put
Fang in the lead. If the Mark survives, you will need to Slow, Stagger, and
pound it a second time to finish it off.
Once the first Mark is down, repeat the process (which will be MUCH easier with
only one of these things pelting you with attacks.) Use #1 to Slow the Mark
and buff the team, Stagger the Mark with #2 and #3, and pound it into the
ground with #5.
This battle definitely takes considerably longer than Mission 47, especially if
you are unfortunate with the Marks' use of Dispelga. For the record, I have 5-
starred this Mission even when my team got hit with Dispelga FOUR times,
forcing me to Stagger each Mark twice. As before, once you figure out how to
survive this battle, you should have little trouble 5-starring the Mission.
According to the Game Mechanics Guide, once a Mark is Staggered, its first move
is to use Dispelga and Slow IF any allies have buffs. Thus, having no buffs
will prevent Dispelga. However, if your team has no buffs at the beginning of
that crucial stage when the Mark is Staggered and you are finally able to do
some damage, you are going to be hard pressed to finish it off in one Stagger
since you first must take the time to buff. I'm going to suggest that you are
better off starting with buffs and expecting that you are going to have to
recast them, since there is at least a chance that they will not be removed,
thus allowing you to finish the Mark in one Stagger.
*******************************************************************************
* *
* Mission 63 -- Crushed by Doubt *
* Adamantortoise [M63] *
* *
*******************************************************************************
Finding your way -- The Ci'eth Stone for Mission 63 is in Sulyya Springs at
ground level, just past where the path splits to the right and uphill.
Unlock condition -- Reach the Faultwarrens.
When to undertake -- Late postgame.
Reward (First Win) -- Genji Glove
Reward (Subsequent wins) -- Gold Nugget
The Problem -- A very tough enemy that takes a while to bring down because of
its 3.7 million HP. In order to damage it significantly, you have to take out
its legs individually, after which it will fall to the ground and be vulnerable
briefly. Its attacks hit your whole team and can cause lots of damage.
The Good News -- If you are sufficiently strong and practice a little, this
isn't that hard a battle. In fact, it becomes more or less automatic.
Times -- Time is really not a problem here. The Target time is nearly 10
minutes and the Mark can be leveled in about 2.
Paradigms:
*************************
* Fang * Van * Light *
******************************
* #1 * Syn * Med * Med *
******************************
* #2 * Rav * Rav * Rav *
******************************
* #3 * Com * Med * Med *
******************************
* #4 * Syn * Sab * Sab *
******************************
* #5 * Com * Rav * Com *
******************************
The Battle -- Because they drop the two items (Platinum Ingot and
Trapezohedron) that are more or less essential to earning all of the game's
trophies, these enemies are well-known, and there are probably as many ways to
defeat them as there are FFXIII enthusiasts. I will describe one way to bring
down this enemy, but as usual I do not claim that it is the best method, only
that it works reliably for me.
Tier 3 weapons are NOT needed for this battle. You can defeat this enemy using
only the equipment that we have used so far with two exceptions. First, I
strongly advise you to get a maxed out Gaian Ring for each member of your team.
The Mark's primary attacks are earth-based, and this accessory reduces damage
from earth-based attacks by 40%. You should have found 2 Clay Rings in your
travels (one on Tier 6 of Taijin's Tower and one on the cliff where you fought
Gigantuar), and you received a Siltstone Ring for completing Mission 39. Both
of these accessories can be upgraded rather cheaply to Gaian Rings. The
catalyst that you will need is Uraninite, but you should have a few in
inventory from completing Missions 29, 30, 36, and 57. You will also want the
Genji Glove that you got from completing Mission 51. It probably isn't
absolutely necessary, but it makes this process go MUCH more quickly because it
allows you to kill off a Staggered leg in a single hit.
I recommend that you undertake this Mission in late postgame not because you
need special equipment, but rather because it is very helpful for all team
members to have sufficient HP and access to all 6 roles and some off their
attendant abilities. For example, Fang is going to act as a Synergist and needs
to know Haste. By the time you get to this stage of the game, you should have
accrued more than enough CP to max out Stage 10 Crystarium in all 6 roles for
all 6 characters, so this should not be an issue. For the record, though, this
battle can be consistently won in Chapter 11 with Stage 9 less than full.
Equip everyone with his/her maxed out Tier 2 weapon, but leave off the Sprint
Shoes. In addition to the Gaian Rings, give Fang 2 Power Gloves and a Genji
Glove; give Vanille 3 Weirding Glyphs; and give Lightning 2 Power Gloves and a
Weirding Glyph. Set the Paradigms as listed above.
Start with #1 and have Fang cast Haste and Protectra on everyone while the
other 2 team members heal. After a while, Protectra won't be necessary, but it
will give you a little more protection while you are vulnerable to the Mark's
attacks. Have Fang cast Bravera on herself, then switch to #2 and have
everyone attack the default target, which is the Left Foreleg. Instead of
using Auto-Battle, you might want to choose to fill Fang's ATB with 5 Thunder
spells. Thunder casts quicker than any other spell, so this is the quickest
way to inflict damage. It also keeps her distanced from the stomping feet,
thus minimizing damage. Do this for 2 full rounds. Switch to #3 and have Fang
do a Highwind on the Left Foreleg while Vanille and Lightning heal. This
should kill off that leg.
If the Highwind does not kill off the leg, there can be a couple of possible
causes. First, make sure that Fang is equipped with a Genji Glove. The leg
has nearly 250,000 HP, and you didn't shave off many of those when Staggering
it. Thus, to kill it, you will need to hit for over 100,000 HP, a feat which
can only be accomplished with a Genji Glove equipped. Second, if you are a
little underpowered, it may be necessary to attack the leg with your 3 Ravagers
for a third round (thus pushing the Stagger gauge up higher) before doing the
Highwind. The third possibility is that the timing of your Highwind was bad.
If Fang's Highwind hits while the Mark is stomping either leg, the damage that
occurs will be diminished, which is not acceptable. We want to kill off the
leg in one Stagger. So, keep track of the Mark's attacks. If it just stomped,
go ahead and Highwind the leg. If it has been a while, you may want to wait
until after it attacks next. Don't overthink this -- more often than not, if
you just go ahead and attack, you'll be just fine, and if you spend too much
time waiting for an attack, your Haste will run out. However, you should be
aware of this possible reason that your Highwind did not cause the desired
amount of damage.
When the Left Foreleg dies, the default target will NOT be the Right Foreleg
(which we want to attack next) but rather the Adamantortoise itself, which we
don't want to attack yet. Therefore, before switching Paradigms again, have
Fang cast Ruin a couple of times on the Right Foreleg. This will identify that
as the new target and also give some additional time for healing. Now go back
to #2 and repeat the process -- hit the Right Foreleg with 3 Ravagers for at
least 2 full rounds to Stagger the leg, switch to #3, and have Fang take out
the leg with a Highwind.
Switch to #4 and prepare to have Fang buff while the other 2 team members
debuff. However, with its legs disabled, the Mark is going to fall down, which
can cause 2 problems. First, anyone standing nearby is going to take some
damage (which is only an issue if a member of your team is already in the red.)
Moreover, if you are trying to cast a spell when the Mark hits the dirt, that
action will be disrupted and canceled. So, execute the following so that they
do not occur when the Mark is actually hitting the ground: have Fang give
herself and Lightning Haste and Bravera, and have her give Vanille Haste and
Faithra. Meanwhile, Vanille and Light should be able to stick the turtle with
Deprotect, Deshell and Imperil.
Now that the Mark is down and debuffed and your team is buffed, it is time to
finish this battle. Go back to #2 to Stagger the turtle. Two full rounds
should do it. Switch to #5 and pound the turtle into submission. Time-wise,
you should have 3 full rounds to beat on the turtle before he stands up again.
If the third round completes but the turtle is still alive, have Fang execute a
Highwind and if you are fortunate, that will finish the battle. If the Mark
successfully stands up, you may want to begin again. You can only do minimal
damage to it when it is standing, which basically means that you have to start
over anyway.
If you haven't started grinding turtles yet, it may take you a few tries to
get the timing of all this right. Mostly, you need to be aware that once the
turtle hits the ground, your time is very limited, so make the most of it.
*******************************************************************************
* *
* Mission 64 -- The Doomherald *
* Vercingetorix [M64] *
* *
*******************************************************************************
Finding your way -- The Stone for this Mission is in Oerba, WAY out where you
fought Barthandelus and boarded an airship to return to Cocoon at the end of
Chapter 11. Pack a lunch -- it's a long hike.
Unlock conditions -- Complete Missions 27 and 51 (i.e., complete all of Titan's
Trials) and defeat Barthandelus in Oerba.
When to undertake -- Late postgame.
Reward (First Win) -- Gold Watch
Reward (Subsequent wins) -- Bomb Core x 10
The Problem -- On the surface, this appears to be one of the toughest battles
in the game. The enemy hits hard and fast and has an attack (Wicked Whirl)
that can wipe out your entire party if you are not in 3-Sentinel mode. He
periodically goes into a trance ("Impenetrable Aura") that removes all of his
debuffs, resets his Stagger Gauge, restores lots of HP, and makes him
invulnerable to your attacks. Buffing your team is relatively pointless since
he can remove them all in a heartbeat.
The Good News -- You never have to hit him even once. You can win a 5-star
rating through use of Poison exclusively. Really!
Times: Even with all of your characters fully developed, Target Time is around
20 minutes. With a little luck, you can Poison him to death in around 12 - 14
minutes.
Paradigms:
Using Poison only OR Using Poison and Attack
************************* *************************
* Van * Fang * Snow * * Light * Fang * Van *
****************************** ******************************
* #1 * Sab * Sab * Sab * * #1 * Sab * Sab * Sab *
****************************** ******************************
* #2 * Sab * Med * Med * * #2 * Sab * Med * Med *
****************************** ******************************
* #3 * Sen * Sen * Sen * * #3 * Com * Com * Med *
****************************** ******************************
* #4 * Med * Syn * Med * * #4 * Syn * Syn * Med *
****************************** ******************************
* #5 * Med * Com * Med * * #5 * Sen * Sen * Sen *
****************************** ******************************
The Battle (Poison only) -- If your HP are still rather low or you are tired of
dying in this battle, this is the strategy that I suggest. Make Vanille the
Leader and replace Lightning with Snow, since you are going to be in Sentinel
Mode almost exclusively. Equip everyone with his/her weakest Tier 1 weapon.
We're playing defense here, so let's dig out those Witch's Bracelets from
Mission 62 and those Black Belts/General's Belts that we first used in Mission
55 and get some more use out of them. Equip each team member with 3 Bracelets,
and one Belt. (I tried this battle with 2 Bracelets and 2 Belts, but it didn't
seem to make much difference, so we might as well use the Accessories that we
have already Upgraded.) You won't have Haste for the first round, but that is
an acceptable tradeoff for the extra protection. Remember -- we're not trying
to out-muscle this guy; we're just trying to outlast him.
Begin with #1 and have Vanille cast Poison 5 times. If it doesn't stick,
switch to #2 and have her try 5 more times. As soon as it sticks, change to #3.
The enemy's attacks will do minimal damage, and your Mediguard ability will
restore some of your HP while you wait for Poison to sap away his HP. You also
get a 20% reduction in damage when Mediguard is being used! When the
Mark goes into his trance, switch to #4 to have Vanille and Snow restore HP
while Fang restores Haste. Before he comes out of his trance, change back to
#1 and be prepared to spam Poison again (because his trance removed it). Fang
will Dispel his buffs, and Snow will try to Slow him. Continue this pattern of
Poisoning and Dispelling him, defending while he attacks, and healing and re-
Hasting when he is in a trance. Eventually Poison will sap away every one of
his 15,840,000 HP and you will earn a 5-star rating without ever drawing a
weapon!
Keep a careful watch on how many pairs of wings the Mark has. Each pair of
wings adds more punch to his attacks. You are relatively safe attacking the
Mark when he only has one or two pairs of wings, because he won't perform
Wicked Whirl until he grows that third pair. From then on, however, you need
to be especially conservative. Please note that the number of pairs of wings
is equal to the number of buffs with which the Mark begins each round, so you
may find it quicker to count buffs than wings. On a related note, if the Mark
has 3 or 4 buffs, Fang will need 2 full rounds in Paradigm #1 to Dispel them
all. Consequently, after that third set of wings appears, you should consider
sticking with #1 for 2 rounds before switching to #2. It turns out that the
most dangerous of his buffs (Bravery and Faith) are the last 2 that you can
Dispel (Protect and Shell are cast last, so they are removed first), so you
should always try to get rid of all of his buffs.
One last note about Wicked Whirl is that it ignores resistances. Black Belts,
Witch's Bracelets, Protect, and Shell are all useless in defending against this
attack. The only thing that will attenuate the damage is being in Sentinel
mode. (Thanks to Jared Livesy for providing me with this information.)
There is a chance that he will go into Wicked Whirl before you get Poison to
stick. If so, you must immediately return to the safety of #3 or you will die.
Once the danger is past, you can try to use #2 to stick Poison again. Safety
first -- as long as you are defending when he uses Wicked Whirl, you should
survive and be victorious.
I have tried this strategy (with full Stage 10 HP) dozens of times. I never
came very close to dying, but once or twice I did get 4 stars instead of 5.
This was mostly because of bad timing of his Impenetrable Aura. It seemed
that as soon as I got Poison to stick, he immediately went into his trance, so
I didn't get much damage out of several battle cycles. Otherwise, this seems
to be a relatively foolproof method of winning an otherwise extremely difficult
battle.
If you are having trouble 5-starring this Mission, there are at least two
possible solutions. One is to let Vanille keep her Tier 2 Malboro Wand. This
will reduce the Target Time by a couple of minutes, but Poison will still stick
with increased frequency. You can also use Paradigm #5 to let Fang whittle
away some HP between when Vanille sticks Poison and when the Mark goes into
Impenetrable Aura. With a crummy weapon and no stat-boosting accessories,
Fang can't do much damage, but at the very least she seems to be able to offset
the HP that the Mark recovers when in a trance. However, once the Mark starts
using Wicked Whirl (when it grows that third set of wings), I would advise
against letting your guard down for these weak physical attacks and just let
Poison do its work.
(Method 2 -- Using Poison and Attacking) -- If your characters are fully
developed, you should be able to work some attacks into your strategy to speed
things up a bit. I would recommend using Lightning as a leader with Fang and
Vanille (see alternate Paradigms above). Lightning is one of 3 characters who
can cast Poison, and when fully developed she has the added advantage of being
able to cast Haste. As far as equipment goes, give Lightning her Axis Blade
and equip her with Nimbletoe Boots (or Sprint Shoes if you don't want to make
the Boots for her), 2 Witch's Bracelets and a General's Belt. The combination
of the Axis Blade and the Nimbletoe Boots will give Lightning a +10% ATB charge
rate, speeding up her actions without changing Target Time. Give Fang and
Vanille wimpy Tier 1 weapons and the same Accessories as Lightning. Resist the
temptation to use Upgraded weapons. You will be attacking for a very short
percentage of this battle, and you pay a big price in Target Time for those
stronger weapons. Remember -- our goal here is maximum score, not necessarily
minimum time.
Start with #1 and have Lightning spam Poison until it sticks. Stay with #1
until someone gets Deprotect to stick, then switch to #3 and pound away until
the Mark goes into his trance. Switch to #4 and have Lightning give herself
Haste and Bravery and cast Bravery on Fang. Fang should get Haste on herself
and Vanille, and Vanille's Curaja spells should be powerful enough to get
everyone pretty much healed in 2 turns. Don't get carried away with buffing.
You are likely to lose these buffs anyway, so spend no more than 2 turns in #4
so that you are prepared when the Mark comes out of his trance. Switch back to
#1 and have Lightning queue up 5 Poison commands to have ready when the Mark's
trance ends. Repeat the debuffing and attacking as described in the first
method above. If Poison is taking a long time to stick, you may need to use #2
to get a bit more healing while Lightning is casting Poison.
More often than not, your carefully cast buffs will be removed. I advise you
NOT to try to restore them. For one thing, this will cause you to lose
valuable attacking time, and for another you don't want to get caught changing
Paradigms when the Mark does a Wicked Whirl. Just stick with the plan --
Poison, Deprotect, and attack, retreating to #5 when a Wicked Whirl is on the
way. If your HP get too low, use Renew, but Vanille's healing Magic should
keep your health sufficient as long as you don't get caught unprotected when
Wicked Whirl hits.
Using the above strategy, I consistently win this battle in around half the
Target Time, which is more than adequate for a 5-star rating. This method is a
little scary at first, and you will probably die a few times before you get a
handle on the rhythm of this battle. However, once you get the hang of this,
you will find it the most reliable way to 5-star a battle against one of the
game's toughest bosses.
Whichever method you choose, keep two things in mind: First, Poison is your
offensive priority and you need to get it to stick as soon as possible and
practical. As long as the Mark is Poisoned, you will gain ground. Secondly,
when you see Wicked Whirl begin, you MUST go to a 3-Sentinel formation or
things will get rather ugly very fast.
******************************************************************************
Now that you have 5-starred all 64 Missions, here is a quick summary of the
methods that I recommended and when each was used.
13 - Preemptive Strikes (#1,3,9,10,11,17,21,23,29,35,37,44,and 61)
2 - Random Instant Chain (#31 and 45)*
1 - Death (#55)**
1 - Poison and tank (#64)
47 - Straight-up fights (all others)
--
64 - Total Missions
0 - Use of Deceptisol (!)
0 - Use of Fortisol
0 - Use of Aegisol**
* For the record, Random Instant Chain can be avoided altogether. On Mission
31, a PS is possible, but getting one really relies on luck more than on
skill and will therefore require several Retries. Mission 45 can be won in
a straight-up battle if you are willing to undertake this Mission in
Postgame play when your team has enough HP to survive.
** Death was used on Mission #55 primarily to allow you to undertake this
Mission and obtain a Growth Egg WAY before you have any business battling
an enemy this tough. Although Aegisol was originally recommended, this
battle can consistently be won without using any shrouds. If you are
willing to wait until Postgame, this battle can also be won without
using Death.
*******************************************************************************
* *
* XIII. Adding Some Challenge [C13] *
* *
*******************************************************************************
Now that you have 5-starred all 64 Missions with (practically) no use of
shrouds, Eidolons, or Tier 3 weapons, you can add some challenge by undertaking
them again without the benefits of Stage 10 Crystarium. As I may have
mentioned before, ALL of the Missions with the possible exception of Mission 64
can be completed and 5-starred before advancing beyond Chapter 11. I
understand that others have 5-starred Mission 64 in Chapter 11, but I have to
admit that I have never done this personally.
Originally, I had intended to give specific information about how to modify
each previously described strategy to the conditions in chapter 11, but I
decided that to do so would take some of the fun away. What I am proposing is
a challenge, and the reader, I reasoned, would find it much more rewarding to
devise his own strategies. Instead, I will outline below some general concepts
to keep in mind and leave it to you to use your wiles and knowledge to guide
you through the process of 5-starring the Missions under more difficult
circumstances.
Remember, though, that the rules remain the same. Shrouds, Eidolons, and Tier
3 weapons are all strictly taboo.
The primary benefit derived from Stage 10 Crystarium is HP. Oh, each
character will get an additional Accessory slot, a few new abilities, and some
minor bumps in Strength and Magic, but the big difference is HP. Specifically,
in Stage 10, each character gets roughly one-and-a-half times as many HP as in
Stages 1 - 9 inclusive. For example, if you completely fill out Stage 9 for
Snow (including secondary roles), he will have around 12,000 HP. Stage 10
provides an additional 18,000 HP or so for a total of 30,000!
The advantage should be obvious. More HP means that you can withstand more
damage without having to spend precious time healing. Since 5-starring the
Missions is all about speed, this is a HUGE advantage. Moreover, since your HP
do not factor into the Target Time, there is no down side to having more HP.
Conversely, then, 5-starring these Missions with dramatically fewer HP is going
to present some challenges. You are facing the same Target Times with fewer
HP, giving you more to do in the same amount of time.
For some Missions, the additional HP make no difference at all. Mission 38
comes to mind. Since it is over is less than 10 seconds anyway, the extra HP
are irrelevant. Other Missions such as 62 and 63 are extremely close when no
one on your team has more than 10,000 HP. And, let's not overlook Mission 54,
in which Gigantuar does 10,000 HP damage to a single character in each turn!
THAT one is going to be a challenge, for sure, but I assure you that it can be
done.
Here are some general tips for 5-starring difficult Missions early in the game:
* Defense becomes much more important. You simply can't afford to let your
enemies pound away at your HP when you have fewer to spare. It is often
worth your while to cast defensive spells such as Protect and Shell rather
than spend additional time healing. Remember that the -ra spells (Protectra
and Shellra) offer more protection but also wear off faster. Of course,
these will be of minimal benefit against enemies (such as Zirnitra) that
spend their time removing your buffs.
* You may have to make additional use of Random Instant Chain when you simply
can't stay alive long enough for a prolonged battle. In a Challenge
situation such as this, I would not consider RIC to be cheating, but I leave
that to your judgment.
* In otherwise hopeless situations, you may have to use Vanille's Death spell.
If you do, remember that any additional buffs that you can stick increase
the chances that Death will connect by 1%. Thus, it may be worth your time
to debuff for a round or two before spamming Death provided, of course, that
the Mark in question can be debuffed. For what it's worth, there are no
Missions that require the Death spell, so try to find an alternate strategy
if at all possible.
* Above all, keep trying different things. The game provides a wealth of
tools for you to use, and a challenge such as this may require you to dig
deeper into that toolbox. If you try a strategy 10 times and are
unsuccessful, it is probably time to try something different.
There are at least two ways to approach this challenge, henceforth referred to
as the "Purist" approach and the "Practical" approach. The "Purist" (and
somewhat wasteful) approach is to undertake and 5-star all Missions before
advancing beyond Chapter 11. The more Practical approach is to allow yourself
to proceed past Chapter 11 and undertake the later Missions in Chapter 13 after
you reach the point where you can access the portal in Orphan's Cradle that
returns you to Gran Pulse. I will compare these for you and offer my
suggestions.
Either way, you are probably going to want to fill out Stage 9 completely,
including secondary roles for all characters. As you can imagine, this is
going to require earning a LOT of CP. With sufficient tedious grinding, the
Purist can actually do this in Chapter 11. However, here's the problem.
Between the beginning of Chapter 12 and the opening of Stage 10 Crystarium,
you will earn MUCH more than the 999,999 CP that you can stockpile (I'm
assuming that you've earned a Growth Egg and have it equipped continuously.)
Since the Purist will have nowhere to spend them (since all available
Crystarium nodes are already activated), all of those CP beyond the 999,999
capacity will be forfeited. This is why I call this approach wasteful.
The alternative is to earn some of those necessary CP in Chapter 12 and early
Chapter 13, spend them on Stage 9, and then return to Gran Pulse to undertake
the Missions. At first blush, it might appear that this would make the
Missions easier since you get any benefits of any loot found in those later
Chapters. It turns out that this really isn't the case. There are only a
couple of minor tactical advantages that are gained in Chapters 12 and 13. The
additional Accessories that you find are mostly ones that you can purchase
anyway, so that really isn't much of an advantage. Perhaps the biggest
advantage is the availability of free Scarletites to transform your Warrior's
Wristbands into Power Gloves and your Sorcerer's Marks to Weirding Glyphs. In
fact, this is WAY less an advantage than most people think. Try undertaking a
couple of Missions some time with Tier 2 weapons but NO Strength or Magic
Accessories. You will find that your scores are very nearly unchanged.
Remember -- this game is more about finesse than brute force.
My point is that completing the Missions in the "Practical" fashion really
doesn't compromise the challenge. Moreover, it will save you the trouble of
grinding CP in Chapter 11, only to earn a surplus in the next 2 Chapters that
you will end up being unable to use. Thus, I recommend the Practical approach
and suggest that if you think that it lacks challenge, then don't allow
yourself to use the Accessories or any Scarletites earned after Chapter 11
until after you have 5-starred all of the Missions.
I will provide quick outlines of how to manage the Missions and your CP for
both methods. Feel free to make your own choice and customize my suggestions
to suit your own style.
*******************************************************************************
* *
* The Purist Approach *
* *
*******************************************************************************
* Begin the same as outlined in steps #1 - 6 in Section XI. Skip Mission 27
for now, but you should be able to 5-star all others up to and including 28.
* Use the money that you got from fixing Bakhti to build and max out a Tier 2
weapon for at least your main 4 characters. Don't worry about Snow or Sazh
for now.
* You should have enough CP stockpiled from your trip to Oerba to make some
headway on filling out the Crystarium for each character's 3 primary roles.
As described in Section X, prioritize the paths that lead the each
character's unique ability, e.g., Fang's Highwind. This should boost your </pre><pre id="faqspan-8">
stats enough for now that you can postpone farming additional CP.
* Tackle the remaining Missions in more or less numerical order, starting with
Mission 27 (which we skipped earlier), then going to 29 and so forth. You
should be able to 5-star all of them except for 54, 59, 62, 63, and 64
without farming additional CP. Rather than teleport everywhere, you might
consider walking (especially through Mah'habara) in order to gain some CP
without the tedium of grinding the same battle repeatedly.
* For now, I would strongly advise against undertaking Missions 54, 62, 63, or
64. You might also want to postpone the 4 Missions in which you fight a
Zirnitra, especially Mission 59.
* Once you have maxed out a character's 3 primary roles, start filling in
their secondary roles as per the guidelines at the end of Section XI of this
guide. This will go very slowly at first, but that is OK. You won't really
need to fill these out for a while. When you feel ready, take on the 4
Missions with Zirnitras.
* Once you have completed all Missions except 54, 62, 63, and 64, you will
need to start farming some CP to fill in secondary roles so that you can get
some more HP. The best way to do this is by killing big turtles for 80,000
CP each. Initiate Mission 63 and work at it until you can win the battle
reliably. With less than 10,000 HP each, your characters are going to have
trouble surviving long enough to win this battle, but with a little practice
it can be done. I don't want to tell you how, but I will say that at this
point, this battle is all about speed and protection. Once you can beat the
turtles dependably, you can farm the one near the Save Point in the Eastern
Tors of the Archylte Steppe to completely fill in Stage 9 relatively
quickly.
* Before you complete Mission 56 - 62 inclusive (thereby replacing the "easy"
turtles with the Long Guis), I would strongly recommend that you make sure
that you have at least one Trapezohedron. With nothing more than Tier 2
weapons and Stage 9 Crystarium, you are going to have a LOT of trouble
beating the Adamantoise or the Long Gui, which, other than Mission 63, will
be your only source of these vital catalysts. (Mission 63 is still
beatable, but you will have to do a lot of running around to activate this
Mission, beat it, and reactivate it.) My point is, farm Adamantortoises
until you get at least one Trap. You will be thankful that you did.
* Once Stage 9 Crystarium is full, you are ready to take on Missions 62 and
54. Neither will be easy, but both are completely doable. For Mission 54,
you will need 3 characters with HP above 10,000. With maxed out Stage 9
Crystarium, Snow and Sazh will each meet this criterion, and Fang will have
precisely 10,000. This means that she will die as soon as she gets hit with
10,000 Needles. Equip Fang with some kind of Bangle, and she will be good
to go. (Notice that in this battle, 10,001 HP is practically the same as
20,000 HP.)
* I will leave Mission 64 up to you. I am told that it can be won at this
point, but I have never done so. I CAN tell you that by spending the
999,999 CP you should have when Stage 10 becomes available, you will
definitely have enough HP to 5-star this battle. It won't be easy, but it
can be done.
* Regardless of how you deal with Mission 64, you are now prepared to proceed
into Chapters 12 and 13. Keep in mind, as mentioned before, that prior to
opening Stage 10, you will amass more CP than you can store, but then you
accepted that premise before embarking on this path, didn't you?
*******************************************************************************
* *
* The Practical Approach *
* *
*******************************************************************************
* Begin the same as outlined in steps #1 - 6 in Section XI. Skip Mission 27
for now, but you should be able to 5-star all others up to and including 28.
* Use the money that you got from fixing Bakhti to build and max out a Tier 2
weapon for at least your main 4 characters. Don't worry about Snow or Sazh
for now.
* You should have enough CP stockpiled from your trip to Oerba to make some
headway on filling out the Crystarium for each character's 3 primary roles.
As described in Section X, prioritize the paths that lead the each
character's unique ability, e.g., Fang's Highwind.
* Return to Oerba, board the aircraft back to Cocoon, and follow the story
line until the portal in Orphan's Cradle that can return you to Gran Pulse
is activated. If you had a Growth Egg equipped for this entire journey, you
should have a lot of CP accumulated. Spend these on primary roles first and
then on secondary roles as per the guidelines at the end of Section XI of
this guide.
* Use the portal to return to Gran Pulse and tackle the remaining Missions in
more or less numerical order, starting with Mission 27 (which we skipped
earlier), then going to 29 and so forth. You should be able to 5-star all
of them except 54, 62, 63, and 64 without farming additional CP. The 4
Missions with Zirnitras will be iffy, but they can be won at this point, so
stick with them. As you work your way through the Missions, you will gain
some CP, but probably not enough to completely fill in Stage 9 secondary
roles.
* Once you have completed all Missions except 54, 62, 63, and 64, you may
need to farm some CP to fill in secondary roles so that you can get some
more HP. Probably the fastest way to do this is by killing big turtles
for 80,000 CP each. Initiate Mission 63 and work at it until you can win
the battle reliably. With less than 10,000 HP each, your characters are
going to have trouble surviving long enough to win this battle, but with a
little practice it can be done. I don't want to tell you how, but I will say
that at this point, this battle is all about speed and protection. Once you
can beat the turtles dependably, you can farm the one near the Save Point in
the Eastern Tors of the Archylte Steppe to completely fill in Stage 9
relatively quickly.
* Once Stage 9 Crystarium is full, you are ready to take on Missions 62 and
54. Neither will be easy, but both are completely doable. For Mission 54,
you will need 3 characters with HP above 10,000. With maxed out Stage 9
Crystarium, Snow and Sazh will each meet this criterion, and Fang will have
precisely 10,000. This means that she will die as soon as she gets hit with
10,000 Needles. Equip Fang with some kind of Bangle, and she will be good
to go. (Notice that in this battle, 10,001 HP is practically the same as
20,000 HP.)
* Before you complete Mission 56 - 62 inclusive (thereby replacing the "easy"
turtles with the Long Guis), I would strongly recommend that you make sure
that you have at least one Trapezohedron. With nothing more than Tier 2
weapons and Stage 9 Crystarium, you are going to have a LOT of trouble
beating the Adamantoise or the Long Gui, which, other than Mission 63, will
be your only source of these vital catalysts. (Mission 63 is still
beatable, but you will have to do a lot of running around to activate this
Mission, beat it, and reactivate it.) My point is, farm Adamantortoises
until you get at least one Trap. You will be thankful that you did.
* I will leave Mission 64 up to you. I am told that it can be won at this
point, but I have never done so. I CAN tell you that by spending the
999,999 CP you should have when Stage 10 becomes available, you will
definitely have enough HP to 5-star this battle. It won't be easy, but it
can be done.
* Having completed all the Missions (with the possible exception of 64), you
can now use the portal at the Base Camp to return to Orphan's Cradle and
continue to the end of the game. You will gain a LOT of CP, but probably
less than your 999,999 carrying capacity. Thus, you succeeded at
essentially the same challenge as the Purists but with less grinding while
still having a good stockpile of CP to spend once Stage 10 opens up.
*******************************************************************************
* *
* XIV. Conclusion and Credits [C14] *
* *
*******************************************************************************
I clearly remember buying the very first Final Fantasy game when it was first
issued for the original Nintendo 8-bit system, and I have bought and played
every installment of the series since. These are some of my very favorite
games in the world, and they are the ones to which I find myself returning over
and over again.
Video games have come a long ways since then. This game is very different from
Final Fantasy I, and Square-Enix took a lot of risks with FFXIII. It threw out
many of the accepted norms of the traditional RPG -- such as towns, Magic
points, healing between battles, armor, etc. -- and crafted a bold and
beautiful game that focused on storyline and battle mechanics. Whether you
agree with all aspects of the finished product or not, you have to respect SE
for thinking outside of the box and for taking some chances in an attempt to
come up with a new and different kind of RPG. The extremely linear nature of
the plot and path tends to put some people off, but many people like myself
find that although the game starts slowly, their enjoyment of it increases as
familiarity with the game is gained. Time will tell what place FFXIII will
hold in video game history, but I for one have really enjoyed it.
I have to admit that I was initially intimidated by the idea of writing a guide
for a game as popular as FFXIII. My 4 previous guides were all written for
older games whose popularity had waned or that were never that popular to begin
with. I know that there are a lot of people who, like myself, pretty much
worship the Final Fantasy series but who have knowledge of the game that far
transcends my own. What intimidated me was the idea of giving advice to people
who, in theory, might know more about the game than I do. In the end, though,
I convinced myself that I am by nature and profession a problem solver. I
viewed each Mission as a problem which necessarily had a solution. If solving
that problem was merely a matter of learning and applying the underlying
principles of the game, I figured that I was up to the challenge.
In retrospect, I am amazed at how much I learned from taking the time to write
this guide. When I was first playing the game, I would work on a Mission until
I got a 5-star rating and then move on. However, when writing this guide, I
attempted each Mission multiple times and multiple ways trying to find the best
(which, to me, means the most reliable and repeatable) way of finishing it with
a 5-star rating. As I did so, I had to do some research on the formulas that
produced the important numbers in the Missions -- Target time, score, rating,
etc. -- and use that knowledge to adjust my strategies. Often I would write up
a strategy for a Mission only to go back later and change it in light of
something that I had learned from working on a different Mission. It was
really a lot of fun and very enlightening, and what began as a "little" 60-page
guide has grown into a full 100 page epic in just over 2 years.
If you wish to contact me, my email address is:
[email protected]
I will do my best to respond to any communications that I receive that are
clearly and courteously worded.
It is difficult to know exactly who to thank for help in writing this. The
strategies that I describe came more from studying and applying concepts than
from copying strategies directly. I can, however, say that I couldn't have
assembled this guide without use of the following resources:
* The Mission guide from the previously cited "Two brothers and a sister" web
site. Without this guide, I would have spent additional hours trying to
track down the locations of all the Ci'eth Stones and Marks. Sadly, as of
late 2011, this site seems to no longer be active.
* The Game Mechanics Guide posted on GameFAQs.com by ximaus. The formulas and
other information in this guide were invaluable to me.
* Alert reader Jared Livesey who, in one of his many information-packed
emails, gave me the basic idea behind my Deceptisol-free strategy for
Mission 60. Jared by the way, firmly believes that all Missions should
be completed and 5-starred in Chapter 11. If anyone can do so, I'm sure
that he is the one who can.
* All other alert readers who took the time to write to me with suggestions
for improving this guide. Hopefully, I remembered to thank each by name in
the passage relevant to the Mission for which they provided assistance. I
enjoyed hearing from each of you and appreciate your contributions towards
making this guide far better than I alone could have made it.
* All of the many gamers who posted useful and helpful answers to questions on
the discussion board of GameFAQs. All of you who post responses that
genuinely try to help others (as opposed to those who post responses just to
see their own names on the web) are very much appreciated. We all benefit
when we pool our knowledge.
* The good people at GameFAQs.com who provide a forum for gamers to share
their ideas. I remember the early days of video games when getting past an
impasse in a game necessitated either buying a printed guide (which was
often expensive, incomplete, and/or inaccurate) or calling a 900 number and
paying by the minute to talk to someone to get help. GameFAQs is a free
resource that contains much more information than any written guide. This
is not a service that we should take for granted.
Thank you for taking the time to read my guide. I hope that you found it
useful and helpful. Happy gaming!
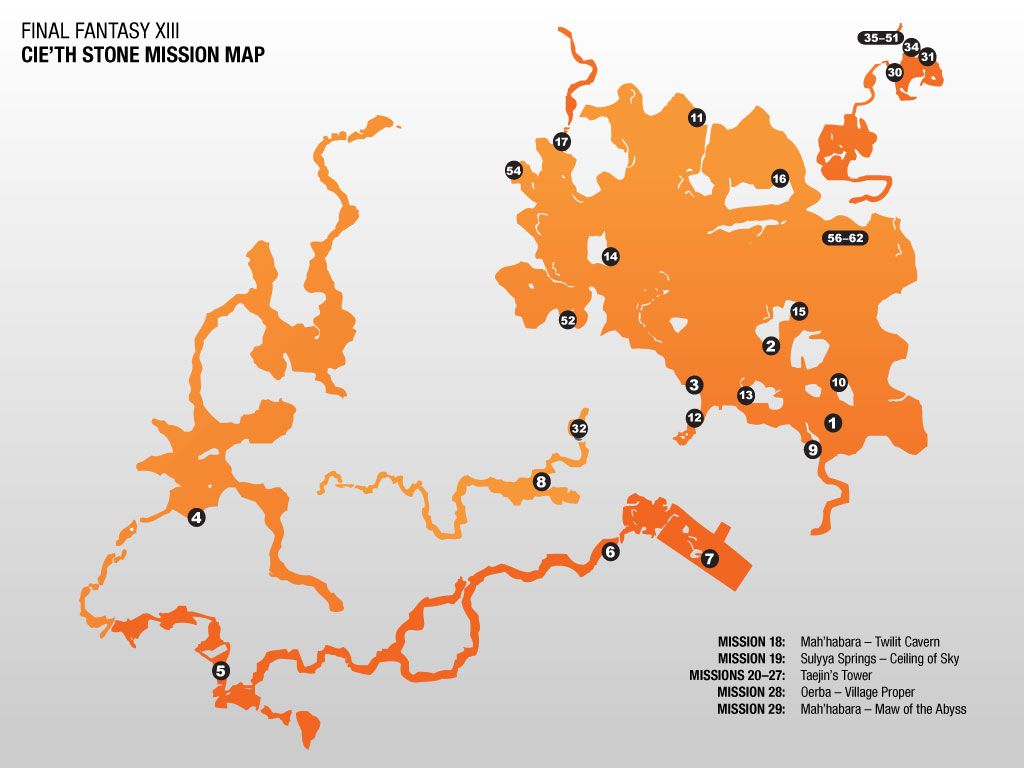