======================================================================
And Then There Were None for PC
FAQ/Walkthrough (version 1.0)
By: neeker
======================================================================
======================================================================
DISCLAIMER AND LEGAL STUFF
======================================================================
This walkthrough can be posted on GameFAQs.com, Neoseeker.com and its
associates only, unless authorized by me. You may contact me at
lestor_wong at yahoo.com for this purpose.
Also, please note that, as with most gaming guides:
+ + + THIS GUIDE CONTAINS SPOILERS! + + +
======================================================================
======================================================================
CONTENTS
======================================================================
1. First Things First
INTRODUCTION
------------
2. Characters
3. Controls
4. Getting Started
WALKTHROUGH
-----------
5. Chapter One: Marston chokes
6. Chapter Two: Mrs Rogers overslept
7. Chapter Three: MacKenzie stays in Devon
8. Chapter Four: Rogers chopped himself into half
9. Chapter Five: A bumblebee stung Emily
10. Chapter Six: Wargrave got in the chancery
11. Chapter Seven: A red herring swallowed Armstrong
12. Chapter Eight: A big bear hugged Blore
13. Chapter Nine: Lombard got frizzled up
14. Chapter Ten: Vera hung herself
15. Conclusion
Appendix 1: Version history
Appendix 2: FAQs
Appendix 2: Credits
======================================================================
======================================================================
1. FIRST THINGS FIRST
======================================================================
Hi, I'm Lestor Wong. I post on GameFAQ.com/ GameSpot.com by the
username "neeker". This is my seventh walkthrough. Feedback can be
directed to lestor_wong at yahoo dot com. You may check out my other
works from this URL:
http://www.gamefaqs.com/features/recognition/52881.html
This document consists of a FAQ/ Walkthrough for The Adventure
Company's "And Then There Were None" PC game, which is based on a
popular novel of the same name by Agatha Christie. The game is
released in October 2005.
======================================================================
======================================================================
2. CHARACTERS
======================================================================
This section lists the characters that appear in this game. If you've
read the novel, they won't be unfamiliar to you. The information is
taken from the official website of the game at:
http://www.agathachristiegame.com/
1. PATRICK NARRACOTT
--------------------
The guests invited to Shipwreck Island assume Narracott hails from the
sleepy fishing village of Sticklehaven and works as a boatman,
ferrying guests out to Shipwreck Island. In fact Narracott, a handsome
man in a rough and windblown sort of way, is not who he appears to be,
and has his own reasons for wanting to keep an eye on his passengers.
NOTE: You'll control Narracott in this game.
2. DR. EDWARD GEORGE ARMSTRONG
------------------------------
Dr. Armstrong is a successful Harley Street physician who enjoys his
success and the money it brings. His confidence and cautious manner
put his patients at ease. Lately he has become increasingly exhausted
from working long hours with no reprieve. Though he is in fairly good
health, he has an extremely addictive personality. He is an alcoholic.
3. WILLIAM HENRY BLORE
----------------------
Mr. Blore is a big, hulking man who works as a private detective. He
can be inappropriately familiar with others in an attempt to inspire
trust and ease, but his behavior is not usually received well. He is
shrewd and cunning, two traits which have gotten him out of many
difficult situations.
4. EMILY CAROLINE BRENT
-----------------------
Miss Brent is a woman of unyielding principals. She often uses her
Bible to justify her uncompromising attitude and unshakable
principals. She is middle-aged and aloof, entirely unwilling to offer
a shoulder to cry on.
5. VERA ELIZABETH CLAYTHORNE
----------------------------
Vera is pretty and shy. She is also bright, very well educated, and
proficient in several languages, including French and German. She used
to be a governess, but much of her work these days consists of
secretarial duties. There is something ethereal, almost otherworldly
about her.
6. PHILIP LOMBARD
-----------------
An adventurer in his mid-thirties, Mr. Lombard has traveled most of
the world in search of excitement. He doesn’t take anything in life
too seriously. He has been involved in both legal and not-so-legal
activities.
7. GENERAL JOHN GORDON MACKENZIE
--------------------------------
Retired for many years, General Mackenzie is now in his seventies. His
command of troops in the Great War has left him with many ghosts, as
well as a few skeletons in his closet. He is a lonely soul, as many of
his old friends are not interested in keeping in contact with him any
longer.
8. ANTHONY JAMES MARSTON
------------------------
Often called Tony by his contemporaries, Mr. Marston is an impressive
specimen of a man. Desired by most women he meets, he is unfortunately
self-absorbed and vain. What charm he has is switched on like a light
to be used when he deems fit, and can be just as quickly switched off.
His three chief passions are parties, women, and driving fast cars.
9. ETHEL ROGERS
---------------
Mrs. Rogers is the housekeeper on Shipwreck Island. She is respectable
and austere, with a flat and monotonous voice. She has been in service
for most of her life, first as a parlor maid, and so on through the
ranks of the household. She resents the idea that she is only one of
two servants employed at the house.
10. THOMAS ROGERS
----------------
Mrs. Rogers’ husband. He is every bit the proper English butler. He is
compulsive in his need to maintain an orderly household. He is very
good at his job, and takes pride in that fact. Mr. Rogers is
completely devoted to his wife, to whom he has been married for many
years.
11. JUDGE LAWRENCE JOHN WARGRAVE
--------------------------------
Justice Wargrave is recently retired. He is often seen with his head
sunk onto his chest in repose, as if he were still looking down at
defendants from his high bench in the courtroom. Wargrave understands
the law in extremely minute detail, but has no hesitation about rising
above its limitations when necessary.
======================================================================
======================================================================
3. CONTROLS
======================================================================
This game is a typical point-and-click adventure that you can play
through using soley the mouse. Point at a location for make your
character walk (or, double click to run) towards it. Point at an item
to make your character picks it up. Point at a person to make your
character talk to him or her. Click at icons to access the various
options available. It's as simple as that.
======================================================================
======================================================================
4. GETTING STARTED
======================================================================
Some stuff you may like to know before you begin your adventure,
(mostly) taken from the manual:
1. SYSTEM REQUIREMENTS
----------------------
+ + MINIMUM + +
OS: Windows 98/ME/2000/XP
CPU: 850MHz Pentium 3 Processor or Equivalent
RAM: 256MB
Video: 32MB Direct X 9 Compatible
CD/DVD-ROM Drive: 16X (or PC DVD-ROM Drive)
Sound: 16-Bit Direct X Compatible
Disk Space: 1.5GB
Input: Mouse, Keyboard and Speakers
+ + RECOMMENDED + +
OS: Windows XP
CPU: 1.8GHz Pentium 4 Processor or Equivalent
RAM: 512MB or Higher
Video: 64MB Direct X 9 Compatible
CD/DVD-ROM Drive: 16X (or PC DVD-ROM Drive)
Sound: 16-Bit Sound Blaster Compatible (Sound Blaster X-Fi Series
recommended)
Disk Space: 1.5GB
Input: Mouse, Keyboard and Speakers
2. MAIN MENU
------------
This is the first screen you see when you launch the game. The
following options are available in the main menu:
New Game: Start a new game.
Load game: Load a previously saved game.
Options: Customize your game settings.
Credits: A list of people who are involved in creating the game.
Exit: Quit the game.
You can access the main menu at any time during the game by pressing
ESC.
3. OPTIONS MENU
---------------
The options menu is available in the main menu. Accessing it will
allow you to change various settings of the game:
Music Volume: Adjust the volume of the background music.
Effects volume: Adjust the volume of the sound and environmental
effects, as well as the voices.
Brightness: Adjust the brightness of the screen.
Captions: Hide or unhide subtitles during the game.
Shadows: Turn shadows on or off.
Animated Water: Turn animated water effects on or off.
Fog: Turn fog effects on or off.
Rain and Lightning: Turn rain and lightning effects on or off.
Anti-Aliasing: Turning this on will enhance the graphics of the game
by making the characters more defined. Not recommended if you've a low
spec PC.
4. IN-GAME MENU
---------------
This is an alternative menu where you can save your game. The options
in this menu include:
Resume Game: Resume your game after you pause it.
Save Game: Save your game. You can save at anytime, and you've an
unlimited amount of slots for saving.
Load Game: Load a previously saved game.
Options: Customize your game settings.
Main Menu: Access the main menu.
You can access the in-game menu at any time during the game by
pressing ESC.
5. CURSORS
----------
It's difficult to explain what each cursor means without any graphical
assistance. As such, I've scanned the page in the manual for easier
reference. You can check out the scan at this link:
http://img.photobucket.com/albums/v313/lestor/cursors.jpg
6. INVENTORY MENU
-----------------
You'll come across a fair bit of items that you'll need to collect
during the game. These objects will be stored in the inventory menu. To
access the inventory menu, you can click the haversack icon at the top
left corner of the game screen, or simply ight click your mouse button
at anywhere. When an item is collected, it'll automatically be placed
into one of the inventory slots in the menu. The haversack icon will
flash to indicate that the item has been collected.
7. MAGNIFYING GLASS
-------------------
Within the inventory menu, there're two different buttons at the
bottom. The first is the magnifying glass button. Click on any item in
your inventory menu and drag it towards this button, and you'll get
the opportunity to find out more about the item. If you do so for
items like books, letters and newspapers clippings, the contents of
these items (if important) will also be transferred into the journal
menu.
8. GEARS
--------
The second button in the inventory menu. This button allows you to
combine items you've collected to create new items. You can also use
this button to decompile items.
9. JOURNAL MENU
---------------
Important information from books, letters and newspapers clippings
will be automatically transferred to the journal menu when you "do a
magnifying glass" on them. The journal menu can be accessed by
clicking the journal icon at the top right corner of the game screen.
The journals are categorized by:
General: Whatever information you collect about the island, as well as
the great "unknown".
Guests: Information your learn about the characters.
Docs: Information you learn from documents you collect.
Books: Information you learn from books you find.
Click on any to view the contents.
10. COMBINING AND DECOMPILING ITEMS
-----------------------------------
At some point during the game, you'll need to combine items to create
new items to solve certain puzzles. You can combine up to a four
different items at one time. To do this, left click on an object in
the inventory list and drop it into the first assembly slot, then
click on the next item and drop it into the second slot. Once you're
done, click the gears button to create a new item. If successful, the
new item will appear in the first slot, and will be added to your
inventory list.
To decompile an item, simply place it into the first assembly slot
and click the gears button. If successful, the items will appear on
the slots, and will be added to your inventory list. At times, you'll
not be allowed to decompile items that are previously created by items
you combine.
======================================================================
======================================================================
5. CHAPTER ONE: MARSTON CHOKES
======================================================================
The game will begin with a long introduction that, er, introduces the
key characters. Although you can simply press ESC to skip it, it's
advisable to watch it just to get familiarized with who's who.
MANSION FRONT
-------------
After the introduction, you'll begin the game in front of the mansion,
talking to Rogers. He thanks you for helping him with the luggage, but
doesn't seem to be interested in continuing the conversation. Leave
him for now, and take a walk back to the pier.
NOTE: Just follow the path opposite the mansion to reach the pier.
At the pier, you'll find that your boat has been scuttled. Looks like
you can't leave the island now. Walk back towards the mansion. On the
way, you'll come across a small path on the left. Walk on this small
path to reach an area where you'll find Marston.
Talk to Marston and comment about the weather. You'll soon have the
opportunity to ask about what he's holding in his hand. Do so, and
you'll find that he's carrying a paper and a piece of string he found
on the beach. After the conversation, he'll go back to the mansion.
Follow the path he takes and return to the mansion. Rogers is ready to
talk again, and you'll tell him about the wrecked boat. He'll allow
you to enter the mansion now.
FOYER
-----
The mansion is a reasonably sized building. You're now at the foyer.
To facilitate your movement, I've drawn this rather ugly ASCII map. I
can't exactly call it a map too. It's just a pointer of (roughly)
where the locations are:
Service Staircase
| Screening
Rogers' Bathroom Room
| |
| |
The Rogers'----- |
Room | |
| | Main --------- Game ----- Study
Pantry | Staircase Room
| | | |
| | | |
K i t c h e n | |
| | |
| | |
| | |
Dining -------- Foyer -------- Parlour
Room |
|
Entrance
KITCHEN
-------
Rogers will inform you that he's going to the kitchen. Go to the dining
room now, and then take the first door you see to enter the kitchen.
As you approach the kitchen, you'll find Mr and Mrs Rogers quarelling.
Your appearance startle them, and Mrs Rogers will go up to the second
level. Rogers is reluctant to talk again, so just ignore him.
Instead, walk to the area on his right to find a fruit press. Zoom in
on the press to find out some information about it if you want.
Otherwise, take the opposite direction to find a refrigerator. To the
right of it is a way out that leads to a hallway, which in turns lead
to the service staircase.
ROGERS' ROOM
------------
Along the way in the hallway to the service staircase, you'll come
across a room on the left wall. This is the Rogers' room. There're
quite a number of items to pick up here:
1. Some sewing needles.
2. A delay letter from Owen.
3. An invitation letter for Rogers that talks about a gramaphone
record.
Copy the contents of the letters into your journal, and read them.
After that, exit the room and follow the path to the service staircase.
Go up.
NOTE: Items that you pick up now may not be useful until later.
LINEN ROOM
----------
You'll find the linen room once you resume control. Mrs Rogers is
here. Talk to her, and offer to give her a hand in picking up some
silk sheets. After that, leave this area for the guest rooms.
Once you enter the guest room area, you'll find two rooms to your
left of the screen. You can now explore this area in an anti-clockwise
direction. A rough idea of how the rooms are located is as follow:
Service Staircase
| Marston's Bathroom MacKenzie's
Linen Room | | |
| |----------------------------|
|--| X |
| |
Wargrave's --| |-- Emily's
| |
| Main Staircase |
Bathroom --| |-- Bathroom
| |
| |
Armstrong's --| |-- Vera's
| |
|----------------------------|
| | |
Blore's Bathroom Lombard's
X - where you begin after the linen room
WARGRAVE'S ROOM
---------------
Try opening it to find that the door is locked. Proceed to Armstrong's
room instead.
ARMSTRONG'S ROOM
----------------
You'll find a luggage once you enter Armstrong's room. Ignore it and
walk forward to reach the bed area, and you'll find a letter of
invitation beisde the bed. Pick the letter up, copy the contents into
the journal, and then read them.
There's also a doctor's bag on top of a cabinet. Examine it, and
remember its location. You'll need to come back for it later.
After that, leave for Blore's room.
BLORE'S ROOM
------------
Find Blore's letter of invitation, and do the usual. Read the contents
in the journal.
Now, head towards the dresser beside the bed to find a diary. Try to
pick it up, and Blore will somehow return to the room to stop you
from doing so. Watch the resulting conversation to find out more about
Blore and yourself.
Leave after that for Lombard's room.
LOMBARD'S ROOM
--------------
Knock on the door and Lombard will open it. He'll talk to you before
returning to his room, so you'll have no chance of taking anything
from it, yet.
Before you leave him, point to the keyhole on his door and take a
peep. It seems that he has a revolver with him.
VERA'S ROOM
-----------
Vera is in her room, so, like Lombard, you can't take anything from
her. Talk to her until the conversation expires, then head over to
Emily's room.
EMILY'S ROOM
------------
Repeat the process as with Vera, then head to MacKenzie's room.
MACKENZIE'S ROOM
----------------
Repeat the process as with Vera and Emily, then head to Marston's
room.
MARSTON'S ROOM
--------------
Like Wargrave's room, Marston's room is also locked. There's nothing
else to do here, so take the main staircase down to the first level.
Head to the game room after you resume control.
GAME ROOM
---------
As you approach the game room, you *should* encounter a cut-scene that
shows Wargrave and Armstrong talking to each other. Watch until the
conversation ends, and you'll hear the dinner bell.
NOTE: If the cut-scene doesn't happen, simply walk elsewhere and go
back to the game room a little while later.
Another cut-scene will show, this time with Rogers telling you that
he didn't prepare anything for you since you're a last minute addition
to the mansion. Cool, this means you've the time to snoop around!
KITCHEN
-------
You resume control in the kitchen. Point to the door ahead, and you
should be able to eavesdrop the conversation in the dining room.
After the conversation, you can take the opportunity to explore the
mansion.
Before you go up, however, you may want to pick up the fruit basket
made of copper wire on the table just beside the door you've just
eavesdropped.
PANTRY
------
The pantry is a small area just beside the fruit press you saw in the
kitchen earlier. There're quite a number of items to pick up from
here:
1. A turkey baster.
2. Cheese wheel covered in cheescloth.
3. A large metal scoop.
Notice also that there's a sack of flour in the pantry. Use the metal
scoop to scoop a small amount of flour out from the sack.
NOTE: To scoop the flour, simply select the scoop from the inventory
list and point to the flour.
Use the metal scoop again on the flour. This time, you'll find some
shinty batteries that are buried in the flour. Hmm, interestong.
Now, head towards the service staircase and go up to the linen room.
LINEN ROOM
----------
Zoom in on the sheets and pick up some pieces of fine silk sheets, and
then head towards Marston's room.
MARSTON's ROOM
--------------
There's a coded message on the dresser. Take a closer look at it with
the magnifying glass. The dresser with a lion statue on it has a
drawer that can be opened. Open it to pick up a code-breaking cypher
that says:
-----------------------
| |
| King James |
| Song of Solomon III |
| |
-----------------------
Before you leave, take Marston's invitation and copy the contents
into the journal. Read them as well. After that, go to MacKenzie's
room.
MACKENZIE'S ROOM
----------------
Pick up the invitation letter as usual, and copy the contents into
the journal. Read the contents, and then take a look at a photo beside
the general's bed. It shows him and his deceased wife, Leslie.
Head towards Emily's room now.
EMILY'S ROOM
------------
Take Emily's invitation and do the usual. There's also a King James
Bible beside the bed that you can pick up. You may also want to take a
peep into her makeup case that is on the dressing table (the one with
a mirror).
Instead of leaving her room by the front door, exit through the bath-
room door.
EMILY'S AND VERA'S BATHROOM
---------------------------
You can find Emily's medical alert card on a table here. It says that
she's allergic to insect stings, especially from bees and wasps.
There's also a well hidden stem to an old pipe to pick up on this
table. It's slotted nicely between the table and the wall, just beside
the mirror. Pick it up, and then head towards Vera's room through the
connecting bathroom door.
VERA'S ROOM
-----------
You can find a newspaper clipping here. Copy the contents into your
journal and read them. It's about the death of a child under her care
previously. Also pick up her invitation and do the usual.
Next, check out her makeup case, as well as the photo on the dresser.
Leave her room via the balcony door, and then move towards the left
until you reach an area that has some sort of an eagle statue at the
bottom right screen. Beside the statue is a brass telescope on a metal
tripod. Take both the telescope and the tripod.
Your next destination should be Lombard's room.
LOMBARD'S ROOM
--------------
Take Lombard's invitation and do the usual, and then go to Blore's
room.
BLORE'S ROOM
------------
Now, you'll have the chance to steal, I mean, borrow the diary that
Blore stopped you from taking earlier. Copy the contents into the
journal and read them.
Head towards the Wargrave's room next.
WARGRAVE'S ROOM
---------------
Do the usual with the invitation letter, and then take the pouch of
tobacco and bowl section of a pipe. Both items are found on the
dresser, but you can only find them in different screens since this
dresser is pretty long.
There's nothing else at the moment to check, so head to the foyer.
FOYER
-----
Quickly head towards the door to the dining room now and eavesdrop on
the conversation again. You'll now witness the classic accusation
scene from the book, as Rogers play a gramaphone record from the
notorious U.N. Owen. Owen will list down the crimes that all these
people have committed, and gotten away from. Apparently, everyone in
the room is a murderer. Mrs Rogers, upon listening to the accusation,
falls to the ground and faints.
When you resume control, you'll find yourself at the foyer again.
Armstrong will ask you to pick up his doctor's bag. Go to his room
then.
ARMSTRONG'S ROOM
----------------
Remember where the bag is? It's on top of a cabinet. Pick it up and
leave. When you return to the foyer, however, Armstrong is no longer
there. Instead, head towards the Rogers' room.
ROGERS ROOM
-----------
Mrs Rogers is in bed, and Armstrong is looking at her intently while
basically doing nothing much. Pass the doctor's bag to him, and then
go to the parlour.
PARLOUR
-------
A whole lot of people are found here, so talk to ALL of them (in any
order). Armstrong will soon join in the party. Your objective here is
to talk to each and single one of them (except Mrs Rogers), and ask
about Owen's accusation. They'll all give you some insights into the
incidents discussed by Owen.
When you finish, return to the foyer.
FOYER
-----
While leaving the parlour, you'll come across a screen that has a
gramaphone on the top left portion of the screen. Check it out, and
take the gramaphone record into your inventory. This will trigger a
hilarious cut-scene that sees Marston taking a drink to his death.
After the cut-scene, return to the parlour.
PARLOUR
-------
Talk to ALL the people (in any order) there again on every option
available. During one of the talks, Armstrong confirms that Marston is
poisoned.
When you finish talking to the last person, Chapter Two will be
triggered.
The mass homicide has begun.
======================================================================
======================================================================
6. CHAPTER TWO: MRS ROGERS OVERSLEPT
======================================================================
You'll begin in the parlour. It's in the middle of the night and it's
pretty dark. Proceed with caution.
PARLOUR
-------
Go towards the fireplace to find a plaque above it. Examine the plaque
to read its contents - it's the Ten Little Sailor Boys nursery rhyme.
Also, pick up the packet of matches to the right of the plaque, on the
fireplace.
There's a table that has some bottles of liquor on it beside the sofa
to the left of the fireplace. Go there, and examine the table. You
should be able to pick up the following:
1. Three empty drink glasses.
2. Marston's drink glass.
3. Oversized cocktail shaker.
Before you leave, you may also want to check out the broken down
radio at the far end of the parlour, opposite the fireplace. Go to
the foyer next.
FOYER
------
En route to the front door, you should reach an area with the
gramaphone. Examine it, and then open the side panel to find a small
vacuum tube marked 807-H and a large vacuum tube marked UX-201A. Take
them both.
Head towards the front door and check out the stand near the door to
find a walking stick with a bear's head handle. Take it, as you'll
need this soon.
You should now head towards the dining room.
STUDY
-----
Once you enter, you should find a book shelf to the left of the
screen. Examine it to find "Wargrave on Justice", by none other than
our dear judge. You can't take it though, so don't bother.
The shelf to the left of also has another book - "Birding on Devon
Shores", property of Thersea Robson. Take it, copy the contents into
the journal, and read them.
You can find another book on a chair near the study table - "A History
of the South Devon Coast". As usual, take it, copy the contents into
the journal, and read them.
There's also a large map on the wall right to the door. Under the map
is a small coffee table. Examine the coffee table for Robson's Diary.
As with the earlier books, copy the contents into the journal and read
the contents. This talks about a secret passageway in the mansion.
The study table is also full of items to pick up. Examine it to find
a desk lamp with bulb. Take it. Note the drawers on the table. The
leftmost drawer is locked, so ignore it. Open the middle drawer to
find a roll of sellotape. Take it. The top drawer on the right also
has an inkpad and inkstamp. Take them both.
The bottom drawer on the right has a map of Shipwreck Island and a
card. Examine the map with the magnifying glass, and take note of the
various landmarks on the island like the apiary, Shiprock Summit and
Orchard. You'll have to visit this place regulary as the game
progresses.
Read the card with the magnifying glass. It says:
-----------------------------------------------
| |
| Powerful Friends |
| |
| Want to shine light on the matter? |
| Flowery speeches may win you a few friends. |
| |
| - U.N. Owen |
| |
-----------------------------------------------
You'll come across quite a number of such cards from Owen as the game
progresses.
Leave the study for the main stairs.
MAIN STAIRS
-----------
Try going up the stairs. You'll find that it's too dark. Looks like
you'll need some lighting equipment.
Go to the dining room instead.
DINING ROOM
-----------
Go to the painting here and click on the drawer below it. Open the top
drawer to find a flashlight without batteries.
Remember the batteries you found in the sack of flour earlier? Time
for your first combination of the game. Select the flashlight and
place it in the first assembly slot above the magnifying glass and
gears buttons. Then, select the batteries and place it in the second
assembly slot. Click the gears button to combine both item, and you'll
get flashlight with batteries, duh!
Go back to the main stairs.
MAIN STAIRS
-----------
You can now go up to the second level.
SECOND LEVEL
------------
Examine all the rooms to find that only Armstrong's, Lombard's,
Emily's and MacKenzie's rooms are unlocked. When you sneak into their
room, click on them to find out more.
After that, you'll automatically decide to go back to sleep.
NOTE: You may not be able to completely check out all four rooms. No
worries.
PARLOUR
-------
It's morning! Go to the dining room for breakfast.
DINING ROOM
-----------
After Marston's death, there's now an empty chair for you to sit in.
No more need to eavesdrop at the door! Listen to the conversation. It
seems that Mrs Rogers has overslept. It'll soon be revealed, however,
that Mrs Rogers has in fact passed on.
Talk to everyone in the room on every option available, but make sure
that MacKenzie is not the last person you talk to. After your
conversation with MacKenzie, select the walking stick and click on
him. This will allow you to talk to him again with a different option
(to find out more about Lombard).
Talk to the remaining people to trigger Chapter Three.
======================================================================
======================================================================
7. CHAPTER THREE: MACKENZIE STAYED IN DEVON
======================================================================
This is going to be a long chapter, so get your aspirins ready. You'll
need to explore the island, and if you don't know the way, you may
find yourself lost in no time. Refer to the following screenshot I
took from the game for reference:
http://img.photobucket.com/albums/v313/lestor/islandmap.jpg
DINING ROOM
-----------
You'll begin in the dining room. Take a look at the ten sailor boys
(ok, eight sailor boys now) on the dining table. It appears that a
sailor boy will be removed every time someone dies.
Go to the game room now.
GAME ROOM
---------
Wargrave and Armstrong are having a game, again. Watch the cut-scene
until you resume control. Talk to both of them on every option. After
that, go to the front door and exit the mansion to the front patio.
FRONT PATIO
-----------
Emily is knitting here. You'll need her to help knit something later,
but for now, just talk to her on every option. After the conversation,
take the left path, past a few screens, to reach the wood shed.
WOOD SHED
---------
Remember the location of the wood shed, as you'll have to come back
later to find a dead body (oops). Click on the door to enter the shed.
You'll find the following stuff in the shed:
1. A large shovel.
2. An empty hurricane lamp.
3. A card.
4. A bucket.
5. A step ladder.
Take them all, and examine the card, which says:
--------------------------------------------------------
| |
| Empty Promises |
| |
| Dark memories haunting you? The fuel for pleasant |
| thoughts must be found before all lie in ruins. |
| |
| - U.N. Owen |
| |
--------------------------------------------------------
Also, check out the axe and the generator in this shed. After that,
leave the shed for the garden.
GARDEN
------
The garden has an area with a pump. Go near there to find a length of
garden hose. Take the hose.
Next, select the bucket from your inventory and point to the pump.
You'll get a bucket of water for your effort. You'll need this bucket
of water very soon.
PATH TOWARDS THE BEACH
----------------------
Remember the area where you saw Marston earlier, when you saw him
holding something in his hands? Go there - from the front patio, go
down one screen, then go left to reach this area.
You'll find Blore and Lombard here. Talk to them to find that Lombard
is planning to build a parachute to escape from the island. At the end
of the conversation, Lombard will pass the parachute plan to you. Copy
the plan into the journal and read it. You'll soon find the stuff
required to build a parachute as the game progresses.
Continue walking towards the beach. On the way, you should reach an
area where you can see Shiprock Summit. Point at it to find out that
it's the highest point on the island. Then carry on walking one more
screen to see a path leading to the right. Ignore that path for now,
and instead take the straight path until you reach the beach.
BEACH
-----
Walk around the various areas of the beach. You'll find MacKenzie in
one of the areas. Talk to him and hear him go hysterical again. Now,
go back up from where you came from. Now, you can take the path you
saw on the right.
You should now be in a screen with four paths crossing each other.
Refer to this screenshot:
http://img.photobucket.com/albums/v313/lestor/fourpaths.jpg
Let's call this the crossroad screen. The various paths lead to
different parts of the island:
1. The one (bottom left) you begin on leads back to the beach.
2. The top left path will eventually lead back to the study.
3. The top right path will eventually lead to the apiary and orchard.
4. The bottom right path leads immediately to Shiprock Summit.
For now, take the path to Shiprock Summit.
SHIPROCK SUMMIT
---------------
Vera is here, so talk to her. After the conversation, leave the area
and proceed to the apiary. Return to the crossroad screen and take
the top right path. Go forward four screens to reach the apiary.
APIARY
------
You'll know that you hear a buzzing sound. Yes, this area has bees.
They won't attack you though. The beehive is hidden in one of the
blocks. You're clever enough not to open it, so just take the basket
of fermented apples from this area, and then go left.
In the next screen, go right to reach another screen with a split
path. Take the bottom left path, and continue on the straight path
until you find the orchard.
ORCHARD
-------
Apples! You need to pluck them. It's time for the step ladder you took
from the wood shed to make its appearance. Place the ladder underneath
the tree on the right, and climb up to take the basket of fresh apples
(where did the basket come from?).
After getting the apples, carry on going forward to the next screen.
You've two paths to go. From where you're, it's difficult to see the
upper right path since it's pretty well hidden. Nevertheless, take it
to reach the next screen.
A goat greet you at the end of the screen. He's blocking the path, and
you can't pass him. Look around for a water trough. Select the bucket
of water in your inventory and click on the trough. You'll pour the
water into the trough. The thirsty goat will then walk towards the
trough to drink water, giving you the opportunity to sneak past him.
Before you leave this screen, however, click on the sunflowers to
check them out.
RUINED VILLAGE
--------------
You've reached the ruined village. Go into the first house you see,
and take the small gas can in it. Visit the second house and take the
leather goat harness in it. There's nothing to take in the third
house.
You can now go back to the screen after the orchard. This time, take
the lower right path. This is another area with goats - yes, two goats
now. Click on them to find out that they're hungry.
Try going forward, only to find that your path is blocked by some
thorns. You can't get through here until later, so remember this area,
and make your way back to the mansion.
STUDY
-----
Ok, on my previous "map" of the mansion, I've purposely left out an
important room so as to minimize spoiler. Now that it's time to
reveal this room, I'll add it into the map, as below:
Service Staircase
| Screening
Rogers' Bathroom Room
| |
| | *SECRET*
The Rogers'----- | *ROOM*
Room | | |
| | Main --------- Game ----- Study
Pantry | Staircase Room
| | | |
| | | |
K i t c h e n | |
| | |
| | |
| | |
Dining -------- Foyer -------- Parlour
Room |
|
Entrance
Yes, there's a secret room in the study! Remember the contents of
Robson's diary? A secret passageway is mentioned. To gain access to
this secret room, go to the book shelf to the left of the study table.
NOTE: This is NOT the book shelf to the left of the room.
Examine the shelf to find three books:
1. Upper shelf - "Safe Passage of the South Sea Islands".
2. Middle shelf - "Sailing the Florida Keys".
3. Lower shelf - "Navigating the Panama Locks".
To open the secret room's door, do the following:
1. Place "Navigating the Panama Locks" onto the upper shelf.
2. Place "Safe Passage of the South Sea Islands" onto the middle
shelf.
3. Place "Sailing the Florida Keys" onto the lower shelf.
You comment that you hear a click. You can now gain access to the
secret room!
SECRET ROOM - ADMIRALTY BASE
----------------------------
There're a lot of things to do in the secret room. First off, take a
look at the poster on the left wall and start singing a song. Next,
examine the shortwave radio on the table, and open the panel on it.
You'll find a vacuum tube marked 305GT inside. Take it. You now have
all the vacuum tubes you need.
Leave the table for now, and check out the chair instead. You'll find
another card from Owen that reads:
--------------------------------
| |
| Talk is cheap |
| |
| And rumors can be ugly. |
| Keep your secrets safe. |
| |
| - U.N. Owen |
| |
--------------------------------
Walk to the end of the room now to find a locked door. This door can
only be opened if you manage to crack the safe on it. The key to
cracking the code is found on the coded message you found in Marston's
room. Also remember what was written on the code-breaking cypher about
a King James Bible. You've a King James Bible from Emily's room. It
looks like you've everything needed to decipher the code!
Combine the coded message, code-breaking cypher and the King James
Bible to get the decoded message. Copy this message into your journal
and take a look at it. It talks about a homing beacon on a buoy, and
also provides the code to crack the safe:
L28 R 11 L49
What this alpha-numeric sequence means is simply to turn the dial on
the safe in the following sequence. I've provided screenshots just in
case you can't figure it out.
1. Left until the arrow points to 28.
2. Then right until the arrow points to 11.
3. Then left until the arrow points to 49.
If done successfully, you'll comment that you hear a click. Now, point
to the handle on the safe. It's opened! Enter the safe room.
SECRET ROOM - SAFE ROOM
-----------------------
You'll find a sturdy rubber raft in the safe room. Take it.
There's a metal cabinet in this room. To its right is a hollow area on
the wall. Point to it for some information this room.
Examine the cabinet next. Notice the various drawers on the cabinet
are labelled as follows:
[ A ] [ E ] [ E ] [ E ]
[ H ] [ L ] [ R ] [ S ]
[ T ] [ U ] [ V ] [ W ]
Click on the "E" drawer immediately right of the "A" drawer to find a
black raved-shaped earring. Then, click on the "H" drawer to get a
torn corner of legal document. You'll find that clicking on "H" after
clicking on "A" switches the positions of both drawers. This is a clue
for opening the hidden door in this room.
Before you proceed with the hidden door, however, click on the "S"
drawer to get the microphone with base and cord, follow by the "V"
drawer to get a card that says:
----------------------------------------------------------
| |
| Row your boat |
| |
| Gently down the stream. Unless it's a fishing boat. |
| And the sea is mean. |
| |
| - U.N. Owen |
| |
----------------------------------------------------------
You can now attempt to unlock the code for the hidden door. When you
click one drawer followed by another, the positions of these drawers
interchange. You'll need to interchange the positions of these drawers
until they look like this:
[ R ] [ U ] [ L ] [ E ]
[ T ] [ H ] [ E ] [ W ]
[ A ] [ V ] [ E ] [ S ]
Yeah, RULE THE WAVES. Corny.
The door to the hidden passageway opens. You enter to find that it's
too dark, so turn on the light with the switch on the left. Continue
thereafter to reach the grotto.
GROTTO
------
Comb the grotto. You should find a one-man submersile. Cool!
Unfortunately, it doesn't work anymore. Examine it for a propeller
though, and pick it up for your inventory.
From the beginning screen of the grotto, go left and cross the long
and winding metal bridge until you reach the other side. Pick up the
large oars here, and also check out the barrels if you want.
Continue forward to reach a wooden door. Open it and enter the passage
to another part of the ruined village.
PASSAGE TO RUINED VILLAGE
-------------------------
Move around a bit to find that you've been standing on a pair of
pliers. Take the pliers. Go forward and click on the vertical wooden
panels, and you'll find that they're out of place. You'll
automatically enter into the next room through the panels.
There's a hole in the ground. Select the large shovel from your
inventory and point to the hole. You'll start digging and will
eventually get a manual air pump for your effort.
Continue walking down the path until you reach a ladder. Climb up and
try to open the door above, only to find that it's locked. Tough luck.
Return to the grotto instead.
GROTTO
------
From the beginning screen of the grotto, go right to reach the shore.
It's time to row some boats! From your inventory, combine the
following items:
1. Sturdy rubber raft
2. Manual air pump
3. Large oars
Hey presto! You'll get the inflate rubber raft with oars! Select this
and place it on the shore. The sweet looking raft awaits you. Point to
it and watch the cut-scene as you find yourself rolling out in the
stormy seas. You'll soon find yourself being washed up to another area
of the ruined village.
RUINED VILLAGE
--------------
Go to the first house and examine to the left of it to find a cross on
the ground. Examine it to find another Owen card:
--------------------------------------------
| |
| Old Bones |
| |
| Are left undistrubed. |
| Not new bones however, if you're game. |
| |
| - U.N. Owen |
| |
--------------------------------------------
Enter the house to find a wooden box on the left. Open it and take
some tangled fishing net from it. The ingredients for the parachute is
almost complete!
Go to the right to find a wooden door by the cliff. Enter it, and
you'll find that this was the door that was locked in the passageway
to the ruined village just now. From here, backtrack all the way to
the game room in the mansion, phew!
GAME ROOM
---------
A previously unseen item appears here - the dice box. Who put it here?
Anyway, pick it up, and then decompile it to get the empty dice box
and a small desk key. Remember the locked drawer on the study table?
Go to the study now.
STUDY
-----
Use the small desk key on the locked drawer. Yes! Another book! This
book is titled "Bee keeping on the Sussex Down". This mansion has all
the weird books. Copy the contents into your journal as usual, and
read them. The book teaches you how to make a makeshift smoker. So, what
do you do? Make a smoker, of course!
The steps for making a smoker:
1. Decompile the pouch of tobacco to get an empty pouch and tobacco.
2. Combine empty hurricane lamp with tobacco to get hurricane lamp
with tobacco inside.
3. Combine the hurricane lamp with tobacco inside with length of
garden hose to get unlit smoker.
4. Combine unlit smoker and packet of matches to get makeshift smoker.
With the smoker, you can now go back to the apiary and subdue the bees
there.
APIARY
------
Use the makeshift smoker on the block with the bees. Watch the cut-
scene as the smoker does its work in putting the bees to sleep. You
can now open the block and take the honeycomb frame inside. with this,
you can make a glass of honey:
1. Combine honeycomb frame with Oversized cocktail shaker to get a
cocktail shaker filled with honey.
2. Combine cocktail shaker filled with honey with one empty drink
glass to get a glass of honey.
Two more empty drink glasses to use, so you might as well go and use
them now. Head towards the kitchen.
KITCHEN
-------
Remember the fruit press near the pantry? It's the key to getting two
more glasses of drinks. Before you begin, however, decompile the cheese
wheel covered in cheescloth to get a heavy wheel of aged cheese and a
piece of cheesecloth.
To get fresh apple juice:
1. Select the cheesecloth and point to the fruit press. The </pre><pre id="faqspan-2">
cheesecloth will be placed nicely into the press bucket.
2. Select one empty drink glass and point it to the front of the
bucket. The glass will be placed there.
3. Select the propeller you found at the grotto and point it to the
press. The propeller will be fixed onto the press.
4. Select the basket of fresh apples you found at the orchard and
point them to the cheesecloth. The apples will fill up the press
bucket.
5. Point to the press and it'll do its job in pressing the apples into
fresh apple juice!
Now, take the basket of fermented apples and repeat the same process
to get apple cider.
With the apple cider, you can go beyond the area with the two hungry
goats, where you were earlier blocked by some thorns. You can also
go out and to talk to various characters to end this chapter. However,
you may be interested in doing an optional side quest just to make use
of some items you've found earlier. If you're not interested in this
side quest, you can skip the next section.
SECOND LEVEL
------------
This side quest involves taking fingerprints of some characters.
Take the service staircase and go up to the second level, and then
create a fingerprint testing kit. To do so, simply combine the turkey
baster in your inventory with the small amount of flour to get a
turkey baster with flour (duh!). To test for prints, simply select it
and point it to an item, then use the roll of sellotape on the item
to get the prints.
First and foremost, spray some flour with the turkey baster onto
Marston's drink glass in your inventory. Use the sellotape on the
glass next to get the print taken from Marston's glass.
The prints you can get in the second level are:
1. Armstrong's, from the doctor's bag in his room.
2. Vera's, from the makeup case in her room.
3. Emily's, from the makeup case in her room.
4. Marston's, from his briefcase, which is to the left of the bed in
his room.
Next, combine the print from Marston's glass with the reference print
from Edward Armstrong and find that it's not a match. Repeat the
process for the reference prints from Vera Claythorne and Emily Brent
respectively to find that there's no match as well. Finally, do the
process again for the reference print for Anthony Marston to find that
the print is an exact match.
So, it seems that no one else has touched Marston's drink glass except
Marston himself.
This redundant information is what you get from this optional side
quest. No wonder it's optional!
Now, you've done a lot of things in this chapter, so I'd suggest you
take a break from further exploration around the island, and leave
the area with the goats till later. Instead, leave the mansion for the
wood shed.
WOOD SHED
---------
You'll find Blore and Lombard there. Talk to them to find out how's
their search for Owen coming on. After that, go to the front patio.
FRONT PATIO
-----------
Emily is still knitting here. Talk to her, and ask her to sew the
parachute for you. You'll give the silk sheets to took from the linen
room earlier to her automatically. Give her the sewing needles you
got from Rogers' room, and she'll comment that she needs stronger
treads to proceed. And no, the goat harness and the tangle fishing net
don't work! Come back to her later after you get the treads.
Go forward a little to see Blore and Lombard coming back from their
search. Talk to them again to trigger a cut-scene. From the cut-scene,
you'll learn that MacKenzie has passed on.
Finally, end of chapter!
======================================================================
======================================================================
8. CHAPTER FOUR: ROGERS CHOPPED HIMSELF INTO HALF
======================================================================
The chapter begins with another cut-scene. You'll resume control in
the dining room.
DINING ROOM
-----------
Talk to everyone on every option available. After that, go to the
kitchen.
KITCHEN
-------
Talk to Rogers, who appears to be refusing to show his face to you, on
every option available. After that, a cut-scene will follow that sees
Wargrave summarizing the situation.
After the cut-scene, you'll resume control in the parlour.
PARLOUR
-------
Talk to Emily again on every option available. She seems to have some
disposition against you. Give her the glass of fresh apple juice to
make her happier, and try talking to her again. You'll now be able to
ask about Vera.
Emily reveals some startling revelation about Vera. Take note of that,
and then go up to the second level.
SECOND LEVEL
------------
Head towards MacKenzie's room.
MACKENZIE'S ROOM
----------------
Once you enter the room, go right to find the judge sitting casually
beside MacKenzie's body. Talk to him, and he'll tell you that he's
"communicating with the dead".
Now, go to your inventory and combine the bowl section of a pipe with
the stem to an old pipe to get a pipe. Give this pipe to Wargrave,
and then try talking to him again. Like the situation with Emily,
you'll get an option to ask about Marston's politics. Do so to find
out more about Marston.
Go to Armstrong's room now.
ARMSTRONG'S ROOM
----------------
Talk to Armstrong. Then, give him the glass of honey to get an option
to ask about Wargrave and the Seton case. Talk about it to find more
information about the judge.
Now, take the service staircase and go to Rogers' room.
ROGERS' ROOM
------------
Go straight into Rogers' bathroom from here.
ROGERS' BATHROOM
----------------
Blore is doing a Sherlock Holmes impression here. Talk to him, and
then take the service staircase to go up to the second level again.
SECOND LEVEL
------------
Take the main staircase and go down to the dining room door beside the
foyer.
NOTE: If you try to go through by the kitchen from Rogers room to the
dining room room at the foyer, you'll find that the dining room door
at the kitchen is locked.
FOYER
-----
Talk to Rogers, and you'll find that he's the bugger who locked the
doors to the dining room. He did so to prevent any sailors boys to
be taken away from the room again. Ok, good logic.
Head towards the screening room via the game room now.
SCREENING ROOM
--------------
Watch the cut-scene as Lombard and Vera get lovey-dovey. Now, talk to
both of them.
After the conversations, you'll find yourself back at the parlour, and
it's night time again.
Go up to Vera's room.
VERA'S ROOM
-----------
Lombard is here, and will tell Vera that he's trying to protect her.
Tell her not to believe him. Regardless, she'll chase both Lombard and
you out of her room, and threatens to put furniture behind her doors
to prevent lepers like you another chance of sneaking into her room.
Damn it. There goes your plan!
You'll go back to bed then, and when you wake up, you'll find yourself
watching a cut-scene again.
You'll resume control at the front patio.
FRONT PATIO
-----------
Rogers and Emily are both missing. Blore insists on going on the
search of them with you. You don't need to go very far to find Emily.
Just go forward one screen and she'll be walking up towards the
mansion. Watch the cut-scene, and then head towards the wood shed.
WOOD SHED
---------
You'll find Rogers quietly tugged at one corner outside the shed. He
seems... tall. You'll then realise that it's because he has been
chopped into half, with the upper and lower parts of his body
separated by a bunch of woodstack. Gruesome.
======================================================================
======================================================================
9. CHAPTER FIVE: A BUMBLEBEE STUNG EMILY
======================================================================
After the cut-scene, go to the game room.
GAME ROOM
---------
The judge is here. Talk to him. He has earlier blame you for "yet
another death" during the cut-scene, but he now claims that it was a
show for the murderer, as he has something up his sleeves.
After the conversation, go up to Armstrong's room again.
ARMSTRONG'S ROOM
----------------
Talk to the doctor once more, and then leave for the screening room.
SCREENING ROOM
--------------
Walk around the room and look at all the movie posters on the side
walls. Hmm, a lot of posters on Gabrielle Steele.
Now, go to the projector beside the door and examine the drawers
there. Notice that the top drawer is locked, so ignore it for now.
Instead, open the second drawer for two Empire Studios film canisters.
Then, open the third drawer for an untitled reel of film and a
projector bulb.
Go to your inventory now and decompile the two Empire studios film
cannisters. You'll get the following for your effort:
1. Last of the Borgias, starring Gabriel Steele.
2. Queen's Handmaiden, starring Gabriel Steele.
3. A note from Gabriel Steele (duh!).
4. A card.
Read the note from Garbiel Steele and see her lamentations, then read
the card, which says:
-----------------------------------------------
| |
| Taking the air |
| |
| A breath of fresh air is rare when buried |
| in windowless rooms and scarcer elsewhere. |
| |
| - U.N. Owen |
| |
-----------------------------------------------
Ok, now it's time for some movies. Select the projector bulb that
you've just taken from the third drawer and place it onto the panel
on the projector. Point to the switch beside the panel to turn it on,
and you'll watch a short clip of a torpedo being fired. Boom!
Take the reel of film on the project away, and replace it with the
untitled reel of film that you've just taken from the third drawer.
This time, you watch some sort of a home movie.
Take this reel of film away and try watching the films by Gabriel
Steele. You'll blatantly refuse, even to the extent of disposing them
away!
Go to the front patio now.
FRONT PATIO
-----------
Once you open the door to leave the mansion, you'll find Armstrong
arguing with Emily. After the quarrel, sneak up to the second level,
outside Armstrong's room.
OUTSIDE ARMSTRONG'S ROOM
------------------------
Point to the keyhole on Armstrong's door and find him enjoying his
drink. This guy's a goner.
Go to Shiprock Summit next.
SHIPROCK SUMMIT
---------------
Lombard and Vera is here. Talk to Vera, and Lombard will interrupt and
tell you that she's interested in you. Groovy, baby.
Now, it's time to check out the area beyond the two hungry goats. I
hope you remember how to go back there. No? Ok, leave Shiprock Summit
to get to the crossroad screen. Take the top right path and go past
the apiary and the orchard. Then continue on the path until you reach
that screen with the lower right path and the hidden upper right path.
Take the lower right path to reach the area with the two hungry goats.
BEACH
-----
Ok, this area with the goats isn't exactly the beach, but the area
beyond it is another part of the beach surronding the island. Walk
towards the thorns. Select the apple cider and point it to the thorns.
The hungry goats will now walk towards the thorns and eat them all up.
Yes, finally, the path is clear. Walk right to the beach.
A length of fishing line is screaming out for your attention. Take it.
It's the strong treads that Emily need for sewing the parachute.
Point to the sky and move around until you see an area that has an
eye icon. Click it and comment about a red blinking light. Use the
brass telescope you found on the balcony outside Vera's room on this
spot to see a homing beacon on a buoy. Remember the decoded message?
It's all coming together!
Go to the wood shed now.
WOOD SHED
---------
Talk to Blore there, watch the cut-scene, and quickly go to the front
patio.
FRONT PATIO
-----------
No time to waste. Emily's gonna die soon! Pass the length of fishing
line to her, and she'll comment it's is exactly what she needs to sew
the silk sheets togeter. She'll need some time to do so, so you may
want to take this time to do some optional side quests.
NOTE: If you don't want to do the side quests, just walk around and
return to Emily later.
The first side quest can be found in the admiralty base in the secret
room of the study.
STUDY
-----
When you walk into the study, you'll find Vera there. Try talking to
her, only to remind yourself that you're better off keeping secrets
to yourself at this stage of the game. Go into the admiralty base
instead.
SECRET ROOM - ADMIRALTY BASE
----------------------------
In this area, you can try to establish contact with the outer world by
with the shortwave radio on the table, by doing the following:
1. Insert the vacuum tubes marked 807-H and 305GT into the panel on
the shortwave radio.
2. Select the microphone with base and cord with base and cord and
point it to the radio. The microphone will be fixed to the radio.
3. Decompile the desk lamp with bulb to get a desk lamp and a light
bulb.
4. Select the desk lamp and point to the radio.
Now, you can click on the microphone and listen to some signals.
Someone is talking. Can you establish contact? Click on the microphone
again and try to make a distress call. You'll then be shocked by a
reply from Mr. U.N. Owen himself!
So, no luck with the distress call, but you used up some time anyway
while Emily is sewing the sheets.
Tired of side quest? Go back to Emily. Otherwise, remove both the
vacuum tubes from the shortwave radio, and go to the parlour for
another side quest.
PARLOUR
-------
Remember the broken down radio at one corner of the parlour? Approach
it and open its panel. To make the radio work, do the following:
1. Combine fruit basket made of copper wire and pliers to get length
of copper wire.
2. Place all vacuum tubes (807-H, UX-201A and 305GT) into the panel,
and close it.
3. Select the copper wire and point to the back of the radio.
Now, click on the dial on the radio to turn it on. Ah, music.
You can (finally) go back to Emily now.
FRONT PATIO
-----------
Talk to Emily, and she'll pass you the sewn silk sheets.
Combine sewn silk sheets, tangled fishing net, metal tripod and
leather goat harness to form... the parachute! Yay!
Remembering that Shiprock Summit is the highest point of the island,
it seems like a great place to take off. Go there then.
SHIPROCK SUMMIT
---------------
Select the parachute, and point to the sky. Here goes nothing now.
You believe you can fly, and you believe you can touch the sky. And
then you fall, and find solace in the buoy with the homing beacon.
Get washed up on shore, and understand that you can't leave the
island with the parachute as well. You decide to go back to the
mansion.
NOTE: The flying, falling and going back to the mansion all happen in
a rather prolonged period when you've no control of the game.
A cut-scene happens now, as Lombard screams about hearing a, er,
scream from Emily from the apiary. Hmm, he has good hearing. You'll
resume control at the front patio. Check your inventory to find that
the German naval homing beacon is in the list now.
Run to the apiary to find Armstrong and Lombard there.
Emily is dead.
======================================================================
======================================================================
10. CHAPTER SIX: WARGRAVE GOT IN THE CHANCERY
======================================================================
Watch the cut-scene. You'll soon resume control in the parlour.
PARLOUR
-------
Talk to Vera first, and then talk to Wargrave. Wargrave will accuse
Vera as the most likely person who could've lure Emily to the apiary
to meet her death. Vera will be angrey, and will leave the parlour.
NOTE: If you talk to Wargrave first, his accusation will cause Vera to
leave immediately, you'll lose the chance to talk to her.
Now, talk to Armstrong. After the conversation, leave the parlour. As
you leave, Wargrave will suggest to Armstrong about having a game of
snooker. Looks like the judge has something up his sleeves.
Go up to Lombard's room.
LOMBARD'S ROOM
--------------
Blore and Lombard are here. Lombard's locker has been forced open, and
his revolver has gone missing. Watch as a body search goes on between
Lombard, Blore and you. Nothing found on all of you, so Blore decides
to go around searching the rest.
Leave Lombard's room by the balcony, and go right until you find Vera
at the place where you earlier found the brass telescope and the metal
tripod.
BALCONY
-------
Try talking to Vera. She tells you to leave her alone. Ok, leave her
alone.
Go down to the game room now.
GAME ROOM
---------
You enter the game room as Wargrave and Armstrong have just fininshed
a conversation. You hear nothing else, except "... a dangerous game.
If it fails...", and they notice you.
Another cut-scene follows. The lot of you now are in the dining room,
as they found the words "SOLIDAMIDE" on the back of your plate. It
seems like you've been poisoned! You can only live if you find the
antidote - Belliman's Universal Embrocation.
Don't worry. You'll find it soon.
The power goes out next, and Wargrave tells everyone to stay together.
Vera insists on getting her wrap from her room though, so she goes
while the four of you stay in the dining room. After a while, Vera
begins to scream. You resume control now, so quickly run up to the
second level.
SECOND LEVEL
------------
Try going to Vera's room, only yo get hit by an known assailant. Watch
another cut-scene, during which a shot is heard. You'll resume control
at the main stairs. The shot seems to come from the dining room, so
quickly run back to there.
DINING ROOM
-----------
You'll find Armstrong standing beside Wargrave. Or rather, his body.
The judge is shot.
FRONT PATIO
-----------
You resume control here. Your next task is to get the lights up again.
Remember the generator in the wood shed? Go there now.
WOOD SHED
---------
It's dark, so try to figure out the directions and go to the
generator. It's time to use the small gas can you found in the ruined
village. Select it and point to the petrol tank of the generator (red
colored, behind the generator) to refill the tank.
Then, turn the switch on the right (squarish panel) to turn the
generator back on. The lights return.
Return to the foyer.
FOYER
-----
Talk to Armstrong and Blore. Blore urges you to find the antidote
soon.
Go to the apiary now.
APIARY
------
From the apiary, go left one screen to reach the screen with a winding
road that is leading to the orchard. On the left of the screen, on
the grass, you'll find a bottle labelled "Belliman's Universal
Embrocation". Yes!
Select the bottle and point it to yourself. You'll drink the antidote
and be cured. Thanks heaven.
Watch the cut-scene, and Chapter Seven follows
======================================================================
======================================================================
11. CHAPTER SEVEN: A RED HERRING SWALLOWED ARMSTRONG
======================================================================
After the cut-scene, you'll resume control at the parlour.
PARLOUR
-------
Talk to Blore, and find out about the history of the island. You'll
get to know something about the Robsons, Gabrielle Steel and the
Admiralty. You'll also learn about the death of someone called
Archibald Morris.
Talk to the rest. From the conversation with Vera, you'll learn about
some seaweed and the shrewdness of the murderer. Then, when you talk
to Lombard, you'll learn that the voice from the gramaphone record
(in Chapter One) is the voice of Archibald Morris. Strange.
The characters agree to lock themselves in bed. Watch the cut-scene.
You'll find yourself in the parlour again, and a shadow slowly creeps
out of the mansion. You'll go towards the door and find Blore coming
down from the stairs. He decides to go after the shadowy figure.
FOYER
-----
Go up to the second level and check out the rooms.
WARGRAVE'S ROOM
----------------
The judge's body is missing. Why?}
Go to Armstrong's room.
ARMSTRONG'S ROOM
----------------
Armstrong is not in his room.
Go to Lombard's room now.
LOMBARD'S ROOM
--------------
Knock on Lombard's door. He's in, but he doesn't let you in. Tell him
about the shadowy figure and he claims it isn't him.
Strangely, however, if you go into Blore's room and enter Lombard's
room through the bathroom, you'll find Lombard missing from his room.
Go to Vera's room now.
VERA'S ROOM
-----------
Knock on her door, and you'll hear her on the defensive.
Leave the mansion for now and search the outside for a while.
OUTSIDE, ANYWHERE
-----------------
Wander around for a while before return to the second level to check
on the rooms.
ARMSTRONG's, BLORE'S AND LOMBARD'S ROOM
---------------------------------------
They're all not in their room. Visit Vera again.
VERA'S ROOM
-----------
Vera is very defensive now. Lombard has passed her his revolver.
She'll also tell you that Lombard has went to start a bonfire.
You should now go to Shiprock Summit.
SHIPROCK'S SUMMIT
-----------------
En route there, you should see fire on the summit. Go up and point to
the bonfire. It's quite a signal fire. Someone should be able to see
it.
Return to the mansion now, and go to Vera's room again.
VERA'S ROOM
-----------
Blore, Vera and Lombard are all at Vera's room's door now. Talk to all
of them. There's no sign of Armstrong. It's also revealed that only
three sailor boys remain in the dining room.
======================================================================
======================================================================
12. CHAPTER EIGHT: A BIG BEAR HUGGED BLORE
======================================================================
After the cut-scene, you'll find yourself at the foyer. Blore is going
to find Wargrave's body. Lombard will go man the bonfire after
escorting Vera back to her room. Vera will stay in her room, and
you'll proceed to the screening room.
SCREENING ROOM
--------------
Go forward to the screen to find Wargrave's body seated in the front
row of seats. Examine the body to find, strangely, that the judge is
dead alright, but not shot.
Make your way to the study.
STUDY
-----
Leave the study through the balcony door. You'll find Blore's body
on the grass patch. Examine it, and find that he has been hit on the
head with a marble clock that is shaped like a bear. Watch the cut-
scene has Vera looks down from above and comments that the murder
weapon is the bear-shaped clock in her room.
Look beside Blore's body to find the large chunk of marble. Take it
into your inventory.
Go to the beach for one more dead body now.
BEACH
-----
Once you're here, go right one screen to find Armstrong's body. Click
on it to find that he has been in the water for some time.
======================================================================
======================================================================
13. CHAPTER NINE: LOMBARD GOT FRIZZLED UP
======================================================================
Choices, choices, choices. As you may have already know, this game
has multiple endings. After the cut-scene of you talking to Vera at
her door, you'll resume control right there. Save your game now to
prepare yourself for the mulitple endings.
CHOICE #1
---------
Waste time by searching the rooms again, etc., and then check the
outside, etc. before going to Shiprock Summit. You'll find that
Lombard has been killed by an explosion from the bonfire. It may take
some time until the explosion occurs, so be patient.
NOTE: "Original ending" means the ending from the book.
CHOICE #2
---------
Run quickly to Shiprock Summit immediately and watch the cut-scene as
you rescue him from the explosion, and find out his true identity as
well.
You've saved "Lombard"! You'll also ask him to lie low for a while and
pretend that he's dead.
======================================================================
======================================================================
14. CHAPTER TEN: VERA HUNG HERSELF
======================================================================
Wow, that's fast! Chapter Ten!
Depending on what you chose just now, you'll get a different ending at
the end of this chapter. Regardless, you'll hear voice upstairs when
you resume control at the foyer. You may want to save your game now to
see the different endings.
SECOND LEVEL
------------
Once you reach the second level, you'll see a cut-scene. Watch now as
the killer confronts Vera. After watching the explanation, you can:
CHOICE #1
---------
Enter the bathroom and watch the murdere shot Vera shot dead. If
you didn't save Lombard earlier, you'll achieve Ending #1: Narracott
survives.
If you've saved Lombard earlier, you'll achieve Ending #2: Narracott
and Lombard survive.
CHOICE #2
---------
Attack the murderer with the large chunk of marble (select it and
point to the murderer's hand, which is holding the revolver). You'll
rescue Vera. If you've didn't save Lombard earlier, you'll achieve
Ending #3, Narracott and Vera survive.
If you rescued Lombard earlier, you'll achieve Ending #4: Narrcott,
Lombard and Vera survived.
The murderer in all four scenarios are Emily Brent, or rather,
Gabrielle Steele! The explanation of her motives is rather bland and
unconvincing, really. A nice try by the game developers.
Below is a description of all the four endings:
ENDING #1: NARRACOTT SURVIVE
----------------------------
Your brother arrives and you escape from the island quickly in his
car, so that you won't be misunderstood as the murderer.
ENDING #2: NARRACOTT AND LOMBARD SURVIVE
----------------------------------------
Lombard, or rather, Morley, agrees to write a statement to save your
brother. He leaves soon after.
ENDING #3: NARRACOTT AND VERA SURVIVE
-------------------------------------
Vera explains to you about what happened between herself, Hugo and
Cyril. It was Hugo who left Cyril to die. Both Vera and you get hot.
ENDING #4: NARRACOTT, LOMBARD AND VERA SURVIVE
----------------------------------------------
This is a combination of Ending #2 and #3. Morley writes a statement
to save your brother, and Vera explains about Hugo and Cyril. Both
Vera and you get hot.
Regardless of which ending you achieve, you'll get the opportunity to
watch the REAL ending, that is, the original ending from the book.
To watch this ending, you'll have to play the game a little longer.
FOYER - BEGINNING OF ORIGINAL ENDING
------------------------------------
You'll begin in the foyer, beside the gramaphone. Hear Owen explains
this ending, and heed his instructions to go to the dining room.
DINING ROOM
-----------
Examine the dining table to find an intact sailor boy figure - the
last one there. Take it.
Head to the screening room now.
SCREENING ROOM
--------------
Examine the projector, and close-up until you see the drawers. Notice
the bottom left corner of the top of the drawers has a small square.
Select the sailor boy figure and point it towards this small square.
This will unlock the previously locked top drawer.
Open the top drawer to find a reel of film titled "Hello Again". Take
this film and place it into the reel, and then turn the switch on the
projector to watch the confession of Judge Lawrence Wargrave.
Yes, the judge is the murderer in the book, and it's totally believable
too. All hail Agatha Christie for this ingenious ending.
Congratulations to you for beating the game as well.
======================================================================
======================================================================
15. CONCLUSION
======================================================================
And so, and then there were none.
I first read an Agatha Christie book when I was ten. I remember it was
Murder on the Orient Express, starring the wonderful Hercule Poirot.
Before long, I've completed the entire series consisting Poirot. I
ventured into reading stories involving Jane Marple, and then I came
across And Then There Were None. Despite the rather bizarre setting
and ending, it struck to me as completely believable. Perhaps I was
gullible, but the book continues to rank among the top three Christie
books in my collection.
It was for this reason that I played this game, which was, well, not
exactly engaging. At times, it feel like Trace Memory all over again,
albeit with much lesser puzzles to solve. Still, I enjoyed playing it,
if only as a tribute to the author. I hope to see more Christie books
get adapted into adventure games in future, since it's a genre that I
particularly enjoy. Murder on the Orient Express, for example, would
be a perfect title to turn into a game.
And for that game, let's hope that it's a little more difficult than
this one.
Till then, goodbye.
======================================================================
======================================================================
APPENDIX 1. VERSION HISTORY
======================================================================
Version 1.0: Guide completed. (11.27.05)
======================================================================
APPENDIX 2. FAQS
======================================================================
Some common questions I anticipated, and some quick answers:
Q: How do I get the parachute?
A: This is a long process, but basically you only need to combine
the sewn silk sheets from Emily, the tangled fishing net from the
ruined village after the grotto, the metal tripod from Vera's balcony
and the leather goat harness from the first ruined village to form the
parachute.
Q: Ok, now, how do I get the sewn silk sheets then?
A: You'll first need to get some silk sheets from the linen room.
Then, you'll need to get the sewing needles from Rogers' room. Then,
you'll need to get the fishing line from the beach after the area with
the two hungry goats. Pass the silk sheets, needles and fishing line
to Emily, go explore around, and then return to her for the sewn silk
sheets.
Q: How do I subdue the bees?
A: You'll need a smoker. Just go to the top of this page, and do a
Ctrl-F on your keyboard, and then type in "smoker" to go to the area
in this document that gives instructions on how to make a smoker.
Q: What's the _______ for?
A: This is a tough one. Everything that I know could be used in the
game, I've explained. The rest, I seriously have no idea. Yes, that
includes that homing beacon.
======================================================================
======================================================================
APPENDIX 3. CREDITS
======================================================================
To my wife, Erica, once again, for making food and drinks during the
three days I spent playing and writing this thing.
======================================================================
Copyright © Lestor Wong 2005.
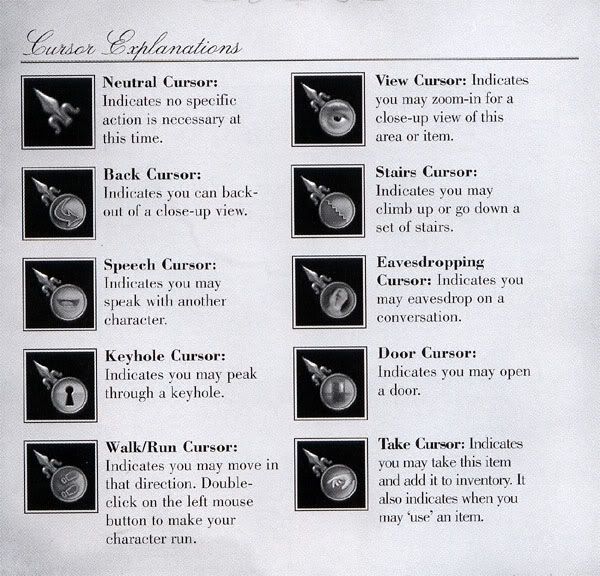
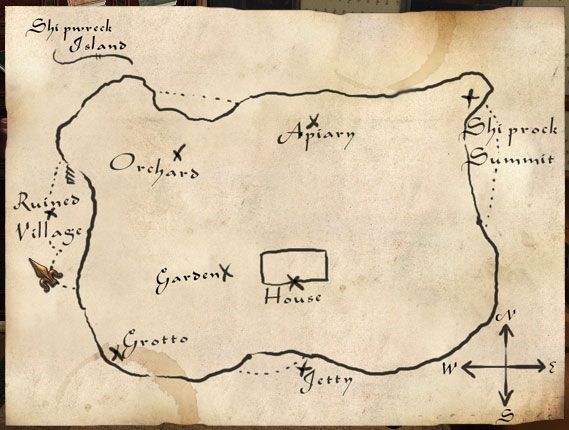
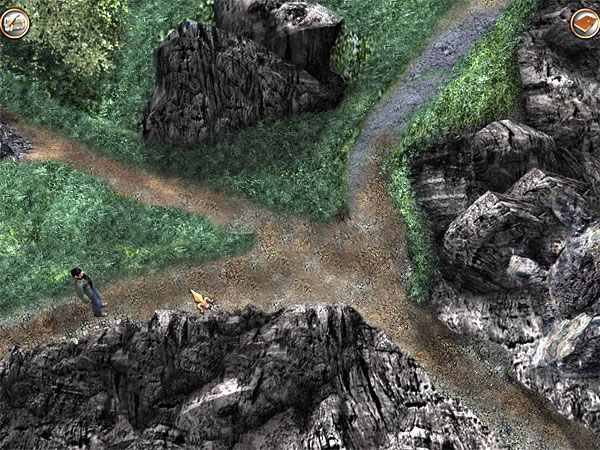