TITLE: Compressing images for this website
DATE: 2019-07-05
AUTHOR: John L. Godlee
====================================================================
I wanted my webpages to load faster, and I was somewhat inspired by
this website which runs entirely on a solar powered raspberry pi.
They needed to minimize the amount of data transfer to keep energy
usage down. I was also inspired a bit by this blog post on their
image dithering procedure which converts images to black and white
while preserving the essence of what the image is trying to
portray. Unfortunately they do their image conversion in Adobe
Photoshop, which I didn't want to use. Instead I decided to see if
I could replicate their conversion process and achieve highly
compressed dithered images using ImageMagick, which could be
written into a reproducible script that I could run on a set of
images. I also wanted to see if there was a better method of
compressing the images.
[this website]:
https://solar.lowtechmagazine.com/2018/09/how-to-build-a-lowtech-web
site/
[blog post]:
http://gauthierroussilhe.com/en/posts/convert-low-tech
[ImageMagick]:
https://imagemagick.org/index.php
ImageMagick runs on the command line and the command I use is
convert which is designed to take an image, alter it in a multitude
of ways, then save to a new file. mogrify is better for overwriting
the same image.
I have an example image here which is currently 6.8 MB.
[example image here]: /img_full/spot_autumn/bike.png
y first pass at the image is simply to reduce the -quality of the
image, which takes a percentage value that pertains to the
compression level.
convert bike.jpg -quality 90% output_1.jpg
This produces an image of 3.3 MB.
Here is a plot of the file size as the -quality percentage is
reduced. and a table of file sizes. Note that 100% compression on
the original image actually made the original image of 6.8 MB
larger, to 7.8 MB.
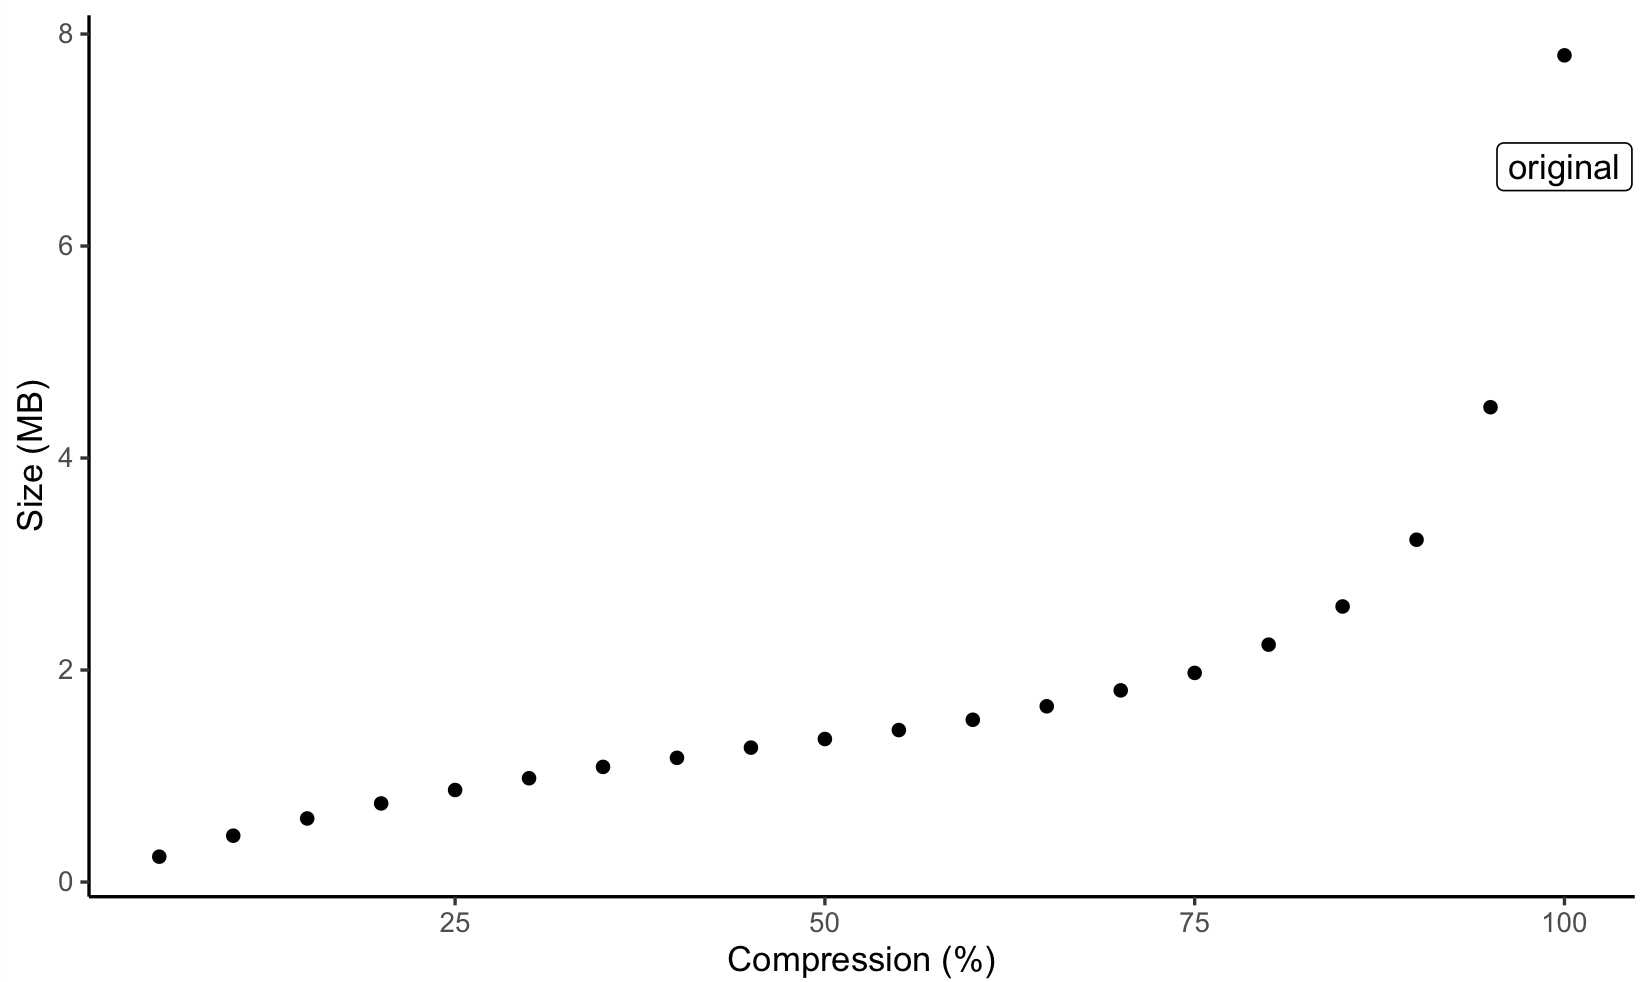
Compression (%) Size (MB)
------------------- --------------
100 7.799
95 4.479
90 3.229
85 2.6
80 2.24
75 1.973
70 1.808
65 1.658
60 1.531
55 1.434
50 1.349
45 1.268
40 1.172
35 1.086
30 0.9793
25 0.8683
20 0.7416
15 0.5998
10 0.4374
5 0.2395
----------------- ------------
It's interesting that even at 5% -quality, the image is still not
bad to look at.
For the next part I'll take an arbitrary -quality value of 50%,
meaning the base image is 1.349 MB.
Converting the image to grayscale makes the file slightly smaller,
but not much
convert bike.jpg -quality 50% -colorspace gray output_21.jpg
The original image was 1,414,879 bytes (1.349 MB) and the grayscale
image is 1,325,856 (1.264 MB), a difference of 89,023 bytes, or 87
KB.
I also experimented with other options for reducing the colors, but
none of these made any positive difference. -posterize 4 = 1.781
MB, -quantize gray = 1.349 MB.
Next I want to dither the image to hopefully save even more file
size. I'll use the grayscale image I generated earlier, which is
1.264 MB. There are multiple options for dithering so here is a
comparison.
convert bike.jpg -quality 50% -colorspace gray -dither
floyd-steinberg output_25.jpg
Both methods produced files of exactly the same size as the
grascale image so I think I'm doing something wrong. I think I
should apply some sort of dithering color reduction flag as well.
Here are examples with different color reduction methods:
convert bike.jpg -quality 50% -colorspace gray -dither
floyd-steinberg -monochrome output_26.jpg
convert bike.jpg -quality 50% -colorspace gray -dither
floyd-steinberg -posterize 10 output_27.jpg
The -monochrome option produced a file of 2.812 MB and the
-posterize 10 option produced a file of 1.428 MB.
Posterize is an interesting one to play with. Here is a comparison
of -posterize with different numbers of colours:
Size (MB) Number of colours
------------- ---------------------
1.428 10
1.459 9
1.487 8
1.532 7
1.578 6
1.631 5
1.674 4
1.793 3
1.437 2
0.06754 1
----------- -------------------
Weirdly, the file size actually increases as the number of colours
decreases, up until the number of colours is two.
There are also predefined dithering threshold maps that can be used
with -ordered-dither:
convert bike.jpg -quality 50% -colorspace gray -ordered-dither
c7x7w output_43.jpg
Here is a comparison of these methods:
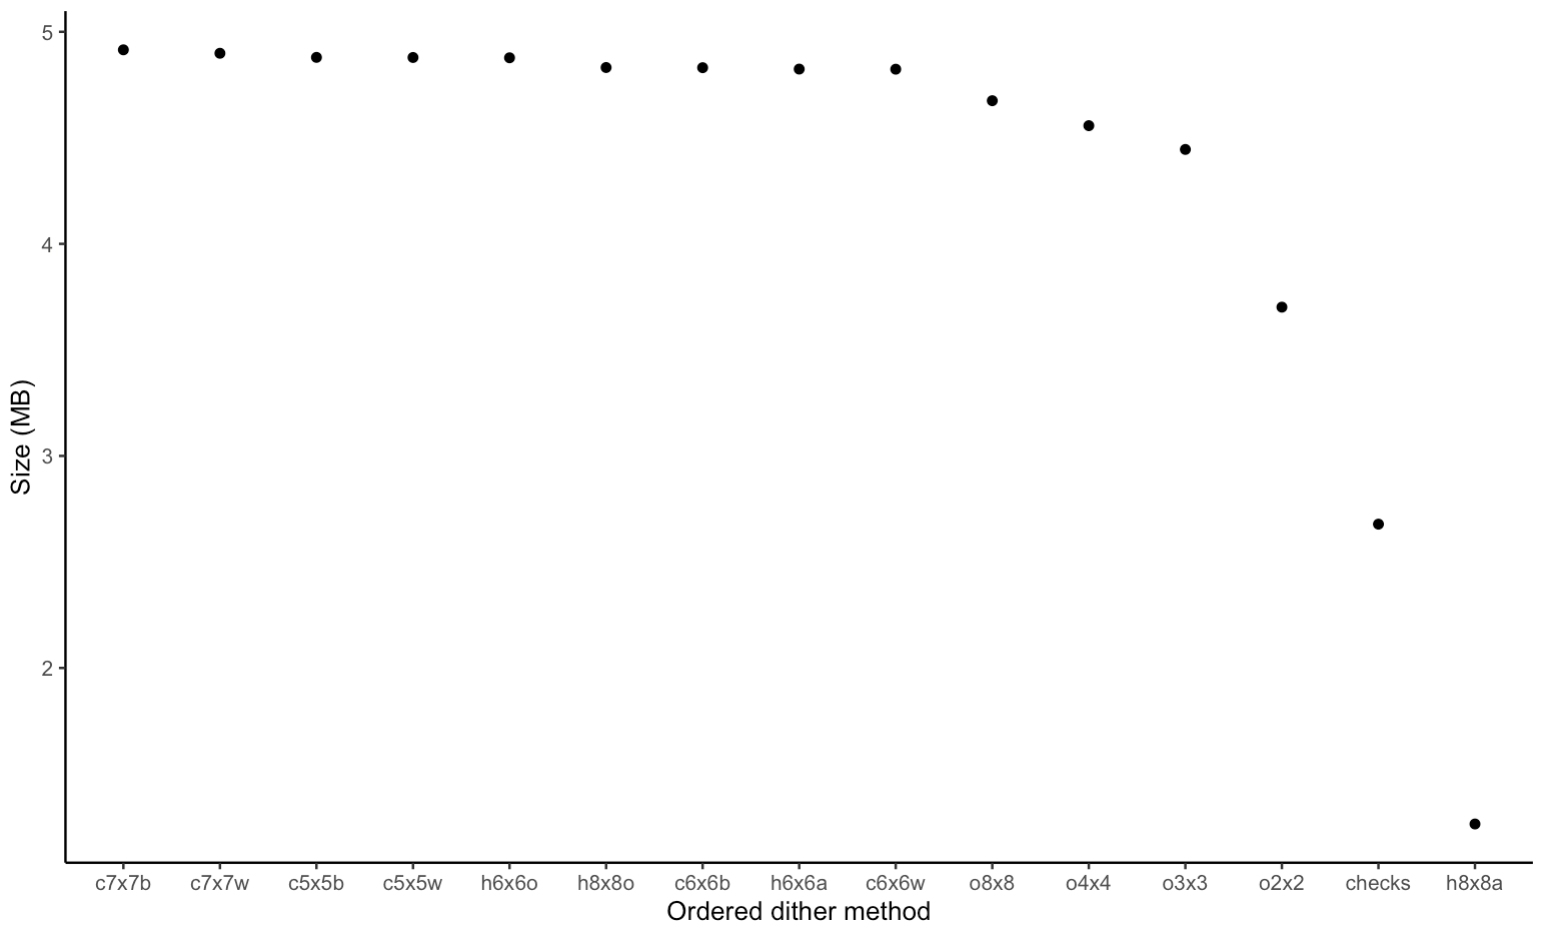
Code Description Size (MB)
---------- ----------------------------- -------------
checks Checkerboard 2x1 (dither) 2.678
o2x2 Ordered 2x2 (dispersed) 3.702
o3x3 Ordered 3x3 (dispersed) 4.445
o4x4 Ordered 4x4 (dispersed) 4.557
o8x8 Ordered 8x8 (dispersed) 4.675
h6x6a Halftone 6x6 (angled) 4.824
h8x8a Halftone 8x8 (angled) 1.264
h6x6o Halftone 6x6 (orthogonal) 4.877
h8x8o Halftone 8x8 (orthogonal) 4.831
c5x5b Circles 5x5 (black) 4.879
c5x5w Circles 5x5 (white) 4.879
c6x6b Circles 6x6 (black) 4.831
c6x6w Circles 6x6 (white) 4.823
c7x7b Circles 7x7 (black) 4.915
c7x7w Circles 7x7 (white) 4.899
-------- --------------------------- -----------
So the h8x8a method produced the smallest file size of 1.264 MB,
but this is only as small as the undithered grayscale image!
So from my little test so far it seems that the best way of
compressing images is to use a grayscale undithered image an adjust
the -quality of the image to my liking.
Here are a few other options to reduce file size I came across.
Here is a comparison using the undithered grayscale image.
Removing EXIF data, which I would probably want to do regardless of
the file size, just for privacy reasons:
convert bike.jpg -quality 50% -colorspace gray -strip
output_54.jpg
This reduces the file size from 1.264 MB to 1.242 MB, a difference
of 23.2 KB.
Adding some Gaussian blur to reduce the detail level:
convert bike.jpg -quality 50% -colorspace gray -strip
-gaussian-blur 0.05 output_54.jpg
This reduces the stripped grayscale image from 1.242 MB to 1.031
MB, a difference of 215 KB.
Here is a comparison of images converted with different levels of
gaussian blur.
One thing I did find was that the computation time increased with
the radius of the blur.
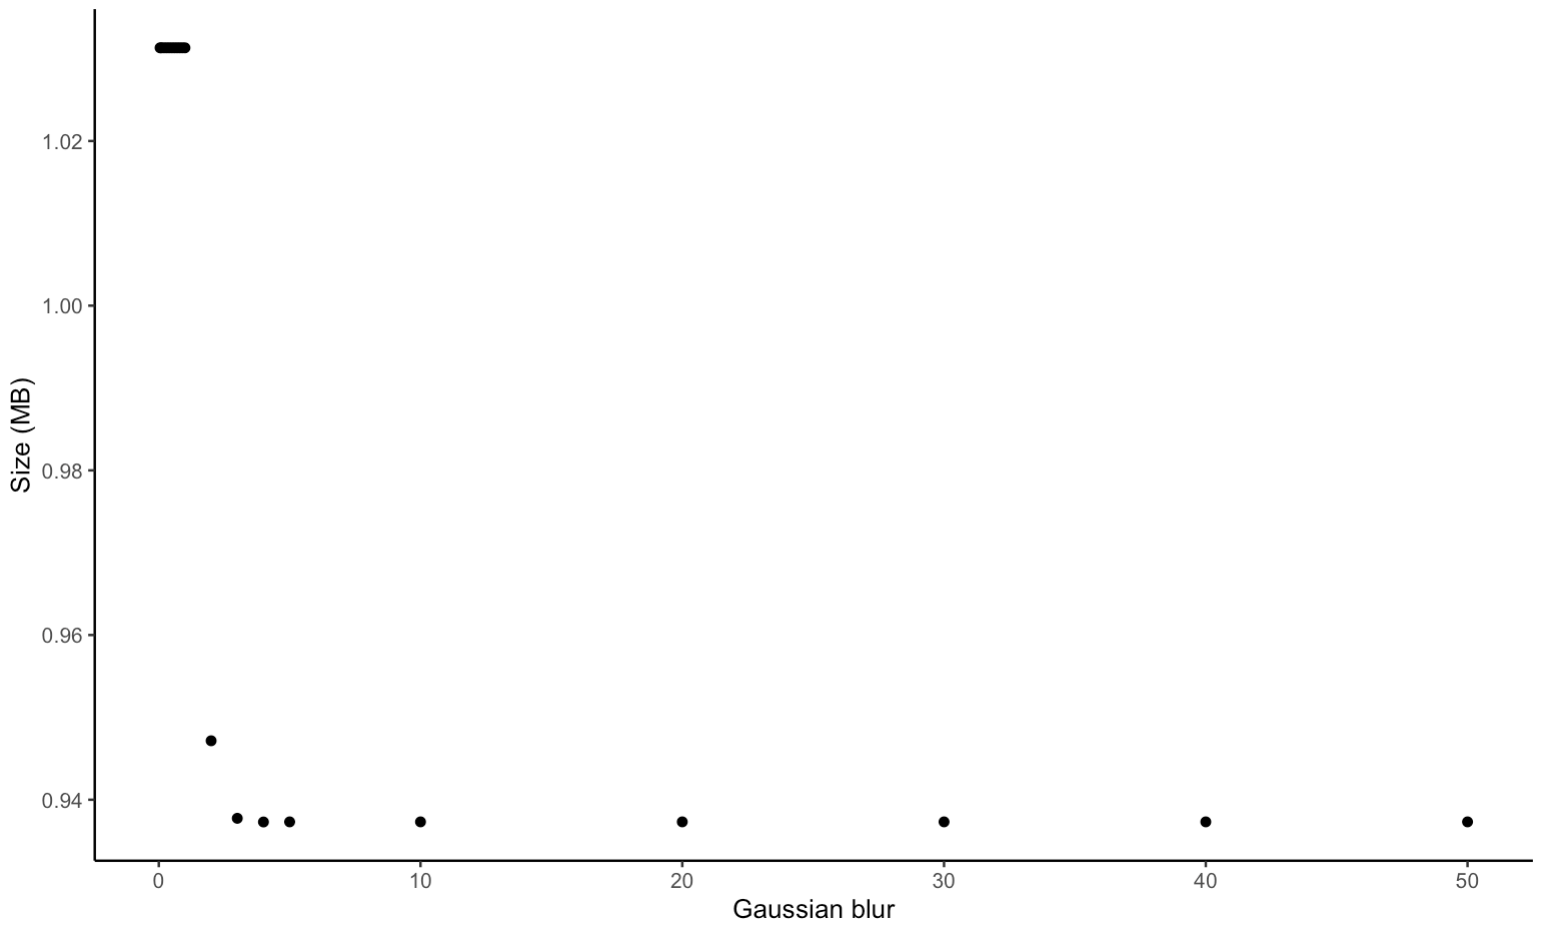
Blur Size (MB)
-------- -------------
0.05 1.031
0.1 1.031
0.2 1.031
0.3 1.031
0.4 1.031
0.5 1.031
0.6 1.031
0.7 1.031
0.8 1.031
0.9 1.031
1 1.031
2 0.9472
3 0.9377
4 0.9373
5 0.9373
10 0.9373
20 0.9373
30 0.9373
40 0.9373
50 0.9373
------ -----------
So, finally, the optimal way of compressing my JPEG images seems to
be:
convert bike.jpg -quality 20% -colorspace gray -strip
-gaussian-blur 3.5 output.jpg
This leads to an image of 538 KB. It looks good, except when
zooming in, then it gets a bit hairy, this is where dithering might
become useful if I can find a way of dithering while maintaining
the small size of the image.
Another thing I learned from reading the comments on this website
was that JPEG is the most appropriate format for reducing image
file size as it is lossy, unlike PNG, so I can convert all my PNG
images to JPEG using:
[this website]:
https://solar.lowtechmagazine.com/2018/09/how-to-build-a-lowtech-web
site/
convert test.png -background white -flatten output.jpg
-background white -flatten is needed to allow the JPEG to properly
display the transparent areas of the JPG as white background.
I have a folder on my website with images sorted into directories
based on what blog post they refer to. I wrote this shell script to
prepare the images to be put onto the website:
#!/bin/bash
shopt -s nullglob
# For each image
for i in img_full/*/*.{jpg,JPG,jpeg,png,PNG}; do
# If the directory in the compressed images directory
doesn't exist, create it
new_dir=$(dirname ${i} | sed "s/img_full/img/g")
if [ ! -d $new_dir ]; then
mkdir -p $new_dir;
fi
echo $dir
# Create new file path for output
new_path=$(echo "${i}" | sed "s/img_full/img/g")
echo $new_path
# Convert image files
if [ ! -f $new_path ]; then
convert $i -quality 20% -colorspace gray -strip
-background white -flatten -gaussian-blur 3.5 $new_path
fi
done
# Maintain full size 404 image
cp img_full/404/404.png img/404/404.png