This is a text-only version of the following page on
https://raymii.org:
---
Title : OSSEC Server, Client, Web UI and Analogi Dashboard Installation tutorial
Author : Remy van Elst
Date : 07-09-2013
URL :
https://raymii.org/s/tutorials/OSSEC_and_webui_and_analogi_dashboard_installation_on_Ubuntu.html
Format : Markdown/HTML
---
OSSEC is an Open Source Host-based Intrusion Detection System that performs log
analysis, file integrity checking, policy monitoring, rootkit detection, real-
time alerting and active response. It runs on most operating systems, including
Linux, MacOS, Solaris, HP-UX, AIX and Windows. It also includes agentless
monitoring for use with for example Cisco, HP or Juniper hardware.
<p class="ad"> <b>Recently I removed all Google Ads from this site due to their invasive tracking, as well as Google Analytics. Please, if you found this content useful, consider a small donation using any of the options below:</b><br><br> <a href="
https://leafnode.nl">I'm developing an open source monitoring app called Leaf Node Monitoring, for windows, linux & android. Go check it out!</a><br><br> <a href="
https://github.com/sponsors/RaymiiOrg/">Consider sponsoring me on Github. It means the world to me if you show your appreciation and you'll help pay the server costs.</a><br><br> <a href="
https://www.digitalocean.com/?refcode=7435ae6b8212">You can also sponsor me by getting a Digital Ocean VPS. With this referral link you'll get $100 credit for 60 days. </a><br><br> </p>
This tutorial covers the installation of the OSSEC server, the standard OSSEC
Web UI and the Analogi dashboard on Ubuntu 12.04. It also covers OSSEC setup
with MySQL support, including a Makefile bugfix. Last but not least it shows you
how to install the OSSEC agent on a *NIX system.
There is a new version of OSSEC, 2.8. [There is also a new version of this
tutorial, for the new OSSEC and for Ubuntu 14.04. Click here to read it.][2]
[![OSSEC Analogi dashboard][3]][3]
This tutorial is written for an ubuntu 12.04 OSSEC server, but can be easily
adapted to other *NIX operating systems. It only covers basic OSSEC
client/server configuration, not automatic blocking or comprehensive
configuration settings. It gets you started, the rest is available in the
documentation:
http://www.ossec.net/doc/
### Steps
* Installing development packages
* Installing Apache, PHP and MySQL
* Configuring MySQL
* Compiling the OSSEC server
* Makefile fix for Ubuntu
* Basic OSSEC setup with MySQL
* Installing OSSEC Web UI
* Installing Analogi Web Dashboard
* Installing and configuring a client
### Requirements
* An Ubuntu 12.04 server
* Apache2, PHP, MySQL and development packages
* OSSEC clients to monitor (*NIX or Windows machines, Cisco switches etc).
### Installing development packages
OSSEC is installed from source, therefore you need development packages. This is
both for the OSSEC clients as for the OSSEC server:
apt-get install build-essential make libssl-dev
### Installing Apache, MySQL and PHP
This is fairly simple on Ubuntu. It is all covered with apt:
apt-get install mysql-server libmysqlclient-dev mysql-client apache2 php5 libapache2-mod-php5 php5-mysql php5-curl php5-gd php5-intl php-pear php5-imagick php5-imap php5-mcrypt php5-memcache php5-ming php5-ps php5-pspell php5-recode php5-snmp php5-sqlite php5-tidy php5-xmlrpc php5-xsl
Remember to give a strong root password for MySQL. Next finish MySQL with a
secure installation:
mysql_secure_installation
Accept all the suggested options. Now restart all requires services:
/etc/init.d/apache2 restart
/etc/init.d/mysqld restart
### Compiling the OSSEC server
Download and verify OSSEC, either via wget or from the website:
http://www.ossec.net/?page_id=19
wget
http://www.ossec.net/files/ossec-hids-2.7.tar.gz
md5sum ossec-hids-2.7.tar.gz
ossec-hids-2.7.tar.gz: 71cd21a20f22b8eafffa3b57250f0a70
From the OSSEC website:
MD5(ossec-hids-2.7.tar.gz)= 71cd21a20f22b8eafffa3b57250f0a70
SHA1(ossec-hids-2.7.tar.gz)= 721aa7649d5c1e37007b95a89e685af41a39da43
If it is correct, then extract it:
tar -xf ossec-hids-2.7.tar.gz
cd ossec-hids-2.7
We first need to fix MySQL support in the installation. Read on:
#### Makefile fix for Ubuntu
Because of some Ubuntu specific errors in compiling with MySQL support we need
to edit the MySQL Makefile:
cd src
vim os_dbd/Makefile
Change this line:
${CC} ${CFLAGS} ${OS_LINK} ${DBFLAGS} ${CDB} ${LOCAL} ${OBJS} -o ${NAME}
To this:
${CC} ${CFLAGS} ${OS_LINK} ${DBFLAGS} ${LOCAL} ${OBJS} -o ${NAME} ${CDB}
This is only needed in Ubuntu, Debian works fine.
Run:
make setdb
Error: PostgreSQL client libraries not installed.
Info: Compiled with MySQL support.
Continue with the compilation/installation:
cd ../
./install.sh
** For installation in English, choose [en].
OSSEC HIDS v2.7 Installation Script -
http://www.ossec.net
You are about to start the installation process of the OSSEC HIDS.
You must have a C compiler pre-installed in your system.
If you have any questions or comments, please send an e-mail
to
[email protected] (or
[email protected]).
- System: Linux vps1.sparklingclouds.nl 3.2.0-042stab076.8
- User: root
- Host: vps1.sparklingclouds.nl
-- Press ENTER to continue or Ctrl-C to abort. --
1- What kind of installation do you want (server, agent, local, hybrid or help)? server
- Server installation chosen.
2- Setting up the installation environment.
- Choose where to install the OSSEC HIDS [/var/ossec]:
- Installation will be made at /var/ossec .
3- Configuring the OSSEC HIDS.
3.1- Do you want e-mail notification? (y/n) [y]:
- What's your e-mail address?
[email protected]
- We found your SMTP server as: mail.raymii.org.
- Do you want to use it? (y/n) [y]: y
--- Using SMTP server: mail.raymii.org.
3.2- Do you want to run the integrity check daemon? (y/n) [y]:
- Running syscheck (integrity check daemon).
3.3- Do you want to run the rootkit detection engine? (y/n) [y]:
- Running rootcheck (rootkit detection).
3.4- Active response allows you to execute a specific
command based on the events received. For example,
you can block an IP address or disable access for
a specific user.
More information at:
http://www.ossec.net/en/manual.html#active-response
- Do you want to enable active response? (y/n) [y]:
- Active response enabled.
- By default, we can enable the host-deny and the
firewall-drop responses. The first one will add
a host to the /etc/hosts.deny and the second one
will block the host on iptables (if linux) or on
ipfilter (if Solaris, FreeBSD or NetBSD).
- They can be used to stop SSHD brute force scans,
portscans and some other forms of attacks. You can
also add them to block on snort events, for example.
- Do you want to enable the firewall-drop response? (y/n) [y]:
- firewall-drop enabled (local) for levels >= 6
- Default white list for the active response:
- 205.185.112.68
- 205.185.112.69
- Do you want to add more IPs to the white list? (y/n)? [n]:
3.5- Do you want to enable remote syslog (port 514 udp)? (y/n) [y]:
- Remote syslog enabled.
3.6- Setting the configuration to analyze the following logs:
-- /var/log/messages
-- /var/log/auth.log
-- /var/log/syslog
-- /var/log/mail.info
-- /var/log/dpkg.log
- If you want to monitor any other file, just change
the ossec.conf and add a new localfile entry.
Any questions about the configuration can be answered
by visiting us online at
http://www.ossec.net .
--- Press ENTER to continue ---
5- Installing the system
- Running the Makefile
INFO: Little endian set.
*** Making zlib (by Jean-loup Gailly and Mark Adler) ***
[...]
*** Making os_xml ***
[...]
*** Making os_regex ***
[...]
*** Making os_net ***
[...]
*** Making shared ***
[...]
*** Making config ***
[...]
*** Making os_maild ***
[...]
*** Making os_dbd ***
[...]
*** Making os_csyslogd ***
[...]
*** Making agentlessd ***
[...]
*** Making os_execd ***
[...]
*** Making analysisd ***
[...]
*** Making logcollector ***
[...]
*** Making remoted ***
[...]
*** Making client-agent ***
[...]
*** Making addagent ***
[...]
*** Making util ***
[...]
*** Making rootcheck ***
[...]
*** Making syscheckd ***
[...]
*** Making monitord ***
[...]
*** Making os_auth ***
[...]
- System is Debian (Ubuntu or derivative).
- Init script modified to start OSSEC HIDS during boot.
- Configuration finished properly.
- To start OSSEC HIDS:
/var/ossec/bin/ossec-control start
- To stop OSSEC HIDS:
/var/ossec/bin/ossec-control stop
- The configuration can be viewed or modified at /var/ossec/etc/ossec.conf
Thanks for using the OSSEC HIDS.
If you have any question, suggestion or if you find any bug,
contact us at
[email protected] or using our public maillist at
[email protected]
(
http://www.ossec.net/main/support/ ).
More information can be found at
http://www.ossec.net
--- Press ENTER to finish (maybe more information below). ---
- In order to connect agent and server, you need to add each agent to the server.
Run the 'manage_agents' to add or remove them:
/var/ossec/bin/manage_agents
More information at:
http://www.ossec.net/en/manual.html#ma
OSSEC is now installed. Restart it:
/var/ossec/bin/ossec-control restart
Continue to the next step for MySQL setup.
### Configuring MySQL
We need to create a user and database for OSSEC. Go to a MySQL shell:
mysql -u root -p
Enter password:
[...]
mysql> create database ossec;
Query OK, 1 row affected (0.02 sec)
grant INSERT,SELECT,UPDATE,CREATE,DELETE,EXECUTE on ossec.* to ossec_u;
Query OK, 0 rows affected (0.00 sec)
set password for ossec_u = PASSWORD('Passw0rd');
Query OK, 1 row affected (0.01 sec)
flush privileges;
Query OK, 0 rows affected (0.00 sec)
quit;
The database also needs a schema. OSSEC provides a schema, it is located in the
extracted OSSEC folder, `src/os_dbd`. Import it into MySQL:
mysql -u root -p ossec < src/os_dbd/mysql.schema
That's it for the database setup. Continue to see the OSSEC configuration.
### OSSEC MySQL configuration
We have to add the database config to `/var/ossec/etc/ossec.conf`:
<ossec_config>
<database_output>
<hostname>127.0.0.1</hostname>
<username>ossec_u</username>
<password>Passw0rd</password>
<database>ossec</database>
<type>mysql</type>
</database_output>
</ossec_config>
Save it, then enable the database in OSSEC:
/var/ossec/bin/ossec-control enable database
/var/ossec/bin/ossec-control restart
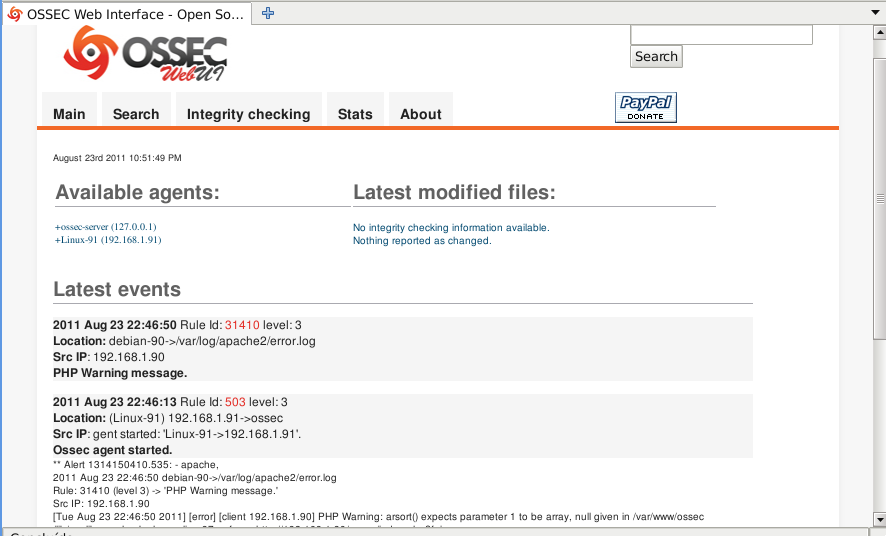
### Installing OSSEC Web UI
[![OSSEC Web UI][4]][4]
This is also quite simple. Because we've already set up Apache and PHP, we can
just download the web UI and extract to `/var/www/`:
wget
http://www.ossec.net/files/ossec-wui-0.8-beta-1.tar.gz
tar -xf ossec-wui-0.8-beta-1.tar.gz
mkdir /var/www/ossec/
mv ossec-wui-0.8-beta-1/* /var/www/ossec/
chown www-data:www-data /var/www/ossec/tmp/
chmod 666 /var/www/ossec/tmp
We use the web UI Beta because there are a lot of errors (like broken search) in
the stable 0.3 version. We also set the correct permissions on the `tmp/`
folder. Afterwards the web ui is visible at
http://hostname/ossec/.
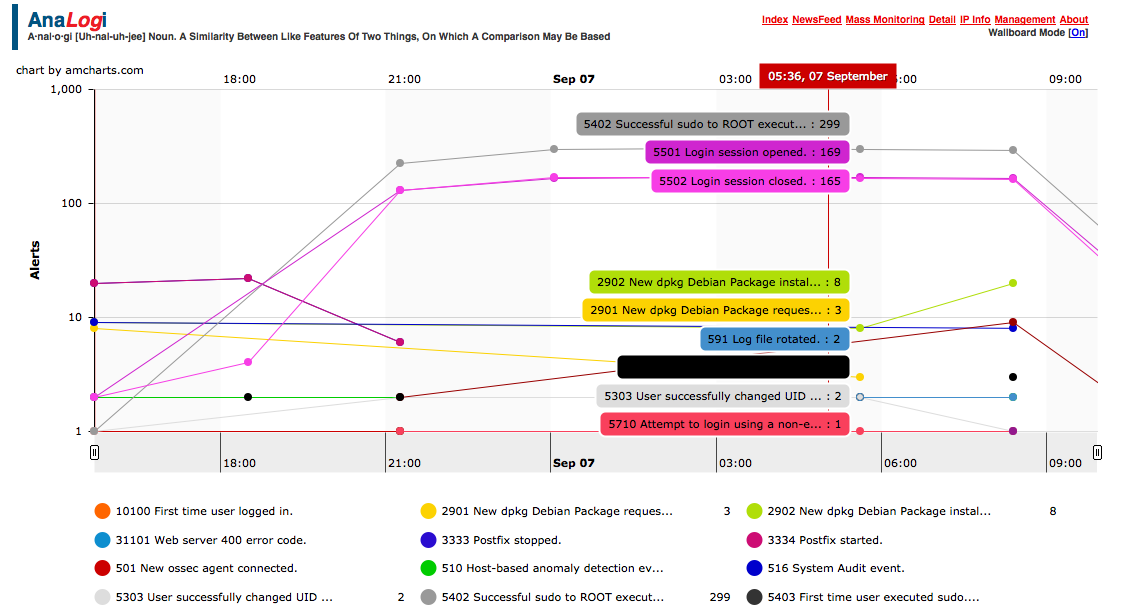
### Installing Analogi Web Dashboard
[![OSSEC Analogi dashboard][3]][3]
The Analogi dashboard is a nice and informative dashboard around OSSEC, which
provides more visual information then the standard Web UI. The standard Web UI
has better search functions, the Dashboard can be used for example on a Wall
Mounted monitor and such.
Installation consists out of cloning the git repo and entering the settings
file:
cd /var/www
git clone
https://github.com/ECSC/analogi.git
cp analogi/db_ossec.php.new analogi/db_ossec.php
vim analogi/db_ossec.php
Edit the relevant settings for the MySQL database configuration. When correctly
configured the Analogi webinterface can be found at
http://hostname/analogi/.
The OSSEC server is now correctly set up.
### Client installation
Download and verify the OSSEC stable .tar.gz file as described above. This time,
do an agent installation. See the output below:
root@testclient:~/ossec-hids-2.7# ./install.sh
** Para instalao em portugus, escolha [br].
** , [cn].
** Fur eine deutsche Installation wohlen Sie [de].
** , [el].
** For installation in English, choose [en].
** Para instalar en Espaol , eliga [es].
** Pour une installation en franais, choisissez [fr]
** A Magyar nyelv teleptshez vlassza [hu].
** Per l'installazione in Italiano, scegli [it].
** [jp].
** Voor installatie in het Nederlands, kies [nl].
** Aby instalowa w jzyku Polskim, wybierz [pl].
** , [ru].
** Za instalaciju na srpskom, izaberi [sr].
** Trke kurulum iin sein [tr].
(en/br/cn/de/el/es/fr/hu/it/jp/nl/pl/ru/sr/tr) [en]:
OSSEC HIDS v2.7 Installation Script -
http://www.ossec.net
You are about to start the installation process of the OSSEC HIDS.
You must have a C compiler pre-installed in your system.
If you have any questions or comments, please send an e-mail
to
[email protected] (or
[email protected]).
- System: Linux testclient.raymii.nl 3.8.0-21-generic-pae
- User: root
- Host: testclient.raymii.nl
-- Press ENTER to continue or Ctrl-C to abort. --
1- What kind of installation do you want (server, agent, local, hybrid or help)? agent
- Agent(client) installation chosen.
2- Setting up the installation environment.
- Choose where to install the OSSEC HIDS [/var/ossec]:
- Installation will be made at /var/ossec .
3- Configuring the OSSEC HIDS.
./install.sh: 372: ./install.sh: [[: not found
3.2- Do you want to run the integrity check daemon? (y/n) [y]: y
- Running syscheck (integrity check daemon).
3.3- Do you want to run the rootkit detection engine? (y/n) [y]:
- Running rootcheck (rootkit detection).
3.4 - Do you want to enable active response? (y/n) [y]:
3.5- Setting the configuration to analyze the following logs:
-- /var/log/auth.log
-- /var/log/syslog
-- /var/log/dpkg.log
- If you want to monitor any other file, just change
the ossec.conf and add a new localfile entry.
Any questions about the configuration can be answered
by visiting us online at
http://www.ossec.net .
--- Press ENTER to continue ---
5- Installing the system
- Running the Makefile
INFO: Little endian set.
#### Client OSSEC config
Adding a client to OSSEC is quite simple. First you add the client to the
server, which gives you a key. Then you add this key to the client, edit the
config file on the client and that's it.
First we need to generate a key on the OSSEC server for this client. We do this
by running `/var/ossec/bin/manage_agents`, option A, then entering the hostname,
IP and ID for the client we want to add. Do these steps on the OSSEC server!:
root@ossec:~# /var/ossec/bin/manage_agents
****************************************
* OSSEC HIDS v2.7 Agent manager. *
* The following options are available: *
****************************************
(A)dd an agent (A).
(E)xtract key for an agent (E).
(L)ist already added agents (L).
(R)emove an agent (R).
(Q)uit.
Choose your action: A,E,L,R or Q: a
- Adding a new agent (use '\q' to return to the main menu).
Please provide the following:
* A name for the new agent: testclient
* The IP Address of the new agent: 10.0.51.32
* An ID for the new agent[001]:
Agent information:
ID:001
Name:testclient
IP Address:10.0.51.32
Confirm adding it?(y/n): y
Agent added.
Now we find out the key for the OSSEC client:
root@ossec:~# /var/ossec/bin/manage_agents
****************************************
* OSSEC HIDS v2.7 Agent manager. *
* The following options are available: *
****************************************
(A)dd an agent (A).
(E)xtract key for an agent (E).
(L)ist already added agents (L).
(R)emove an agent (R).
(Q)uit.
Choose your action: A,E,L,R or Q: e
Available agents:
ID: 001, Name: testclient, IP: 10.0.51.32
Provide the ID of the agent to extract the key (or '\q' to quit): 001
Agent key information for '001' is:
SD[...]AAUjd=
** Press ENTER to return to the main menu.
Then switch to the OSSEC client and execute the manage_agents:
root@ossec:~# /var/ossec/bin/manage_agents
****************************************
* OSSEC HIDS v2.7 Agent manager. *
* The following options are available: *
****************************************
(I)mport key from the server (I).
(Q)uit.
Choose your action: I or Q: i
* Provide the Key generated by the server.
* The best approach is to cut and paste it.
*** OBS: Do not include spaces or new lines.
Paste it here (or '\q' to quit): SD[...]AAUjd=
Agent information:
ID:001
Name:testclient
IP Address:10.0.51.32
Confirm adding it?(y/n): y
Added.
** Press ENTER to return to the main menu.
And then this needs to be in the `/var/ossec/etc/ossec.conf` file:
<client>
<server-hostname>ossec.raymii.nl</server-hostname>
</client>
Where `ossec.raymii.nl` is your OSSEC server URL or IP.
Now restart the OSSEC agents:
/var/ossec/bin/ossec-control restart
Killing ossec-monitord ..
Killing ossec-logcollector ..
Killing ossec-remoted ..
Killing ossec-syscheckd ..
Killing ossec-analysisd ..
Killing ossec-maild ..
Killing ossec-execd ..
Killing ossec-dbd ..
ossec-agentlessd not running ..
OSSEC HIDS v2.7 Stopped
Starting OSSEC HIDS v2.7 (by Trend Micro Inc.)...
Started ossec-dbd...
Started ossec-agentlessd...
Started ossec-maild...
Started ossec-execd...
Started ossec-analysisd...
Started ossec-logcollector...
Started ossec-remoted...
Started ossec-syscheckd...
Started ossec-monitord...
Completed.
That's it. Repeat these steps for any client that needs to be added. There are
both puppetfiles and chef cookbooks to manage this process.
### Bonus Tips
Here are a few bonus tips/config examples for OSSEC:
#### Ignoring rules
To very simply ignore rules based on rule id, add them to the XML file located
in `/var/ossec/rules/local_rules/xml`, either on the ossec client for one
machine or the ossec server to ignore on all machines:
<!-- Specify here a list of rules to ignore. -->
<!-- 3334 postfix start -->
<!-- 3333 postfix stop -->
<rule id="100030" level="0">
<if_sid>3333, 3334</if_sid>
<description>List of rules to be ignored.</description>
</rule>
#### Monitoring additional log files
The OSSEC agent by default only monitors a few log files. To add more, edit the
`/var/ossec/etc/ossec.conf` file and add a line like this:
<localfile>
<location>/var/log/*</location>
<log_format>syslog</log_format>
</localfile>
This will add all files under `/var/log`. This might be a lot, you can also just
add multiple `<localfile>` blocks with filenames.
#### Firewall
You need to allow UDP port 1514 between OSSEC server and clients. Otherwise you
get errors like this:
2013/09/06 19:53:00 ossec-agentd: INFO: Using IPv4 for: 10.0.51.31 .
2013/09/06 19:53:21 ossec-agentd(4101): WARN: Waiting for server reply (not started). Tried: 'ossec.raymii.nl/10.0.51.31'.
### Removing OSSEC
[If you want to remove OSSEC, either the client or the server, read this
tutorial. It covers all the steps required to uninstall OSSEC][5]
[1]:
https://www.digitalocean.com/?refcode=7435ae6b8212
[2]:
https://raymii.org/s/tutorials/OSSEC_2.8.0_Server_Client_and_Analogi_Dashboard_on_Ubuntu.html
[3]:
https://raymii.org/s/inc/img/ossec/analogi.png
[4]:
https://raymii.org/s/inc/img/ossec/webui.png
[5]:
https://raymii.org/s/tutorials/Uninstall_OSSEC.html
---
License:
All the text on this website is free as in freedom unless stated otherwise.
This means you can use it in any way you want, you can copy it, change it
the way you like and republish it, as long as you release the (modified)
content under the same license to give others the same freedoms you've got
and place my name and a link to this site with the article as source.
This site uses Google Analytics for statistics and Google Adwords for
advertisements. You are tracked and Google knows everything about you.
Use an adblocker like ublock-origin if you don't want it.
All the code on this website is licensed under the GNU GPL v3 license
unless already licensed under a license which does not allows this form
of licensing or if another license is stated on that page / in that software:
This program is free software: you can redistribute it and/or modify
it under the terms of the GNU General Public License as published by
the Free Software Foundation, either version 3 of the License, or
(at your option) any later version.
This program is distributed in the hope that it will be useful,
but WITHOUT ANY WARRANTY; without even the implied warranty of
MERCHANTABILITY or FITNESS FOR A PARTICULAR PURPOSE. See the
GNU General Public License for more details.
You should have received a copy of the GNU General Public License
along with this program. If not, see <
http://www.gnu.org/licenses/>.
Just to be clear, the information on this website is for meant for educational
purposes and you use it at your own risk. I do not take responsibility if you
screw something up. Use common sense, do not 'rm -rf /' as root for example.
If you have any questions then do not hesitate to contact me.
See
https://raymii.org/s/static/About.html for details.