This is a text-only version of the following page on
https://raymii.org:
---
Title : Nitrokey Start: Getting started guide (gnuk openpgp token)
Author : Remy van Elst
Date : 14-08-2016
URL :
https://raymii.org/s/articles/Nitrokey_Start_Getting_started_guide.html
Format : Markdown/HTML
---
The Nitrokey Start is an OpenPGP USB token. It supports three 2048 bit GPG keys
and is based on `gnuk` version 1.0.4. Gnuk is an implementation of USB
cryptographic token for GPG. A cryptographic token is a store of private keys
and it computes cryptographic functions on the device. The main difference with
other GPG cards like the Nitrokey Pro, Yubikey or the OpenPGP card is that this
device does not use a smartcard. Whereas the other devices are basically USB
smartcard readers, the Nitrokey Start has everything in it's firmware. Therefore
it is a very cheap device ($29) and a great choice if you want token based GPG
security but don't want to spend much on an expensive other key.
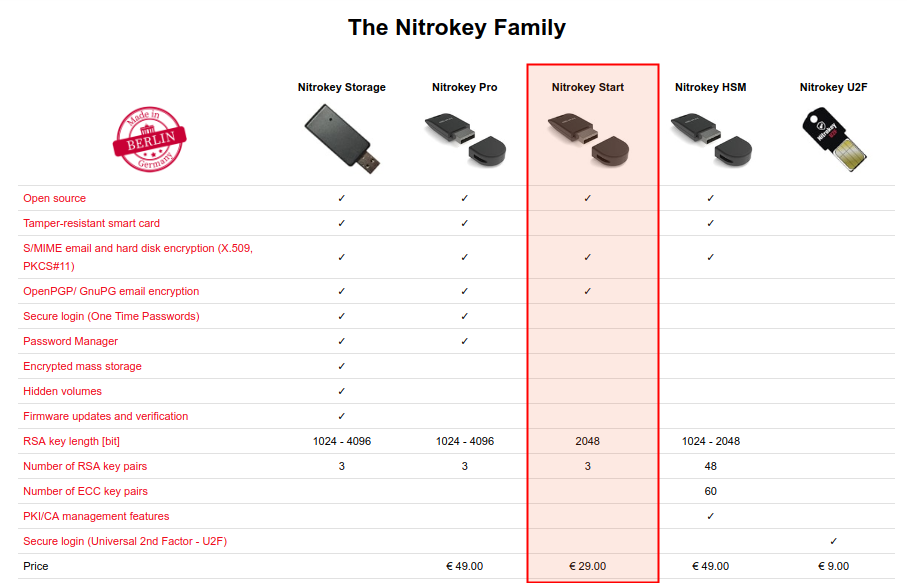
![][1]
Compared with for example the Yubikey, the Nitrokey's big advantage is that both
the software (firmware) and the hardware are open source. If you want you can
buy the microcontroller, flash the firmware and print the case from the Cad
file.
![][2]
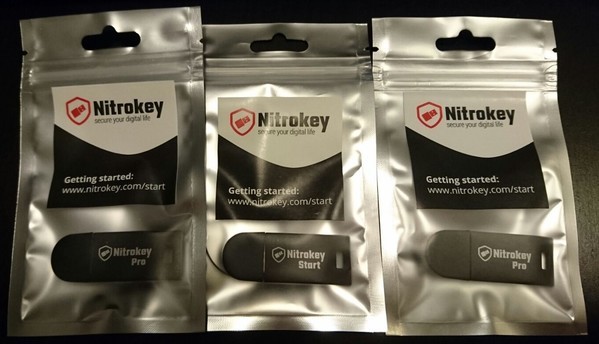
> Two Nitrokey Pro's and the Nitrokey Start
This article is a getting started guide where I talk about the initial setup of
the device, setting up a user PIN, an admin PIN and a reset code, generating the
key and subkeys on the device, or loading external keys into the device and
usage examples with GPG, OpenSSH and Thunderbird.
This article is largely compatible with other gnuk tokens and other OpenPGP
Smartcards like the Nitrokey Pro or the Yubikey.
<p class="ad"> <b>Recently I removed all Google Ads from this site due to their invasive tracking, as well as Google Analytics. Please, if you found this content useful, consider a small donation using any of the options below:</b><br><br> <a href="
https://leafnode.nl">I'm developing an open source monitoring app called Leaf Node Monitoring, for windows, linux & android. Go check it out!</a><br><br> <a href="
https://github.com/sponsors/RaymiiOrg/">Consider sponsoring me on Github. It means the world to me if you show your appreciation and you'll help pay the server costs.</a><br><br> <a href="
https://www.digitalocean.com/?refcode=7435ae6b8212">You can also sponsor me by getting a Digital Ocean VPS. With this referral link you'll get $100 credit for 60 days. </a><br><br> </p>
Nitrokey has multiple models like the Start, Storage, Pro and HSM. I'm
especially fond of the Nitrokey HSM. I've written a [getting started][4] article
for that as well. It explains what the HSM is, how to set it up and how to use
it with OpenSSH for example.
The build quality of the device is excellent. Sturdy and quality. It doesn't
feel like flimsy chinese crap at all, since it isn't that. Durable Germany made
quality here.
I have [multiple articles][5] on the Nitrokeys, so make sure to check out the
other articles as well.
### Initial setup
On Ubuntu, install the following packages:
apt-get install opensc pcscd paperkey haveged gnupg2 gnupg-agent pinentry-curses libccid scdaemon libksba8 libpth20
On Arch linux, follow [the Wiki][6].
If the software is installed, plug in the Nitrokey Start and execute the
following command:
gpg --card-status
Output:
Reader ...........: Nitrokey Nitrokey Start (FSIJ-1.0.4-52FF6E06) 00 00
Application ID ...: D276000124010200FFFE52FF6E060000
Version ..........: 2.0
Manufacturer .....: unmanaged S/N range
Serial number ....: 52FF6E06
Name of cardholder: [not set]
Language prefs ...: [not set]
Sex ..............: unspecified
URL of public key : [not set]
Login data .......: [not set]
Signature PIN ....: forced
Key attributes ...: rsa2048 rsa2048 rsa2048
Max. PIN lengths .: 127 127 127
PIN retry counter : 3 3 3
Signature counter : 0
Signature key ....: [none]
Encryption key....: [none]
Authentication key: [none]
General key info..: [none]
The output above is of an uninitialized token. As you can see, it's a OpenPGP
Card version 2 compatible token. Three keys are supported, the max pin length is
listed and the PIN error counters are all at three (default value).
### Setting up a user PIN, an admin PIN and a reset code
The Nitrokey Start, actually `gnuk`, has a few different options when it comes
to PIN codes. There is the User PIN (PW1), which you use for day to day
operations like unlocking the token, signing and encrypting things. The minimum
length for the User pin is 6 characters.
The Admin PIN (PW3) is used for card/token administration, like loading keys
onto the device, generating keys or changing information like the owner data on
the card. The minimum length for the Admin PIN is 8 characters.
If you enter the wrong user PIN three times the card is blocked. It can then
only be reset with the Admin PIN or reset code. If you enter the wrong Admin pin
three times the card will become unusable.
Last is the reset code, this code can be used only to reset the user PIN. The
minimum length for the Reset Code is 8 characters. The reset code error counter
can be reset with the Admin PIN.
So what is the difference between the Admin PIN and reset code? If you receive a
card from, for example your employer, it will have data and keys filled in
(name, organization, public key url etc). Generally it will not be the case that
you are allowed to change that, so you will not know the Admin PIN. If you
entered the user PIN wrong three times, you cannot use the Admin PIN to reset
the User PIN. This is where the RESET CODE comes in. This code can only be used
to reset the User PIN (PW1).
If you give the wrong PIN two times and then the correct PIN, the error counter
is reset. (Both admin and user PIN.)
#### Admin-less PIN
`gnuk` has a special option that allows you to use the same PIN for user and
admin. This [is in their documentation][7] and will be active if you set the
User PIN BEFORE the Admin PIN. They state that for day to day operations it's
more convinient, but it is also less secure.
Admin-less mode is incompatible with the official GnuPG card specification.
#### Admin PIN reset
If you ever enter the admin PIN wrong three times in a row the device is
unusable. The above reset code can only be used to reset the User PIN. In a
normal GnuPG Smartcard you can send special reset ADPU commands to the smartcard
and make it usable again, although all the keys are wiped.
For a gnuk token like the Nitrokey the procedure is different. You need to store
a public key first and then later on, if the token is hosed, upgrade the
firmware. That public key you stored will be used to sign the update.
I'm having some compile issues for the firmware and the key upload since all my
versions (gcc, libusb, python) are way to new. I'll create a seperate article
for this once I got it all figured out and working.
### Initialize the Nitrokey
We're going to set up the card for the first time. Fire up GPG and get started:
gpg --card-edit
The same output as from `--card-status` but now it gives you an interactive
prompt:
gpg/card>
Using the `help` command to see the available commands:
quit quit this menu
admin show admin commands
help show this help
list list all available data
fetch fetch the key specified in the card URL
passwd menu to change or unblock the PIN
verify verify the PIN and list all data
unblock unblock the PIN using a Reset Code
We are going to set values, so switch to `admin` mode:
gpg/card> admin
Admin commands are allowed
There are a lot more commands available now:
gpg/card> help
quit quit this menu
admin show admin commands
help show this help
list list all available data
name change card holder's name
url change URL to retrieve key
fetch fetch the key specified in the card URL
login change the login name
lang change the language preferences
sex change card holder's sex
cafpr change a CA fingerprint
forcesig toggle the signature force PIN flag
generate generate new keys
passwd menu to change or unblock the PIN
verify verify the PIN and list all data
unblock unblock the PIN using a Reset Code
factory-reset destroy all keys and data
The first thing you want to do is set the Admin PIN. Make sure it's only known
to you.
gpg/card> passwd
gpg: OpenPGP card no. D276000124010200FFFE52FF6E060000 detected
1 - change PIN
2 - unblock PIN
3 - change Admin PIN
4 - set the Reset Code
Q - quit
Your selection? 3
In my case a dialog box popped up to ask for the current Admin PIN (12345678).
Then it asks you twice for the new Admin PIN.
Set up a user PIN, choice `1 - change PIN`. Same thing, it will ask you for the
current user PIN (123456) and for a new PIN two times.
Finally set up a reset code, choice `4 - set the Reset Code`. It will ask you
for the current admin PIN, then two times for a new reset code.
We continue on to further personalize the card. Let it know your name:
gpg/card> name
Cardholder's surname: van Elst
Cardholder's given name: Remy
Your gender:
gpg/card> sex
Sex ((M)ale, (F)emale or space): F
Your preferred country code / language:
gpg/card> lang
Language preferences: nl
If you want, you can place your public key on a website and let people download
it:
gpg/card> url
URL to retrieve public key:
https://raymii.org/s/inc/current_gpg.key
At any point you can list the current data:
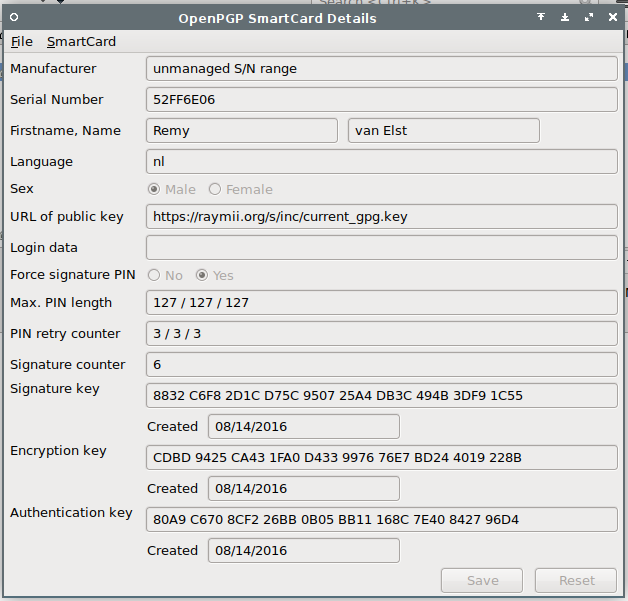
gpg/card> list
Reader ...........: Nitrokey Nitrokey Start (FSIJ-1.0.4-52FF6E06) 00 00
Application ID ...: D276000124010200FFFE52FF6E060000
Version ..........: 2.0
Manufacturer .....: unmanaged S/N range
Serial number ....: 52FF6E06
Name of cardholder: Remy van Elst
Language prefs ...: nl
Sex ..............: female
URL of public key :
https://raymii.org/s/inc/current_gpg.key
Login data .......: [not set]
Signature PIN ....: forced
Key attributes ...: rsa2048 rsa2048 rsa2048
Max. PIN lengths .: 127 127 127
PIN retry counter : 3 3 3
Signature counter : 0
Signature key ....: [none]
Encryption key....: [none]
Authentication key: [none]
General key info..: [none]
When done, save and quit with the `quit` command. Next we will discuss GPG key
generation and some things to keep in mind when deciding to generate keys on the
card or load external keys.
### A note on GPG keys and subkeys
GnuPG keys can have attributes to limit their usage. You can have a key which
you can only use for signing data, and one that you can only use to encrypt
data, or one key that has both attributes.
GnuPG has the concept of subkeys. Subkeys just like normal keys, except that
they are bound to a master keypair. A subkey can be used for signing,
authentication or for encryption. Subkeys can be revoked independently of their
master keypair and can be stored seperately from the master keypair. Subkeys are
associated to your master keypair.
When generating a new keypair, GnuPG creates a keypair with the signing-only
attribute as the master key. It then generates a subkey with the encryption-only
attribute.
For key management it is extremely useful to be able to independently revoke a
subkeypair. Imagine that you do not use subkeys and your laptop gets stolen. You
didn't set up full-disk-encryption, because of time or effort required, and now
you're toast. The thief has your master GPG key and can, if they brute force
your passphrase, decrypt anything and impersonate you via the identity. You can
use your revocation certificate (which you hopefully saved) to revoke the
keypair, but now you need to visit all the people that signed your key to get a
new key signed.
If you generate your master keypair offline, for example, via a Debian Live CD
([Tails][8]) and save it to a secure place (use `paperkey` to print it and place
it in a vault, next to an encrypted USB disk), you can later use the master
keypair to revoke your laptop-subkey and generate a new one. Your master key is
still safe in the safe and all the people that signed your key don't have to re-
sign your new key.
To sign other people's keys you do need to boot up your offline setup and use
your primary master keypair to sign other keypairs.
I also recommend to set an expiry date of a year or two on your master public
key. Do note that private keys never expire, only public keys do. You can extend
the date on a pubkey easily with `gpg --edit-key 0xKEY_ID` and then `expire`.
The [Debian Wiki][9] has a very extensive guide on GPG subkeys.
If you want to convert your current key to subkeys, [here][10] is a good guide.
### Generating the key and subkeys on the device
You can choose to generate an entirely new keypair on this device. Do note that
you cannot get the keypair out, so if the token is lost or broken, your keys are
lost. It is also possible to load an external key on the device, we'll cover
that later in the guide.
If you want to generate a key only on the device, make sure you use an existing
key to sign that key, and use this key to sign the existing key so that you have
a cross-signature and people know that keypair belongs to you.
After you've initialised the Nitrokey we can generate a key on the device. Start
up gpg:
gpg --card-edit
admin
generate
The first question is:
Make off-card backup of encryption key? (Y/n)
This will create a file on your host machine with the private key. In the
specific case you are generating keys on the device and not on your machine, you
might not want to do this.
It will then ask you for the Admin PIN and the User PIN. Enter those.
It will ask you for a key expiry date. Note that this is the public key only and
can be updated later on easily. Set an expiry of 1 year so that if you don't use
this key, it doesn't linger on the keyservers:
Please specify how long the key should be valid.
0 = key does not expire
<n> = key expires in n days
<n>w = key expires in n weeks
<n>m = key expires in n months
<n>y = key expires in n years
Key is valid for? (0) 1y
Key expires at Mon Aug 14 08:15:42 2017 CEST
Is this correct? (y/N) y
Enter your user data for the GPG key:
GnuPG needs to construct a user ID to identify your key.
Real name: Remy van Elst Nitrokey
Email address:
Comment: Nitrokey Start Key
You selected this USER-ID:
"Remy van Elst Nitrokey (Nitrokey Start Key) <
[email protected]>"
Change (N)ame, (C)omment, (E)mail or (O)kay/(Q)uit? O
The on-device key generation takes a while, my key took about 4 minutes.
You will be asked for a passphrase for the key. Enter that twice.
When the generation is finished the following message appears:
We need to generate a lot of random bytes. It is a good idea to perform
some other action (type on the keyboard, move the mouse, utilize the
disks) during the prime generation; this gives the random number
generator a better chance to gain enough entropy.
gpg: key 0x7237395DC5696F9F marked as ultimately trusted
gpg: revocation certificate stored as '/home/remy/.gnupg/openpgp-revocs.d/D78A0B1E407EBD678435CCC77237395DC5696F9F.rev'
public and secret key created and signed.
Using the `list` command in the `gpg` prompt you can now see the keypairs:
[...]
Signature counter : 4
Signature key ....: D78A 0B1E 407E BD67 8435 CCC7 7237 395D C569 6F9F
created ....: 2016-08-14 06:17:48
Encryption key....: 2E7D 26B3 5D9E B690 4C56 3174 78F9 DDE9 9FFF 73F2
created ....: 2016-08-14 06:17:48
Authentication key: D91C 38A7 294C BD63 275F 0D87 7AC8 3DB0 C0EB 9447
created ....: 2016-08-14 06:17:48
General key info..: pub rsa2048/0x7237395DC5696F9F 2016-08-14 Remy van Elst Nitrokey (Nitrokey Start Key) <
[email protected]>
sec> rsa2048/0x7237395DC5696F9F created: 2016-08-14 expires: 2017-08-14
card-no: FFFE 52FF6E06
ssb> rsa2048/0x7AC83DB0C0EB9447 created: 2016-08-14 expires: 2017-08-14
card-no: FFFE 52FF6E06
ssb> rsa2048/0x78F9DDE99FFF73F2 created: 2016-08-14 expires: 2017-08-14
card-no: FFFE 52FF6E06
If you want you can now sign your new key with the old key. My new key id is
`7237395DC5696F9F`. My regular key ID is `2B6755BD1B7F88DC`:
gpg -u 2B6755BD1B7F88DC --sign-key 7237395DC5696F9F
Output:
Primary key fingerprint: D78A 0B1E 407E BD67 8435 CCC7 7237 395D C569 6F9F
Remy van Elst Nitrokey (Nitrokey Start Key) <
[email protected]>
This key is due to expire on 2017-08-14.
Are you sure that you want to sign this key with your
key "Remy van Elst <
[email protected]>" (0x2B6755BD1B7F88DC)
You will then be asked for your password.
To cross-sign, reverse the process:
gpg -u 7237395DC5696F9F --sign-key 2B6755BD1B7F88DC
Output:
Primary key fingerprint: 4DDE 73DB 5030 B539 2681 3A50 2B67 55BD 1B7F 88DC
Remy van Elst <
[email protected]>
This key is due to expire on 2019-05-31.
Are you sure that you want to sign this key with your
key "Remy van Elst Nitrokey (Nitrokey Start Key) <
[email protected]>" (0x7237395DC5696F9F)
Really sign? (y/N) y
You will be asked for your USER PIN for the Nitrokey.
Afterwards send both keys to the keyserver:
gpg --send-key 7237395DC5696F9F
gpg --send-key 2B6755BD1B7F88DC
If, for whatever reason, you need to revoke this keypair, import the revocation
certificate that GnuPG generated for you:
gpg: revocation certificate stored as '/home/remy/.gnupg/openpgp-revocs.d/D78A0B1E407EBD678435CCC77237395DC5696F9F.rev'
But, you need to edit the file first:
To avoid an accidental use of this file, a colon has been inserted
before the 5 dashes below. Remove this colon with a text editor
before importing and publishing this revocation certificate.
:-----BEGIN PGP PUBLIC KEY BLOCK-----
After you've done that, import the revocation certificate:
gpg --import /home/remy/.gnupg/openpgp-revocs.d/D78A0B1E407EBD678435CCC77237395DC5696F9F.rev
Output:
gpg: key 0x7237395DC5696F9F: "Remy van Elst Nitrokey (Nitrokey Start Key) <
[email protected]>" revocation certificate imported
gpg: Total number processed: 1
gpg: new key revocations: 1
gpg: public key of ultimately trusted key 0xB9073AEB64937870 not found
gpg: marginals needed: 3 completes needed: 1 trust model: pgp
gpg: depth: 0 valid: 3 signed: 13 trust: 0-, 0q, 0n, 0m, 0f, 3u
gpg: depth: 1 valid: 13 signed: 4 trust: 12-, 0q, 0n, 0m, 1f, 0u
gpg: next trustdb check due at 2016-09-01
Send the updated and revoked key to the keyservers:
gpg --send-key 7237395DC5696F9F
### Loading external keys into the device
If you already have a keypair and subkeys, you can import those to the device.
[This][11] is a good guide for setting up a machine for offline key generation
and subkeys. I already have my master key so I won't cover it here.
I will add my key with key ID `2B6755BD1B7F88DC` to the card. Fire up gpg for
this key:
gpg --expert --edit-key 2B6755BD1B7F88DC
We provice `--expert` since we are going to add three different subkeys to this
key to load on the card. If you already have these subkeys, then it's not
required.
My master key is 4096 bit, which the Nitrokey doesn't support. Therefore we also
need to generate these specific subkeys, they must be 2048 bit.
Add an `Authentication` subkey:
gpg> addkey
Please select what kind of key you want:
(3) DSA (sign only)
(4) RSA (sign only)
(5) Elgamal (encrypt only)
(6) RSA (encrypt only)
(7) DSA (set your own capabilities)
(8) RSA (set your own capabilities)
(10) ECC (sign only)
(11) ECC (set your own capabilities)
(12) ECC (encrypt only)
(13) Existing key
Your selection? 8
Disable the `Encrypt` and `Sign` attributes:
Possible actions for a RSA key: Sign Encrypt Authenticate
Current allowed actions: Sign Encrypt
(S) Toggle the sign capability
(E) Toggle the encrypt capability
(A) Toggle the authenticate capability
(Q) Finished
Your selection? S
Possible actions for a RSA key: Sign Encrypt Authenticate
Current allowed actions: Encrypt
(S) Toggle the sign capability
(E) Toggle the encrypt capability
(A) Toggle the authenticate capability
(Q) Finished
Your selection? E
Add the `Authenticate` attribute:
Possible actions for a RSA key: Sign Encrypt Authenticate
Current allowed actions:
(S) Toggle the sign capability
(E) Toggle the encrypt capability
(A) Toggle the authenticate capability
(Q) Finished
Your selection? A
Continue on with the keysize (`2048`) and the expiry date (1 year):
Your selection? Q
RSA keys may be between 1024 and 4096 bits long.
What keysize do you want? (2048)
Requested keysize is 2048 bits
Please specify how long the key should be valid.
0 = key does not expire
<n> = key expires in n days
<n>w = key expires in n weeks
<n>m = key expires in n months
<n>y = key expires in n years
Key is valid for? (0) 1y
Key expires at Mon Aug 14 09:47:19 2017 CEST
Is this correct? (y/N) y
Really create? (y/N) y
The key is now being generated:
We need to generate a lot of random bytes. It is a good idea to perform
some other action (type on the keyboard, move the mouse, utilize the
disks) during the prime generation; this gives the random number
generator a better chance to gain enough entropy.
sec rsa4096/0xD4A50E9CC37ACA81
created: 2014-09-02 expires: 2017-08-14 usage: SCA
trust: unknown validity: full
ssb rsa4096/0x107F143B25325ED6
created: 2014-09-02 expires: 2016-09-01 usage: E
ssb rsa2048/0x168C7E40842796D4
created: 2016-08-14 expires: 2017-08-14 usage: A
[ full ] (1). R. van Elst <
[email protected]>
Repeat the above process and generate two more keys. One with ONLY the Encrypt
(E) attribute and one with only the Sign (S) attribute. When that's done, the
`list` command should look like this:
ssb rsa2048/0x168C7E40842796D4
created: 2016-08-14 expires: 2017-08-14 usage: A
ssb rsa2048/0x76E7BD244019228B
created: 2016-08-14 expires: 2017-08-14 usage: E
ssb rsa2048/0xDB3C494B3DF91C55
created: 2016-08-14 expires: 2017-08-14 usage: S
Select the key to transfer to the card. We need to do all three the new keys. In
my case, it's key 2:
gpg> key 2
The key gets a `*` added:
ssb* rsa2048/0x168C7E40842796D4
created: 2016-08-14 expires: 2017-08-14 usage: A
Transfer the key to the Nitrokey:
gpg> keytocard
Confirm the key position in the card:
Please select where to store the key:
(3) Authentication key
Your selection? 3
You will be asked for the key passphrase and the Admin PIN.
If you issue the `gpg --card-status` command in another terminal you can see
that this key is added:
Signature counter : 0
Signature key ....: [none]
Encryption key....: [none]
Authentication key: 80A9 C670 8CF2 26BB 0B05 BB11 168C 7E40 8427 96D4
created ....: 2016-08-14 07:45:16
General key info..: [none]
Issue the `key 2` command on the GPG prompt again to unselect this key, and
continue with the next key:
gpg> key 2
gpg> key 3
Output:
ssb* rsa2048/0x76E7BD244019228B
created: 2016-08-14 expires: 2017-08-14 usage: E
Place it on the Nitrokey:
gpg> keytocard
Output:
Please select where to store the key:
(2) Encryption key
Your selection? 2
Again you will be asked for the Key passphrase. Afterwards in another terminal,
validate that this key is loaded:
gpg --card-status
Output:
Signature counter : 0
Signature key ....: [none]
Encryption key....: CDBD 9425 CA43 1FA0 D433 9976 76E7 BD24 4019 228B
created ....: 2016-08-14 07:49:25
Authentication key: 80A9 C670 8CF2 26BB 0B05 BB11 168C 7E40 8427 96D4
created ....: 2016-08-14 07:45:16
General key info..: [none]
Repeat the process for the last key, unselect key 3 and select key 4:
gpg> key 3
gpg> key 4
Output:
ssb* rsa2048/0xDB3C494B3DF91C55
created: 2016-08-14 expires: 2017-08-14 usage: S
Place it on the card:
Please select where to store the key:
(1) Signature key
(3) Authentication key
Your selection? 1
Save and quit the prompt:
gpg> save
Check with `gpg --card-status` that all the keys are loaded:
Signature counter : 0
Signature key ....: 8832 C6F8 2D1C D75C 9507 25A4 DB3C 494B 3DF9 1C55
created ....: 2016-08-14 07:50:28
Encryption key....: CDBD 9425 CA43 1FA0 D433 9976 76E7 BD24 4019 228B
created ....: 2016-08-14 07:49:25
Authentication key: 80A9 C670 8CF2 26BB 0B05 BB11 168C 7E40 8427 96D4
created ....: 2016-08-14 07:45:16
General key info..: sub rsa2048/0xDB3C494B3DF91C55 2016-08-14 R. van Elst <
[email protected]>
sec rsa4096/0xD4A50E9CC37ACA81 created: 2014-09-02 expires: 2017-08-14
ssb rsa4096/0x107F143B25325ED6 created: 2014-09-02 expires: 2016-09-01
ssb> rsa2048/0x168C7E40842796D4 created: 2016-08-14 expires: 2017-08-14
card-no: FFFE 52FF6E06
ssb> rsa2048/0x76E7BD244019228B created: 2016-08-14 expires: 2017-08-14
card-no: FFFE 52FF6E06
ssb> rsa2048/0xDB3C494B3DF91C55 created: 2016-08-14 expires: 2017-08-14
card-no: FFFE 52FF6E06
Export your public key:
gpg --export --armor D4A50E9CC37ACA81
Save this on your filesystem. We are going to remove the private keys from your
machine, since they are on the Nitrokey. You do need your public key later on.
Just to make sure, before removing any GPG keys, make a backup of your
`~/.gnupg` folder:
cp -ar ~/.gnupg ~/.gnupg-backup-$(date +%s)
Unplug the Nitrokey. Then delete the secret keys for this keypair:
gpg --delete-secret-key D4A50E9CC37ACA81
Confirm it a few times.
To use the smartcard on another PC, you first need to import the public key
first. On the current machine, to use the keys, first run:
gpg --card-status
To test, create a small test file:
echo 'this is a small test file' > test
Sign that with this specific key:
gpg --sign -u D4A50E9CC37ACA81 test
You will be asked for the User PIN of the Nitrokey. Afterwards there is a
`test.gpg` file. You can verify that file is signed:
gpg --verify -u 2B6755BD1B7F88DC test.gpg
Output:
gpg: Signature made Sun Aug 14 10:56:48 2016 CEST
gpg: using RSA key 0xDB3C494B3DF91C55
gpg: Good signature from "R. van Elst <
[email protected]>" [full]
Primary key fingerprint: 5DD7 711A F8C4 72D7 BEEF 03D0 D4A5 0E9C C37A CA81
Subkey fingerprint: 8832 C6F8 2D1C D75C 9507 25A4 DB3C 494B 3DF9 1C55
If the Nitrokey is not present when you want to sign, gpg will tell you to
please insert the correct smartcard.
### Overwriting (deleting) keys on the Nitrokey
Nitrokey Start (actually gnuk) doesn't support overriding keys. Once generated
or written, you should use a Python script provided by GnuK, [gnuk _remove_
keys_libusb.py][12] to remove keys before trying to write a new one.
Do note that I got [errors][13] while using this script. There is a non `libusb`
versio that did work for me. First make sure you have `pyscard` installed:
pip2 install pyscard
Clone the git repository:
git clone
https://github.com/Nitrokey/nitrokey-start-firmware.git
cd nitrokey-start-firmware
**IF YOU EXECUTE THE BELOW SCRIPT ALL YOUR KEYS WILL BE REMOVED**
Execute the non libusb removal script:
python2 tool/gnuk_remove_keys.py -p
It will ask you for the ADMIN PIN:
Admin password: <12345678>
Output:
Token: Nitrokey Nitrokey Start (FSIJ-1.0.4-52FF6E06) 00 00
ATR: 3B DA 11 FF 81 B1 FE 55 1F 03 00 31 84 73 80 01 80 00 90 00 E4
You can afterwards check that all the keys are removed:
gpg --card-status
Output:
Signature counter : 0
Signature key ....: [none]
Encryption key....: [none]
Authentication key: [none]
General key info..: [none]
If you receive errors like:
smartcard.Exceptions.CardConnectionException: Unable to connect with protocol: T0 or T1. Sharing violation.
Or
File "tool/gnuk_remove_keys.py", line 54, in cmd_verify
raise ValueError, ("%02x%02x" % (sw1, sw2))
ValueError: 6982
Then just remove and insert the key and try again.
### Usage examples with GPG
To encrypt a file for recipient with key `2B6755BD1B7F88DC`, use the following
command:
gpg --sign --encrypt -u D4A50E9CC37ACA81 -r 2B6755BD1B7F88DC test
If you want to just encrypt the file, remove the `--sign` flag. `-r` is the
recipient, `-u` is your key. If you remove the sign flag, the other person
cannot validate that the file came from you.
To sign a message and have the ASCII output, use the following command:
gpg --sign --armor -u D4A50E9CC37ACA81 test
Enter the User PIN, and afterwards check the output:
$ cat test.asc
-----BEGIN PGP MESSAGE-----
owEBVAGr/pANAwAKAds8SUs9+RxVAawkYgR0ZXN0V7AzN3RoaXMgaXMgYSBzbWFs
bCB0ZXN0IGZpbGUKiQEcBAABCgAGBQJXsDM3AAoJENs8SUs9+RxV9zwH/R/CFYzt
FJ/TniMWEwUOQ8YvyM2b7Sj4mcw+7yI/db1J6jsdGuoisWrIhvs0tp3i6qtKIjWV
SrGSHcnv+Ur6k2YYqfAEpybw1ixAa/XwVZjUJaSfLm8uqYDD4pMhBupky/OVfZTl
aI/hhZuaPShAt3f8Zg6ZwqIk8OqM6HCe+eSSflC/HVDyt4WKtq0JcZtIjzKbvsGD
jfHrtabzoKdGLmG2y1GT5wrDIM8nInn66Q3uPm/jNlnEH1M93Z4DnY3/jm/+hu+3
DjJFximcSlt3H0kQ7c1y2FXNiufXP+LPmB5QooZouZ5ILSaIiQenoi28T5/aQPv4
P9BiMreZVKzZ6IQ=
=Ztv5
-----END PGP MESSAGE-----
If you receive an encrypted and signed message, you can decypt it with the
following command:
gpg --decrypt test.gpg
You will be asked to enter your user PIN. Output:
gpg: encrypted with 2048-bit RSA key, ID 0x76E7BD244019228B, created 2016-08-14
"R. van Elst <
[email protected]>"
this is a small test file
gpg: Signature made Sun Aug 14 12:12:35 2016 CEST
gpg: using RSA key 0x2B6755BD1B7F88DC
gpg: Good signature from "Remy van Elst <
[email protected]>" [ultimate]
Primary key fingerprint: 4DDE 73DB 5030 B539 2681 3A50 2B67 55BD 1B7F 88DC
### Usage examples with OpenSSH
OpenSSH requires to have a subkey with the Authentication attribute. We don't
use a complicated GPG agent setup or key conversion, but we utilize `OpenSC`.
The Nitrokey Start can also be used with OpenSC just as the Nitrokey HSM.
Make sure the Nitrokey is plugged in. Execute the following command to add the
module to the `ssh-agent`:
ssh-add -s opensc-pkcs11.so
Output:
Enter passphrase for PKCS#11:
Card added: opensc-pkcs11.so
You can check that the keys are available now with the `-l` flag:
ssh-add -l
Output:
2048 SHA256:INvUw/LHzO/loNzzAu99FYlvYpq1o3IgPgjJJuDt/FE opensc-pkcs11.so (RSA)
2048 SHA256:rb0keTL7bQFtr1C5Rii/c6hTcTIM+OYeZ/aqHWJf9+0 opensc-pkcs11.so (RSA)
2048 SHA256:QR/Wr8YAvRQW1rA6Y9UnORZvbXflFB6uG9l2PqxRS2A opensc-pkcs11.so (RSA)
With the `-L` flag you also get the public keys for use in
`~/.ssh/authorized_keys`:
ssh-add -l
Output:
ssh-rsa AAAAB3NzaC1yc2EAAAADAQABAAABAQDuDJUnbB81eUOZ+I0FZk35Yk9S4MyAPIJIcpN5jywNUcX5DJdgXNv/k4gm2grCIAdhACMK6sxnH2jd7e23Iq3LhDLz+I8Stc3qzKqnl1agD87IG2+trCCz2Odd7nIxRr3me5eutEDhvwqLX1aXiH/UEcUOOWGQ6Vu7iDOlia2s5p5qr5F4tbiD0TwdmiTvqtgMPyiXMIk4OCttB5dLyY/7hplfBSYXGgGujQEx6Q7OaHeGc983ZbfLnWvSWqEEfHnQG4IemhgHGU4ZuPdgfc8BgYDBPBFXtcG5lv3SREpupFVnWXm5L8bh3y3j7twlZamlCA7Sk7Vf29UDsbZ/1COT opensc-pkcs11.so
ssh-rsa AAAAB3NzaC1yc2EAAAADAQABAAABAQDgfplUpYCDOGGU9hnZdiHYvetm6Fz7vflcTh/PdQl+9E20ocOXK7IEmm70ABv5Sp5wESIrzyrchUfKo1mvALdxy3Xb1Qc1WC7NQfmUOpMJ4ztNwTB8Jy+Qs2XzMRXGq6RU8RlZcrer7gj0QQIzIxkDrwLG21SByt/hyVUqSI31tQwqs/SKP9cKxcZLAIzReeu2JAqr6U2O62O6/SVYWTa5XV6HKs3PLBsNfjojfGHPYfheSEdY7tMkAZ6uaQsW0FelwdSYoVjhejk29H9AsIuz6Ivp5oscHZhIR9kesnhPj7SBZV2/CFEWSvwmuyNlH3UNr8kvZbdcWPZbLCeLlDTj opensc-pkcs11.so
ssh-rsa AAAAB3NzaC1yc2EAAAADAQABAAABAQCyDuf4vqd4G0CboNKqOOV8UMsYRF/KvPnKO2bZHS46PFMOjBLz0eDQku+YFeNu9wE4uEuBN1eAkvArp5cBTEds8F+qHAoj7C6lRNGrevxBBG/i5m8N6WLl6Ser1P7SZBRv+YF7ErDWDvuHm5GzrD7DU/sVH15ZT+MUDPZ5ANL0PcCYUafxBVigBTNb1siab86sHLDsv+JqYvVyY7qwnog57WyG3C51+GfxmglwDYZeCtBVrP0FKnnaWXnsJIDiE8YlaaUmvQErEDr5NEzNQj5pKcP9Di0IXdPkjBp0AcHZE2u34nT6L0YXKreaWPcyq1eUJC83+x8YRhgQ+C9u1Yip opensc-pkcs11.so
But which key is the Authentication key? Find out with `pkcs15-tool`:
pkcs15-tool --list-keys
Output:
Using reader with a card: Nitrokey Nitrokey Start (FSIJ-1.0.4-52FF6E06) 00 00
Private RSA Key [Signature key]
Object Flags : [0x3], private, modifiable
Usage : [0x20C], sign, signRecover, nonRepudiation
Access Flags : [0x1D], sensitive, alwaysSensitive, neverExtract, local
ModLength : 2048
Key ref : 0 (0x0)
Native : yes
Auth ID : 01
ID : 01
MD:guid : 2c444dd0-08c1-0684-5f26-4eb852d0bb81
Private RSA Key [Encryption key]
Object Flags : [0x3], private, modifiable
Usage : [0x22], decrypt, unwrap
Access Flags : [0x1D], sensitive, alwaysSensitive, neverExtract, local
ModLength : 2048
Key ref : 1 (0x1)
Native : yes
Auth ID : 02
ID : 02
MD:guid : f4238588-7a7d-29bd-c130-27a565150066
Private RSA Key [Authentication key]
Object Flags : [0x3], private, modifiable
Usage : [0x222], decrypt, unwrap, nonRepudiation
Access Flags : [0x1D], sensitive, alwaysSensitive, neverExtract, local
ModLength : 2048
Key ref : 2 (0x2)
Native : yes
Auth ID : 02
ID : 03
MD:guid : d2f08102-b940-3efe-9e91-50f8d377a1d7
The key with ID 3 is the authentication key. Get the SSH key for that ID:
pkcs15-tool --read-ssh-key 3
Output:
Using reader with a card: Nitrokey Nitrokey Start (FSIJ-1.0.4-52FF6E06) 00 00
ssh-rsa AAAAB3NzaC1yc2EAAAADAQABAAABAQCyDuf4vqd4G0CboNKqOOV8UMsYRF/KvPnKO2bZHS46PFMOjBLz0eDQku+YFeNu9wE4uEuBN1eAkvArp5cBTEds8F+qHAoj7C6lRNGrevxBBG/i5m8N6WLl6Ser1P7SZBRv+YF7ErDWDvuHm5GzrD7DU/sVH15ZT+MUDPZ5ANL0PcCYUafxBVigBTNb1siab86sHLDsv+JqYvVyY7qwnog57WyG3C51+GfxmglwDYZeCtBVrP0FKnnaWXnsJIDiE8YlaaUmvQErEDr5NEzNQj5pKcP9Di0IXdPkjBp0AcHZE2u34nT6L0YXKreaWPcyq1eUJC83+x8YRhgQ+C9u1Yip Authentication key
Add that to a server's `~/.ssh/authorized_keys` file and you are able to login
without being asked a password:
$ ssh
[email protected]
Warning: Permanently added '85.222.224.108' (ECDSA) to the list of known hosts.
Welcome to Ubuntu 16.04.1 LTS (GNU/Linux 4.4.0-31-generic x86_64)
* Documentation:
https://help.ubuntu.com
* Management:
https://landscape.canonical.com
* Support:
https://ubuntu.com/advantage
root@smartcard:~# cat /var/log/auth.log
Aug 14 12:41:48 ubuntu sshd[1754]: Accepted password for root from 192.168.20.332 port 50330 ssh2
Aug 14 12:41:48 ubuntu sshd[1754]: pam_unix(sshd:session): session opened for user root by (uid=0)
Aug 14 12:42:06 ubuntu sshd[1754]: Received disconnect from 192.168.20.332 port 50330:11: disconnected by user
Aug 14 12:42:06 ubuntu sshd[1754]: Disconnected from 192.168.20.332 port 50330
[...]
Aug 14 12:42:08 ubuntu sshd[1776]: Postponed publickey for root from 192.168.20.332 port 50366 ssh2 [preauth]
Aug 14 12:42:09 ubuntu sshd[1776]: Accepted publickey for root from 192.168.20.332 port 50366 ssh2: RSA SHA256:QR/Wr8YAvRQW1rA6Y9UnORZvbXflFB6uG9l2PqxRS2A
Aug 14 12:42:09 ubuntu sshd[1776]: pam_unix(sshd:session): session opened for user root by (uid=0)
When you're done with all the sessions, close them and remove the Nitrokey from
the ssh-agent:
ssh-add -e opensc-pkcs11.so
Output:
Card removed: opensc-pkcs11.so
`ssh-add -l` shouldn't show the keys anymore.
### Usage examples with Thunderbird
Using [Enigmail][14] with Thunderbird is very easy. If you've set up the
Nitrokey Start as shown above with OpenPGP, Enigmail will automatically find the
key and use it, if it's inserted, no further setup required. Here's the
smartcard information screen:
![][15]
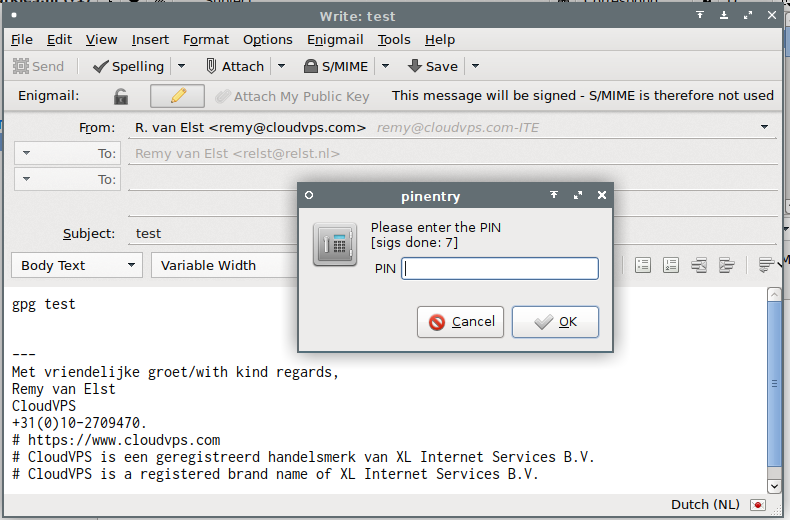
When sending an email, it will automatically ask you for the PIN:
![][16]
If you receive an encrypted email, it will also automatically ask you for the
PIN and decrypt the email:
![][17]
Literally no setup required. I've rarely seen this kind of encrypton be so
easily setup, major props to Thunderbird, Enigmail and GPG here.
[1]:
https://raymii.org/s/inc/img/nitrokey_family_start.png
[2]:
https://raymii.org/s/inc/img/nitrokey_start_pro.jpg
[3]:
https://www.digitalocean.com/?refcode=7435ae6b8212
[4]:
https://raymii.org/s/articles/Get_Started_With_The_Nitrokey_HSM.html
[5]:
https://raymii.org/s/tags/nitrokey.html
[6]:
https://wiki.archlinux.org/index.php/GnuPG
[7]:
http://www.fsij.org/doc-gnuk/gnuk-passphrase-setting.html#set-up-pw1-pw3-and-reset-code
[8]:
https://tails.boum.org/
[9]:
https://wiki.debian.org/Subkeys
[10]:
http://www.macfreek.nl/memory/Convert_GPG_keys_to_subkeys
[11]:
https://blog.josefsson.org/2014/06/23/offline-gnupg-master-key-and-subkeys-on-yubikey-neo-smartcard/
[12]:
https://raw.githubusercontent.com/Nitrokey/nitrokey-start-firmware/master/tool/gnuk_remove_keys_libusb.py
[13]:
https://github.com/Nitrokey/nitrokey-start-firmware/issues/2
[14]:
https://www.enigmail.net/index.php/en/
[15]:
https://raymii.org/s/inc/img/gpg_tbird_nitrokey.png
[16]:
https://raymii.org/s/inc/img/gpg_tbird_nitrokey_2.png
[17]:
https://raymii.org/s/inc/img/gpg_tbird_nitrokey_3.png
---
License:
All the text on this website is free as in freedom unless stated otherwise.
This means you can use it in any way you want, you can copy it, change it
the way you like and republish it, as long as you release the (modified)
content under the same license to give others the same freedoms you've got
and place my name and a link to this site with the article as source.
This site uses Google Analytics for statistics and Google Adwords for
advertisements. You are tracked and Google knows everything about you.
Use an adblocker like ublock-origin if you don't want it.
All the code on this website is licensed under the GNU GPL v3 license
unless already licensed under a license which does not allows this form
of licensing or if another license is stated on that page / in that software:
This program is free software: you can redistribute it and/or modify
it under the terms of the GNU General Public License as published by
the Free Software Foundation, either version 3 of the License, or
(at your option) any later version.
This program is distributed in the hope that it will be useful,
but WITHOUT ANY WARRANTY; without even the implied warranty of
MERCHANTABILITY or FITNESS FOR A PARTICULAR PURPOSE. See the
GNU General Public License for more details.
You should have received a copy of the GNU General Public License
along with this program. If not, see <
http://www.gnu.org/licenses/>.
Just to be clear, the information on this website is for meant for educational
purposes and you use it at your own risk. I do not take responsibility if you
screw something up. Use common sense, do not 'rm -rf /' as root for example.
If you have any questions then do not hesitate to contact me.
See
https://raymii.org/s/static/About.html for details.