This is a text-only version of the following page on
https://raymii.org:
---
Title : KVM host with bonding and VLAN tagged Virtual Machines setup on Ubuntu 12.04
Author : Remy van Elst
Date : 15-02-2014
URL :
https://raymii.org/s/tutorials/KVM_with_bonding_and_VLAN_tagging_setup_on_Ubuntu_12.04.html
Format : Markdown/HTML
---
### Preface
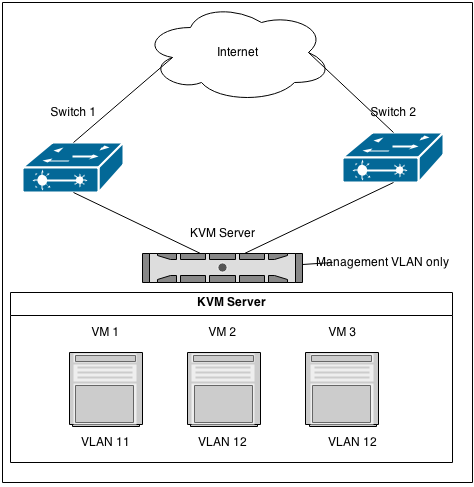
![kvm][1]
I want to set up a KVM host which is only reachable from the management network
(VLAN 10). It is going to run VM's in two other VLAN's, VLAN 11 (accept) and
VLAN 12 (production). The KVM host itself should not be reachable on the two
latter VLAN's, only on the management network.
The KVM host has 2 NIC's, which are plugged in to two switches who support LACP.
The switch ports for the KVM host are trunk ports for the above VLAN's (11, 10
and 12). The two NIC's are bonded in balance-xor (bond mode 3) for fault
tolerance and load balancing.
<p class="ad"> <b>Recently I removed all Google Ads from this site due to their invasive tracking, as well as Google Analytics. Please, if you found this content useful, consider a small donation using any of the options below:</b><br><br> <a href="
https://leafnode.nl">I'm developing an open source monitoring app called Leaf Node Monitoring, for windows, linux & android. Go check it out!</a><br><br> <a href="
https://github.com/sponsors/RaymiiOrg/">Consider sponsoring me on Github. It means the world to me if you show your appreciation and you'll help pay the server costs.</a><br><br> <a href="
https://www.digitalocean.com/?refcode=7435ae6b8212">You can also sponsor me by getting a Digital Ocean VPS. With this referral link you'll get $100 credit for 60 days. </a><br><br> </p>
We are going to create three interfaces using the linux vlan config, `bond0.11`,
`bond0.10` and `bond0.12`. We need to do this for the VLAN tagging.
On those interfaces we are going to create bridges for use with KVM: `vmbr11`,
`vmbr10` and `vmbr12`. Only `vmbr10` will get an IP address, which we will use
for connecting over ssh for management. The other two bridges only serve as
bridges for the virtual machine nic's. Because we do it this way, it will appear
to the virtual machines as if they were only in the network they are bridged in
and they require no further configuration themselves.
We are using Ubuntu's vmbuilder to build a test VM. Instructions for adding a
serial console for troubleshooting are also included.
My management VLAN (10) has the IP range `192.168.10.0/24`. The accept VLAN (11)
has the IP range `192.168.11.0/24`. My production VLAN, as you might have
guessed, has the range `192.168.12.0/24`.
This is an example situation to keep the tutorial simple. I actually use a
`environment-dmz`, `environment-frontend` and `environment-backend` setup with
corresponding VLANs.
### Requirements
* Server with Ubuntu 12.04
* Switch with VLAN and LACP support
* Hardware Virtualization support
You can check hardware virtualization support with the following command:
egrep '(vmx|svm)' /proc/cpuinfo
If it results in output like this:
flags : fpu vme de pse tsc msr pae mce cx8 apic sep mtrr pge mca cmov pat pse36 clflush mmx fxsr sse sse2 ht syscall nx mmxext fxsr_opt pdpe1gb rdtscp lm constant_tsc rep_good nopl nonstop_tsc extd_apicid aperfmperf pni pclmulqdq monitor ssse3 cx16 sse4_1 sse4_2 popcnt aes xsave avx lahf_lm cmp_legacy svm extapic cr8_legacy abm sse4a misalignsse 3dnowprefetch osvw ibs xop skinit wdt lwp fma4 nodeid_msr topoext perfctr_core arat cpb hw_pstate npt lbrv svm_lock nrip_save tsc_scale vmcb_clean flushbyasid decodeassists pausefilter pfthreshold
Your CPU is able to run KVM virtual machines.
### Install required packages
The below command installs all the required packages for KVM virtualization,
bridged networking and VLAN support:
apt-get install vlan ifenslave ubuntu-virt-server python-vm-builder kvm-ipxe bridge-utils libguestfs-tools guestfish
### Set up NIC bonding
Read this article I wrote for a lot more info on NIC bonding:
[
https://raymii.org/s/tutorials/NIC _Bonding_ on _Ubuntu_ 12.04.html][3]
### Set up network bridge for VLAN
We are going to add an interface definition for each VLAN to
`/etc/network/interfaces`. The VLAN interface names must follow one of the
naming conventions supported by vconfig. The one used and recommended here is of
the form `ethx.y`, where ethx is the physical interface name and y is the VLAN
number.
As stated above, we are bonding/teaming `eth0` and `eth1` together in `balance-
xor` mode. This provides load balancing and fault tolerance.
We add an interface for every VLAN on the `bond0` interface. This interface is
used for the bridge to the KVM VM's. The bridge for the management vlan (VLAN
10) will have an IP address and all the other regular network configuration
required. The other two bridges have the IP stub of 0.0.0.0, if this is not
defined, your VM's will not have network connectivity. The KVM server itself
however is not reachable on that network. If you would want that, you would need
to change the IP address to something for that VLAN.
vim /etc/network/interfaces
Contents:
# The loopback network interface
auto lo
iface lo inet loopback
# The primary network interface
auto eth0
iface eth0 inet manual
bond-master bond0
auto eth1
iface eth1 inet manual
bond-master bond0
auto bond0
iface bond0 inet manual
bond-miimon 100 # Specifies the MII link monitoring frequency in milliseconds. This determines how often the link state of each slave is inspected for link failures.
bond-downdelay 200 # Specifies the time, in milliseconds, to wait before disabling a slave after a link failure has been detected.
bond-updelay 200 # Specifies the time, in milliseconds, to wait before enabling a slave after a link recovery has been detected.
bond-mode 3 # balance-xor; XOR policy: Transmit based on the selected transmit hash policy. The default policy is a simple [(source MAC address XOR'd with destination MAC address) modulo slave count]. Alternate transmit policies may be selected via the xmit_hash_policy option, described below.
bond-slaves none # we already defined the interfaces above with bond-master
# Management VLAN
auto bond0.10
iface bond0.10 inet manual
vlan-raw-device bond0
auto vmbr10
iface vmbr10 inet static
address 192.168.10.25
netmask 255.255.255.0
network 192.168.10.0
broadcast 192.168.10.255
gateway 192.168.10.1
dns-nameservers 192.168.9.10
dns-search example.org.eu
bridge_ports bond0.10
bridge_hello 2 # Periodically, a hello packet is sent out by the Root Bridge and the Designated Bridges. Hello packets are used to communicate information about the topology throughout the entire Bridged Local Area Network.
bridge_maxage 12 # If a another bridge in the spanning tree does not send out a hello packet for a long period of time, it is assumed to be dead. This timeout is set with:
bridge_stp off
bridge_fd 9 # Forwarding delay time is the time spent in each of the Listening and Learning states before the Forwarding state is entered. This delay is so that when a new bridge comes onto a busy network it looks at some traffic before participating.
up /sbin/ifconfig $IFACE up || /bin/true
# Accept VLAN
auto bond0.11
iface bond0.11 inet manual
vlan-raw-device bond0
auto vmbr11
iface vmbr11 inet manual
address 0.0.0.0
bridge_ports bond0.11
bridge_hello 2
bridge_maxage 12
bridge_stp off
bridge_fd 9
up /sbin/ifconfig $IFACE up || /bin/true
# Production VLAN
auto bond0.12
iface bond0.12 inet manual
vlan-raw-device bond0
auto vmbr12
iface vmbr12 inet manual
address 0.0.0.0
bridge_ports bond0.12
bridge_hello 2
bridge_maxage 12
bridge_stp off
bridge_fd 9
up /sbin/ifconfig $IFACE up || /bin/true
We want to delete the default libvirt interface which is created by default to
be used for guests (It uses NAT, I never use it).
virsh net-destroy default
virsh net-autostart --disable default
Also add the following items to `/etc/sysctl.conf`:
net.bridge.bridge-nf-call-ip6tables = 0
net.bridge.bridge-nf-call-iptables = 0
net.bridge.bridge-nf-call-arptables = 0
net.bridge.bridge-nf-filter-pppoe-tagged = 0
net.bridge.bridge-nf-filter-vlan-tagged = 0
And apply them:
sysctl -p;
ebtables -F
We do this to make sure that `iptables` and `ebtables` (iptables for arp) do not
interfere with the virtual networking setup.
After all the configuration is set up, restart `libvirtd`:
/etc/init.d/libvirtd restart
/etc/init.d/libvirt-bin restart
/etc/init.d/qemu-kvm restart
### Add root user to right groups
The root user needs to be in the `libvirtd` and `kvm` groups to be able to work
with `virsh` and related tools. Add it to the groups:
adduser `id -un` libvirtd
adduser `id -un` kvm
### First VM with VMBuilder
We will use the vmbuilder tool to create VMs. vmbuilder uses a template to
create virtual machines, this template is located in the /etc/vmbuilder/libvirt/
directory. First we create a copy for the new vm, which we will name `vm1`:
mkdir -p /var/lib/libvirt/images/vm1/mytemplates/libvirt
cp /etc/vmbuilder/libvirt/* /var/lib/libvirt/images/vm1/mytemplates/libvirt/
Edit the following file to define the VM disk partitions and size:
vim /var/lib/libvirt/images/vm1/vmbuilder.partition
Contents:
root 10000
swap 2000
---
/var 10000
This defines a 10 GB root partition, a 2 GB swap area and the `---` makes that
the 10 GB /var partition gets its own disk image.
Create a script which will be executed on (and only on) the first boot of the
VM. I use this to regenerate the SSH host key, otherwise it will have the SSH
host key from the vmbuilder template:
vim /var/lib/libvirt/images/vm1/boot.sh
Contents:
# This script will run the first time the virtual machine boots as root
# Expire the user account
passwd -e remy
# regenerate ssh host key
rm -rf /etc/ssh/ssh_host_*
dpkg-reconfigure openssh-server
Now create the VM:
cd /var/lib/libvirt/images/vm1/
vmbuilder kvm ubuntu --suite=precise --flavour=virtual --arch=amd64 --mirror=
http://nl.archive.ubuntu.com/ubuntu -o --libvirt=qemu:///system --ip=192.168.12.20 --gw=192.168.12.1 --part=vmbuilder.partition --templates=mytemplates --user=remy --name=Remy --pass=example --addpkg=vim-nox --addpkg=unattended-upgrades --addpkg=acpid --addpkg=openssh-server --firstboot=/var/lib/libvirt/images/vm1/boot.sh --mem=512 --hostname=vm1 --bridge=vmbr12
The options explained:
* kvm: the hypervisor image format (Valid options: xen kvm vmw6 vmserver)
* ubuntu: the distribution (Valid options: ubuntu)
* suite: distribution version
* flavour: specifies the virtual kernel
* arch: architecture of the VM
* mirror: the ubuntu mirror you want to use
* o: overwrite the previous version of the VM
* libvirt: add the resulting VM to the list of available machines
* ip: IP for the VM
* gw: gateway for the VM
* part: defines the partition file
* templates: specifies the directory that holds the template file, relative to our working directory
* user: username for the new user
* pass: password for the new user
* name: full name for the new user
* firstboot: specifies the firstboot script.
* addpkg: specify Ubuntu packages that you want to have installed during the VM creation
* mem: VM RAM
* hostname: VM Hostname
* bridge: The bridge interface the VM will be attached to
Example output:
2014-02-14 19:13:03,541 INFO : Calling hook: preflight_check
2014-02-14 19:13:03,545 INFO : Calling hook: set_defaults
2014-02-14 19:13:03,546 INFO : Calling hook: bootstrap
2014-02-14 19:20:11,227 INFO : Calling hook: configure_os
2014-02-14 19:21:40,418 INFO : invoke-rc.d: policy-rc.d denied execution of start.
2014-02-14 19:22:02,081 INFO :
2014-02-14 19:22:02,082 INFO : Current default time zone: 'Etc/UTC'
2014-02-14 19:22:02,085 INFO : Local time is now: Fri Feb 14 18:22:02 UTC 2014.
2014-02-14 19:22:02,085 INFO : Universal Time is now: Fri Feb 14 18:22:02 UTC 2014.
2014-02-14 19:22:02,086 INFO :
Extracting templates from packages: 100%
2014-02-14 19:23:44,503 INFO : invoke-rc.d: policy-rc.d denied execution of stop.
2014-02-14 19:24:36,398 INFO : invoke-rc.d: policy-rc.d denied execution of start.
2014-02-14 19:24:39,584 INFO : invoke-rc.d: policy-rc.d denied execution of restart.
2014-02-14 19:25:13,496 INFO :
2014-02-14 19:25:13,496 INFO : Current default time zone: 'Etc/UTC'
2014-02-14 19:25:13,502 INFO : Local time is now: Fri Feb 14 18:25:13 UTC 2014.
2014-02-14 19:25:13,502 INFO : Universal Time is now: Fri Feb 14 18:25:13 UTC 2014.
2014-02-14 19:25:13,502 INFO : Run 'dpkg-reconfigure tzdata' if you wish to change it.
2014-02-14 19:25:13,502 INFO :
2014-02-14 19:25:16,014 INFO : invoke-rc.d: policy-rc.d denied execution of stop.
2014-02-14 19:25:46,843 INFO : gpg: key 437D05B5: "Ubuntu Archive Automatic Signing Key <
[email protected]>" not changed
2014-02-14 19:25:46,847 INFO : gpg: key FBB75412: "Ubuntu CD Image Automatic Signing Key <
[email protected]>" not changed
2014-02-14 19:25:46,849 INFO : gpg: key C0B21F32: public key "Ubuntu Archive Automatic Signing Key (2012) <
[email protected]>" imported
2014-02-14 19:25:46,850 INFO : gpg: key EFE21092: public key "Ubuntu CD Image Automatic Signing Key (2012) <
[email protected]>" imported
2014-02-14 19:25:46,812 INFO : gpg: Total number processed: 4
2014-02-14 19:25:46,812 INFO : gpg: imported: 2 (RSA: 2)
2014-02-14 19:25:46,812 INFO : gpg: unchanged: 2
2014-02-14 19:25:46,852 INFO : gpg: no ultimately trusted keys found
2014-02-14 19:25:58,038 INFO : gpg: key 437D05B5: "Ubuntu Archive Automatic Signing Key <
[email protected]>" not changed
2014-02-14 19:25:58,042 INFO : gpg: key FBB75412: "Ubuntu CD Image Automatic Signing Key <
[email protected]>" not changed
2014-02-14 19:25:58,044 INFO : gpg: key C0B21F32: "Ubuntu Archive Automatic Signing Key (2012) <
[email protected]>" not changed
2014-02-14 19:25:58,045 INFO : gpg: key EFE21092: "Ubuntu CD Image Automatic Signing Key (2012) <
[email protected]>" not changed
2014-02-14 19:25:58,046 INFO : gpg: Total number processed: 4
2014-02-14 19:25:58,046 INFO : gpg: unchanged: 4
2014-02-14 19:25:58,094 INFO : No packages found matching linux-image-[0-9]*.
2014-02-14 19:26:44,695 INFO : invoke-rc.d: policy-rc.d denied execution of stop.
2014-02-14 19:27:00,223 INFO : invoke-rc.d: policy-rc.d denied execution of start.
2014-02-14 19:27:08,390 INFO : invoke-rc.d: policy-rc.d denied execution of start.
2014-02-14 19:27:18,082 INFO : invoke-rc.d: policy-rc.d denied execution of restart.
2014-02-14 19:27:24,214 INFO : invoke-rc.d: policy-rc.d denied execution of start.
2014-02-14 19:27:33,555 INFO : Cleaning up
2014-02-14 19:27:33,557 INFO : Calling hook: preflight_check
2014-02-14 19:27:33,868 INFO : Calling hook: configure_networking
2014-02-14 19:27:33,950 INFO : Calling hook: configure_mounting
2014-02-14 19:27:33,979 INFO : Calling hook: mount_partitions
2014-02-14 19:27:33,980 INFO : Mounting target filesystems
2014-02-14 19:27:33,980 INFO : Creating disk image: "/tmp/tmpd08iAo" of size: 12001MB
2014-02-14 19:27:10,070 INFO : Adding partition table to disk image: /tmp/tmpd08iAo
2014-02-14 19:27:10,537 INFO : Adding type 4 partition to disk image: /tmp/tmpd08iAo
2014-02-14 19:27:10,538 INFO : Partition at beginning of disk - reserving first cylinder
2014-02-14 19:27:10,633 INFO : Adding type 3 partition to disk image: /tmp/tmpd08iAo
2014-02-14 19:27:10,642 INFO : [0] ../../libparted/filesys.c:148 (ped_file_system_type_get): File system alias linux-swap(new) is deprecated
2014-02-14 19:27:10,693 INFO : Creating loop devices corresponding to the created partitions
2014-02-14 19:27:10,769 INFO : Creating file systems
2014-02-14 19:27:10,849 INFO : mke2fs 1.42 (11-Nov-2011)
2014-02-14 19:27:37,331 INFO : mkswap: /dev/mapper/loop0p2: warning: don't erase bootbits sectors
2014-02-14 19:27:37,332 INFO : on whole disk. Use -f to force.
2014-02-14 19:27:44,301 INFO : Calling hook: install_bootloader
2014-02-14 19:28:23,227 INFO : Removing update-grub hooks from /etc/kernel-img.conf in favour of
2014-02-14 19:28:23,227 INFO : /etc/kernel/ hooks.
2014-02-14 19:28:23,312 INFO : Searching for GRUB installation directory ... found: /boot/grub
2014-02-14 19:28:23,422 INFO : Searching for default file ... Generating /boot/grub/default file and setting the default boot entry to 0
2014-02-14 19:28:23,424 INFO : Searching for GRUB installation directory ... found: /boot/grub
2014-02-14 19:28:23,431 INFO : Testing for an existing GRUB menu.lst file ...
2014-02-14 19:28:23,432 INFO :
2014-02-14 19:28:23,432 INFO : Could not find /boot/grub/menu.lst file. Would you like /boot/grub/menu.lst generated for you? (y/N) /usr/sbin/update-grub: line 1094: read: read error: 0: Bad file descriptor
2014-02-14 19:28:31,712 INFO : Searching for GRUB installation directory ... found: /boot/grub
2014-02-14 19:28:31,783 INFO : Searching for default file ... found: /boot/grub/default
2014-02-14 19:28:31,789 INFO : Testing for an existing GRUB menu.lst file ...
2014-02-14 19:28:31,789 INFO :
2014-02-14 19:28:31,789 INFO : Could not find /boot/grub/menu.lst file.
2014-02-14 19:28:31,790 INFO : Generating /boot/grub/menu.lst
2014-02-14 19:28:31,902 INFO : Searching for splash image ... none found, skipping ...
2014-02-14 19:28:32,110 INFO : grep: /boot/config*: No such file or directory
2014-02-14 19:28:32,269 INFO : Updating /boot/grub/menu.lst ... done
2014-02-14 19:28:32,270 INFO :
2014-02-14 19:28:32,754 INFO : Searching for GRUB installation directory ... found: /boot/grub
2014-02-14 19:28:32,826 INFO : Searching for default file ... found: /boot/grub/default
2014-02-14 19:28:32,833 INFO : Testing for an existing GRUB menu.lst file ... found: /boot/grub/menu.lst
2014-02-14 19:28:33,025 INFO : Searching for splash image ... none found, skipping ...
2014-02-14 19:28:33,062 INFO : grep: /boot/config*: No such file or directory
2014-02-14 19:28:33,207 INFO : Updating /boot/grub/menu.lst ... done
2014-02-14 19:28:33,207 INFO :
2014-02-14 19:28:33,431 INFO : Searching for GRUB installation directory ... found: /boot/grub
2014-02-14 19:28:33,444 INFO : Calling hook: install_kernel
2014-02-14 19:28:58,376 INFO : Done.
2014-02-14 19:11:19,370 INFO : Running depmod.
2014-02-14 19:11:19,475 INFO : update-initramfs: deferring update (hook will be called later)
2014-02-14 19:11:19,487 INFO : Examining /etc/kernel/postinst.d.
2014-02-14 19:11:19,489 INFO : run-parts: executing /etc/kernel/postinst.d/apt-auto-removal 3.2.0-58-virtual /boot/vmlinuz-3.2.0-58-virtual
2014-02-14 19:11:19,544 INFO : run-parts: executing /etc/kernel/postinst.d/initramfs-tools 3.2.0-58-virtual /boot/vmlinuz-3.2.0-58-virtual
2014-02-14 19:11:19,549 INFO : update-initramfs: Generating /boot/initrd.img-3.2.0-58-virtual
2014-02-14 19:11:23,561 INFO : run-parts: executing /etc/kernel/postinst.d/zz-update-grub 3.2.0-58-virtual /boot/vmlinuz-3.2.0-58-virtual
2014-02-14 19:11:23,686 INFO : Searching for GRUB installation directory ... found: /boot/grub
2014-02-14 19:11:23,757 INFO : Searching for default file ... found: /boot/grub/default
2014-02-14 19:11:23,764 INFO : Testing for an existing GRUB menu.lst file ... found: /boot/grub/menu.lst
2014-02-14 19:11:23,957 INFO : Searching for splash image ... none found, skipping ...
2014-02-14 19:11:24,064 INFO : Found kernel: /boot/vmlinuz-3.2.0-58-virtual
2014-02-14 19:11:24,242 INFO : Replacing config file /run/grub/menu.lst with new version
2014-02-14 19:11:24,283 INFO : Updating /boot/grub/menu.lst ... done
2014-02-14 19:11:24,283 INFO :
2014-02-14 19:11:11,394 INFO : Calling hook: post_install
2014-02-14 19:11:11,474 INFO : Calling hook: unmount_partitions
2014-02-14 19:11:11,475 INFO : Unmounting target filesystem
2014-02-14 19:11:35,991 INFO : Calling hook: convert
2014-02-14 19:11:35,992 INFO : Converting /tmp/tmpd08iAo to qcow2, format ubuntu-kvm/tmpd08iAo.qcow2
2014-02-14 19:11:54,187 INFO : Calling hook: fix_ownership
2014-02-14 19:11:54,188 INFO : Calling hook: deploy
### Managing the first VM
We are using `virsh` to manage the VM. `virsh` is a hypervisor agnostic way to
manage virtual machines, it work with Xen, KVM and others.
First define it so that `virsh` knows abot it:
virsh define /etc/libvirt/qemu/vm1.xml
Output:
Domain vm1 defined from /etc/libvirt/qemu/vm1.xml
Then start it:
virsh start vm1
Output:
Domain vm1 started
Check if it is running:
virsh list
Output:
Id Name State
----------------------------------
1 vm1 running
Other commands to manage virtual machines with `virsh` are listed below:
Shutdown the VM:
virsh shutdown vm1
Pull the power plug from the VM:
virsh destroy vm1
The difference between `shutdown` and `destroy` is that the first sends a ACPI
signal to the VM so that it can shut down itself cleanly (like pressing the
power button) and the latter just bluntly pulls the power plug.
Suspend or resume the VM:
virsh suspend vm1
virsh resume vm1
Remove the VM from the virsh list:
virsh undefine vm1
You need to manually remove the KVM disk image after this.
Autostart the vm on hypervisor host boot:
virsh autostart vm1
This way, when the machine has a reboot or power loss, the VM will autostart
when the machine is booted.
You should now be able to SSH in to your virtual machine from another host
(which has access to the correct VLAN). The KVM host itself is only managable
from the management VLAN and the VM's cannot access either the KVM host or the
management VLAN.
Repeat the above steps to create more virtual machines. Remember to change the
name, IP address and VLAN, otherwise they override existing configuration.
### Console access to a VM
You might have a network configuration error or any other reason to get console
access to your VM. To access your VM's "serial console" use the following
command:
virsh console vm1
If you only get blank output like this:
Connected to domain vm1
Escape character is ^]
You might need to set up a serial console. This can be the case on an Ubuntu
12.04 guest. Here are instructions to set up a serial console on Ubuntu 12.04.
We do a dirty grub hack because we cannot access the VM to do it the clean way.
Use `virt-edit` on the KVM host machine to edit a few files in the guest:
# first stop the VM
virsh destroy vm1
# edit the VM config
virsh edit vm1
Place the following inside the section:
<serial type='pty'>
<target port='0'/>
</serial>
<console type='pty'>
<target type='serial' port='0'/>
</console>
# then edit the boot menu in the vm:
virt-edit vm1 /boot/grub/menu.lst
Add this to the top of the file:
serial --unit=0 --speed=115200 --word=8 --parity=no --stop=1
terminal --timeout=15 serial console
Add the following after the kernel line of the boot entry:
console=ttyS0,19200 earlyprint=serial,ttyS0,19200
I also removed the `quiet` and `splash` parts.
My entry looks like this:
title Ubuntu 12.04.4 LTS, kernel 3.2.0-58-virtual
uuid 5a17ce36-580b-47ab-95b2-ff9be5d5d6d8
kernel /boot/vmlinuz-3.2.0-58-virtual root=UUID=5a17ce36-580b-47ab-95b2-ff9be5d5d6d8 ro console=ttyS0,19200 earlyprint=serial,ttyS0,19200
initrd /boot/initrd.img-3.2.0-58-virtual
The output from grub will go to the normal console unless input is received from
the serial port. Whichever receives input first becomes the default console.
This gives you the best of both worlds.
We also need to create a file in the VM for the console itself. We'll use
`guestfish` for that because `virt-edi`t does not support creating files in the
disk image:
guestfish --rw -a ubuntu-kvm/tmpIrlKJF.qcow2 -i write /etc/init/ttyS0.conf " "
Change `ubuntu-kvm/tmpIrlKJF.qcow2` to the path to your disk image. We can now
use `virt-edit` to edit the file again:
virt-edit vm1 /etc/init/ttyS0.conf
Write the following to the file:
# ttyS0 - getty
#
# This service maintains a getty on ttyS0 from the point the system is
# started until it is shut down again.
start on stopped rc RUNLEVEL=[2105]
stop on runlevel [!2105]
respawn
exec /sbin/getty -L 115200 ttyS0 xterm
This will start a serial console on the VM. If you do not do this you will only
see the GRUB boot prompt and not the OS output.
Now boot the machine with the console attached:
virsh start vm1 --console
Output:
Domain vm1 started
Connected to domain vm1
Escape character is ^]
Press any key to continue.
Boot from (hd0,0) ext4 5a17ce36-580b-47ab-95b2-ff9be5d5d6d8
Starting up ...
Waiting for network configuration...
Waiting up to 60 more seconds for network configuration...
Booting system without full network configuration...
Ubuntu 12.04.4 LTS vm1 ttyS0
vm1 login:
If the machine is not reachable via ssh you can use the console to do recovery
or maintenance.
### Sources
* [vmbuilder manpage][4]
* [ubuntu serial console][5]
* [libvirt network format][6]
* [linux kernel bonding documentation][7]
* [linux bridge utils documentation][8]
* [kvm network documentation][9]
[1]:
https://raymii.org/s/inc/img/kvm-1.png
[2]:
https://www.digitalocean.com/?refcode=7435ae6b8212
[3]:
https://raymii.org/s/tutorials/NIC_Bonding_on_Ubuntu_12.04.html
[4]:
http://manpages.ubuntu.com/manpages/precise/en/man1/vmbuilder.1.html
[5]:
https://help.ubuntu.com/community/SerialConsoleHowto
[6]:
http://libvirt.org/formatnetwork.html
[7]:
https://www.kernel.org/doc/Documentation/networking/bonding.txt
[8]:
http://www.linuxfoundation.org/collaborate/workgroups/networking/bridge
[9]:
http://www.linux-kvm.org/page/Networking
---
License:
All the text on this website is free as in freedom unless stated otherwise.
This means you can use it in any way you want, you can copy it, change it
the way you like and republish it, as long as you release the (modified)
content under the same license to give others the same freedoms you've got
and place my name and a link to this site with the article as source.
This site uses Google Analytics for statistics and Google Adwords for
advertisements. You are tracked and Google knows everything about you.
Use an adblocker like ublock-origin if you don't want it.
All the code on this website is licensed under the GNU GPL v3 license
unless already licensed under a license which does not allows this form
of licensing or if another license is stated on that page / in that software:
This program is free software: you can redistribute it and/or modify
it under the terms of the GNU General Public License as published by
the Free Software Foundation, either version 3 of the License, or
(at your option) any later version.
This program is distributed in the hope that it will be useful,
but WITHOUT ANY WARRANTY; without even the implied warranty of
MERCHANTABILITY or FITNESS FOR A PARTICULAR PURPOSE. See the
GNU General Public License for more details.
You should have received a copy of the GNU General Public License
along with this program. If not, see <
http://www.gnu.org/licenses/>.
Just to be clear, the information on this website is for meant for educational
purposes and you use it at your own risk. I do not take responsibility if you
screw something up. Use common sense, do not 'rm -rf /' as root for example.
If you have any questions then do not hesitate to contact me.
See
https://raymii.org/s/static/About.html for details.