This is a text-only version of the following page on
https://raymii.org:
---
Title : IPSEC VPN on Ubuntu 16.04 with StrongSwan
Author : Remy van Elst
Date : 12-09-2016
URL :
https://raymii.org/s/tutorials/IPSEC_vpn_with_Ubuntu_16.04.html
Format : Markdown/HTML
---
This is a guide on setting up an IPSEC VPN server on Ubuntu 16.04 using
StrongSwan as the IPsec server and for authentication. It has a detailed
explanation with every step. We choose the IPSEC protocol stack because of
vulnerabilities found in pptpd VPNs and because it is supported on all recent
operating systems by default.
### Why a VPN?
More than ever, your freedom and privacy when online is under threat.
Governments and ISPs want to control what you can and can't see while keeping a
record of everything you do, and even the shady-looking guy lurking around your
coffee shop or the airport gate can grab your bank details easier than you may
think. A self hosted VPN lets you surf the web the way it was intended:
anonymously and without oversight.
A VPN (virtual private network) creates a secure, encrypted tunnel through which
all of your online data passes back and forth. Any application that requires an
internet connection works with this self hosted VPN, including your web browser,
email client, and instant messaging program, keeping everything you do online
hidden from prying eyes while masking your physical location and giving you
unfettered access to any website or web service no matter where you happen to
live or travel to.
This tutorial is available for the following platforms:
* [Raspberry Pi with Arch Linux ARM][1]
* [CentOS 7, Scientific Linux 7 or Red Hat Enterprise Linux 7 (IKEv2,no L2TP)][2]
* [CentOS 6, Scientific Linux 6 or Red Hat Enterprise Linux 6][3]
* [Ubuntu 16.04, (IKEv2,no L2TP)][4]
* [Ubuntu 15.10, (IKEv2,no L2TP)][5]
* [Ubuntu 15.04, (IKEv2,no L2TP)][6]
* [Ubuntu 14.04 LTS][7]
* [Ubuntu 13.10][8]
* [Ubuntu 13.04][9]
* [Ubuntu 12.10][10]
* [Ubuntu 12.04 LTS][11]
<p class="ad"> <b>Recently I removed all Google Ads from this site due to their invasive tracking, as well as Google Analytics. Please, if you found this content useful, consider a small donation using any of the options below:</b><br><br> <a href="
https://leafnode.nl">I'm developing an open source monitoring app called Leaf Node Monitoring, for windows, linux & android. Go check it out!</a><br><br> <a href="
https://github.com/sponsors/RaymiiOrg/">Consider sponsoring me on Github. It means the world to me if you show your appreciation and you'll help pay the server costs.</a><br><br> <a href="
https://www.digitalocean.com/?refcode=7435ae6b8212">You can also sponsor me by getting a Digital Ocean VPS. With this referral link you'll get $100 credit for 60 days. </a><br><br> </p>
IPSEC encrypts your IP packets to provide encryption and authentication, so no
one can decrypt or forge data between your clients and your server. It also
provides a tunnel to send data to the server.
This VPN setup is called a road-warrior setup, because clients can connect from
anywhere. Another much used VPN setup is called site-to-site, where two VPN
servers connect two networks with one another. In a road warrior setup your
local network isn't shared, but you do get access to the server's network.
To work trough this tutorial you should have:
* 1 Ubuntu 16.04 server with at least 1 public IP address and root access
* 1 (or more) clients running an OS that support IPsec IKEv2 vpns (Ubuntu, Mac OS, Windows 7+, Android 4+).
* Ports 4500/UDP, 500/UDP, 51/UDP and 50/UDP opened in the firewall.
I do all the steps as the root user. You should do to, but only via `sudo -i` or
`su -`.
### No L2TP?
A few of the previous tutorials used L2TP to set up the VPN tunnel and use IPSEC
only for the encryption. With the IKEv2 protocol and newer operating systems
(like OS X 10.8+, Android 4+, iOS 6+ and Windows 7+) supporting IKEv2 we can
also use IPSEC to set up the tunnel, before we used IPSEC to do that.
This VPN will therefore not work out of the box on older operating systems. See
my other tutorials with L2TP on how to do that.
### Overview
The tutorial consists out of the following steps:
* Install packages
* Generate certificates
* Configure IPSEC
* Configure Firewall
Android and Windows client configuration is covered at the end of the tutorial.
### Install Strongswan
StrongSwan is a descendant of FreeS/WAN, just like Openswan or LibreSwan.
Strongswan however is actively developed, whereas the other ones, except
LibreSwan are less. StrongSwan is in default in the Ubuntu repositories. You can
read more about Strongswan on [wikipedia][13] or their [website][14].
apt-get install strongswan strongswan-plugin-af-alg strongswan-plugin-agent strongswan-plugin-certexpire strongswan-plugin-coupling strongswan-plugin-curl strongswan-plugin-dhcp strongswan-plugin-duplicheck strongswan-plugin-eap-aka strongswan-plugin-eap-aka-3gpp2 strongswan-plugin-eap-dynamic strongswan-plugin-eap-gtc strongswan-plugin-eap-mschapv2 strongswan-plugin-eap-peap strongswan-plugin-eap-radius strongswan-plugin-eap-tls strongswan-plugin-eap-ttls strongswan-plugin-error-notify strongswan-plugin-farp strongswan-plugin-fips-prf strongswan-plugin-gcrypt strongswan-plugin-gmp strongswan-plugin-ipseckey strongswan-plugin-kernel-libipsec strongswan-plugin-ldap strongswan-plugin-led strongswan-plugin-load-tester strongswan-plugin-lookip strongswan-plugin-ntru strongswan-plugin-pgp strongswan-plugin-pkcs11 strongswan-plugin-pubkey strongswan-plugin-radattr strongswan-plugin-sshkey strongswan-plugin-systime-fix strongswan-plugin-whitelist strongswan-plugin-xauth-eap strongswan-plugin-xauth-generic stron
gswan-plugin-xauth-noauth strongswan-plugin-xauth-pam
### Certificates
The VPN server will identify itself with a certificate to the clients. The
clients should use a certificate to authenticate themself. Previous tutorials
also configured usernames and password and pre-shared keys, this tutorial does
not. Certificates are easier to use, can be revoked and are less hassle than
managing usernames and passwords.
On Android with the StrongSwan Application you can just import the `.p12` we are
going to create later on. OS X and iOS from 10.10 and 9 upwards also support
this authentication method.
You might want to install `haveged` to speed up the key generation process:
apt-get install haveged
systemctl enable haveged
systemctl start haveged
Haveged provides a constant source of entropy and randomness.
Start by creating a self singed root CA private key:
cd /etc/ipsec.d/
mkdir private
mkdir cacerts
mkdir certs
mkdir p12
ipsec pki --gen --type rsa --size 4096 --outform der > private/strongswanKey.der
chmod 600 private/strongswanKey.der
Generate a self signed root CA certificate of that private key:
ipsec pki --self --ca --lifetime 3650 --in private/strongswanKey.der --type rsa --dn "C=NL, O=Example Company, CN=strongSwan Root CA" --outform der > cacerts/strongswanCert.der
You can view the certificate properties with the following command:
ipsec pki --print --in cacerts/strongswanCert.der
Example output:
cert: X509
subject: "C=NL, O=Example Company, CN=strongSwan Root CA"
issuer: "C=NL, O=Example Company, CN=strongSwan Root CA"
validity: not before Dec 20 08:12:27 2015, ok
not after Dec 17 08:12:27 2025, ok (expires in 3649 days)
serial: 1f:8e:0c:08:c4:a2:5b:1f
flags: CA CRLSign self-signed
authkeyId: d1:ad:f7:76:ad:10:02:7f:1d:04:e1:80:46:9d:b2:c7:fb:4d:d3:bb
subjkeyId: d1:ad:f7:76:ad:10:02:7f:1d:04:e1:80:46:9d:b2:c7:fb:4d:d3:bb
pubkey: RSA 4096 bits
keyid: 88:ef:88:13:7f:da:5a:28:13:77:4b:4c:81:df:ee:db:fb:5c:69:54
subjkey: d1:ad:f7:76:ad:10:02:7f:1d:04:e1:80:46:9d:b2:c7:fb:4d:d3:bb
Generate the VPN Host key. This is the keypair the VPN server host will use to
authenticate itself to clients. First the private key:
ipsec pki --gen --type rsa --size 4096 --outform der > private/vpnHostKey.der
chmod 600 private/vpnHostKey.der
Generate the public key and use our earlier created root ca to sign the public
key:
ipsec pki --pub --in private/vpnHostKey.der --type rsa | ipsec pki --issue --lifetime 730 --cacert cacerts/strongswanCert.der --cakey private/strongswanKey.der --dn "C=NL, O=Example Company, CN=vpn.example.org" --san vpn.example.com --san vpn.example.net --san 85.222.227.169 --san @85.222.227.169 --flag serverAuth --flag ikeIntermediate --outform der > certs/vpnHostCert.der
The domain name or IP address of your VPN server, which is later entered in the
clients connection properties, MUST be contained either in the subject
Distinguished Name (CN) and/or in a subject Alternative Name (`--san`). If this
does not match the clients will fail to connect.
The built in Windows 7 VPN client needs the `serverAuth` extended key usage flag
in your host certificate as shown above, or the client will refuse to connect.
In addition, OS X 10.7.3 or older requires the `ikeIntermediate` flag, which we
also add here.
We add the IP address twice, one with an `@` in front so that it gets added as
an `subjectAltName` of the `DNSName` type and one of the `IPAddess` type.
Let's view the certificate:
ipsec pki --print --in certs/vpnHostCert.der
Output:
cert: X509
subject: "C=NL, O=Example Company, CN=vpn.example.org"
issuer: "C=NL, O=Example Company, CN=strongSwan Root CA"
validity: not before Dec 20 08:15:22 2015, ok
not after Dec 19 08:15:22 2017, ok (expires in 729 days)
serial: aa:31:ac:fd:4b:fa:41:5d
altNames: vpn.example.com, vpn.example.net, 185.3.211.43, 185.3.211.43
flags: serverAuth iKEIntermediate
authkeyId: d1:ad:f7:76:ad:10:02:7f:1d:04:e1:80:46:9d:b2:c7:fb:4d:d3:bb
subjkeyId: 27:c7:87:de:83:38:6c:f7:56:57:c2:b3:1f:05:11:ca:b9:2f:89:d4
pubkey: RSA 4096 bits
keyid: f8:03:95:ad:eb:a1:76:93:5f:8d:b8:77:5e:60:dc:ce:78:42:3b:dd
subjkey: 27:c7:87:de:83:38:6c:f7:56:57:c2:b3:1f:05:11:ca:b9:2f:89:d4
You can also use OpenSSL to see the contents, here is an excerpt:
openssl x509 -inform DER -in certs/vpnHostCert.der -noout -text
Output:
Certificate:
Data:
Version: 3 (0x2)
Serial Number: 12263773464207966557 (0xaa31acfd4bfa415d)
Signature Algorithm: sha1WithRSAEncryption
Issuer: C=NL, O=Example Company, CN=strongSwan Root CA
Validity
Not Before: Dec 20 07:15:22 2015 GMT
Not After : Dec 19 07:15:22 2017 GMT
Subject: C=NL, O=Example Company, CN=vpn.example.org
Subject Public Key Info:
Public Key Algorithm: rsaEncryption
Public-Key: (4096 bit)
[...]
Exponent: 65537 (0x10001)
X509v3 extensions:
X509v3 Authority Key Identifier:
keyid:D1:AD:F7:76:AD:10:02:7F:1D:04:E1:80:46:9D:B2:C7:FB:4D:D3:BB
X509v3 Subject Alternative Name:
DNS:vpn.example.com, DNS:vpn.example.net, IP Address:185.3.211.43, DNS:185.3.211.43
X509v3 Extended Key Usage:
TLS Web Server Authentication, 1.3.6.1.5.5.8.2.2
Signature Algorithm: sha1WithRSAEncryption
The private key (`/etc/ipsec.d/private/strongswanKey.der`) of the CA should be
moved somewhere safe, possibly to a special signing host without access to the
Internet. Theft of this master signing key would completely compromise your
public key infrastructure. Use it only to generate client certificates when
needed.
This key needs to be added into `/etc/ipsec.secrets`, otherwise StrongSwan will
not use it.
vim /etc/ipsec.secrets
Add the key:
# This file holds shared secrets or RSA private keys for authentication.
# RSA private key for this host, authenticating it to any other host
# which knows the public part.
: RSA vpnHostKey.der
The format `: RSA keyname` is important, don't forget the space. You can check
afterwards if StrongSwan has the private key available with the `ipsec
listcerts` command:
ipsec listcerts
Output:
List of X.509 End Entity Certificates:
altNames: vpn.example.com, 85.222.227.169, 85.222.227.169
subject: "C=NL, O=Example Company, CN=vpn.example.com"
issuer: "C=NL, O=Example Company, CN=strongSwan Root CA"
serial: 0b:46:48:d4:28:c6:74:b1
validity: not before Sep 11 08:26:01 2016, ok
not after Sep 11 08:26:01 2018, ok
pubkey: RSA 4096 bits, has private key
keyid: df:fe:cb:ff:69:78:58:91:a1:47:5a:53:0e:49:84:8b:64:bc:c1:05
subjkey: 5b:0e:0b:15:43:3f:0f:3c:52:30:02:e6:e1:bd:17:e2:c7:87:c9:93
authkey: f8:3a:98:f3:b5:a6:c2:ec:8c:c3:95:56:b9:1d:9c:17:6f:1c:be:e5
If it doesn't say `has private key` on the `pubkey` line your filename or syntax
is wrong.
#### Client certificate
Any client will require a personal certificate in order to use the VPN. The
process is analogous to generating a host certificate, except that we identify a
client certificate by the clients e-mail address rather than a hostname.
We create a keypair for the example user "John".
Private key:
ipsec pki --gen --type rsa --size 2048 --outform der > private/JohnKey.der
chmod 600 private/JohnKey.der
Public key, signed by our root ca we generated:
ipsec pki --pub --in private/JohnKey.der --type rsa | ipsec pki --issue --lifetime 730 --cacert cacerts/strongswanCert.der --cakey private/strongswanKey.der --dn "C=NL, O=Example Company,
[email protected]" --san "
[email protected]" --san "
[email protected]" --san "
[email protected]" --outform der > certs/JohnCert.der
A VPN client needs a client certificate, its corresponding private key, and the
signing CA certificate. The most convenient way is to put everything in a single
signed PKCS#12 file and export it with a paraphrase.
Convert the required keys to PEM formt before converting to a .p12:
openssl rsa -inform DER -in private/JohnKey.der -out private/JohnKey.pem -outform PEM
openssl x509 -inform DER -in certs/JohnCert.der -out certs/JohnCert.pem -outform PEM
openssl x509 -inform DER -in cacerts/strongswanCert.der -out cacerts/strongswanCert.pem -outform PEM
Construct the .p12:
openssl pkcs12 -export -inkey private/JohnKey.pem -in certs/JohnCert.pem -name "John's VPN Certificate" -certfile cacerts/strongswanCert.pem -caname "strongSwan Root CA" -out p12/John.p12
Enter a passphrase twice, then you have a .p12. You can send `John.p12` and its
export paraphrase to the person who is going to install it onto the client. In
some cases (iOS for example) you have to separately include the CA certificate
`cacerts/strongswanCert.pem`.
Transport this `John.p12` file and the password over seperate channels to a
client.
If you need any more user certificates, repeat the above steps with other user
data. You can also do this later on.
#### Revoking a certificate
If a certificate is lost or stolen, it must be revoked so nobody can use it to
connect to your VPN server. Assuming the certificate from the previous step got
stolen, we revoke it with:
cd /etc/ipsec.d/
ipsec pki --signcrl --reason key-compromise --cacert cacerts/strongswanCert.der --cakey private/strongswanKey.der --cert certs/JohnCert.der --outform der > crls/crl.der
Restart ipsec afterwards:
ipsec restart
This generates the new certificate revocation list (CRL) `crls/crl.der`. When
someone tries to authenticate with the stolen certificate, he'll receive an
authentication credentials error message, and your log file will contain
something like:
04[CFG] using trusted certificate "C=NL, O=Example Company, CN=strongSwan Root CA"
04[CFG] crl correctly signed by "C=NL, O=Example Company, CN=strongSwan Root CA"
04[CFG] certificate was revoked on Sep 10 10:15:33 UTC 2016, reason: key compromise
To add another revoked certificate to the same list, we need to copy the
existing list into a temporary file:
cd /etc/ipsec.d/
cp crls/crl.der crl.der.tmp
ipsec pki --signcrl --reason key-compromise --cacert cacerts/strongswanCert.der --cakey private/strongswanKey.der --cert certs/OtherStolenCert.der --lastcrl crl.der.tmp --outform der > crls/crl.der
rm crl.der.tmp
Restart ipsec afterwards:
ipsec restart
### IPSEC Configuration
The main `ipsec` configuration file is located in `/etc/`. We are going to edit
it:
vim /etc/ipsec.conf
Place the following contents:
# ipsec.conf - strongSwan IPsec configuration file
config setup
charondebug="ike 2, knl 2, cfg 2, net 2, esp 2, dmn 2, mgr 2"
conn %default
keyexchange=ikev2
ike=aes128-sha1-modp1024,aes128-sha1-modp1536,aes128-sha1-modp2048,aes128-sha256-ecp256,aes128-sha256-modp1024,aes128-sha256-modp1536,aes128-sha256-modp2048,aes256-aes128-sha256-sha1-modp2048-modp4096-modp1024,aes256-sha1-modp1024,aes256-sha256-modp1024,aes256-sha256-modp1536,aes256-sha256-modp2048,aes256-sha256-modp4096,aes256-sha384-ecp384,aes256-sha384-modp1024,aes256-sha384-modp1536,aes256-sha384-modp2048,aes256-sha384-modp4096,aes256gcm16-aes256gcm12-aes128gcm16-aes128gcm12-sha256-sha1-modp2048-modp4096-modp1024,3des-sha1-modp1024!
esp=aes128-aes256-sha1-sha256-modp2048-modp4096-modp1024,aes128-sha1,aes128-sha1-modp1024,aes128-sha1-modp1536,aes128-sha1-modp2048,aes128-sha256,aes128-sha256-ecp256,aes128-sha256-modp1024,aes128-sha256-modp1536,aes128-sha256-modp2048,aes128gcm12-aes128gcm16-aes256gcm12-aes256gcm16-modp2048-modp4096-modp1024,aes128gcm16,aes128gcm16-ecp256,aes256-sha1,aes256-sha256,aes256-sha256-modp1024,aes256-sha256-modp1536,aes256-sha256-modp2048,aes256-sha256-modp4096,aes256-sha384,aes256-sha384-ecp384,aes256-sha384-modp1024,aes256-sha384-modp1536,aes256-sha384-modp2048,aes256-sha384-modp4096,aes256gcm16,aes256gcm16-ecp384,3des-sha1!
dpdaction=clear
dpddelay=300s
authby=pubkey
left=%any
leftid=vpn.example.org
leftsubnet=0.0.0.0/0
leftcert=vpnHostCert.der
leftsendcert=always
right=%any
rightsourceip=10.42.42.0/24,2002:25f7:7489:3::/112
rightdns=8.8.8.8,2001:4860:4860::8888
conn IPSec-IKEv2
keyexchange=ikev2
auto=add
The configuration has settings for IKEv2 + RSA certificates. This is, as stated
above, the most secure method. Older tutorials also set up IKEv1 (xauth) and
username-password combo, but that is considered insecure.
Apple added support for IKEv2 in iOS 8, but it needs to be configured using a
[custom configuration profile][15]. OS X 10.9 and lower do not support IKEv2.
Beginning with iOS 9, IKEv2 connections are natively supported. However, iOS9
only supports the use of certificates or username/password, but not both.
For iOS 9+ and OS X 10.10+ you need to make sure the `leftid=` is the same as
the `CN` in your certificate. You also need to enter that on the devices,
otherwise you'll get a `no matching peer config found` log error.
Android 4+ and Windows 7+ support IKEv2.
Clients will get the Google DNS servers and an IP address in the `10.42.42.0/24`
range. We use a strong ciphersuite.
The `leftcert=vpnHostCert.der` expands to the path
`/etc/ipsec.d/certs/vpnHostCert.der`.
### Firewall & Packet Routing
Configure the iptables firewall to allow vpn traffic and to forward packets:
# for ISAKMP (handling of security associations)
iptables -A INPUT -p udp --dport 500 --j ACCEPT
# for NAT-T (handling of IPsec between natted devices)
iptables -A INPUT -p udp --dport 4500 --j ACCEPT
# for ESP payload (the encrypted data packets)
iptables -A INPUT -p esp -j ACCEPT
# for the routing of packets on the server
iptables -t nat -A POSTROUTING -j SNAT --to-source %SERVERIP% -o eth+
Replace `%SERVERIP%` with the external IP of the VPN server. If your external
interface is not named ethX (`+` is a wildcard) then rename appropriately.
Execute the below commands to enable kernel IP packet forwarding and disable ICP
redirects.
echo "net.ipv4.ip_forward = 1" | tee -a /etc/sysctl.conf
echo "net.ipv4.conf.all.accept_redirects = 0" | tee -a /etc/sysctl.conf
echo "net.ipv4.conf.all.send_redirects = 0" | tee -a /etc/sysctl.conf
echo "net.ipv4.conf.default.rp_filter = 0" | tee -a /etc/sysctl.conf
echo "net.ipv4.conf.default.accept_source_route = 0" | tee -a /etc/sysctl.conf
echo "net.ipv4.conf.default.send_redirects = 0" | tee -a /etc/sysctl.conf
echo "net.ipv4.icmp_ignore_bogus_error_responses = 1" | tee -a /etc/sysctl.conf
Set these settings for other network interfaces:
for vpn in /proc/sys/net/ipv4/conf/*; do echo 0 > $vpn/accept_redirects; echo 0 > $vpn/send_redirects; done
Apply them:
sysctl -p
##### Persistent settings via /etc/rc.local
To make sure this keeps working at boot you might want to add the following to
/etc/rc.local:
for vpn in /proc/sys/net/ipv4/conf/*; do echo 0 > $vpn/accept_redirects; echo 0 > $vpn/send_redirects; done
iptables -t nat -A POSTROUTING -j SNAT --to-source %SERVERIP% -o eth+
iptables -A INPUT -p udp --dport 500 --j ACCEPT
iptables -A INPUT -p udp --dport 4500 --j ACCEPT
iptables -A INPUT -p esp -j ACCEPT
Add it before the `exit 0` line and replace `%SERVERIP%` with the external IP of
your server.
### Start the VPN
All the configuration on the server is now done. Enable the VPN at startup:
systemctl enable strongswan
And start it:
systemctl start strongswan
If you get a permission denied error, stroke the files with apparmor:
apparmor_parser -R /etc/apparmor.d/usr.lib.ipsec.charon
apparmor_parser -R /etc/apparmor.d/usr.lib.ipsec.stroke
Check the status of the service:
ipsec status
Output:
Security Associations (0 up, 0 connecting):
none
And a more elaborate status:
ipsec statusall
Output:
Status of IKE charon daemon (strongSwan 5.3.5, Linux 4.4.0-31-generic, x86_64):
uptime: 8 seconds, since Sep 11 08:33:54 2016
malloc: sbrk 2207744, mmap 532480, used 1036032, free 1171712
worker threads: 11 of 16 idle, 5/0/0/0 working, job queue: 0/0/0/0, scheduled: 0
loaded plugins: charon test-vectors unbound ldap pkcs11 aes rc2 sha1 sha2 md4 md5 random nonce x509 revocation constraints acert pubkey pkcs1 pkcs7 pkcs8 pkcs12 pgp dnskey sshkey dnscert ipseckey pem openssl gcrypt af-alg fips-prf gmp agent chapoly xcbc cmac hmac ctr ccm gcm ntru bliss curl soup mysql sqlite attr kernel-netlink resolve socket-default connmark farp stroke updown eap-identity eap-sim eap-sim-pcsc eap-aka eap-aka-3gpp2 eap-simaka-pseudonym eap-simaka-reauth eap-md5 eap-gtc eap-mschapv2 eap-dynamic eap-radius eap-tls eap-ttls eap-peap eap-tnc xauth-generic xauth-eap xauth-pam xauth-noauth tnc-tnccs tnccs-20 tnccs-11 tnccs-dynamic dhcp whitelist lookip error-notify certexpire led radattr addrblock unity
Virtual IP pools (size/online/offline):
10.42.42.0/24: 254/0/0
2002:25f7:7489:3::/112: 65534/0/0
Listening IP addresses:
85.222.227.169
Connections:
IPSec-IKEv2: %any...%any IKEv2, dpddelay=300s
IPSec-IKEv2: local: [C=NL, O=Example Company, CN=vpn.example.com] uses public key authentication
IPSec-IKEv2: cert: "C=NL, O=Example Company, CN=vpn.example.com"
IPSec-IKEv2: remote: uses public key authentication
IPSec-IKEv2: child: 0.0.0.0/0 === dynamic TUNNEL, dpdaction=clear
Security Associations (0 up, 0 connecting):
none
### Client Configuration
See the [Strongswan Wiki][16] for guides on configuring Windows and [OS X/iOS
clients][17]
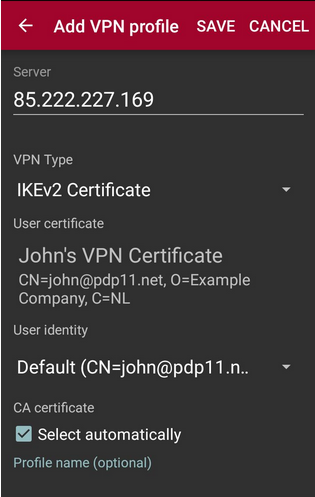
On Android, the easiest way is to install the [StrongSwan app][18], copy over
the `.p12` and connect with the IP and option `IKEv2 Certificate`. Nothing more:
![][19]
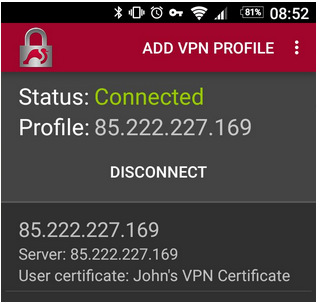
Just one tap to `Connect` and you're good to go:
![][20]
### Sources
Thanks to:
* [StrongSwan Wiki][21] and the
* [StrongSwan ipsec.conf reference][22] for most of the configuration.
* [zeitgeist][23] for the certificate setup.
[1]:
https://raymii.org/s/tutorials/IPSEC_L2TP_vpn_on_a_Raspberry_Pi_with_Arch_Linux.html
[2]:
https://raymii.org/s/tutorials/IPSEC_vpn_with_CentOS_7.html
[3]:
https://raymii.org/s/tutorials/IPSEC_L2TP_vpn_on_CentOS_-_Red_Hat_Enterprise_Linux_or_Scientific_-_Linux_6.html
[4]:
https://raymii.org/s/tutorials/IPSEC_vpn_with_Ubuntu_16.04.html
[5]:
https://raymii.org/s/tutorials/IPSEC_vpn_with_Ubuntu_15.10.html
[6]:
https://raymii.org/s/tutorials/IPSEC_vpn_with_Ubuntu_15.04.html
[7]:
https://raymii.org/s/tutorials/IPSEC_L2TP_vpn_with_Ubuntu_14.04.html
[8]:
https://raymii.org/s/tutorials/IPSEC_L2TP_vpn_with_Ubuntu_13.10.html
[9]:
https://raymii.org/s/tutorials/IPSEC_L2TP_vpn_with_Ubuntu_13.04.html
[10]:
https://raymii.org/s/tutorials/IPSEC_L2TP_vpn_with_Ubuntu_12.10.html
[11]:
https://raymii.org/s/tutorials/IPSEC_L2TP_vpn_with_Ubuntu_12.04.html
[12]:
https://www.digitalocean.com/?refcode=7435ae6b8212
[13]:
http://en.wikipedia.org/wiki/StrongSwan
[14]:
http://strongswan.org
[15]:
https://wiki.strongswan.org/projects/strongswan/wiki/AppleIKEv2Profile
[16]:
https://wiki.strongswan.org/projects/strongswan/wiki/Windows7
[17]:
https://wiki.strongswan.org/projects/strongswan/wiki/IOS_(Apple)
[18]:
https://play.google.com/store/apps/details?id=org.strongswan.android
[19]:
https://raymii.org/s/inc/img/vpn/1604_android.png
[20]:
https://raymii.org/s/inc/img/vpn/1604_android2.png
[21]:
https://wiki.strongswan.org/projects/strongswan
[22]:
https://wiki.strongswan.org/projects/strongswan/wiki/IpsecConf
[23]:
https://www.zeitgeist.se/2013/11/22/strongswan-howto-create-your-own-vpn/
---
License:
All the text on this website is free as in freedom unless stated otherwise.
This means you can use it in any way you want, you can copy it, change it
the way you like and republish it, as long as you release the (modified)
content under the same license to give others the same freedoms you've got
and place my name and a link to this site with the article as source.
This site uses Google Analytics for statistics and Google Adwords for
advertisements. You are tracked and Google knows everything about you.
Use an adblocker like ublock-origin if you don't want it.
All the code on this website is licensed under the GNU GPL v3 license
unless already licensed under a license which does not allows this form
of licensing or if another license is stated on that page / in that software:
This program is free software: you can redistribute it and/or modify
it under the terms of the GNU General Public License as published by
the Free Software Foundation, either version 3 of the License, or
(at your option) any later version.
This program is distributed in the hope that it will be useful,
but WITHOUT ANY WARRANTY; without even the implied warranty of
MERCHANTABILITY or FITNESS FOR A PARTICULAR PURPOSE. See the
GNU General Public License for more details.
You should have received a copy of the GNU General Public License
along with this program. If not, see <
http://www.gnu.org/licenses/>.
Just to be clear, the information on this website is for meant for educational
purposes and you use it at your own risk. I do not take responsibility if you
screw something up. Use common sense, do not 'rm -rf /' as root for example.
If you have any questions then do not hesitate to contact me.
See
https://raymii.org/s/static/About.html for details.