This is a text-only version of the following page on
https://raymii.org:
---
Title : Building HA Clusters with Ansible and Openstack
Author : Remy van Elst
Date : 25-07-2014
URL :
https://raymii.org/s/articles/Building_HA_Clusters_With_Ansible_and_Openstack.html
Format : Markdown/HTML
---
This is an extensive guide on building high available clusters with Ansible and
Openstack. We'll build a Highly available cluster consisting out of two load
balancers, two database servers and two application servers. This is all done
with Ansible, the cluster nodes are all on Openstack. Ansible is a super awesome
orchestration tool and Openstack is a big buzzword filled software suite for
datacenter virtualization.
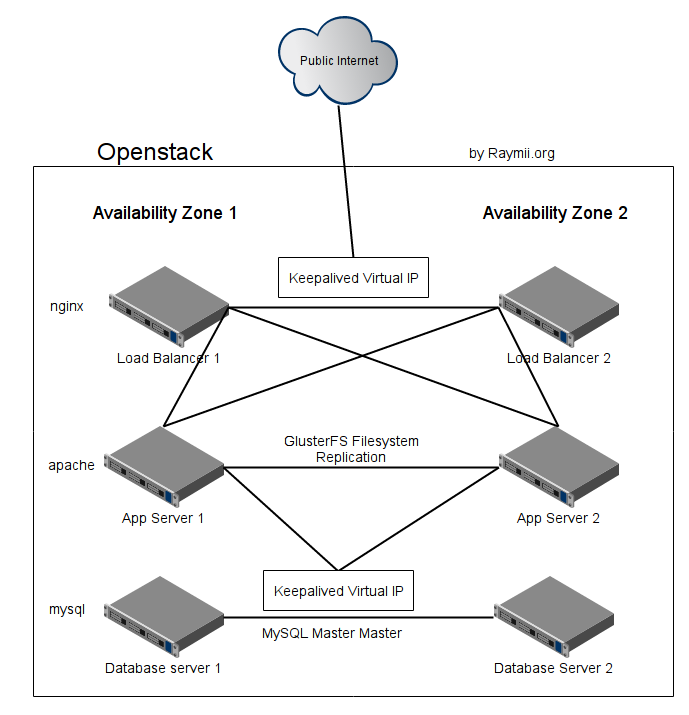
### Summary
![][1]
This image represents the setup we will create. It will be a simple, data center
redundant high available cluster. The tutorial sets up two nginx frontend load
balancers with keepalived failover, two mysql database servers with master-
master replication and keepalived failover and two application servers with
apache and php plus glusterfs for file syncronization.
We'll create and provision these VM's fully with Ansible combined with the magic
of Openstack.
Openstack has the concept of Availability Zones. Your can see this as multiple,
physically independent networks which are logically able to communicate. Most
Cloud providers call them seperate Data centers or Regions. If your Cloud
provider has set it up correctly, the Openstack Cloud, and thus your cluster,
will survive one full datacenter failing.
This tutorial sets up Wordpress as the application, but it can be easily adapted
for any other cluster setup.
I'm using the Openstack Cloud from [CloudVPS][2], but any Openstack cloud will
do. CloudVPS is the best one though, in my opinion. The screenshots you'll see
are not of the default Openstack dashboard but of the CloudVPS Skyline Openstack
Interface.
<p class="ad"> <b>Recently I removed all Google Ads from this site due to their invasive tracking, as well as Google Analytics. Please, if you found this content useful, consider a small donation using any of the options below:</b><br><br> <a href="
https://leafnode.nl">I'm developing an open source monitoring app called Leaf Node Monitoring, for windows, linux & android. Go check it out!</a><br><br> <a href="
https://github.com/sponsors/RaymiiOrg/">Consider sponsoring me on Github. It means the world to me if you show your appreciation and you'll help pay the server costs.</a><br><br> <a href="
https://www.digitalocean.com/?refcode=7435ae6b8212">You can also sponsor me by getting a Digital Ocean VPS. With this referral link you'll get $100 credit for 60 days. </a><br><br> </p>
The playbook can be found [in this git repository][4].
I like [Ansible, I've written some more articles about it.][5] I'm also a fan of
[Openstack, check out my other articles about it.][6]. Last but not least I also
like [Ubuntu][7].
### Openstack Preparations
We need to do a few things before we can start.
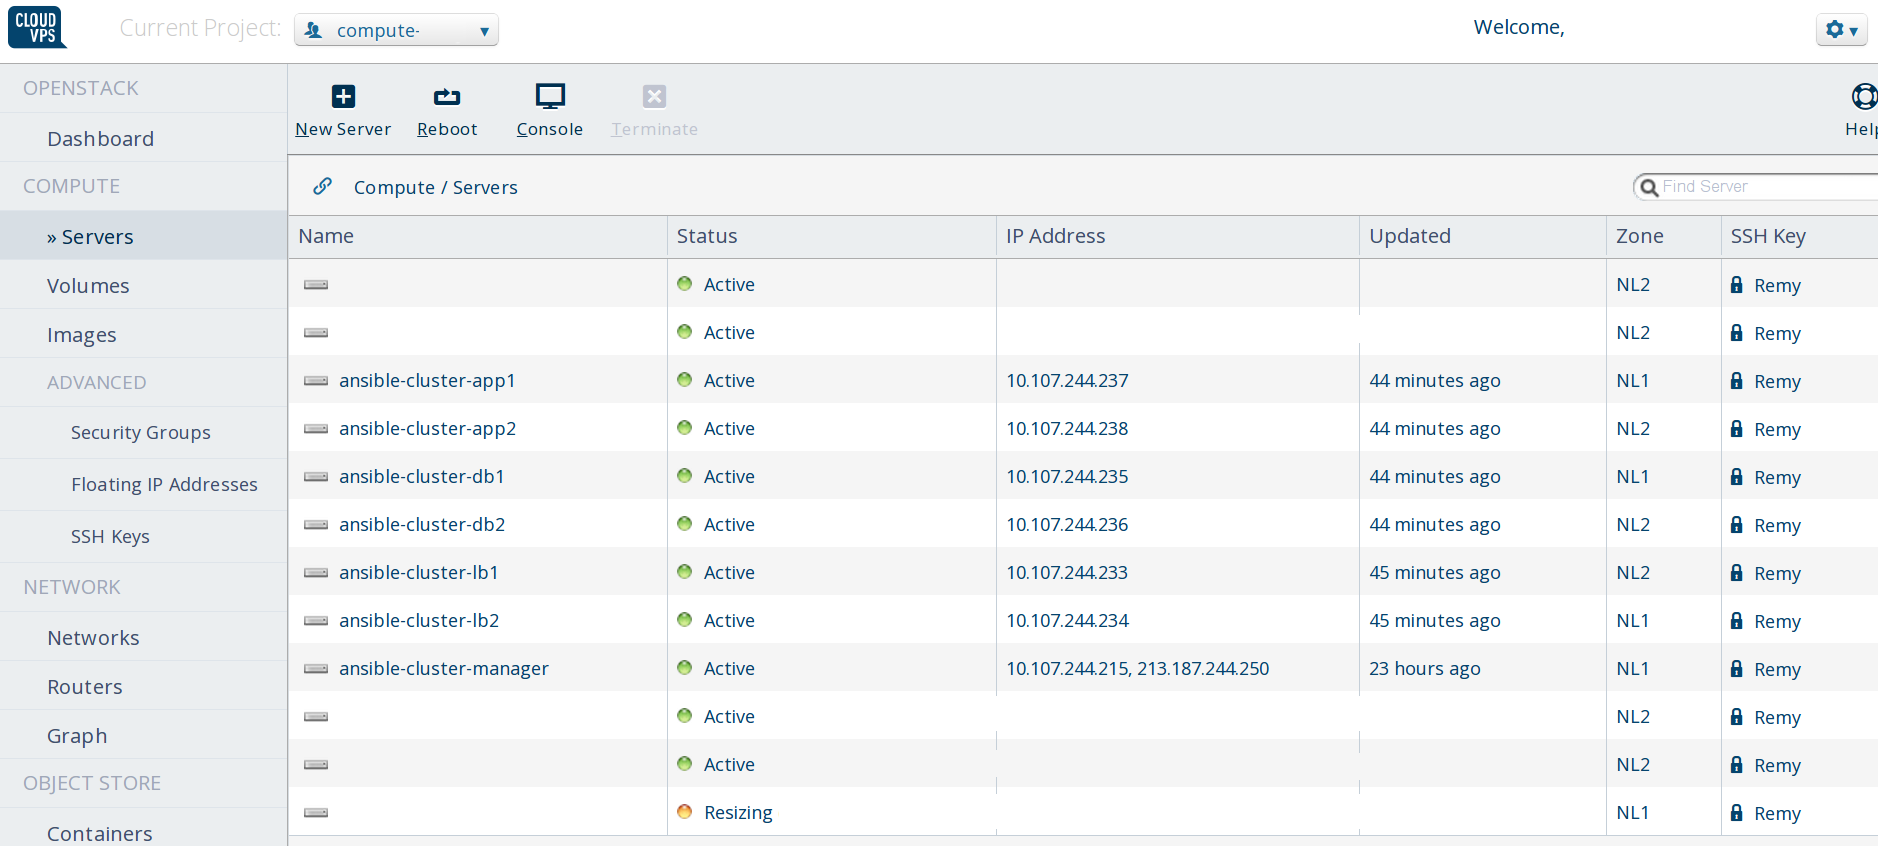
#### Set up a manager host
![network][8]
We will create all the nodes in a private network, unreachable from the
internet. To access all hosts we need a manager vm where we can run ansible and
debug if needed.
Create a VM in Openstack, I'll create an Ubuntu 14.04 VM and install Ansible on
it. Give it an internal IP in that network and associate a floating IP with that
to make sure you can SSH in.
Install the packages required for building Ansible:
apt-get install python-pip python-dev
Install the latest Ansible:
pip install ansible
Install the openstack nova client:
pip install python-novaclient
Copy the playbook over and edit the `vars/main.yml` file with your two port IP's
and your Openstack credentials and your passwords.
Create a `ansible_hosts` file with the following contents:
[localhost]
127.0.0.1
The combination of Openstack and Ansible will create all the hosts and make them
dynamically available to us for use within the playbook.
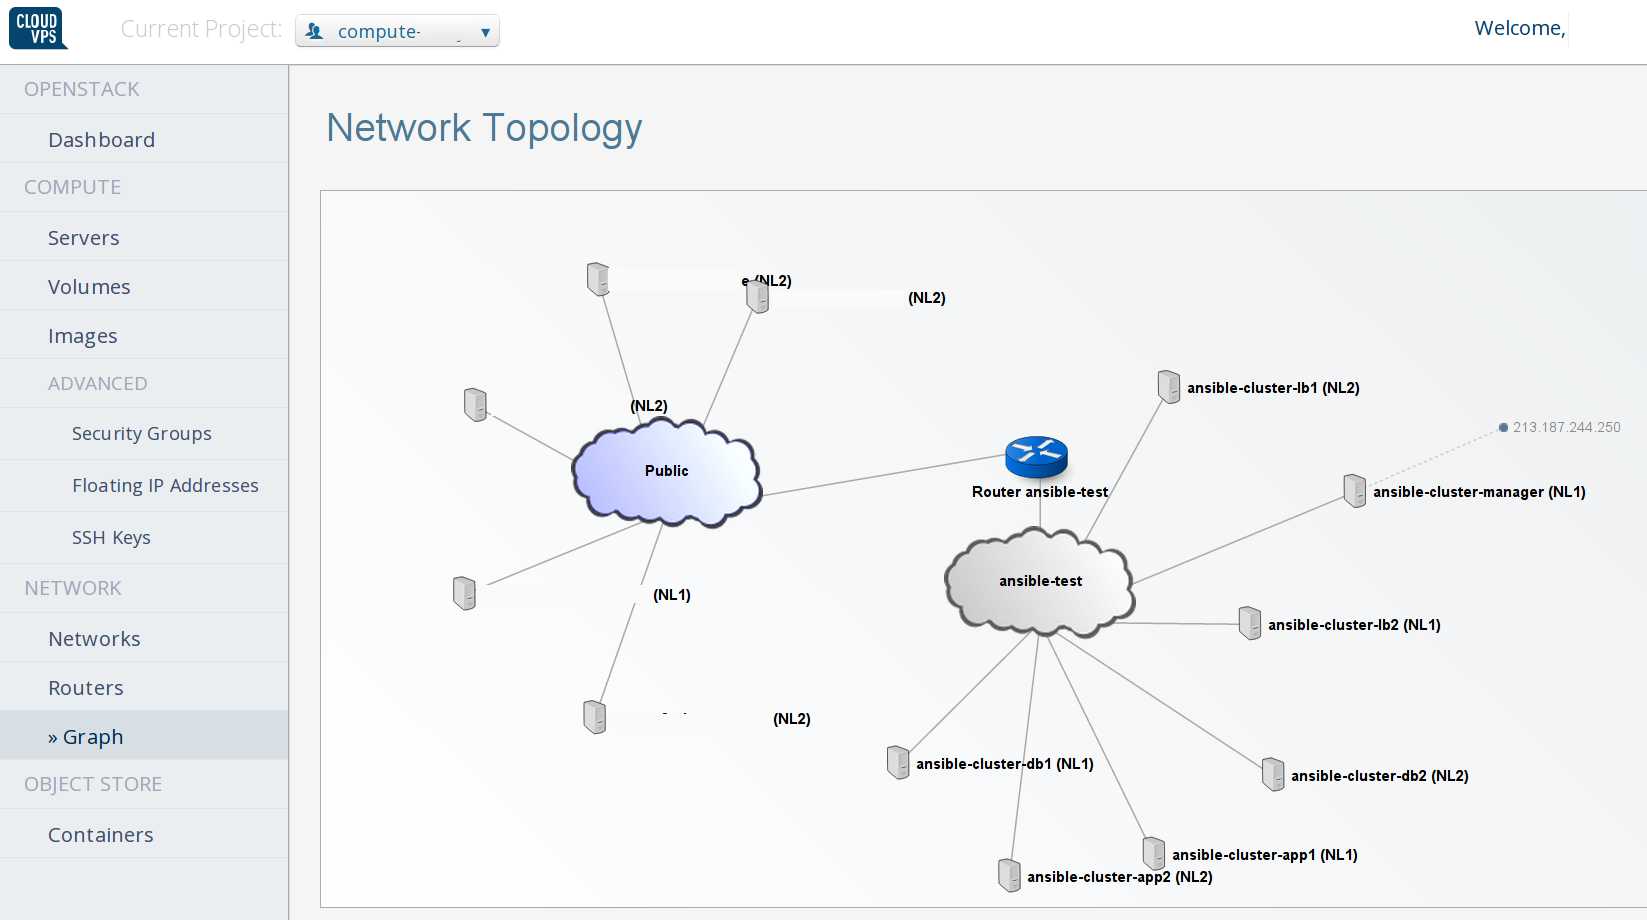
#### Creating a network
Use the GUI or CLI to create a network with routing/NAT and DHCP. Note down the
network ID and the subnet ID. The network ID must be changed in the Playbook
Variables.
![network][9]
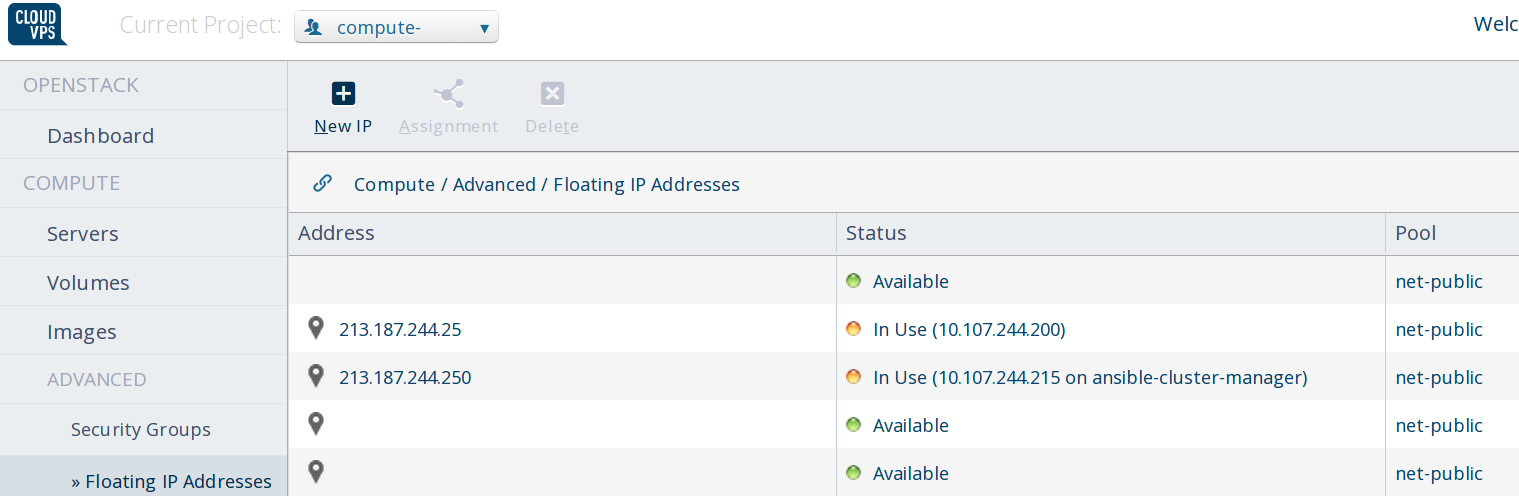
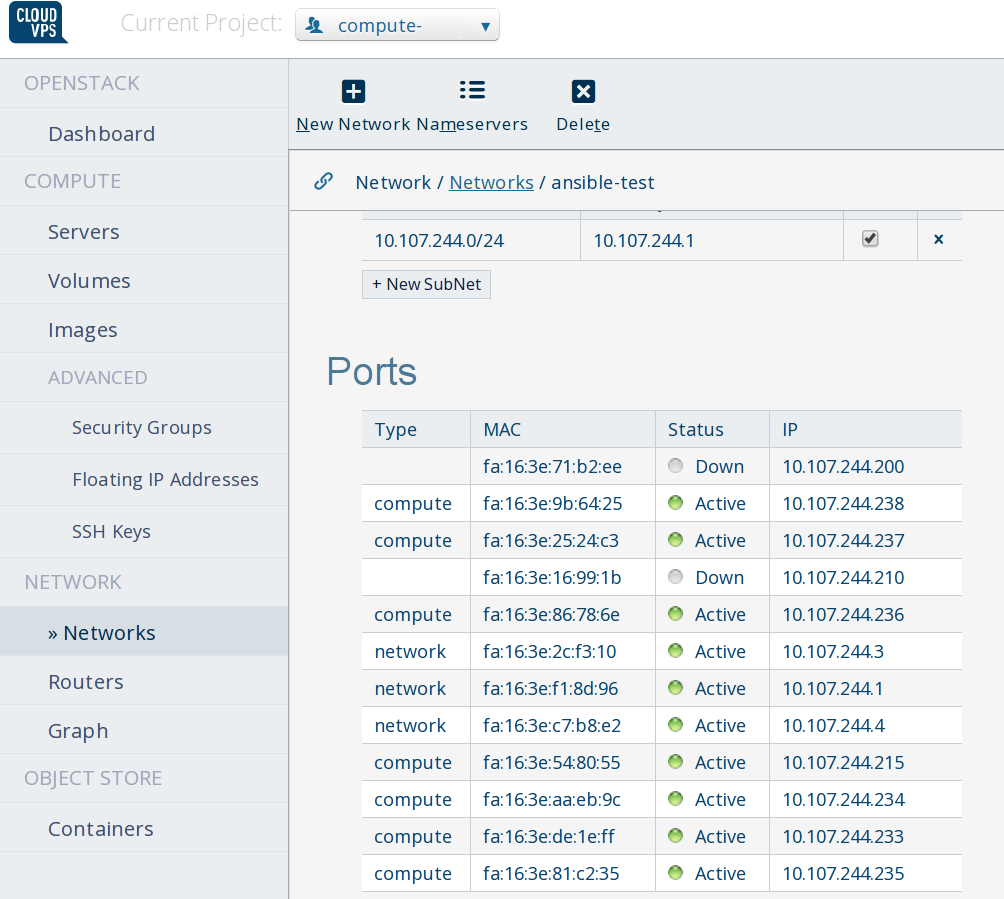
#### Network ports for keepalived and floating IP
Create two floating IP's. Attach one to the Ansible Manager host.
![keepalived][10]
Create two ports in your private network for the two keepalived configurations.
And associate the floating IP with one of these ports.
The first command will create a port in the private network and will return an
port id and IP address which will be used for Keepalived. The VM's in this
network can bind and use these addresses. The second command will associate the
port we created previously with the floating ip address so that we can bind and
fail over the load balancers with one external (and internal) IP. The commands
look like this:
neutron port-create NETWORK-UUID --tenant-id YOUR_TENANT_ID
neutron floatingip-associate FLOATING_IP_UUID PORT_UUID
The port-create should be done two times since we'll use keepalived on the
database servers and on the load balancers.
The two ports will be listed as "DOWN", even when they are not.
![network][11]
I'll cover all the different parts of the playbook before we run it. Let's start
with the Host Creation.
### Variable setup
Make sure you edit the `vars/main.yml` file. Change your authentication data,
the HA IP addresses to the ones you received from your Openstack provider. Here
are the most important things to change:
---
auth_url:
https://identity.stack.cloudvps.com/v2.0
image_id:
private_net:
keypair_name: SSH_Key
website_name: "example.org"
mysql_user: "app"
mysql_password: "FINE2yfUIt"
keepalived_sql_vip: "10.107.244.210"
keepalived_sql_router_id: "60"
keepalived_sql_passwd: "cc2BgJiGAbAoSlks"
keepalived_lbs_vip: "10.107.244.200"
keepalived_lbs_router_id: "50"
keepalived_lbs_passwd: "m9RwFk3Mx"
### Host Creation
We'll use the ansible nova_compute module to create all the required hosts. You
should have adapted the variables file with the parameters for your Openstack
Cloud, in this example we will create 6 hosts:
* 2 load balancers running nginx and keepalived
* 2 database servers running mysql in master-master
* 2 app servers running apache and php, plus glusterfs for the file sync
All the example servers run Ubuntu 14.04.
One of each these servers will be in Availability Zone NL1 and one in zone NL2.
If your Openstack Provider has Availability Zones and you use them correctly
then your cluster will be protected against one whole data center (Availability
Zone) loss.
I've added the Availability Zone selection code to Ansible 1.7, [see this pull
request][12]. Make sure you run at least Ansible 1.7, otherwise it will complain
about not knowing the parameter. You can also just comment out the availability
zone parameter, apply the patch yourself or run the "devel" branch of Ansible
(when it is merged).
The play consists out of 6 times the following, one for each host:
# tasks/create-instances.yml
- nova_compute:
auth_url: "{{ auth_url }}"
login_username: "{{ login_username }}"
login_password: "{{ login_password }}"
login_tenant_name: "{{ login_tenant_name }}"
security_groups: "built-in-allow-all"
state: present
availability_zone: "NL2"
name: ansible-cluster-lb1
image_id: "{{ image_id }}"
key_name: "{{ keypair_name }}"
wait_for: 500
nics:
- net-id: "{{ private_net }}"
flavor_id: "{{ flavor_id }}"
meta:
hostname: ansible-cluster-lb1
group: ansible
register: openstacklb1
- add_host:
name: "{{ openstacklb1.private_ip }}"
groupname: lbs
keepalived_lbs_prio: 150
We give all the nodes only Internal IP addresses. Since we have a network with
NATing and a router they will all be able to access the internet. All
communication will go via the earlier created manager node, and all web traffic
will go via the virtual/Floating IP.
Make sure you have ssh key forwarding set up. Make sure you have uploaded your
SSH key to Openstack. Check all variables and match them with your Openstack
Cloud. (Image ID, flavor ID etc.)
After the instance has been created we add the host to a new hostgroup,
according to the role it will be in `app`, `lbs` or `dbs`. We also, per host
when applicable, give the keepalived priority and the mysql server ID as Ansible
Variables. These will be used later on in the playbook run.
All hosts should be created by Ansible. Openstack will give them an IP and
Ansible registers that IP for use in a later play.
### Configuring Loadbalancers
![][13]
Our load balancer configuration consists out of two nginx servers with a reverse
proxy configuration to both app servers. They are connected to each other via
keepalived and this, if one fails, the other will take over. Because the
keepalived virtual IP is also associated to the floating IP, it wil
automatically work for that as well.
This play is configured to gather facts on both the `lbs` group and the `app`
group, but only runs tasks on the `lbs` group.
We need to do this because we need facts from the `app` group to configure
nginx, but Ansible only gathers facts from hosts in the play.
We therefore cannot run the playbook just on the load balancer nodes. We also
don't want to do any actions in on the app nodes, just the facts.
You can define multipe groups where a playbook should run with the `:` as you
can see below, we run on `lbs:app`. The `when` statement makes sure the actual
playbook only runs on the nodes in the `lbs` group.
# tasks/main.yml
- name: Configure LoadBalancers
hosts: lbs:app
vars_files:
- "vars/main.yml"
user: root
tasks:
- include: tasks/configure-lbs.yml
when: '"{{ inventory_hostname }}" in "{{ groups.lbs }}"'
- include: tasks/keepalived.yml
when: '"{{ inventory_hostname }}" in "{{ groups.lbs }}"'
#### nginx setup
We start by adding the nginx stable PPA so that we have the latest version of
nginx available:
# tasks/configure-lbs.yml
---
- apt_repository:
repo: 'ppa:nginx/stable'
state: present
update_cache: yes
We install nginx, vim, git and ntp. The first is the load balancer itself, the
next two are tools I frequently use and the last is important, out-of-sync time
can cause weird cluster issues.
- apt:
name: "{{ item }}"
state: latest
update_cache: yes
with_items:
- nginx
- vim
- git
- ntp
The folder for the nginx cache is created:
- file:
dest: /var/cache/nginx
state: directory
owner: www-data
We then place the loadbalancer config:
- template:
src: nginx-lb.conf.j2
dest: /etc/nginx/sites-available/lbs.conf
register: confresult
notify:
- restart keepalived
The template file looks like this:
# templates/nginx.conf.j2
upstream backend {
{% for host in groups['app'] %}
server {{ hostvars[host]['ansible_eth0']['ipv4']['address'] }}:80 max_fails=5 fail_timeout=5s;
{% endfor %}
}
proxy_cache_path /var/cache/nginx levels=1:2 keys_zone=CACHE:10m inactive=24h max_size=1g;
server {
listen 80 default_server;
server_name {{ website_name }};
access_log /var/log/nginx/{{ website_name }}.access.log;
error_log /var/log/nginx/{{ website_name }}.error.log;
root /usr/share/nginx/html;
location / {
proxy_pass
http://backend;
proxy_next_upstream error timeout invalid_header http_500 http_502 http_503 http_504;
proxy_redirect off;
proxy_cache CACHE;
proxy_cache_valid 200 1d;
proxy_cache_use_stale error timeout invalid_header updating http_500 http_502 http_503 http_504;
proxy_set_header Host $host;
proxy_set_header X-Real-IP $remote_addr;
proxy_set_header X-Forwarded-For $proxy_add_x_forwarded_for;
}
}
As you can see it uses Jinja2 loops to add every app-server to the backend using
this piece of logic:
{% for host in groups['app'] %}
server {{ hostvars[host]['ansible_eth0']['ipv4']['address'] }}:80 max_fails=5 fail_timeout=5s;
{% endfor %}
If we want to spawn more app servers we can do that and they will be
automatically configured here on the next ansible run.
This configuration will remove a backend server if it gives more than 5 non 2XX
or 3XX HTTP status coedes or if it does not respond in 5 seconds. If one app
server is down, the load balancer will not send more visitors to it.
proxy_next_upstream error timeout invalid_header http_500 http_502 http_503 http_504;
This configuration also has caching enabled:
proxy_cache_path /var/cache/nginx levels=1:2 keys_zone=CACHE:10m max_size=1g;
proxy_cache CACHE;
proxy_cache_valid 200 1h;
proxy_cache_use_stale error timeout invalid_header updating http_500 http_502 http_503 http_504;
This will cache all data which was sent with a 200 response for 1 hour. All data
that is cached but not accessed is removed from the cache after 10 minutes.
Make sure you send a `Cache-Control` header: `Cache-Control: max-age=900, must-
revalidate` otherwise you might run into caching problems. Read the [rfc
here][14]. If you are unsure, turn it off.
We link the file to the `sites-enabled` folder, as a good practice:
- file:
src: /etc/nginx/sites-available/lbs.conf
dest: /etc/nginx/sites-enabled/lbs.conf
state: link
notify:
- restart keepalived
This means that when your fellow sysadmin removes the file in sites-enabled/ it
will not be gone forever, but just disabled.
We make sure the default site is not running:
- file:
dest: /etc/nginx/sites-enabled/default
state: absent
notify:
- restart keepalived
nginx is restarted when needed by the notify handler.
#### keepalived setup
![][15]
keepalived will provide basic IP failover. If one node fails the other will take
over. Ansible will make sure the confituration everywhere is the same, and we
have created a port and floating IP which will we connect visitors to so that in
the case of a failover everything keeps working.
Keepalived is very simple to setup, [I've written an article about the setup on
Ubuntu 14.04 which you should read][16].
First we install keepalived on both nodes:
# tasks/keepalived.yml
---
- apt:
name: "{{ item }}"
state: latest
update_cache: yes
with_items:
- keepalived
We make sure linux can bind to an address not configured on an interface (the
VIP, for example):
- sysctl:
name: net.ipv4.ip_nonlocal_bind
value: "1"
state: present
reload: yes
If we don't do that, keepalived will not work.
We place the config file. The playbook places a different config file for the
load balancers and for the database servers, this because the Virtual IP, router
ID and password are different for both configurations.
These values are used by Keepalived to determine the VIP, nodes and other
configuration. We can run multiple keepalived instances in the same subnet, but
we need to make sure they have a different ID and password.
- template:
src: keepalived.lbs.conf.j2
dest: /etc/keepalived/keepalived.conf
when: inventory_hostname in groups['lbs']
notify:
- restart keepalived
- template:
src: keepalived.sql.conf.j2
dest: /etc/keepalived/keepalived.conf
when: inventory_hostname in groups['dbs']
notify:
- restart keepalived
You can check out the [git repository][17] to see the keepalived layout. Since
it is fairly standard, I won't show it here.
Do note that it only protects against full host failure, not just failure of the
webserver. That is some homework for you to figure out.
If the config has changed, we restart the keepalived service via the notify
handler.
We now have configured the load balancers. Let's move on to the Database
Servers.
### Database Cluster
![][17]
Our database cluster will consist out of two MySQL servers running in Master
Master mode.
This play runs on the two database servers Ansible created earlier:
# tasks/main.yml
- name: Configure Databases
hosts: dbs
vars_files:
- "vars/main.yml"
user: root
tasks:
- include: tasks/configure-dbs.yml
- include: tasks/keepalived.yml
handlers:
- include: handlers/main.yml
#### MySQL Master Master
We start with installing MySQL and the python module Ansible needs for MySQL:
# tasks/configure-dbs.yml
---
- apt:
name="{{ item }}"
state=latest
update_cache=yes
with_items:
- mysql-server
- python-mysqldb
- vim
- git
- ntp
We place our MySQL config file:
- template:
src: my.cnf.j2
dest: /etc/mysql/my.cnf
notify:
- restart mysql
This is the config file:
# templates/my.cnf.j2
[client]
port = 3306
socket = /var/run/mysqld/mysqld.sock
[mysqld_safe]
socket = /var/run/mysqld/mysqld.sock
nice = 0
[mysqld]
user = mysql
pid-file = /var/run/mysqld/mysqld.pid
socket = /var/run/mysqld/mysqld.sock
port = 3306
basedir = /usr
datadir = /var/lib/mysql
tmpdir = /tmp
lc-messages-dir = /usr/share/mysql
skip-external-locking
bind-address = 0.0.0.0
key_buffer = 16M
max_allowed_packet = 16M
thread_stack = 192K
thread_cache_size = 8
myisam-recover = BACKUP
query_cache_limit = 1M
query_cache_size = 16M
log_error = /var/log/mysql/error.log
log_bin = mysql-bin
binlog_do_db = {{ mysql_user }}
expire_logs_days = 10
max_binlog_size = 100M
auto_increment_offset = 1
auto_increment_increment = 2
server_id = {{ sql_server_id }}
[mysqldump]
quick
quote-names
max_allowed_packet = 16M
[mysql]
[isamchk]
key_buffer = 16M
!includedir /etc/mysql/conf.d/
It is a default Ubuntu config file. The master master configuration consists out
of the following:
log_bin = mysql-bin
binlog_do_db = {{ mysql_user }} # this database will be replicated
expire_logs_days = 10
max_binlog_size = 100M
auto_increment_offset = 1
auto_increment_increment = 2 # avoid primary key conflicts
server_id = {{ sql_server_id }} # variable set during ansible host creation
We also copy the debian mysql config file to `/root/.my.cnf`. Ansible needs this
to connect to the database later on. Ansible has no way to copy a file on a host
to another file on that host, so we need to fetch it first and copy it then to
the new location. I use the hostname in the `dest` otherwise one server would
receive the wrong credentials file.
- fetch:
src: /etc/mysql/debian.cnf
flat: yes
dest: "/tmp/my.cnf.{{ ansible_hostname }}"
- copy:
src: "/tmp/my.cnf.{{ ansible_hostname }}"
dest: /root/.my.cnf
We create the MySQL database and user for that database on both nodes:
- mysql_user:
name: "{{ mysql_user }}"
password: "{{ mysql_password }}"
host: "%"
priv: '{{ mysql_user }}.*:ALL'
state: present
- mysql_db:
name: "{{ mysql_user }}"
state: present
I use the database username as the database name. This can be changed if needed.
The replication user is made on both nodes, with the correct permissions:
- mysql_user:
name: "replicator"
host: "%"
password: "{{ mysql_password }}"
priv: "*.*:REPLICATION SLAVE"
state: present
notify:
- restart mysql
The following part has some Ansible Magic. The mysql_replication module only
works once, it does not seem to be that much idempotent. If you run it again, it
will fail and complain that the slave must be stopped first before it change its
master. That is the expected behaviour, so we only want to set up the
replication if that hasn't been done yet.
Therefore we first check for the existence of a file. If that file exists, the
replication setup is skipped. If that file does not exist, we set up replication
and then create that file. The file creation is done after the replication setup
is done, so if the first one fails the latter one fails as well.
- stat: path=/etc/mysql/ansible.repl
register: check_sql_path
The existense of the file or folder can then later on be checked like so:
when: check_sql_path.stat.exists == false # or true.
We also use a double `when` conditional. We need to set up the servers with each
other's IP as the master. Therefore we need to run the setup for host A with the
master IP of host B, and vice versa.
However, we also need to check for that file. Luckally Ansible supports `and`
and `or` in their `when` conditionals. As you can see we extract the hostname of
the other database node (`master_host: "{{ groups.dbs[1] }}"`), which in our
case will be the IP address Openstack returns.
- mysql_replication:
mode: changemaster
master_host: "{{ groups.dbs[1] }}"
master_user: replicator
master_password: "{{ mysql_password }}"
when: check_sql_path.stat.exists == false and '{{ inventory_hostname }}' == '{{ groups.dbs[0] }}'
notify:
- restart mysql
- mysql_replication:
mode: changemaster
master_host: "{{ groups.dbs[0] }}"
master_user: replicator
master_password: "{{ mysql_password }}"
when: check_sql_path.stat.exists == false and '{{ inventory_hostname }}' == '{{ groups.dbs[1] }}'
notify:
- restart mysql
After this has succeeded the files are created:
- command: touch /etc/mysql/repl.ansible
when: check_sql_path.stat.exists == false and '{{ inventory_hostname }}' == '{{ groups.dbs[1] }}'
- command: touch /etc/mysql/repl.ansible
when: check_sql_path.stat.exists == false and '{{ inventory_hostname }}' == '{{ groups.dbs[1] }}'
We've now got two servers running in master master replication mode. You can
test this later on when the wordpress is set up by logging in to db server 1 and
check the tables in the database. Then check the same on the second db server.
#### Keepalived for MySQL
The keepalive playbook is the same as the one we used in the load balancer
setup. However, we check in which group the hostname is and based on that place
a different config file:
# tasks/keepalived.yml
- template:
src: keepalived.lbs.conf.j2
dest: /etc/keepalived/keepalived.conf
when: inventory_hostname in groups['lbs']
notify:
- restart keepalived
- template:
src: keepalived.sql.conf.j2
dest: /etc/keepalived/keepalived.conf
when: inventory_hostname in groups['dbs']
notify:
- restart keepalived
During the creation of the host we also set a different priority for the
database hosts, so that is handled as well.
The keepalived setup is again very simple. Move on the the last part, the actual
application servers.
### App servers
![][18]
The app servers are two Apache servers with PHP and GlusterFS for the file sync.
Glusterfs is set up first so that when we deploy the app the changes wil
automagically arrive on the second node:
# tasks/main.yml
- name: Configure App Server
hosts: app
vars_files:
- "vars/main.yml"
user: root
tasks:
- include: tasks/configure-gluster-app.yml
- include: tasks/configure-app.yml
handlers:
- include: handlers/main.yml
Because of [a bug][19] in the Ubuntu Glusterfs packages we need to enable the
official PPA and use newer glusterfs packages. Otherwise your OS will fail to
boot, miserably.
Little rant here, this bug was in some form in 12.04, you would think that 3
years and loads of bug reports would have fixed in 14.04, but that is still not
the case. It seems that if you want a stable distro you still need Red Hat...
End rant.
# tasks/configure-gluster-app.yml
---
# boot bug in standard 14.04 packages:
https://bugs.launchpad.net/ubuntu/+source/glusterfs/+bug/1268064
- apt_repository:
repo: 'ppa:semiosis/ubuntu-glusterfs-3.4'
state: present
update_cache: yes
Our application servers are both glusterfs servers and clients of one another.
You can set up a seperate glusterfs cluster, however that would be out of scope
for this tutorial. If you expect lots of IO, it is a recommendation to do.
We install both the server and te client:
- apt:
name: "{{ item }}"
state: installed
update_cache: yes
with_items:
- glusterfs-server
- glusterfs-client
- ntp
Glusterfs has the concepts of volumes and bricks. A volume is served by the
servers and mounted on the clients. A volume can consist out of multiple bricks,
either providing striping or replication. In our case we go for replication,
that means that both application servers have all the data.
I recommend you rad more on glusterfs, it is a really awesome product and I know
of a few
We make sure the actual brick folder exists:
- file:
path: "{{ gluster_brick_dir }}"
state: directory
There is no glusterfs module for Ansible, so here again we need to work around
to prevent some idempotency issues. We make sure all the nodes know about each
other:
- shell: "gluster peer probe {{ item }}"
with_items:
- "{{ groups.app }}"
Then we get a list of all glusterfs nodes for use later on. Ansible gives me
back a nice python-style list in the form of `u[10.1.1.2], u[10.1.1.3]` which is
of no use in the later gluster commands, therefore we apply some sed
replacements to filter and keep only the IP addresses:
- shell: 'echo {{ groups.app }} | sed -e "s/\]//g" -e "s/, u/, /g" -e "s/\[u//g" -e "s%,%:{{ gluster_brick_dir }} %g; s%$%:{{ gluster_brick_dir }}%"'
register: gluster_bricks
connection: local
We check if the volume already exists by issuing a `volume info` command. If
that fails, the `||` will make sure the other action happens, that is create the
volume. It is a replicated volume, with the data on at least two nodes. The
output of the sed command from earlier is used to specify all the nodes. We also
only do this on the first glusterfs server, it will otherwise fail on both or on
the other.
- shell: 'gluster volume info {{ gluster_volume }} ||
gluster volume create {{ gluster_volume }} transport tcp replica 2
{{ gluster_bricks.stdout }} force'
when: '"{{ inventory_hostname }}" == "{{ groups.app[0] }}"'
We wait a while to make sure the volume is actually being created. Without this
delay the next steps would fail for me.
- wait_for:
delay: 10
timeout: 10
We check if the volume is already started, if not, we start it, on both nodes:
- shell: 'gluster volume info {{ gluster_volume }} | grep "Status: Started" ||
gluster volume start {{ gluster_volume }}'
We make sure the `/var/www/html` folder exists, since this is the folder we will
be mounting the glusterfs on:
- file:
path: "/var/www/html"
state: directory
We mount the volume. The ansible module will also place this in `/etc/fstab` so
we don't need to edit that as well:
* mount: name: /var/www/html fstype: glusterfs src: "{{ groups.app[0] }}:{{ gluster_volume }}" state: mounted
If we now create a file on one node, for example `/var/www/html/test`, this file
should appear on the other node as well.
Gluster cluster information can be found on either hosts with the `gluster
volume info` or `gluster peer info` commands.
We can now deploy the actual application.
#### Apache and Deployment
We start by installing the Apache webserver, php (mod_php) and a few tools and
modules:
# tasks/configure-app.yml
---
- apt:
name="{{ item }}"
state=latest
update_cache=yes
with_items:
- php5-mysql
- python-pip
- php5
- libapache2-mod-php5
- php5-mcrypt
- vim
- git
- ntp
We are going to deploy wordpress right out of the git repository:
- git:
repo:
https://github.com/WordPress/WordPress.git
dest: /var/www/html/site
force: yes
update: no
when: '"{{ inventory_hostname }}" == "{{ groups.app[0] }}"'
If you want to check out a specific version then give a branch name:
version: 3.9-branch
We only do this on the first node since Gluster will take care of the sync to
the other node.
We remove the default `index.html` file and replace it with our simple
`index.php` that redirects to `/site` where wordpress is located:
- file:
dest: /var/www/html/index.html
state: absent
- copy:
src: index.php
dest: /var/www/html/index.php
when: '"{{ inventory_hostname }}" == "{{ groups.app[0] }}"'
We deploy the `wp-config.php` file with our database settings pointing to the
keepalived database IP:
- template:
src: wp-config.php.j2
dest: /var/www/html/site/wp-config.php
when: '"{{ inventory_hostname }}" == "{{ groups.app[0] }}"'
![][20]
You can now navigate to the floating IP address and start the wordpress
installation.
### Testing the cluster
When it is all up and running and you have successfully deployed your
application you of course want to know if the cluster setup works or not. How to
do that best other that just shutting down all nodes in one availability zone?
Or just the database servers or the load balancers? Try it out, start them up
again, see that it all still works.
Congratulations, you've now got an awesome cluster setup running, all deployed
via Ansible and Openstack!
![][21]
[Repository][4].
### What if shit hits the fan?
![][22]
You now have your awesome cluster setup and working. As you know, this cluster
setup protects against full host failure per layer, thus providing protection
against one full availability zone being offline.
In the case that happens, your site will still be working. However, what do do
when the Availability Zone issue is fixed?
Make sure your servers in the affected zone are offline.
Start with the load balancer, turn it on and check the logs to see if it picks
up keepalived. If it had the highest priority it should pick up the VIP again.
If it had a lower priority, try stopping keepalived on the master and see if it
fails over. If so, make sure the nginx config still works and you are good to
go.
Start up the application server. Make sure it starts correctly. Wait a while for
GlusterFS to sync the files over. Test the sync by creating a few files on one
node and check the other node if they are there as well. Then stop the webserver
on the node that kept working during the crash and test the website. If that all
works you are good to go.
The database is a trickier part. If it has diverged too much, as in, it has been
offline to long you will need to fix the mysql replication. Stop the slave on
both nodes. Also stop the master. Create a dump of the database srever that kept
working and import it on the other db server. Check the binlog positions and
start up replication manually again with the correct file and position.
[17][17]:
[1]:
https://raymii.org/s/inc/img/openstack-cluster.png
[2]:
https://cloudvps.com
[3]:
https://www.digitalocean.com/?refcode=7435ae6b8212
[4]:
https://github.com/RaymiiOrg/ansible/tree/master/openstack-example
[5]:
https://raymii.org/s/tags/ansible.html
[6]:
https://raymii.org/s/tags/openstack.html
[7]:
https://raymii.org/s/tags/ubuntu.html
[8]:
https://raymii.org/s/inc/img/skyline-hosts.png
[9]:
https://raymii.org/s/inc/img/skyline-graph.png
[10]:
https://raymii.org/s/inc/img/skyline-floating-ips.png
[11]:
https://raymii.org/s/inc/img/skyline-network.png
[12]:
https://github.com/ansible/ansible/pull/8182
[13]:
https://raymii.org/s/inc/img/nginx-alt.png
[14]:
http://www.w3.org/Protocols/rfc2616/rfc2616-sec13.html
[15]:
https://raymii.org/s/inc/img/keepalived-portal.png
[16]:
https://raymii.org/s/tutorials/Keepalived-Simple-IP-failover-on-Ubuntu.html
[17]:
https://raymii.org/s/inc/img/database-dilbert.png
[18]:
https://raymii.org/s/inc/img/stupid-questions.png
[19]:
https://bugs.launchpad.net/ubuntu/+source/glusterfs/+bug/1268064
[20]:
https://raymii.org/s/inc/img/wordpress-install.png
[21]:
https://raymii.org/s/inc/img/youre-awesome.png
[22]:
https://raymii.org/s/inc/img/shtf.png
---
License:
All the text on this website is free as in freedom unless stated otherwise.
This means you can use it in any way you want, you can copy it, change it
the way you like and republish it, as long as you release the (modified)
content under the same license to give others the same freedoms you've got
and place my name and a link to this site with the article as source.
This site uses Google Analytics for statistics and Google Adwords for
advertisements. You are tracked and Google knows everything about you.
Use an adblocker like ublock-origin if you don't want it.
All the code on this website is licensed under the GNU GPL v3 license
unless already licensed under a license which does not allows this form
of licensing or if another license is stated on that page / in that software:
This program is free software: you can redistribute it and/or modify
it under the terms of the GNU General Public License as published by
the Free Software Foundation, either version 3 of the License, or
(at your option) any later version.
This program is distributed in the hope that it will be useful,
but WITHOUT ANY WARRANTY; without even the implied warranty of
MERCHANTABILITY or FITNESS FOR A PARTICULAR PURPOSE. See the
GNU General Public License for more details.
You should have received a copy of the GNU General Public License
along with this program. If not, see <
http://www.gnu.org/licenses/>.
Just to be clear, the information on this website is for meant for educational
purposes and you use it at your own risk. I do not take responsibility if you
screw something up. Use common sense, do not 'rm -rf /' as root for example.
If you have any questions then do not hesitate to contact me.
See
https://raymii.org/s/static/About.html for details.