This is a text-only version of the following page on
https://raymii.org:
---
Title : Distributed load testing with Tsung
Author : Remy van Elst
Date : 13-04-2017
URL :
https://raymii.org/s/articles/Basic_Website_load_testing_with_Tsung.html
Format : Markdown/HTML
---
### Preface
![][1]
At $dayjob I manage a large OpenStack Cloud. Next to that I also build high-
performance and redundant clusters for customers. Think multiple datacenters,
`haproxy`, `galera` or `postgres` or mysql replication, `drbd` with `nfs` or
`glusterfs` and all sorts of software that can (and sometimes cannot) be
clustered (`redis`, `rabbitmq` etc.). Our customers deploy their application on
there and when one or a few components fail, their application stays up.
Hypervisors, disks, switches, routers, all can fail without actual service
downtime. Next to building such clusters, we also monitor and manage them.
When we build such a cluster (fully automated with Ansible) we do a basic load
test. We do this not for benchmarking or application flow testing, but to
optimize the cluster components. Simple things like the `mpm` workers or threads
in Apache or more advanced topics like MySQL or DRBD. Optimization there depends
on the specifications of the servers used and the load patterns.
Tsung is a high-performance but simple to configure and use piece of software
written in Erlang. Configuration is done in a simple readable XML file. Tsung
can be run distributed as well for large setups. It has good reporting and a
live web interface for status and reports during a test.
<p class="ad"> <b>Recently I removed all Google Ads from this site due to their invasive tracking, as well as Google Analytics. Please, if you found this content useful, consider a small donation using any of the options below:</b><br><br> <a href="
https://leafnode.nl">I'm developing an open source monitoring app called Leaf Node Monitoring, for windows, linux & android. Go check it out!</a><br><br> <a href="
https://github.com/sponsors/RaymiiOrg/">Consider sponsoring me on Github. It means the world to me if you show your appreciation and you'll help pay the server costs.</a><br><br> <a href="
https://www.digitalocean.com/?refcode=7435ae6b8212">You can also sponsor me by getting a Digital Ocean VPS. With this referral link you'll get $100 credit for 60 days. </a><br><br> </p>
I'm by no means a load-testing expert. User flow, parsing the results and such
are not my cup of tea. I do however understand server performance and
optimization. These load tests are ment to help me and my team to have a general
idea of that the clients setup is able to handle. For example, high-load
clusters benefit from several extra IP addresses just for monitoring. Sockets in
linux are per IP, and when the IP's and conntrack are exhausted, the monitoring
IP will still work. We found that during one of these load tests where the load
was relatively low, but all the monitoring failed (because of conntrack).
### Tsung configuration
The tsung configuration file consists out of several different parts. We'll
cover them here, but first we must install the software. The version of `tsung`
that I'm using is 1.6.0. We'll talk in detail about the configuration file. The
entire file can be found at the bottom of this page as a whole.
#### Installation
Tsung can be installed via `apt`:
apt-get install tsung
Under Ubuntu 16.04 and 17.04 I did get strange erlang errors complaining about
`enoent`. It appears in the Ubuntu package something was missing. Manually
compiling `tsung` with the classical
./configure
make
make install
fixed those errors.
#### Header
Tsung configuration is xml, so first we need to place the header:
<?xml version="1.0"?>
<!DOCTYPE tsung SYSTEM "/usr/share/tsung/tsung-1.0.dtd">
<tsung loglevel="notice" version="1.0">
#### Clients
The clients are the servers that execute the actual load test. If you have a
distributed setup (see below) then you define them here:
<clients>
<client host="ts2" maxusers="30000" weight="2" />
<client host="ts3" weight="1" />
</clients>
`ts3` will do a maximum amount of users and client `ts2` will be used twice as
much as client `ts3` due to the weight. You can omit those two options.
If you want to execute the test from your local workstation you can use the
following configuration:
<clients>
<client host="localhost" use_controller_vm="true"/>
</clients>
#### Servers
The servers are the endpoints where the clients will send the requests to. This
will be either the hostname or IP address of the server you are going to test.
<servers>
<server host="example.org" port="443" type="ssl"></server>
</servers>
Servers can have a `weight` as well.
`type` can be any of the following:
* tcp
* ssl
* udp
* tcp6
* ssl6
* udp6
* websocket
For HTTP you need to use `tcp`, for HTTPS you need to use `ssl`. If you use
multiple servers based on IP address and they use virtual hosts, for every
request (see below) you need to also define the `HTTP Host:` header in the
configuration section for that request:
<request>
<http url="/bla" method="POST" contents="bla=blu&name=glop">
<www_authenticate userid="Aladdin" passwd="open sesame"/>
<http_header name="Cache-Control" value="no-cache"/>
<http_header name="Host" value="example.org"/>
</http>
</request>
For more information on `servers` and `clients` [see here][3].
#### Load progression
The load test is split up into several phases. Each phase has a duration and a
number of visitors. During these phases the sessions will be executed. A basic
load setup I use often is one where there are the number of users increases:
<load>
<!-- 50 users a second for 3 minutes == 9000 sessions -->
<arrivalphase phase="1" duration="3" unit="minute">
<users arrivalrate="50" unit="second"></users>
</arrivalphase>
<!-- 100 users a second for 3 minutes == 18000 sessions -->
<arrivalphase phase="2" duration="3" unit="minute">
<users arrivalrate="100" unit="second"></users>
</arrivalphase>
<!-- 200 users a second for 6 minutes == 72000 sessions -->
<arrivalphase phase="3" duration="6" unit="minute">
<users arrivalrate="200" unit="second"></users>
</arrivalphase>
</load>
You can define as many phases as you please. If you want to test a maximum
number of users per phase, use the `maxnumber=""` option:
<load>
<arrivalphase phase="1" duration="3" unit="minute">
<users maxnumber="100" arrivalrate="2" unit="second"></users>
</arrivalphase>
</load>
There will be a maximum of 100 users in the three minutes setup.
Phases are done in order of the number. First phase 1, then 2, then 3 and so on.
These phases can also be looped. More information on phases and load progression
[can be found here][4].
#### Options
Per test we can define options. These are mostly used for `xmpp` testing, the
only option we have for HTTP is the user agent. Multiple user agents can be
setup and given a probability:
<options>
<option type="ts_http" name="user_agent">
<user_agent probability="20">Mozilla/5.0 (Windows; U; Windows NT 6.1; en-US) AppleWebKit/532.0 (KHTML, like Gecko) Chrome/4.0.201.1 Safari/532.0</user_agent>
<user_agent probability="30">Mozilla/5.0 (Windows NT 10.0; WOW64; rv:40.0) Gecko/20100101 Firefox/40.0</user_agent>
<user_agent probability="50">Mozilla/5.0 (IE 11.0; Windows NT 6.3; Trident/7.0; .NET4.0E; .NET4.0C; rv:11.0) like Gecko</user_agent>
</option>
</options>
Chrome will be 20% of the visits, Firefox 30 and the rest is Internet Explorer.
The probability must add up to 100.
A few more options like SSL Ciphers and global timeouts can be set, [see
here][5] for details.
#### Sessions
Sessions define the content of the scenario itself. They describe the requests
to execute. Multiple types of requests can be given, next to the basic HTTP GET
and POST requests. WEBDAV is supported as well as basic, oauth and digest
authentication, HTTP headers and more.
This article limits itself to HTTP website testing. For XMPP and the other types
supported by Tsung, please [consult the documentation][6].
Before we dive in to all the configuration, lets think about what our goal is
here. We want to simulate a visitor with a web browser. Browsers normally do not
just get a page over and over again. They request the page, but also all the
content included, like javascript, stylesheets and images. Once a page is
loaded, they stop doing stuff while the human reads the page, until a new link
is clicked and the whole thing starts over. Include a search or a POST reqeust
here and there and you've got something much more complex than just a `curl`
loop in your shell.
A very nice feature of Tsung is support for so called Transactions. Transactions
are a way to group several requests. In the statistics these requests will be
shown as a group, like here below in the image:
![][7]
In the picture I've defined two transactions. One to get the index page
including javascript, css, the logo image and the custom web fonts, and one to
get an actual article including all of the above plus the images in the article.
Using transactions your can understand your statistics better. You can also find
out bottlenecks easier. Let's say your index page and your articles are cached
by `varnish` or `nginx`, but your product list is not. With the transactions you
can probably see that the caching works for the first to. The latter group, the
product list, will have a lower performance.
So let's define our first session with two transactions. Use your favorite
browser and the Proxy Recorder from Tsung (see below) or open up the development
tools and copy the URL's of all the requests. You can have multiple sessions as
well, after this session we will add another one that does a website search.
<sessions>
<session name="http" weight="10" type="ts_http">
<thinktime value="2" random="true"></thinktime>
<transaction name="index_request">
<request>
<http url="/" method="GET" version="1.1"></http>
</request>
<request>
<http url="/s/" method="GET" version="1.1"></http>
</request>
<request>
<http url="/inc/css/custom-first.css" method="GET" version="1.1"></http>
</request>
<request>
<http url="/inc/css/light.css" method="GET" version="1.1"></http>
</request>
<request>
<http url="//inc/js/toc.js" method="GET" version="1.1"></http>
</request>
<request>
<http url="/inc/img/resistor-50.png" method="GET" version="1.1"></http>
</request>
<request>
<http url="/inc/css/raleway.ttf" method="GET" version="1.1"></http>
</request>
</transaction>
</session>
</sessions>
The weight can be defined here as well, just as a probability. I prefer to use
weight due to a more even distribution, probability is still a chance-based
calculation. A probablity of 10 and 90 doesn't mean that 10% of the requests
will be as you specified, just that is has a 10% change. A weight of 1 and 10
will mean that there will be 10 times more requests absolute.
Thinktime is a random pause with a maximum of 2 seconds between requests.
The actual requests are self explanatory, an URL is defined. I use relative
URL's, but you can also use absolute URL's. Do note that the absolute URL
overrides the server for the rest of the sessions, until you define another
absolute URL.
Here is an example of a POST request wich submits data and does a HTTP Basic
login:
<request>
<http url="/migration/new" method="POST" contents="server=www1&name=dave&reason=maintenance">
<www_authenticate userid="
[email protected]" passwd="hunter2"/>
<http_header name="Cache-Control" value="no-cache"/>
<http_header name="Host" value="www.example.org"/>
</http>
</request>
You can add a cookie to a request. I haven't found a way to do a POST and use
the cookie you get from that yet. You also need to define the cookie during
every request:
<request>
<http url="/s/" method="GET" version="1.1">
<add_cookie key="admin" value="1"/>
</http>
</request>
Here is the second transaction which gets an article page from here, including
all the images.
<transaction name="article_request">
<request> <http url="/s/blog/Burn_in_testing_for_Hypervisor_and_Storage_servers.html" method="GET" version="1.1"></http> </request>
<request> <http url="/inc/css/custom-first.css" method="GET" version="1.1"></http> </request>
<request> <http url="/inc/css/light.css" method="GET" version="1.1"></http> </request>
<request> <http url="/inc/js/toc.js" method="GET" version="1.1"></http> </request>
<request> <http url="/inc/img/resistor-50.png" method="GET" version="1.1"></http> </request>
<request> <http url="/inc/css/raleway.ttf" method="GET" version="1.1"></http> </request>
<request> <http url="/s/inc/img/busy-compute.jpg" method="GET" version="1.1"></http> </request>
<request> <http url="/s/inc/img/automate-all-the-things.png" method="GET" version="1.1"></http> </request>
<request> <http url="/s/inc/img/empty-compute.jpg" method="GET" version="1.1"></http> </request>
<request> <http url="/s/inc/img/iops-compute.jpg" method="GET" version="1.1"></http> </request>
<request> <http url="/s/inc/img/iops-zfs.png" method="GET" version="1.1"></http> </request>
<request> <http url="/s/inc/img/busy-compute.jpg" method="GET" version="1.1"></http> </request>
<request> <http url="/s/inc/img/busy-compute2.jpg" method="GET" version="1.1"></http> </request>
<request> <http url="/s/inc/img/notification-memory.png" method="GET" version="1.1"></http> </request>
</transaction>
##### Random variables
Static content mostly works just fine and probably comes from a caching layer.
One thing we always do is something dynamic to let the requests fall through the
cache and go to the application, `php`, `django` or `rails` for example. 90% of
the time we can use the search feature of the tested application, the other 10%
we do POST requests or have the development team build a special testing page.
Tsung can do a few more tricks and even allows you to write custom Erlang
scripts for more magic. We use but a simple part of that to get a random string
for the searches. If the site has a GET based search page, this is easy.
Using `dynvars` we can create a random string. Tsung has multiple types of
random strings. First, and in my experience the fastest, is a numeric only ID.
Append `subst="true"` to the `<request>` for a dynamic variable request.
One thing to remember is that all dynamic variables must be prefixed with an
underscore (`_`) in the requests. If you define a variable named `example_var`,
in your request you need to call it via `%%_example_var%%`.
In your request you can call this by adding `%%ts_user_server:get_unique_id%%`
in the request URL. For example:
<http url="/zoeken/?q=%%ts_user_server:get_unique_id%%" method="GET" version="1.1"></http>
Will result in the following in your logs:
215.83.32.40 - - [14/Apr/2017:16:21:06 +0200] "GET /zoeken/?q=15375 HTTP/1.1" 200 308 "-" "Mozilla/5.0 (Windows; U; Windows NT 6.1; en-US) AppleWebKit/532.0 (KHTML, like Gecko) Chrome/4.0.201.1 Safari/532.0"
215.83.32.40 - - [14/Apr/2017:16:21:09 +0200] "GET /zoeken/?q=15522 HTTP/1.1" 200 308 "-" "Mozilla/5.0 (Windows NT 10.0; WOW64; rv:40.0) Gecko/20100101 Firefox/40.0"
215.83.32.40 - - [14/Apr/2017:16:21:09 +0200] "GET /zoeken/?q=15532 HTTP/1.1" 200 308 "-" "Mozilla/5.0 (Windows NT 10.0; WOW64; rv:40.0) Gecko/20100101 Firefox/40.0"
The parameter is different for every single request.
The next parameter is `urandom_string`. According to the documentation this
string is faster than `random_string` but not truly random. It is also the same
for the entire session. In the `<session>`, define the variable:
<setdynvars sourcetype="urandom_string" length="20">
<var name="urndstring1" />
</setdynvars>
In your request:
<http url="/zoeken/?q_random=%%_rndstring1%%" method="GET" version="1.1"></http>
In your logs:
215.83.32.38 - - [14/Apr/2017:16:08:52 +0200] "GET /zoeken/?q_urand=qxvmvtglimieyhemzlxc HTTP/1.1" 200 308 "-" "Mozilla/5.0 (IE 11.0; Windows NT 6.3; Trident/7.0; .NET4.0E; .NET4.0C; rv:11.0) like Gecko"
215.83.32.40 - - [14/Apr/2017:16:08:53 +0200] "GET /zoeken/?q_urand=qxvmvtglimieyhemzlxc HTTP/1.1" 200 308 "-" "Mozilla/5.0 (Windows NT 10.0; WOW64; rv:40.0) Gecko/20100101 Firefox/40.0"
215.83.32.40 - - [14/Apr/2017:16:08:54 +0200] "GET /zoeken/?q_urand=qxvmvtglimieyhemzlxc HTTP/1.1" 200 308 "-" "Mozilla/5.0 (IE 11.0; Windows NT 6.3; Trident/7.0; .NET4.0E; .NET4.0C; rv:11.0) like Gecko"
The same parameter is sent for every request. This can be a problem if your
search results are cached, only the first search will be slow until the cache
expires.
The last random method is `random_string`. This is slower to generate but is
different for each request.
In your session:
<setdynvars sourcetype="random_string" length="13">
<var name="rndstring1" />
</setdynvars>
In your request:
<http url="/zoeken/?q_random=%%_rndstring1%%" method="GET" version="1.1"></http>
In your logs:
215.83.32.38 - - [14/Apr/2017:16:08:52 +0200] "GET /zoeken/?q_rand=jrekkkrqrobiq HTTP/1.1" 200 308 "-" "Mozilla/5.0 (IE 11.0; Windows NT 6.3; Trident/7.0; .NET4.0E; .NET4.0C; rv:11.0) like Gecko"
215.83.32.38 - - [14/Apr/2017:16:08:52 +0200] "GET /zoeken/?q_rand=shypceesbeyth HTTP/1.1" 200 308 "-" "Mozilla/5.0 (IE 11.0; Windows NT 6.3; Trident/7.0; .NET4.0E; .NET4.0C; rv:11.0) like Gecko"
215.83.32.40 - - [14/Apr/2017:16:08:53 +0200] "GET /zoeken/?q_rand=hwfhuubmgvejb HTTP/1.1" 200 308 "-" "Mozilla/5.0 (Windows NT 10.0; WOW64; rv:40.0) Gecko/20100101 Firefox/40.0"
215.83.32.40 - - [14/Apr/2017:16:08:54 +0200] "GET /zoeken/?q_rand=egidgqflijzul HTTP/1.1" 200 308 "-" "Mozilla/5.0 (IE 11.0; Windows NT 6.3; Trident/7.0; .NET4.0E; .NET4.0C; rv:11.0) like Gecko"
The parameter here is different.
Do be carefull with these random or dynamic requests that fall through the cache
to your application. We mostly make 10% of the scenario requests of this type,
our experience is that more will bring every application to a grinding halt.
Regular user traffic (non-bots) also most of the time doesn't do that many
things that cannot be cached. Take a forum for example, only the post-request
that submits a topic or reply cannot be cached, but a user won't send 1500 new
topics in a few minutes. All the other parts, even dynamic stuff like profile
pages or user-generated content can be cached. Maybe not in `varnish`, but in a
key-value store like `redis` instead of directly coming from your database.
Here is a session that utilizes the three different random string methods:
<session name="zoeken" weight="1" type="ts_http">
<setdynvars sourcetype="random_string" length="13">
<!-- different for each request -->
<var name="rndstring1" />
</setdynvars>
<setdynvars sourcetype="urandom_string" length="20">
<!-- the same for each request -->
<var name="urndstring1" />
</setdynvars>
<request subst="true">
<http url="/zoeken/?q_id=%%ts_user_server:get_unique_id%%" method="GET" version="1.1"></http>
</request>
<request subst="true">
<http url="/zoeken/?q_random=%%_rndstring1%%" method="GET" version="1.1"></http>
</request>
<request subst="true">
<http url="/zoeken/?q_urandom=%%_urndstring1%%" method="GET" version="1.1"></http>
</request>
<thinktime value="20" random="true"></thinktime>
</session>
##### Dynamic variables from a file (usernames and passwords)
The [manual][8] has another example where you can read a `csv` file with
usernames and passwords and use those for a request. This is a good way to test
if your application has a rate-limiting feature, to make sure users cannot just
brute-force their way in.
The `userlist.csv` file:
user1;password1
user2;password2
The dynvar:
<setdynvars sourcetype="file" fileid="userlist.csv" delimiter=";" order="iter">
<var name="username" />
<var name="user_password" />
</setdynvars>
The request:
<request subst="true">
<http url='/login/' version='1.0'
contents='username=%%_username%%&password=%%_user_password%%&op=login'
content_type='application/x-www-form-urlencoded' method='POST'>
</http>
</request>
Testing the actual rate limiting can be done as well by checking the servers
response.
##### Checking the servers response
With the tag match in a `<request>` tag, you can check the server's response
against a given string, and do some actions depending on the result. In any
case, if it matches, this will increment the `match` counter, if it does not
match, the `nomatch` counter will be incremented.
The list of available actions to do is:
* `continue`: do nothing, continue (only update `match` or `nomatch` counters)
* `log`: log the `request id`, `userid`, `sessionid`, `name` in `match.log`
* `abort`: abort the session
* `restart`: restart the session.
* `loop`: repeat the request, after 5 seconds. The maximum number of loops is 20 by default.
* `dump`: dump the content of the response in a filen filename is `match-<userid>-<sessionid>-<requestid>-<dumpid>.dump`
To test if brute-force protection works, you can use either the `continue`
option or the `abort` option. If you use continue, check the `nomatch` counter
in the statistics. If you use the `abort` option, the test will stop when the
rate-limiting is in place and your match fails.
Here is an example of a login page with an `abort` if the content has the words
`login failed!`:
<request>
<match do="abort" when="match">login failed!</match>
<http url="/login.php" version="1.0" method="POST"
contents="username=dave&user_password=hunter2"
content_type="application/x-www-form-urlencoded" >
</request>
You can also use `nomatch`, for example if you don't give an error when your
brute-force protection kicks in. You can then test if the `Welcome dear
$username` is not on the page.
The [docs][9] have more examples, including complex conditionals and loops.
#### Closing the XML
When you've defined all your transactions and requests, you need to close the
file with the last tag:
</tsung>
Now you're ready to execute the loadtest.
### Running a test
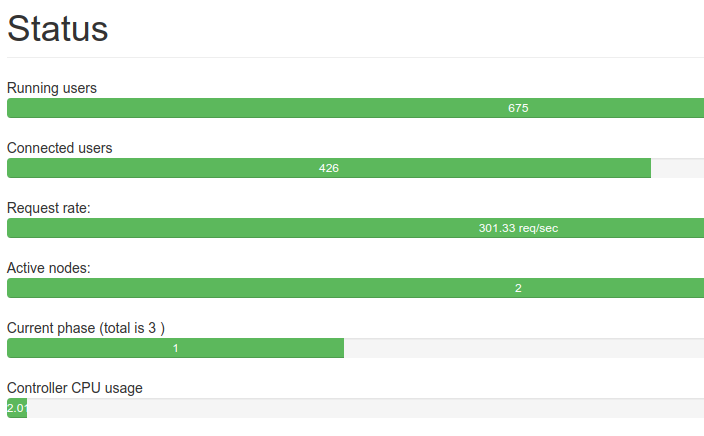
With your configuration file set up, and if defined, your distributed setup working, you can start the test. During the test there is a live status web interface running on [`127.0.0.1:8091`][10]:
![][11]
Using the below command we can start a test. The `-k` option keeps the web
interface open even when the test is finished.
tsung -k -f file.xml start
Example output:
Starting Tsung
Log directory is: /root/.tsung/log/20170414-1609
When the test is finished:
All slaves have stopped; keep controller and web dashboard alive.
Hit CTRL-C or click Stop on the dashboard to stop.
If you want to abort a test while it is running, because for example your server
crashes, hit `CTRL+C` a few times.
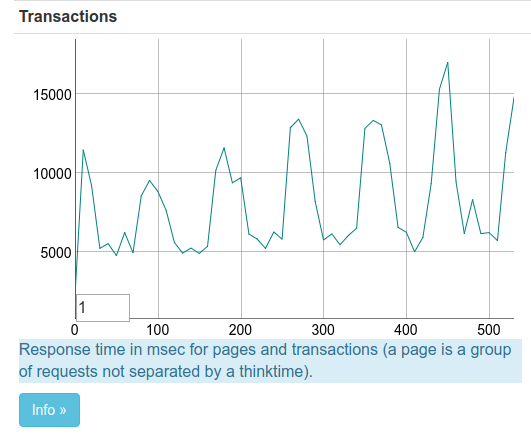
During the test you get live metrics and graphs on the web interface:
![][12]
I'll discuss two other very nice features of Tsung, the distributed setup and
the proxy recorder. The distributed setup allows you to scale up the load test
far beyond one server. We've done tests with over ten million concurrent hits
using 50 virtual machines. Just small single core instances with gigabit
network.
The proxy recorder allows you to record a browsing session. Way better than
manually creating a text configuration file. Even the client can do so.
### Distributed setup
[If you like this article, consider sponsoring this site by trying out a Digital
Ocean VPS. With this link you'll get a $5 VPS for 2 months free (as in, you get
$10 credit). (referral link)][2]
Tsung communicates between testing nodes using SSH, so make sure your SSH keys
are installed on the servers and that you can SSH between them without a
password prompt. If you can't, generate a special SSH key for tsung, without a
password:
ssh-keygen -C 'tsung' -t rsa -b 2048 -N "" -f /root/.ssh/id_rsa.tsung
Output:
Generating public/private rsa key pair.
Your identification has been saved in /root/.ssh/id_rsa.tsung.
Your public key has been saved in /root/.ssh/id_rsa.tsung.pub.
The key fingerprint is:
SHA256:eCl3Vkk/afmYAraZVQw4Y9OSnIIQas tsung
The key's randomart image is:
+---[RSA 2048]----+
|o+oo.oo= B+o |
| |
+----[SHA256]-----+
Place the key on the server you are using for tsung:
ssh-copy-id
[email protected]
Add the server to your SSH config and specify to use the key we just generated:
vim ~/.ssh/config
Add:
Host ts1
Hostname 1.2.3.4
User root
IdentityFile ~/.ssh/id_rsa.tsung
Port 22
Also add them to your `/etc/hosts` file:
1.2.3.4 ts1
4.3.2.1 ts2
Test to see if you can login without a password:
ssh root@ts1
Repeat this for all the other nodes.
You must use a hostname (ssh hostname or actual hostname), otherwise you will
get an error:
ERROR: client config: 'host' attribute must be a hostname, not an IP ! (was "213.187.242.156")
It is important to use the same `erlang` and `tsung` version on all the servers.
I had my controller vm on CentOS 7 and the test servers on Ubuntu 16.04, with a
slightly different erlang version (`erts-8.2.1` vs `erts-8.3`) and the tests all
timed out or failed. Booting up a controller VM with 16.04 made it all work.
If you do experience issues with the distributed setup, you can test if the SSH
connection via erlang works. On your controller VM execute the following
command:
erl -rsh ssh -sname foo -setcookie mycookie
In the prompt, give the following command, where `ts2` is the hostname of the
server to test the connection to:
slave:start(ts2,bar,"-setcookie mycookie").
It should return:
{ok,bar@ts2}
Otherwise your setup is incorrect. [See here][13] for more troubleshooting tips.
### Proxy recorder
Tsung has a proxy recorder. It allows you to record a browser session to a
configuration file. I haven't used it but for complicated browsing session it
seems quite handy.
The recorder has three plugins: for HTTP, WebDAV and for PostgreSQL. To start
it, run:
tsung-recorder -p PLUGIN start
where PLUGIN can be `http`, `webdav` or `pgsql` for PostgreSQL. The default
plugin is `http`. The proxy is listening to port 8090. You can change the port
with `-L portnumber`.
To stop it, use :
tsung-recorder stop.
The recorded session is created as `~/.tsung/tsung_recorderYYYMMDD-HH:MM.xml`;
if it doesn't work, take a look at `~/.tsung/log/tsung.log-
tsung_recorder@hostname`.
[More info][14]
### Complete example configuration
Below you'll find the complete configuration file we discussed in this article.
<?xml version="1.0"?>
<!DOCTYPE tsung SYSTEM "/usr/share/tsung/tsung-1.0.dtd">
<tsung loglevel="notice" version="1.0">
<clients>
<client host="ts2" maxusers="30000"/>
<client host="ts3" maxusers="30000"/>
</clients>
<!-- Server side setup -->
<servers>
<server host="example.org" port="443" type="ssl"></server>
</servers>
<load>
<arrivalphase phase="1" duration="3" unit="minute">
<users arrivalrate="500" unit="second"></users>
</arrivalphase>
<arrivalphase phase="2" duration="3" unit="minute">
<users arrivalrate="1000" unit="second"></users>
</arrivalphase>
<arrivalphase phase="3" duration="6" unit="minute">
<users arrivalrate="2000" unit="second"></users>
</arrivalphase>
</load>
<options>
<option type="ts_http" name="user_agent">
<user_agent probability="20">Mozilla/5.0 (Windows; U; Windows NT 6.1; en-US) AppleWebKit/532.0 (KHTML, like Gecko) Chrome/4.0.201.1 Safari/532.0</user_agent>
<user_agent probability="30">Mozilla/5.0 (Windows NT 10.0; WOW64; rv:40.0) Gecko/20100101 Firefox/40.0</user_agent>
<user_agent probability="50">Mozilla/5.0 (IE 11.0; Windows NT 6.3; Trident/7.0; .NET4.0E; .NET4.0C; rv:11.0) like Gecko</user_agent>
</option>
</options>
<sessions>
<session name="zoeken" weight="1" type="ts_http">
<setdynvars sourcetype="random_string" length="13">
<var name="rndstring1" />
</setdynvars>
<setdynvars sourcetype="urandom_string" length="20">
<var name="urndstring1" />
</setdynvars>
<request subst="true"> <http url="/zoeken/?q=%%ts_user_server:get_unique_id%%" method="GET" version="1.1"></http> </request>
<request subst="true"> <http url="/zoeken/?q=%%_rndstring1%%" method="GET" version="1.1"></http> </request>
<request subst="true"> <http url="/zoeken/?q=%%_urndstring1%%" method="GET" version="1.1"></http> </request>
<thinktime value="20" random="true"></thinktime>
</session>
<session name="http" weight="10" type="ts_http">
<thinktime value="2" random="true"></thinktime>
<transaction name="index_request">
<request> <http url="/" method="GET" version="1.1"></http> </request>
<request> <http url="/s/" method="GET" version="1.1"></http> </request>
<request> <http url="/inc/css/custom-first.css" method="GET" version="1.1"></http> </request>
<request> <http url="/inc/css/light.css" method="GET" version="1.1"></http> </request>
<request> <http url="//inc/js/toc.js" method="GET" version="1.1"></http> </request>
<request> <http url="/inc/img/resistor-50.png" method="GET" version="1.1"></http> </request>
<request> <http url="/inc/css/raleway.ttf" method="GET" version="1.1"></http> </request>
</transaction>
<transaction name="article_request">
<request> <http url="/s/blog/Burn_in_testing_for_Hypervisor_and_Storage_servers.html" method="GET" version="1.1"></http> </request>
<request> <http url="/inc/css/custom-first.css" method="GET" version="1.1"></http> </request>
<request> <http url="/inc/css/light.css" method="GET" version="1.1"></http> </request>
<request> <http url="/inc/js/toc.js" method="GET" version="1.1"></http> </request>
<request> <http url="/inc/img/resistor-50.png" method="GET" version="1.1"></http> </request>
<request> <http url="/inc/css/raleway.ttf" method="GET" version="1.1"></http> </request>
<request> <http url="/s/inc/img/busy-compute.jpg" method="GET" version="1.1"></http> </request>
<request> <http url="/s/inc/img/automate-all-the-things.png" method="GET" version="1.1"></http> </request>
<request> <http url="/s/inc/img/empty-compute.jpg" method="GET" version="1.1"></http> </request>
<request> <http url="/s/inc/img/iops-compute.jpg" method="GET" version="1.1"></http> </request>
<request> <http url="/s/inc/img/iops-zfs.png" method="GET" version="1.1"></http> </request>
<request> <http url="/s/inc/img/busy-compute.jpg" method="GET" version="1.1"></http> </request>
<request> <http url="/s/inc/img/busy-compute2.jpg" method="GET" version="1.1"></http> </request>
<request> <http url="/s/inc/img/notification-memory.png" method="GET" version="1.1"></http> </request>
</transaction>
</session>
</sessions>
</tsung>
### Conclusion
Load testing is a powerfull tool. We use it to optimize our clusters. You can
also do more harm than good with it, like crashing poorly setup applications. So
please make sure you always test only your own setup or a non-production setup.
A staging or preproduction environment that replicates production, or if you
must, make sure to have written permission from the client on the exact test you
are going to execute.
[1]:
https://raymii.org/s/inc/img/tsung_logo_non_official.png
[2]:
https://www.digitalocean.com/?refcode=7435ae6b8212
[3]:
http://tsung.erlang-projects.org/user_manual/conf-client-server.html
[4]:
http://tsung.erlang-projects.org/user_manual/conf-load.html
[5]:
http://tsung.erlang-projects.org/user_manual/conf-options.html
[6]:
http://tsung.erlang-projects.org/user_manual/conf-sessions.html
[7]:
https://raymii.org/s/inc/img/tsung2.png
[8]:
http://tsung.erlang-projects.org/user_manual/conf-advanced-features.html
[9]:
http://tsung.erlang-projects.org/user_manual/conf-advanced-features.html#checking-the-server-s-response
[10]: 127.0.0.1:8091
[11]:
https://raymii.org/s/inc/img/tsung1.png
[12]:
https://raymii.org/s/inc/img/tsung3.png
[13]:
http://tsung.erlang-projects.org/user_manual/faq.html#can-t-start-distributed-clients-timeout-error
[14]:
http://tsung.erlang-projects.org/user_manual/proxy.html
---
License:
All the text on this website is free as in freedom unless stated otherwise.
This means you can use it in any way you want, you can copy it, change it
the way you like and republish it, as long as you release the (modified)
content under the same license to give others the same freedoms you've got
and place my name and a link to this site with the article as source.
This site uses Google Analytics for statistics and Google Adwords for
advertisements. You are tracked and Google knows everything about you.
Use an adblocker like ublock-origin if you don't want it.
All the code on this website is licensed under the GNU GPL v3 license
unless already licensed under a license which does not allows this form
of licensing or if another license is stated on that page / in that software:
This program is free software: you can redistribute it and/or modify
it under the terms of the GNU General Public License as published by
the Free Software Foundation, either version 3 of the License, or
(at your option) any later version.
This program is distributed in the hope that it will be useful,
but WITHOUT ANY WARRANTY; without even the implied warranty of
MERCHANTABILITY or FITNESS FOR A PARTICULAR PURPOSE. See the
GNU General Public License for more details.
You should have received a copy of the GNU General Public License
along with this program. If not, see <
http://www.gnu.org/licenses/>.
Just to be clear, the information on this website is for meant for educational
purposes and you use it at your own risk. I do not take responsibility if you
screw something up. Use common sense, do not 'rm -rf /' as root for example.
If you have any questions then do not hesitate to contact me.
See
https://raymii.org/s/static/About.html for details.