_________________________________________________________________________
\_______________________________________________________________________/
SNES SimCity Donut Building/Top Zoning FAQ/Guide by Saint Cyan
Version 1.1
6/30/2007
Email:
[email protected]
_________________________________________________________________________
\_______________________________________________________________________/
Contents:
I.Pretext
II.Choosing a good map
III.Learning the donut building technique
IV.Top Zoning
V.Getting Started
VI.Gifts and Strategy
VII.Cheats and Secrets
VIII.FAQ
IX.Credits
X.Legal
_________________________________________________________________________
\_______________________________________________________________________/
I. Pretext
Well this will be my 3rd FAQ, so bear with me on that one. I have seen
several other great FAQ/guides for this old game, but none address the
issues I will cover here. Motivation for this FAQ comes from a new
discovery I found that enables all gifts used for the donut building
method to gain full potential. I also rarely see anybody discussing this
game anymore, but with its re-release for the Wii virtual console I am
hopeful it will regain some popularity. Please remember that this guide
is not 100 percent accurate, nor is it completed so there will be plenty
of updates to come.
_________________________________________________________________________
\_______________________________________________________________________/
(i). Version History
FAQ was accepted. Version 1.1 update completed, fixed up some repeating
text, minor format errors. Added Disaster/strategy subsection. Version
1.2 update completed, added solving city issues subsection, minor updates
all over.
_________________________________________________________________________
\_______________________________________________________________________/
II. Choosing a good map
There are about 2000 maps you can choose from to start building your
city, most of them are not well suited for building a Megalopolis sized
city, due to the amount and layout of the water. I will list the top
2 maps for buidling a huge city. They are map number 061 and 137. For
more information on maps you can check Webgraphics excellent Best Map
FAQ here at gamefaqs. Those 2 are the best bar none though. Keep in
mind that you want a map with a good chunk of land in the center of the
map. Maps with large amounts of water in the middle are going to hurt
the higher population density normally found there. Do not choose one
of the island maps. While you do have the entire center of the map to
work with, you will never have enough room to reach 500,000 population.
_________________________________________________________________________
\_______________________________________________________________________/
III. Learning the donut building technique
Okay, if your reading this, you most likely know how to do it. However
I will go into detail for those playing the game for the first time.
This method of building uses Residential and Commercial zones in patterns
of 8, forming a square with an open spot for gifts, parks, or police/fire
departments. Here is an example, each letter represents a zone, the T
represents train tracks, P represents police department. Here is a link
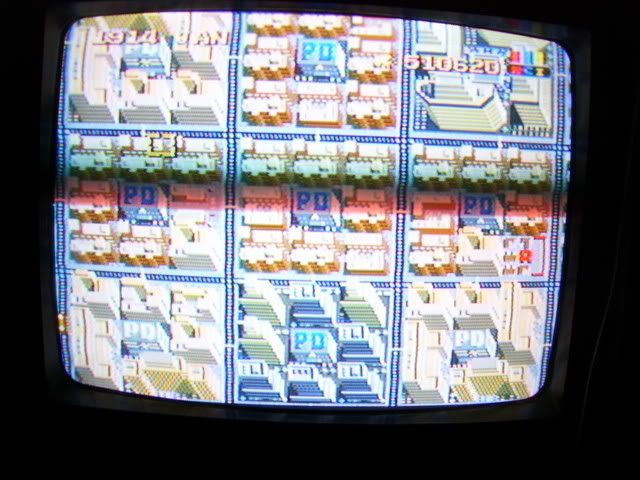
to a screenshot of mine that shows the donut build so you get a better
idea. Also I will show you how to build your Stadium in the pattern. S
will represent the Stadium zone.
http://img.photobucket.com/albums/v738/sfrickinc/000_0773.jpg
~~~~~~~~~~~~~~~~~~~~~~~~~~~~~~~~~~~~~~~~~
~~~~~~~~TTTTTTTTTTTTTTTTTTTTTTTTT~~~~~~~~
~~~~~~~~T RRR T RRR T CCC T SSR T~~~~~~~~
~~~~~~~~T RPR T RPR T CPC T SSR T~~~~~~~~
~~~~~~~~T RRR T RRR T CCC T RRR T~~~~~~~~
~~~~~~~~TTTTTTTTTTTTTTTTTTTTTTTTT~~~~~~~~
~~~~~~~~~~~~~~~~~~~~~~~~~~~~~~~~~~~~~~~~~
Now, this is the basic method, notice no Industrial zones, Ill show you
how to place them when getting started in section number V. Now that
you know how to donut build, its time to learn how to maximize its full
potential!
_________________________________________________________________________
\_______________________________________________________________________/
IV. Top Zoning
This is the best part of the guide. Here you will learn the secret to
top zoning, a method that I believe I was the first to discover, or at
least the first one to put it out there to the public. Using this as
your strategy you can unlock the full potential of your gifts, spread
out your land value to even the edges of the map and everything in
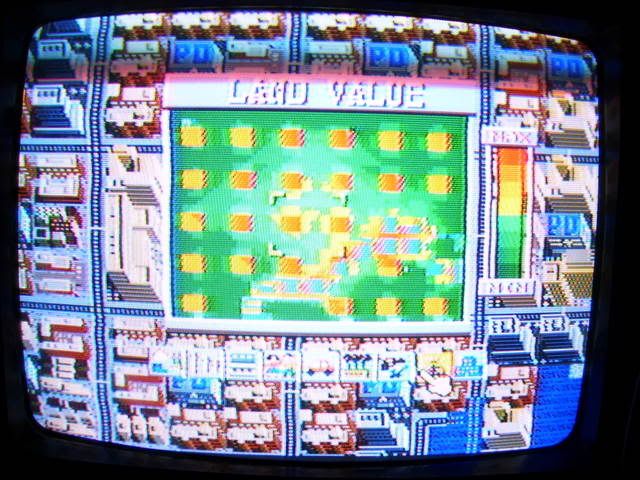
between! The following link is a land value map. This shows the full
potential of the top zoning method, possibly the perfected one I have
finally achieved. Once you have confirmed that you locked in the top
zoning pattern, your land value map should be somewhat similar to this
one.
http://img.photobucket.com/albums/v738/sfrickinc/000_0762.jpg
This is so far the best city I have made land value wise. The 6x5 rows
of top zones were tough to work in and keep enough industry, but the
total number of I zones is actually very low for a Megalopolis sized
city. This shows the true potential of the top zoning method, leaving
you more space for R and C zones, and nice visual impact with all the
tops you have.
_________________________________________________________________________
\_______________________________________________________________________/
(i). The Top Zoning Method
Now, the first thing to remember when trying to start a successful top
zoning pattern is to save just before you place your first gift, so you
can find where to place the gift for its maximum potential. I will show
you how to get started on this in the next section, here we will only
review how to tell if you have a successful top zone pattern.
_________________________________________________________________________
\_______________________________________________________________________/
(ii). The First Few Gifts
Once you receive your first gift, most likely the Mayors House, do NOT
place it yet. I HIGHLY suggest that you instead spend all your cash to
get the Bank gift, then use the money code(see cheats/secrets section)
so you can build freely. I usually build about 3 donuts, 2 residential
1 Commercial, and add parks or PDs in the center. Make sure all the
conditions are perfect for growth, by this time you will probably have
the citizens demanding a fire department and stadium, build them.
_________________________________________________________________________
\_______________________________________________________________________/
(iii). Finding the High Land Value
Now, with your Bank and House gifts, pick one of your Commercial donut
block zones to place the Bank in the center of. Now this is crucial,
build a few more industrial zones to spark growth right after you place
the Bank. Wait for a few minutes, then check your land value map. If
the donut block around the bank, meaning all 8 zones appears to be a red
or orange square, then you are well on your way to a successful pattern!
If it is not a fully orange or red square, but only a small rectangle,
then you should start over and place your donuts differently. Now, if
all 8 zones end up being high land value C zones, the next step is to
build another donut block of R zones beside/above/underneath the high
land value one. Then construct another donut block, but on the same
line as your high land value donut block. Here is an example. B is
the bank zone. H will be the house gift. Remember that your pattern
of placing a gift in every other donut block zone MUST NEVER CHANGE,
even if it is just a single space off, it will not work correctly.
So be careful when your trying to continue your pattern over the water
to another landform.
~~~~~~~~~~~~~~~~~~~~~~~~~~~~~~~~~~~
~~~~~~~~TTTTTTTTTTTTTTTTTTT~~~~~~~~
~~~~~~~~T RRR T RRR T CCC T~~~~~~~~
~~~~~~~~T RHR T RPR T CBC T~~~~~~~~
~~~~~~~~T RRR T RRR T CCC T~~~~~~~~
~~~~~~~~TTTTTTTTTTTTTTTTTTT~~~~~~~~
~~~~~~~~~~~~~~~~~~~~~~~~~~~~~~~~~~~
_________________________________________________________________________
\_______________________________________________________________________/
(iv). Finding the Top Zoning Pattern
Once again, wait for a bit and check your land value map. If this zone
also appears to be a full red or orange square, and the R zones all end
up being high value, then the Top Zoning pattern has been set! If you
continue to build in this pattern, either by horizontal or vertical
means, every other donut block of zones with a gift in the center WILL
end up in all top zones, just make sure not to lose any kind of growth,
be it by disaster or bad planning. By using this pattern, you can not
only bring high land value to the edges of the map, you also get better
land values in between each block of zones with gifts and a completely
balanced city! All that plus you can be certain your gift placement
will never fall victim to poor growth or land value! Planning ahead
also becomes easier, as you have your set pattern and can visualize how
you want to spread out your zones. The house gift seems to not spark
the high land value of say, the Zoo or most other residential gifts.
To be certain you have locked in the top zoning pattern, build another
donut block of zones in the same pattern/row and place another gift in
the correct spot. If this gift gives you the full orange/red square
for the land value map, and is on the same row as your bank/house, then
you can be certain the top zoning patten has worked. Even if the house
only appears as a smaller rectangle, as long as the other 2 top zones
are in line and follow the pattern perfectly, the R zones around the
house WILL eventually all reach tops.
_________________________________________________________________________
\_______________________________________________________________________/
(v). Space Rows
The rows of zones in between your top zones are what I have come to
call "Space Rows". For donut blocks in these rows, you should try to
always place a PD in the center of the block. This will keep crime low
and also help even out your police radius. An exception to this are
the blocks of zones that lie along the hidden cross of the map, which
I will cover next. These rows of zones will not have the growth and
high land value of the other, top zoned rows unless they are near the
center of the map. Late in the game some of these zones will not see
any development at all, carefully place I zones in these areas, but do
not place too many. Here is a good example, T is tracks, R is reside-
ntial, C is commercial, I is industrial, P is police department, G is
gift, N is for non developed zone, S is for the space row, Z is for
the top zoning row. Sometimes you will find that you have 1 or 2 gift
zones left once you have fully completed the top zoning pattern. Place
these gifts near the center of the map, or between 2 of your top zone
blocks.
~~~~~~~~~~ZZZ~~~SSS~~~ZZZ~~~~~~~~~~
~~~~~~~~TTTTTTTTTTTTTTTTTTT~~~~~~~~
Z~~~~~~~T RRR T CCC T RRR T~~~~~~~Z
Z~~~~~~~T RGR T CPC T RGR T~~~~~~~Z
Z~~~~~~~T RRR T CCC T RRR T~~~~~~~Z
~~~~~~~~TTTTTTTTTTTTTTTTTTT~~~~~~~~
S~~~~~~~T RRR T RNR T RRR T~~~~~~~S
S~~~~~~~T RPR T NPN T RPR T~~~~~~~S
S~~~~~~~T RRR T NNR T RRR T~~~~~~~S
~~~~~~~~TTTTTTTTTTTTTTTTTTT~~~~~~~~
Z~~~~~~~T CCC T RRR T RRR T~~~~~~~Z
Z~~~~~~~T CGC T RPR T RGR T~~~~~~~Z
Z~~~~~~~T CCC T RRR T RRR T~~~~~~~Z
~~~~~~~~TTTTTTTTTTTTTTTTTTT~~~~~~~~
~~~~~~~~~~ZZZ~~~SSS~~~ZZZ~~~~~~~~~~
So, what I would do here, since that center block of zones isnt doing
well is.....
~~~~~~~~~~ZZZ~~~SSS~~~ZZZ~~~~~~~~~~
~~~~~~~~TTTTTTTTTTTTTTTTTTT~~~~~~~~
Z~~~~~~~T RRR T CCC T RRR T~~~~~~~Z
Z~~~~~~~T RGR T CPC T RGR T~~~~~~~Z
Z~~~~~~~T RRR T CCC T RRR T~~~~~~~Z
~~~~~~~~TTTTTTTTTTTTTTTTTTT~~~~~~~~
S~~~~~~~T RRR T RIR T RRR T~~~~~~~S
S~~~~~~~T RPR T IPI T RPR T~~~~~~~S
S~~~~~~~T RRR T CIR T RRR T~~~~~~~S
~~~~~~~~TTTTTTTTTTTTTTTTTTT~~~~~~~~
Z~~~~~~~T CCC T RRR T RRR T~~~~~~~Z
Z~~~~~~~T CGC T RPR T RGR T~~~~~~~Z
Z~~~~~~~T CCC T RRR T RRR T~~~~~~~Z
~~~~~~~~TTTTTTTTTTTTTTTTTTT~~~~~~~~
~~~~~~~~~~ZZZ~~~SSS~~~ZZZ~~~~~~~~~~
By placing those I zones exactly in that way, they will not affect the
higher land value top zones, since the pollution output will be just
shy of those high value zones. This also might even spark new growth
in the area, as the R zones are closer to the I zones, meaning new job
growth and shorter commute time for the citizens in the area.
_________________________________________________________________________
\_______________________________________________________________________/
(vi). The Land Value Cross
Lastly, another thing worthy of note. You know how when you scroll on
the map a small box appears with your location and map number in the
upper right hand corner of the screen? See the dotted cross there? It
is almost like an indicator of where zones can have the most potential.
For the most part, the center of the map will have the best land value
and growth. However, if you build your donut blocks in line with that
(cross) and use gifts, they will be much more likely to end up with tops.
Look at the picture of a megalopolis city of mine in this link.
http://img.photobucket.com/albums/v738/sfrickinc/000_0776.jpg
Notice how the land value is higher along that (cross) of land that I
built the zones along. Keep this in mind when building your city.
_________________________________________________________________________
\_______________________________________________________________________/
Section V. Getting Started
First of all, I want to give you a general idea of how to get started.
This does not have to be exactly the same as you plan to build, but it
has worked out perfectly for me every time I use it. Following these
steps in order should be an easy way to get started.
_________________________________________________________________________
\_______________________________________________________________________/
(i). Step by Step
1.Choose your map, and use the easy setting for 20,000 starting cash.
Build 2 nuclear power plants right next to each other, in the far corner
of your map. Set your taxes to 0 percent, and set the game speed to the
lowest setting.
2.Start building your industrial zones along the edge of the map, in a
pattern similar to this one. Keep in mind that space is key, try to
keep the patterns even and as close as they can get with full rail
coverage. / will represent the edge of the map, N will represent the
nuclear power plants.
/////////////////
/NN
/TTTT
/II T
/II T
/TTTT
/II T
/II T
/TTTT
3.Start building your residential and commercial zones in the donut
pattern, keeping them as close as you can to the industrial zones, but
keep them at least 2/3 of a zone away from them, so the pollution does
not harm their potential. Also build a fire department and several
police departments as needed.
4.After you have 2 full residential, and 1 full commercial block, start
hooking them up with power, along with your industrial zones and getting
rails put up. NEVER use roads, ever, until you are ready to obtain the
Amusement Park or Casino gift, in which case you MUST build a long path
of roads. After you get the gift, bulldoze all the roads right away.
5.By this time you should have at least 5 PD, 1 FD, 8-12 I zones, 16-20 R
zones and 8-10 commercial zones. Use up any remaining cash on parks, or
whatever else you see fit.
6.After you are certain everything has power and full rail/police radius,
set the game speed to the higest setting.
7.Your village should become a town, you get the mayor house gift. This
should happen no later than April.
8.Your town should become a city, hopefully by November at the latest.
You receive the Bank gift.
9.Now is the time to use the money cheat code(see secrets section). It
should be used no later than December, so the budget/cheat will take its
effect.
10.By January, you should have maximum cash, and 2 or more gifts to work
with. I do not recommend using the PDHQ gifts just yet. Save them for
later on when your building around the center of the map. About this
time the citizens will be demanding a stadium, build them one in an area
designated for it. You will need 2 more stadiums later, for the extra
Zoo gift, but this one will ALWAYS remain in your city, or the citizens
will demand it and your residential zones will suffer.
11.Now is the time to save your game, and start trying out the Top Zoning
method(see section IV). If your attempts at top zoning are not working,
then reset to this save, before you wasted your gifts, and try again.
This should be plenty enough to get you started. Now it is time that I
started to elaborate on the general strategy of the game. I will divide
each section of strategy into each level of city you reach. I will also
elaborate on all kinds of strategy.
_________________________________________________________________________
\_______________________________________________________________________/
VI. Gifts and Strategy
First of all, we need to review the Gift Checklist. Getting ALL of them
is crucial in getting your city to a megalopolis. I will display each
gift, and how it is obtained. I will also show you which zones will get
the best benefits from placing that gift in the center of the donut block.
Never place gifts close to industry zones!
There are a total of 28 gifts you can obtain without cheating. Get them
all so you have full potential. Landfills are not counted in that tally
since the amount you get depends on the map you choose. Here is the gift
checklist.
_________________________________________________________________________
\_______________________________________________________________________/
(i). Gift Checklist:
Mayor House <-> Reach 2000 population <-> Residential
Bank <-> Reach 10,000 population and use all of your money <-> Commercial
Police HQ <-> Build 6, 12 and 18 PD to get all 3 <-> Residential
Fire HQ <-> Build 6, 12 and 18 FD to get all 3 <-> Residential
Zoo <-> 2 possible, build 1, then 2 more stadiums <-> Residential
Amusement Park/Casino <-> 5 available, build a long stretch of rails for
the first 2, then a long stretch of roads for the other 3 <-> Residential
for Amusement Park, Commercial for Casino
Library <-> 3 possible, depends on number of schools/hospitals <-> Resi-
dential
Expo <-> Build a seaport and airport <-> Commercial
Train Station <-> 2 possible, build 50, then 250k of tracks <-> Commercial
Windmill <-> 2 possible, fully develop 100, then 250 zones <-> Commercial
City Park <-> 3 possible, build 300, 600, and 900 units of park <-> Both
Mario Statue <-> Reach 500,000 population <-> Both
Fountain <-> Play until the year 1950 <-> Both
Landfill <-> Fully develop certain percentages of the map <-> Extra Land
_________________________________________________________________________
\_______________________________________________________________________/
(ii). General Strategy
Okay, now that we know how to get all the gifts, and where to place them,
its time to move on to some general strategy.
~Watch the demand bars closely. You want demand to be as high as possible
when it comes to R and C zones. I zone demand is almost always going to
be very high, if you can manage to keep it low then start building as many
R zones as possible until the demand increases for the I zones again. If
demand starts to decline for C zones, do not worry about it too much but
try to build more R or I zones. If demand for R zones starts to decline,
then you want to quickly build I zones, and C zones to a lesser extent.
You never want the R zone demand to be low, ever.
~Keep a close proximity between your PDs, residential and commercial zones.
~You want to keep your zone percentage balanced. About 50-60 percent of
the city should be residential, 15-20 percent commercial and 20-30 percent
industrial when it is completely done. Keep an eye on the demand gauge in
the top right hand corner of the screen. If they are all above the RCI
letters, build more of those zones. If below then build more of the other
types of zones. Those percentages DO NOT include other types of zones.
~Power Plants are important, you should never need any more than 12 unless
you are zone stacking(see cheats/secrets section). Build them all touching
each other, along the corner/edge of the map. Placing a 13th one could be
useful if you have a very large amount of zones.
~Keep a close eye on your maps and voice menus. Never go too long without
taking a look at them.
~Build your Airport and Seaport in the corners of the map, or an isolated
area. They put out alot of pollution.
~Save often! If you are hit with a disaster in the middle of your build,
and did not save for awhile, your going to hate yourself for not saving
more often.
~If you are hit with a bad disaster, like Earthquake or Tornado, you might
just want to restart your last save, as the damage done is almost always
unrecoverable.
~If playing on a SNES console, be wary of the startup bug. Everytime you
have to load your city, the crime rate skyrockets and really hurts your
population count. There is no way to avoid it, and it can cost upwards of
5000 people lost.
~Save your PDHQ gifts for the center of the map. This is where the highest
density of people will be, and using other gifts in your donut blocks here
will not cover the crime rate.
~Once you have your 3 FDHQ and 3 Library gifts, start to seek out hospital,
school, and FD zones. Bulldoze them all, except for maybe the hospital and
schools in low land value zones. They are worthless and take up space, you
should rebuild these areas with R or C zones.
~When getting started, line the outer areas of your city with parks. This
tends to help out alot more early on in the game.
~Keep your R and C zones high for the early part of the game. Once you hit
100,000 population, shift your focus to I zones.
~Be prepared for a shipwreck or plane crash, they are quite common. If you
do have one happen, quickly bulldoze the surrounding areas to prevent fires
from spreading. Then build mass FDs around the area.
~Take the Amusement Park gift over the Casino. The Casino causes crime, at
the cost of a few extra dollars at the end of the year. Remember that to
get all 5 of the Amusement Park gifts you must make a long stretch of roads
but will be bulldozing them away once you have all 5.
~ALWAYS keep funding at 100 percent.
~NEVER use coal power plants.
~Look for brownouts in low land value R zones, they are common there.
~Do not get messy with your city layout. Keep it as clean as possible.
~When building your Airport/Seaport, keep in mind that you do NOT have to
power them up to get their desired effect. This can cut down on the risk
of a shipwreck or plane crash. Once you hit 100,000 population though,
they should be powered up.
~When starting, build your donut block patterns evenly around the center
of the map. Reason being that growth is generally better in the early
parts of the game, and getting good growth late in the game is easier
when you have just the center of the map to build on, and everything
else around it is allready developed. So by building a "Frame" around
the center of the map you can have the best results.
~Build commercial zones that are far from the center of the map close to
the water. They are much more likely to do better there.
~Use your landfill gifts wisely. Using them for R zones in the water,
around the center of the map works well. Or if you have a donut block
of zones that fits into the pattern for a top zone, but cannot be a full
donut block due to water, use them there and place a gift in the middle
for maximum potential.
~Balance out your R and C zones. You do not want a block of R zones to
be very far away from C zones or C zone blocks, at any point.
~I like to set the game speed to the lowest setting when building more
than 2 donut blocks at a time. Then I turn it back up to the highest
setting and check the land value map or other statistics while I wait
to see if the newly built area is going to develop well.
~As you get to the 300,000 mark, every last detail is important. At
this point in the game you need to start building carefully and planning
ahead. Check your Totals menu and watch your amount of each zone.
~Once your city hits around 450,000 people, this is where the real
challenge is going to begin. Zones in or around the corners of the map
are going to see a big decline in land value and population density. If
you have a high demand for Commercial or Industrial zones, which you are
going to have most likely at this point, re-zone these areas into C zone
donut blocks or place a couple I zones in there.
~The typical Megalopolis has around 400+ R zones, 130-180 I zones, 100-
130 C zones and roughly 75-95 police departments. Keep this in mind as
you are building your city, and watch the demand bars closely.
~Any coastline that has not been developed you should place parks in.
~Be sure to obtain ALL the gifts by the time your city is done. Getting
the Fountain is usually the toughest one as it takes alot of time.
_________________________________________________________________________
\_______________________________________________________________________/
(iii). Addressing and Solving City Issues
Here I will cover dealing with the problems that your citizens will be
complaining about in your voice menu.
~Crime~
Crime is not difficult to fix. Just scan your crime rate map for the
problem areas in yellow or orange color and place police departments in
these areas. Also balance out your police departments, and remember that
the PDHQ gift will cover nearly twice the radius of a normal PD zone.
~Housing Costs~
This is possibly the most common complaint from the citizens. Fixing it
can be somewhat tricky, the games counsel, Dr. Wright will tell you that
you need to build I and C zones closer to your R zones and try to keep
your higher land value zones limited. I disagree with that last part of
advice he gives, you can never have enough high land value zones if you
ask me. Building more I zones is how I fix the housing cost issue. This
is not a major problem that will hurt growth, but it will most likely be
constant.
~Taxes~
This is an easy one, unless you are not using the money cheat(see section
VII-i). The games starts you off with a default tax rate of 7 percent.
Over time, the citizens are going to start to complain about this, so if
you are having problems getting growth, lower the tax rate by about 2 or
3 percent until they start to complain about it again. If you are going
to use the money cheat then just lower it all the way to 0 percent.
~Unemployment~
Another very common problem, this one is also pretty easy to fix. Just
build more I zones and C zones to a lesser extent. If your map is full,
then you are going to have to re-zone some of your R zones that are not
doing very well. While the inital loss might worry you, once the new
zones start to develop there and unemployment decreases, your population
mark is going to climb.
~Pollution~
Possibly the most common problem, also one of the toughest ones to fix.
You must balance the unemployment and pollution issues carefully. The
industrial zones are very important, and you must have a great amount of
them to keep unemployment down. However they are going to pollute and
spreading them out, as the Dr. Wright suggests is not going to be easy.
For the most part, keeping the I zones at the edge of the map will cut
down on the total amount of pollution. Adding parks around the I zones
can also cut down on it. There is not an easy fix to the pollution and
the complaints for it, bulldozing those I zones is going to hurt your
population mark any way you slice it. All you can really do here is scan
for the highest areas of pollution and bulldoze I zones in those areas.
Do not bulldoze too many, only the ones that will cut down on pollution
the most in that area, then rebuild those zones into C zones. Also, you
should try to build new I zones in areas of the map that are not develop-
ing well.
~Traffic~
This should never be an issue. Simply do not use roads at all, unless it
is time to go for the 3 Amusement Park gifts. Once you get the gifts you
should bulldoze all the roads you used right away.
~Fire~
If this is your main problem, you are in big trouble. There is a fire
raging somewhere in your city, find it and take care of it ASAP.
_________________________________________________________________________
\_______________________________________________________________________/
(iv). Disasters
Here I am going to discuss how to recover from disasters, and knowing
when to restart when the damage is too great. If you ever lose a gift
zone to a disaster, consider reseting to your last save. Also keep in
mind that late in the game growth is alot slower, meaning that those
higher land value zones you lost will never recover when you rebuild. A
final note, fire departments are vital to recovering from disasters in
containing the fires. However once all the fires are out, bulldoze them
away.
~Fire~
Fires tend to start in high land value commercial zones. If you have one
break out, quickly bulldoze ALL the surronding zones, and debris left
behind by the zones close to the fire. Get fire departments put up very
quickly around the fire and power them up. If the fire spreads to the
center of a zone, the whole zone will explode into flames, not good. If
you are hit with a fire and a gift zone has become damaged or destroyed,
I suggest restarting to your last save, as the gifts are the most valued
zones you can have. Other disasters will most likely start fires, but
there is a chance of a random one breaking out.
~Flooding~
Flooding occurs in areas along the coastline. The floodwaters will take
out any zones or other stuff in their path, causing fires or lost zones.
Again, if you lose gifts to the flooding reset to your last save. The
best way to recover from flooding is the same way with fires, bulldoze
away the zones in danger, then rebuild after the water recedes. Place-
ment of parks around the flooding MIGHT slow its progress, but this has
not been confirmed.
~Tornado~
Tornadoes are one of the more dangerous disasters. Early in the game it
is not that big of a worry, as the tornado is unlikely to hit your small
city. Once you start running out of room though, the tornado is going
to carve a path of destruction through the city. If the funnel cloud
hits the center of a zone, its going to explode and fuel the path of fire
that the tornado has allready carved out. Recovery from a tornado isnt
going to be easy, consider reseting if you were hit badly or lost gifts
in the storm. Try to guess where the tornado is heading, and bulldoze
a clear path for it before the fires start if you want to try and rebuild
the affected areas.
~Plane Crash/Shipwreck~
These disasters are quite frequent, but not as bad as most of the other
ones. A plane crash can be severe depending on where it crashes at. If
it crashes into the center of a zone, or in a crowded block of your city
then act quickly to put out fires. If a gift is lost, reset. The ship-
wreck is not a big threat usually. It will hit along the coastline or in
crowded areas of tracks or powerlines in the sea. Be sure to repair any
lost tracks or powerlines. Sometimes, if the shipwreck is close to land
a fire may start on the coastline, take care of it quickly.
~Monster Attack~
This disaster is similar to the tornado but is a bit worse and lasts much
longer. Bowser will appear in your city and start carving out a path of
destruction, starting fires. It will be quite awhile before the attack
ends, so bulldoze ahead of him like with the tornado. Once again, if any
gifts are lost, or extensive damage has occured, reset to your last save.
~Nuclear Meltdown~
This disaster will happen around your nuclear power plants. What happens
is that you will see several radiation icons in the affected area. These
icons kill land value and growth completely, meaning this area of the map
cannot be used for rebuilding until 5 years after the disaster occured. A
rare but serious disaster, recovery depends on how much of the map you
have used allready. If the map is full, you must wait until the icons
are all gone to rebuild there.
~Earthquake~
This is by far the worst disaster you can have. Depending on how severe
the richter scale reads the quake,(see the history menu) will determine
the amount of destruction. The screen will shake and you will hear that
sound of zones being destroyed/start to see random fires all over the
map. This is the only disaster that is not limited to a certain area.
Any part of the city is vulnerable to the quake. Recovery from this
disaster is very difficult, as you must scan the map to find affected
areas, which takes time while other fires are raging. Anytime I am hit
with this disaster the damage done is pretty much un-recoverable and I
reset to my last save.
_________________________________________________________________________
\_______________________________________________________________________/
(v). Level by Level
Next, we are going to go into getting through each level of your city. I
have arranged them to address the most common problems for each level of
city.
~Village~
Not much to worry about here. Build 2 nuclear power plants in the one
of the corners of the map, build I zones at the edges of the map. You
should have no problems getting past 2,000 population. Keeping C zones
and I zones limited at this stage, you want mostly R zones.
~Town~
Save that House gift until you have the Bank to go with it. Build a few
more C zones and several more R zones. Also build a fire department.
Keep your limited citizens happy, add parks. Build just a few more I
zones at this stage. Hitting 10,000 population should be no trouble for
you considering you have enough R zones.
~City~
Build a stadium, and start to build some more I zones. Start placing your
gifts and looking for the top zoning pattern. Save and experiment often!
Make sure you are placing your PDs so they balance out the overall radius.
Also watch the land value and crime rate maps closely and keep a close eye
on your demand bars.
~Capital~
Now it gets interesting. Build your Airport and Seaport in an isolated
area. Consider lowering your taxes if you havent allready, and check that
voice menu often. By now you should have your donut block pattern in full
swing, and hopefully have the top zoning method working for you too. Keep
your focus on building plenty of PDs, keeping the people happy and mainly
building plenty of R zones. Use those gifts wisely, each one is vital.
Try to spread them out also, refrain from placing 2 of the same gift close
to each other unless it is a PD or FDHQ gift.
~Metropolis~
At this stage, you should have a good sized city, several gifts placed and
a good amount of R zones. Now is the time to shift your focus to massive
development of I and C zones. Keep building your R zones still, but try
to build mostly industrial, and commercial to a lesser extent. Getting a
large amount of I zones now is crucial to reaching the lofty 500,000 mark.
Around the 450,000 mark, it starts to get difficult to up that population,
due to lack of space and large city problems. Crime will be somewhat high
in areas, there is just no avoiding it. Get clever in placing your PDs to
counter it. About this time your R and C zones will be developing at a
much slower rate than before, and you will start to see some zones that
are not developing at all. These areas are the parts you must somehow try
to build more I zones in, while keeping pollution and crime under control.
The biggest key to 500,000 is the industry, and cramming every last zone
you can into the map. If you have gotten the top zoning method to work at
this phase, the amount of additional I zones needed for 500,000 should be
much lesser than it would be if your gifts are not working.
~Megalopolis~
You did it! There is really no reason other than your own goals to go on
building now. The map should be pretty much full at this point, so that
Fountain and Mario Statue gift should be placed in donut blocks around the
center of the map, or in areas you know will do well based on your pattern
of donut blocks. My best is about 640,000 population, then I gave up. I
have yet to try zone stacking though.
_________________________________________________________________________
\_______________________________________________________________________/
VII. Cheats and Secrets
This section will review various methods of cheating to obtain lots of
money early on, various secrets that can help your city, and the method
of zone stacking. Also included is the Game Genie code for faster game-
play.
_________________________________________________________________________
\_______________________________________________________________________/
(i). The Money Cheat
This can save you a LOT of time when trying to build a Megalopolis sized
city. It is quite simple but can be confusing if you do not read carefu-
lly. The first thing you want to do, considering you are just starting a
new game is build up about 5 PD stations, some train tracks and a FD.
This is so you will have to pay funding for them at the end of the year.
Next, review section 5 if you are actually trying to build a good city.
If you just want to try the code or mess around then set your taxes to 0
percent and quickly spend all your cash. Now wait until you budget menu
comes up at the end of December. BEFORE you exit this screen by select-
ing "go with the figures", make sure you are holding the L button and set
all your funding to 0 percent, then exit. Still holding the L button,
you should now be at the main map screen, wait for about 2 seconds and
while still holding the L button, enter the budget menu again. Now set
all your funding back to 100 percent, while still holding the L button,
then exit. Finally, when you return to the main map screen, release the
L button and you should then have the maximum amount of cash! Be sure
to save before trying this cheat.
_________________________________________________________________________
\_______________________________________________________________________/
(ii). Free Funding
First of all, turn OFF the Auto-Budget option if you have it enabled.
When the budget screen appears at the end of December, set all funding to
0 percent, then exit and quickly save the game. When you reload the game
you should be in January, without having paid a cent for those funds,
which are now set to 100 percent as if nothing happened. Beware of the
starup bug when doing this cheat though.
_________________________________________________________________________
\_______________________________________________________________________/
(iii). The Startup Bug
When you reload an allready saved city on the SNES console, the game is
going to start out with a huge crime rate and power loss to the entire
city. There is no way to avoid this, and it will hurt your population
mark by as much as 5000 or more. The good news is that it recovers at
a quick rate, but you will still lose potential no matter what. There is
only one way to avoid the bug, which is to build the entire city in one
sitting, or use an emulator.
_________________________________________________________________________
\_______________________________________________________________________/
(iv). 999 Alternate Starting Maps
Choose a map to start, then when you are ready to begin building, select
the go to menu and start new city. When the map loads, still on the same
number, it will be a completely different map! This only works for the
single map number you choose before entering the go to menu. You can
check out the Best Map FAQ posted here at Gamefaqs to see which are the
overall best.
_________________________________________________________________________
\_______________________________________________________________________/
(v). Zone Stacking
This is a method of play that can double the population of a normal, non
stacked Megalopolis sized city. It is a very long, tedious process if
you are going to try it, but the results for your population and pop
density are amazing. Here is how to do it.
First, build a residential zone, power it up and wait for the small icon
houses to start forming around the R in the center of the zone. These
small icons can be bulldozed away, but still leaving the R zone in tact.
So by bulldozing each icon around the R, you are allowed to place another
zone which overlaps what would have been the edge of the R zone. With
extreme abuse of this method, you can cram in nearly triple the amount
of zones as opposed to the donut building or other types of development.
Any kind of building can be stacked by first bulldozing the small icons
of the R zone away, then building that type of zone directly next to the
bulldozed area of the R zone and finally bulldozing the entire R zone by
clicking on the R. The resulting explosion will take out a chunk of the
zone/building you placed next to it, allowing for more space. You can
also triple stack the zones. Here is a link of a city made by The Cynic
of the gamefaqs SNES Simcity message board, which uses zone stacking to
the extreme.
http://www.geocities.com/TimesSquare/Lair/3439/stuff/millioncity2.html
As you can see, the population is HUGE. He also used hacks for this one
though he only used the infinite gift code and spent a great deal of his
time and effort on this city no doubt.
_________________________________________________________________________
\_______________________________________________________________________/
(vi). Game Genie Codes
I only have the enhance game speed code available at this time. Look
for more codes in a future update.
Enhance Game Speed:
DD67-DFAA
_________________________________________________________________________
\_______________________________________________________________________/
VIII. FAQ
This section will review the most frequently asked questions I am seeing
about this game.
----
Q:How do I control the Crime rate?
A:Build more PDs in close frequency to each other
----
Q:How do I recover from disasters?
A:See section VI-iii for tips on getting by them
----
Q:Pollution is my biggest problem, how can I reduce it and still keep
my jobs with the industrial zones?
A:Pollution is going to be there, no matter what you do. Just try to
keep it at a minimum if it is your biggest problem.
----
Q:What method of development is the best?
A:There is no real answer for this one. However Zone Stacking(section
VII-v) has been proven to yield the largest amounts of population, most
well over 1 million. It is all a matter of your own tastes, I like to
use the donut building method myself, as it gives the city balance and
allows for maximum land value potential.
----
More FAQs to come.
_________________________________________________________________________
\_______________________________________________________________________/
IX. Credits
I would like to first of all thank Gamefaqs, for making this guide even
exist. Maxis and Nintendo also deserve thanks, for making the game. A
big thank you from me to the regulars at the ghost town of a board we
have for the SNES game. WebGraphics, JJholt, Poolshark, The Cynic, and
any one else I forgot to mention. More thanks go out to WebGraphics, who
brought it to my attention that you can obtain a total of 5 Amusement
Park gifts, rather than 3.
_________________________________________________________________________
\_______________________________________________________________________/
X. Legal
The boring legal section.
Guess what, this guide is copyright protected, so if you think you want
copy it, I suggest you tell me, and give me and the others who have
helped me their due credit. If you dont, then your a square, and thus
could face some jail time. Feel free to copy whatever you want from here
as long as cred is given.