____ _ _____ _ _
/ ___|_ __ __ _ _ __ __| | |_ _| |__ ___ __| |_
| | _| '__|/ _` | '_ \ / _` | | | | '_ \ / _ \ / _| _|
| |_| | | | (_| | | | | (_| | | | | | | | __/| |_| |_
\____|_| \__,_|_| |_|\__,_| |_| |_| |_|\___|| _|\__/
_ _ _ _ |_|
/ \ _ _| |_ ___ _ | | | | _ ___ ___
/ _ \| | | | _|/ _ \ (_) | | | |(_)/ __| / _ \
/ ___ \ |_| | |_| (_) | _ \ \/ / | | (__ | __/
/_/ \_\__,_|\__|\___/ (_) \__/ |_|\___| \___|
____ _ ____ _
/ ___|_ | |_ _ _ / ___|| |_ ___ _ __ _ ___ ___
| | (_)| _|| | | |___ || _|/ _ \ | '__|(_)/ _ \| __|
| |___| || |__| | | ___| || |_| (_) || | | | __/|__ |
\____|_| \__/ \ | |____/ \__/\___/ |_| |_|\___||___|
|__/
By Rob White Playstation 2 Exclusive Content Guide
a.k.a HappyWomble
V1.02 18/04/07
CONTENTS
========
1. The Intro....
=============
1a. Introduction
1b. TED (The Essential Disclaimer)
1c. Legal Information
1d. Version History And Development Notes
1e. Contact Details
1f. Contributors
2. Unique Stunt Jumps
==================
2a. Unique Stunt Jump 1 - Little Havana
2b. Unique Stunt Jump 2 - Starfish Island
2c. Unique Stunt Jump 3 - Vice Point
2d. Unique Stunt Jump 4 - Vice Point
2e. Unique Stunt Jump 5 - Vice Port
2f. Unique Stunt Jump 6 - Vice Port
2g. Unique Stunt Jump Rewards
3. Rampages
========
3a. Rampage 1 - Little Havana
3b. Rampage 2 - Starfish Island
3c. Rampage 3 - Downtown
3d. Rampage 4 - Prawn Island
3e. Rampage 5 - Vice Point
3f. Rampage 6 - Ocean Beach
3g. Rampage Rewards
4. Side Missions
=============
4a. Playground On The Dock
4b. Rush!
4c. Hyman Memorial O.D.T.
4d. Caddy Daddy
4e. Playground At The Park
4f. Crims On Water Wings
5. New Purchases
=============
5a. Bulletproof Sanchez
5b. Bulletproof Ventoso
5c. Skimmer
5d. Little Willie
5e. Squallo
5f. Marquis
5g. Bovver '64
5h. Splitz-6 ATV
5i. Quadbike
5j. Bulletproof BF Injection
5k. Bulletproof Stretch
5l. Jetski
6. Easter Eggs
===========
6a. The 'I Wasn't Joking...' Hidden Sign
6b. The VCN Building Easter Egg
6c. A Message From Rockstar Leeds
6d. The Great Rockstar Games Easter Egg Hunt!
7. Picture And Video Links
=======================
7a. The 'I Wasn't Joking...' Hidden Sign
7b. The VCN Building Easter Egg
7c. A Message From Rockstar Leeds
7d. The Great Rockstar Games Easter Egg Hunt!
8. ....And The Outro
=================
============================================================================
1. The Intro....
================
1a. Introduction
----------------
Hello and welcome to this guide for the recent Playstation2 port of Grand
Theft Auto: Vice City Stories. This is just a simple guide to finding and
completing the extra content that was included in this version of the game.
There is nothing much here for the PSP version of this game, although there
are great guides for that anyway. In particular, the walkthrough by
Forelli_Boy and the specific guides for Unique Stunt Jumps and Rampages by
YuGiOhFm2002 & YuGiOhAngel. In this guide we are mainly looking at the
Playstation2 version.
To the best of my knowledge there isn't a guide like this on the web, so I
hope people find it useful. This document is basically an addendum to my
USJs and Rampages guide. This version should be considered the definitive
one though. I kind of thought it would be easier to have a seperate guide
rather than trawling the forums and message boards for information.
One thing to note: There is one Rampage that has simply moved location, but
the weapon used and the requirements for completion remain the same. I'll
get back to this and explain why in the guide.
A new helpful, and very welcome, addition to the in-game map in GTA:VCS is a
feature that allows you to see any completed Red Balloons, Unique Stunt
Jumps and Rampages simply by using the in-game map. Enter the map and hold X
to bring up the menu. In the past (And I'm sure I'm not alone here) I found
it quite frustrating having to check which ones I'd done seperately on a
paper map, especially if you accidentally forget to mark one off.....
On the subject of maps, I might be persuaded to make a map if I get enough
requests. The instructions I've used are quite detailed, but an exact
location map could be handy for people who just want to locate something at
a glance.
----------------------------------------------------------------------------
1b. TED (The Essential Disclaimer)
----------------------------------
This guide may contain mild spoilers. Nothing too heavy that's going to
totally kill the storyline, but it will mention certain mission names and
the times in the game that you'll receive them.
This guide is *not* a walkthrough for the rest of the game, so please don't
feel inclined to send me emails complaining. Any such feedback will be
deleted without a reply. So there.
----------------------------------------------------------------------------
1c. Legal Information
---------------------
This document is copyright 2007 Robert White. It may only appear on GameFAQs
and must be distributed freely. Any sale of this guide without the
permission of the author will be treated to the strict letter of the law.
You have been warned.
By all means, if you would like this document to appear on your website,
please do get in touch.
----------------------------------------------------------------------------
1d. Version History And Development Notes
-----------------------------------------
V1.00 - I'm happy that all the information is accurate, and the strategies
laid out are easy to follow.
V1.01 - A minor update, corrected a few typos and added the Jetski to the
purchasable vehicle section. I'm not sure if this was in the PSP
version, but if it was I didn't see it. This version was just about
to be uploaded before Paul Rudoff's email arrived, so....
V1.02 - .... a major update was inevitable. A new section has been added for
links to pictures and videos of the easter egg signs and I've fixed
some terribly confusing grammar too. Due to sheer stupidity on my
part, I put my email as a '.co.uk' address instead of a '.com'. You
have full permission to hit me with a wet fish.
20/03/07 - Started and work after finding everything this guide is supposed
to help out with.
21/03/07 - Finished guide, all USJ and Rampage strategies verified and the
entire guide is (Hopefully) typo free.
28/03/07 - After discovering the Playstation2 versions additional content,
I set about writing the guide.
03/04/07 - Guide is finally finished, it's been hectic my end.
06/04/07 - Got 100% again and double checked everything. I'm tempted to get
another PSP to just to verify the purchasable vehicles properly.
15/04/07 - V1.01 is ready to be uploaded. I've decided to make a map after
all, once I find a clean map (Or at least get permission to edit
and upload the one I found on GTAforums).
18/04/07 - V1.02 is finished and sent to GameFAQs. My guides never seem to
be accepted straight off, so it'll probably be a few days before
it appears.
----------------------------------------------------------------------------
1e. Contact Details
-------------------
I can be contacted via email at
[email protected] and you should
expect a reply within a day or two. Anything not related to any of the
guides I've written will be deleted (Although hero-worship would be nice).
My thanks go out to everyone who has sent me notes of encouragement. Your
support is greatly appreciated.
----------------------------------------------------------------------------
1f. Contributors
----------------
It would be an absolute travesty if I didn't thank Paul Rudoff for his
contributions. Not only did he point out some confusing grammatical errors,
he also supplied links to pictures and videos of the easter egg signs. I now
feel thanks to information he emailed me this guide is as complete as can
be. Cheers mate, you're a diamond.
Also, a big shout out to everyone on the alt.games.grand-theft-auto
newsgroup, GTA forums and also on the VIP Lounge at the Virgin Radio
website. Thanks for your interesting and often humourous discussions guys
and gals.
============================================================================
2. Unique Stunt Jumps
=====================
Unique Stunt Jumps, herein shortened to USJs, have been a regular feature in
the GTA games since the original game in 1997. In that game certain bonuses
were given for completing 'Insane Stunts', although unlike the 3d GTA games
they weren't needed for overall game completion (100%).
GTAIII, GTA: Vice City, GTA: Liberty City Stories and GTA: Vice City Stories
all require them for 100%. The exception in the series is GTA: San Andreas
where despite being incredibly fun they weren't needed for 100%.
In the Playstation 2 port of GTA:VCS from the PSP, 6 jumps were added. Why?
I've no idea. I presume it was due to the amount of PSP owners who also
bought a PS2 version (If you look at how many bought GTA:LCS it adds
credence to my theory). Some of the jumps were quite hard to find, plus the
'Unique Stunts Found' stat has been removed, so along with the extra
Rampages added it gives the player a reason to search for them to reach that
elusive 100%.
What follow is a detailed guide to all 6. To be honest they're all quite
easy, especially when compared to the other 30 jumps. Every jump is easiest
to complete using a PCJ600 motorcycle unless otherwise stated. The
Streetfighter bike, despite being a good all-rounder, seems to have a real
problem with some of the jumps, so it easier to just use the best bike of
the game, the PCJ600.
The extra jetski jump is easy enough too, all you need is a straight run-up
to pass it easily.
As many veteran GTA fans will know, pointing the left stick forward slightly
will make your playable character lean forward and gain more speed. I
recommend this for faster acceleration. The Jetski, for some reason, seems
to travel faster with the stick pushed all the way forward. If you don't
believe me, listen to the higher pitch of the engine.
Another handy thing is to hold the handbrake button (R1) and then hold
accelerate with X. The bike will reach top revs when you let go of R1 and
give you an extra boost to the acceleration of the bike. Using R1 with a
Jetski allows you to turn faster by the way.
Also note that in the air you can tip the weight of the bike forward or
backwards. For some jumps it is crucial to get this right. Remember that if
the bike has both wheels at the same height, it will travel further.
You can re-try USJs at any time after completion for a small bonus ('Insane
Stunt Bonus') and plus you still get the cool cinematic camera angle. Try
hitting some of the jumps with an Infernus, Cheetah or Banshee using just
one side. With some jumps you can imitate that mega cool jump performed by
James Bond in "The Man With The Golden Gun".
Finally, only two of the extra jumps can be completed from the start of the
game. For the other four you'll need access to the eastern island, which
requires you to beat the mission "From Zero To Hero". There are ways to get
to the eastern island early, but I'm not mentioning here.
----------------------------------------------------------------------------
2a. Unique Stunt Jump 1 - Little Havana
---------------------------------------
Location: From your 101 Bayshore Avenue safehouse, turn left and head north
up the main road. Take the second left and about half way up start
looking left for a wooden ramp that points south.
1. Head north away from the ramp, through the alleyway and on to the road on
the other side. Anywhere near the building with a sign reading 'La Vieja
Cucaracha' is good for a run-up.
2. Face south and go full-pelt for the jump.
3. To successfully complete the USJ you need to land anywhere in the back
area of Sunshine Autos. Aim for somewhere near where the "Turismo" races
start and you should get this one with ease.
4. The main problem here isn't enough speed, it's making sure you don't clip
the fence on your way in. Tip the bike slightly forward just after
leaving the jump and you should be fine.
----------------------------------------------------------------------------
2b. Unique Stunt Jump 2 - Starfish Island
-----------------------------------------
Location: Enter Starfish Island from the western island and travel down the
main road. On the right hand side you really can't miss the huge
mansion that's having some construction work done. This belongs to
Ricardo Diaz and will later belong to Tommy Vercetti in GTA: Vice
City. The jump you want is the dirt ramp that leads up to some
wooden boards at the north-west corner of the mansion.
1. This is piss-easy. Just get a good run-up and hit the jump straight. I
can particularly recommend using the faster acceleration trick here,
otherwise a longer run-up that needs you to turn in to the jump will be
required.
2. All you have to do is clear the bridge and land on the grass on the other
side. Again, tipping the bike forward slightly may help.
----------------------------------------------------------------------------
2c. Unique Stunt Jump 3 - Vice Point
------------------------------------
Location: From the northernmost Pay'n'Spray on the eastern island, go north
and turn west on the first road you come to. Travel down the road
to the hairpin corner and you can't fail to see the wooden ramp on
your left that leads over the water in to Leaf Links golf course.
1. Believe it or not, you won't need a huge run-up for this. You can
instantly tell if you jumped to far as the game will simply fail the
jump.
2. If you head directly away from the ramp you'll see a lamp-post between
two big palm trees. Anywhere starting here is fine.
3. You won't need to lean the bike forward for this one. If you go too fast
and land too far on to the green the jump won't count.
----------------------------------------------------------------------------
2d. Unique Stunt Jump 4 - Vice Point
------------------------------------
Location: Find the Chunder Wheel at the fairground area. The jump you want
is just to the south-west of it and consists of a ramp leaned up
against a small shack. As USJs go, it's quite big so finding it
shouldn't be a problem.
1. All you need to do is get a straight run up and clear the first grassy
area that has a few picnic benches on it. Your best landing spot is
between that grassy area and the blue and red building.
2. My ideal run-up was from the river railing that's directly south from the
jump. Charge for the jump and you'll clear this easily.
----------------------------------------------------------------------------
2e. Unique Stunt Jump 5 - Vice Port
-----------------------------------
Location: From the southernmost Pay'n'Spray, head north up the road and take
a right. This road should have an Empire building on the left, and
just after that a construction area. The jump you require is the
mound of sand that's pointing north. If you look for the Bobcat
truck that's next to a little hut you'll see this jump straight
ahead of you.
1. This is another easy one. Travel south until you reach a wall that
seperates the petrol station with the Empire building.
2. Face north, line up straight and hit the jump. To pass, you need to land
after the most northern of the brick walls.
3. You may need to tip the bike forward here, and the acceleration trick
comes in quite handy.
----------------------------------------------------------------------------
2f. Unique Stunt Jump 6 - Vice Port
-----------------------------------
Location: Go to the marina in the south-west of the eastern island. Find the
entrance to Pier 1 and travel west along the thin walkways. The
jump you're looking for is a little way in on the left. It's easy
to see as it's half submerged underwater.
1. Obviously you're going to need a Jetski to complete this jump, and a
convenient place to find one is just at the entrance to Pier 1. Go
through the entrance and immediately look left to see it in the water.
2. All you need is a good run-up in a straight line. Go directly south from
the jump until you hit the other walkway of the marina (Pier 2) and turn
around. The distance should be ample.
3. To complete the jump, just land in the water on the otherside.
----------------------------------------------------------------------------
2g. Unique Stunt Jump Rewards
-----------------------------
For successful completion of each USJ you'll receive $250.
For successful completion of all 36 USJs you'll receive $10000
============================================================================
3. Rampages
===========
Like the USJs, Rampages have also been a long-term staple of the GTA games
although in the first few games (GTA, GTA:London 1969 and GTA2) they were
called "Kill Frenzies".
Every Rampage requires you to kill or destroy a set amount of gang members
or vehicles within an allotted time using a specific weapon.
Some of them are very easy but some require a few tactics. I recommend
always having full health and armour just in case. The bonuses of extra
health and armour might be useful too. For extra health, complete the "Air
Rescue" side mission and for extra armour complete "Vigilante" (This might
take a while as you need to beat level 15 to pass). Basic health and armour
should be fine for this lot anyway.
One Rampage has been moved from the PSP version and thus isn't extra, but
the other five are brand new. The Tec-9 machine pistol Rampage used to be
located in Downtown at the top of a set of stairs and near to a Comet car.
Why Rockstar moved it is a good question. A theory of mine is that before
the second island is unlocked the gang members wouldn't spawn in enough
numbers to easily pass it (There's no traffic or pedestrians on this part of
the road before the completion of "From Zero To Hero"). To be honest, it
isn't a very good theory, as the gang members required for Rampages normally
spawn in enough numbers anyway (Well, most of the time they do).
If at any time you can't see any gang members spawning, run away a few steps
and then turn around to go back and the game should spawn some for you.
One final note is that the icon for completed Rampages turn a slightly
different colour, so you can easily see if it's done or not. Like the USJs,
the completed Rampages also show up on the in-game map.
By the way, you're free to try any completed Rampage again for fun but you
won't receive any more rewards.
----------------------------------------------------------------------------
3a. Rampage 1 - Little Havana
-----------------------------
Objective: Kill 40 Cholos in 2 minutes (Stubby Shotgun).
Location: This Rampage can be found on top of Guano's Cafe. Facing west
from the Starfish Island bridge, turn right, then left, then left
again. On your right you'll spot an opening in the buildings and
at the south corner is a stone ramp leadin up to the rooftops
where the Rampage icon is sitting.
1. This is surprisingly easy as long as you don't get mobbed. Grab the icon
and go to the edge of the roof. Pick off any Cholos you can see across
the street or in the road. If Vic starts aiming steeply down it means
that the Cholos have started to gather on the street underneath him.
2. Take out as many as you can and when you start to hear a lot of gang
members underneath you jump down. The beauty of this shotgun is that it
knocks anyone cleanly off their feet. Even if it doesn't kill them their
health will be so depleted that even a weak shot or them getting hit by a
blast intended for another victim will kill them.
3. If there's too many of them all firing at you at once, run away and then
turn around to face them. Even at medium range the stubby is effective.
Try to aim for the middle of the pack and then pick off anyone to the
left or right.
4. As the Cholos are only armed with pistols and knives it shouldn't be too
hard prowling the streets finding enough victims. Be wary of firing at
any gang members near vehicles as 2 shots is often all that's needed to
blow it up.
----------------------------------------------------------------------------
3b. Rampage 2 - Starfish Island
-------------------------------
Objective: Destroy 15 Vehicles in 2 minutes (Spas-12 Shotgun).
Location: Enter Starfish Island from the western bridge and look on your
right. The second house on the right which is yellow with a red
roof and a Banshee parked in front of it is the one you want. The
Rampage icon is on the porch.
1. This one is slightly trickier as the Spas-12 can blow up a car in two or
three close shots and fires so fast for a shotgun that when things get
heated you might accidentally detonate a car that's close to Vic. I
recommend using the free-aim (Hold R1 and tap L3). To start off with,
blow up the vehicle you drove here in, and then detonate the Bansee. If
you see the car alight, run away!
2. Run back out on to the road and shoot at any cars you can see. Fire at
any car that's further away than two or three car lengths and Vic will
be OK when it explodes.
3. If you can't see any more cars, travel up the road. If your actions have
caused you to get a wanted level, all the better (In fact, a 2-star
wanted level from the start is quite handy). Blow up any police cars that
come near you. Be careful though: They like to drive right up to you and
all too often I've panicked and shot at it with a reflex action, taking a
big chunk of Vic's health/armour with it.
4. The hardest part of this Rampage is finding enough vehicles. The annoying
thing is that if you fail you'll probably have to travel elsewhere to
restore your health and armour.
5. If a lot of cops are shooting at you, waste no time in taking them out.
Just like in other GTA games the targetting system often won't work
whilst the main character is taking damage.
6. A really helpful thing in GTA:VCS is that shooting at a vehicle often
results in the owner fleeing in terror. If a car is travelling away from
you, take a shot. With a bit of luck it will stop allowing you to blow it
up. The extra added bonus is that an abandoned car will stop any traffic
if it's blocking the road. Capitalise on this.
----------------------------------------------------------------------------
3c. Rampage 3 - Downtown
------------------------
Objective: Kill 20 Bikers in 2 minutes (Tec-9 Machine Pistol).
Location: Look on you in-game map at the very top of the western island. In
the north-east you'll see the butterfly tracks used for the
off-road side missions and two long white buildings just south of
it. The Rampage icon is sitting kind of in the middle of these
buildings.
1. The gun for this Rampage is quite weak compared to the others, especially
with Bikers marauding about you! Grab the icon and head out on to the
street. With a bit of luck the Bikers will have already started to spawn
and will have certainly noticed Vic's presence.
2. There will be just too many for you to stand still and pick them off one
by one as despite being a machine-pistol it still takes four individual
shots to kill someone. Run a distance round a corner and switch to
free-aim.
3. The pursuing Bikers will follow you round the corner but for some reason
will bunch up allowing you to open fire and kill them one by one as they
get closer. Lather rinse and repeat and this Rampage shouldn't take you
too long to complete.
4. If you get surrounded, run away! The Bikers' melee weapon of choice is a
baseball bat, which can easily floor you with one hit. If you've got
loads of the bastards around you then they'll put the boot in meaning
you'll lose even more health.
5. If you're really having trouble with this Rampage, have a go at this: At
your 101 Bayshore Avenue safehouse is a pink icon allowing you to
purchase a bulletproof Sanchez motorbike. As any bike allows you to fire
forward as well as to the sides, and it's immune to bullets, you can mop
up those unruly Bikers quite quickly.
6. If you do use the motorbike strategy detailed above be careful not to let
the Bikers surround you. One punch is all that's needed to knock you off
and by the time you've recovered there'll be more heading your way.
7. As you don't need to reload the Tec-9, like you would do if you were on
foot, hold down the fire button. You'll shoot people quite accidentally
who just got in the way. Remember: The Sanchez is bulletproof, Vic is
not. If things get too sticky, retreat, reform and then attack again.
----------------------------------------------------------------------------
3d. Rampage 4 - Prawn Island
----------------------------
Objective: Destroy 15 Vehicles in 2 minutes (Rocket Launcher).
Location: Enter Prawn Island from the western island and look to your left.
There's a road that cruves up round a fountain and back to the
main road again. The Rampage icon is sitting right on that
fountain.
1. Now we get to the good stuff :o) First off, some ground rules:
(a) Only fire at a vehicle that's more than 2 car lengths away, otherwise
you'll blow Vic up in the process.
(b) The police will inevitably get called (Actually, I can recommend
having a 2-star wanted level again) and like nothing better than
driving right up to you. All too many times my reflexes kicked in and
I blew it up without thinking. If a cop car pulls up, wait for it to
stop so the officers jump out *then* run away and blow it up.
(c) Like all the Rampages, full health and armour is good to have. This
is much more true for the rocket launcher Rampages, as any mis-aimed
shots will affect you badly.
2. OK, start by running towards the green house to the north. There are two
Sentinel XS cars sitting on the driveway. They're you're first two kills.
When you turn around, blow up the vehicle you drove here in.
3. Head down to the main road near Interglobal Film Studios and await
traffic. When you see a vehicle appear quickly take aim and fire. When
it's dust, go towards it. With any luck it will be blocking the road and
any traffic behind it is fair game. The problem with Prawn Island is that
it never appears to have much traffic on the roads, so if no vehicles
spawn in one direction, turn around and try the other way.
4. If you've got at least 30 seconds left and require only two more
vehicles, have a jog in to the Interglobal Film Studios compund where a
Caddy and a Deluxo car are waiting to be blown to smithereens.
5. There's also a van parked up on the road that's right next to the bridge
leading to the eastern island should you need it. All in all, the problem
with this kind of Rampage is trying to get enough vehicles to appear.
6. If you're doing this by getting to the eastern island early, you'll be
stuck as cars don't seem to populate the roads. Simply grab a PCJ600 and
ride at speed to the parking structure on the western side of the Vice
Point Mall. There should be more than enough cars here for you to
detonate.
----------------------------------------------------------------------------
3e. Rampage 5 - Vice Point
--------------------------
Objective: Kill 70 Sharks in 2 minutes (M249 Machine Gun).
Location: Find the huge North Point Mall (nb: In GTA:VCS it's simply called
the Vice Point Mall) and enter the entrance on the eastern side.
Head forward and look to your left. You should see a security
booth. The Rampage icon is right in there.
1. This is probably the only Rampage where having the extra health and
armour is near-essential, basically due to the huge amount of Sharks you
need to kill in such a tight time limit.
2. After grabbing icon, scout out any Sharks, lock-on and take them out. As
long as you keep pressing L2 and R2 to switch targets you'll mow them
very quickly. At close range only one shot is often enough to kill
someone, but at a slight distance it will probably require two shots.
More often than not, one shot is all you need, so be quick to press L2 or
R2 to switch targets rapidly.
3. Have a run around and every now and then and turn around. If there are a
lot of Sharks around, shoot them all one by one before moving on. If you
notice anyone running away after taking the nearest Sharks out, try and
lock-on. More often than not the M249 will target them at an incredible
distance.
4. If you can hear loads of gang activity but can't see them, head up one of
the escalators. The game often spawns loads of Sharks up here and all you
need to do is stand central and use the L2/R2 targetting tactic. Most of
the time, any Sharks that have gathered on the narrow walkways that go
round the perimeter of the mall will try and jump over the wall to fall
to the bottom floor. Annoyingly the game seems to target these even
though you can't hit them.
5. If the supply of fresh victims dries up, again, run a distance and turn
around. You can often tell if gang members have spawned as they'll be
firing in your general direction. The Sharks really can't shoot that
well, and you have got the best machine gun of the game (Possibly even
the best weapon).
6. If there are just too many Sharks in the vicinity, run round a corner and
use the free-aim. Just like the Bikers' Tec-9 Rampage (See above) they'll
bunch up and you can mow them down with little problems.
----------------------------------------------------------------------------
3f. Rampage 6 - Ocean Beach
---------------------------
Objective: Kill 25 Sharks in 2 minutes (Laser Scoped Sniper Rifle).
Location: Go to the south of the eastern island and look for a huge
billboard advertising 'Los Santos Fop'. Directly north is a road,
so head north up this road and look on your right for an alleyway.
Enter the alleyway and you'll hopefully see a Comet parked
underneath a building. Head round the corner to see a staircase
leading up to the roof. You can't miss the Rampage icon up here
next to a little white structure.
1. This is, in my opinion, the hardest of all the games' Rampages (In fact,
it's the only one that took me more than five attempts!). The problem
this time isn't just finding enough victims, it's also the stringent time
limit. If your skills with the sniper rifle suck, you might want to do
"Phil's Shooting Range" on the western island to improve. If you can
complete that, than this shouldn't take much more skill.
2. The time limit is so tight that any time spent re-positioning Vic will
have to be minimal.
3. Grab the icon and position yourself on the corner of the roof. Take aim
and shoot any Sharks you see on the street. Any Sharks on the street
right beneath you will most likely notice and start shooting. As long
they're directly under you, their bullets will hit the edge of the
rooftop (They obviously don't have the mental capacity to go down the
alley and up the stairs to your position).
4. If your supply of victims dries up, go to the other end of the rooftop
and position Vic in the same corner position. The good thing about taking
shots off of a corner like this is that it gives you a chance to shoot
any Sharks that could be running either towards or away from your
position.
5. At between 15 to 25 kills, drop in to either narrow alley and pick the
rest of them up from ground level. As long as your fast you can shoot
them all without taking too much fire. One thing to note is that if a
Shark is far away, he'll run towards you, stop and fire and then start
running again.
6. If they do get to mob-handed, run away into the alley, turn around and
try and pick them off again. If you're lucky, they should have started
running after you by which time you will have had a chance to take aim
and fire.
7. This sniper rifle is *not* semi automatic, so every time you need to
shoot remember to just tap X instead of holding it down. The clip holds 7
bullets, so try and count the shots and know when it's time to reload.
Use the reloading time to steady your aim on the next target.
8. Rather helpfully it only requires one shot from a sniper rifle to put
someone down for good so don't waste time going for headshots, ideally,
aim for the torso.
----------------------------------------------------------------------------
3g. Rampage Rewards
-------------------
For successful completion of each Rampage you'll receive $50 x the number of
Rampages completed. So, if you complete 10 Rampages you'll get $500, for 20
you'll get $1000 and so on.
For successful completion of all 35 Rampages you'll receive $3000. Quite a
paltry sum, but rest assured that you're now a skilful bad-ass Rampaging
maniac.
============================================================================
4. Side Missions
================
4a. Playground On The Dock
--------------------------
Objective: Collect all the coronas in 1:15.
Location: On the southern end of the row of condominiums that contains your
101 Bayshore Avenue safehouse.
Available: After "Soldier", the first mission of the game.
Reward: $500
Like the other Playground missions this is quite easy once you know the
course. The route will take you around the condos, north up Bayshore Avenue
and on to the Benny's Restaurant boat. I'd advise you to at least have a
"dry run" to scout the coronas, that way you'll see the most logical order
to collect them.
1. The corona straight ahead of you should be your first one, but you should
approach it from the south.
2. Drive along on top of the orange structure, and when you get to the end
drop on to the road and turn around.
3. Tear up this little alleyway to the end. When you see the place that
activates this mission, turh left on to Bayshore Avenue.
4. Collect the coronas in front of you and veer to the right on to the
grass. Pick up some speed and try to hit the ramp in the middle.
5. With a bit of luck you'll collect the corona as you land. Start reducing
speed now.
6. Board the boat on the second gangplank, then turn left. Stick the left of
the boat as you don't want to go to the upper deck yet.
7. Collect the corona at the bow of the boat and then head to the stern,
corona collecting on the way.
8. When all the coronas on the deck have been collected, go to the upper
deck and collect the final few.
----------------------------------------------------------------------------
4b. Rush!
---------
Objective: Cause $1700 worth of damage in 3:00.
Location: At the docks. Drive along the most southern road and look for a
Linerunner parked next to some cargo crates.
Available: After "Soldier".
Reward: $1000
This mission is very similar to the side mission "Crash!" available at
Interglobal Film Studios after Reni Wassulmaier's mission "Accidents Will
Happen". Essentially all you need to do is smash in to vehicles and cause
carnage on the roads.
The scoring system works the same as the "Crash!" mission:
$10 For every 90° you can spin a car.
$150 If a car flips, upgraded to $300 if it's destroyed.
$50 For dismounting someone from a bike.
$10 For every second you can get a car airborne "Knockaround" bonus
multiplier that increases your single collision total depending on how
many cars you can pile up in one collision.
The points scored will be accumulated and totalled *before* being added to
your total score. For example, you'll only get $40 for spinning a car 360°
and not $100 (i.e. $10 + $20 + $30 + $40).
There aren't any real strategies here, but I can recommend building up speed
heading along Bayshore Avenue and hitting traffic head on. With a bit of
practice you can work out the ideal places to hit vehicles to make them spin
out of control. If you're going fast enough they'll probably end up in the
air, in which case they'll either hit another vehicle or land on their roof
(Which results in an explosion and more points for you).
----------------------------------------------------------------------------
4c. Hyman Memorial O.D.T.
-------------------------
Objective: Collect all the coronas in 4:40.
Location: Go to Escobar International Airport and enter the huge runway
area. On the western edge right next to the water is a row of
aircraft hangars. The Biplane you want is parked in the
southernmost hangar.
Available: After "From Zero To Hero".
Reward: $500
This is a reverse version of the "Land, Sea And Air Ace" mission, and is
just about the same in difficulty.
1. To start with you're using a Biplane to fly around certain landmarks on
the western and Starfish islands. This is easy enough if you just check
your map to see where the next corona is. You might want to hold down the
X button to do this part of the mission as fast as possible.
2. After a while you'll end up back on the western side of the island to
transfer to a Jetmax boat. To do this very quickly, dive the Biplane
kamikaze-style towards the boat and bail out just as you're over this.
With practice you can land directly on the deck of the boat, but even if
you land in the water you can tap triangle when near to get transported
automatically inside.
3. It's helpful to use the wide camera as you'll be able to see the next
coronas much more clearly. All in all this section is quite fast.
4. The final section of this mission takes place on a PCJ600. To transfer
quickly from the Jetmax on to the bike, drive the boat up the ramp and
then bail out to the left to land right next to it.
5. This route will take you around the Hyman Memorial Stadium, around the
streets of Downtown and then back to Arena area. To avoid traffic simply
position the bike in the middle of the road and speed along. For the
corners, just tap the R1 button whilst turning in and the bike will
handle it with ease.
----------------------------------------------------------------------------
4d. Caddy Daddy
---------------
Objective: Complete 3 laps around Leaf Links golf course in less than 6:00.
Location: Enter Leaf Links golf course and look slightly to the right to see
the Caddy parked next to the tennis courts.
Available: After "From Zero To Hero".
Reward: $2500
This is easy once you know the route and the lay of the land.
1. Each lap will take you around the southern part of Leaf Links, across the
narrow bridge to the middle part, down the winding pathway, back past the
tennis courts, across the bridge over the small lake, round the northern
part of the course and finally back to the tennis courts via another
route.
2. Your main problem here is visibility. Those largish green shrubs can be
driven through but do obscure your view. In particular, watch out for the
entrance to the narrow bridge. All too many times I've clipped the bridge
which cost me vital seconds.
3. Your other problem is the Caddy being one of the flimsiest and top-heavy
vehicles in the game. Like the Ambulance and other boxy vans, it seems to
have a tendency to flip on it's side without much difficulty. Just try to
land on a flat piece of ground and correct the vehicle back on to four
wheels.
4. Use the stick for control and just tap it in the direction you want to
go. It's much easier using analogue control, especially if you spot the
Caddy going on to two wheels early enough.
5. Except for the above difficulties, you can pretty much go full pelt the
majority of the time. It's very possible to get times of 1:40 - 1:50 for
each lap.
----------------------------------------------------------------------------
4e. Playground At The Park
--------------------------
Objective: Collect all the coronas in 1:10.
Location: From the southernmost Pay'n'Spray in Ocean Beach, head north and
take the next right. At the end of this road in front of you is a
multistorey parking structure. Find the entrance at the southern
end, go up one level and turn right to find the PCJ600 sitting
there.
Available: After "From Zero To Hero".
Reward: $500
This extra PCJ mission is easy except for the jumps at the end. Good bike
control is pretty much all you need, that and the faster acceleration trick
used for USJs.
1. Simply do laps of the first two floors of the carpark to collect all the
coronas. It helps if you know where the ramps are that lead up, that way
you can collect the coronas in the fastest way possible.
2. When you reach the top level it gets a bit harder. Veer left and
carefully navigate up the ramp on the corner and then down again.
3. Just after you come off the ramp, speed for the corona and a hit the
wooden ramp fast enough to land on a slightly elevated rooftop.
4. After collecting the one corona up here, veer left and line yourself up
for the next ramp. Go full speed for the ramp, making sure you're going
straight.
5. When you land on the roof across the street, carry on going straight.
6. When you reach the edge of the roof there's a small gap before the next
wooden ramp. Hold back on the stick as you go across this to pass it with
ease and retain your speed.
7. As long as you've held down X across these rooftops you'll easily have
enough speed to reach the final rooftop.
8. Keep on going and pray that there's no traffic blocking your way when you
hop off the last rooftop. Simply go down the alleyway to collect the last
few coronas.
----------------------------------------------------------------------------
4f. Crims On Water Wings
------------------------
Objective: Collect all the coronas in 2:30.
Location: Near the lighthouse in the south of Ocean Beach is a jetty. The
Skimmer seaplane is sitting in the water here.
Available: After "From Zero To Hero".
Reward: $500
This is arguably the hardest of the extra missions as you need to be quite
adept at flying the plane. The game doesn't exactly have a tutorial for
piloting aircraft like in GTA: San Andreas, and this mission involves flying
down a narrow street between buildings.
The route will take you around the south of the east island, near Starfish
Island, past the marina and back to the lighthouse.
1. 2:30 is quite a tough time, but it's certainly not impossible. Knowing
the limitations of the Skimmer will be helpful here.
2. Hold X all the way except for when you have to collect a corona near to
the ground. You'll keep a constant speed as the seaplane will be diving.
3. By all means if you're finding it hard to fly between the narrow
buildings, release X. There are a few places to make up time where there
aren't any obstructions.
4. If you miss a corona, it's easier to go back and start the mission again.
Believe me it'll cost you more time to circle round than is healthy and
you'll be more tempted to go faster and probably make a mistake.
----------------------------------------------------------------------------
5. New Purchases
================
Several handy vehicles can be be purchased all around Vice City and are
represented by a pink Rampage-style icon. Just walk in to it and tap X to
purchase or Triangle to cancel.
Some were actually in the PSP version, and I've included them for
completeness sake.
5a. Bulletproof Sanchez
-----------------------
Location: Your 101 Bayshore Avenue safehouse.
Available: After "Conduct Unbecoming".
Cost: $4000
----------------------------------------------------------------------------
5b. Bulletproof Ventoso
-----------------------
Location: Downtown, outside the King Knuts food outlet
Available: After "From Zero To Hero".
Cost: $2500
----------------------------------------------------------------------------
5c. Skimmer
-----------
Location: Vice Point, at the jetty behind your Clymenus Suite safehouse.
Available: After "From Zero To Hero".
Cost: $4500
----------------------------------------------------------------------------
5d. Little Willie
-----------------
Location: Vice Point, on top of your Clemynus Suite safehouse.
Available: After "From Zero To Hero".
Cost: $5000
----------------------------------------------------------------------------
5e. Squallo
-----------
Location: Little Haiti, there's a long jetty that's between your Compound
safehouse and the Junkyard.
Available: After "From Zero To Hero".
Cost: $4500
----------------------------------------------------------------------------
5f. Marquis
-----------
Location: Viceport, at the jetty opposite your 101 Bayshore Avenue
safehouse.
Available: After "From Zero To Hero".
Cost: $4500
----------------------------------------------------------------------------
5g. Bovver '64
--------------
Location: Vice Point, at the jetty behind your Clymenus Suite safehouse.
Available: After "White Lies".
Cost: $4500
----------------------------------------------------------------------------
5h. Splitz-6 ATV
----------------
Location: Your Compound safehouse, next to the garage.
Available: After "From Zero To Hero".
Cost: $4500
----------------------------------------------------------------------------
5i. Quadbike
------------
Location: Sunshine Autos in Little Havana.
Available: After "When Funday Comes".
Cost: #2000
----------------------------------------------------------------------------
5j. Bulletproof BF Injection
----------------------------
Location: Sunshine Autos in Little Havana.
Available: After "Beach Patrol".
Cost: $4000
----------------------------------------------------------------------------
5k. Bulletproof Stretch
-----------------------
Location: Sunshine Autos in Little Havana.
Available: After "Kill Phil".
Cost: $3000
----------------------------------------------------------------------------
5l. Jetski
----------
Location: Just south of the Hyman Memorial Stadium.
Available: After "From Zero To hero"
Cost: $4500
============================================================================
6. Easter Eggs
==============
Easter eggs have been a longtime staple of videogames ever since the author
of Atari's 'Adventure' included one in his game and Rockstar have quite a
reputation for including quirky and amusing messages in their games.
Rockstar have included more than just side missions and special vehicles in
the Playstation2 port of GTA:VCS. Check this little lot out.
A new section in this version of the guide (7. Picture And Video Links) will
let you see photographic and video evidence of the easter eggs if you follow
the links. Kudos to Paul Rudoff for supplying the links.
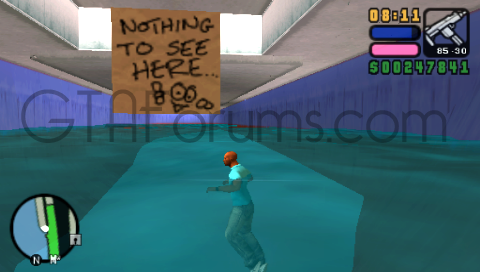
6a. The 'I Wasn't Joking...' Hidden Sign
----------------------------------------
In the PSP version of GTA:VCS there is a hidden sign that simply states
'Nothing To See Here' with the cartoon face and hands that were used for the
'Hello Again' sign in GTA: Liberty City Stories (Note: The Playstation2 port
of GTA:LCS was changed to 'You really can't get enough of this alley can
you?').
Now in the Playstation2 port of GTA:VCS the sign now states 'I wasn't
joking... There really is nothing to see here. Go and look in the VCN
building instead!'
To find the 'I wasn't joking...' sign, locate the big ship that's opposite
your 101 Bayshore Avenue safehouse and jump in the water. From the northern
end (That's the ships bow - the front end), swim towards the boat. Position
Vic Vance so that he's swimming in to the hull of the boat and keep tapping
X to swim faster.
Eventually the camera view will allow you to see inside the ship where the
sign is clearly visible. Some people have also reported that crashing in to
the boat at high speed on a Jetski will somtimes "throw" Vic through the
boat and in to the enclosed area that has the sign.
This is quite a cool easter egg, but not as good a find as what it's
referring to.
----------------------------------------------------------------------------
6b. The VCN Building Easter Egg
-------------------------------
This easter egg that was hinted in the hidden sign from the boat is located</pre><pre id="faqspan-2">
in the same place as the 'Happy Easter' egg from GTA:VC.
To find it, go to the western end of the Downtown bridge that goes over to
Prawn Island and enter the VCN building. Go up to the roof and from here, go
up the ramps to the helipad.
On the north-west corner of the helipad is a small rectangular window that
belongs to the building next door. Do a running jump in to this window to
find the easter egg, complete with construction crane.
There is also #11 of the easter egg signs.
----------------------------------------------------------------------------
6c. A Message From Rockstar Leeds
---------------------------------
In the PSP version, travel to the south-eastern corner of the Hyman Memorial
Stadium and you'll find a set of steps that form a Unique Stunt Jump. Look on
here to find a special message from the developers, Rockstar Leeds.
It reads:
'You are standing on USJ 005a, a fine new addition to our great city that
isn't contrived at all. Have you found the 10 easter eggs? Rockstar Leeds
would like to thank you for playing the game and letting us have a rockin'
christmas party.'
This was altered slightly to suit the Playstation2 port.
It now reads:
'You are standing on USJ 005a, a fine new addition to our great city that
we've all grown to love. Have you found the 11 easter eggs? Rockstar Leeds
would like to thank you for playing the game, and by the way, our Christmas
party was great.'
----------------------------------------------------------------------------
6d. The Great Rockstar Games Easter Egg Hunt!
---------------------------------------------
These signs were added in the mould of a traditional easter egg hunt.
Dotted around Vice City are numbered signs with a smiley face and are hinted
at in the sign near Hyman Memorial Stadium. Needless to say, they took a very
long time to find.
The rumour circulating as to why there are 11 of them is that the
October-scheduled Grand Theft Auto IV will be the eleventh game in the
series. If you want to know how they worked that out:
1. Grand Theft Auto
2. Grand Theft Auto: London 1969
3. Grand Theft Auto: London 1961
4. GTA2
5. Grand Theft Auto III
6. Grand Theft Auto: Advance
7. Grand Theft Auto: Vice City
8. Grand Theft Auto: San Andreas
9. Grand Theft Auto: Liberty City Stories
10. Grand Theft Auto: Vice City Stories
Anyway, on with the easter eggs!
#1 - Find Marty Williams' trailer at the site in Little Havana. The sign is
on the eastern side of the caravan directly east of Marty's.
#2 - Inside a green trailer in Viceport. Head south from your 101 Bayshore
Avenue safehouse and you'll find an area with loads of trailers near a
USJ ramp. The green trailer with the sign is roughly in the middle of
this area on the western side.
#3 - In Little Haiti, find the orange and red FIDL shop that's east of your
Compound safehouse. Go down the alleyway next to it and look for the
sign at the bottom of a short staircase.
#4 - In Vice Point, go north-east from the bridge and take the left just
after the Well Stacked Pizza food outlet. Look to your right at the
end of this road to see an open gate leading behind the apartment
buildings. The sign is just inside here.
#5 - You'll need a helicopter for this one. On Prawn Island, find the huge
yellow mansion that's near the fountain to the north of the island.
The easter egg is on the roof on the inside of the little wall. If at
first you can't see it, look for a small wooden ramp that's leaning on
the wall. The sign is directly underneath that.
#6 - This is probably the easiest. Simply go round to the south-west of the
Hyman Memorial Stadium to find this on a wall.
#7 - <Updated> Go to the Ammu-Nation in Downtown and head west along the
road. On the right hand side is an alleyway that will lead to a set of
garage buildings. The one you want that contains the sign is the big
one at the northern end that has two entrances. Interestingly, the
doorway that's just east of the sign changes the camera angle, as if
you were walking in to a Pay'n'Spray. <In GTA:VC, this area was part
of Mitch Baker's mission "Hog Tied", but in GTA:VCS it's free to
access (You don't have to jump using a PCJ600 from the staircase like
I said in V1.00) >
#8 - Just north of the Pay'n'Spray in Ocean Beach is the condemned remains
of a building. There's a staircase at the southern end inside this
building and the sign is just up these stairs. You might have to do
some jumping to reach the staircase.
#9 - This sign wins the award for being the most obscure. In the huge Vice
Point mall head upstairs and find a shop called Vinyl Countdown that
should be roughly in the middle on the western side. The sign is
hidden in the racks of records to the left of the payment area.
#10 - In Washington Beach, this sign can be found under the bridge that's
south of the fairground.
#11 - You'll find this one accompanying the under construction VCN building
easter egg.
============================================================================
7. Picture And Video Links
==========================
Here you'll find links to various sites that feature the easter eggs. I've
included the PSP version's images for completeness sake.
7a. The 'I Wasn't Joking...' Hidden Sign
----------------------------------------
PSP Version:
Image:
http://i35.photobucket.com/albums/d157/getdustin/EasterEgg.jpg
Image:
http://www.gta-series.com/it/vcstories/eastereggs/002.jpg
Image:
http://img.photobucket.com/albums/v297/antocfc/screen3.png
Video:
http://www.youtube.com/watch?v=e4vbdby2440
Playstation2 Version:
Image:
http://pnmedia.gamespy.com/planetgrandtheftauto.gamespy.com/images/
news/signvcs.jpg
----------------------------------------------------------------------------
7b. The VCN Building Easter Egg
-------------------------------
Image:
http://pnmedia.gamespy.com/planetgrandtheftauto.gamespy.com/images/
news/eggcon.jpg
Video:
http://www.youtube.com/watch?v=6RDswuSdpbE
----------------------------------------------------------------------------
7c. A Message From Rockstar Leeds
---------------------------------
Image:
http://img242.imageshack.us/img242/8741/easternt7.png
Image:
http://www.gta-series.com/it/vcstories/eastereggs/001.jpg
Video:
http://www.youtube.com/watch?v=5h25fjTbOYw
----------------------------------------------------------------------------
7d. The Great Rockstar Easter Egg Hunt!
---------------------------------------
Sign #1 -
http://www.gta-series.com/it/vcstories/eastereggs/001_1.jpg
http://img520.imageshack.us/img520/7315/imagem075fd6.jpg
Sign #2 -
http://www.gta-series.com/it/vcstories/eastereggs/001_2.jpg
http://img515.imageshack.us/img515/8858/img2965le1.jpg
Sign #3 -
http://www.gta-series.com/it/vcstories/eastereggs/001_3.jpg
http://img176.imageshack.us/img176/7208/secretsignoc9.png
Video:
http://www.youtube.com/watch?v=4Ym8ZDmXqiY
Sign #4 -
http://www.gta-series.com/it/vcstories/eastereggs/001_4.jpg
Sign #5 -
http://www.gta-series.com/it/vcstories/eastereggs/001_5.jpg
Sign #6 -
http://www.gta-series.com/it/vcstories/eastereggs/001_6.jpg
http://img159.imageshack.us/img159/4308/img2962te2.jpg
Sign #7 -
http://www.gta-series.com/it/vcstories/eastereggs/001_7.jpg
http://i75.photobucket.com/albums/i304/Dmac_91/image7.jpg
http://img76.imageshack.us/img76/4342/img2957yj3.jpg
Sign #8 -
http://www.gta-series.com/it/vcstories/eastereggs/001_8.jpg
http://img174.imageshack.us/img174/5806/screen1nu3.png
Sign #9 -
http://www.gta-series.com/it/vcstories/eastereggs/001_9.jpg
Sign #10 -
http://www.gta-series.com/it/vcstories/eastereggs/001_10.jpg
http://img234.imageshack.us/img234/2616/dscn2866sr2.jpg
Sign #11 -
http://pnmedia.gamespy.com/planetgrandtheftauto.gamespy.com/
images/news/eggcon.jpg
Video:
http://www.youtube.com/watch?v=6RDswuSdpbE
============================================================================
8. ....And The Outro
====================
And that just about does her for this version. If you have any feedback,
criticism, encouragement or anything else relevant you know where to contact
me.
I have now decided to make a map after all, so the next update of this guide
could well be the final version. Adding a single link and changing the
version number is something I *hate* doing, so hopefully I'll get more
feedback and alter/add more to the guide to make the update more
substantial.
My GTA: Vice City plot guide is nearing completion, and I think I might do a
GTA:VCS plot guide before approaching GTA: San Andreas. The storyline is
easily the longest in the series and it will take me quite a while to get
all the cutscenes and missions on to VHS whilst still trying to put some
sort of structure in to the narration of the story.
Still, it shouldn't be too hard. GTA:SA is arranged in such a way that
certain key plot points lead on to new areas. "The Green Sabre" mission
opens up the Badlands missions and to open San Fierro needs completion of
"Wear Flowers In Your Hair", etc.
Anyway, be well and don't do anything I would do.
Cheers,
Rob