| Return Create A Forum - Home | |
| --------------------------------------------------------- | |
| The Old Landrover Arms | |
| https://seriouslyseries.createaforum.com | |
| --------------------------------------------------------- | |
| ***************************************************** | |
| Return to: The Landrover Gallery | |
| ***************************************************** | |
| #Post#: 18468-------------------------------------------------- | |
| Mandy | |
| By: espacekiller Date: December 24, 2014, 6:12 am | |
| --------------------------------------------------------- | |
| The rebuild is moving on slowly so I thought I would start a | |
| thread will post up pictures of progress, bit of cut and past of | |
| old stuff below. | |
| This is what mine was like when bought. | |
| [img width=1000 | |
| height=750] | |
| http://i965.photobucket.com/albums/ae131/my05pjn/Land%20Rover/DSCF3004.jpg[/img… | |
| />width=1000 | |
| height=750] | |
| http://i965.photobucket.com/albums/ae131/my05pjn/Land%20Rover/DSCF3070.jpg[/img] | |
| [img width=1000 | |
| height=750] | |
| http://i965.photobucket.com/albums/ae131/my05pjn/Land%20Rover/DSCF3002.jpg[/img] | |
| [img width=1000 | |
| height=750] | |
| http://i965.photobucket.com/albums/ae131/my05pjn/Land%20Rover/DSCF3028.jpg[/img] | |
| [img width=1000 | |
| height=750] | |
| http://i965.photobucket.com/albums/ae131/my05pjn/Land%20Rover/DSCF3011.jpg[/img] | |
| [img width=1000 | |
| height=750] | |
| http://i965.photobucket.com/albums/ae131/my05pjn/Land%20Rover/DSCF3051.jpg[/img] | |
| [img width=1000 | |
| height=750] | |
| http://i965.photobucket.com/albums/ae131/my05pjn/Land%20Rover/DSCF3129.jpg[/img] | |
| [img width=1000 | |
| height=750] | |
| http://i965.photobucket.com/albums/ae131/my05pjn/Land%20Rover/DSCF3139.jpg[/img] | |
| #Post#: 18469-------------------------------------------------- | |
| Re: Mandy | |
| By: espacekiller Date: December 24, 2014, 6:14 am | |
| --------------------------------------------------------- | |
| More pictures from the past showing the strip down, everything | |
| photographed and labled and boxed and put in the to restore | |
| pile. | |
| Plan was to strip it rite down to "let dog see t rabit" and | |
| assess the main items chassis bulkhead side frame etc, it was | |
| 'worse than I expected'. | |
| [img width=1000 | |
| height=708] | |
| http://i965.photobucket.com/albums/ae131/my05pjn/1.jpg[/img] | |
| [img width=1000 | |
| height=700] | |
| http://i965.photobucket.com/albums/ae131/my05pjn/2.jpg[/img] | |
| [img width=1000 | |
| height=667] | |
| http://i965.photobucket.com/albums/ae131/my05pjn/3.jpg[/img] | |
| [img width=1000 | |
| height=714] | |
| http://i965.photobucket.com/albums/ae131/my05pjn/4.jpg[/img] | |
| [img width=1000 | |
| height=814] | |
| http://i965.photobucket.com/albums/ae131/my05pjn/5-1.jpg[/img] | |
| [img width=1000 | |
| height=951] | |
| http://i965.photobucket.com/albums/ae131/my05pjn/7.jpg[/img] | |
| [img width=1000 | |
| height=869] | |
| http://i965.photobucket.com/albums/ae131/my05pjn/8.jpg[/img] | |
| #Post#: 18470-------------------------------------------------- | |
| Re: Mandy | |
| By: espacekiller Date: December 24, 2014, 6:18 am | |
| --------------------------------------------------------- | |
| Not sure if I should copy the entire build thread over here a | |
| bit at a time or just update with the new stuff I imagine most | |
| of you will have seen my project already. | |
| #Post#: 18472-------------------------------------------------- | |
| Re: Mandy | |
| By: moomoo Date: December 24, 2014, 9:27 am | |
| --------------------------------------------------------- | |
| It certainly looks as if your hard work is paying off bud. | |
| Keeps the heart in the job when progress is visible ,doesn't it? | |
| Keep it up chief. plgxmastr | |
| Merry thingy. | |
| #Post#: 18486-------------------------------------------------- | |
| Re: Mandy | |
| By: espacekiller Date: December 24, 2014, 3:43 pm | |
| --------------------------------------------------------- | |
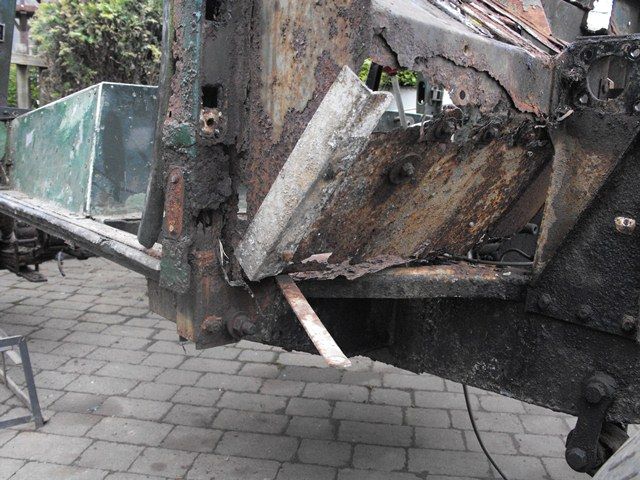
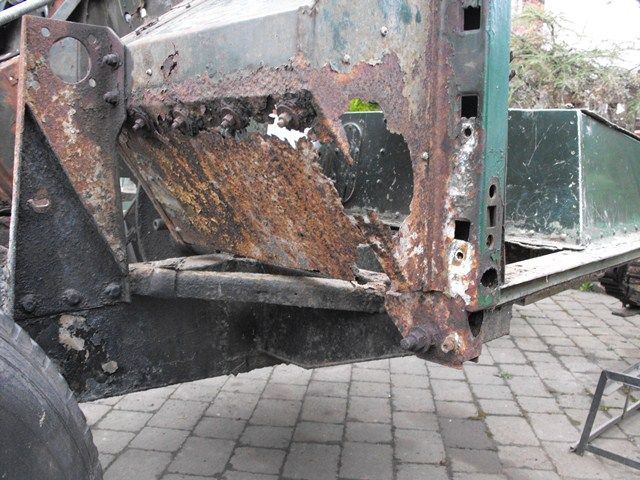
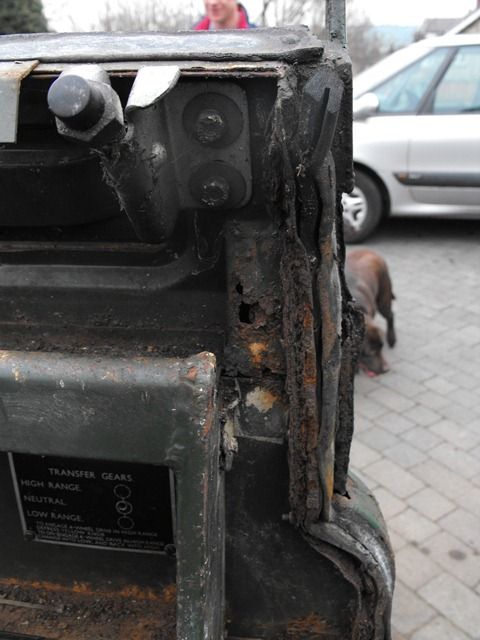
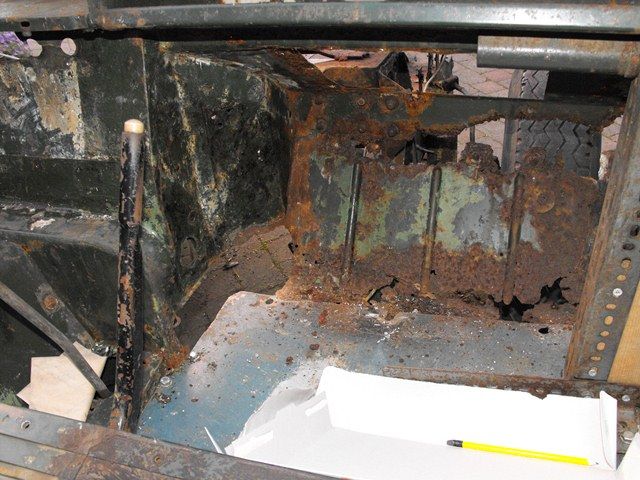
| The Bulkhead | |
| Once i got it stripped I could get a good look at the bulkhead, | |
| I was compltely out faced by what I saw :starsI have included | |
| lots of pictures to show how bad it was and help inspire others. | |
| Holey cheese graters batman | |
| http://i965.photobucket.com/albums/ae131/my05pjn/1-1.jpg | |
| Foot odour prevention vents | |
| http://i965.photobucket.com/albums/ae131/my05pjn/2-1.jpg | |
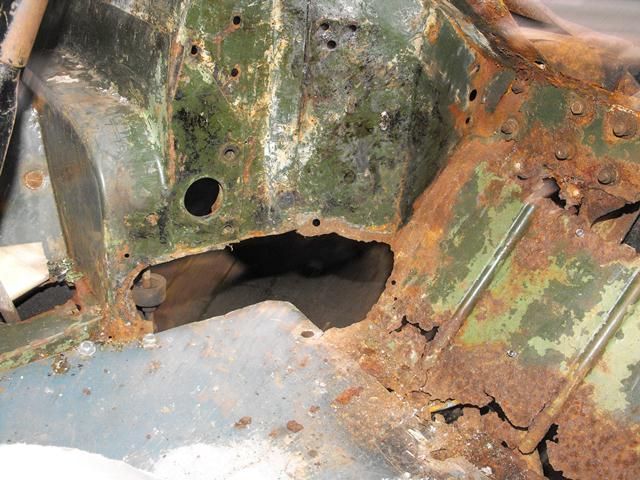
| This is the hole which had been gas axed out by the PO to fit in | |
| a 2.8 nissan :angry it had some bean can sections riveted over | |
| the hole, top main rail axed so is the suport gusset on the | |
| right. :thud | |
| http://i965.photobucket.com/albums/ae131/my05pjn/3-1.jpg | |
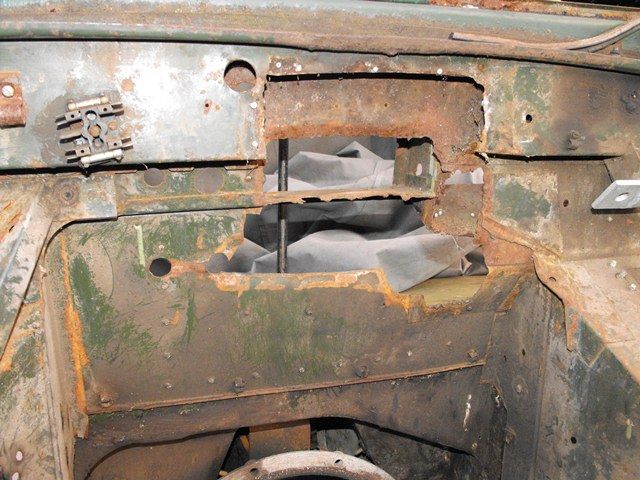
| Hole cut out of driver footwell. :shakinghead | |
| http://i965.photobucket.com/albums/ae131/my05pjn/4-1.jpg | |
| Door pillar, rust is only held together by more rust. :agh | |
| [img width=750 | |
| height=1000] | |
| http://i965.photobucket.com/albums/ae131/my05pjn/5-2.jpg[/img] | |
| top of pillar is as bad | |
| http://i965.photobucket.com/albums/ae131/my05pjn/6-1.jpg | |
| There was so much fresh air and wobbly bits i needed a reference | |
| piont for the footwells, Mr Jabawocky kindly :cheers donated me | |
| 2 4pot foot plates, I then scribed around his 6 pot plates and | |
| cut them out, giving me some 6 pot foot plates to use as a | |
| guide. | |
| http://i965.photobucket.com/albums/ae131/my05pjn/7-1.jpg | |
| The drivers pillar was so bad I decided :coffee to brace it in | |
| position before I removed the screen and other bits holding it | |
| in position. The wooden blocks line up exactly with the door | |
| pillar edge, the hinge bolt centres are lined through with a | |
| square on to the block so i could get the new pillar in the | |
| correct position. | |
| [img width=755 | |
| height=1000] | |
| http://i965.photobucket.com/albums/ae131/my05pjn/9.jpg[/img] | |
| I also added the two M12 threaded rods to brace the top of the | |
| bulkhead in the correct vertical position before i removed the | |
| screen. | |
| [img width=1000 | |
| height=677] | |
| http://i965.photobucket.com/albums/ae131/my05pjn/8-1.jpg[/img] | |
| Top of drivers door pillar was shot I just kept cutting more | |
| back, but eventually got to solid metal. | |
| http://i965.photobucket.com/albums/ae131/my05pjn/10.jpg | |
| More to follow. | |
| #Post#: 18488-------------------------------------------------- | |
| Re: Mandy | |
| By: espacekiller Date: December 24, 2014, 3:45 pm | |
| --------------------------------------------------------- | |
| The Bulkhead | |
| Once i got it stripped I could get a good look at the bulkhead, | |
| I was compltely out faced by what I saw :starsI have included | |
| lots of pictures to show how bad it was and help inspire others. | |
| Holey cheese graters batman | |
| http://i965.photobucket.com/albums/ae131/my05pjn/1-1.jpg | |
| Foot odour prevention vents | |
| http://i965.photobucket.com/albums/ae131/my05pjn/2-1.jpg | |
| This is the hole which had been gas axed out by the PO to fit in | |
| a 2.8 nissan :angry it had some bean can sections riveted over | |
| the hole, top main rail axed so is the suport gusset on the | |
| right. :thud | |
| http://i965.photobucket.com/albums/ae131/my05pjn/3-1.jpg | |
| Hole cut out of driver footwell. :shakinghead | |
| http://i965.photobucket.com/albums/ae131/my05pjn/4-1.jpg | |
| Door pillar, rust is only held together by more rust. :agh | |
| [img width=750 | |
| height=1000] | |
| http://i965.photobucket.com/albums/ae131/my05pjn/5-2.jpg[/img] | |
| top of pillar is as bad | |
| http://i965.photobucket.com/albums/ae131/my05pjn/6-1.jpg | |
| There was so much fresh air and wobbly bits i needed a reference | |
| piont for the footwells, Mr Jabawocky kindly :cheers donated me | |
| 2 4pot foot plates, I then scribed around his 6 pot plates and | |
| cut them out, giving me some 6 pot foot plates to use as a | |
| guide. | |
| http://i965.photobucket.com/albums/ae131/my05pjn/7-1.jpg | |
| The drivers pillar was so bad I decided :coffee to brace it in | |
| position before I removed the screen and other bits holding it | |
| in position. The wooden blocks line up exactly with the door | |
| pillar edge, the hinge bolt centres are lined through with a | |
| square on to the block so i could get the new pillar in the | |
| correct position. | |
| [img width=755 | |
| height=1000] | |
| http://i965.photobucket.com/albums/ae131/my05pjn/9.jpg[/img] | |
| I also added the two M12 threaded rods to brace the top of the | |
| bulkhead in the correct vertical position before i removed the | |
| screen. | |
| [img width=1000 | |
| height=677] | |
| http://i965.photobucket.com/albums/ae131/my05pjn/8-1.jpg[/img] | |
| Top of drivers door pillar was shot I just kept cutting more | |
| back, but eventually got to solid metal. | |
| http://i965.photobucket.com/albums/ae131/my05pjn/10.jpg | |
| More to follow. | |
| #Post#: 18489-------------------------------------------------- | |
| Re: Mandy | |
| By: espacekiller Date: December 24, 2014, 3:46 pm | |
| --------------------------------------------------------- | |
| The Bulkhead | |
| Once i got it stripped I could get a good look at the bulkhead, | |
| I was compltely out faced by what I saw :starsI have included | |
| lots of pictures to show how bad it was and help inspire others. | |
| Holey cheese graters batman | |
| http://i965.photobucket.com/albums/ae131/my05pjn/1-1.jpg | |
| Foot odour prevention vents | |
| http://i965.photobucket.com/albums/ae131/my05pjn/2-1.jpg | |
| This is the hole which had been gas axed out by the PO to fit in | |
| a 2.8 nissan :angry it had some bean can sections riveted over | |
| the hole, top main rail axed so is the suport gusset on the | |
| right. :thud | |
| http://i965.photobucket.com/albums/ae131/my05pjn/3-1.jpg | |
| Hole cut out of driver footwell. :shakinghead | |
| http://i965.photobucket.com/albums/ae131/my05pjn/4-1.jpg | |
| Door pillar, rust is only held together by more rust. :agh | |
| [img width=750 | |
| height=1000] | |
| http://i965.photobucket.com/albums/ae131/my05pjn/5-2.jpg[/img] | |
| top of pillar is as bad | |
| http://i965.photobucket.com/albums/ae131/my05pjn/6-1.jpg | |
| There was so much fresh air and wobbly bits i needed a reference | |
| piont for the footwells, Mr Jabawocky kindly :cheers donated me | |
| 2 4pot foot plates, I then scribed around his 6 pot plates and | |
| cut them out, giving me some 6 pot foot plates to use as a | |
| guide. | |
| http://i965.photobucket.com/albums/ae131/my05pjn/7-1.jpg | |
| The drivers pillar was so bad I decided :coffee to brace it in | |
| position before I removed the screen and other bits holding it | |
| in position. The wooden blocks line up exactly with the door | |
| pillar edge, the hinge bolt centres are lined through with a | |
| square on to the block so i could get the new pillar in the | |
| correct position. | |
| [img width=755 | |
| height=1000] | |
| http://i965.photobucket.com/albums/ae131/my05pjn/9.jpg[/img] | |
| I also added the two M12 threaded rods to brace the top of the | |
| bulkhead in the correct vertical position before i removed the | |
| screen. | |
| [img width=1000 | |
| height=677] | |
| http://i965.photobucket.com/albums/ae131/my05pjn/8-1.jpg[/img] | |
| Top of drivers door pillar was shot I just kept cutting more | |
| back, but eventually got to solid metal. | |
| http://i965.photobucket.com/albums/ae131/my05pjn/10.jpg | |
| More to follow. | |
| #Post#: 18490-------------------------------------------------- | |
| Re: Mandy | |
| By: espacekiller Date: December 24, 2014, 3:48 pm | |
| --------------------------------------------------------- | |
| Just a short update showing t'other door post, this side was | |
| much more solid and as i had already done one side seemed to go | |
| in easily. | |
| [img width=601 | |
| height=1000] | |
| http://i965.photobucket.com/albums/ae131/my05pjn/c1.jpg[/img] | |
| Had a few issues with the repair panel hinge holes, they did not | |
| line up with what had been there, I ended up slotting the top | |
| pillar holes slightly to get it to line up. | |
| [img width=632 | |
| height=1000] | |
| http://i965.photobucket.com/albums/ae131/my05pjn/c2.jpg[/img] | |
| Welding is improving a bit now getting a feel for it again. | |
| [img width=613 | |
| height=1000] | |
| http://i965.photobucket.com/albums/ae131/my05pjn/c3.jpg[/img] | |
| finished off flush with an 80 grit flexible sanding disc in the | |
| grinder, i love the way this works you can get a really nice | |
| finish. | |
| [img width=934 | |
| height=1000] | |
| http://i965.photobucket.com/albums/ae131/my05pjn/c4.jpg[/img] | |
| More to follow next to tacke the fudgedaboutwith bulkhead centre | |
| section. | |
| #Post#: 18491-------------------------------------------------- | |
| Re: Mandy | |
| By: espacekiller Date: December 24, 2014, 3:49 pm | |
| --------------------------------------------------------- | |
| Drivers inner footwell repaired | |
| [img width=1000 | |
| height=710] | |
| http://i965.photobucket.com/albums/ae131/my05pjn/bulkhead/d7.jpg[/img] | |
| Now to start on this *&%^$ mess, biggest issue was I didn't know | |
| what it should look like, eventually I found a good picture of | |
| each side on the internet. | |
| [IMG] | |
| http://i965.photobucket.com/albums/ae131/my05pjn/bulkhead/b1.jpg[/img] | |
| Rebuilding the dash from the inside, access was awkward | |
| [img width=1000 | |
| height=750] | |
| http://i965.photobucket.com/albums/ae131/my05pjn/bulkhead/d1.jpg[/img] | |
| Top rail was repaired using thicker guage steel as the repair | |
| needed to be strong, took some bending! | |
| [img width=1000 | |
| height=685] | |
| http://i965.photobucket.com/albums/ae131/my05pjn/bulkhead/d2.jpg[/img] | |
| 6 pot dash panel made from scaling off a photograph on the | |
| internet. | |
| [img width=1000 | |
| height=750] | |
| http://i965.photobucket.com/albums/ae131/my05pjn/bulkhead/d21.jpg[/img] | |
| Thats a BIG hole all clean ready for new panels | |
| [img width=1000 | |
| height=646] | |
| http://i965.photobucket.com/albums/ae131/my05pjn/bulkhead/d4.jpg[/img] | |
| New Repair panels made | |
| [img width=1000 | |
| height=614] | |
| http://i965.photobucket.com/albums/ae131/my05pjn/bulkhead/d5.jpg[/img] | |
| Welding finished note new corner gusset | |
| [img width=1000 | |
| height=753] | |
| http://i965.photobucket.com/albums/ae131/my05pjn/bulkhead/d6.jpg[/img] | |
| Grit blasted bulkhead ready for Galvanising | |
| [img width=1000 | |
| height=478] | |
| http://i965.photobucket.com/albums/ae131/my05pjn/bulkhead/e1.jpg[/img] | |
| [img width=1000 | |
| height=525] | |
| http://i965.photobucket.com/albums/ae131/my05pjn/bulkhead/e2.jpg[/img] | |
| Repairs looking OK, grit blasing revaled a few pin holes, on the | |
| up side most of these where filled with zinc during the | |
| Galvanising. | |
| [img width=1000 | |
| height=723] | |
| http://i965.photobucket.com/albums/ae131/my05pjn/bulkhead/e3.jpg[/img] | |
| to be continued... | |
| #Post#: 18494-------------------------------------------------- | |
| Re: Mandy | |
| By: espacekiller Date: December 24, 2014, 3:53 pm | |
| --------------------------------------------------------- | |
| One shiney galvanised bulkhead, waiting for some better weather | |
| and some paint. On the whole it galvanised OK it has warped on | |
| the footwells slightly. | |
| [img width=1000 | |
| height=620] | |
| http://i965.photobucket.com/albums/ae131/my05pjn/bulkhead/f1.jpg[/img] | |
| Zinc run and raised welds. | |
| [img width=958 | |
| height=1000] | |
| http://i965.photobucket.com/albums/ae131/my05pjn/bulkhead/f2.jpg[/img] | |
| pin holes filled with zinc | |
| [img width=1000 | |
| height=709] | |
| http://i965.photobucket.com/albums/ae131/my05pjn/bulkhead/f4.jpg[/img] | |
| Raised welds where the weld has taken on more zinc than the | |
| surrounding metal, this is to do with the silicon content of the | |
| steel, these welds where perfectly flat before galving. | |
| [img width=1000 | |
| height=992] | |
| http://i965.photobucket.com/albums/ae131/my05pjn/bulkhead/f3.jpg[/img] | |
| Zinc has filled most of the panel overlaps which should help | |
| prevent rust, worth spending time cleaning and closing the gaps | |
| before galving. | |
| [img width=1000 | |
| height=636] | |
| http://i965.photobucket.com/albums/ae131/my05pjn/bulkhead/f5.jpg[/img] | |
| On the whole I am happy with the galvanising, it fits what i | |
| want which is function and should look OK with some careful | |
| paintwork high build primer etc... | |
| If i was doing it again I would probably still get it galvanised | |
| in this case, if it was a rare or or very original vehicle I | |
| would probably look at other options like zinc spraying. | |
| ***************************************************** | |
| Next Page |
![http://i965.photobucket.com/albums/ae131/my05pjn/Land%20Rover/DSCF3070.jpg[/img]](http://i965.photobucket.com/albums/ae131/my05pjn/Land%20Rover/DSCF3070.jpg[/img])
![http://i965.photobucket.com/albums/ae131/my05pjn/Land%20Rover/DSCF3002.jpg[/img]](http://i965.photobucket.com/albums/ae131/my05pjn/Land%20Rover/DSCF3002.jpg[/img])
![http://i965.photobucket.com/albums/ae131/my05pjn/Land%20Rover/DSCF3028.jpg[/img]](http://i965.photobucket.com/albums/ae131/my05pjn/Land%20Rover/DSCF3028.jpg[/img])
![http://i965.photobucket.com/albums/ae131/my05pjn/Land%20Rover/DSCF3011.jpg[/img]](http://i965.photobucket.com/albums/ae131/my05pjn/Land%20Rover/DSCF3011.jpg[/img])
![http://i965.photobucket.com/albums/ae131/my05pjn/Land%20Rover/DSCF3051.jpg[/img]](http://i965.photobucket.com/albums/ae131/my05pjn/Land%20Rover/DSCF3051.jpg[/img])
![http://i965.photobucket.com/albums/ae131/my05pjn/Land%20Rover/DSCF3129.jpg[/img]](http://i965.photobucket.com/albums/ae131/my05pjn/Land%20Rover/DSCF3129.jpg[/img])
![http://i965.photobucket.com/albums/ae131/my05pjn/Land%20Rover/DSCF3139.jpg[/img]](http://i965.photobucket.com/albums/ae131/my05pjn/Land%20Rover/DSCF3139.jpg[/img])
![http://i965.photobucket.com/albums/ae131/my05pjn/1.jpg[/img]](http://i965.photobucket.com/albums/ae131/my05pjn/1.jpg[/img])
![http://i965.photobucket.com/albums/ae131/my05pjn/2.jpg[/img]](http://i965.photobucket.com/albums/ae131/my05pjn/2.jpg[/img])
![http://i965.photobucket.com/albums/ae131/my05pjn/3.jpg[/img]](http://i965.photobucket.com/albums/ae131/my05pjn/3.jpg[/img])
![http://i965.photobucket.com/albums/ae131/my05pjn/4.jpg[/img]](http://i965.photobucket.com/albums/ae131/my05pjn/4.jpg[/img])
![http://i965.photobucket.com/albums/ae131/my05pjn/5-1.jpg[/img]](http://i965.photobucket.com/albums/ae131/my05pjn/5-1.jpg[/img])
![http://i965.photobucket.com/albums/ae131/my05pjn/7.jpg[/img]](http://i965.photobucket.com/albums/ae131/my05pjn/7.jpg[/img])
![http://i965.photobucket.com/albums/ae131/my05pjn/8.jpg[/img]](http://i965.photobucket.com/albums/ae131/my05pjn/8.jpg[/img])
![http://i965.photobucket.com/albums/ae131/my05pjn/5-2.jpg[/img]](http://i965.photobucket.com/albums/ae131/my05pjn/5-2.jpg[/img])
![http://i965.photobucket.com/albums/ae131/my05pjn/9.jpg[/img]](http://i965.photobucket.com/albums/ae131/my05pjn/9.jpg[/img])
![http://i965.photobucket.com/albums/ae131/my05pjn/8-1.jpg[/img]](http://i965.photobucket.com/albums/ae131/my05pjn/8-1.jpg[/img])
![http://i965.photobucket.com/albums/ae131/my05pjn/c1.jpg[/img]](http://i965.photobucket.com/albums/ae131/my05pjn/c1.jpg[/img])
![http://i965.photobucket.com/albums/ae131/my05pjn/c2.jpg[/img]](http://i965.photobucket.com/albums/ae131/my05pjn/c2.jpg[/img])
![http://i965.photobucket.com/albums/ae131/my05pjn/c3.jpg[/img]](http://i965.photobucket.com/albums/ae131/my05pjn/c3.jpg[/img])
![http://i965.photobucket.com/albums/ae131/my05pjn/c4.jpg[/img]](http://i965.photobucket.com/albums/ae131/my05pjn/c4.jpg[/img])
![http://i965.photobucket.com/albums/ae131/my05pjn/bulkhead/d7.jpg[/img]](http://i965.photobucket.com/albums/ae131/my05pjn/bulkhead/d7.jpg[/img])
![http://i965.photobucket.com/albums/ae131/my05pjn/bulkhead/b1.jpg[/img]](http://i965.photobucket.com/albums/ae131/my05pjn/bulkhead/b1.jpg[/img])
![http://i965.photobucket.com/albums/ae131/my05pjn/bulkhead/d1.jpg[/img]](http://i965.photobucket.com/albums/ae131/my05pjn/bulkhead/d1.jpg[/img])
![http://i965.photobucket.com/albums/ae131/my05pjn/bulkhead/d2.jpg[/img]](http://i965.photobucket.com/albums/ae131/my05pjn/bulkhead/d2.jpg[/img])
![http://i965.photobucket.com/albums/ae131/my05pjn/bulkhead/d21.jpg[/img]](http://i965.photobucket.com/albums/ae131/my05pjn/bulkhead/d21.jpg[/img])
![http://i965.photobucket.com/albums/ae131/my05pjn/bulkhead/d4.jpg[/img]](http://i965.photobucket.com/albums/ae131/my05pjn/bulkhead/d4.jpg[/img])
![http://i965.photobucket.com/albums/ae131/my05pjn/bulkhead/d5.jpg[/img]](http://i965.photobucket.com/albums/ae131/my05pjn/bulkhead/d5.jpg[/img])
![http://i965.photobucket.com/albums/ae131/my05pjn/bulkhead/d6.jpg[/img]](http://i965.photobucket.com/albums/ae131/my05pjn/bulkhead/d6.jpg[/img])
![http://i965.photobucket.com/albums/ae131/my05pjn/bulkhead/e1.jpg[/img]](http://i965.photobucket.com/albums/ae131/my05pjn/bulkhead/e1.jpg[/img])
![http://i965.photobucket.com/albums/ae131/my05pjn/bulkhead/e2.jpg[/img]](http://i965.photobucket.com/albums/ae131/my05pjn/bulkhead/e2.jpg[/img])
![http://i965.photobucket.com/albums/ae131/my05pjn/bulkhead/e3.jpg[/img]](http://i965.photobucket.com/albums/ae131/my05pjn/bulkhead/e3.jpg[/img])
![http://i965.photobucket.com/albums/ae131/my05pjn/bulkhead/f1.jpg[/img]](http://i965.photobucket.com/albums/ae131/my05pjn/bulkhead/f1.jpg[/img])
![http://i965.photobucket.com/albums/ae131/my05pjn/bulkhead/f2.jpg[/img]](http://i965.photobucket.com/albums/ae131/my05pjn/bulkhead/f2.jpg[/img])
![http://i965.photobucket.com/albums/ae131/my05pjn/bulkhead/f4.jpg[/img]](http://i965.photobucket.com/albums/ae131/my05pjn/bulkhead/f4.jpg[/img])
![http://i965.photobucket.com/albums/ae131/my05pjn/bulkhead/f3.jpg[/img]](http://i965.photobucket.com/albums/ae131/my05pjn/bulkhead/f3.jpg[/img])
![http://i965.photobucket.com/albums/ae131/my05pjn/bulkhead/f5.jpg[/img]](http://i965.photobucket.com/albums/ae131/my05pjn/bulkhead/f5.jpg[/img])