| Return Create A Forum - Home | |
| --------------------------------------------------------- | |
| Old Leafsprung Land Rovers | |
| https://ollr.createaforum.com | |
| --------------------------------------------------------- | |
| ***************************************************** | |
| Return to: Technical Archive | |
| ***************************************************** | |
| #Post#: 3622-------------------------------------------------- | |
| KWD's Megajolt Ignition | |
| By: Goose Date: January 12, 2012, 2:17 am | |
| --------------------------------------------------------- | |
| So, after being inspired by OTLY, ex of this parish, this is a | |
| conversion I have been meaning to do for some time, but i'm only | |
| just getting round to it. I aim to keep a record of the | |
| instalation, and the results here. This will be going onto my | |
| 2.5 petrol engine, which is running a 2.25 timing cover etc. | |
| What is it? Well, as some of you will know, there is a another | |
| type of fuel available, other than diesel. It's called Petrol, | |
| because it's made from refined pets. This type of fuel | |
| requires electricty to make sparks, in order for it to explode | |
| at the right time and produce power. Making this spark happen at | |
| the correct time, is really rather difficult, and in the old | |
| days they used a device called a dizzytributer. This device is | |
| full of points, condensors, rotor arms and centrifugal weights | |
| and advances. In the olden days they were accepted as being | |
| adequate. Alas, these days they seem to be made from cheese, | |
| and wear out and break often. Yes, a good one is fine for a land | |
| rover engine, but I suspect there should be a bit more power and | |
| economy to be had from having a stronger, more precise and | |
| accuratly timed spark. | |
| As my dizzy is a useless peice of badly made shite, I have | |
| decided to retrofit the ignition system off of an old 1990's | |
| ford. This ford system is called an EDIS system, which stands | |
| for a string of pretty dull words. It does away with the | |
| distributor entirely, and instead it has a magnetic pickup | |
| mounted to the crank pulley. This sensor reads the position of | |
| the crank using a toothed wheel, which is designed with one | |
| tooth missing. As the teeth pass by the sensor, something | |
| called the Hall effect (After it's discover, the Emeritus | |
| Professor of Engineering DaveH). What this means is, that as the | |
| teeth pass the sensor, a electrical pulse happens. This pulse | |
| is fed into some electronics, and then lots of magic happens, | |
| which I won't bore you with, and sparks happen in the correct | |
| places. This also means that you no longer have any mechanical | |
| slop and wear between the crank, camshaft and dizzy drive to | |
| worry about. | |
| The Megajolt itself, is a tiny programable box, that interfaces | |
| with the EDIS system, and allows you to create and customise | |
| your own igniton maps, so you can very finely tune your petrol | |
| engine, and get the most power and efficency out of it. It will | |
| also allow you to select between 2 maps, so you can have one for | |
| petrol and one for LPG. It does a multitute of other things too. | |
| All of this means, that I will no longer need a distributor, and | |
| I will no longer have to muck about with points and timing. But | |
| "Hah!" I hear you say, "You've now got a load of complicated | |
| electronics to go wrong instead, you fool!" Well, yes, I | |
| suppose. But the actual system itself is pretty simple, and | |
| there are no moving parts to go wrong. If the megajolt goes | |
| wrong, then the EDIS system simply switches into "limp home" | |
| mode and sets the timing to a static amount. And you can leave | |
| the distributor in place, so you can always just swap the HT | |
| leads over if you must, But I would hope the megajolt and EDIS | |
| system should be far more reliable than the pants �19 | |
| distributors you can buy are. | |
| I appreciate this system isn't for everyone, but electronics is | |
| what I do, and I fancied the challenge, and I am keen to see if | |
| there is any improvement, or if I'm about to waste a few weeks | |
| of work. So if you're interested, read on.... | |
| The bits! | |
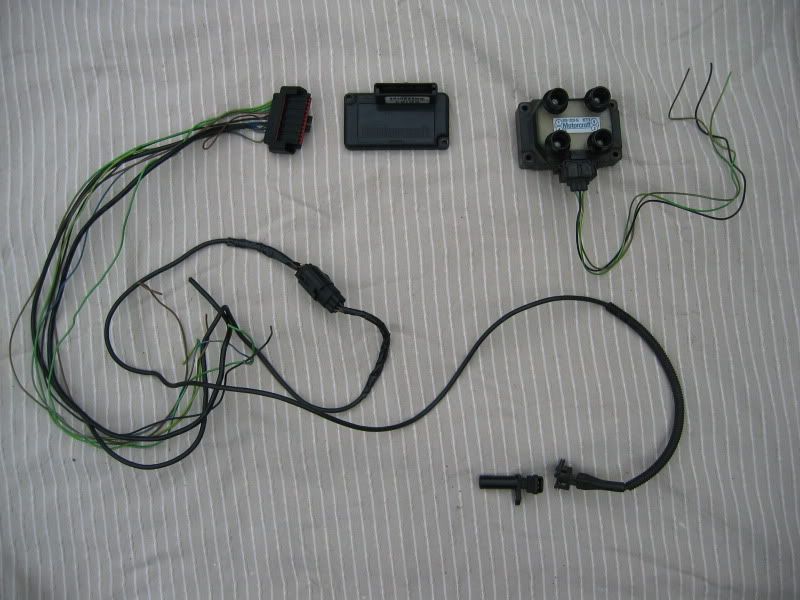
| This is the basic EDIS system, as it is when ripped out of some | |
| old Ford: | |
| http://i654.photobucket.com/albums/uu264/Goose76UK/Megajolt/IMG_2613.jpg | |
| On the left, is the connector for the EDIS module, along with a | |
| section of the required wiring loom. In the middle, the big | |
| plastic brick thing is the EDIS module. On the right, is the | |
| coil pack. This has 4 HT lead sockets, for each cylinder. At | |
| the bottom is the "VR sensor" which is what reads the position | |
| of the crank shaft. | |
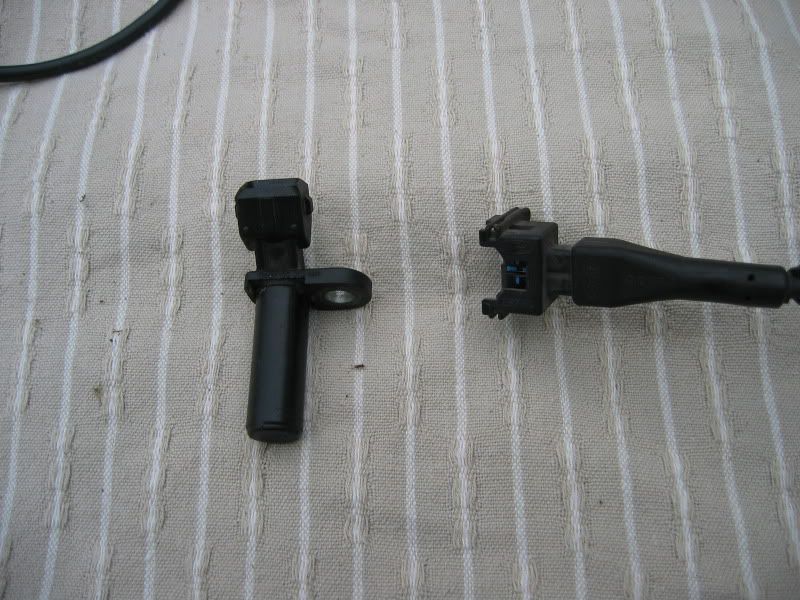
| http://i654.photobucket.com/albums/uu264/Goose76UK/Megajolt/IMG_2615.jpg | |
| A closer look at the VR sensor, it's just a plastic lump with a | |
| magnet and a coil inside. | |
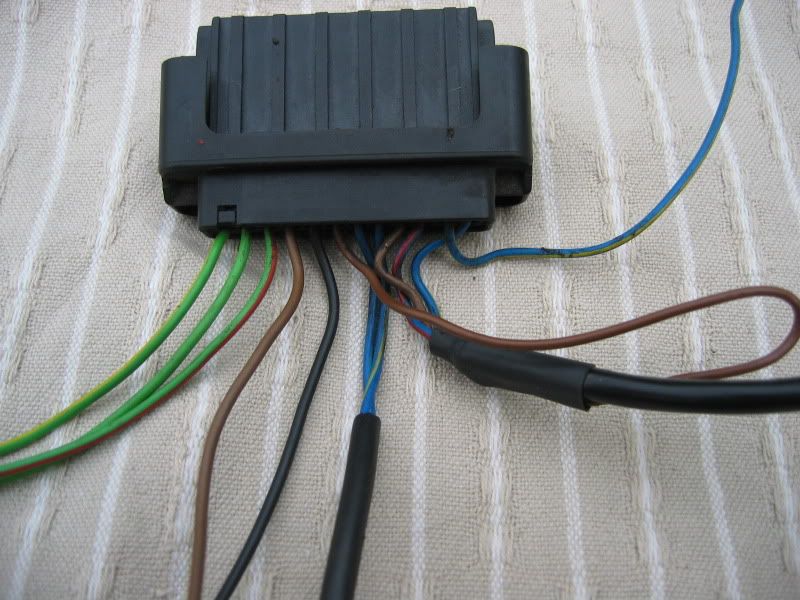
| http://i654.photobucket.com/albums/uu264/Goose76UK/Megajolt/IMG_2616.jpg | |
| The EDIS connector. Starting at the left, we have 3 wires for | |
| the coil pack and the tacho. The brown wire is ground, and the | |
| black is +12v (Ford wiring colours are retarded) The next 2 | |
| blueish wires are for the VR sensor, and the rest go to the | |
| megajolt. | |
| Speaking of which, | |
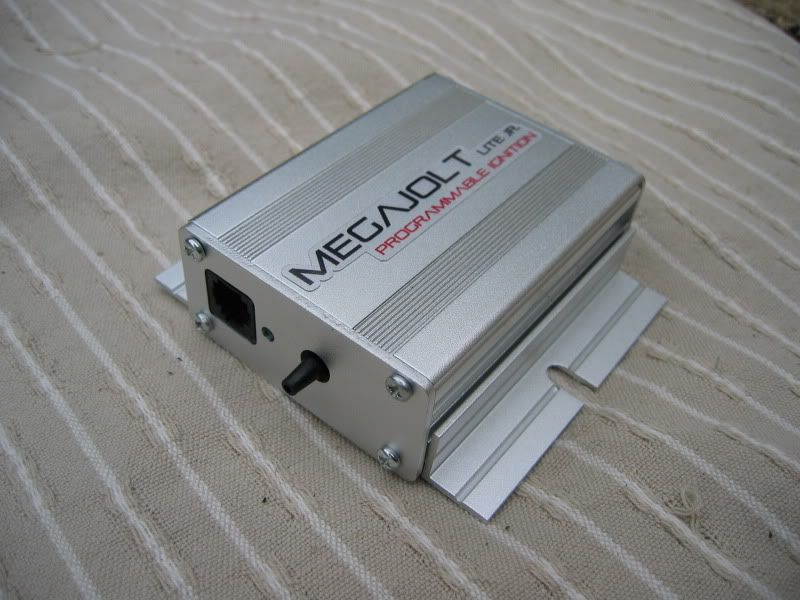
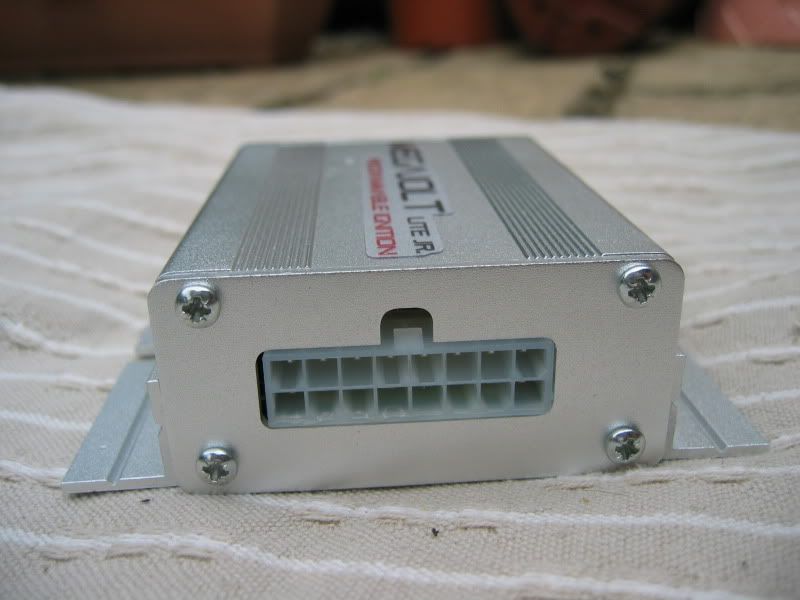
| http://i654.photobucket.com/albums/uu264/Goose76UK/Megajolt/IMG_2619.jpg | |
| Here is the wee beasty, all assembled. The thing that looks | |
| like a phone socket is where you plug your laptop, and the other | |
| thing is the vacuum advance from the manifold. | |
| http://i654.photobucket.com/albums/uu264/Goose76UK/Megajolt/IMG_2622.jpg | |
| On the back is a complicated looking connector, that allows you | |
| to interface with pretty much everything, and also connects to | |
| the EDIS system (Although, you only acually need 2 wires | |
| connected between the EDIS and megajolt) | |
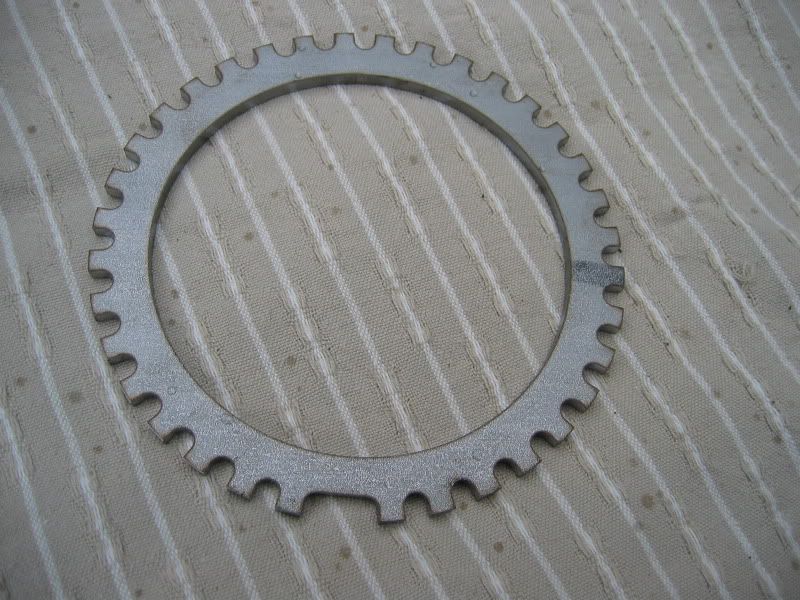
| Next, you need to mount the trigger wheel: | |
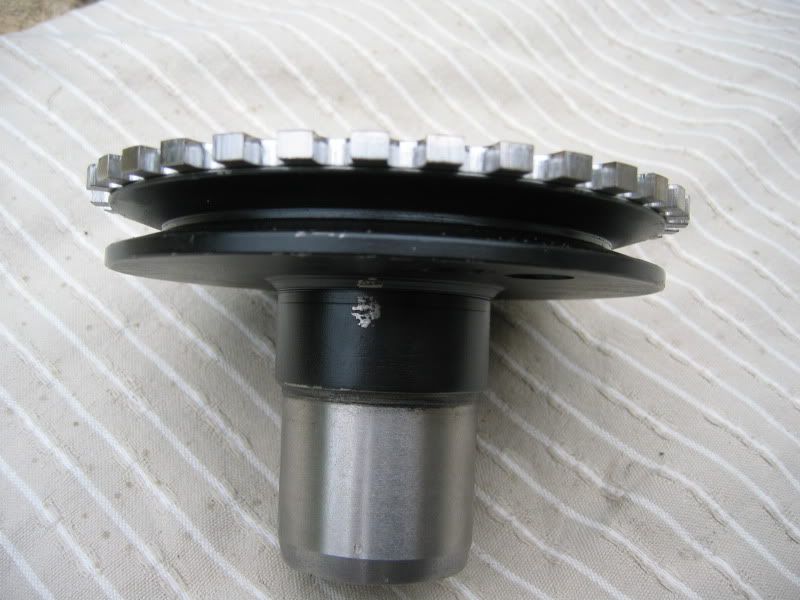
| http://i654.photobucket.com/albums/uu264/Goose76UK/Megajolt/IMG_2626.jpg | |
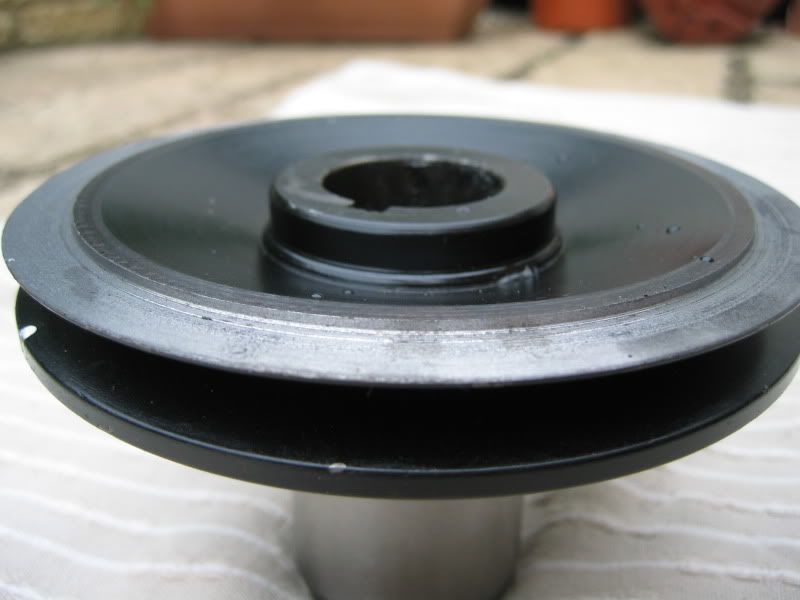
| .... to the crank pulley: | |
| http://i654.photobucket.com/albums/uu264/Goose76UK/Megajolt/IMG_2625.jpg | |
| I took my crank pulley to a chap called Bob, who is a very | |
| clever man who is an automotive engineer. (Cheers FenTiger for | |
| putting me in touch with him). Whilst we drank tea, and bob | |
| regailed me with stories of making wooden pistons to get out of | |
| the desert in Africa, he trued the pulley up on the lathe, and | |
| spun a resess into it, to allow the toothed trigger wheel to fit | |
| centrally, with mimimum run out. He did this all the old | |
| fashioned way, and needless to say it fits perfectly. Top bloke. | |
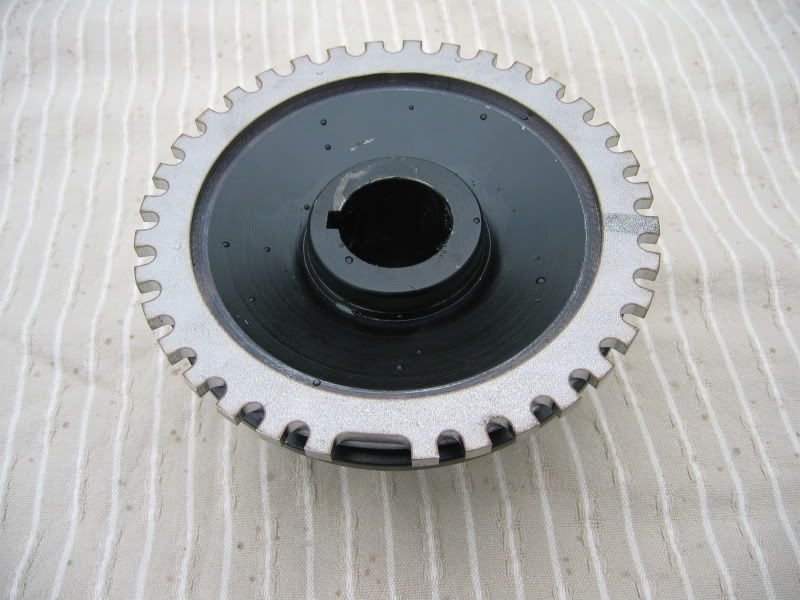
| http://i654.photobucket.com/albums/uu264/Goose76UK/Megajolt/IMG_2629.jpg | |
| http://i654.photobucket.com/albums/uu264/Goose76UK/Megajolt/IMG_2632.jpg | |
| Once I have worked out the correct position, this will be welded | |
| on. | |
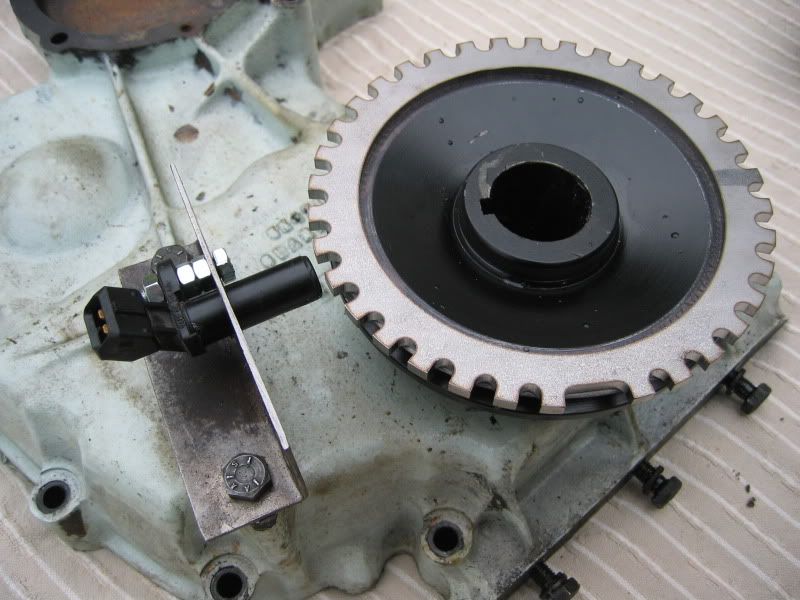
| Next, I made up a rudimentary precision engineered bracket for | |
| the VR sensor. This was made from a rusty old bit of steel | |
| found in a skip, and bent into a right angle. | |
| Trial fit on spare timing cover, shows it should work ok, | |
| hopefully: | |
| http://i654.photobucket.com/albums/uu264/Goose76UK/Megajolt/IMG_2637.jpg | |
| Conveniantly, there are 2 threaded holes on the timing cover, | |
| which are pefect for mounting the sensor onto. | |
| Thats all so far, I hope to get more done in the week! | |
| So now you're all really enthused (or appalled) you'd maybe not | |
| want to know where you can buy all these bits! | |
| Well, eBay is where I bought the second hand EDIS system. You | |
| want one thats still complete with the nice waterproof ford | |
| connectors if possible, rather than one someones butchered with | |
| side cutters. | |
| The megajolt box is available from | |
| http://www.autosportlabs.net/Main_Page | |
| http://www.autosportlabs.net/Main_Page | |
| Which is in America. You | |
| can buy it as a kit form, or readily assembled for a bit more. | |
| The trigger wheel is from | |
| http://trigger-wheels.com | |
| http://trigger-wheels.com | |
| Who sell a wide range of wheels and | |
| parts (including ready made megajolt boxes) I have used the | |
| 5.75" ring wheel. | |
| I have yet to actually touch my land rover with this | |
| instalation, as the timing cover was a spare, and the pulley was | |
| a new one (my old one is wankered and leaking oil) from | |
| craddocks. So the next job is to get that bastard crank bolt | |
| undone, and get the existing timing cover (which is also fecked) | |
| off my engine. | |
| I'll keep you posted on my progress, and I hope at least some of | |
| you were not bored to sleep... | |
| :D | |
| #Post#: 3623-------------------------------------------------- | |
| Re: KWD's Megajolt Ignition | |
| By: Goose Date: January 12, 2012, 2:21 am | |
| --------------------------------------------------------- | |
| No photos tonight, as I forgot the camera. But I got a few bits | |
| done. The crank puley nut is off, using the wedge a bar on the | |
| chassis and blip the starter motor trick. | |
| I also made up a vacuum take off from the manifold, as the | |
| megajolt requires direct manifold pressure, rather than ported | |
| manifold pressure, which is what you get from the standard | |
| vacuum advance when taken from the carb. As described on the | |
| megajolt website: | |
| [quote]Most vacuum advance takeoff ports are designed in such a | |
| way that vacuum is measured through a hole, which is actually | |
| covered by the edge of the throttle plate at idle. That is | |
| called Ported Vacuum. That is done to cut off all vacuum advance | |
| at idle, which in turn slows the engine and makes it easier to | |
| achieve stable idle with the tiny throttle plate opening used at | |
| idle. Vacuum measured on such a port, therefore, has no vacuum | |
| at idle, moves to maximum vacuum just off idle, and then | |
| decreasing vacuum as the throttle is opened further. The | |
| discontinuity just off idle makes such a port awkward to deal | |
| with on the load map. | |
| You can test whether you have ported vacuum or not: pull the vac | |
| hose off the vacuum advance unit. With your finger over the end | |
| of the hose, you should feel vacuum with the engine revved above | |
| idle. Assuming yes, let the engine speed drop back to idle. Is | |
| there still vacuum? If not (most likely), that means you have | |
| ported vacuum, and should find another source of vacuum, | |
| somewhere on the manfold. [/quote] | |
| So I have used the take off that would be used for a brake | |
| servo. This should work perfectly. | |
| Other stuff I have done is to paint the timing cover (yes... I | |
| know..) and also start to work out where to locate the parts in | |
| the engine bay. I also managed to brand myself with an M5 bolt | |
| while cutting some down. | |
| The plan is to get everything ready to fit, and then swap over | |
| the pulley and timing cover in one go, without having to leave | |
| the engine open and exposed to dust/rain/chickens/etc on the | |
| farm. | |
| I'll head down after work tomorrow and get a bit more done | |
| hopefully. | |
| #Post#: 3624-------------------------------------------------- | |
| Re: KWD's Megajolt Ignition | |
| By: Goose Date: January 12, 2012, 2:21 am | |
| --------------------------------------------------------- | |
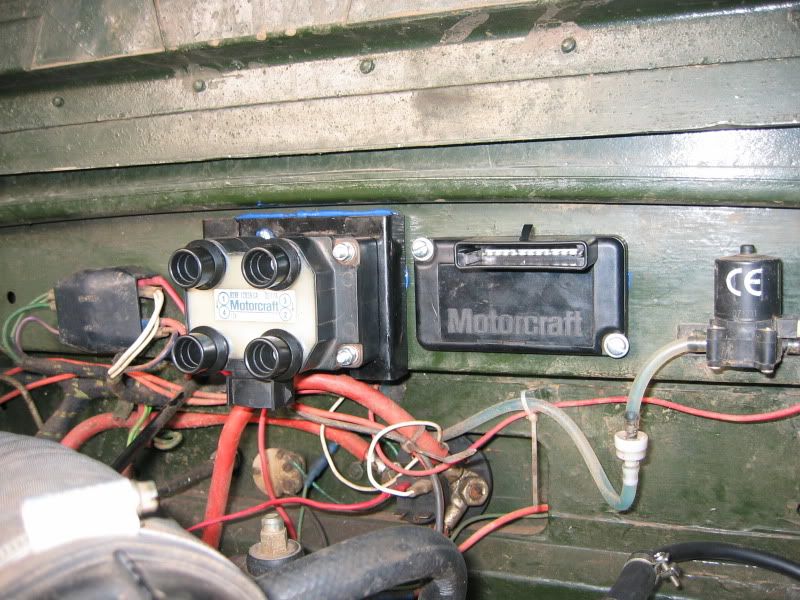
| Tonight I mounted up the coil pack and EDIS module to the | |
| bulkhead. I've mounted them up nice and high, in the hope they | |
| stay dry. Having said that, all the connectors are supposedly | |
| waterproof, so I am hopeful they should be better than your | |
| normal dizzy in the wet. | |
| http://i654.photobucket.com/albums/uu264/Goose76UK/Megajolt/IMG_2639.jpg | |
| No, i've not stuck it on with blue snot, that was just so I | |
| could line up the holes to drill for the screws that hold it to | |
| the bulkhead. | |
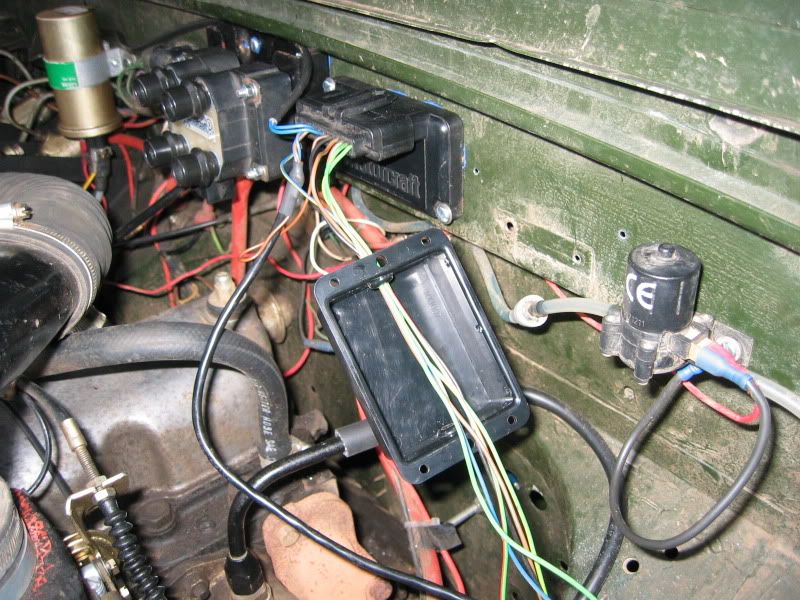
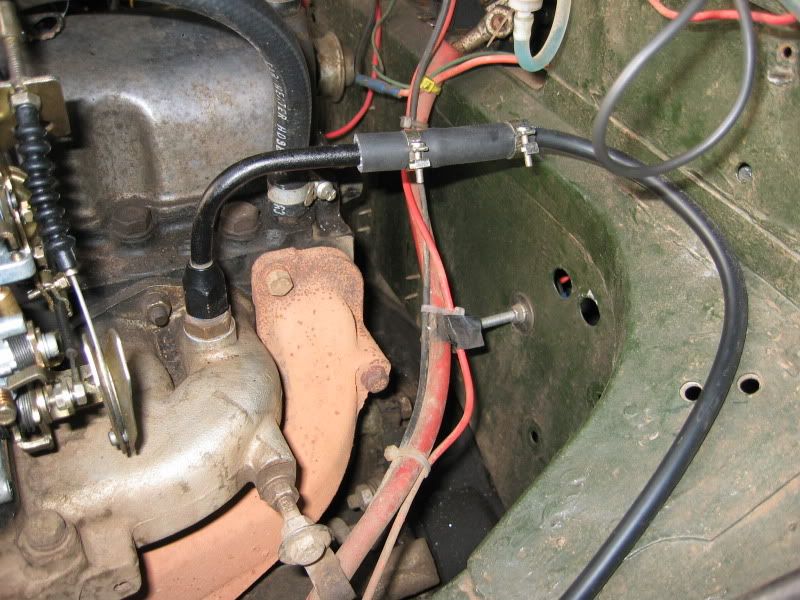
| I also made a start at the wiring. The plan is to run all of | |
| the wires into a plastic housing, where any connections will be. | |
| The idea behind this is to keep water off the connections, and | |
| to also neaten things up a bit. This is the box i'll be using: | |
| http://i654.photobucket.com/albums/uu264/Goose76UK/Megajolt/IMG_2641.jpg | |
| I plan to mount the megajolt box inside the cab, in the dash | |
| tray, to keep it safer from mud and shite. There are only a | |
| couple of wires, and the vacuum advance to pass through the | |
| bulkhead to the megajolt. | |
| Vaccum advance, bodged out of bits of pipe. Works well enough: | |
| http://i654.photobucket.com/albums/uu264/Goose76UK/Megajolt/IMG_2640.jpg | |
| I'll carry on with wring things up tommorow, and then come the | |
| weekend I'll get on with swapping the timing cover over for the | |
| new one. | |
| Cheers! | |
| #Post#: 3625-------------------------------------------------- | |
| Re: KWD's Megajolt Ignition | |
| By: Goose Date: January 12, 2012, 2:23 am | |
| --------------------------------------------------------- | |
| [quote]For the parts, what Ford's are we talking about - model / | |
| year? [/quote] | |
| These ones! And possibly others too. | |
| So, EDIS-4 is for 4cyl engines, EDIS-6 is for 6 cyl (V or | |
| straight), and EDIS-8 is for the V8 folks. | |
| EDIS-4 | |
| Ford Escort | |
| Ford Fiesta | |
| Mazda 121 | |
| Ford Escort | |
| Ford Sierra | |
| EDIS-6 | |
| Ford Ranger Pickup truck | |
| Mazda B-Series Pickup | |
| Ford Explorer | |
| Mazda Navajo | |
| Ford Aerostar | |
| Ford Scorpio 2.9 Cosworth | |
| Ford Mondeo V6 | |
| EDIS-8 | |
| Crown Victoria | |
| Mercury Grand Marquis | |
| Lincoln Town Car | |
| Ford Thunderbird | |
| Mercury Cougar | |
| Ford Mustang 5.0 | |
| [quote]can i just ask what happens when it all gets wet and | |
| muddy?[/quote] | |
| Well, i'll soon find out... | |
| Seriously though, as I mentioned earlier all the conenctions on | |
| the ford loom have rubber seals around them, and are supposedly | |
| water proof. Any additional connections I am making will be | |
| made inside a splash proof junction box, as shown above. The VR | |
| sensor is a sealed unit, and it's just a magnet. Water shouldn't | |
| really affect it. I am more worried about the toothed wheel | |
| picking up a lump of shit and clouting the sensor with it. The | |
| coil pack is a sealed unservicable unit, as is the EDIS module, | |
| so these shouldn't have a problem. The large connector on the | |
| EDIS module is a sealed plug too, and i'll be wrapping it up a | |
| bit better once i'm done. The megajolt unit is definately not | |
| waterproof, and for that reason it'll be mounted in the dash | |
| board, (mostly) out of harms way. I'm also considering filling | |
| it with jelly wax, which will waterproof it and keep moisture | |
| off the electronics. | |
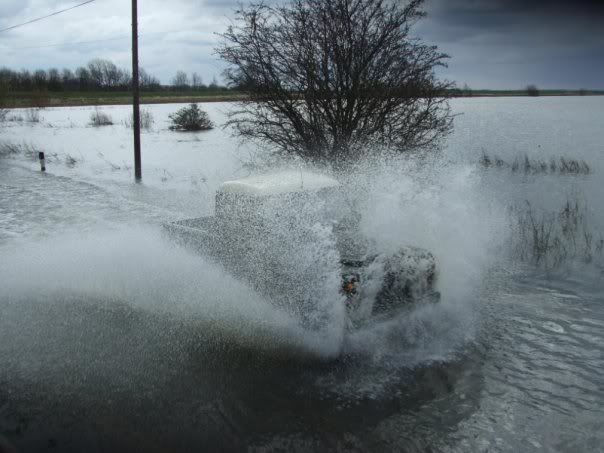
| I can't imagine it being any less waterproof than a dizzy, and I | |
| hope it should be more resiliant to water. If it does all go | |
| tits up, I'll look into mounting all the components into a | |
| waterproof box, but I hope this won't be needed. | |
| Having said that, the dizzy did cope with this act of stupidity: | |
| http://i654.photobucket.com/albums/uu264/Goose76UK/bits%20n%20bobs/n745570051_2… | |
| :lol: | |
| #Post#: 3626-------------------------------------------------- | |
| Re: KWD's Megajolt Ignition | |
| By: Goose Date: January 12, 2012, 2:26 am | |
| --------------------------------------------------------- | |
| [quote]I thought running EDIS for V8's was similar to the 4 | |
| cylinder version but it just ran a wasted spark. | |
| [/quote] | |
| The EDIS system is a wasted spark system anyway. I think for | |
| the V8 system you just have 2 coil packs. I guess the module | |
| must be slightly different too. But I've not seen one. There | |
| will be lots of information available on the Autolabs website | |
| though. | |
| http://www.autosportlabs.net/MegaJolt_Lite_Jr. | |
| http://www.autosportlabs.net/MegaJolt_Lite_Jr. | |
| [quote]when mine was petrol the dizzy coped very well in water | |
| if it didnt it dryed in 5 mins it seemed a little water was | |
| worse thaan lots as starting on damp days was its worst | |
| downfall. | |
| i like the idea i just like things as simple to fix and the less | |
| wires the better i think? depends what u want i supose | |
| [/quote] | |
| Cooper - To be honest, there really isn't a huge amount to go | |
| wrong. There are no moving parts, it's just electronics, and | |
| compared to modern ECU systems, it's very simple. And if they | |
| go wrong, then it's not too hard to replace. You can just swap | |
| the HT leads over to the distributor and run as normal if you | |
| need to. | |
| I appreciate it's not for everyone, but I work in Electronics, | |
| so I obviouslty find it easier to get my head round whats going | |
| on with it. It might turn out that i've wasted a couple of | |
| weeks and it's unreliable and rubbish. I really hope it isn't, | |
| it shouldn't be, but I won't know until I try! :) | |
| #Post#: 3627-------------------------------------------------- | |
| Re: KWD's Megajolt Ignition | |
| By: Goose Date: January 12, 2012, 2:27 am | |
| --------------------------------------------------------- | |
| [quote]How does the map switching work? can you switch between | |
| say a LPG and petrol map "manually" - or is it a case of | |
| plugging a laptop in and swapping them over?[/quote] | |
| Yes, you can switch over on the fly. There is a pin on the | |
| connector called the option pin. All you need to do is wire a | |
| switch to it, that pulls the pin high or low, to choose between | |
| ignition maps. | |
| #Post#: 3628-------------------------------------------------- | |
| Re: KWD's Megajolt Ignition | |
| By: Goose Date: January 12, 2012, 2:28 am | |
| --------------------------------------------------------- | |
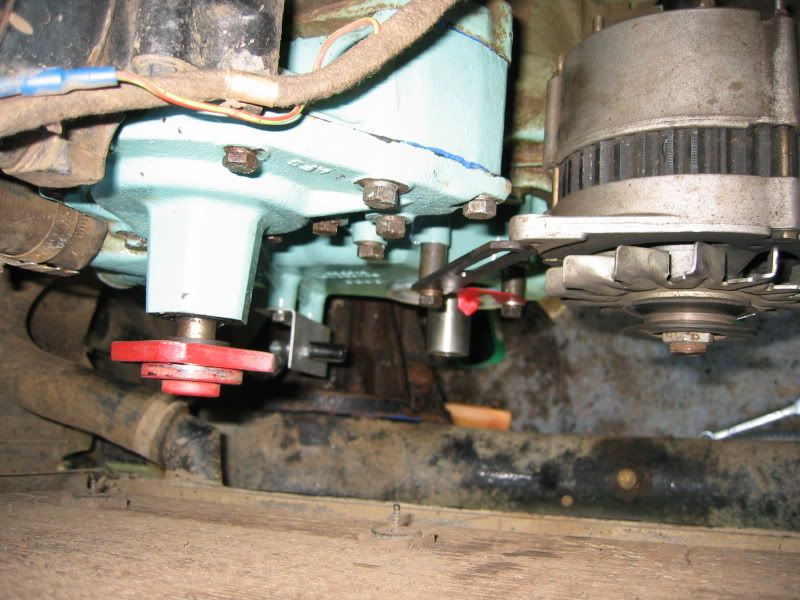
| Right, so it's in and done, and it rocks! :8): | |
| I had a mammoth session on it this weekend. Firstly, I set | |
| about swapping the timing cover over. This wasn't necessary for | |
| the install, but seeing as I had the crank pulley off, it seemed | |
| like a good time to do it, as the seal was leaking, and someone | |
| had stripped the threads on the holes for the sump bolts. So, | |
| alternator off, water pump off, crank pulley off, and then off | |
| with the timing cover. Fit the new crank seal to the | |
| replacement timing cover, and refit everything. | |
| http://i654.photobucket.com/albums/uu264/Goose76UK/Megajolt/IMG_2644.jpg | |
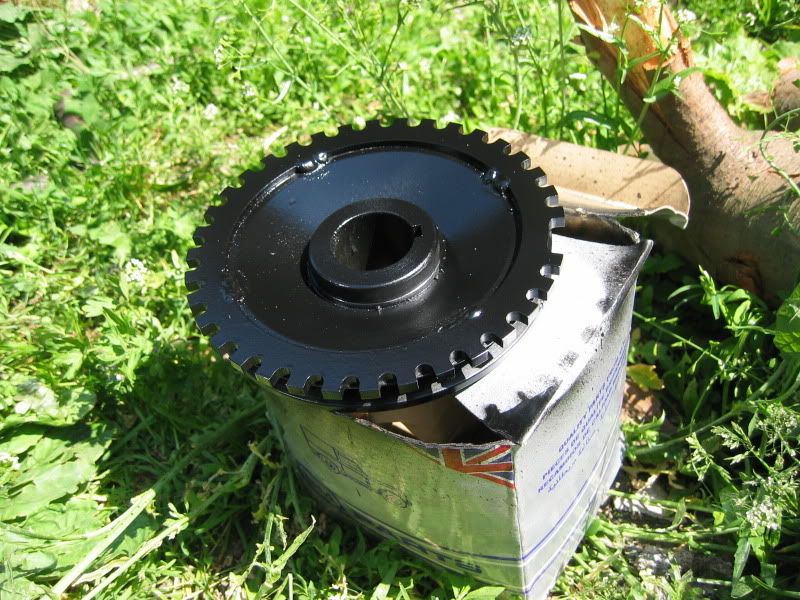
| I then trial fitted the crank pulley, and lined the trigger | |
| wheel up to the sensor. With the crank at TDC, the timing wheel | |
| needs to be fitted so that the missing tooth is 90 degrees ahead | |
| of the sensor. (This is different for 6 pots and V8's.) | |
| Once I was happy it was in the right place, I went over to | |
| FenTigers house, where he fired some weld at it for me. | |
| Obviously then I had to paint it. The result: | |
| http://i654.photobucket.com/albums/uu264/Goose76UK/Megajolt/IMG_2643.jpg | |
| Then on Sunday, I fitted the crank pulley, and put the rest of | |
| the engine back together, and refilled the rad. Next I finished | |
| the wiring off. As I mentioned above I made a junction box, to | |
| hold any connectors in. This tidies up the install and also | |
| keeps muck and shite off the connections, not that there are | |
| many. Below you can see the coil pack, EDIS module and my | |
| junction box. | |
| http://i654.photobucket.com/albums/uu264/Goose76UK/Megajolt/IMG_2646.jpg | |
| At the bottom you can see the vacuum advance hose disappearing | |
| through the bulkhead. I'll add a grommet at some point. | |
| Once this was done, and before connecting the Megajolt, I | |
| decided to fire the engine up. It should run in limp home mode. | |
| And, to my surprise it fired up straight away and sat there | |
| purring at a static 12 degrees advance. Spurred on by this | |
| success I decided to fit the Megajolt | |
| Installing the megajolt itself is dead simple. You only need 4 | |
| wires for a basic install. These are +12v, ground, PIP and SAW. | |
| The PIP and SAW lines go between the EDIS module (pins 1 and 3) | |
| and the Megajolt, and are the only wires needed for the two to | |
| talk to each other. It's important to note, that you should | |
| power and ground the EDIS and Megajolt from the same points, as | |
| to avoid earth loops and other electomagical phenomena. | |
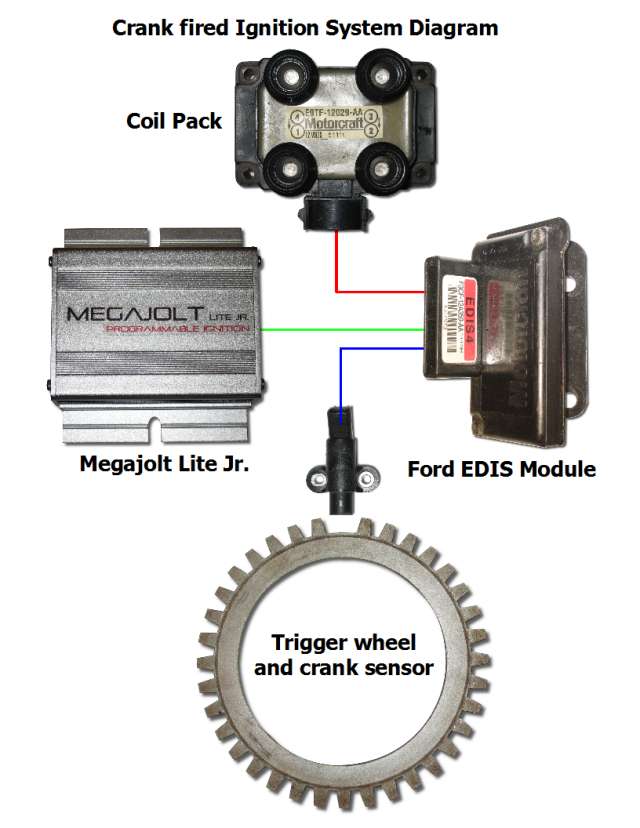
| Here is an overall view of the system, pinched from the autolabs | |
| page: | |
| http://www.autosportlabs.net/images/3/35/Megajolt_system.jpg | |
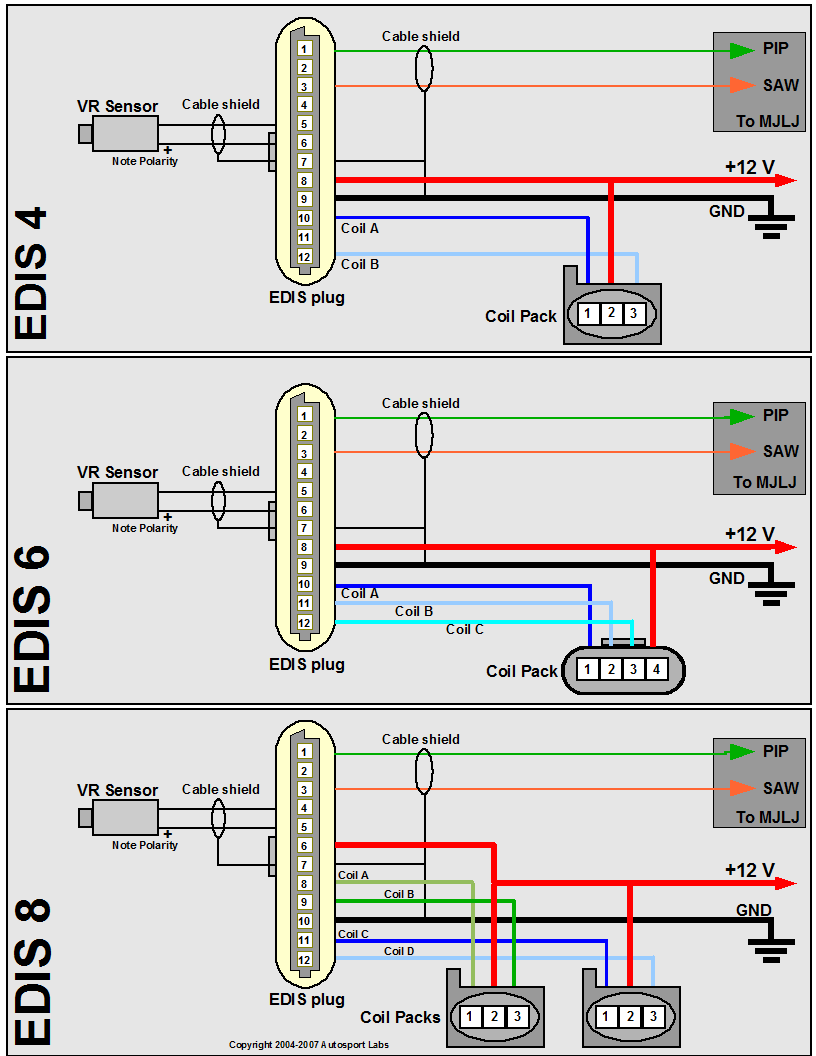
| And here is the basic wiring diagram: | |
| http://www.autosportlabs.net/images/5/59/EDIS_Module_harness.png | |
| There are a few differences between 4,6 and 8 cyl versions. | |
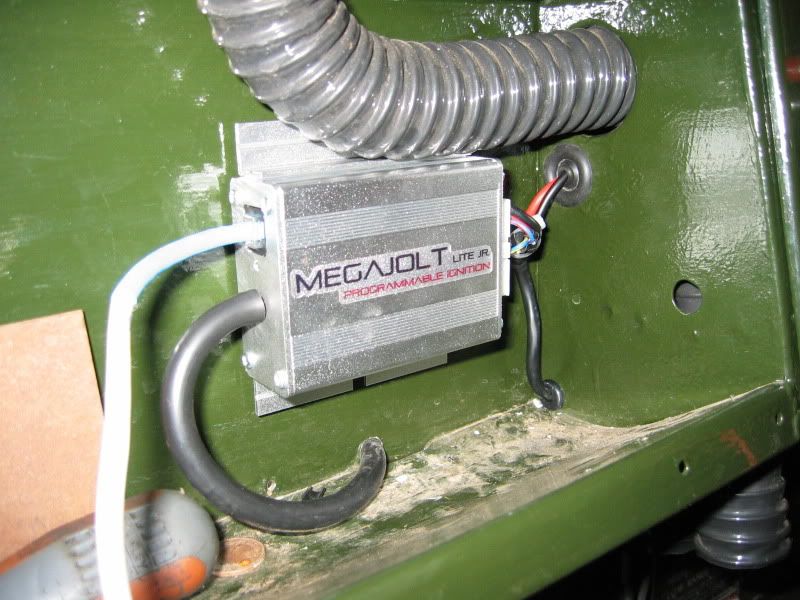
| Here is the Megajolt, wired in. The white wire at the top is the | |
| serial cable, for plugging into a laptop. | |
| http://i654.photobucket.com/albums/uu264/Goose76UK/Megajolt/IMG_2647.jpg | |
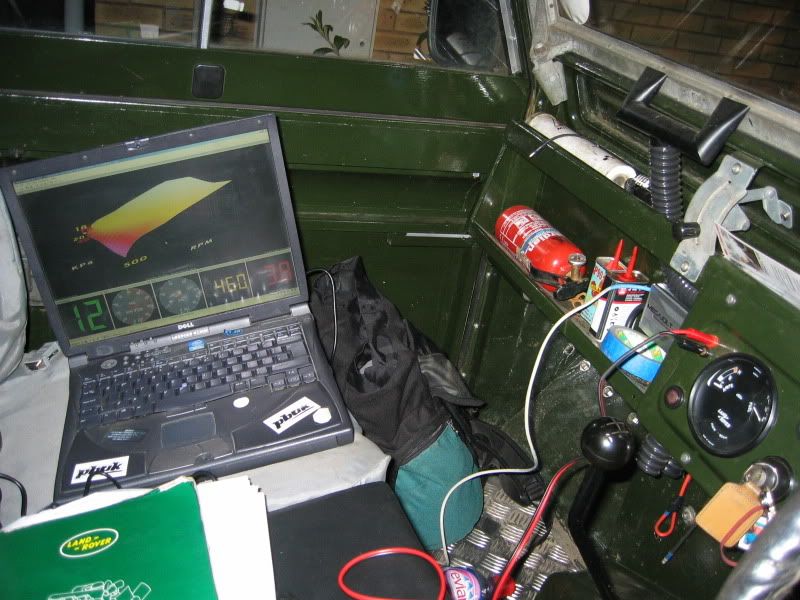
| After 5 minutes of wondering why nothing was working, I plugged | |
| the power back in and it started up fine. With the laptop | |
| plugged in, you can be a real anorak and watch the digital RPM | |
| gauge and load values going up and down in real time etc. | |
| http://i654.photobucket.com/albums/uu264/Goose76UK/Megajolt/IMG_2649.jpg | |
| Note the laptop running off the dash sockets, due to a fucked | |
| battery. Only problem is, it switches off when you press the | |
| starter! :roll: On the screen is a 3D graph of your ignition | |
| map, with pointers that move about n that. | |
| And here is s nerdy graph of a drive home from Kev's house back | |
| to mine. All those lines mean stuff. Apparently. | |
| http://i654.photobucket.com/albums/uu264/Goose76UK/Megajolt/IMG_2651.jpg | |
| I'm currently running OTLY's ignition map, and it runs | |
| brilliantly. It starts easier, needs barely any choke, | |
| accelerates far smoother and quicker, has more torque and more | |
| power. It's a real noticeable difference. With the strobe gun | |
| on the pulley, you can see that the timing is as steady as a | |
| rock. No more jumping about and generally being shit. | |
| I suspect there is a lot more performance gains to be had out of | |
| it, once I start tweaking the igniton map a bit. But for now, | |
| it's running brilliantly. I'm very pleased with it, it's | |
| difficult to describe just how much of a difference it's made to | |
| how well the engine runs! | |
| I'll keep you posted of how it runs over the next few months. | |
| Cheers! | |
| #Post#: 3629-------------------------------------------------- | |
| Re: KWD's Megajolt Ignition | |
| By: Goose Date: January 12, 2012, 2:33 am | |
| --------------------------------------------------------- | |
| Just an update to this archived post - I've done nearly 15000 | |
| trouble free miles now with the Megajolt, and I'm really pleased | |
| with it. It runs so much smoother, pulls harder and never goes | |
| out of tune. It's also survived a fair amount of abuse and | |
| drowning off-road too. I have now also fitted a switch on the | |
| dashboard that changes my ignition map, depending what fuel type | |
| I am running. So I now have a custom map for LPG and one for | |
| Petrol. This means I don't have to try and compromise betweeb | |
| the two. | |
| Can't recommend it enough! | |
| #Post#: 3791-------------------------------------------------- | |
| Re: KWD's Megajolt Ignition | |
| By: Doug_T Date: January 12, 2012, 10:48 am | |
| --------------------------------------------------------- | |
| Nice 8) I too intend to go down the EDIS road when I get the | |
| new cam in. One question: what did you do with the now | |
| redundant Dizzy, have you left it there? I was thinking of | |
| getting the vacum pump off a 2.5/200 and putting that in place | |
| of the dizzy to give me my brake vacum, and using the inlet | |
| manifold takeoff for the vac advance as you have done. | |
| #Post#: 3792-------------------------------------------------- | |
| Re: KWD's Megajolt Ignition | |
| By: Goose Date: January 12, 2012, 10:51 am | |
| --------------------------------------------------------- | |
| Hi Doug, | |
| I've taken the internals out my dizzy and left it there. It now | |
| just serves to fil the redundant hole in the engine! Also it's | |
| handy as a backup just incase something goes tits up, although | |
| it hasn't yet! Touch wood...! | |
| Fitting a vacuum pump sounds like an excellent idea! | |
| ***************************************************** | |
| Next Page |