| Return Create A Forum - Home | |
| --------------------------------------------------------- | |
| Old Leafsprung Land Rovers | |
| https://ollr.createaforum.com | |
| --------------------------------------------------------- | |
| ***************************************************** | |
| Return to: Technical Archive | |
| ***************************************************** | |
| #Post#: 1346-------------------------------------------------- | |
| How to rebuild a steering relay. | |
| By: Jackual Date: January 7, 2012, 3:53 am | |
| --------------------------------------------------------- | |
| A commonly neglected part of any Land-rover, The seals wear out, | |
| Leak all the oil and eventually start to sieze. | |
| After seeing one OLLR's members replacement relay shaft shear, I | |
| decided to rebuild the original, After all, How hard can it be!? | |
| A quick word of warning, There is a coil :-\ spring held under | |
| compression, | |
| Treat it with respect and it will be good to you, Twat it about, | |
| And it'll go shitstorm. | |
| Also re-fitting the spring calls for special tools, Although | |
| there is a few different ways of doing this job. | |
| The first thing to do is remove the drag links by the TRE's, | |
| Then loosen and remove the pinch bolts holding the relay upper | |
| and lower levers, Remove the levers, Note the position. | |
| Then at the top of the relay undo the two long through bolts. | |
| Drain the oil (if any) by removing one bottom screw(7/16Early | |
| models 5/16Late), And one top just to let air in. | |
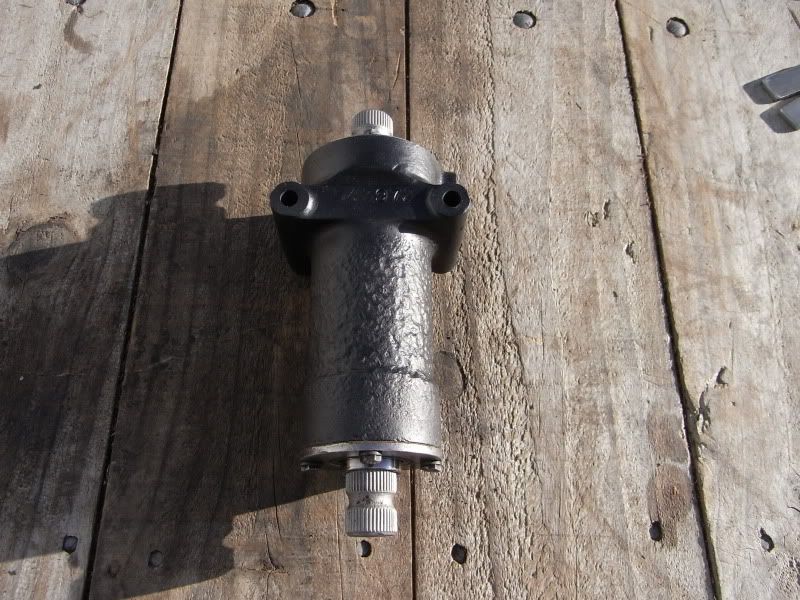
| The relay can now be pushed up out of the chassis, I'll leave | |
| this part up to your imagination, If it won't budge, Don't | |
| panic, It can be rebuilt in place. | |
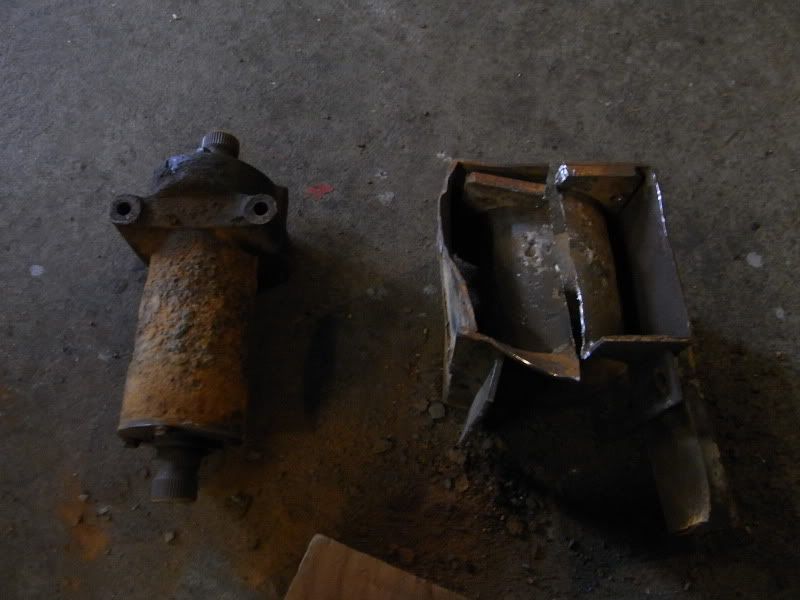
| Once out it'll look a bit like this; | |
| http://i8.photobucket.com/albums/a1/hey124/RIMG0225.jpg | |
| The one I've got here is out of a scrap chassis, Cut out the | |
| section complete with the relay. | |
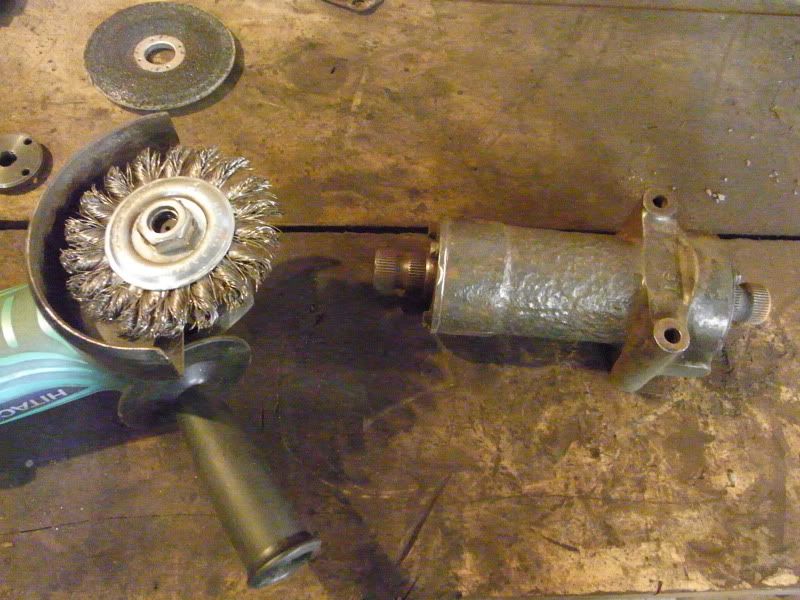
| It was rusty, So the scale was removed using a wire wheel in an | |
| angle grinder; | |
| http://i8.photobucket.com/albums/a1/hey124/RIMG0226.jpg | |
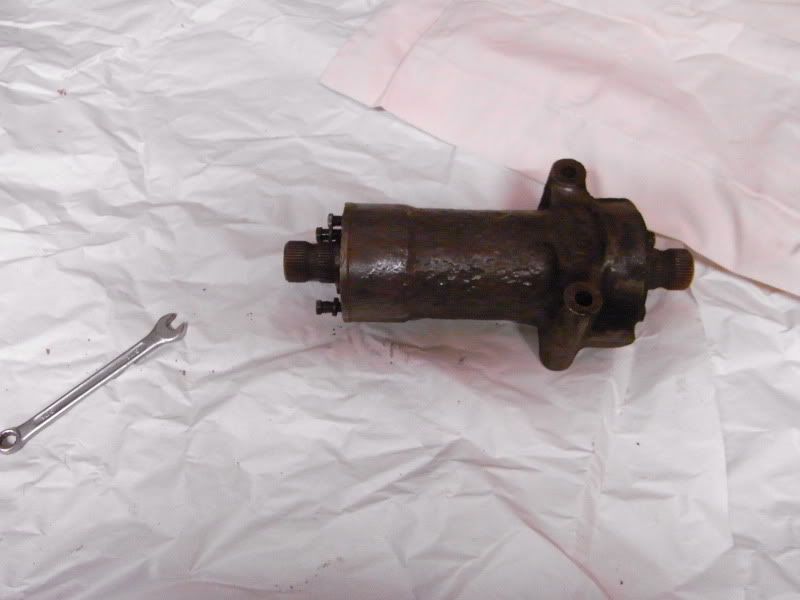
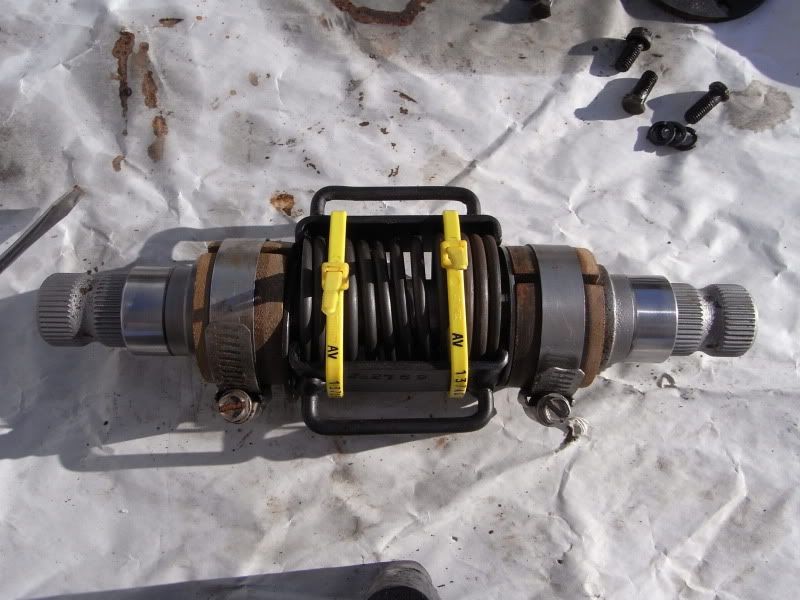
| Then onto the strip down, I removed the four bottom screws | |
| holding the retaining plate on, It won't spring to bits just | |
| yet, Just dont hit/drop/ect. | |
| http://i8.photobucket.com/albums/a1/hey124/RIMG0228.jpg | |
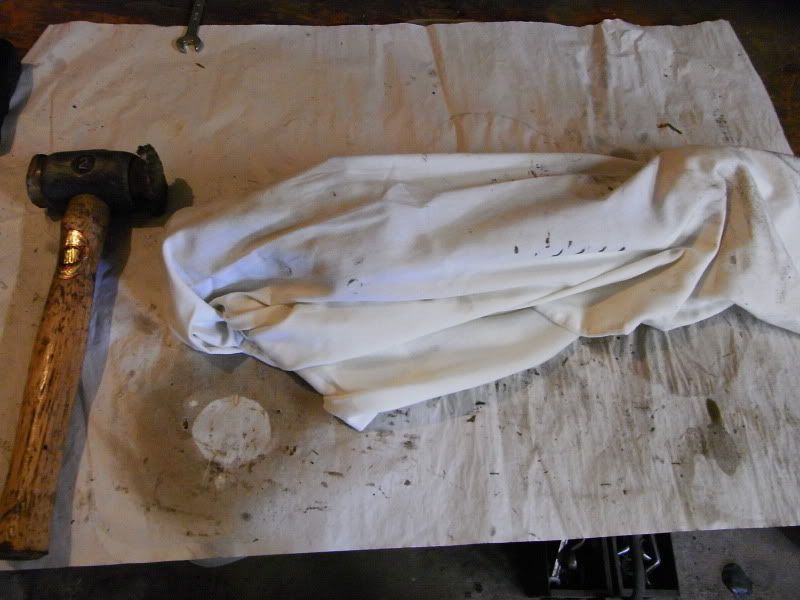
| OLLR top tip; Put the relay in an old pillow case when | |
| drifting/clouting out the shaft and the spring. | |
| http://i8.photobucket.com/albums/a1/hey124/RIMG0153.jpg | |
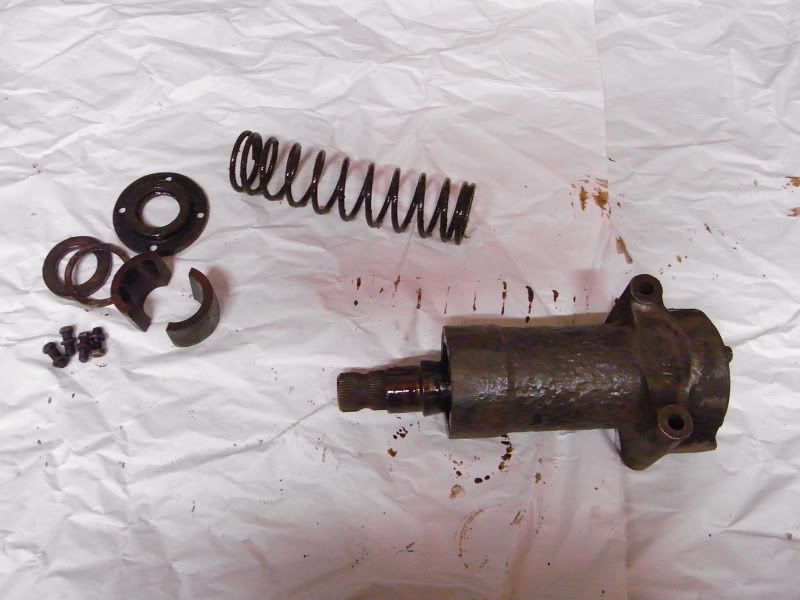
| Retrive all the parts out of the pillow case; | |
| http://i8.photobucket.com/albums/a1/hey124/RIMG0230.jpg | |
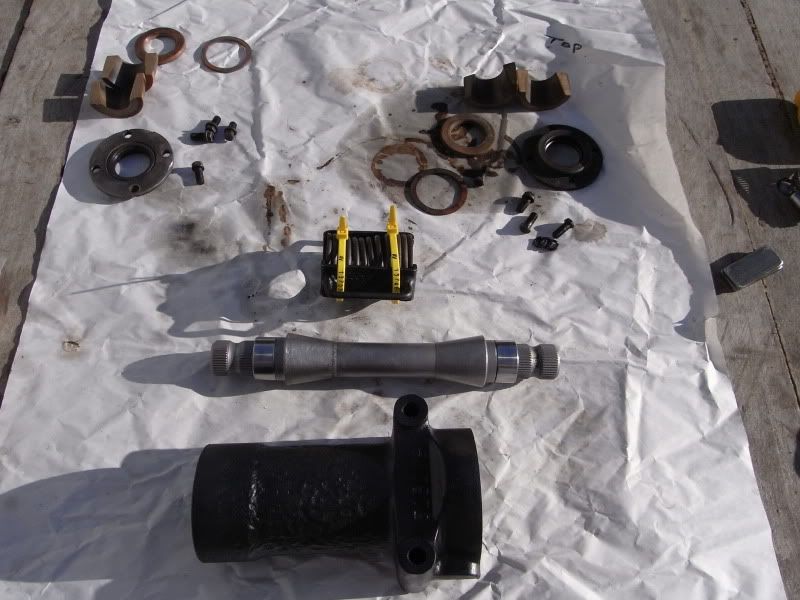
| Make note of the parts from the top and bottom, The split tufnol | |
| bushes are a matched pair. | |
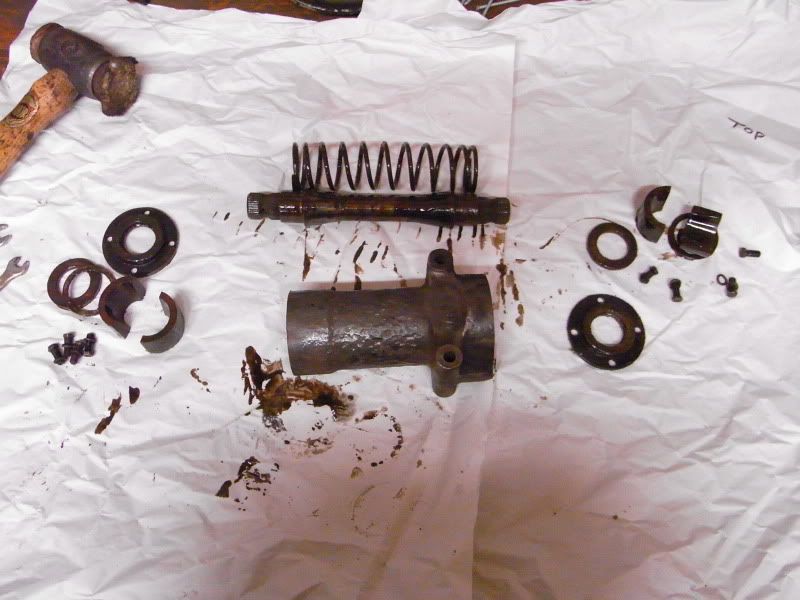
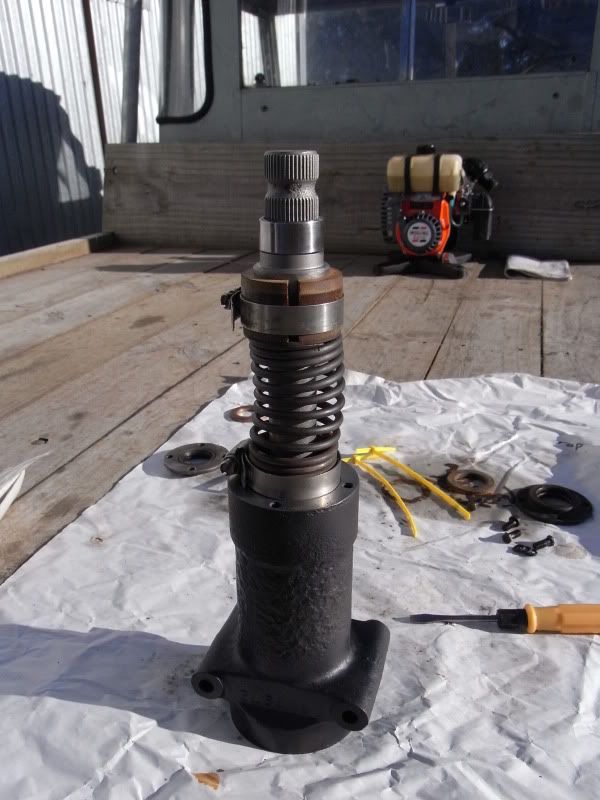
| I then remove the screws holding the top cover and remove the | |
| remaining parts; | |
| http://i8.photobucket.com/albums/a1/hey124/RIMG0231.jpg | |
| Parts you should now be able to see; | |
| Two bronze thrust washers, | |
| Two steel washers, | |
| Two end caps with seals, | |
| One spring, | |
| One Relay shaft & Housing. | |
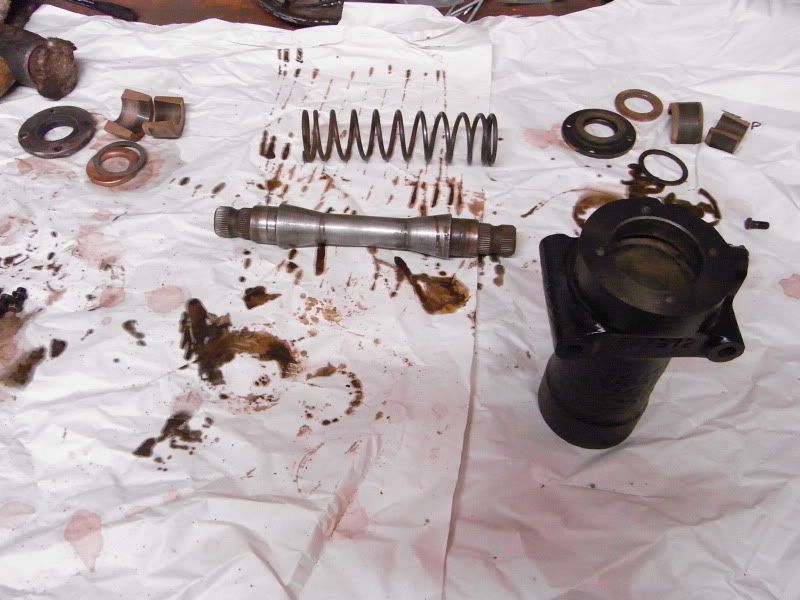
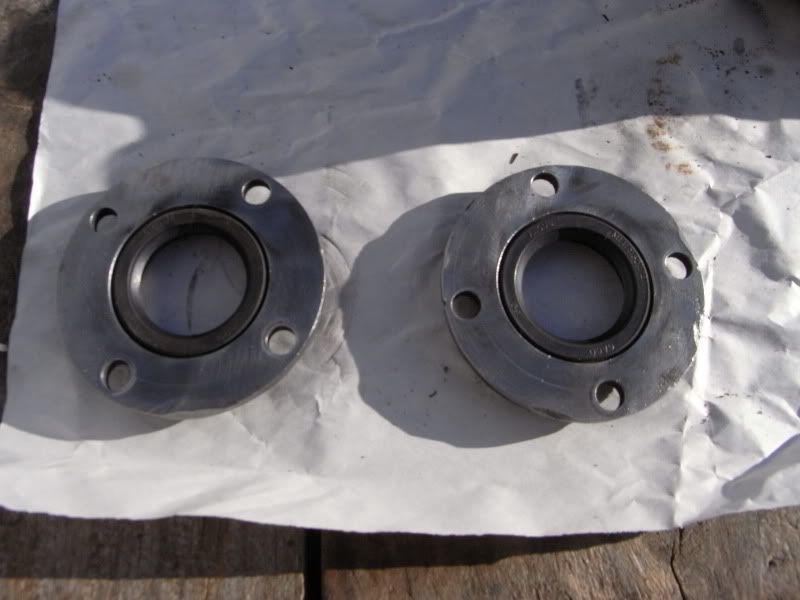
| Clean up the parts, I just use brake cleaner, works a treat on | |
| the tufnol bushes. Check the parts for wear, The bronze thrust | |
| washes and the split tufnol bushes especially. | |
| Don't worry if the surface the split bushes run on the shaft is | |
| pitted, This will aid lubrication by holding the oil, Something | |
| Land-rover later added into the design by cutting a groove in | |
| each split bush. | |
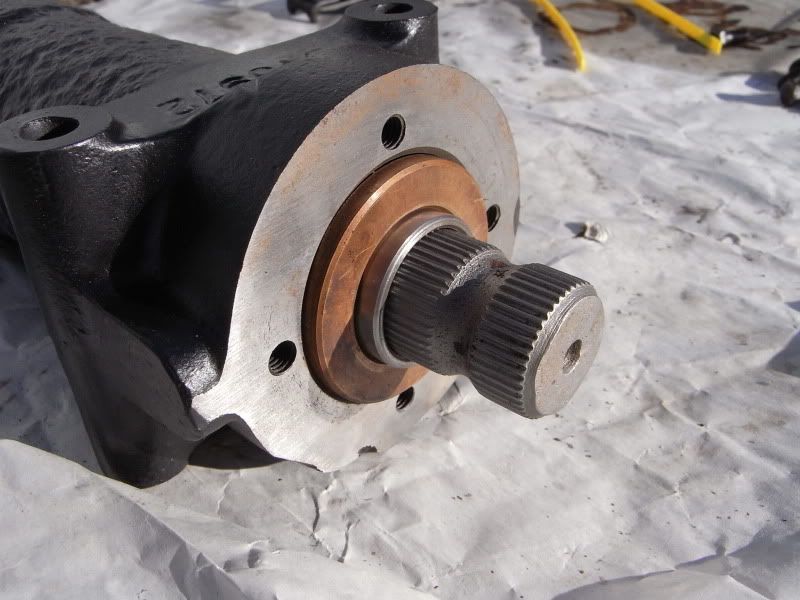
| Also check the surface the seal runs on, The early models will | |
| be a one peice shaft, Later ones have sleeves that can be | |
| replaced if the seals have worn a groove in it. | |
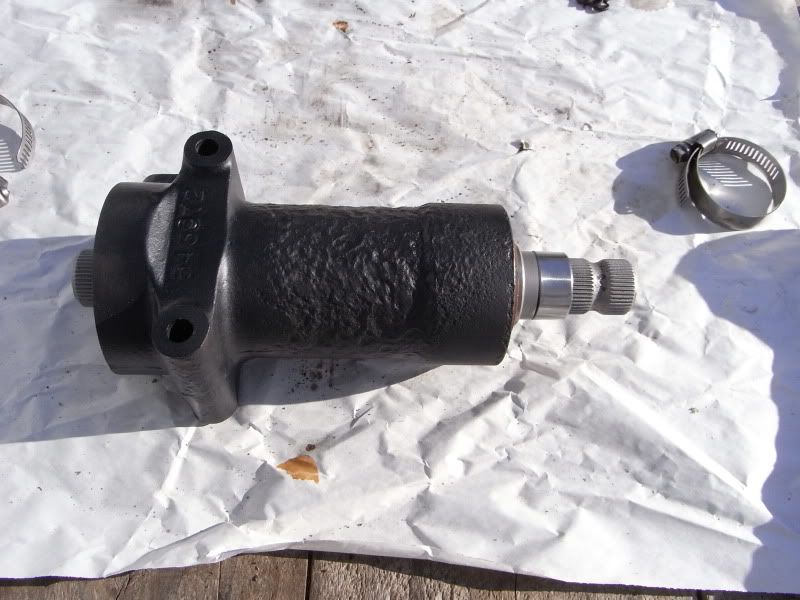
| Painted the body and cleaned up the rest of the parts; | |
| http://i8.photobucket.com/albums/a1/hey124/RIMG0232.jpg | |
| And thats where I left it tonight. | |
| ================================================================ | |
| ========================================== | |
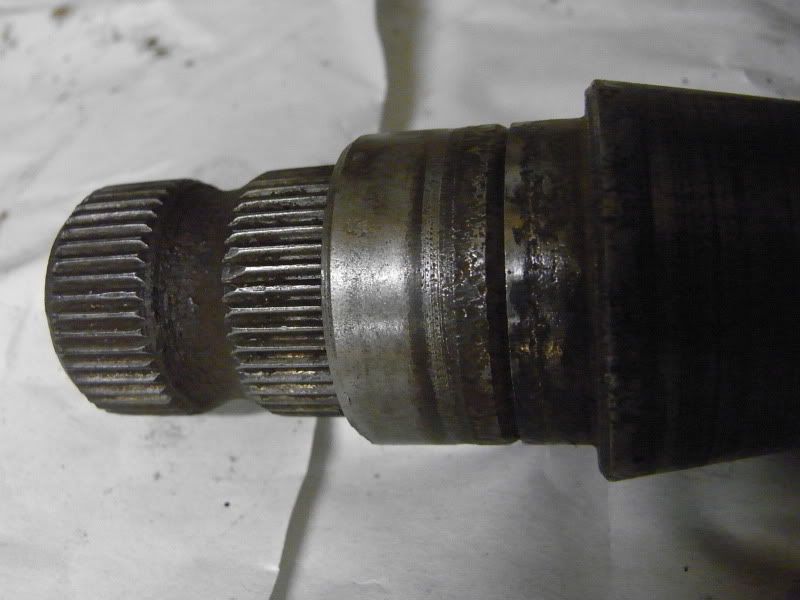
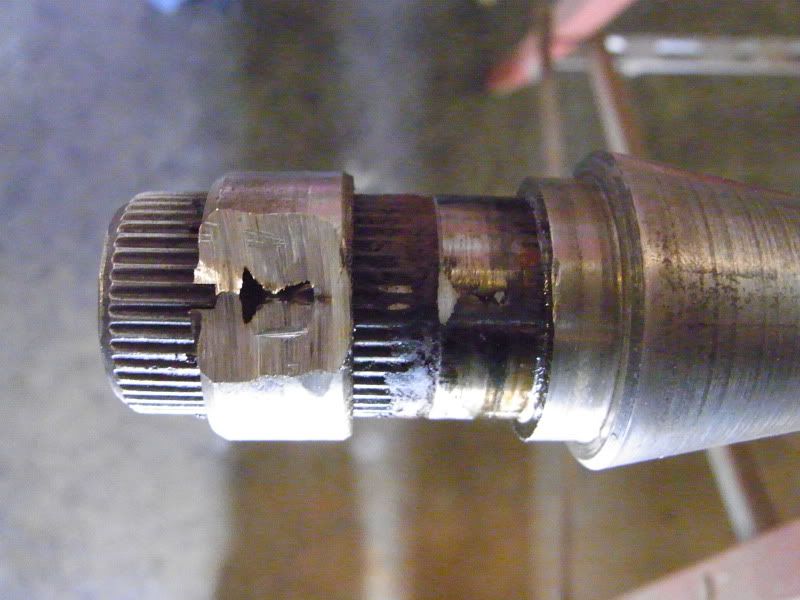
| I did a little work to the relay during the week, | |
| The sleeves the seal runs on look a little worse for wear, so I | |
| decided to replace them, Part no 230184. | |
| http://i8.photobucket.com/albums/a1/hey124/RIMG0235.jpg | |
| To remove them I tried heat and a chisel, That didnt budge them, | |
| So in the end I ground a flat spot and split them, They then | |
| slid off. | |
| I did catch the shaft the odd place with the grinder, But not to | |
| worry. | |
| http://i8.photobucket.com/albums/a1/hey124/RIMG0236.jpg | |
| Just to wait for the bits to arrive and It'll be going back | |
| together. | |
| ================================================================ | |
| ========================================== | |
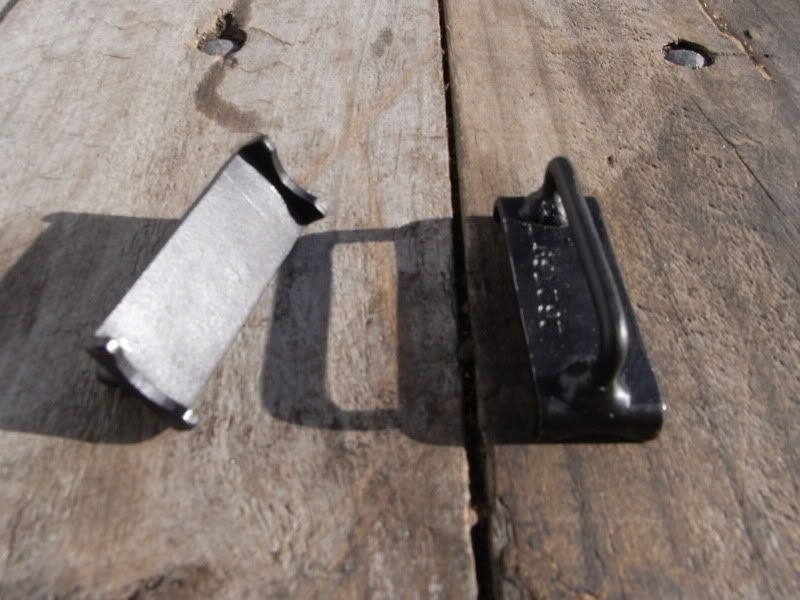
| Put it together this afternoon with no problems, | |
| The tool I use to refit the spring is a simple pair of clamps; | |
| http://i8.photobucket.com/albums/a1/hey124/RIMG0002-4.jpg | |
| There made from a flat bit of steel, With the ends bent over in | |
| the vice, So the distance between the two is about 60mm, And | |
| then using and angle grinder, I removed some material to make | |
| the tangs that hold the spring. | |
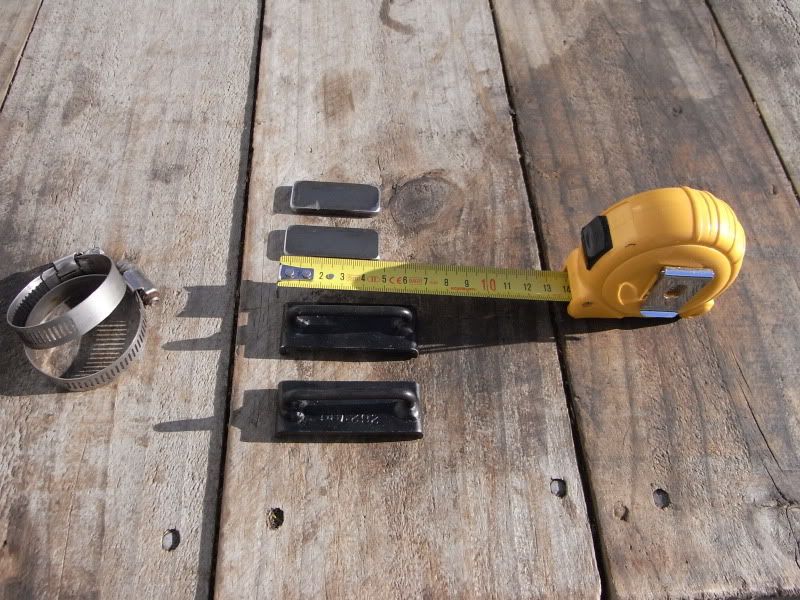
| Then some 2" hose clamps, And a couple of 50mm long 3mm thick | |
| steel bar used as compressing bars. | |
| http://i8.photobucket.com/albums/a1/hey124/RIMG0001-2.jpg | |
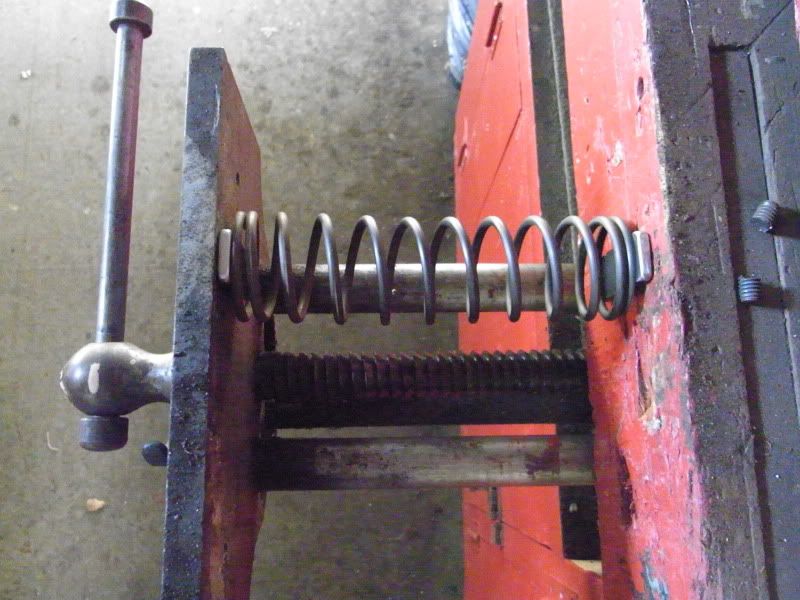
| I first compressed the spring in the vise, Using the compressing | |
| bars; | |
| http://i8.photobucket.com/albums/a1/hey124/RIMG0003-4.jpg | |
| Squashing it to a length of 60mm so that the clamps can fit | |
| around it; | |
| http://i8.photobucket.com/albums/a1/hey124/RIMG0004-3.jpg | |
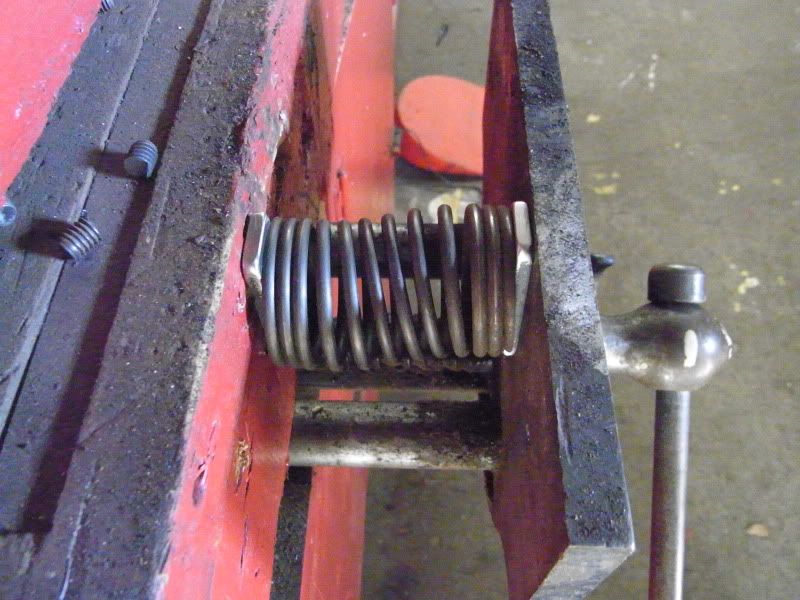
| Then fit the clamps, I use a couple of cable ties to hold them | |
| in place, Then gently ease off the vise, Making sure the clamps | |
| stay in position; | |
| http://i8.photobucket.com/albums/a1/hey124/RIMG0005-3.jpg | |
| Once the tension is placed on the clamps the compressing bars | |
| will fall away, Be carefull handling the spring now! | |
| I worked out doors today, So welcome to my outdoor workbench!, | |
| The main shaft has been cleaned up, And the distance peices | |
| pressed on using the hydraulic press; | |
| http://i8.photobucket.com/albums/a1/hey124/RIMG0006-4.jpg | |
| Start assembling by sliding the compressed spring onto the | |
| shaft, Followed by a steel washer at each end; | |
| http://i8.photobucket.com/albums/a1/hey124/RIMG0007-4.jpg | |
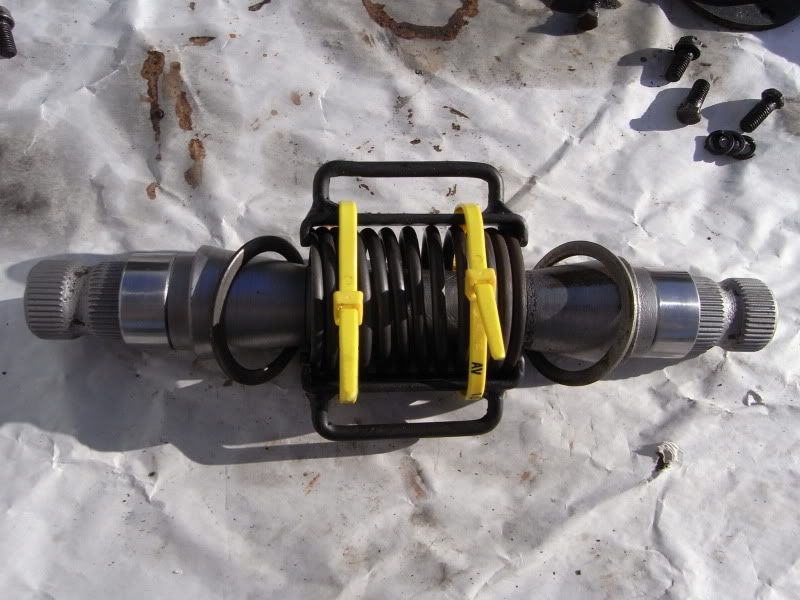
| Then using the Jubilee clips, Place the tufnol bushes on the | |
| shaft held in place with the jubilee clip, Make sure these are | |
| tight!; | |
| http://i8.photobucket.com/albums/a1/hey124/RIMG0008-4.jpg | |
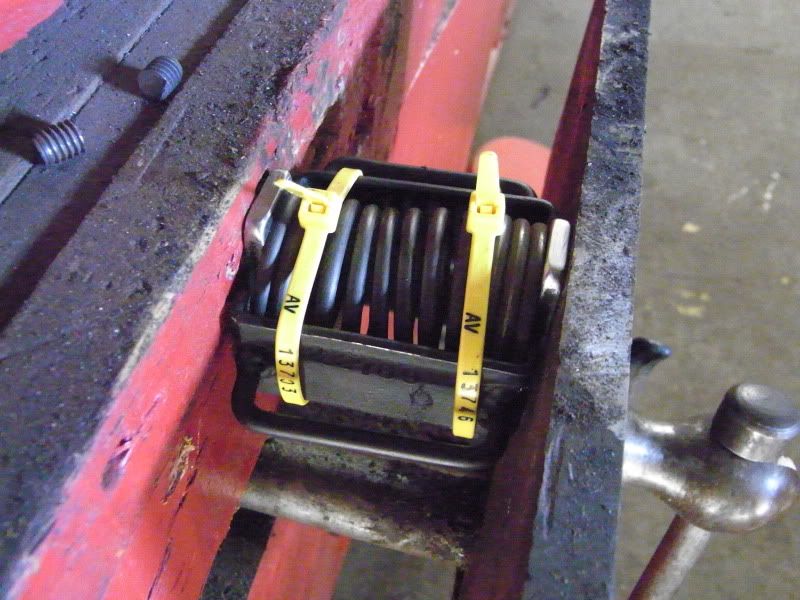
| Once the jubilee clips and bushes are in place the ties and | |
| spring clamps can be removed; | |
| http://i8.photobucket.com/albums/a1/hey124/RIMG0009-3.jpg | |
| Then position the washers and spring for fitting. | |
| Now the fun begins!, I start pressing/hitting the assembly in | |
| from the bottom of the casing, Once the top bush is engaged in | |
| the casing the jubilee clip can be removed from around that one, | |
| Leaving the clip on the lower one; | |
| http://i8.photobucket.com/albums/a1/hey124/RIMG0010-2.jpg | |
| Then I keep hitting the assembly all the way to the bottom | |
| jubilee clip, Same with this one, Once engaged I remove the | |
| clip, And continue hitting the shaft all the way home; | |
| http://i8.photobucket.com/albums/a1/hey124/RIMG0011-2.jpg | |
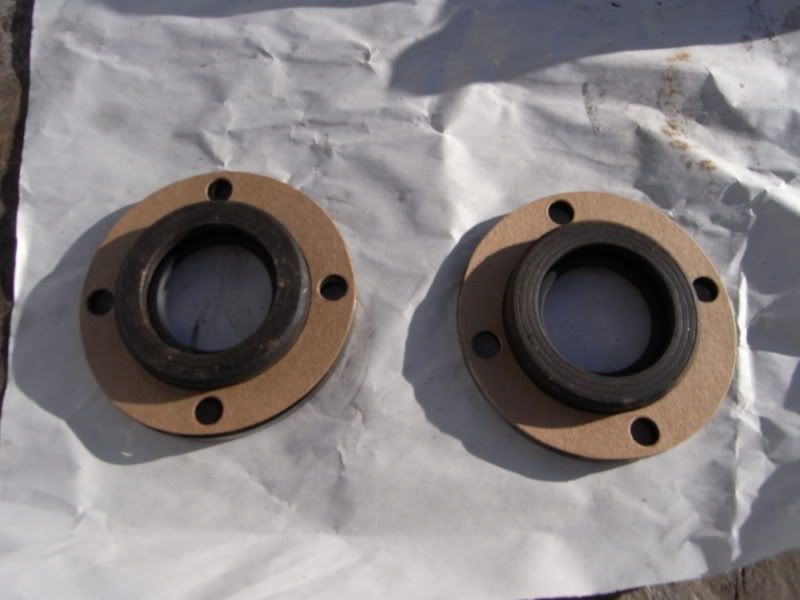
| Then I replaced the seals in the end caps; | |
| http://i8.photobucket.com/albums/a1/hey124/RIMG0012-2.jpg | |
| The bronze thrusts are then slid along the shaft, Into the | |
| casing; | |
| http://i8.photobucket.com/albums/a1/hey124/RIMG0013-2.jpg | |
| Followed by the end caps, Fitted with new gaskets & a smear of | |
| hylomar if ya like; | |
| http://i8.photobucket.com/albums/a1/hey124/RIMG0014-2.jpg | |
| http://i8.photobucket.com/albums/a1/hey124/RIMG0015-2.jpg | |
| Replace and tighten all the bottom end cap screws, On the top | |
| cap only replace two of the screws, And fill the unit with oil | |
| using ep 90 through the missing screw hole, One to fill the | |
| other to let air out, Then, once full of oil replace the screws | |
| and tighten . | |
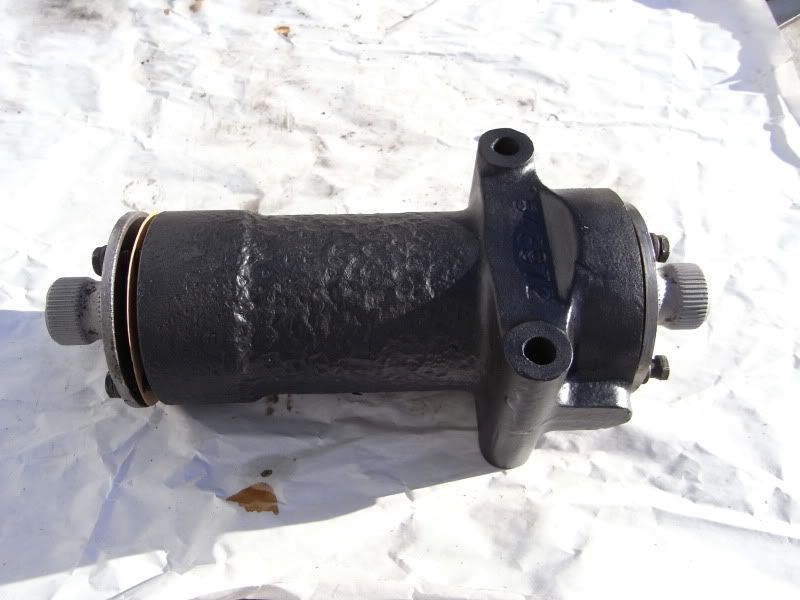
| Job done!; | |
| http://i8.photobucket.com/albums/a1/hey124/RIMG0017-1.jpg | |
| http://i8.photobucket.com/albums/a1/hey124/RIMG0016-2.jpg | |
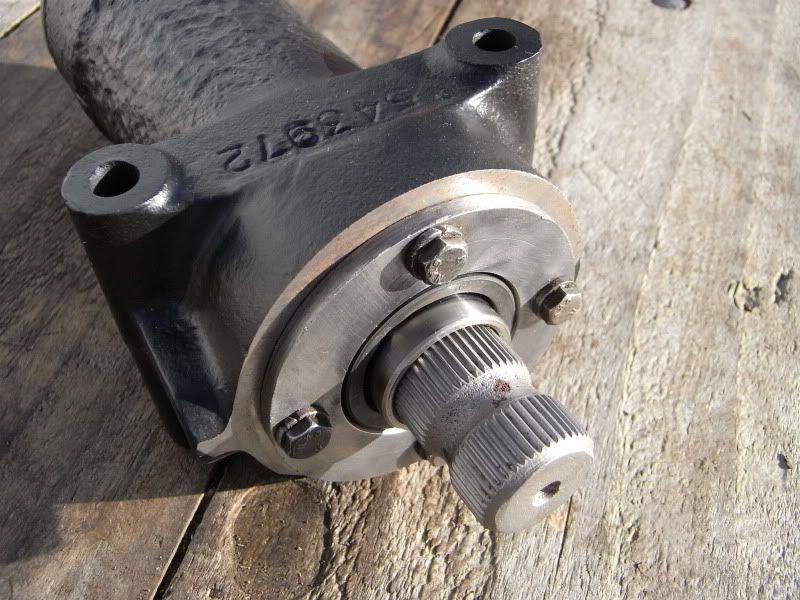
| Now just fit it to the chassis using plenty of anti-seize!, And | |
| re-fit the steering arms ;D. | |
| Cheers, Jack | |
| #Post#: 5131-------------------------------------------------- | |
| Re: How to rebuild a steering relay. | |
| By: Calum Date: January 16, 2012, 7:25 pm | |
| --------------------------------------------------------- | |
| Very good! I like the way you compressed the spring. I struggled | |
| with a 10-minute version of the special tool listed in the | |
| workshop manual. I need to make a proper version of the tool | |
| ideally. After all the messing about trying to get it all in | |
| with the tufnol bushes, I left out the steel washers :@ They | |
| shouldn't make all that much difference in all honesty, but if I | |
| do get round to making a proper tool I'll strip it down and fit | |
| them. | |
| #Post#: 5150-------------------------------------------------- | |
| Re: How to rebuild a steering relay. | |
| By: Willy Eckerslyke Date: January 17, 2012, 4:07 am | |
| --------------------------------------------------------- | |
| Very useful post. I have one that needs doing and was wondering | |
| how. So thanks! | |
| #Post#: 5163-------------------------------------------------- | |
| Re: How to rebuild a steering relay. | |
| By: Jackual Date: January 17, 2012, 5:15 am | |
| --------------------------------------------------------- | |
| Thanks! :D I followed an ancient set of instructions that was | |
| with a NOS relay shaft, This was the tool they used. | |
| I think you'll be pretty safe, Calum, With out those steel | |
| washers, Its not as if the spring or bushes move, Just the relay | |
| shaft itself. | |
| [quote author=Willy Eckerslyke link=topic=226.msg5150#msg5150 | |
| date=1326794875] | |
| Very useful post. I have one that needs doing and was wondering | |
| how. So thanks! | |
| [/quote] | |
| Thanks, Glad you found it of use 8)!. | |
| #Post#: 6678-------------------------------------------------- | |
| Re: How to rebuild a steering relay. | |
| By: Harry2a Date: January 23, 2012, 11:21 am | |
| --------------------------------------------------------- | |
| Great thread, Pillow case is a good idea, avoids loosing that | |
| part that you saw roll under the bench, yet isn�t there when you | |
| look! Usually the rarest bolt known to man. | |
| #Post#: 97304-------------------------------------------------- | |
| Re: How to rebuild a steering relay. | |
| By: Fluffle-Valve Date: April 27, 2015, 2:02 pm | |
| --------------------------------------------------------- | |
| Good detailed write up. Thanks for that. | |
| http://www.series2club.co.uk/forum/forum/Smileys/default/tiphat.gif<br | |
| /> | |
| I was wondering how people did this task and now I know. :-? | |
| #Post#: 97312-------------------------------------------------- | |
| Re: How to rebuild a steering relay. | |
| By: Snailer Date: April 28, 2015, 3:04 am | |
| --------------------------------------------------------- | |
| excellent write up. thanks for posting. | |
| #Post#: 98162-------------------------------------------------- | |
| Re: How to rebuild a steering relay. | |
| By: poprodder Date: June 27, 2015, 11:24 am | |
| --------------------------------------------------------- | |
| great write up, very informative. | |
| cheers. | |
| #Post#: 102819-------------------------------------------------- | |
| Re: How to rebuild a steering relay. | |
| By: Correus Date: May 15, 2018, 4:30 pm | |
| --------------------------------------------------------- | |
| Hello - | |
| Do you still have the pics of the tool you made out of a pair of | |
| clamps to refit the spring? | |
| Thanks! | |
| #Post#: 102872-------------------------------------------------- | |
| Re: How to rebuild a steering relay. | |
| By: Jackual Date: August 25, 2018, 5:23 am | |
| --------------------------------------------------------- | |
| Photos seem to be working ok? I know Photobucket went a bit | |
| weird, but seems ok now :-? | |
| Cheers, Jack. | |
| ***************************************************** | |
| Next Page |