| Return Create A Forum - Home | |
| --------------------------------------------------------- | |
| 690 Enduro R | |
| https://690enduro.createaforum.com | |
| --------------------------------------------------------- | |
| ***************************************************** | |
| Return to: Airbox, Pipes, and Programmers | |
| ***************************************************** | |
| #Post#: 288-------------------------------------------------- | |
| 690 Enduro EFI -- Idiot's Guide link (part I) | |
| By: Rusty Shovel Date: February 13, 2014, 8:50 am | |
| --------------------------------------------------------- | |
| [quote author=dave_simpson link=topic=75.msg286#msg286 | |
| date=1392246101] | |
| http://www.advrider.com/forums/showthread.php?t=931664 | |
| [/quote] | |
| Thanks Dave, for the link. The original poster, El Ponkin at | |
| ADVrider, seems to have done his homework! For convenience's | |
| sake, I've included the text of his post here. If you want to | |
| thanks El Ponkin for donating his time to benefit fellow 690 | |
| Enduro owners, you can do so over at ADVrider | |
| ( | |
| http://www.advrider.com/forums/index.php | |
| http://www.advrider.com/forums/index.php). | |
| Introduction | |
| My attempt here is to produce an idiot�s guide basically written | |
| by an idiot. | |
| I will placemat the first 10 posts in this thread so that I can | |
| put �Chapters� up as I finish them and keep all the facts on the | |
| first page of the thread. I have read numerous forums and | |
| threads to gather this info and my attempt here is to collate | |
| the information into one place in a logical sequence to save you | |
| the effort of searching, like I had too. I am not claiming to be | |
| an expert I am just acting as a conduit to gather the knowledge | |
| of multiple forums and posts into one place. | |
| Some information will be incomplete and some may be incorrect, | |
| the idea is I post it up and people can PM me corrections or | |
| additional information so it builds into a concise and accurate | |
| guide. | |
| If you have questions you can post them up, but make sure the | |
| answer is NOT already covered in the guide first and then the | |
| collective can come up with the answer and I can add it to the | |
| guide. | |
| Disclaimer | |
| Usual disclaimer in that any work you do on your own bike is at | |
| your own risk and if you are unsure you should be going to a | |
| dealer. | |
| If your bike is in warranty anything you do here will void your | |
| warranty. | |
| This guide is to help those who are mechanically efficient and | |
| computer literate who just want the facts in one place, the | |
| guide will not make you an engineer overnight. Don�t mess with | |
| your bike unless you are completely confident you know what you | |
| are doing and have fully researched the subject. | |
| Resources | |
| These are the major sources for the information I have produced. | |
| http://advrider.com/forums/showthread.php?t=685657 | |
| http://advrider.com/forums/showthread.php?t=685657 | |
| http://advrider.com/forums/showthread.php?t=666269 | |
| http://advrider.com/forums/showthread.php?t=666269 | |
| http://www.supermotojunkie.com/showthread.php?113690-FREE-KTM-690-Tuning-Softwa… | |
| http://www.supermotojunkie.com/showthread.php?113690-FREE-KTM-690-Tuning-Softwa… | |
| http://www.monomaniacs.nl/tnt/KTM-690/Stalling-and-throttle-issues | |
| http://www.monomaniacs.nl/tnt/KTM-690/Stalling-and-throttle-issues | |
| http://www.tuneecu.com/ | |
| http://www.tuneecu.com/ | |
| This final one is a site that has training material on the | |
| common OBDII Electronic Fuel Management Systems. | |
| Select Technical Articles from the LH Menu and then the relevant | |
| courses start from 31. | |
| http://www.autoshop101.com/ | |
| http://www.autoshop101.com/ | |
| Books: | |
| How to Tune And Modify Motorcycle Engine Management Systems � | |
| Tracy Martin | |
| __________________ | |
| http://www.jet-metal.com | |
| http://www.jet-metal.com | |
| ******** | |
| Chapter 1 | |
| The basics about KTM 690 EFI | |
| KTM 690 models all have the same Keihin EFI system. This EFI | |
| system is different in a number of ways than on most - if not | |
| all - other bikes. It uses a 46mm single valve throttle body | |
| with two ECUs. One ECU controls the fuelling & ignition and the | |
| other controls the throttle valve through semi ride-by-wire. The | |
| ECUs interact with each other communicating over a CAN-BUS | |
| connection. The two cables from the throttle grip hook up to the | |
| throttle valve but the ECU has the ability to 'take over' if | |
| needed. Closing the throttle valve is 'hard wired' for safety | |
| reasons. Under normal conditions the throttle valve will follow | |
| the commands from the rider 1:1 but if the throttle commands get | |
| outside the working parameters of the engine, the ECU will take | |
| over controlling the throttle valve in a way that the engine | |
| will keep performing to its optimum. For instance; whacking the | |
| throttle wide open in a split second at 2500 RPM in 5th gear | |
| will normally stall the engine. This is when the throttle ECU | |
| takes over and opens the throttle as quickly as the engine will | |
| allow without stalling, a neat and sophisticated system that | |
| works really well. The fact that you never feel the ECU taking | |
| over when riding a 690 kind of shows how good it works. | |
| Basic Mapping | |
| Because of the setup with two ECUs the 'mapping' or 'fuel map' | |
| for a 690 also consists of two parts/files. A map (file) for the | |
| fuelling: ....FIMap.hex and a file for the throttle: | |
| ....EPMap.hex. This has led to problems and confusion with both | |
| dealers and owners. The two parts of a fuel map belong together | |
| and are NOT interchangeable with other fuel maps. When updating | |
| or changing the fuel map it is critical that both files are | |
| downloaded to the bikes' ECUs. | |
| � EPT map: Determines the amount of throttle body opening | |
| relative to handlebar throttle input. Adjustment of this | |
| fly-by-wire throttle permits dramatic changes in response of the | |
| engine to throttle input. This system is what causes a lot of | |
| the twitchiness in the throttle. | |
| � FI map: Determines the amount of fuel delivered depending on | |
| engine load, RPM and throttle body input. This map may utilize | |
| the oxygen sensor or the SAI (secondary air intake) but these | |
| can be selected OFF. | |
| Later we will use a program called TuneECU to access these maps, | |
| the program allows us to access certain data from these maps but | |
| we do not see all of the functions. You will see that the EPT | |
| map takes longer to read than the FI map even though it appears | |
| to do less in the way of mapping tables and that is because | |
| there are other built in functions that TuneECU will not let us | |
| access. The modern engine management systems have monitoring | |
| circuits to make sure certain parameters are not exceeded and | |
| the result can be a �fuel-cut� signal being sent from the ECU, | |
| unfortunately there is very little information available about | |
| the effects of this and what parameters are monitored. | |
| The naming convention for map files indicates the year grouping | |
| that the map is applicable to, in this example the 11 indicates | |
| applicable to 2011 bikes only: | |
| � KM765EU11B0231FIMap.hex | |
| The models EFI systems differ and therefore are grouped | |
| according to year model. | |
| A. 2008-2010 � map code 08 | |
| B. 2011 � map code 11 | |
| C. 2012-2013 � map code 12 | |
| Mapsets available for different set ups. | |
| There are various KTM Map sets (EPT / FI) available for each of | |
| the different year groups as follows: | |
| � Standard � Standard air filter and catalytic converter | |
| exhaust. | |
| � Akrapovic � applicable to most performance pipes � runs lean | |
| at lower RPMs runs rich up higher. | |
| � EVO1 - applicable to most performance pipes with the addition | |
| of the opened up airbox lid. The best map from KTM and the best | |
| bike set up. | |
| � EVO2 - applicable to most performance pipes plus the opened up | |
| airbox lid plus performance camshaft. | |
| Each mapset actually contains submaps that look like excel | |
| spreadsheets that give different values for each combination of | |
| RPM,Throttle setting, pressure etc etc. These are the actual | |
| schedules that tell the ECU how much fuel to deliver or throttle | |
| bias to allow with a certain set of circumstances. | |
| FI Map Submaps: | |
| � F submap is the fuel mapping based on throttle position � it | |
| shows injection pulse width according to throttle plate opening@ | |
| given rpm | |
| � F Trim Adjustment for the fuel table F (in%) | |
| � L submap is the fuel mapping based manifold pressure � | |
| injection pulse width according to manifold absolute pressure | |
| (MAP) @ given rpm | |
| � I table is the ignition mapping | |
| � I Trim Correction tables for Ignition advance (I) in degrees. | |
| � F-L switch submap sets the threshold where the vacuum mapping | |
| goes over into the throttle mapping. | |
| EP Submaps | |
| � Throttle submap is the throttle by wire map, shows percentage | |
| throttle for each RPM thus affecting the sensitivity of the | |
| throttle, 100% is basically 1 to 1 ratio. | |
| There is a different F,L,I and Throttle submap for each number | |
| on the map select switch dial under your seat (0,1,2,3) If you | |
| are in position 2 on the dial then you will be using L1, F1, I1, | |
| and Throttle "performance" submaps. | |
| Obviously KTM have set these tables up to accommodate the | |
| different set ups of exhaust and air filter, but remember they | |
| have to meet stringent emission regulations and hence the tables | |
| all have calculations based on emission regs and not necessarily | |
| the optimum settings, later you will see how we can customise | |
| these individual submaps to fine tune for optimum performance. | |
| Map Select Switch under the seat | |
| The Map select switch under the seat has 10 positions these | |
| relate to the following settings: | |
| 0 � Poor fuel | |
| 1 � Soft | |
| 2 � Performance | |
| 3 � Standard (4-9 is the same) | |
| As discussed above these settings will change which submaps the | |
| ECU is using to control the engine. | |
| With some of the maps all of the "L" maps are the same, all of | |
| the "F" maps are the same and all of the "I" maps are the same | |
| (except for "I low octane fuel"). So in these cases, the only | |
| change to feel or performance that this switch does is to change | |
| the EP map which only affects the throttle sensitivity. | |
| ******* | |
| Chapter 2 | |
| Diagnosing EFI | |
| Understand that these bikes have issues with fuel quality and | |
| operation of the fuel pump. | |
| The rear filler design and the minute fuel injector nozzle mean | |
| that crap can get in and stop the bike. In normal use the pump | |
| attracts a grey residue from the fuel tank material that will | |
| eventually block filters. Also the plumbing of the pump can get | |
| kinked lines and electrical connectors can work loose. So make | |
| sure that you eradicate all pump and injector issues before | |
| trying to diagnose an EFI fault. | |
| EFI systems are electrically controlled and driven, fault | |
| monitoring circuits therefore can only detect electrical faults | |
| and monitor for extremes i.e. open circuit or short circuit. If | |
| a sensor is misreading it will not be detected as a fault until | |
| its parameters go outside of set limits. If any sensors go | |
| outside limits you will get a flashing FI light and the KTM | |
| operators manual will be able to interpret the �blink� code | |
| which is kind of like �morse� code from the FI light blinking so | |
| many long and short blinks. | |
| If you have a mechanical fault, a sensor reading incorrectly or | |
| an incorrectly adjusted sensor there will be no warning. If you | |
| have a combination of a couple of faults it can get very hard to | |
| diagnose, particularly if you are dealership mechanic on a tight | |
| timeframe servicing a multitude of weaponry you simply won�t | |
| have the time to get fully up to speed on one particular model. | |
| My thoughts are that you as the owner need to become an expert. | |
| As KTM use a specific KTM diagnostics box to read and adjust the | |
| ECUs the price is inhibitive for the general home mechanic | |
| however some bright spark came up with a program called TuneECU. | |
| ECU Fault Monitoring | |
| The ECU monitors many items for electrical faults and is looking | |
| for them to be in a set range, if outside these values the ECU | |
| will give a fault. Several sensors are purely there to fine tune | |
| emissions to get the bike to pass the stringent European | |
| legislation and in most cases these systems are what upsets the | |
| ride- ability of the bike and they can be disabled without any | |
| issues. | |
| As there are so many sensors obviously the more you can disable | |
| then the less likely you will get a fault. KTM terminology is | |
| not consistent through their manuals so some names may vary | |
| depending on what manual you are looking at. | |
| � Crankshaft Position Sensor � Determines engine speed and Top | |
| Dead Centre position. | |
| � Throttle Position Sensor (Circuit A) � referred to as THAD in | |
| the KTM Manual, it is on the LH Side of throttle body and senses | |
| the throttle body butterfly valve position. | |
| � Accelerator Position Sensor � referred to as APAD in the KTM | |
| Manual, RH Side of throttle body and senses the cable input from | |
| the throttle. | |
| � Manifold Absolute Pressure Sensor � On top of the throttle | |
| body. The engine ECU uses barometric pressure to get ideal | |
| air/fuel mixture, thinner air = less fuel. 1013 hPa at sea level | |
| and 15 degrees Celsius air temperature is normal pressure. | |
| Barometric air pressure will vary from 960 to 1050 hPa. 988 hPa | |
| is normal with engine off, when you start the engine and rev it, | |
| more suction = less pressure. | |
| � Engine Coolant Temperature Sensor � changes fuel schedule | |
| during cold starting. Just below spark plug. | |
| � Intake Air Temperature Sensor � Located inside the airbox and | |
| can be damaged by oil contamination. NTC thermistor should be | |
| 100k at 25 degrees C. | |
| � Ambient Air Pressure Sensor � Located under the instrument | |
| cluster behind the headlight, the sensing tube must be pointing | |
| down. | |
| � Rollover Sensor � Like a crash switch, just in behind the rear | |
| brake reservoir. | |
| � Lambda Sensor � Senses O2 in the exhaust to trim the fuel | |
| mixture a little, turned off with Performance Mapping. Located | |
| in the exhaust just below the radiator. Cold engine uses open | |
| loop and it switches to closed loop as soon as the lambda | |
| sensors reach their operating temperature, This might have | |
| something to do with the issue that few people have reported | |
| (the bike stalls after 10 s).ECU will use open loop operation in | |
| warm engine also whenever there is enough engine load | |
| (acceleration). The O2 sensor is only a narrow band sensor and | |
| therefore hasn�t got much authority over fuel flow, it can only | |
| make slight adjustments , more for emission control. | |
| � System Voltage � EFI systems are sensitive to volts and need a | |
| minimum voltage to work. | |
| � Sidestand switch � Can be removed and resistor put in its | |
| place. | |
| � Ignition Coil | |
| � Fuel Pump Controller | |
| � Lambda Sensor Heater � Heater in the O2 sensor. | |
| � Fuel Evaporation Valve � USA Models only | |
| � Secondary Air Valve � Commonly called SAI, turned off with | |
| Performance Mapping. LH Side mounted by the side of the airbox | |
| up near the radiator. | |
| � EPT Motor Drive Relay Permission | |
| � Motor Drive � this electrical motor drives the throttle body | |
| butterfly valve. | |
| � Motor Drive Hall Sensor | |
| � Motor Drive Voltage. | |
| � CAN Bus Communication � electronic communication between | |
| system components. | |
| � Gear position sensor | |
| According to the KTM tech, the 2011 bikes have different sensors | |
| than the previous 690's, so the resistance values maybe | |
| different. | |
| Don�ts with EFI | |
| As the EFI system is working on such minute voltage changes the | |
| electrical connections in the circuit are critical. | |
| � Don�t spray electrical connectors with WD40 as these circuits | |
| work on millivolts and WD40 will affect resistances. | |
| � Don�t use a jet wash near the sensors or throttle body as | |
| water will get in connectors and cause corrosion affecting | |
| resistances. | |
| ****** | |
| Chapter 3 | |
| TuneECU | |
| TuneECU is a free program that can be used instead of the KTM | |
| Diagnostic tool. Please donate to the users if you find the | |
| program useful to help them keep the project going. | |
| The program will allow you to access diagnostics, read sensor | |
| values, set up sensors, read / reset fault codes and read / | |
| change mapping. | |
| EFI systems all follow a set format called OBDII so a standard | |
| cable is used just with an adapter lead to the KTM connector | |
| under the seat. | |
| It is highly important to buy a good quality cable from a | |
| reputable distributor as many have had problems with cheap ebay | |
| alternates. I bought mine from here: | |
| http://www.cjdesignsllc.com/. | |
| Use extra care when disconnecting the cable from your bike, by | |
| that I mean pull on the right part of the plug housing and not | |
| the cable/harness so as not to encourage it coming apart. | |
| So go to this website and read all about it and download and | |
| read the user guide to fully understand how it works. | |
| http://www.tuneecu.com/ | |
| http://www.tuneecu.com/ | |
| To set the system up on your laptop you will need to download | |
| the following: | |
| � The program | |
| � The drivers for the cable (these are specific to your computer | |
| operating system � Mine is Windows 7 with 64 bit � see note | |
| below ref determining whether 32 or 64 bit). | |
| � The maps | |
| The website has strict recommendations on how and where to store | |
| these files on your computer and making sure that the computer | |
| is not on the internet when first connecting the lead as you | |
| don�t want it to use any drivers from the internet, it must use | |
| the specified driver that you download. | |
| Once up to speed with TuneECU you will be able to read and save | |
| current maps and flash new ones. You will also be able to access | |
| the diagnostics page and read real time sensor values and set up | |
| your Throttle Position Sensor. | |
| Installing Drivers | |
| Installing the cable drivers is probably the most difficult part | |
| of the whole process as computers now automate this process and | |
| it can be hard to stop that automatic process to insist on | |
| installing your own specific drivers. | |
| These installation guides can help to overcome any issues | |
| depending on your operating system: | |
| http://www.ftdichip.com/Support/Documents/InstallGuides.htm | |
| http://www.ftdichip.com/Support/Documents/InstallGuides.htm | |
| How to determine whether your Windows 7 is 32 Bit or 64 Bit. | |
| Click the Start button, right-click Computer, and then click | |
| Properties. | |
| If "64-bit Operating System" is listed next to System type, | |
| you�re running the 64-bit version of Windows 7. | |
| If "32-bit Operating System" is listed next to System type, | |
| you�re running the 32-bit version of Windows 7. | |
| Download the corresponding Driver for your cable from here: | |
| http://www.ftdichip.com/Drivers/D2XX.htm | |
| http://www.ftdichip.com/Drivers/D2XX.htm | |
| Now watch the video | |
| http://www.youtube.com/watch?v=ctNjC_7HtjE | |
| http://www.youtube.com/watch?v=ctNjC_7HtjE | |
| http://www.youtube.com/watch?v=0hE2GnnqWWE | |
| http://www.youtube.com/watch?v=0hE2GnnqWWE | |
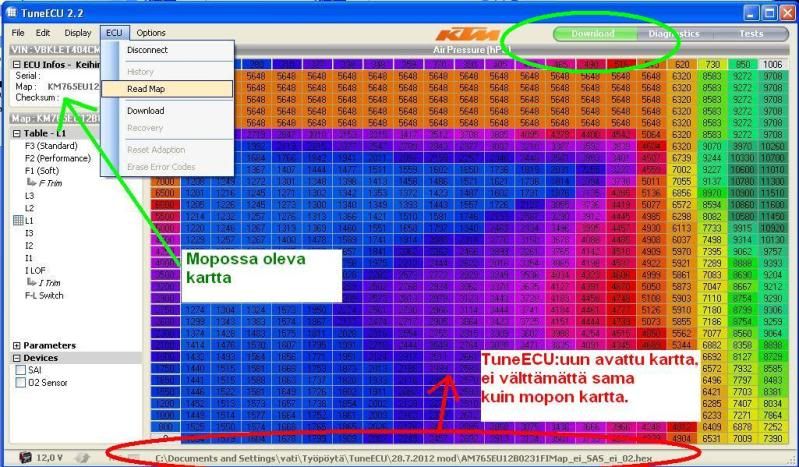
| How to see what Map is loaded on your bike | |
| When you are connected with the bike in tune ECU, in Map Edit, | |
| you will see ECU info in the top left corner, ECU serial, ECU | |
| map, checksum. You can toggle between the two ECUs to each of | |
| the two map names by clicking on the map name. | |
| Or | |
| When you are in the Map Edit, you press ECU - then Read Map - | |
| and here you can choose to read FI or EP map and the map code | |
| stands there to, just click cancel if you don�t want to read | |
| them to the computer. | |
| Working with Maps on the bike | |
| When you are connected with the bike in tune ECU you must | |
| understand that the display panel will tell you what map is | |
| loaded on the bike and you can �read� and �save� that map and | |
| �download� a new map but you cannot make �live� changes to the | |
| currently installed map. | |
| To explain it another way if you wanted to customise the current | |
| maps that are on the bike you would have to �read� them to | |
| display them in Tune ECU then make the changes in TuneECU before | |
| �downloading� them back to the bike. So you can see you only | |
| need to connect to the bike to �read�, �save� or �download�. All | |
| work to be done to change or customise mapping can be done in | |
| TuneECU whilst disconnected from the bike. | |
| #Post#: 289-------------------------------------------------- | |
| 690 Enduro EFI -- Idiot's Guide link (part II) | |
| By: Rusty Shovel Date: February 13, 2014, 9:07 am | |
| --------------------------------------------------------- | |
| Chapter 4 | |
| Remapping | |
| WARNINGS � READ THESE OR ELSE: | |
| Make sure that you have a decent charge in your battery or hook | |
| it up to a tender/charger. Reading maps from your bike takes | |
| about 45min and re-writing, re-mapping, (downloading, flashing) | |
| takes just about few minutes. | |
| If the power drops out or computer trips up during this process | |
| the ECU will freeze, if this happens you will need to carefully | |
| read the TuneECU guide to recover the ECU. This is the risky | |
| side of this operation so make sure you have back up for your | |
| bike battery and that your laptop isn�t going to run out half | |
| way through either. | |
| Don�t have any other EFI Programs running on your computer | |
| whilst connected to the bike as some can cause damage. Only use | |
| the TuneECU program whilst connected. | |
| Procedure: | |
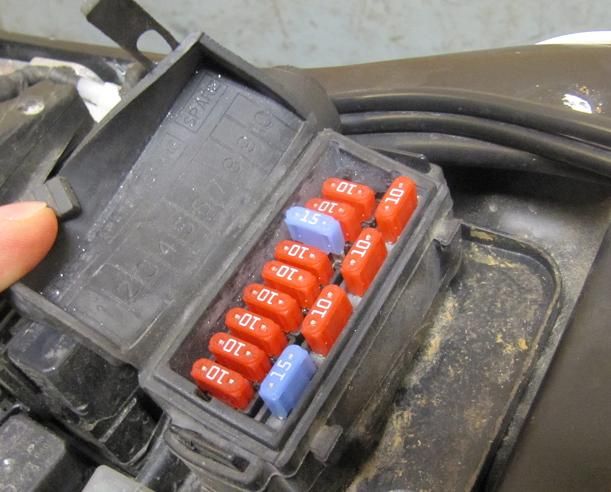
| 1. As you cannot turn off the headlight you must remove the | |
| headlight fuse in order to save battery charge (15A, blue) | |
| http://i168.photobucket.com/albums/u195/Elponkin/TuneECU/1_zps0c90e43b.jpg | |
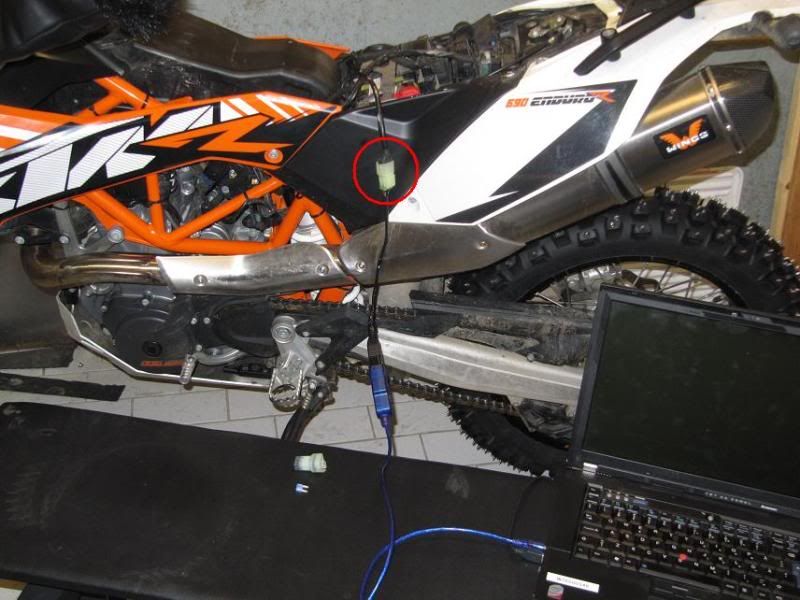
| 2. Locate the ECU test connection and carefully remove the | |
| blanking plug. Attach the cable to your bike and turn the | |
| ignition ON. (You can connect the cables wrong, check out the | |
| pins and make sure you orientate the plug correctly before | |
| pushing it in) | |
| http://i168.photobucket.com/albums/u195/Elponkin/TuneECU/2_zps5f12da31.jpg | |
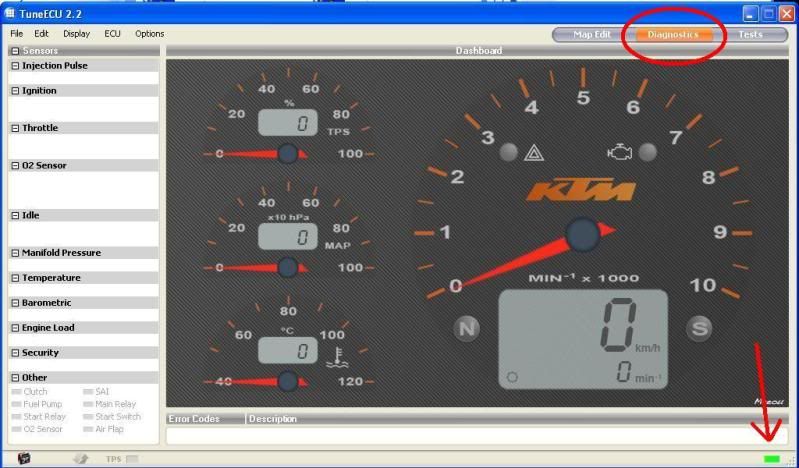
| 3. Start up the TuneECU software. | |
| Three views are possible and can be selected in the top | |
| right-hand-corner. | |
| Maps - allows view and editing of maps | |
| Diagnostics - Allow you to see a wide variety of parameters the | |
| ECU is monitoring such as barometric pressure, oil temp, ambient | |
| temp, engine load, throttle voltage. | |
| Tests - Allows you to perform several tests on the bike via the | |
| ECU | |
| NOTE: When opening the program for the first time the opening | |
| screen is set to Triumph by default, it will change to KTM upon | |
| connection or loading a map. | |
| NOTE: As a default, it should connect to your bike. If it | |
| doesn't, select the ECU menu and click connect. You will see in | |
| the �Options� menu a selection for �Auto Connect� and you can | |
| select this if you like, if working in TuneECU whilst | |
| disconnected from the bike it is best to uncheck this to stop | |
| the annoying pop up telling you it can�t connect. | |
| Within 30 seconds, a little rectangle will blink in the lower | |
| right-hand-corner of the application. Initially it will be red | |
| when sensing the connection and turn to green once a connection | |
| is established. | |
| http://i168.photobucket.com/albums/u195/Elponkin/TuneECU/3_zpsa5c08408.jpg | |
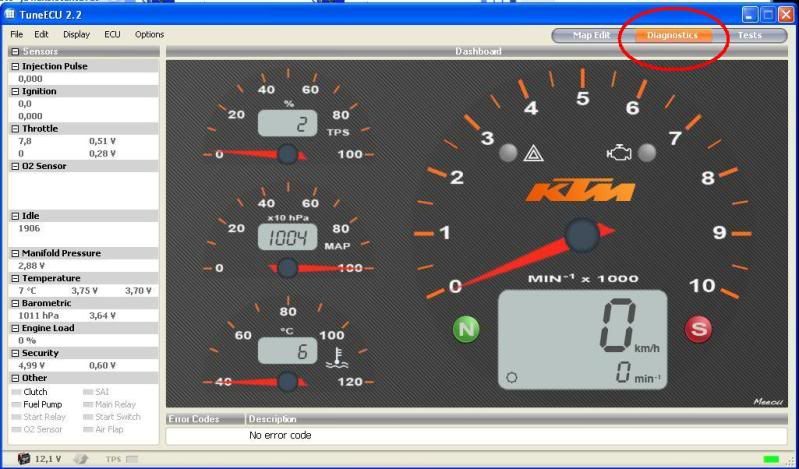
| 4. After a while TuneECU has read the sensor readings. | |
| http://i168.photobucket.com/albums/u195/Elponkin/TuneECU/4_zps7f709fc7.jpg | |
| 5. Move to the "Download" page. Reading your currently installed | |
| map and saving it is recommended as a fail-safe feature at least | |
| if your recent map is not available at Tune ECU site. Just make | |
| a backup. | |
| The Green arrow below shows the ECU info and this will indicate | |
| what map is currently loaded in the bike, you can click on the | |
| Map number and it will toggle between the EP map number and the | |
| FI map number. | |
| NOTE: TuneECU does not display the Maps currently loaded on the | |
| bike in the tables, the table displayed is the last map that you | |
| chose to �open� or �read� it is not looking �live� at the map | |
| that is on the bike. You can see the Red arrow shows the | |
| computer address of the map that is currently being displayed. | |
| To display the map currently installed in the bike you must | |
| first �Read� the map. To do this from the ECU menu select Read. | |
| http://i168.photobucket.com/albums/u195/Elponkin/TuneECU/5_zps369cde90.jpg | |
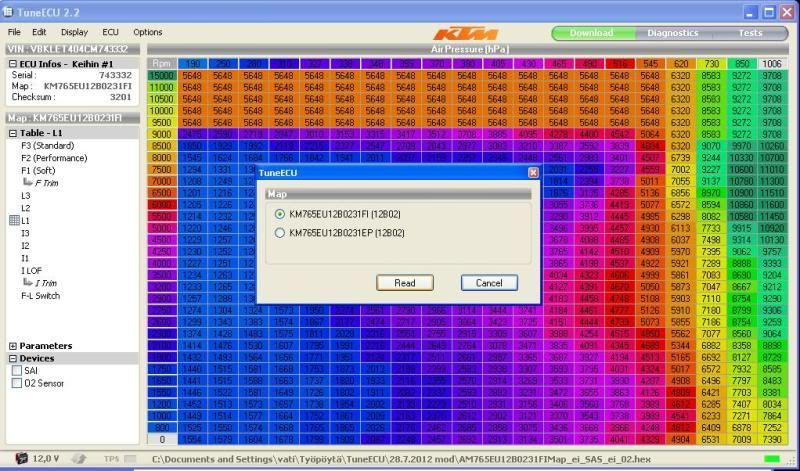
| 6. TuneECU software will ask which map you want to Read. Select | |
| the first map and select Read. TuneECU will then commence | |
| reading the map and copying it to the tables. A green progress | |
| bar will appear at the bottom of the tables which will indicate | |
| the percentage read. | |
| NOTE: The FI map takes about 10 mins but the EP map takes about | |
| 30 mins. | |
| BE PATIENT AND DON�T MESS WITH ANYTHING. | |
| http://i168.photobucket.com/albums/u195/Elponkin/TuneECU/6_zpsca23972c.jpg | |
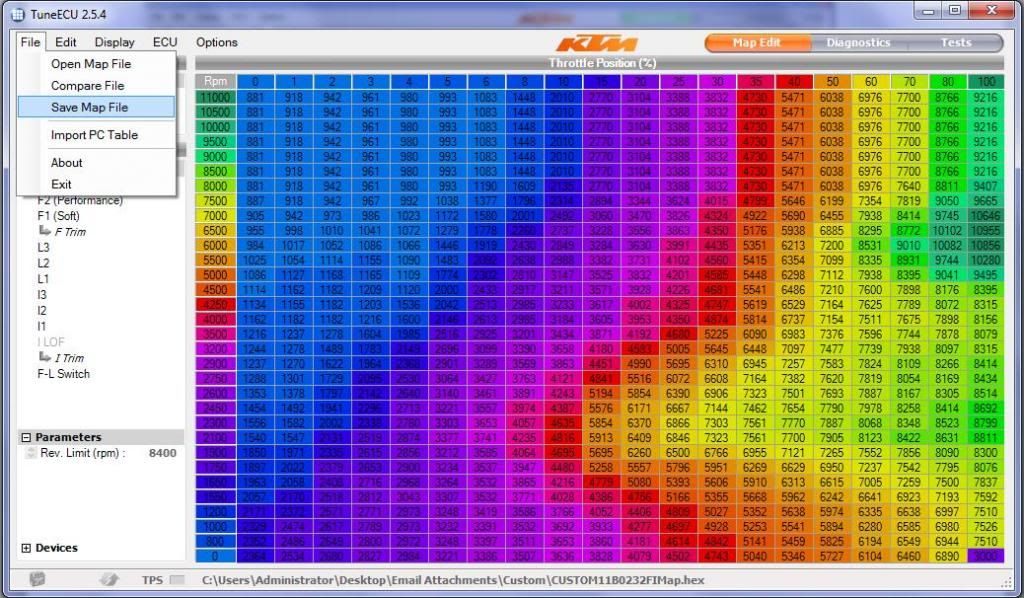
| 7. After the Map has finished being read you must then save the | |
| map to your laptop so you keep a copy of what was originally | |
| installed in case you have a problem. Select the File Menu and | |
| click on Save Map File. | |
| http://i168.photobucket.com/albums/u195/Elponkin/TuneECU/7_zps714c9acc.jpg | |
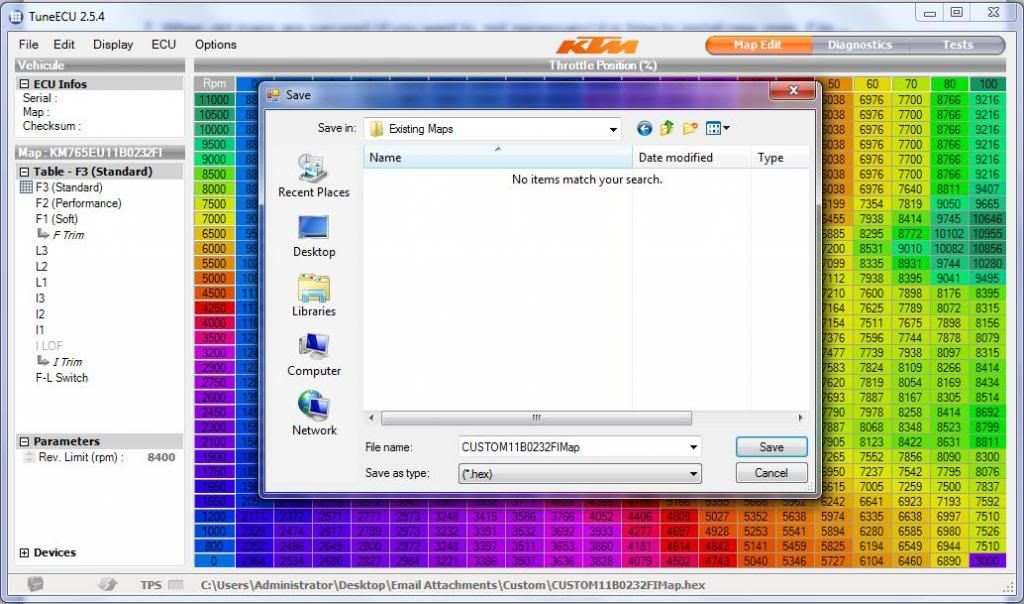
| 8. Create a folder for the existing maps and save to that | |
| folder. | |
| http://i168.photobucket.com/albums/u195/Elponkin/TuneECU/8_zps0979eb9d.jpg | |
| 9. Now repeat the �read and save� process for the EP Map. | |
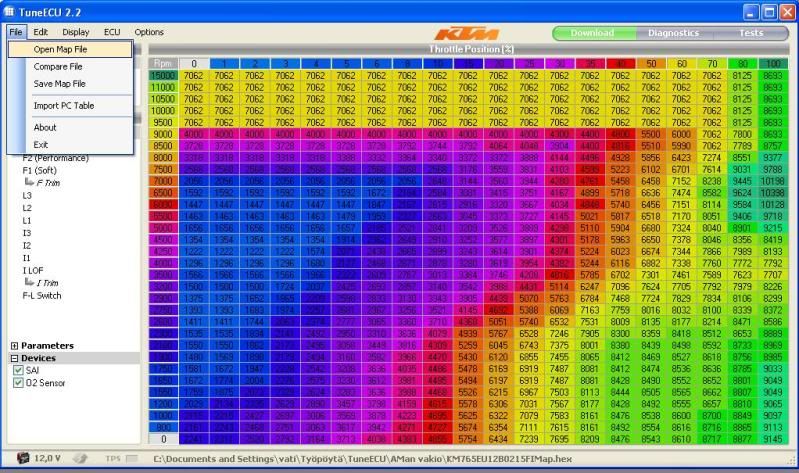
| 10. Now the old maps are secured it is time to install new ones. | |
| Select File Menu and click on Open Map File. | |
| http://i168.photobucket.com/albums/u195/Elponkin/TuneECU/9_zpsf2939b92.jpg | |
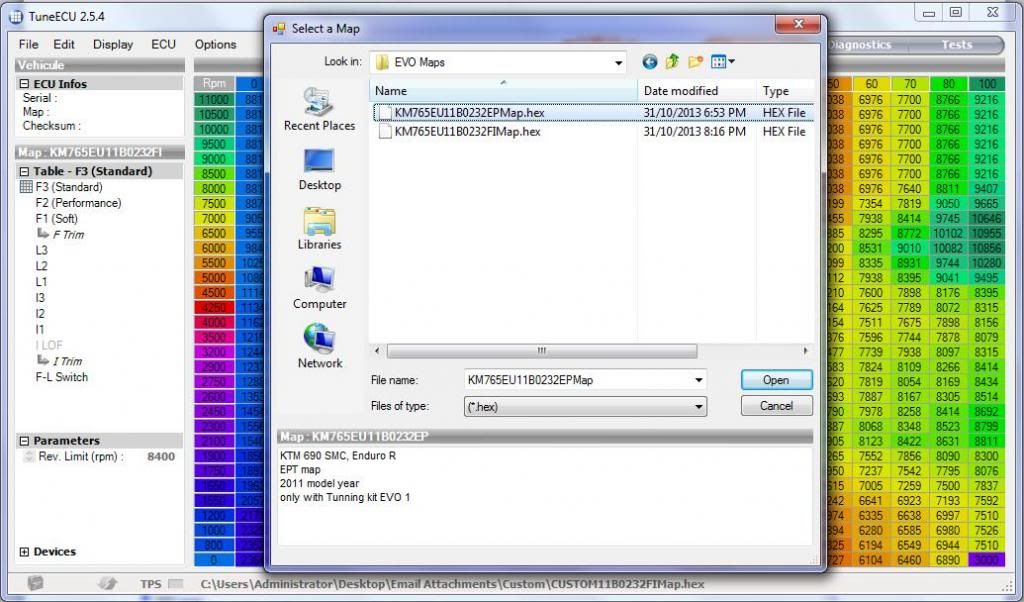
| 11. Open the map that you're going to install starting with the | |
| EP Map. In this case we are installing the EVO1 maps for a 2011 | |
| bike. | |
| http://i168.photobucket.com/albums/u195/Elponkin/TuneECU/9a_zps1a1376fd.jpg | |
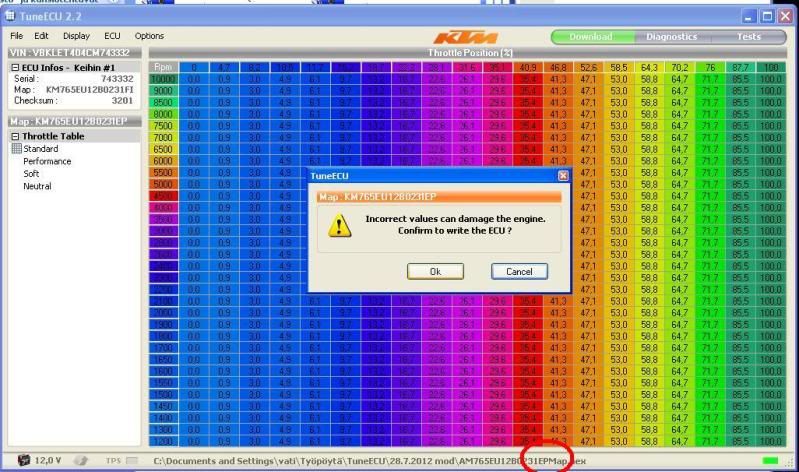
| 12. Once you have opened your new map it will be displayed in | |
| the tables. To Install the map on the bike select the ECU menu | |
| and click on Download. A warning will pop up explaining the | |
| dangers of loading an incorrect map, this is a standard warning | |
| that will always show and acts as a timely reminder to ensure | |
| you have selected the correct map. Click Ok and the download to | |
| the bike will commence. It only takes a couple of minutes and | |
| again you will see the progress bar as this happens. | |
| NOTE: The Red circle in the screenshot shows the path to the map | |
| file which is going to be downloaded. | |
| http://i168.photobucket.com/albums/u195/Elponkin/TuneECU/9b_zpsa7a0278d.jpg | |
| 13. After the EP map install you must do a Throttle Calibration. | |
| The bike remains hooked up through this process so you can | |
| monitor the throttle calibration with TuneECU. Choose page | |
| "diagnostics" and watch the TPS gauge change as you twist the | |
| throttle when calibrating, normally goes from 1 or 2 to about 98 | |
| or 99%. | |
| . | |
| Carry out as follows: | |
| Turn the ignition off for 10 secs | |
| Turn ignition back on and Twist the throttle grip slowly to full | |
| open and then slowly to full close and then turn the ignition | |
| back off. | |
| Turn the ignition back on and make sure TuneECU reconnects | |
| automatically and you get a green bar again in the bottom RH | |
| corner. | |
| http://i168.photobucket.com/albums/u195/Elponkin/TuneECU/9c_zps4085de54.jpg | |
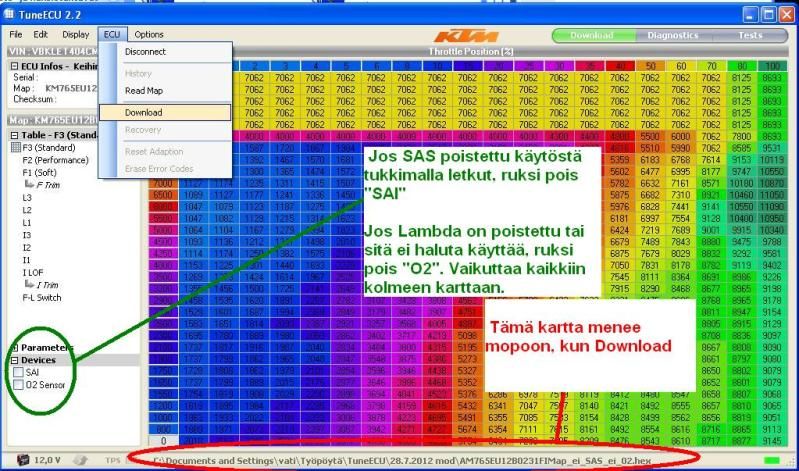
| 14. Repeat items 12 and 13 to install the FI map with the | |
| following addition: | |
| Once you have opened the FI map you need to make sure you have | |
| the right boxes ticked on or off under the �Devices� heading. If | |
| you have SAS plugged, you should uncheck the SAI box. If you | |
| have the O2 lambda sensor removed you should uncheck the O2 box. | |
| If they are still fitted you can decide whether to just | |
| electrically disable them or not just by unchecking each box, I | |
| would recommend they be disabled for smoother running if you do | |
| not have the standard exhaust still fitted. | |
| NOTE: as long as these checkboxes are unchecked i.e. disabled | |
| the sensors can be removed WITHOUT having to fit a slave | |
| resistor and there will be no FI warnings and map loading will | |
| work fine with them not fitted. | |
| Now download the FI map to the bike as we did before for the EP | |
| map. | |
| NOTE: The Red circle in the screenshot below shows the path to | |
| the map file which is going to be downloaded. | |
| http://i168.photobucket.com/albums/u195/Elponkin/TuneECU/9d_zpsbd117666.jpg | |
| 15. After the FI map is installed you must do the 15 min | |
| �adaptation� run as follows: | |
| NOTE: The engine must be stone cold and throughout the process | |
| do not touch the throttle. Leave the bike connected to the | |
| laptop but make sure the cabling is away from the exhaust heat. | |
| Start the engine and let it run for 15 min. | |
| After 15 mins Kill the engine with the ignition key. | |
| You can monitor the 15 min adaptation run with TuneECU. Choose | |
| page "diagnostics" and watch the IAT and Coolant Temp rise when | |
| idling and the fan kicking in and out to control water temp. | |
| 16. Once complete and with the ignition off, shutdown the | |
| TuneECU program and disconnect the cable. | |
| Remember to reinstall the blanking cap on the ECU connector and | |
| then restow it out of harms way. Refit the headlight fuse and | |
| refit the seat. Job done. | |
| http://i168.photobucket.com/albums/u195/Elponkin/TuneECU/9e_zpsaf0bf724.jpg | |
| #Post#: 290-------------------------------------------------- | |
| 690 Enduro EFI -- Idiot's Guide link (part III) | |
| By: Rusty Shovel Date: February 13, 2014, 9:14 am | |
| --------------------------------------------------------- | |
| Chapter 5 | |
| Tune ECU Experimentation | |
| For a more in-depth look into customising maps check out this | |
| link | |
| http://advrider.com/forums/showthread.php?t=666269 | |
| http://advrider.com/forums/showthread.php?t=666269 | |
| Warning. | |
| When customising maps you can seriously damage your engine. It | |
| is best to have the mapping customised by an expert with the | |
| bike on a dyno. | |
| Customising Maps | |
| http://Customising Maps | |
| The F map is usable at high engine load when MAP (Manifold Air | |
| Pressure) is close to atmosphere or there is just a little under | |
| pressure. | |
| The L map is usable at low engine load, when there is much under | |
| pressure. | |
| When you are cruising at suburban speeds the throttle plate is | |
| almost completely shut. The pressure in the manifold is very | |
| low. L-map starts from 190 hPa, which is approx. 0,19 * | |
| atmospheric pressure. KTM 690 fuel pressure is 3,5 bar or 3500 | |
| hPa. The amount of fuel being delivered to the manifold is | |
| defined by 2 things; pulse width (injector open) + pressure | |
| difference. Injecting the same, let's say 8000 �s, at 0,2 bar | |
| MAP compared to 0,9 bar MAP makes 19% difference in the amount | |
| of fuel injected. That makes a lot in terms of Air Fuel Ratio | |
| (AFR). Therefore, you need to match the pulse width to manifold | |
| (under) pressure. | |
| The F-L switch map controls the point at which fuel scheduling | |
| goes from the L map to the F Map. The F-L map can be tweaked to | |
| read 10,10,0,0,0,0,0 and this means that the bike's ECU uses | |
| almost all the time the F map. 10 means 10% throttle as a limit | |
| to change using F map. At higher revs (1800 and up) the limit is | |
| 0%. So the bike is using the F map practically all the time. | |
| The L map is more accurate at low engine load. That's where the | |
| jerky ride and stalling gremlin lives. L map has also the | |
| ability to adapt to changed airflow conditions like clogged air | |
| filter or changing atmospheric pressure (high elevation, | |
| barometric low). | |
| In 690cc KTM 690 bikes (2012-) there is no need to tweak the F-L | |
| switch map. | |
| The F-maps can be edited in two different ways: | |
| � If you want to make a change that will be applied to all the | |
| F-maps you can select "Edit" from the drop-down menu and click | |
| the option to "use F-trim for all F tables". Then you can select | |
| the F-trim icon in the left hand column and then change all the | |
| "0s" to "4s". Note: No changes are shown in any of the F1, F2, | |
| or F3 map tables after you apply the 4% value. | |
| � If you want to make changes to each individual map, first make | |
| sure "apply F-trim value to all maps" is NOT selected. Then you | |
| select a map you want to edit and highlight all the cells. Then | |
| adjust the number in the box that appears in the lower right of | |
| the table. Hit enter and the map values in the table will | |
| update. Select the next F-map and repeat. | |
| The L-maps are changed the same way you change the F-maps | |
| individually. You select a map and then highlight all the cells | |
| and adjust the number in the box that appears in the lower right | |
| of the table. Hit enter and the map values in the table will | |
| update. Select the next L-map and repeat. | |
| Always work on a renamed copy of the file and don't forget to | |
| save it. | |
| Check out this link to the full process with pics: | |
| http://advrider.com/forums/showpost.php?p=15358449&postcount=13 | |
| http://advrider.com/forums/showpost.php?p=15358449&postcount=13 | |
| When you really get into it then read this forum and join the | |
| elite: | |
| http://advrider.com/forums/showthread.php?t=685657&page=3 | |
| http://advrider.com/forums/showthread.php?t=685657&page=3 | |
| ********* | |
| Chapter 6 | |
| KTM 690 - Stalling and throttle issues | |
| Sourced from: | |
| http://www.monomaniacs.nl/tnt/KTM-690/Stalling-and-throttle-issues | |
| http://www.monomaniacs.nl/tnt/KTM-690/Stalling-and-throttle-issues | |
| A lot of 690 owners complain about stalling and/or a jerky | |
| throttle response. While there are differences between | |
| individual bikes (and their owners...), there seems to be no | |
| pattern in models or production years. Some bikes suffer more | |
| from stalling and throttle glitches than others. Most don't at | |
| all or only occasionally. But these niggles are usually easy to | |
| solve! | |
| The fact that KTM 690s are a bit more sensitive to stalling | |
| and/or throttle issues is down to two important factors; | |
| performance and emission & noise regs. The 690 is one of the | |
| strongest 4-stroke singles on the market today, this means a | |
| relatively high state of tune, big valves, big ports, big | |
| throttle body, high compression, low rotating mass etc. But the | |
| 690 also has to meet the ever tougher regulations for emissions | |
| and noise. Power & performance do not go hand-in-hand with noise | |
| & emissions regs very well, especially not with a big single. | |
| The Lambda sensor controlled EFI keeps the engine on a | |
| super-lean mixture, catalytic converter(s), Secondary Air | |
| System, throttle restriction in 2nd & 3rd gear are all there to | |
| make it pass the murdering emission & noise regs. They do not | |
| help the engine... they do exactly the opposite. The high | |
| performance concept & design of the 690s combined with all the | |
| environmental measures makes them more sensitive to the right | |
| setup and adjustments. | |
| But we all want that performance so stop moaning and deal with | |
| it properly. 95% of the stalling and throttle issues are easily | |
| solved and are usually only down to proper service and dealer | |
| knowledge. | |
| These are the steps to follow to kill throttle gremlins: | |
| 1.Throttle calibration (All) | |
| 2.Idle reset procedure (All) | |
| 3.Throttle sensor check/adjustment (Values change depending on | |
| year model) | |
| 4.Idle CO check/adjustment | |
| 1. Throttle calibration | |
| The simplest one. This re-calibrates the start & stop position | |
| of the throttle grip. Turn the ignition on but don't start. Wait | |
| for the tacho needle to return to zero. Then turn the throttle | |
| grip gradually from close to open and back from open to closed. | |
| Don't let it snap shut. Turn the ignition off, done. | |
| 2. Idle reset procedure | |
| The 'famous' 15 minute idle reset procedure. This resets the | |
| adaptive base values of the ECU. It won't transform the bike but | |
| it can make a worthwhile improvement. It is very important that | |
| the engine is stone cold. One or two hours after riding is not | |
| enough! Do this after the bike has been off for a full night or | |
| day. Start the engine and let it idle for 15 minutes without | |
| touching anything. After 15 minutes, switch the engine off with | |
| the ignition key. Done. During this procedure you won't see or | |
| hear anything happening besides the idling and (probably) the | |
| fan. Don't worry, the reset is done. Besides after certain | |
| maintenance or parts replacement, you could consider doing it | |
| twice a year with the turning of the seasons. A reset for the | |
| colder autumn & winter period and one time for warmer conditions | |
| during spring & summer. This is not mandatory or needed and | |
| don't expect miracles. | |
| 3. Throttle sensor check/adjustment | |
| This requires a KTM diagnostics tool hooked up to the bike or | |
| use TuneECU as described before. There are two throttle sensors | |
| on the throttle body (where the carb used to be...). On the left | |
| hand side is the sensor controlled by the ECU. This one is used | |
| when the ECU takes over the control of the throttle valve from | |
| the rider (ride by wire with data from the throttle map). On the | |
| right hand side is the sensor connected to the throttle cables | |
| coming from the throttle grip. This is the one that makes you | |
| think you're in control. :-) Both sensors interact with each | |
| other and each has its own base adjustment. It's not difficult | |
| to understand that these are important. The abbreviations in the | |
| maintenance & repair manual for these base adjustments are | |
| 'THAD' and 'APAD'. The procedure is pretty straightforward but | |
| precise. It shouldn't take longer than 20 minutes or so. After | |
| adjustment it makes sense to do a �Throttle Calibration� as per | |
| step 1 above. On the left side is the TPS "THAD" basic setting | |
| is 0.50 - 0.54v this is the throttle position for the ECU | |
| throttle butterfly closed with your finger. On the right side is | |
| the TPS "APAD" basic setting is 0.70 - 0.74v this is the | |
| throttle grip position sensor These settings are from the | |
| 2008-2010 manuals (2011 is different and I haven�t found the | |
| values yet). Be aware there is a plastic tag on the TPS driving | |
| the butterfly so be careful not to break it off by being to | |
| rough. | |
| 4. Idle & Load CO check/adjustment | |
| This requires a KTM diagnostics tool hooked up to the bike or | |
| use TuneECU as described later. There is some control over the | |
| idle & load mixture through adjustment of the CO targets from | |
| the ECU. This is within a limited bandwith but enough to iron | |
| out idle or fueling glitches. Adjustments are made by up & down | |
| mouse-clicks with real time bar graphs on the screen that show | |
| what happens. Very easy. Only small changes at a time should be | |
| made. The effect of changes to the idle CO take a while to show | |
| in the graphs. The target for load CO (riding) is usually set at | |
| 1.000. This is Lamda 1 and corresponds to an air/fuel mixture of | |
| 1:14.7. Adjustment of this value goes in small steps of 0.008 | |
| but has a clear effect on the mixture throughout the rev range. | |
| Only one or two steps is enough. Not more because the mixture is | |
| likely to become too rich or lean. So if the mixture needs to be | |
| a little richer (probably) this would be 1.008 or 1.016. Ideally | |
| this should be done on a dyno but minor adjustments like this | |
| can be done by 'set & ride' too. | |
| After these 4 steps, 99% of all idle and throttle glitches will | |
| be solved. Most already after steps 1 to 3. If not, something | |
| else is really wrong or malfunctioning but this is rarely the | |
| case. If so, there is a big chance the cause will show up on the | |
| diagnostics page of TuneECU in the error message log. | |
| Idle Figures | |
| 2200 idle rpm when cold is normal, 1650 when hot is normal idle | |
| rpm. | |
| #Post#: 291-------------------------------------------------- | |
| 690 Enduro EFI -- Idiot's Guide link (part IV) | |
| By: Rusty Shovel Date: February 13, 2014, 9:22 am | |
| --------------------------------------------------------- | |
| Chapter 7 | |
| Setting up the Throttle sensor. | |
| Sourced from: | |
| http://www.supermotojunkie.com/showthread.php?115864-KTM-690-fix-staling-proble… | |
| http://www.supermotojunkie.com/showthread.php?115864-KTM-690-fix-staling-proble… | |
| KTM 690 fix stalling problem using TuneECU | |
| I spent a week trying to get bike not to stall after loading any | |
| kind of map with after market slip-on exhaust. This is a guide | |
| on how to do it yourself in much less time. | |
| Symptoms: | |
| 1. Bike stalls after start up when cold. You need to fire it up | |
| every 10 or 30 sec. You can hear it idle irregular and you can | |
| even know when it�s going to stall just by listening to the | |
| engine... | |
| 2. Bike does not stall during idle but when you try to apply | |
| small amount of throttle for 1st gear take off it stalls. During | |
| idle try to open throttle by very small amounts Very slowly and | |
| you can hear engine running irregular or even stall. | |
| Cause of the problem is in the two throttle sensors on each side | |
| of keihin throttle body. For the ECU to know how much throttle | |
| is opened, its sensors need to be reading the same voltage. If | |
| sensors are not aligned the ECU will think it has throttle | |
| opening of 3% while actual opening would be 5% or more, it can | |
| also go the other way around. Also if sensors are not aligned | |
| the ECU will not pickup small throttle openings that you apply | |
| around idle. | |
| To fix this you need to use the TuneECU program, the voltage | |
| figures particular to your year model and some tools. To be able | |
| to unscrew throttle sensors you will need a torx t20 bit that | |
| has a hole in middle. | |
| The procedure on how to adjust these 2 sensors can also be found | |
| in the KTM Repair manual from pages 165-169. I also advise to | |
| read it twice. In manual this procedure is explained using the | |
| KTM diagnostic tool. You don�t need the tool to adjust anything | |
| you just need it to read voltages so therefore you can use | |
| TuneECU instead as it will read and show the voltages. | |
| Try to read all of the TuneECU guides to get familiar on how to | |
| use this software before u start to adjust sensors. | |
| 2008-2010 Year Models Procedure: | |
| Remember these wise words �If it isn�t broke don�t fix it�, only | |
| do this procedure if you have a problem and only then if you are | |
| absolutely sure you know what you are doing. I believe KTM | |
| change the throttle body as a complete assembly so if you bugger | |
| it up it will be expensive. | |
| Remember to disconnect the stepper motor before pushing with | |
| finger. | |
| These values are for 2008-2010 Models ONLY I do not have the | |
| figures or procedure for 2011 onwards yet. | |
| Do this while engine is as cold as possible. Always consult | |
| manual first before doing any of this. I am not explaining how | |
| to turn every bolt around and I am using nuts and connector | |
| names and numbers as in the KTM repair manual. | |
| 1. Take off the seat, body fairing and air box (don�t forget to | |
| unplug air temp sensor before you remove the air box), | |
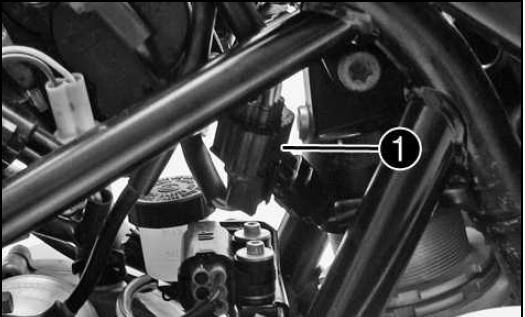
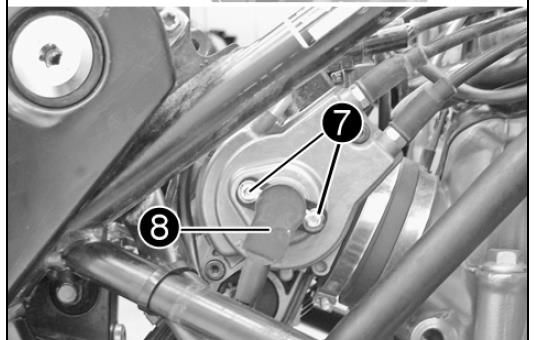
| 2. Unplug the motor drive connector that�s under the keihin | |
| throttle body on the left side of the bike (connector DR1 from | |
| manual). There are 2 connectors and DR1 is one that has more | |
| than 3 wires. You will know if you unplug the wrong one by | |
| hearing the drive motor working when you use your finger to | |
| fully close throttle valve (see repair manual on how to close it | |
| with your finger). | |
| http://i168.photobucket.com/albums/u195/Elponkin/TuneECU/a_zps3ce9294d.jpg | |
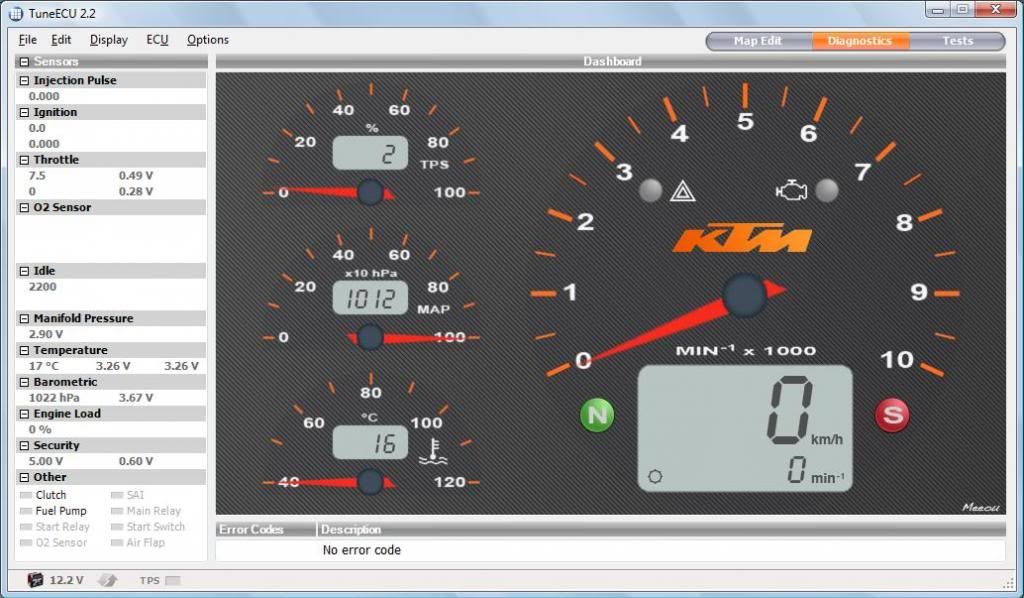
| 3. Now connect TuneECU to the bike and go to diagnostic menu. | |
| When its communicating with the bikes ECU you will see most of | |
| bikes sensors values appear in Diagnostic menu. | |
| http://i168.photobucket.com/albums/u195/Elponkin/TuneECU/b_zpsc496ab7b.jpg | |
| What you need is to be able to see is the 2 voltage values under | |
| the "Throttle" menu on the left side of the TuneECU Diagnostic | |
| window. Both upper and lower voltage should be round 0.70-0.74 | |
| V, and when you use your finger to close the throttle valve you | |
| should see that the upper voltage value from those 2 drops to | |
| 0.50-0.54V. Now if ANY of these voltages is only 0.1V off from | |
| what it should be you need to adjust all 3 readings. | |
| NOTE: Apologies for the screenshot � As it is a shot from my | |
| 2011 the figures are obviously not the same as the 2008-2010 | |
| model that we are discussing. | |
| 4. Check that the upper voltage value drops to 0.50-0.54V when | |
| you press the throttle valve to the closed position with your | |
| finger. Do this gently as there is a plastic tang that can be | |
| damaged. This is referred to in the manual as the Throttle | |
| Position Sensor Circuit A Basic Position � Voltage �THAD�. | |
| http://i168.photobucket.com/albums/u195/Elponkin/TuneECU/c_zps8db5c57c.jpg | |
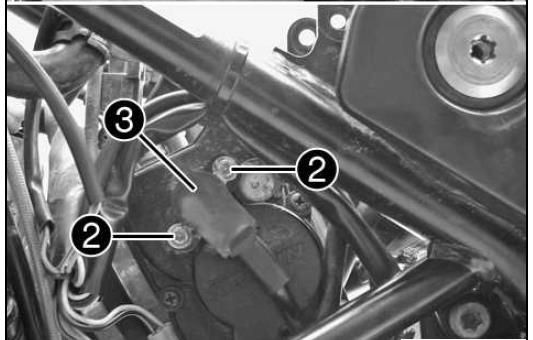
| If the value is incorrect you need to adjust the TPS that is on | |
| left side of the bike (item 3 below), it�s on the same side as | |
| where you unplug the motor drive connector. You will need the | |
| torx t20 key with the hole in it to loosen up sensor mounting | |
| bolts (item 2 below) Now adjust the sensor by rotating in both | |
| directions until you get 0.50-0.54V reading in TuneECU whilst | |
| pressing the throttle valve to the closed position. The TuneECU | |
| reading has some lag so don�t expect the voltages to drop | |
| instantly. | |
| Now make sure that the voltage reading stays adjusted AFTER you | |
| screw the sensor bolts tight. | |
| Release the throttle valve and open and close the throttle 10 | |
| times. | |
| Carefully close the throttle valve again with your finger and | |
| recheck the reading. | |
| Continue the process until you get a consistent result. | |
| http://i168.photobucket.com/albums/u195/Elponkin/TuneECU/d_zps0eca926e.jpg | |
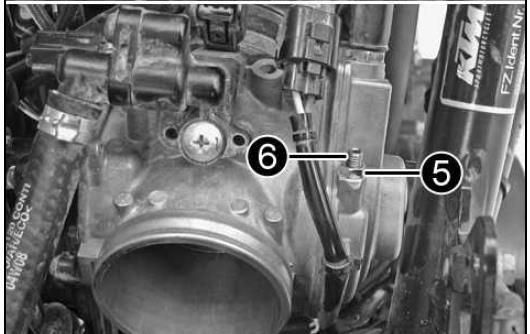
| 5. Next check that the upper voltage value returns to 0.70-0.74V | |
| when you are NOT pressing the throttle valve to the closed | |
| position. This is referred to in the manual as the Throttle | |
| Position Sensor Circuit A Emergency running position � Voltage | |
| �THAD�. | |
| Release the throttle valve and open and close the throttle 10 | |
| times. | |
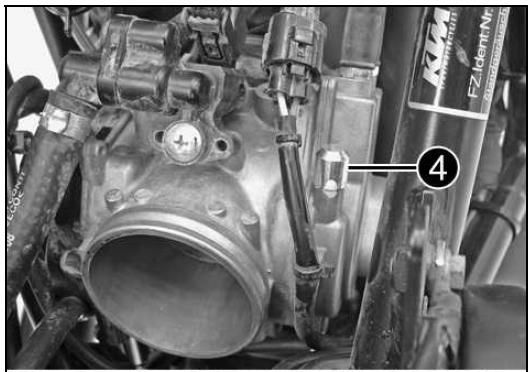
| If the value is incorrect you need to adjust as follows: | |
| Locate the adjustment point on the RH side of the throttlebody. | |
| http://i168.photobucket.com/albums/u195/Elponkin/TuneECU/e_zps83eb8596.jpg | |
| You need to unscrew the cap (item 4 - it is called the fuse | |
| cover in the manual) it is held on with varnish so can be tight | |
| and difficult to remove. Once removed it will reveal the | |
| adjustment screw and locknut. | |
| http://i168.photobucket.com/albums/u195/Elponkin/TuneECU/f_zps47c53f23.jpg | |
| Loosen the nut (item 5) and adjust the voltage with screw (item | |
| 6). | |
| I found the manual guide not working for me since the top fuse | |
| cap was glued on to screw no.6 and nut no.5 was glued so hard to | |
| screw no.6 that I needed to take it out completely and use some | |
| method to hold screw no.6 while I turn nut no.5. | |
| Also you need to ensure the screw is making contact with the | |
| throttle valve so turn it until you see a change in voltage and | |
| then back it off until you achieve the correct value. | |
| Once you get this top voltage reading to 0.70-0.74V recheck the | |
| value after opening and closing the throttle 10 times until you | |
| get consistent results. Refit the cap. | |
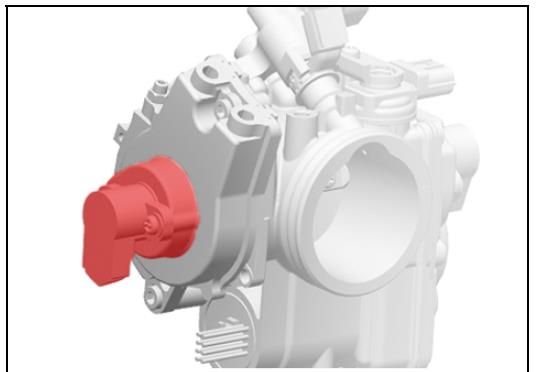
| 6. Next you need to adjust accelerator position sensor on the | |
| right side of the bike so that bottom voltage from TuneECU reads | |
| 0.70-0.74V this is called the Throttle Grip Sensor � Voltage | |
| �APAD�. | |
| http://i168.photobucket.com/albums/u195/Elponkin/TuneECU/g_zps3565dbaa.jpg | |
| Its same procedure as the TPS only by using sensor on the right | |
| hand side of the throttle body (opposite side from the TPS). | |
| Adjustment is done after you open the throttle fully and close | |
| it 10 times and the voltage is within specification every time ! | |
| http://i168.photobucket.com/albums/u195/Elponkin/TuneECU/h_zps6a068486.jpg | |
| 7. You need to turn the ignition off and back on, then wait | |
| until it connects to TuneECU and check AGAIN if all 3 voltages | |
| are in still within specification range. | |
| Dont forget to do this after any sensors adjustment! | |
| #Post#: 292-------------------------------------------------- | |
| 690 Enduro EFI -- Idiot's Guide link (part V) | |
| By: Rusty Shovel Date: February 13, 2014, 9:31 am | |
| --------------------------------------------------------- | |
| Chapter 8 | |
| Stories | |
| A success story on loading maps | |
| This morning, I have installed the Evo 1 Airbox Lid, �21 from | |
| KTM dealer and mapped the bike with the KM765EU11B0232 maps | |
| using TuneECU, did the 15min idle initialisation run, turned off | |
| ignition, TPS reset, slowly open throttle to 100% and then | |
| slowly back down, I did this twice just in case and switch off | |
| the bike. During the 15min idle procedure, I even noticed the | |
| idle is much better than with standard Akra maps, you get this | |
| erratic idling when you start the bike, but with these maps, | |
| much better. Idle seems to be around 1650 after the 15mins idle | |
| procedure, blipped the throttle in neutral and 1st gear, no | |
| stalling so far. Went for a quick ride ... what a difference, | |
| it's a new bike, the Akra pipe even sounds better, especially | |
| when accelerating hard (front wheel also lifts, idle revs are | |
| constant ... | |
| Throttle adjustment story | |
| Sourced from: | |
| Post #144 | |
| http://advrider.com/forums/showthread.php?t=685657&page=10 | |
| http://advrider.com/forums/showthread.php?t=685657&page=10 | |
| A couple important notes that I've learned that solved my | |
| stalling issues (knock on wood), for now anyway. | |
| When adjusting the second voltage value in TuneEcu (upper | |
| voltage value 0.70~.74, butterfly not pressed closed), you | |
| adjust it by way of the nut/stud throttle stop adjuster. This is | |
| the stud that physically stops the movement of the butterfly | |
| when you let the throttle go back to its zero state. In my case, | |
| I was getting a voltage within range BUT, and this is a very | |
| important BUT... the adjuster stud was not resting against the | |
| butterfly stop. I believe this is the reason for my erratic | |
| idling, stalling and intermittent low end issues over all. Since | |
| the butterfly was not physically resting up against the adjuster | |
| stud, once running, it would physically bounce around ever so | |
| slightly causing stalling and other weird intermittent issues | |
| yet when checked with TuneEcu, was still in spec. So when | |
| adjusting this, make sure you screw the adjuster stud in far | |
| enough to see the voltage change a few hundredths of a volt, | |
| then as your backing it out again, watch the point at which the | |
| voltage no longer changes. If the voltage is no longer changing, | |
| the adjuster stud is no longer in contact with the butterfly | |
| stop. After doing this a few times you can actually feel when it | |
| makes contact. It needs to make contact. Having the throttle | |
| cables out of adjustment may also affect this. | |
| Something else I ended up doing was adjusting all the voltage | |
| levels and then immediately firing it up. I only did the | |
| throttle calibration and did not plug in the air box or do the | |
| 15 min reset. I'd then see how it idled, test the response, and | |
| do quick blips to try and make it stall etc etc. Then once I was | |
| content, I waited overnight for a cold start & did the 15 min | |
| idle reset. This saved me lots of 15 min idle cycles while I was | |
| learning by trial and error as initially I tried many different | |
| voltage combinations, all within the allowable spec but just a | |
| bit different within the range. In my experience if it stalled | |
| before the idle reset, it would also stall after the idle reset. | |
| Bonus 15-Minute Idle Info! | |
| 15 min idle stripped bare | |
| Sourced from Inmate AMa as follows: | |
| http://advrider.com/forums/showpost....&postcount=304 | |
| http://advrider.com/forums/showpost....&postcount=304 | |
| Quoted from Wunderfest thead: | |
| Quote: | |
| Originally Posted by sprouty115 | |
| Just got back from my dealer. For $39, he loaded the "...233" | |
| map and did an abbreviated idle reset adaptation. Basically | |
| pushed the bike outside, started it up and let it idle until the | |
| fan came on then said I was good to go. I was always under the | |
| impression that it was supposed to be done with the engine cold? | |
| I figured I'd just do it myself tomorrow morning unless I was | |
| mistaken? | |
| I have heard the same from few other sources. At least one of | |
| them is also a KTM dealer. In that case, the customer was | |
| advised to perform a longer idle next morning when the engine is | |
| cold again. | |
| Let's start from the KTM 690 Service Manual: | |
| Initialization run is advised to do after two things; adjustment | |
| of APAD and THAD voltages and ECU flashing (re-mapping). Both | |
| include adaptations reset, APAD+THAD operation icludes "ECU | |
| Reset" with diagnostics tool and flashing erases the adaptation | |
| as the new map is installed. | |
| "Start the engine and perform a initialization run. Guideline: | |
| 15 min." | |
| Nothing about throttle calibration or stone cold engine. <- I | |
| think this wisdom originates from here: | |
| http://www.monomaniacs.nl/tnt/KTM-69...hrottle-issues | |
| http://www.monomaniacs.nl/tnt/KTM-69...hrottle-issues | |
| "2. Idle reset procedure | |
| The 'famous' 15 minute idle reset procedure. This resets the | |
| adaptive base values of the ECU. It won't transform the bike but | |
| it can make a worthwhile improvement. It is very important that | |
| the engine is stone cold. One or two hours after riding is not | |
| enough! Do this after the bike has been off for a full night or | |
| day. Start the engine and let it idle for 15 minutes without | |
| touching anything. After 15 minutes, switch the engine off with | |
| the ignition key. Done. During this procedure you won't see or | |
| hear anything happening besides the idling and (probably) the | |
| fan. Don't worry, the reset is done. Besides after certain | |
| maintenance or parts replacement, you could consider doing it | |
| twice a year with the turning of the seasons. A reset for the | |
| colder autumn & winter period and one time for warmer conditions | |
| during spring & summer. This is not mandatory or needed and | |
| don't expect miracles." | |
| Where does this come from? Maybe one possibility is KTM 990 | |
| initialization. From Tune ECU website: | |
| "990cc models SD, SM, and Adventure: | |
| After download from an new map, you must perform an | |
| initialization run. | |
| The 990s must be on the center stand, and are thus stand | |
| vertically. For SD / SM models use a Paddock | |
| Stands or the side stand with a piece of wood underneath. | |
| The engine must be cold. | |
| There should be the coolest possible air temperature outside, | |
| this can be very helpful for a lower fuel consumption. | |
| Start the engine and let it run at idle for 15 minutes. During | |
| these 15 minutes, not use the throttle or any other functions. | |
| The 15 minutes need to be strictly adhered to, and must not fall | |
| below. The time can only be exceeded by | |
| a maximum of one minute. | |
| Should the engine go out, then re-start ONLY, do not begin 15 | |
| minutes again. (Source: German KTM Forum) | |
| If you want to perform an initialization run only, you must | |
| first reset in any case the adaptation. | |
| (Source: LC8 German KTM Forum)" | |
| Sounds familiar to me. These are the guidelines that come up in | |
| many KTM sites now and then when discussing KTM 690 15 min idle | |
| also. | |
| What does the ECU do during 15 min idle? | |
| It is advised to do after ECU adaptations reset. Clearly the ECU | |
| has to adapt to something and I think that it has something to | |
| do with intake air temperature (IAT), manifold abolute pressure | |
| (MAP), amount of RPM and lambda voltage. Engine's suction and | |
| exhaust pressure are changed when hardware has been changed and | |
| so is engine's volumetric efficiency (VE) which has a lot to do | |
| with the injection pulse width. During the 15 min ECU adjusts | |
| injection pulse width and ignition advance as the IAT rises. I | |
| think that the ECU is aiming to a leanest possible mix that | |
| gives constant idle and is "learning" the right pulse width and | |
| ignition advance to whole IAT/coolant temp range. Or adapting to | |
| conditions, which are changed after hardware modding. If this is | |
| so, the 15 min is not needed for a new map per se, it is needed | |
| because the new map has no valid adaptations for current | |
| hardware. Also, then 15 min is important every time when | |
| hardware has been changed. For example a airbox cover removal or | |
| slip-on installation. | |
| What I have experienced: | |
| I have done 15 mins to stone cold, warm and hot engine, maybe 20 | |
| to 30 times after re-mapping my bike. Most of the times it has | |
| been done stone cold. I have never accomplished to get solid 15 | |
| min to warm or hot engine without stalling. Of course it is just | |
| my bike, I'm not saying it is impossible. There can always be | |
| something else. Also, when 15 min ends prematurely to stall, my | |
| bike has always had poor idle and driveability at low rpm. Once | |
| the 15 min has been done by dealer, warm engine, stalling and | |
| poor idling. The advise was "Well, maybe it gets better with | |
| time" ..... | |
| Conclusion: | |
| I will do the 15 min initialization to stone cold just to be | |
| sure. It won't harm anything and I like to keep the loose ends | |
| out of the equation. | |
| #Post#: 3328-------------------------------------------------- | |
| Re: 690 Enduro EFI -- Idiot's Guide link (part I) | |
| By: Dirk Diggler Date: December 19, 2015, 1:08 pm | |
| --------------------------------------------------------- | |
| That YouTube video of TuneECU on the Tiger 1050 is me ;D | |
| Looking forward to getting into the ECU on the KTM next... | |
| ***************************************************** |