\input texinfo @c -*-texinfo-*-
@setfilename asymptote.info
@settitle Asymptote: the Vector Graphics Language
@include version.texi
@finalout
@codequoteundirected on
@copying
This file documents @code{Asymptote}, version @value{VERSION}.
@url{
https://asymptote.sourceforge.io}
Copyright @copyright{} 2004-25 Andy Hammerlindl, John Bowman, and Tom Prince.
@quotation
Permission is granted to copy, distribute and/or modify this document
under the terms of the @acronym{GNU} Lesser General Public License (see the
file LICENSE in the top-level source directory).
@end quotation
@end copying
@dircategory Languages
@direntry
* asymptote: (asymptote/asymptote). Vector graphics language.
@end direntry
@titlepage
@title Asymptote: the Vector Graphics Language
@subtitle For version @value{VERSION}
@sp 1
@center @image{./logo}
@page
@vskip 0pt plus 1filll
@insertcopying
@end titlepage
@c So the toc is printed at the start.
@contents
@ifnottex
@node Top
@top Asymptote
@insertcopying
@end ifnottex
@menu
* Description:: What is @code{Asymptote}?
* Installation:: Downloading and installing
* Tutorial:: Getting started
* Drawing commands:: Four primitive graphics commands
* Bezier curves:: Path connectors and direction specifiers
* Programming:: The @code{Asymptote} vector graphics language
* LaTeX usage:: Embedding @code{Asymptote} commands within @code{LaTeX}
* Base modules:: Base modules shipped with @code{Asymptote}
* Options:: Command-line options
* Interactive mode:: Typing @code{Asymptote} commands interactively
* GUI:: Graphical user interface
* Command-Line Interface:: Remote command-line interface
* Language server protocol:: Help when writing code
* PostScript to Asymptote:: @code{Asymptote} backend to @code{pstoedit}
* Help:: Where to get help and submit bug reports
* Debugger:: Squish those bugs!
* Credits:: Contributions and acknowledgments
* Index:: General index
@detailmenu
--- The Detailed Node Listing ---
Installation
* UNIX binary distributions:: Prebuilt @code{UNIX} binaries
* MacOS X binary distributions:: Prebuilt @code{MacOS X} binaries
* Microsoft Windows:: Prebuilt @code{Microsoft Windows} binary
* Configuring:: Configuring @code{Asymptote} for your system
* Search paths:: Where @code{Asymptote} looks for your files
* Compiling from UNIX source:: Building @code{Asymptote} from scratch
* Editing modes:: Convenient @code{emacs} and @code{vim} modes
* Git:: Getting the latest development source
* Building the documentation:: Building the documentation
* Uninstall:: Goodbye, @code{Asymptote}!
Tutorial
* Drawing in batch mode:: Run @code{Asymptote} on a text file
* Drawing in interactive mode:: Running @code{Asymptote} interactively
* Figure size:: Specifying the figure size
* Labels:: Adding @code{LaTeX} labels
* Paths:: Drawing lines and curves
Drawing commands
* draw:: Draw a path on a picture or frame
* fill:: Fill a cyclic path on a picture or frame
* clip:: Clip a picture or frame to a cyclic path
* label:: Label a point on a picture
Programming
* Data types:: void, bool, int, real, pair, triple, string
* Paths and guides:: Bezier curves
* Pens:: Colors, line types, line widths, font sizes
* Transforms:: Affine transforms
* Frames and pictures:: Canvases for immediate and deferred drawing
* Deferred drawing:: Witholding drawing until all data is available
* Files:: Reading and writing your data
* Variable initializers:: Initialize your variables
* Structures:: Organize your data
* Operators:: Arithmetic and logical operators
* Implicit scaling:: Avoiding those ugly *s
* Functions:: Traditional and higher-order functions
* Arrays:: Dynamic vectors
* Casts:: Implicit and explicit casts
* Import:: Importing external @code{Asymptote} modules
* Static:: Where to allocate your variable?
Operators
* Arithmetic & logical:: Basic mathematical operators
* Self & prefix operators:: Increment and decrement
* User-defined operators:: Overloading operators
Functions
* Default arguments:: Default values can appear anywhere
* Named arguments:: Assigning function arguments by keyword
* Rest arguments:: Functions with a variable number of arguments
* Mathematical functions:: Standard libm functions
Arrays
* Slices:: Python-style array slices
Import
* Templated imports::
Base modules
* plain:: Default @code{Asymptote} base file
* simplex:: Linear programming: simplex method
* simplex2:: Two-variable simplex method
* math:: Extend @code{Asymptote}'s math capabilities
* interpolate:: Interpolation routines
* geometry:: Geometry routines
* trembling:: Wavy lines
* stats:: Statistics routines and histograms
* patterns:: Custom fill and draw patterns
* markers:: Custom path marker routines
* map:: Map keys to values
* tree:: Dynamic binary search tree
* binarytree:: Binary tree drawing module
* drawtree:: Tree drawing module
* syzygy:: Syzygy and braid drawing module
* feynman:: Feynman diagrams
* roundedpath:: Round the sharp corners of paths
* animation:: Embedded @acronym{PDF} and @acronym{MPEG} movies
* embed:: Embedding movies, sounds, and 3D objects
* slide:: Making presentations with @code{Asymptote}
* MetaPost:: @code{MetaPost} compatibility routines
* babel:: Interface to @code{LaTeX} @code{babel} package
* labelpath:: Drawing curved labels
* labelpath3:: Drawing curved labels in 3D
* annotate:: Annotate your @acronym{PDF} files
* CAD:: 2D CAD pen and measurement functions (DIN 15)
* graph:: 2D linear & logarithmic graphs
* palette:: Color density images and palettes
* three:: 3D vector graphics
* obj:: 3D obj files
* graph3:: 3D linear & logarithmic graphs
* grid3:: 3D grids
* solids:: 3D solid geometry
* tube:: 3D rotation minimizing tubes
* flowchart:: Flowchart drawing routines
* contour:: Contour lines
* contour3:: Contour surfaces
* smoothcontour3:: Smooth implicit surfaces
* slopefield:: Slope fields
* ode:: Ordinary differential equations
Graphical User Interface
* GUI installation:: Installing @code{xasy}
* GUI usage:: Using @code{xasy} to edit objects
@end detailmenu
@end menu
@node Description
@chapter Description
@cindex description
@cindex @code{Asymptote Web Application}
@code{Asymptote} is a powerful descriptive vector graphics language that
provides a mathematical coordinate-based framework for technical drawing.
Labels and equations are typeset with @code{LaTeX}, for overall document
consistency, yielding the same high-quality level of typesetting that
@code{LaTeX} provides for scientific text. By default it produces
@code{PostScript} output, but it can also generate @code{OpenGL}, @code{PDF},
@code{SVG}, @code{WebGL}, @code{V3D}, and legacy @code{PRC} vector graphics,
along with any format that the @code{ImageMagick} package can
produce. You can even try it out in your Web browser without
installing it, using the @code{Asymptote Web Application}
@url{
https://asymptote.ualberta.ca}
It is also possible to send remote commands to this server via the
curl utility (@pxref{Command-Line Interface}).
A major advantage of @code{Asymptote} over other graphics packages is
that it is a high-level programming language, as opposed to just a graphics
program: it can therefore exploit the best features of the script
(command-driven) and graphical-user-interface (@acronym{GUI}) methods for
producing figures. The rudimentary @acronym{GUI} @code{xasy} included with the
package allows one to move script-generated objects
around. To make @code{Asymptote} accessible to the average user, this
@acronym{GUI} is currently being developed into a full-fledged interface
that can generate objects directly. However, the script portion of the language
is now ready for general use by users who are willing to learn a few
simple @code{Asymptote} graphics commands (@pxref{Drawing commands}).
@code{Asymptote} is mathematically oriented (e.g.@ one can
use complex multiplication to rotate a vector) and uses
@code{LaTeX} to do the
typesetting of labels. This is an important feature for scientific
applications. It was inspired by an earlier drawing program (with a weaker
syntax and capabilities) called @code{MetaPost}.
The @code{Asymptote} vector graphics language provides:
@itemize @bullet
@item a standard for typesetting mathematical figures, just
as @TeX{}/@code{LaTeX} is the de-facto standard for typesetting equations.
@item @code{LaTeX} typesetting of labels, for overall document consistency;
@item the ability to generate and embed 3D vector @acronym{WebGL}
graphics within @acronym{HTML} files;
@item the ability to generate and embed 3D vector @acronym{PRC}
graphics within @acronym{PDF} files;
@item a natural coordinate-based framework for technical drawing,
inspired by @code{MetaPost}, with a much cleaner, powerful C++-like programming
syntax;
@item compilation of figures into virtual machine code for speed, without
sacrificing portability;
@item the power of a script-based language coupled to the convenience of
a @acronym{GUI};
@item customization using its own C++-like graphics programming language;
@item sensible defaults for graphical features, with the ability to override;
@item a high-level mathematically oriented interface to the
@code{PostScript} language for vector graphics, including affine transforms
and complex variables;
@item functions that can create new (anonymous) functions;
@item deferred drawing that uses the simplex method to solve overall size
constraint issues between fixed-sized objects (labels and arrowheads) and
objects that should scale with figure size;
@end itemize
Many of the features of @code{Asymptote} are written in the
@code{Asymptote} language itself. While the stock version of
@code{Asymptote} is designed for mathematics typesetting needs, one can
write @code{Asymptote} modules that tailor it to specific
applications; for example, a scientific graphing module is available
(@pxref{graph}). Examples of @code{Asymptote} code and output,
including animations, are available at
@quotation
@url{
https://asymptote.sourceforge.io/gallery/}
@end quotation
@noindent
Clicking on an example file name in this manual, like
@code{@uref{
https://asymptote.sourceforge.io/gallery/Pythagoras.svg,,Pythagoras}}, will display the @acronym{PDF} output, whereas clicking on its
@code{@uref{
https://asymptote.sourceforge.io/gallery/Pythagoras.asy,,.asy}}
extension will show the corresponding @code{Asymptote} code in a separate window.
Links to many external resources, including an excellent user-written
@code{Asymptote} tutorial can be found at
@quotation
@url{
https://asymptote.sourceforge.io/links.html}
@end quotation
@cindex reference
@cindex quick reference
A quick reference card for @code{Asymptote} is available at
@quotation
@url{
https://asymptote.sourceforge.io/asyRefCard.pdf}
@end quotation
@node Installation
@chapter Installation
@cindex installation
@menu
* UNIX binary distributions:: Prebuilt @code{UNIX} binaries
* MacOS X binary distributions:: Prebuilt @code{MacOS X} binaries
* Microsoft Windows:: Prebuilt @code{Microsoft Windows} binary
* Configuring:: Configuring @code{Asymptote} for your system
* Search paths:: Where @code{Asymptote} looks for your files
* Compiling from UNIX source:: Building @code{Asymptote} from scratch
* Editing modes:: Convenient @code{emacs} and @code{vim} modes
* Git:: Getting the latest development source
* Building the documentation:: Building the documentation
* Uninstall:: Goodbye, @code{Asymptote}!
@end menu
After following the instructions for your specific distribution,
please see also @ref{Configuring}.
@noindent
We recommend subscribing to new release announcements at
@quotation
@url{
https://sourceforge.net/projects/asymptote}
@end quotation
@noindent
Users may also wish to monitor the @code{Asymptote} forum:
@quotation
@url{
https://sourceforge.net/p/asymptote/discussion/409349}
@end quotation
@noindent
@node UNIX binary distributions
@section UNIX binary distributions
@cindex UNIX binary distributions
@cindex @acronym{RPM}
@cindex @code{tgz}
We release both @code{tgz} and @acronym{RPM} binary distributions of
@code{Asymptote}. The root user can install the @code{Linux x86_64} @code{tgz}
distribution of version @code{x.xx} of @code{Asymptote} with the commands:
@verbatim
tar -C / -zxf asymptote-x.xx.x86_64.tgz
texhash
@end verbatim
@noindent
The @code{texhash} command, which installs LaTeX style files, is optional.
The executable file will be @code{/usr/local/bin/asy}) and example code
will be installed by default in @code{@value{Docdir}/examples}.
@noindent
@cindex Fedora
Fedora users can easily install a recent version of @code{Asymptote}
with the command
@verbatim
dnf --enablerepo=rawhide install asymptote
@end verbatim
@cindex Debian
@noindent
To install the latest version of @code{Asymptote} on a Debian-based distribution
(e.g.@ Ubuntu, Mepis, Linspire) follow the instructions for compiling
from @code{UNIX} source (@pxref{Compiling from UNIX source}).
Alternatively, Debian users can install one of Hubert Chan's
prebuilt @code{Asymptote} binaries from
@quotation
@url{
https://ftp.debian.org/debian/pool/main/a/asymptote}
@end quotation
@node MacOS X binary distributions
@section MacOS X binary distributions
@cindex @code{MacOS X} binary distributions
@code{MacOS X} users can either compile the @code{UNIX} source code
(@pxref{Compiling from UNIX source})
or install the @code{Asymptote} binary available at
@url{
https://www.macports.org/}
or at
@url{
https://brew.sh/}
@noindent
Note that many @code{MacOS X} (and FreeBSD) systems lack the
@acronym{GNU} @code{readline} library. For full interactive
functionality, @acronym{GNU} @code{readline} version 4.3 or later must
be installed.
@node Microsoft Windows
@section Microsoft Windows
@cindex Microsoft Windows
Users of the @code{Microsoft Windows} operating system can install the
self-extracting @code{Asymptote} executable @code{asymptote-x.xx-setup.exe},
where @code{x.xx} denotes the latest version.
A working @TeX{} implementation (we recommend
@url{
https://www.tug.org/texlive} or
@url{
https://miktex.org}) will be required to typeset labels.
You will also need to install @code{GPL Ghostscript} version 9.56 or
later from @url{
https://www.ghostscript.com/}.
To view @code{PostScript} output, you can install the
program @code{Sumatra PDF} available from
@url{
https://www.sumatrapdfreader.org/}.
The @code{ImageMagick} package from
@url{
https://www.imagemagick.org/script/binary-releases.php}
@noindent
is required to support output formats other than @acronym{HTML},
@acronym{PDF}, @acronym{SVG}, and @acronym{PNG} (@pxref{magick}).
The @code{Python 3} interpreter from @url{
https://www.python.org} is only
required if you wish to try out the graphical user interface (@pxref{GUI}).
@noindent
Example code will be installed by default in the @code{examples}
subdirectory of the installation directory (by default,
@code{C:\Program Files\Asymptote}).
@node Configuring
@section Configuring
@cindex configuring
@cindex @code{-V}
In interactive mode, or when given the @code{-V} option (the default
when running @code{Asymptote} on a single file under @code{MSDOS}),
@code{Asymptote} will automatically invoke your @code{PostScript}
viewer (@code{evince} under @code{UNIX}) to display graphical output.
The @code{PostScript} viewer should be capable of automatically
redrawing whenever the output file is updated. The @code{UNIX}
@code{PostScript} viewer @code{gv} supports this (via a @code{SIGHUP}
signal). Users of @code{ggv} will need to enable @code{Watch file} under
@code{Edit/PostScript Viewer Preferences}.
@cindex @code{psviewer}
@cindex @code{pdfviewer}
@cindex @code{htmlviewer}
@cindex @code{gs}
@cindex @code{display}
@cindex @code{animate}
@cindex @code{settings}
@cindex configuration file
Configuration variables are most easily set as @code{Asymptote}
variables in an optional configuration file @code{config.asy}
(@pxref{configuration file}).
For example, the setting @code{pdfviewer} specifies the location of
the @acronym{PDF} viewer. Here are the default values of several
important configuration variables under @code{UNIX}:
@noindent
@verbatim
import settings;
pdfviewer="acroread";
htmlviewer="google-chrome";
psviewer="evince";
display="display";
animate="animate";
gs="gs";
libgs="";
@end verbatim
@noindent
@cindex @code{cmd}
Under @code{MSDOS}, the viewer settings
@code{htmlviewer}, @code{pdfviewer}, @code{psviewer},
@code{display}, and @code{animate} default to the string @code{cmd},
requesting the application normally associated with each file type.
The (installation-dependent) default values of @code{gs}
and @code{libgs} are determined automatically from the @code{Microsoft
Windows} registry. The @code{gs} setting specifies the location of the
@code{PostScript} processor @code{Ghostscript}, available from
@url{
https://www.ghostscript.com/}.
@noindent
@cindex @code{htmlviewer}
@cindex @code{absolute}
The configuration variable @code{htmlviewer} specifies the
browser to use to display 3D @code{WebGL} output.
The default setting is @code{google-chrome} under @code{UNIX} and
@code{cmd} under @code{Microsoft Windows}. Note that @code{Internet Explorer}
does not support @code{WebGL}; @code{Microsoft Windows} users should set their
default html browser to @code{chrome} or @code{microsoft-edge}.
By default, 2D and 3D @code{HTML} images expand to the enclosing canvas;
this can be disabled by setting the configuration variable @code{absolute}
to @code{true}.
On @code{UNIX} systems, to support automatic document
reloading of @code{PDF} files in @code{Adobe Reader}, we recommend
copying the file @code{reload.js} from the @code{Asymptote} system
directory (by default, @code{@value{Datadir}/asymptote} under @code{UNIX} to
@code{~/.adobe/Acrobat/x.x/JavaScripts/},
where @code{x.x} represents the appropriate @code{Adobe Reader}
version number. The automatic document reload feature must then be
explicitly enabled by putting
@verbatim
import settings;
pdfreload=true;
pdfreloadOptions="-tempFile";
@end verbatim
@noindent
in the @code{Asymptote} configuration file. This reload feature is not
useful under @code{MSDOS} since the document cannot be updated anyway on
that operating system until it is first closed by @code{Adobe Reader}.
The configuration variable @code{dir} can be used to adjust the
search path (@pxref{Search paths}).
@cindex @code{papertype}
@cindex @code{paperwidth}
@cindex @code{paperheight}
@cindex @code{letter}
@cindex @code{a4}
By default, @code{Asymptote} attempts to center the figure on the
page, assuming that the paper type is @code{letter}. The default paper
type may be changed to @code{a4} with the configuration variable
@code{papertype}. Alignment to other paper sizes can be obtained by setting the
configuration variables @code{paperwidth} and @code{paperheight}.
@cindex @code{config}
@cindex @code{texpath}
@cindex @code{texcommand}
@cindex @code{dvips}
@cindex @code{dvisvgm}
@cindex @code{magick}
@cindex @code{ImageMagick}
@cindex @code{asygl}
These additional configuration variables normally do not require adjustment:
@verbatim
config
texpath
texcommand
dvips
dvisvgm
convert
asygl
@end verbatim
@noindent
@cindex @code{warn}
Warnings (such as "unbounded" and "offaxis") may be enabled or disabled with
the functions
@verbatim
warn(string s);
nowarn(string s);
@end verbatim
@noindent
or by directly modifying the string array @code{settings.suppress}, which lists
all disabled warnings.
@cindex command-line options
Configuration variables may also be set or overwritten with a
command-line option:
@verbatim
asy -psviewer=evince -V venn
@end verbatim
@cindex environment variables
Alternatively, system environment versions of the above configuration
variables may be set in the conventional way. The corresponding
environment variable name is obtained by converting the configuration
variable name to upper case and prepending @code{ASYMPTOTE_}:
for example, to set the environment variable
@verbatim
ASYMPTOTE_PAPERTYPE="a4";
@end verbatim
@noindent
under @code{Microsoft Windows XP}:
@enumerate
@item Click on the @code{Start} button;
@item Right-click on @code{My Computer};
@item Choose @code{View system information};
@item Click the @code{Advanced} tab;
@item Click the @code{Environment Variables} button.
@end enumerate
@node Search paths
@section Search paths
@cindex search paths
In looking for @code{Asymptote} files, @code{asy} will search the
following paths, in the order listed:
@enumerate
@item
The current directory;
@item
@cindex @code{dir}
A list of one or more directories specified by the configuration
variable @code{dir} or environment variable @code{ASYMPTOTE_DIR}
(separated by @code{:} under UNIX and
@code{;} under @code{MSDOS});
@item
@cindex @code{.asy}
The directory specified by the environment variable
@code{ASYMPTOTE_HOME}; if this variable is not set,
the directory @code{.asy} in the user's home directory
(@code{%USERPROFILE%\.asy} under @code{MSDOS}) is used;
@item
The @code{Asymptote} system directory (by default,
@code{@value{Datadir}/asymptote} under @code{UNIX} and
@code{C:\Program Files\Asymptote} under @code{MSDOS}).
@item
The @code{Asymptote} examples directory (by default,
@code{@value{Docdir}/examples} under @code{UNIX} and
@code{C:\Program Files\Asymptote\examples} under @code{MSDOS}).
@end enumerate
@node Compiling from UNIX source
@section Compiling from UNIX source
@cindex Compiling from UNIX source
To compile and install a @code{UNIX} executable from
the source release @code{asymptote-x.xx.src.tgz} in the subdirectory
@code{x.xx} under
@url{
https://sourceforge.net/projects/asymptote/files/}
execute the commands:
@verbatim
gunzip asymptote-x.xx.src.tgz
tar -xf asymptote-x.xx.src.tar
cd asymptote-x.xx
@end verbatim
Then compile @code{Asymptote} with the commands
@verbatim
/configure
make all
make install
@end verbatim
@noindent
Be sure to use @acronym{GNU} @code{make} (on non-@acronym{GNU} systems
this command may be called @code{gmake}).
To build the documentation, you may need to install the
@code{texinfo-tex} package. If you get errors from a broken @code{texinfo}
or @code{pdftex} installation, simply put
@quotation
@url{
https://asymptote.sourceforge.io/asymptote.pdf}
@end quotation
@noindent
in the directory @code{doc} and repeat the command @code{make all}.
@noindent
For a (default) system-wide installation, the last command should be
done as the root user. To install without root privileges, change the
@code{./configure} command to
@verbatim
/configure --prefix=$HOME/asymptote
@end verbatim
@cindex @code{MacOS X} configuration
@cindex @code{clang}
One can disable use of the Boehm garbage collector by configuring
with @code{./configure --disable-gc}. For a list of other configuration
options, say @code{./configure --help}. For example, under
@code{MacOS X}, one can tell configure to use the @code{clang} compilers and
look for header files and libraries in nonstandard locations:
@verbatim
/configure CC=clang CXX=clang++ CPPFLAGS=-I/opt/local/include LDFLAGS=-L/opt/local/lib
@end verbatim
If you are compiling @code{Asymptote} with @code{gcc}, you will need a
relatively recent version (e.g.@ 3.4.4 or later). For full interactive
functionality, you will need version 4.3 or later of the @acronym{GNU}
@code{readline} library.
The file @code{gcc3.3.2curses.patch} in the @code{patches} directory can
be used to patch the broken curses.h header file (or a local copy thereof
in the current directory) on some @code{AIX} and @code{IRIX} systems.
@cindex @code{FFTW}
@cindex @code{GSL}
The @code{FFTW} library is only required if you want @code{Asymptote}
to be able to take Fourier transforms of data (say, to compute an
audio power spectrum). The @code{GSL} library is only required if you
require the special functions that it supports.
If you don't want to install @code{Asymptote} system wide, just make
sure the compiled binary @code{asy} and @acronym{GUI} script @code{xasy} are in
your path and set the configuration variable @code{dir} to point
to the directory @code{base} (in the top level directory of the
@code{Asymptote} source code).
@node Editing modes
@section Editing modes
@cindex Editing modes
@cindex @code{emacs}
@cindex @code{asy-mode}
@cindex @code{lasy-mode}
Users of @code{emacs} can edit @code{Asymptote} code with the mode
@code{asy-mode}, after enabling it by putting the following lines in their
@code{.emacs} initialization file, replacing @code{ASYDIR} with the
location of the @code{Asymptote} system directory (by default,
@code{@value{Datadir}/asymptote} or @code{C:\Program Files\Asymptote}
under @code{MSDOS}):
@verbatim
(add-to-list 'load-path "ASYDIR")
(autoload 'asy-mode "asy-mode.el" "Asymptote major mode." t)
(autoload 'lasy-mode "asy-mode.el" "hybrid Asymptote/Latex major mode." t)
(autoload 'asy-insinuate-latex "asy-mode.el" "Asymptote insinuate LaTeX." t)
(add-to-list 'auto-mode-alist '("\\.asy$" . asy-mode))
@end verbatim
@noindent
Particularly useful key bindings in this mode are @code{C-c C-c}, which compiles
and displays the current buffer, and the key binding @code{C-c ?}, which
shows the available function prototypes for the command at the cursor.
For full functionality you should also install the Apache Software Foundation
package @code{two-mode-mode}:
@quotation
@url{
https://github.com/erlyaws/yaws/blob/master/two-mode-mode.el}
@end quotation
@noindent
The hybrid mode @code{lasy-mode} can be used to edit a
LaTeX file containing embedded @code{Asymptote} code (@pxref{LaTeX usage}).
This mode can be enabled within @code{latex-mode}
with the key sequence @code{M-x lasy-mode <RET>}.
On @code{UNIX} systems, additional keywords will be generated from
all @code{asy} files in the space-separated list of directories
specified by the environment variable @code{ASYMPTOTE_SITEDIR}.
Further documentation of @code{asy-mode} is available within
@code{emacs} by pressing the sequence keys @code{C-h f asy-mode <RET>}.
@cindex @code{vim}
@cindex @code{asy.vim}
Fans of @code{vim} can customize @code{vim} for @code{Asymptote} with
@noindent
@code{cp @value{Datadir}/asymptote/asy.vim ~/.vim/syntax/asy.vim}
@noindent
and add the following to their @code{~/.vimrc} file:
@verbatim
augroup filetypedetect
au BufNewFile,BufRead *.asy setf asy
augroup END
filetype plugin on
@end verbatim
If any of these directories or files don't exist, just create them.
To set @code{vim} up to run the current asymptote script using @code{:make}
just add to @code{~/.vim/ftplugin/asy.vim}:
@verbatim
setlocal makeprg=asy\ %
setlocal errorformat=%f:\ %l.%c:\ %m
@end verbatim
@cindex @code{KDE editor}
@cindex @code{Kate}
@cindex @code{asymptote.xml}
Syntax highlighting support for the @acronym{KDE} editor @code{Kate}
can be enabled by running @code{asy-kate.sh} in the
@code{@value{Datadir}/asymptote} directory and putting the generated
@code{asymptote.xml} file in @code{~/.local/share/org.kde.syntax-highlighting/syntax/}.
@node Git
@section Git
@cindex git
The following commands are needed to install the latest development version of
@code{Asymptote} using @code{git}:
@verbatim
git clone
https://github.com/vectorgraphics/asymptote
cd asymptote
/autogen.sh
/configure
make all
make install
@end verbatim
@noindent
To compile without optimization
On @code{Ubuntu} systems, you may need to first install the required
dependencies:
@verbatim
apt-get build-dep asymptote
@end verbatim
@noindent
@node Building the documentation
@section Building the documentation
Here are instructions for building the documentation:
@verbatim
cd doc
make # for both the PDF version doc/asymptote.pdf and the HTML version
cd png
make # for the HTML version only: doc/png/index.html
@end verbatim
Note that the @code{HTML} version cannot be built without
executing @code{make} from @code{doc} folder first.
The @code{asy} executable is required for compiling the diagrams
in the documentation.
@node Uninstall
@section Uninstall
@cindex uninstall
To uninstall a @code{Linux x86_64} binary distribution
@verbatim
tar -zxvf asymptote-x.xx.x86_64.tgz | xargs --replace=% rm /%
texhash
@end verbatim
@noindent
To uninstall all @code{Asymptote} files installed from a source
distribution, use the command
@verbatim
make uninstall
@end verbatim
@node Tutorial
@chapter Tutorial
@cindex tutorial
@menu
* Drawing in batch mode:: Run @code{Asymptote} on a text file
* Drawing in interactive mode:: Running @code{Asymptote} interactively
* Figure size:: Specifying the figure size
* Labels:: Adding @code{LaTeX} labels
* Paths:: Drawing lines and curves
@end menu
A concise introduction to @code{Asymptote} is given here.
For a more thorough introduction, see the excellent @code{Asymptote}
tutorial written by Charles Staats:
@url{
https://asymptote.sourceforge.io/asymptote_tutorial.pdf}
Another @code{Asymptote} tutorial is available as a wiki,
with images rendered by an online Asymptote engine:
@url{
https://www.artofproblemsolving.com/wiki/?title=Asymptote_(Vector_Graphics_Language)}
@node Drawing in batch mode
@section Drawing in batch mode
@cindex batch mode
To draw a line from coordinate (0,0) to coordinate (100,100),
create a text file @code{test.asy} containing
@verbatiminclude diagonal.asy
@noindent
Then execute the command
@verbatim
asy -V test
@end verbatim
@noindent
Alternatively, @code{MSDOS} users can drag and drop @code{test.asy} onto the
Desktop @code{asy} icon (or make @code{Asymptote} the default
application for the extension @code{asy}).
@noindent
@cindex @code{-V}
This method, known as @emph{batch mode}, outputs a @code{PostScript}
file @code{test.eps}. If you prefer @acronym{PDF} output, use
the command line
@verbatim
asy -V -f pdf test
@end verbatim
In either case, the @code{-V} option opens up a viewer window so you
can immediately view the result:
@sp 1
@center @image{./diagonal}
@cindex @code{bp}
@noindent
Here, the @code{--} connector joins the two points @code{(0,0)} and
@code{(100,100)} with a line segment.
@node Drawing in interactive mode
@section Drawing in interactive mode
@cindex interactive mode
Another method is @emph{interactive mode}, where @code{Asymptote} reads
individual commands as they are entered by the user. To try this out, enter
@code{Asymptote}'s interactive mode by clicking on the
@code{Asymptote} icon or typing the command @code{asy}.
Then type
@verbatim
draw((0,0)--(100,100));
@end verbatim
@noindent
followed by @code{Enter}, to obtain the above image.
@cindex tab completion
@cindex arrow keys
@cindex erase
@cindex quit
At this point you can type further @code{draw} commands, which will be added
to the displayed figure, @code{erase} to clear the canvas,
@verbatim
input test;
@end verbatim
@noindent
to execute all of the commands contained in the file @code{test.asy},
or @code{quit} to exit interactive mode.
You can use the arrow keys in interactive mode to edit previous lines.
The tab key will automatically complete unambiguous words;
otherwise, hitting tab again will show the possible choices. Further
commands specific to interactive mode are described in @ref{Interactive mode}.
@node Figure size
@section Figure size
@cindex @code{size}
@cindex @code{pair}
In @code{Asymptote}, coordinates like @code{(0,0)} and @code{(100,100)},
called @emph{pairs},
are expressed in @code{PostScript} "big points" (1 @code{bp} = 1/72
@code{inch}) and the default line width is @code{0.5bp}.
However, it is often inconvenient to work directly in
@code{PostScript} coordinates.
The next example produces identical output to the previous example, by
scaling the line @code{(0,0)--(1,1)} to fit a rectangle of width
@code{100.5 bp} and height @code{100.5 bp} (the extra @code{0.5bp}
accounts for the line width):
@verbatim
size(100.5,100.5);
draw((0,0)--(1,1));
@end verbatim
@sp 1
@center @image{./diagonal}
@cindex @code{inches}
@cindex @code{cm}
@cindex @code{mm}
@cindex @code{pt}
One can also specify the size in @code{pt} (1 @code{pt} = 1/72.27 @code{inch}),
@code{cm}, @code{mm}, or @code{inches}.
Two nonzero size arguments (or a single size argument) restrict the
size in both directions, preserving the aspect ratio.
If 0 is given as a size argument, no restriction is made in that direction;
the overall scaling will be determined by the other direction (@pxref{size}):
@verbatiminclude bigdiagonal.asy
@sp 1
@center @image{./bigdiagonal}
@cindex @code{cycle}
To connect several points and create a cyclic path, use the
@code{cycle} keyword:
@verbatiminclude square.asy
@sp 1
@center @image{./square}
@noindent
For convenience, the path @code{(0,0)--(1,0)--(1,1)--(0,1)--cycle}
may be replaced with the predefined variable
@code{unitsquare}, or equivalently, @code{box((0,0),(1,1))}.
@cindex user coordinates
@cindex @code{unitsize}
To make the user coordinates represent multiples of exactly @code{1cm}:
@verbatim
unitsize(1cm);
draw(unitsquare);
@end verbatim
@noindent
@node Labels
@section Labels
@cindex @code{label}
Adding labels is easy in @code{Asymptote}; one specifies the
label as a double-quoted @code{LaTeX} string, a
coordinate, and an optional alignment direction:
@verbatiminclude labelsquare.asy
@sp 1
@center @image{./labelsquare}
@cindex compass directions
@cindex @code{N}
@cindex @code{E}
@cindex @code{W}
@cindex @code{S}
@code{Asymptote} uses the standard compass directions @code{E=(1,0)},
@code{N=(0,1)}, @code{NE=unit(N+E)}, and @code{ENE=unit(E+NE)}, etc.,
which along with the directions @code{up}, @code{down}, @code{right},
and @code{left} are defined as pairs in the @code{Asymptote} base
module @code{plain} (a user who has a local variable named @code{E}
may access the compass direction @code{E} by prefixing it with the name
of the module where it is defined: @code{plain.E}).
@node Paths
@section Paths
@cindex @code{path}
This example draws a path that approximates a quarter circle,
terminated with an arrowhead:
@verbatiminclude quartercircle.asy
@sp 1
@center @image{./quartercircle}
@noindent
Here the directions @code{up} and @code{left} in braces specify the
outgoing and incoming directions at the points @code{(1,0)} and
@code{(0,1)}, respectively.
In general, a path is specified as a list of points (or other paths)
interconnected with
@cindex @code{cycle}
@cindex @code{--}
@cindex @code{..}
@code{--}, which denotes a straight line segment, or @code{..}, which
denotes a cubic spline (@pxref{Bezier curves}).
@cindex @code{unitcircle}
@anchor{unitcircle}
@cindex @code{unitcircle}
Specifying a final @code{..cycle} creates a cyclic path that
connects smoothly back to the initial node, as in this approximation
(accurate to within 0.06%) of a unit circle:
@verbatim
path unitcircle=E..N..W..S..cycle;
@end verbatim
@cindex @code{PostScript} subpath
@cindex @code{^^}
@cindex @code{path[]}
@cindex superpath
@noindent
An @code{Asymptote} path, being connected, is equivalent to a
@code{PostScript subpath}. The @code{^^} binary operator, which
requests that the pen be moved (without drawing or affecting
endpoint curvatures) from the final point of the left-hand path to the
initial point of the right-hand path, may be used to group several
@code{Asymptote} paths into a @code{path[]} array (equivalent to a
@code{PostScript} path):
@verbatiminclude superpath.asy
@sp 1
@center @image{./superpath}
@cindex evenodd
@noindent
The @code{PostScript} even-odd fill rule here specifies that only the
region bounded between the two unit circles is filled (@pxref{fillrule}).
In this example, the same effect can be achieved by using the default
zero winding number fill rule, if one is careful to alternate the
orientation of the paths:
@verbatim
filldraw(unitcircle^^reverse(g),yellow,black);
@end verbatim
@cindex @code{unitbox}
The @code{^^} operator is used by the @code{box(triple, triple)} function in
the module @code{three} to construct the edges of a
cube @code{unitbox} without retracing steps (@pxref{three}):
@verbatiminclude cube.asy
@sp 1
@center @image{./cube}
See section @ref{graph} (or the online
@code{Asymptote} @uref{
https://asymptote.sourceforge.io/gallery,,gallery} and
external links posted at @url{
https://asymptote.sourceforge.io}) for
further examples, including two-dimensional and interactive
three-dimensional scientific graphs. Additional examples have been
posted by Philippe Ivaldi at @url{
https://blog.piprime.fr/asymptote/}.
@node Drawing commands
@chapter Drawing commands
@cindex drawing commands
All of @code{Asymptote}'s graphical capabilities are based on four primitive
commands. The three @code{PostScript} drawing commands @code{draw},
@code{fill}, and @code{clip} add objects to a picture in the order in
which they are executed, with the most recently drawn object appearing on top.
The labeling command @code{label} can be used to add text
labels and external @acronym{EPS} images, which will appear on top of the
@code{PostScript} objects (since this is normally what one wants), but
again in the relative order in which they were executed. After drawing
objects on a picture, the picture can be output with the
@code{shipout} function (@pxref{shipout}).
@cindex @code{layer}
If you wish to draw @code{PostScript} objects on top of labels (or verbatim
@code{tex} commands; @pxref{tex}), the @code{layer} command may be
used to start a
new @code{PostScript/LaTeX} layer:
@verbatim
void layer(picture pic=currentpicture);
@end verbatim
The @code{layer} function gives one full control over the order in which
objects are drawn. Layers are drawn sequentially, with the most recent
layer appearing on top. Within each layer, labels, images, and
verbatim @code{tex} commands are always drawn after the
@code{PostScript} objects in that layer.
@cindex @code{newpage}
A page break can be generated with the command
@verbatim
void newpage(picture pic=currentpicture);
@end verbatim
While some of these drawing commands take many options, they all have sensible
default values (for example, the picture argument defaults to
currentpicture).
@cindex legend
@cindex @code{draw}
@cindex @code{arrow}
@menu
* draw:: Draw a path on a picture or frame
* fill:: Fill a cyclic path on a picture or frame
* clip:: Clip a picture or frame to a cyclic path
* label:: Label a point on a picture
@end menu
@node draw
@section draw
@cindex @code{draw}
@verbatim
void draw(picture pic=currentpicture, Label L="", path g,
align align=NoAlign, pen p=currentpen,
arrowbar arrow=None, arrowbar bar=None, margin margin=NoMargin,
Label legend="", marker marker=nomarker);
@end verbatim
Draw the path @code{g} on the picture @code{pic} using pen @code{p}
for drawing, with optional drawing attributes (Label @code{L},
explicit label alignment @code{align},
arrows and bars @code{arrow} and @code{bar}, margins @code{margin},
legend, and markers @code{marker}). Only one parameter, the path, is
required. For convenience, the arguments @code{arrow} and @code{bar} may be
specified in either order. The argument @code{legend} is a Label to
use in constructing an optional legend entry.
@cindex @code{None}
@cindex @code{BeginBar}
@cindex @code{EndBar}
@cindex @code{Bar}
@cindex @code{Bars}
@cindex @code{barsize}
Bars @code{bar} are useful for indicating dimensions. The possible values of
@code{bar} are @code{None}, @code{BeginBar}, @code{EndBar} (or
equivalently @code{Bar}), and @code{Bars} (which draws a bar at both
ends of the path). Each of these bar specifiers (except for
@code{None}) will accept an optional real argument that denotes the
length of the bar in @code{PostScript} coordinates. The default
bar length is @code{barsize(pen)}.
@cindex arrows
@anchor{arrows}
@cindex @code{arrowbar}
@cindex @code{None}
@cindex @code{Blank}
@cindex @code{BeginArrow}
@cindex @code{MidArrow}
@cindex @code{EndArrow}
@cindex @code{Arrow}
@cindex @code{Arrows}
The possible values of @code{arrow} are @code{None}, @code{Blank}
(which draws no arrows or path), @code{BeginArrow}, @code{MidArrow},
@code{EndArrow} (or equivalently @code{Arrow}),
and @code{Arrows} (which draws an arrow at both ends of the path).
@cindex @code{BeginArcArrow}
@cindex @code{MidArcArrow}
@cindex @code{EndArcArrow}
@cindex @code{ArcArrow}
@cindex @code{ArcArrows}
There are also arrow versions with
slightly modified default values of @code{size} and @code{angle} suitable for
curved arrows: @code{BeginArcArrow}, @code{EndArcArrow} (or equivalently
@code{ArcArrow}), @code{MidArcArrow}, and @code{ArcArrows}.
For example:
@verbatim
draw((0,0)--(1,1),arrow=Arrows);
@end verbatim
All of the arrow specifiers except for @code{None} and @code{Blank}
may be given optional arguments, for example:
@verbatim
draw((0,0)--(1,1),arrow=Arrow(
arrowhead=HookHead,size=3mm,angle=20,filltype=Draw,position=0.9));
@end verbatim
The function @code{Arrow} has the signature
@verbatim
arrowbar Arrow(arrowhead arrowhead=DefaultHead,
real size=0, real angle=arrowangle,
filltype filltype=null, position position=EndPoint)
@end verbatim
@noindent
Calling @code{Arrow()} returns @code{Arrow}, which is an @code{arrowbar} object.
The parameters are:
@itemize
@cindex @code{arrowhead}
@cindex @code{DefaultHead}
@cindex @code{SimpleHead}
@cindex @code{HookHead}
@cindex @code{TeXHead}
@item @code{arrowhead}
can be one of
the predefined arrowhead styles @code{DefaultHead}, @code{SimpleHead},
@code{HookHead}, @code{TeXHead}.
@item real @code{size} is the arrowhead size in @code{PostScript} coordinates.
The default arrowhead size when drawn
with a pen @code{p} is @code{arrowsize(p)}.
@item real @code{angle} is the arrowhead angle
in degrees.
@item filltype @code{filltype} (@pxref{filltype}),
@item (except for
@code{MidArrow} and @code{Arrows}) real @code{position} (in the
sense of @code{point(path p, real t)}) along the path where the tip of
the arrow should be placed.
@end itemize
Margins @code{margin} can be used to shrink the visible portion of a path by
@code{labelmargin(p)} to avoid overlap with other drawn objects.
Typical values of @code{margin}
are:
@table @code
@cindex @code{NoMargin}
@item NoMargin
@cindex @code{BeginMargin}
@item BeginMargin
@cindex @code{EndMargin}
@cindex @code{Margin}
@item EndMargin
(equivalently @code{Margin})
@cindex @code{Margins}
@item Margins
leaves a margin at both ends of the path.
@item Margin(real begin, real end=begin)
specify the size of the beginning and ending margin, respectively,
in multiples of the units @code{labelmargin(p)} used for aligning labels.
@cindex @code{BeginPenMargin}
@item BeginPenMargin
@cindex @code{EndPenMargin}
@cindex @code{PenMargin}
@item EndPenMargin
(equivalently @code{PenMargin})
@cindex @code{PenMargins}
@item PenMargins
@item PenMargin(real begin, real end=begin)
specify a margin in units of
the pen line width, taking account of the pen line width when drawing
the path or arrow.
@cindex @code{DotMargin}
@item DotMargin
an abbreviation for @code{PenMargin(-0.5*dotfactor,0.5*dotfactor)},
used to draw from the usual beginning point just up to the boundary of an
end dot of width @code{dotfactor*linewidth(p)}.
@cindex @code{BeginDotMargin}
@item BeginDotMargin
@cindex @code{EndDotMargin}
@cindex @code{DotMargins}
@item DotMargins
work similarly.
@cindex @code{TrueMargin}
@item TrueMargin(real begin, real end=begin)
specify a margin directly in @code{PostScript} units,
independent of the pen line width.
@end table
The use of arrows, bars, and margins is illustrated by the examples
@code{@uref{
https://asymptote.sourceforge.io/gallery/Pythagoras.svg,,Pythagoras}@uref{
https://asymptote.sourceforge.io/gallery/Pythagoras.asy,,.asy}} and
@code{@uref{
https://asymptote.sourceforge.io/gallery/3Dgraphs/sqrtx01.html,,sqrtx01}@uref{
https://asymptote.sourceforge.io/gallery/sqrtx01.asy,,.asy}}.
The legend for a picture @code{pic} can be fit and aligned to a frame
with the routine:
@cindex @code{legend}
@verbatim
frame legend(picture pic=currentpicture, int perline=1,
real xmargin=legendmargin, real ymargin=xmargin,
real linelength=legendlinelength,
real hskip=legendhskip, real vskip=legendvskip,
real maxwidth=0, real maxheight=0,
bool hstretch=false, bool vstretch=false, pen p=currentpen);
@end verbatim
@noindent
Here @code{xmargin} and @code{ymargin} specify the surrounding @math{x}
and @math{y} margins, @code{perline} specifies the number of entries
per line (default 1; 0 means choose this number automatically),
@code{linelength} specifies the length of the path lines, @code{hskip}
and @code{vskip} specify the line skip (as a multiple of the legend entry
size), @code{maxwidth} and @code{maxheight} specify optional upper limits
on the width and height of the resulting legend (0 means unlimited),
@code{hstretch} and @code{vstretch} allow the legend to stretch
horizontally or vertically, and @code{p} specifies the pen used to draw
the bounding box. The legend frame can then be added and aligned about a
point on a picture @code{dest} using @code{add} or @code{attach}
(@pxref{add about}).
@cindex @code{dot}
To draw a dot, simply draw a path containing a single point.
The @code{dot} command defined in the module @code{plain} draws a
dot having a diameter equal to an explicit pen line width or the
default line width magnified by @code{dotfactor} (6 by default),
using the specified filltype (@pxref{filltype}) or @code{dotfilltype}
(@code{Fill} by default):
@verbatim
void dot(frame f, pair z, pen p=currentpen, filltype filltype=dotfilltype);
void dot(picture pic=currentpicture, pair z, pen p=currentpen,
filltype filltype=dotfilltype);
void dot(picture pic=currentpicture, Label L, pair z, align align=NoAlign,
string format=defaultformat, pen p=currentpen, filltype filltype=dotfilltype);
void dot(picture pic=currentpicture, Label[] L=new Label[], pair[] z,
align align=NoAlign, string format=defaultformat, pen p=currentpen,
filltype filltype=dotfilltype);
void dot(picture pic=currentpicture, path[] g, pen p=currentpen,
filltype filltype=dotfilltype);
void dot(picture pic=currentpicture, Label L, pen p=currentpen,
filltype filltype=dotfilltype);
@end verbatim
@cindex @code{Label}
If the variable @code{Label} is given as the @code{Label}
argument to the third routine, the @code{format} argument will be
used to format a string based on the dot location (here @code{defaultformat}
is @code{"$%.4g$"}).
The fourth routine draws a dot at every point of a pair array @code{z}.
One can also draw a dot at every node of a path:
@verbatim
void dot(picture pic=currentpicture, Label[] L=new Label[],
explicit path g, align align=RightSide, string format=defaultformat,
pen p=currentpen, filltype filltype=dotfilltype);
@end verbatim
See @ref{pathmarkers} and @ref{markers} for more general
methods for marking path nodes.
To draw a fixed-sized object (in @code{PostScript} coordinates) about
the user coordinate @code{origin}, use the routine
@cindex @code{draw}
@verbatim
void draw(pair origin, picture pic=currentpicture, Label L="", path g,
align align=NoAlign, pen p=currentpen, arrowbar arrow=None,
arrowbar bar=None, margin margin=NoMargin, Label legend="",
marker marker=nomarker);
@end verbatim
@cindex @code{fill}
@node fill
@section fill
@cindex @code{fill}
@verbatim
void fill(picture pic=currentpicture, path g, pen p=currentpen);
@end verbatim
Fill the interior region bounded by the cyclic path @code{g} on the picture
@code{pic}, using the pen @code{p}.
@cindex @code{filldraw}
There is also a convenient @code{filldraw} command, which fills the path
and then draws in the boundary. One can specify separate pens for each
operation:
@verbatim
void filldraw(picture pic=currentpicture, path g, pen fillpen=currentpen,
pen drawpen=currentpen);
@end verbatim
@cindex @code{fill}
This fixed-size version of @code{fill} allows one to fill an object
described in @code{PostScript} coordinates about the user coordinate
@code{origin}:
@verbatim
void fill(pair origin, picture pic=currentpicture, path g, pen p=currentpen);
@end verbatim
@noindent
This is just a convenient abbreviation for the commands:
@verbatim
picture opic;
fill(opic,g,p);
add(pic,opic,origin);
@end verbatim
The routine
@cindex @code{filloutside}
@verbatim
void filloutside(picture pic=currentpicture, path g, pen p=currentpen);
@end verbatim
@noindent
fills the region exterior to the path @code{g}, out to the current
boundary of picture @code{pic}.
@anchor{gradient shading}
@cindex gradient shading
@cindex shading
@cindex @code{latticeshade}
Lattice gradient shading varying smoothly over a two-dimensional
array of pens @code{p}, using fill rule @code{fillrule}, can be produced with
@verbatim
void latticeshade(picture pic=currentpicture, path g, bool stroke=false,
pen fillrule=currentpen, pen[][] p)
@end verbatim
@cindex @code{stroke}
If @code{stroke=true}, the region filled is the same as the region that
would be drawn by @code{draw(pic,g,zerowinding)}; in this case the path
@code{g} need not be cyclic.
The pens in @code{p} must belong to the same color space. One can use the
functions @code{rgb(pen)} or @code{cmyk(pen)} to promote pens to a
higher color space, as illustrated in the example file
@code{@uref{
https://asymptote.sourceforge.io/gallery/latticeshading.svg,,latticeshading}@uref{
https://asymptote.sourceforge.io/gallery/latticeshading.asy,,.asy}}.
@cindex @code{axialshade}
Axial gradient shading varying smoothly from @code{pena} to @code{penb} in the
direction of the line segment @code{a--b} can be achieved with
@verbatim
void axialshade(picture pic=currentpicture, path g, bool stroke=false,
pen pena, pair a, bool extenda=true,
pen penb, pair b, bool extendb=true);
@end verbatim
@noindent
The boolean parameters @code{extenda} and @code{extendb} indicate
whether the shading should extend beyond the axis endpoints @code{a}
and @code{b}. An example of axial shading is provided in the example file
@code{@uref{
https://asymptote.sourceforge.io/gallery/axialshade.svg,,axialshade}@uref{
https://asymptote.sourceforge.io/gallery/axialshade.asy,,.asy}}.
@cindex @code{radialshade}
Radial gradient shading varying smoothly from
@code{pena} on the circle with center @code{a} and radius @code{ra} to
@code{penb} on the circle with center @code{b} and radius @code{rb}
is similar:
@verbatim
void radialshade(picture pic=currentpicture, path g, bool stroke=false,
pen pena, pair a, real ra, bool extenda=true,
pen penb, pair b, real rb, bool extendb=true);
@end verbatim
@noindent
The boolean parameters @code{extenda} and @code{extendb} indicate
whether the shading should extend beyond the radii @code{a} and @code{b}.
Illustrations of radial shading are provided in the example files
@code{@uref{
https://asymptote.sourceforge.io/gallery/shade.svg,,shade}@uref{
https://asymptote.sourceforge.io/gallery/shade.asy,,.asy}}, @code{@uref{
https://asymptote.sourceforge.io/gallery/PDFs/ring.pdf,,ring}@uref{
https://asymptote.sourceforge.io/gallery/PDFs/ring.asy,,.asy}}, and @code{@uref{
https://asymptote.sourceforge.io/gallery/PDFs/shadestroke.pdf,,shadestroke}@uref{
https://asymptote.sourceforge.io/gallery/PDFs/shadestroke.asy,,.asy}}.
@cindex @code{gouraudshade}
Gouraud shading using fill rule @code{fillrule} and the vertex colors in the
pen array @code{p} on a triangular lattice defined by the vertices
@code{z} and edge flags @code{edges} is implemented with
@verbatim
void gouraudshade(picture pic=currentpicture, path g, bool stroke=false,
pen fillrule=currentpen, pen[] p, pair[] z,
int[] edges);
void gouraudshade(picture pic=currentpicture, path g, bool stroke=false,
pen fillrule=currentpen, pen[] p, int[] edges);
@end verbatim
@noindent
In the second form, the elements of @code{z} are taken to be successive
nodes of path @code{g}. The pens in @code{p} must belong to the same
color space. Illustrations of Gouraud shading are provided in the example file
@code{@uref{
https://asymptote.sourceforge.io/gallery/PDFs/Gouraud.pdf,,Gouraud}@uref{
https://asymptote.sourceforge.io/gallery/PDFs/Gouraud.asy,,.asy}}.
The edge flags used in Gouraud shading are documented on pages 270--274
of the PostScript Language Reference (3rd edition):
@quotation
@url{
https://www.adobe.com/jp/print/postscript/pdfs/PLRM.pdf}
@end quotation
@cindex Coons shading
@cindex tensor product shading
@cindex @code{tensorshade}
Tensor product shading using clipping path @code{g}, fill rule
@code{fillrule} on patches bounded by the @math{n} cyclic paths of
length 4 in path array @code{b}, using the vertex colors specified in
the @math{n \times 4} pen array @code{p} and internal control points
in the @math{n \times 4} array @code{z}, is implemented with
@verbatim
void tensorshade(picture pic=currentpicture, path[] g, bool stroke=false,
pen fillrule=currentpen, pen[][] p, path[] b=g,
pair[][] z=new pair[][]);
@end verbatim
@noindent
If the array @code{z} is empty, Coons shading, in which the color
control points are calculated automatically, is used.
The pens in @code{p} must belong to the same color space.
A simpler interface for the case of a single patch (@math{n=1}) is also
available:
@verbatim
void tensorshade(picture pic=currentpicture, path g, bool stroke=false,
pen fillrule=currentpen, pen[] p, path b=g,
pair[] z=new pair[]);
@end verbatim
One can also smoothly shade the regions between consecutive paths of a
sequence using a given array of pens:
@verbatim
void draw(picture pic=currentpicture, pen fillrule=currentpen, path[] g,
pen[] p);
@end verbatim
@noindent
Illustrations of tensor product and Coons shading are provided in the
example files @code{@uref{
https://asymptote.sourceforge.io/gallery/PDFs/tensor.pdf,,tensor}@uref{
https://asymptote.sourceforge.io/gallery/PDFs/tensor.asy,,.asy}}, @code{@uref{
https://asymptote.sourceforge.io/gallery/PDFs/Coons.pdf,,Coons}@uref{
https://asymptote.sourceforge.io/gallery/PDFs/Coons.asy,,.asy}}, @code{@uref{
https://asymptote.sourceforge.io/gallery/3Dwebgl/BezierPatch.html,,BezierPatch}@uref{
https://asymptote.sourceforge.io/gallery/3Dwebgl/BezierPatch.asy,,.asy}},
and @code{@uref{
https://asymptote.sourceforge.io/gallery/PDFs/rainbow.pdf,,rainbow}@uref{
https://asymptote.sourceforge.io/gallery/PDFs/rainbow.asy,,.asy}}.
@cindex Function shading
@cindex function shading
@cindex @code{functionshade}
More general shading possibilities are available using @TeX{} engines
that produce PDF output (@pxref{texengines}): the routine
@verbatim
void functionshade(picture pic=currentpicture, path[] g, bool stroke=false,
pen fillrule=currentpen, string shader);
@end verbatim
@noindent
shades on picture @code{pic} the interior of path @code{g} according
to fill rule @code{fillrule} using the @code{PostScript} calculator routine
specified by the string @code{shader}; this routine takes 2 arguments,
each in [0,1], and returns @code{colors(fillrule).length} color components.
Function shading is illustrated in the example @code{@uref{
https://asymptote.sourceforge.io/gallery/PDFs/functionshading.pdf,,functionshading}@uref{
https://asymptote.sourceforge.io/gallery/PDFs/functionshading.asy,,.asy}}.
@cindex unfill
The following routine uses @code{evenodd} clipping together with the
@code{^^} operator to unfill a region:
@verbatim
void unfill(picture pic=currentpicture, path g);
@end verbatim
@node clip
@section clip
@cindex @code{clip}
@cindex @code{stroke}
@verbatim
void clip(picture pic=currentpicture, path g, stroke=false,
pen fillrule=currentpen);
@end verbatim
Clip the current contents of picture @code{pic} to the region bounded
by the path @code{g}, using fill rule @code{fillrule} (@pxref{fillrule}).
If @code{stroke=true}, the clipped portion is the same as the region
that would be drawn with @code{draw(pic,g,zerowinding)}; in
this case the path @code{g} need not be cyclic. While clipping has no notion
of depth (it transcends layers and even pages), one can localize clipping
to a temporary picture, which can then be added to @code{pic}.
For an illustration of picture clipping, see the first example in @ref{LaTeX usage}.
@node label
@section label
@cindex @code{label}
@cindex @code{labelmargin}
@verbatim
void label(picture pic=currentpicture, Label L, pair position,
align align=NoAlign, pen p=currentpen, filltype filltype=NoFill)
@end verbatim
Draw Label @code{L} on picture @code{pic} using pen @code{p}. If
@code{align} is @code{NoAlign}, the label will be centered at user
coordinate @code{position}; otherwise it will be aligned in the
direction of @code{align} and displaced from @code{position} by
the @code{PostScript} offset @code{align*labelmargin(p)}.
Here, @code{real labelmargin(pen p=currentpen)} is a quantity used to align labels.
In the code below,
@verbatim
label("abcdefg",(0,0),align=up,basealign);
@end verbatim
@noindent
the baseline of the label will be exactly
@code{labelmargin(currentpen)} @code{PostScript} units above the center.
@cindex @code{Align}
The constant @code{Align} can be used to align the
bottom-left corner of the label at @code{position}.
@cindex @code{nullpen}
@cindex @code{Label}
@anchor{Label}
The Label @code{L} can either be a string or the structure obtained by calling
one of the functions
@verbatim
Label Label(string s="", pair position, align align=NoAlign,
pen p=nullpen, embed embed=Rotate, filltype filltype=NoFill);
Label Label(string s="", align align=NoAlign,
pen p=nullpen, embed embed=Rotate, filltype filltype=NoFill);
Label Label(Label L, pair position, align align=NoAlign,
pen p=nullpen, embed embed=L.embed, filltype filltype=NoFill);
Label Label(Label L, align align=NoAlign,
pen p=nullpen, embed embed=L.embed, filltype filltype=NoFill);
@end verbatim
The text of a Label can be scaled, slanted, rotated, or shifted by
multiplying it on the left by an affine transform (@pxref{Transforms}).
For example, @code{rotate(45)*xscale(2)*L} first scales @code{L} in the
@math{x} direction and then rotates it counterclockwise by 45
degrees. The final position of a Label can also be shifted by a
@code{PostScript} coordinate translation: @code{shift(10,0)*L}.
An explicit pen specified within the Label overrides other pen arguments.
The @code{embed} argument determines how the Label should transform with the
embedding picture:
@table @code
@item Shift
@cindex @code{Shift}
only shift with embedding picture;
@item Rotate
@cindex @code{Rotate}
only shift and rotate with embedding picture (default);
@item Rotate(pair z)
@cindex @code{Rotate(pair z)}
rotate with (picture-transformed) vector @code{z}.
@item Slant
@cindex @code{Slant}
only shift, rotate, slant, and reflect with embedding picture;
@item Scale
@cindex @code{Scale}
shift, rotate, slant, reflect, and scale with embedding picture.
@end table
To add a label to a path, use
@verbatim
void label(picture pic=currentpicture, Label L, path g, align align=NoAlign,
pen p=currentpen, filltype filltype=NoFill);
@end verbatim
@cindex @code{Relative}
By default the label will be positioned at the midpoint of the path.
An alternative label position (in the sense of @code{point(path p, real t)})
may be specified as a real value for @code{position} in constructing
the Label. The position @code{Relative(real)} specifies a location
relative to the total arclength of the path. These convenient
abbreviations are predefined:
@cindex @code{BeginPoint}
@cindex @code{MidPoint}
@cindex @code{EndPoint}
@verbatim
position BeginPoint=Relative(0);
position MidPoint=Relative(0.5);
position EndPoint=Relative(1);
@end verbatim
@cindex @code{Relative}
@cindex @code{LeftSide}
@cindex @code{Center}
@cindex @code{RightSide}
Path labels are aligned in the direction @code{align}, which may
be specified as an absolute compass direction (pair) or a direction
@code{Relative(pair)} measured relative to a north axis
in the local direction of the path. For convenience @code{LeftSide},
@code{Center}, and @code{RightSide} are defined as @code{Relative(W)},
@code{Relative((0,0))}, and @code{Relative(E)}, respectively.
Multiplying @code{LeftSide} and @code{RightSide} on the
left by a real scaling factor will move the label further away from or
closer to the path.
A label with a fixed-size arrow of length @code{arrowlength} pointing
to @code{b} from direction @code{dir} can be produced with the routine
@cindex @code{arrow}
@verbatim
void arrow(picture pic=currentpicture, Label L="", pair b, pair dir,
real length=arrowlength, align align=NoAlign,
pen p=currentpen, arrowbar arrow=Arrow, margin margin=EndMargin);
@end verbatim
If no alignment is specified (either in the Label or as an explicit
argument), the optional Label will be aligned in the direction @code{dir},
using margin @code{margin}.
@cindex including images
@cindex @code{graphic}
@cindex @acronym{EPS}
The function @code{string graphic(string name, string options="")}
returns a string that can be used to include an encapsulated
@code{PostScript} (@acronym{EPS}) file. Here, @code{name} is the name
of the file to include and @code{options} is a string containing a
comma-separated list of optional bounding box (@code{bb=llx lly urx
ury}), width (@code{width=value}), height (@code{height=value}),
rotation (@code{angle=value}), scaling (@code{scale=factor}), clipping
(@code{clip=bool}), and draft mode (@code{draft=bool}) parameters. The
@code{layer()} function can be used to force future objects to be
drawn on top of the included image:
@verbatim
label(graphic("file.eps","width=1cm"),(0,0),NE);
layer();
@end verbatim
@anchor{baseline}
@cindex @code{baseline}
The @code{string baseline(string s, string template="\strut")}
function can be used to enlarge the bounding box of a label to match a
given template, so that their baselines will be typeset on a
horizontal line. See @code{@uref{
https://asymptote.sourceforge.io/gallery/Pythagoras.svg,,Pythagoras}@uref{
https://asymptote.sourceforge.io/gallery/Pythagoras.asy,,.asy}} for an example.
Alternatively, the pen @code{basealign} may be used to force labels to
respect the TeX baseline (@pxref{basealign}).
One can prevent labels from overwriting one another with the
@code{overwrite} pen attribute (@pxref{overwrite}).
The structure @code{object} defined in @code{plain_Label.asy}
allows Labels and frames to be treated in a uniform manner.
A group of objects may be packed together into single frame with the routine
@cindex @code{pack}
@verbatim
frame pack(pair align=2S ... object inset[]);
@end verbatim
@noindent
@anchor{envelope}
@cindex @code{envelope}
@cindex @code{object}
To draw or fill a box (or ellipse or other path) around a @code{Label} and
return the bounding object, use one of the routines
@verbatim
object draw(picture pic=currentpicture, Label L, envelope e,
real xmargin=0, real ymargin=xmargin, pen p=currentpen,
filltype filltype=NoFill, bool above=true);
object draw(picture pic=currentpicture, Label L, envelope e, pair position,
real xmargin=0, real ymargin=xmargin, pen p=currentpen,
filltype filltype=NoFill, bool above=true);
@end verbatim
@noindent
Here @code{envelope} is a boundary-drawing routine such as @code{box},
@code{roundbox}, or @code{ellipse} defined in @code{plain_boxes.asy}.
@cindex @code{texpath}
The function @code{path[] texpath(Label L)} returns the path array that
@TeX{} would fill to draw the Label @code{L}.
@cindex @code{minipage}
The @code{string minipage(string s, width=100pt)} function can be used
to format string @code{s} into a paragraph of width @code{width}.
This example uses @code{minipage}, @code{clip}, and @code{graphic} to
produce a CD label:
@sp 1
@center @image{./CDlabel}
@verbatiminclude CDlabel.asy
@node Bezier curves
@chapter Bezier curves
@cindex Bezier curves
@cindex direction specifier
Each interior node of a cubic spline may be given a
direction prefix or suffix @code{@{dir@}}: the direction of the pair
@code{dir} specifies the direction of the incoming or outgoing tangent,
respectively, to the curve at that node. Exterior nodes may be
given direction specifiers only on their interior side.
A cubic spline between the node @math{z_0}, with postcontrol point
@math{c_0}, and the node @math{z_1}, with precontrol point @math{c_1},
is computed as the Bezier curve
@sp 1
@center @image{./bezier,,,(1-t)^3*z_0+3t(1-t)^2*c_0+3t^2(1-t)*c_1+t^3*z_1 for 0 <=t <= 1.}
As illustrated in the diagram below, the third-order midpoint (@math{m_5})
constructed from two endpoints @math{z_0} and @math{z_1} and two control points
@math{c_0} and @math{c_1}, is the point corresponding to @math{t=1/2} on
the Bezier curve formed by the quadruple (@math{z_0}, @math{c_0},
@math{c_1}, @math{z_1}). This allows one to recursively construct the
desired curve, by using the newly extracted third-order midpoint as an
endpoint and the respective second- and first-order midpoints as control
points:
@sp 1
@center @image{./bezier2}
Here @math{m_0}, @math{m_1} and @math{m_2} are the first-order
midpoints, @math{m_3} and @math{m_4} are the second-order midpoints, and
@math{m_5} is the third-order midpoint.
The curve is then constructed by recursively applying the algorithm to
(@math{z_0}, @math{m_0}, @math{m_3}, @math{m_5}) and
(@math{m_5}, @math{m_4}, @math{m_2}, @math{z_1}).
In fact, an analogous property holds for points located at any
fraction @math{t} in @math{[0,1]} of each segment, not just for
midpoints (@math{t=1/2}).
The Bezier curve constructed in this manner has the following properties:
@itemize @bullet
@item It is entirely contained in the convex hull of the given four points.
@item It starts heading from the first endpoint to the first control point
and finishes heading from the second control point to the second endpoint.
@end itemize
@cindex @code{controls}
The user can specify explicit control points between two nodes like this:
@verbatim
draw((0,0)..controls (0,100) and (100,100)..(100,0));
@end verbatim
However, it is usually more convenient to just use the
@code{..} operator, which tells @code{Asymptote} to choose its own
control points using the algorithms described in Donald Knuth's
monograph, The MetaFontbook, Chapter 14.
The user can still customize the guide (or path) by specifying
direction, tension, and curl values.
The higher the tension, the straighter the curve is, and the more
it approximates a straight line.
@cindex @code{tension}
@cindex @code{and}
@cindex @code{atleast}
One can change the spline tension from its default value of 1 to any
real value greater than or equal to 0.75 (see John D. Hobby, Discrete and
Computational Geometry 1, 1986):
@verbatim
draw((100,0)..tension 2 ..(100,100)..(0,100));
draw((100,0)..tension 3 and 2 ..(100,100)..(0,100));
draw((100,0)..tension atleast 2 ..(100,100)..(0,100));
@end verbatim
In these examples there is a space between @code{2} and @code{..}.
This is needed as @code{2.} is interpreted as a numerical constant.
@cindex @code{curl}
The curl parameter specifies the curvature at the endpoints of a path
(0 means straight; the default value of 1 means approximately circular):
@verbatim
draw((100,0){curl 0}..(100,100)..{curl 0}(0,100));
@end verbatim
@cindex @code{MetaPost ...@ }
@cindex @code{::}
The @code{MetaPost ...} path connector, which requests, when possible, an
inflection-free curve confined to a triangle defined by the
endpoints and directions, is implemented in @code{Asymptote} as the
convenient abbreviation @code{::} for @code{..tension atleast 1 ..}
(the ellipsis @code{...} is used in @code{Asymptote} to indicate a
variable number of arguments; @pxref{Rest arguments}). For example,
compare
@verbatiminclude dots.asy
@sp 1
@center @image{./dots}
@noindent
with
@verbatiminclude colons.asy
@sp 1
@center @image{./colons}
@cindex @code{---}
@cindex @code{&}
The @code{---} connector is an abbreviation for @code{..tension atleast
infinity..} and the @code{&} connector concatenates two paths, after
first stripping off the last node of the first path (which normally
should coincide with the first node of the second path).
@node Programming
@chapter Programming
@cindex programming
@menu
* Data types:: void, bool, int, real, pair, triple, string
* Paths and guides:: Bezier curves
* Pens:: Colors, line types, line widths, font sizes
* Transforms:: Affine transforms
* Frames and pictures:: Canvases for immediate and deferred drawing
* Deferred drawing:: Witholding drawing until all data is available
* Files:: Reading and writing your data
* Variable initializers:: Initialize your variables
* Structures:: Organize your data
* Operators:: Arithmetic and logical operators
* Implicit scaling:: Avoiding those ugly *s
* Functions:: Traditional and higher-order functions
* Arrays:: Dynamic vectors
* Casts:: Implicit and explicit casts
* Import:: Importing external @code{Asymptote} modules
* Static:: Where to allocate your variable?
* Autounravel:: Adding associated libraries to structures
@end menu
Here is a short introductory example to the @code{Asymptote} programming
language that highlights the similarity of its control structures
with those of C, C++, and Java:
@cindex declaration
@cindex assignment
@cindex conditional
@cindex loop
@cindex @code{if}
@cindex @code{else}
@cindex @code{for}
@verbatim
// This is a comment.
// Declaration: Declare x to be a real variable;
real x;
// Assignment: Assign the real variable x the value 1.
x=1.0;
// Conditional: Test if x equals 1 or not.
if(x == 1.0) {
write("x equals 1.0");
} else {
write("x is not equal to 1.0");
}
// Loop: iterate 10 times
for(int i=0; i < 10; ++i) {
write(i);
}
@end verbatim
@cindex @code{while}
@cindex @code{do}
@cindex @code{break}
@cindex @code{continue}
@code{Asymptote} supports @code{while}, @code{do}, @code{break}, and
@code{continue} statements just as in C/C++. It also supports the Java-style
shorthand for iterating over all elements of an array:
@cindex array iteration
@anchor{array iteration}
@verbatim
// Iterate over an array
int[] array={1,1,2,3,5};
for(int k : array) {
write(k);
}
@end verbatim
@noindent
In addition, it supports many features beyond the ones found in those
languages.
@node Data types
@section Data types
@cindex data types
@code{Asymptote} supports the following data types (in addition to
user-defined types):
@table @code
@item void
@cindex @code{void}
The void type is used only by functions that take or return no arguments.
@item bool
@cindex @code{bool}
a boolean type that can only take on the values @code{true} or
@code{false}. For example:
@verbatim
bool b=true;
@end verbatim
@noindent
defines a boolean variable @code{b} and initializes it to the value
@code{true}. If no initializer is given:
@verbatim
bool b;
@end verbatim
@noindent
the value @code{false} is assumed.
@item bool3
@cindex @code{bool3}
an extended boolean type that can take on the values
@code{true}, @code{default}, or @code{false}. A bool3 type can be cast
to or from a bool. The default initializer for bool3 is @code{default}.
@item int
@cindex @code{int}
@cindex @code{intMin}
@cindex @code{intMax}
an integer type; if no initializer is given, the implicit value @code{0}
is assumed. The minimum allowed value of an integer is @code{intMin} and the
maximum value is @code{intMax}.
@item real
@cindex @code{real}
@cindex @code{realMin}
@cindex @code{realMax}
@cindex @code{realEpsilon}
@cindex @code{realDigits}
@cindex @code{mask}
@cindex @code{inf}
@cindex @code{nan}
@cindex @code{isnan}
a real number; this should be set to the highest-precision native
floating-point type on the architecture. The implicit initializer for
reals is @code{0.0}. Real numbers have precision
@code{realEpsilon}, with @code{realDigits} significant digits.
The smallest positive real number is @code{realMin} and the largest
positive real number is @code{realMax}.
The variables @code{inf} and @code{nan}, along with the function
@code{bool isnan(real x)} are useful when floating-point exceptions
are masked with the @code{-mask} command-line option (the default in
interactive mode).
@item pair
@cindex @code{pair}
complex number, that is, an ordered pair of real components @code{(x,y)}.
The real and imaginary parts of a pair @code{z} can read as @code{z.x}
and @code{z.y}. We say that @code{x} and @code{y} are virtual members of
the data element pair; they cannot be directly modified, however.
The implicit initializer for pairs is @code{(0.0,0.0)}.
There are a number of ways to take the complex conjugate of a pair:
@example
pair z=(3,4);
z=(z.x,-z.y);
z=z.x-I*z.y;
z=conj(z);
@end example
Here @code{I} is the pair @code{(0,1)}.
A number of built-in functions are defined for pairs:
@table @code
@item pair conj(pair z)
@cindex @code{conj}
returns the conjugate of @code{z};
@item real length(pair z)
@cindex @code{length}
@cindex @code{abs}
@cindex @code{abs2}
returns the complex modulus @math{|@code{z}|} of its argument @code{z}.
For example,
@example
pair z=(3,4);
length(z);
@end example
returns the result 5. A synonym for @code{length(pair)} is @code{abs(pair)}.
The function @code{abs2(pair z)} returns @math{|@code{z}|^2};
@item real angle(pair z, bool warn=true)
@cindex @code{angle}
returns the angle of @code{z} in radians in the interval
[-@code{pi},@code{pi}] or @code{0} if @code{warn} is @code{false} and
@code{z=(0,0)} (rather than producing an error);
@item real degrees(pair z, bool warn=true)
@cindex @code{degrees}
returns the angle of @code{z} in degrees in the interval [0,360)
or @code{0} if @code{warn} is @code{false} and @code{z=(0,0)} (rather than
producing an error);
@item pair unit(pair z)
@cindex @code{unit}
returns a unit vector in the direction of the pair @code{z};
@item pair expi(real angle)
@cindex @code{expi}
returns a unit vector in the direction @code{angle} measured in radians;
@item pair dir(real degrees)
@cindex @code{dir}
returns a unit vector in the direction @code{degrees} measured in degrees;
@item real xpart(pair z)
@cindex @code{xpart}
returns @code{z.x};
@item real ypart(pair z)
@cindex @code{ypart}
returns @code{z.y};
@item pair realmult(pair z, pair w)
@cindex @code{realmult}
returns the element-by-element product @code{(z.x*w.x,z.y*w.y)};
@item real dot(explicit pair z, explicit pair w)
@cindex @code{dot}
returns the dot product @code{z.x*w.x+z.y*w.y};
@item real cross(explicit pair z, explicit pair w)
@cindex @code{cross}
returns the 2D scalar product @code{z.x*w.y-z.y*w.x};
@cindex @code{orient}
@item real orient(pair a, pair b, pair c);
returns a positive (negative) value if @code{a--b--c--cycle} is oriented
counterclockwise (clockwise) or zero if all three points are colinear.
Equivalently, a positive (negative) value is returned if
@code{c} lies to the left (right) of the line through @code{a} and @code{b}
or zero if @code{c} lies on this line.
The value returned can be expressed in terms of the 2D scalar cross product
as @code{cross(a-c,b-c)}, which is the determinant
@verbatim
|a.x a.y 1|
|b.x b.y 1|
|c.x c.y 1|
@end verbatim
@cindex @code{incircle}
@item real incircle(pair a, pair b, pair c, pair d);
returns a positive (negative) value if @code{d} lies inside (outside)
the circle passing through the counterclockwise-oriented points @code{a,b,c}
or zero if @code{d} lies on the this circle.
The value returned is the determinant
@verbatim
|a.x a.y a.x^2+a.y^2 1|
|b.x b.y b.x^2+b.y^2 1|
|c.x c.y c.x^2+c.y^2 1|
|d.x d.y d.x^2+d.y^2 1|
@end verbatim
@item pair minbound(pair z, pair w)
@cindex @code{minbound}
returns @code{(min(z.x,w.x),min(z.y,w.y))};
@item pair maxbound(pair z, pair w)
@cindex @code{maxbound}
returns @code{(max(z.x,w.x),max(z.y,w.y))}.
@end table
@item triple
@cindex @code{triple}
an ordered triple of real components @code{(x,y,z)} used for
three-dimensional drawings. The respective components of a triple
@code{v} can read as @code{v.x}, @code{v.y}, and @code{v.z}.
The implicit initializer for triples is @code{(0.0,0.0,0.0)}.
Here are the built-in functions for triples:
@table @code
@item real length(triple v)
@cindex @code{length}
@cindex @code{abs}
@cindex @code{abs2}
returns the length @math{|@code{v}|} of its argument @code{v}.
A synonym for @code{length(triple)} is @code{abs(triple)}.
The function @code{abs2(triple v)} returns @math{|@code{v}|^2};
@item real polar(triple v, bool warn=true)
@cindex @code{polar}
returns the colatitude of @code{v} measured from the @math{z} axis in radians
or @code{0} if @code{warn} is @code{false} and @code{v=O} (rather than
producing an error);
@item real azimuth(triple v, bool warn=true)
@cindex @code{azimuth}
returns the longitude of @code{v} measured from the @math{x} axis in radians
or @code{0} if @code{warn} is @code{false} and @code{v.x=v.y=0} (rather than
producing an error);
@item real colatitude(triple v, bool warn=true)
@cindex @code{colatitude}
returns the colatitude of @code{v} measured from the @math{z} axis in degrees
or @code{0} if @code{warn} is @code{false} and @code{v=O} (rather than
producing an error);
@item real latitude(triple v, bool warn=true)
@cindex @code{latitude}
returns the latitude of @code{v} measured from the @math{xy} plane in degrees
or @code{0} if @code{warn} is @code{false} and @code{v=O} (rather than
producing an error);
@item real longitude(triple v, bool warn=true)
@cindex @code{longitude}
returns the longitude of @code{v} measured from the @math{x} axis in degrees
or @code{0} if @code{warn} is @code{false} and @code{v.x=v.y=0} (rather than
producing an error);
@item triple unit(triple v)
@cindex @code{unit}
returns a unit triple in the direction of the triple @code{v};
@item triple expi(real polar, real azimuth)
@cindex @code{expi}
returns a unit triple in the direction @code{(polar,azimuth)}
measured in radians;
@item triple dir(real colatitude, real longitude)
@cindex @code{dir}
returns a unit triple in the direction @code{(colatitude,longitude)}
measured in degrees;
@item real xpart(triple v)
@cindex @code{xpart}
returns @code{v.x};
@item real ypart(triple v)
@cindex @code{ypart}
returns @code{v.y};
@item real zpart(triple v)
@cindex @code{zpart}
returns @code{v.z};
@item real dot(triple u, triple v)
@cindex @code{dot}
returns the dot product @code{u.x*v.x+u.y*v.y+u.z*v.z};
@item triple cross(triple u, triple v)
@cindex @code{cross}
returns the cross product
@code{(u.y*v.z-u.z*v.y,u.z*v.x-u.x*v.z,u.x*v.y-v.x*u.y)};
@item triple minbound(triple u, triple v)
@cindex @code{minbound}
returns @code{(min(u.x,v.x),min(u.y,v.y),min(u.z,v.z))};
@item triple maxbound(triple u, triple v)
@cindex @code{maxbound}
returns @code{(max(u.x,v.x),max(u.y,v.y),max(u.z,v.z)}).
@end table
@item string
@cindex @code{string}
@cindex @TeX{} string
a character string, implemented using the STL @code{string} class.
Strings delimited by double quotes (@code{"}) are subject to the
following mappings to allow the use of double quotes in @TeX{} (e.g.@ for
using the @code{babel} package, @pxref{babel}):
@itemize @bullet
@item \" maps to "
@item \\ maps to \\
@end itemize
@cindex @code{C} string
Strings delimited by single quotes (@code{'}) have the same mappings as
character strings in ANSI @code{C}:
@itemize @bullet
@item \' maps to '
@item \" maps to "
@item \? maps to ?
@item \\ maps to backslash
@item \a maps to alert
@item \b maps to backspace
@item \f maps to form feed
@item \n maps to newline
@item \r maps to carriage return
@item \t maps to tab
@item \v maps to vertical tab
@item \0-\377 map to corresponding octal byte
@item \x0-\xFF map to corresponding hexadecimal byte
@end itemize
The implicit initializer for strings is the empty string @code{""}.
Strings may be concatenated with the @code{+} operator. In the following
string functions, position @code{0} denotes the start of the string:
@table @code
@cindex @code{length}
@item int length(string s)
returns the length of the string @code{s};
@cindex @code{find}
@item int find(string s, string t, int pos=0)
returns the position of the first occurrence of string @code{t} in string
@code{s} at or after position @code{pos}, or -1 if @code{t} is not a
substring of @code{s};
@cindex @code{rfind}
@item int rfind(string s, string t, int pos=-1)
returns the position of the last occurrence of string @code{t} in string
@code{s} at or before position @code{pos} (if @code{pos}=-1, at the end
of the string @code{s}), or -1 if @code{t} is not a substring of @code{s};
@cindex @code{insert}
@item string insert(string s, int pos, string t)
returns the string formed by inserting string @code{t} at position
@code{pos} in @code{s};
@cindex @code{erase}
@item string erase(string s, int pos, int n)
returns the string formed by erasing the string of length @code{n}
(if @code{n}=-1, to the end of the string @code{s}) at
position @code{pos} in @code{s};
@cindex @code{substr}
@item string substr(string s, int pos, int n=-1)
returns the substring of @code{s} starting at position @code{pos}
and of length @code{n} (if @code{n}=-1, until the end of the
string @code{s});
@cindex @code{reverse}
@item string reverse(string s)
returns the string formed by reversing string @code{s};
@item string replace(string s, string before, string after)
@cindex @code{replace}
returns a string with all occurrences of the string @code{before} in the
string @code{s} changed to the string @code{after};
@item string replace(string s, string[][] table)
returns a string constructed by translating in string @code{s} all
occurrences of the string @code{before} in an array @code{table} of
string pairs @{@code{before},@code{after}@} to the corresponding
string @code{after};
@cindex @code{split}
@item string[] split(string s, string delimiter="")
returns an array of strings obtained by splitting @code{s} into substrings
delimited by @code{delimiter} (an empty delimiter signifies a space,
but with duplicate delimiters discarded);
@cindex @code{array}
@cindex @code{operator +(...string[] a)}.
@item string[] array(string s)
returns an array of strings obtained by splitting @code{s} into
individual characters. The inverse operation is provided by
@code{operator +(...string[] a)}.
@anchor{format}
@item string format(string s, int n, string locale="")
@cindex @code{format}
returns a string containing @code{n} formatted according to the C-style format
string @code{s} using locale @code{locale} (or the current locale if an
empty string is specified), following the behavior of the C function
@code{fprintf}), except that only one data field is allowed.
@item string format(string s=defaultformat, bool forcemath=false, string s=defaultseparator, real x, string locale="")
returns a string containing @code{x} formatted according to the C-style format
string @code{s} using locale @code{locale} (or the current locale if an
empty string is specified), following the behavior of the C function
@code{fprintf}), except that only one data field is allowed, trailing
zeros are removed by default (unless @code{#} is specified), and
if @code{s} specifies math mode or @code{forcemath=true}, @TeX{} is
used to typeset scientific notation using the
@code{defaultseparator="\!\times\!";};
@cindex @code{hex}
@cindex @code{hexadecimal}
@item int hex(string s);
casts a hexadecimal string @code{s} to an integer;
@cindex @code{ascii}
@cindex @code{ascii}
@item int ascii(string s);
returns the ASCII code for the first character of string @code{s};
@cindex @code{string}
@item string string(real x, int digits=realDigits)
casts @code{x} to a string using precision @code{digits} and the C locale;
@cindex @code{locale}
@item string locale(string s="")
sets the locale to the given string, if nonempty, and returns the
current locale;
@item string time(string format="%a %b %d %T %Z %Y")
@cindex @code{time}
@cindex date
@cindex @code{strftime}
returns the current time formatted by the ANSI C routine
@code{strftime} according to the string @code{format} using the current
locale. Thus
@verbatim
time();
time("%a %b %d %H:%M:%S %Z %Y");
@end verbatim
@noindent
are equivalent ways of returning the current time in the default
format used by the @code{UNIX} @code{date} command;
@cindex @code{seconds}
@cindex @code{strptime}
@item int seconds(string t="", string format="")
returns the time measured in seconds after the Epoch (Thu Jan 01
00:00:00 UTC 1970) as determined by the ANSI C routine @code{strptime}
according to the string @code{format} using the current locale, or the
current time if @code{t} is the empty string.
Note that the @code{"%Z"} extension to the POSIX @code{strptime}
specification is ignored by the current GNU C Library. If an error occurs, the
value -1 is returned. Here are some examples:
@verbatim
seconds("Mar 02 11:12:36 AM PST 2007","%b %d %r PST %Y");
seconds(time("%b %d %r %z %Y"),"%b %d %r %z %Y");
seconds(time("%b %d %r %Z %Y"),"%b %d %r "+time("%Z")+" %Y");
1+(seconds()-seconds("Jan 1","%b %d"))/(24*60*60);
@end verbatim
The last example returns today's ordinal date, measured from the
beginning of the year.
@cindex @code{time}
@cindex @code{strftime}
@item string time(int seconds, string format="%a %b %d %T %Z %Y")
returns the time corresponding to @code{seconds} seconds after the Epoch
(Thu Jan 01 00:00:00 UTC 1970) formatted by the ANSI C routine
@code{strftime} according to the string @code{format} using the current
locale. For example, to return the date corresponding to 24 hours ago:
@verbatim
time(seconds()-24*60*60);
@end verbatim
@cindex @code{system}
@item int system(string s)
@item int system(string[] s)
if the setting @code{safe} is false, call the arbitrary system command @code{s};
@cindex @code{asy}
@item void asy(string format, bool overwrite=false ... string[] s)
conditionally process each file name in array @code{s} in a new environment,
using format @code{format}, overwriting the output file only if
@code{overwrite} is true;
@cindex @code{abort}
@item void abort(string s="")
aborts execution (with a non-zero return code in batch mode); if string
@code{s} is nonempty, a diagnostic message constructed from the source
file, line number, and @code{s} is printed;
@cindex @code{assert}
@item void assert(bool b, string s="")
aborts execution with an error message constructed from @code{s} if
@code{b=false};
@cindex @code{exit}
@item void exit()
exits (with a zero error return code in batch mode);
@cindex @code{sleep}
@item void sleep(int seconds)
pauses for the given number of seconds;
@cindex @code{usleep}
@item void usleep(int microseconds)
pauses for the given number of microseconds;
@cindex @code{beep}
@item void beep()
produces a beep on the console;
@end table
@cindex @code{typedef}
@cindex @code{using}
@end table
As in C/C++, complicated types may be abbreviated with @code{typedef}
or @code{using}. For instance, the line
@verbatim
using multipath = path[];
@end verbatim
will make @code{multipath} a type equivalent @code{path[]}, as will
the equivalent line
@verbatim
typedef path[] multipath;
@end verbatim
For the most part such type aliasing is a convenience. However, it is required
when declaring a function whose return type is a function
(see the example in @ref{Functions}).
@node Paths and guides
@section Paths and guides
@table @code
@item path
@cindex @code{path}
a cubic spline resolved into a fixed path.
The implicit initializer for paths is @code{nullpath}.
@cindex @code{circle}
@anchor{circle}
For example, the routine @code{circle(pair c, real r)}, which returns a
Bezier curve approximating a circle of radius @code{r} centered on @code{c},
is based on @code{unitcircle} (@pxref{unitcircle}):
@verbatim
path circle(pair c, real r)
{
return shift(c)*scale(r)*unitcircle;
}
@end verbatim
If high accuracy is needed, a true circle may be produced with the
routine @code{Circle} defined in the module @code{graph}:
@cindex @code{Circle}
@verbatim
import graph;
path Circle(pair c, real r, int n=nCircle);
@end verbatim
A circular arc consistent with @code{circle} centered on
@code{c} with radius @code{r} from @code{angle1} to @code{angle2}
degrees, drawing counterclockwise if @code{angle2 >= angle1}, can be
constructed with
@cindex @code{arc}
@verbatim
path arc(pair c, real r, real angle1, real angle2);
@end verbatim
One may also specify the direction explicitly:
@verbatim
path arc(pair c, real r, real angle1, real angle2, bool direction);
@end verbatim
Here the direction can be specified as CCW (counter-clockwise) or CW
(clockwise). For convenience, an arc centered at @code{c} from pair
@code{z1} to @code{z2} (assuming @code{|z2-c|=|z1-c|}) in the may also
be constructed with
@verbatim
path arc(pair c, explicit pair z1, explicit pair z2,
bool direction=CCW)
@end verbatim
If high accuracy is needed, true arcs may be produced with routines
in the module @code{graph} that produce Bezier curves with @code{n}
control points:
@cindex @code{Arc}
@verbatim
import graph;
path Arc(pair c, real r, real angle1, real angle2, bool direction,
int n=nCircle);
path Arc(pair c, real r, real angle1, real angle2, int n=nCircle);
path Arc(pair c, explicit pair z1, explicit pair z2,
bool direction=CCW, int n=nCircle);
@end verbatim
An ellipse can be drawn with the routine
@cindex @code{ellipse}
@verbatim
path ellipse(pair c, real a, real b)
{
return shift(c)*scale(a,b)*unitcircle;
}
@end verbatim
A brace can be constructed between pairs @code{a} and @code{b} with
@cindex @code{brace}
@verbatim
path brace(pair a, pair b, real amplitude=bracedefaultratio*length(b-a));
@end verbatim
This example illustrates the use of all five guide connectors discussed
in @ref{Tutorial} and @ref{Bezier curves}:
@verbatiminclude join.asy
@sp 1
@center @image{./join}
Here are some useful functions for paths:
@table @code
@cindex @code{length}
@item int length(path p);
This is the number of (linear or cubic) segments in path @code{p}.
If @code{p} is cyclic, this is the same as the number of nodes in @code{p}.
@cindex @code{size}
@item int size(path p);
This is the number of nodes in the path @code{p}.
If @code{p} is cyclic, this is the same as @code{length(p)}.
@cindex @code{cyclic}
@item bool cyclic(path p);
returns @code{true} iff path @code{p} is cyclic.
@cindex @code{straight}
@item bool straight(path p, int i);
returns @code{true} iff the segment of path @code{p} between node
@code{i} and node @code{i+1} is straight.
@cindex @code{piecewisestraight}
@item bool piecewisestraight(path p)
returns @code{true} iff the path @code{p} is piecewise straight.
@cindex @code{point}
@item pair point(path p, int t);
If @code{p} is cyclic, return the coordinates of node @code{t} mod
@code{length(p)}. Otherwise, return the coordinates of node @code{t},
unless @code{t} < 0 (in which case @code{point(0)} is returned) or
@code{t} > @code{length(p)} (in which case @code{point(length(p))}
is returned).
@item pair point(path p, real t);
This returns the coordinates of the point between node @code{floor(t)}
and @code{floor(t)+1} corresponding to the cubic spline parameter
@code{t-floor(t)} (@pxref{Bezier curves}). If @code{t} lies outside the range
[0,@code{length(p)}], it is first reduced modulo @code{length(p)}
in the case where @code{p} is cyclic or else converted to the corresponding
endpoint of @code{p}.
@cindex @code{dir}
@item pair dir(path p, int t, int sign=0, bool normalize=true);
If @code{sign < 0}, return the direction (as a pair) of the incoming tangent
to path @code{p} at node @code{t}; if @code{sign > 0}, return the
direction of the outgoing tangent. If @code{sign=0}, the mean of these
two directions is returned.
@item pair dir(path p, real t, bool normalize=true);
returns the direction of the tangent to path @code{p} at the point
between node @code{floor(t)} and @code{floor(t)+1} corresponding to the
cubic spline parameter @code{t-floor(t)} (@pxref{Bezier curves}).
@item pair dir(path p)
returns dir(p,length(p)).
@item pair dir(path p, path q)
returns unit(dir(p)+dir(q)).
@cindex @code{accel}
@item pair accel(path p, int t, int sign=0);
If @code{sign < 0}, return the acceleration of the incoming path
@code{p} at node @code{t}; if @code{sign > 0}, return the
acceleration of the outgoing path. If @code{sign=0}, the mean of these
two accelerations is returned.
@cindex @code{accel}
@item pair accel(path p, real t);
returns the acceleration of the path @code{p} at the point @code{t}.
@cindex @code{radius}
@item real radius(path p, real t);
returns the radius of curvature of the path @code{p} at the point @code{t}.
@cindex @code{precontrol}
@item pair precontrol(path p, int t);
returns the precontrol point of @code{p} at node @code{t}.
@item pair precontrol(path p, real t);
returns the effective precontrol point of @code{p} at parameter @code{t}.
@cindex @code{postcontrol}
@item pair postcontrol(path p, int t);
returns the postcontrol point of @code{p} at node @code{t}.
@item pair postcontrol(path p, real t);
returns the effective postcontrol point of @code{p} at parameter @code{t}.
@cindex @code{arclength}
@item real arclength(path p);
returns the length (in user coordinates) of the piecewise linear
or cubic curve that path @code{p} represents.
@cindex @code{arctime}
@item real arctime(path p, real L);
returns the path "time", a real number between 0 and the length of
the path in the sense of @code{point(path p, real t)}, at which the
cumulative arclength (measured from the beginning of the path) equals @code{L}.
@cindex @code{arcpoint}
@item pair arcpoint(path p, real L);
returns @code{point(p,arctime(p,L))}.
@cindex @code{dirtime}
@item real dirtime(path p, pair z);
returns the first "time", a real number between 0 and the length of
the path in the sense of @code{point(path, real)}, at which the tangent
to the path has the direction of pair @code{z}, or -1 if this never happens.
@cindex @code{reltime}
@item real reltime(path p, real l);
returns the time on path @code{p} at the relative fraction @code{l} of
its arclength.
@cindex @code{relpoint}
@item pair relpoint(path p, real l);
returns the point on path @code{p} at the relative fraction @code{l} of its
arclength.
@cindex @code{midpoint}
@item pair midpoint(path p);
returns the point on path @code{p} at half of its arclength.
@cindex @code{reverse}
@item path reverse(path p);
returns a path running backwards along @code{p}.
@cindex @code{subpath}
@item path subpath(path p, int a, int b);
returns the subpath of @code{p} running from node @code{a} to node @code{b}.
If @code{a} > @code{b}, the direction of the subpath is reversed.
@item path subpath(path p, real a, real b);
returns the subpath of @code{p} running from path time @code{a} to path
time @code{b}, in the sense of @code{point(path, real)}. If @code{a} >
@code{b}, the direction of the subpath is reversed.
@cindex @code{intersect}
@item real[] intersect(path p, path q, real fuzz=-1);
If @code{p} and @code{q} have at least one intersection point, return a
real array of length 2 containing the times representing the respective
path times along @code{p} and @code{q}, in the sense of
@code{point(path, real)}, for one such intersection point (as chosen by
the algorithm described on page 137 of @code{The MetaFontbook}).
The computations are performed to the absolute error specified by @code{fuzz},
or if @code{fuzz < 0}, to machine precision. If the paths do not
intersect, return a real array of length 0.
@cindex @code{intersections}
@item real[][] intersections(path p, path q, real fuzz=-1);
Return all (unless there are infinitely many) intersection times of
paths @code{p} and @code{q} as a sorted array of real arrays of length 2
(@pxref{sort}). The computations are performed to the absolute error
specified by @code{fuzz}, or if @code{fuzz < 0}, to machine precision.
@cindex @code{intersections}
@item real[] intersections(path p, explicit pair a, explicit pair b, real fuzz=-1);
Return all (unless there are infinitely many) intersection times of path
@code{p} with the (infinite) line through points @code{a} and @code{b}
as a sorted array. The intersections returned are guaranteed to be
correct to within the absolute error specified by @code{fuzz}, or if
@code{fuzz < 0}, to machine precision.
@cindex @code{times}
@item real[] times(path p, real x)
returns all intersection times of path @code{p} with the vertical line
through @code{(x,0)}.
@cindex @code{times}
@item real[] times(path p, explicit pair z)
returns all intersection times of path @code{p} with the horizontal line
through @code{(0,z.y)}.
@cindex @code{mintimes}
@item real[] mintimes(path p)
returns an array of length 2 containing times at which path @code{p}
reaches its minimal horizontal and vertical extents, respectively.
@cindex @code{maxtimes}
@item real[] maxtimes(path p)
returns an array of length 2 containing times at which path @code{p}
reaches its maximal horizontal and vertical extents, respectively.
@cindex @code{intersectionpoint}
@item pair intersectionpoint(path p, path q, real fuzz=-1);
returns the intersection point @code{point(p,intersect(p,q,fuzz)[0])}.
@cindex @code{intersectionpoints}
@item pair[] intersectionpoints(path p, path q, real fuzz=-1);
returns an array containing all intersection points of the paths
@code{p} and @code{q}.
@anchor{extension}
@cindex @code{whatever}
@cindex @code{extension}
@item pair extension(pair P, pair Q, pair p, pair q);
returns the intersection point of the extensions of the line segments
@code{P--Q} and @code{p--q}, or if the lines are parallel,
@code{(infinity,infinity)}.
@cindex @code{cut}
@cindex @code{slice}
@item slice cut(path p, path knife, int n);
returns the portions of path @code{p} before and after the @code{n}th
intersection of @code{p} with path @code{knife} as a structure
@code{slice} (if no intersection exist is found, the entire path is
considered to be `before' the intersection):
@verbatim
struct slice {
path before,after;
}
@end verbatim
The argument @code{n} is treated as modulo the number of intersections.
@cindex @code{firstcut}
@cindex @code{slice}
@item slice firstcut(path p, path knife);
equivalent to @code{cut(p,knife,0);}
@cindex @code{MetaPost cutbefore}
Note that @code{firstcut.after} plays the role of the @code{MetaPost
cutbefore} command.
@cindex @code{lastcut}
@item slice lastcut(path p, path knife);
equivalent to @code{cut(p,knife,-1);}
@cindex @code{MetaPost cutafter}
Note that @code{lastcut.before} plays the role of the
@code{MetaPost cutafter} command.
@cindex @code{buildcycle}
@item path buildcycle(... path[] p);
This returns the path surrounding a region bounded by a list of two or more
consecutively intersecting paths, following the behavior of the
@code{MetaPost buildcycle} command.
@cindex @code{min}
@item pair min(path p);
returns the pair (left,bottom) for the path bounding box of path @code{p}.
@cindex @code{max}
@item pair max(path p);
returns the pair (right,top) for the path bounding box of path @code{p}.
@cindex @code{windingnumber}
@cindex @code{undefined}
@item int windingnumber(path p, pair z);
returns the winding number of the cyclic path @code{p} relative to the point
@code{z}. The winding number is positive if the path encircles @code{z} in the
counterclockwise direction. If @code{z} lies on @code{p} the constant
@code{undefined} (defined to be the largest odd integer) is returned.
@cindex @code{interior}
@item bool interior(int windingnumber, pen fillrule)
returns true if @code{windingnumber} corresponds to an interior point
according to @code{fillrule}.
@cindex @code{inside}
@item bool inside(path p, pair z, pen fillrule=currentpen);
returns @code{true} iff the point @code{z} lies inside or on the edge of
the region bounded by the cyclic path @code{p} according to the fill
rule @code{fillrule} (@pxref{fillrule}).
@cindex @code{inside}
@item int inside(path p, path q, pen fillrule=currentpen);
returns @code{1} if the cyclic path @code{p} strictly contains @code{q}
according to the fill rule @code{fillrule} (@pxref{fillrule}), @code{-1}
if the cyclic path @code{q} strictly contains @code{p}, and @code{0}
otherwise.
@cindex @code{inside}
@item pair inside(path p, pen fillrule=currentpen);
returns an arbitrary point strictly inside a nondegenerate cyclic path @code{p}
according to the fill rule @code{fillrule} (@pxref{fillrule}).
@cindex @code{strokepath}
@item path[] strokepath(path g, pen p=currentpen);
returns the path array that @code{PostScript} would fill in drawing path
@code{g} with pen @code{p}.
@end table
@item guide
@cindex @code{guide}
an unresolved cubic spline (list of cubic-spline nodes and control points).
The implicit initializer for a guide is @code{nullpath}; this is useful
for building up a guide within a loop.
A guide is similar to a path except that the computation of the cubic spline is
deferred until drawing time (when it is resolved into a path); this allows
two guides with free endpoint conditions to be joined together smoothly.
The solid curve in the following example is built up incrementally as
a guide, but only resolved at drawing time; the dashed curve is
incrementally resolved at each iteration, before the entire set of nodes
(shown in red) is known:
@verbatiminclude mexicanhat.asy
@sp 1
@center @image{./mexicanhat}
We point out an efficiency distinction in the use of guides and paths:
@verbatim
guide g;
for(int i=0; i < 10; ++i)
g=g--(i,i);
path p=g;
@end verbatim
@noindent
runs in linear time, whereas
@verbatim
path p;
for(int i=0; i < 10; ++i)
p=p--(i,i);
@end verbatim
@noindent
runs in quadratic time, as the entire path up to that point is copied at each
step of the iteration.
The following routines can be used to examine the individual elements of
a guide without actually resolving the guide to a fixed path (except for
internal cycles, which are resolved):
@table @code
@cindex @code{size}
@item int size(guide g);
Analogous to @code{size(path p)}.
@cindex @code{length}
@item int length(guide g);
Analogous to @code{length(path p)}.
@cindex @code{cyclic}
@item bool cyclic(path p);
Analogous to @code{cyclic(path p)}.
@cindex @code{point}
@item pair point(guide g, int t);
Analogous to @code{point(path p, int t)}.
@cindex @code{reverse}
@item guide reverse(guide g);
Analogous to @code{reverse(path p)}. If @code{g} is cyclic and
also contains a secondary cycle, it is first solved to a
path, then reversed. If @code{g} is not cyclic but contains an internal
cycle, only the internal cycle is solved before reversal. If there are
no internal cycles, the guide is reversed but not solved to a path.
@cindex @code{dirSpecifier}
@item pair[] dirSpecifier(guide g, int i);
This returns a pair array of length 2 containing the outgoing (in
element 0) and incoming (in element 1) direction specifiers (or
@code{(0,0)} if none specified) for the segment of guide @code{g}
between nodes @code{i} and @code{i+1}.
@cindex @code{controlSpecifier}
@item pair[] controlSpecifier(guide g, int i);
If the segment of guide @code{g} between nodes @code{i} and @code{i+1}
has explicit outgoing and incoming control points, they are returned as
elements 0 and 1, respectively, of a two-element array. Otherwise, an
empty array is returned.
@cindex @code{tensionSpecifier}
@item tensionSpecifier tensionSpecifier(guide g, int i);
This returns the tension specifier for the segment of guide @code{g} between
nodes @code{i} and @code{i+1}. The individual components of the
@code{tensionSpecifier} type can be accessed as the virtual members
@code{in}, @code{out}, and @code{atLeast}.
@cindex @code{curlSpecifier}
@item real[] curlSpecifier(guide g);
This returns an array containing the initial curl specifier (in element 0)
and final curl specifier (in element 1) for guide @code{g}.
@end table
As a technical detail we note that a direction specifier given to
@code{nullpath} modifies the node on the other side: the guides
@verbatim
a..{up}nullpath..b;
c..nullpath{up}..d;
e..{up}nullpath{down}..f;
@end verbatim
are respectively equivalent to
@verbatim
a..nullpath..{up}b;
c{up}..nullpath..d;
e{down}..nullpath..{up}f;
@end verbatim
@end table
@node Pens
@section Pens
@cindex @code{pen}
@cindex @code{currentpen}
@cindex @code{MetaPost pickup}
In @code{Asymptote}, pens provide a context for the four basic drawing
commands (@pxref{Drawing commands}). They are used to specify the
following drawing attributes: color, line type, line width, line cap,
line join, fill rule, text alignment, font, font size, pattern,
overwrite mode, and calligraphic transforms on the pen nib. The
default pen used by the drawing routines is called
@code{currentpen}. This provides the same functionality as the
@code{MetaPost} command @code{pickup}.
The implicit initializer for pens is @code{defaultpen}.
@cindex @code{+}
@cindex @code{*}
Pens may be added together with the nonassociative binary
operator @code{+}. This will add the colors of the two pens.
All other non-default attributes of the rightmost pen will
override those of the leftmost pen. Thus, one can obtain a yellow
dashed pen by saying @code{dashed+red+green} or @code{red+green+dashed}
or @code{red+dashed+green}. The binary operator @code{*}
can be used to scale the color of a pen by a real number, until it
saturates with one or more color components equal to 1.
@itemize @bullet
@item Colors are specified using one of the following colorspaces:
@cindex color
@table @code
@item pen gray(real g);
@cindex @code{gray}
@cindex grayscale
This produces a grayscale color, where the intensity @code{g} lies in the
interval [0,1], with 0.0 denoting black and 1.0 denoting white.
@item pen rgb(real r, real g, real b);
@cindex @code{rgb}
This produces an @acronym{RGB} color, where each of the red, green,
and blue intensities @code{r}, @code{g}, @code{b}, lies in the interval [0,1].
@item pen RGB(int r, int g, int b);
@cindex @code{rgb}
This produces an @acronym{RGB} color, where each of the red, green,
and blue intensities @code{r}, @code{g}, @code{b}, lies in the
interval [0,255].
@item pen cmyk(real c, real m, real y, real k);
@cindex @code{cmyk}
This produces a @acronym{CMYK} color, where each of the cyan, magenta,
yellow, and black intensities @code{c}, @code{m}, @code{y}, @code{k},
lies in the interval [0,1].
@item pen invisible;
@cindex @code{invisible}
This special pen writes in invisible ink, but adjusts the bounding
box as if something had been drawn (like the @code{\phantom}
command in @TeX{}). The function @code{bool invisible(pen)} can be used
to test whether a pen is invisible.
@end table
@cindex @code{defaultpen}
The default color is @code{black}; this may be changed with the routine
@code{defaultpen(pen)}. The function @code{colorspace(pen p)} returns
the colorspace of pen @code{p} as a string (@code{"gray"}, @code{"rgb"},
@code{"cmyk"}, or @code{""}).
@cindex @code{colors}
The function @code{real[] colors(pen)} returns the color components of a pen.
The functions @code{pen gray(pen)}, @code{pen rgb(pen)}, and
@code{pen cmyk(pen)} return new pens obtained by converting their
arguments to the respective color spaces.
@cindex @code{colorless}
The function @code{colorless(pen=currentpen)} returns a copy of its argument
with the color attributes stripped (to avoid color mixing).
A 6-character RGB hexadecimal string can be converted to a pen with
the routine
@cindex @code{rgb}
@cindex @code{hexadecimal}
@verbatim
pen rgb(string s);
@end verbatim
@item A pen can be converted to a hexadecimal string with
@cindex @code{hex}
@code{string hex(pen p);}
Various shades and mixtures of the grayscale primary colors
@code{black} and @code{white}, @acronym{RGB} primary colors
@code{red}, @code{green}, and @code{blue}, and
@acronym{RGB} secondary colors @code{cyan}, @code{magenta}, and @code{yellow}
are defined as named colors, along with the @acronym{CMYK} primary
colors @code{Cyan}, @code{Magenta}, @code{Yellow}, and @code{Black}, in
the module @code{plain}:
@sp 1
@center @image{./colors}
The standard 140 @acronym{RGB} @code{X11} colors can be imported with
the command
@verbatim
import x11colors;
@end verbatim
and the standard 68 @acronym{CMYK} @TeX{} colors can be imported with
the command
@verbatim
import texcolors;
@end verbatim
Note that there is some overlap between these two standards
and the definitions of some colors (e.g.@ @code{Green}) actually disagree.
@code{Asymptote} also comes with a @code{asycolors.sty} @code{LaTeX} package
that defines to @code{LaTeX} @acronym{CMYK} versions of
@code{Asymptote}'s predefined colors, so that they can be used
directly within @code{LaTeX} strings. Normally, such colors are
passed to @code{LaTeX} via a pen argument; however, to change the
color of only a portion of a string, say for a slide presentation,
(@pxref{slide}) it may be desirable to specify the color directly to
@code{LaTeX}. This file can be passed to @code{LaTeX} with the
@code{Asymptote} command
@verbatim
usepackage("asycolors");
@end verbatim
The structure @code{hsv} defined in @code{plain_pens.asy} may be used
to convert between @acronym{HSV} and @acronym{RGB} spaces, where
the hue @code{h} is an angle in @math{[0,360)} and the saturation
@code{s} and value @code{v} lie in @code{[0,1]}:
@verbatim
pen p=hsv(180,0.5,0.75);
write(p); // ([default], red=0.375, green=0.75, blue=0.75)
hsv q=p;
write(q.h,q.s,q.v); // 180 0.5 0.75
@end verbatim
@item Line types are specified with the function
@code{pen linetype(real[] a, real offset=0, bool scale=true, bool adjust=true)},
@cindex @code{solid}
@cindex @code{dashed}
@cindex @code{dotted}
@cindex @code{longdashed}
@cindex @code{dashdotted}
@cindex @code{longdashdotted}
where @code{a} is an array of real array numbers.
The optional parameter @code{offset} specifies where in the pattern
to begin. The first number specifies how far (if @code{scale} is
@code{true}, in units of the pen line width; otherwise in
@code{PostScript} units) to draw with the pen on, the second number
specifies how far to draw with the pen off, and so on. If
@code{adjust} is @code{true}, these spacings are automatically
adjusted by @code{Asymptote} to fit the arclength of the path. Here
are the predefined line types:
@verbatim
pen solid=linetype(new real[]);
pen dotted=linetype(new real[] {0,4});
pen dashed=linetype(new real[] {8,8});
pen longdashed=linetype(new real[] {24,8});
pen dashdotted=linetype(new real[] {8,8,0,8});
pen longdashdotted=linetype(new real[] {24,8,0,8});
pen Dotted(pen p=currentpen) {return linetype(new real[] {0,3})+2*linewidth(p);}
pen Dotted=Dotted();
@end verbatim
@sp 1
@center @image{./linetype}
@cindex @code{defaultpen}
The default line type is @code{solid}; this may be changed with
@code{defaultpen(pen)}.
@cindex @code{linetype}
@cindex @code{offset}
@cindex @code{scale}
@cindex @code{adjust}
The line type of a pen can be determined with the functions
@code{real[] linetype(pen p=currentpen)},
@code{real offset(pen p)}, @code{bool scale(pen p)}, and
@code{bool adjust(pen p)}.
@cindex @code{linewidth}
@cindex @code{defaultpen}
@item The pen line width is specified in @code{PostScript} units with
@code{pen linewidth(real)}. The default line width is 0.5 bp; this value
may be changed with @code{defaultpen(pen)}. The line width of a pen
is returned by @code{real linewidth(pen p=currentpen)}.
For convenience, in the module @code{plain_pens} we define
@verbatim
void defaultpen(real w) {defaultpen(linewidth(w));}
pen operator +(pen p, real w) {return p+linewidth(w);}
pen operator +(real w, pen p) {return linewidth(w)+p;}
@end verbatim
so that one may set the line width like this:
@verbatim
defaultpen(2);
pen p=red+0.5;
@end verbatim
@cindex @code{linecap}
@cindex @code{squarecap}
@cindex @code{roundcap}
@cindex @code{extendcap}
@cindex @code{defaultpen}
@item A pen with a specific @code{PostScript} line cap is returned on
calling @code{linecap} with an integer argument:
@verbatim
pen squarecap=linecap(0);
pen roundcap=linecap(1);
pen extendcap=linecap(2);
@end verbatim
@noindent
The default line cap, @code{roundcap}, may be changed with
@code{defaultpen(pen)}. The line cap of a pen is returned by
@code{int linecap(pen p=currentpen)}.
@cindex @code{linejoin}
@cindex @code{miterjoin}
@cindex @code{roundjoin}
@cindex @code{beveljoin}
@item A pen with a specific @code{PostScript} join style is returned on
calling @code{linejoin} with an integer argument:
@verbatim
pen miterjoin=linejoin(0);
pen roundjoin=linejoin(1);
pen beveljoin=linejoin(2);
@end verbatim
@noindent
The default join style, @code{roundjoin}, may be changed with
@code{defaultpen(pen)}.The join style of a pen is returned by
@code{int linejoin(pen p=currentpen)}.
@cindex @code{miterlimit}
@item A pen with a specific @code{PostScript} miter limit is returned by
calling @code{miterlimit(real)}.
The default miterlimit, @code{10.0}, may be changed with
@code{defaultpen(pen)}. The miter limit of a pen is returned by
@code{real miterlimit(pen p=currentpen)}.
@cindex @code{fillrule}
@cindex @code{zerowinding}
@cindex @code{evenodd}
@anchor{fillrule}
@item A pen with a specific @code{PostScript} fill rule is returned on
calling @code{fillrule} with an integer argument:
@verbatim
pen zerowinding=fillrule(0);
pen evenodd=fillrule(1);
@end verbatim
@noindent
The fill rule, which identifies the algorithm used to determine the
insideness of a path or array of paths, only affects the @code{clip},
@code{fill}, and @code{inside} functions. For the @code{zerowinding}
fill rule, a point @code{z} is outside the region bounded by a path if
the number of upward intersections of the path with the horizontal
line @code{z--z+infinity} minus the number of downward intersections
is zero. For the @code{evenodd} fill rule, @code{z} is considered to
be outside the region if the total number of such intersections is even.
The default fill rule, @code{zerowinding}, may be changed with
@code{defaultpen(pen)}. The fill rule of a pen is returned by
@code{int fillrule(pen p=currentpen)}.
@cindex @code{nobasealign}
@cindex @code{basealign}
@anchor{basealign}
@item A pen with a specific text alignment setting is returned on
calling @code{basealign} with an integer argument:
@verbatim
pen nobasealign=basealign(0);
pen basealign=basealign(1);
@end verbatim
@noindent
The default setting, @code{nobasealign}, which may be changed with
@code{defaultpen(pen)}, causes the label alignment routines to use the
full label bounding box for alignment. In contrast, @code{basealign}
requests that the @TeX{} baseline be respected.
The base align setting of a pen is returned by
@code{int basealign(pen p=currentpen)}.
For example, in the following image, the baselines of green @math{\pi} and
@math{\gamma} are aligned, while the bottom border of red @math{-\pi}
and @math{-\gamma} are aligned.
@verbatiminclude basealign.asy
@sp 1
@center @image{./basealign}
Another method for aligning baselines is provided by the @code{baseline} function (@pxref{baseline}).
@cindex @code{fontsize}
@cindex @code{lineskip}
@cindex @code{defaultpen}
@cindex @code{type1cm}
@item The font size is specified in @TeX{} points (1 pt = 1/72.27 inches) with
the function @code{pen fontsize(real size, real lineskip=1.2*size)}.
The default font size, 12pt, may be changed with @code{defaultpen(pen)}.
Nonstandard font sizes may require inserting
@verbatim
import fontsize;
@end verbatim
at the beginning of the file (this requires the @code{type1cm} package
available from
@quotation
@url{
http://mirror.ctan.org/macros/latex/contrib/type1cm/}
@end quotation
and included in recent @code{LaTeX} distributions). The font size and line
skip of a pen can be examined with the routines
@code{real fontsize(pen p=currentpen)} and
@code{real lineskip(pen p=currentpen)}, respectively.
@cindex font
@cindex @LaTeX{} NFSS fonts
@cindex @code{font}
@item A pen using a specific @LaTeX{} NFSS font is returned
by calling the function @code{pen font(string encoding, string family,
string series, string shape)}. The default setting,
@code{font("OT1","cmr","m","n")}, corresponds to 12pt Computer Modern Roman;
this may be changed with @code{defaultpen(pen)}.
The font setting of a pen is returned by
@code{string font(pen p=currentpen)}.
@cindex @TeX{} fonts
Alternatively, one may select a fixed-size @TeX{} font (on which
@code{fontsize} has no effect) like @code{"cmr12"} (12pt Computer Modern
Roman) or @code{"pcrr"} (Courier) using the function @code{pen font(string
name)}. An optional size argument can also be given to scale the font
to the requested size: @code{pen font(string name, real size)}.
@cindex @code{fontcommand}
A nonstandard font command can be generated with
@code{pen fontcommand(string)}.
@cindex @code{PostScript} fonts
A convenient interface to the following standard @code{PostScript}
fonts is also provided:
@verbatim
pen AvantGarde(string series="m", string shape="n");
pen Bookman(string series="m", string shape="n");
pen Courier(string series="m", string shape="n");
pen Helvetica(string series="m", string shape="n");
pen NewCenturySchoolBook(string series="m", string shape="n");
pen Palatino(string series="m", string shape="n");
pen TimesRoman(string series="m", string shape="n");
pen ZapfChancery(string series="m", string shape="n");
pen Symbol(string series="m", string shape="n");
pen ZapfDingbats(string series="m", string shape="n");
@end verbatim
@cindex font
@cindex font encoding
@cindex input encoding
@cindex language context
@item Starting with the 2018/04/01 release, @LaTeX{} takes UTF-8 as
the new default input encoding. However, you can still set different input
encoding (so as the font, font encoding or even language context).
@cindex Cyrillic
@cindex Russian
Here is an example for @code{cp1251} and Russian language in Cyrillic script
(font encoding @code{T2A}):
@verbatim
texpreamble("\usepackage[math]{anttor}");
texpreamble("\usepackage[T2A]{fontenc}");
texpreamble("\usepackage[cp1251]{inputenc}");
texpreamble("\usepackage[russian]{babel}");
@end verbatim
@noindent
@cindex Chinese
@cindex Japanese
@cindex Korean
@cindex CJK
Support for Chinese, Japanese, and Korean fonts is provided by the
CJK package:
@quotation
@url{
https://ctan.org/pkg/cjk}
@end quotation
@noindent
The following commands enable the CJK song family (within a label, you
can also temporarily switch to another family, say kai, by prepending
@code{"\CJKfamily@{kai@}"} to the label string):
@verbatim
texpreamble("\usepackage{CJK}
\AtBeginDocument{\begin{CJK*}{GBK}{song}}
\AtEndDocument{\clearpage\end{CJK*}}");
@end verbatim
@anchor{transparency}
@cindex transparency
@cindex @code{opacity}
@item The transparency of a pen can be changed with the command:
@verbatim
pen opacity(real opacity=1, string blend="Compatible");
@end verbatim
The opacity can be varied from @code{0} (fully transparent) to the default
value of @code{1} (opaque), and @code{blend} specifies one of the
following foreground--background blending operations:
@verbatim
"Compatible","Normal","Multiply","Screen","Overlay","SoftLight",
"HardLight","ColorDodge","ColorBurn","Darken","Lighten","Difference",
"Exclusion","Hue","Saturation","Color","Luminosity",
@end verbatim
as described in Tables 136 and 137 of
@url{
https://opensource.adobe.com/dc-acrobat-sdk-docs/standards/pdfstandards/pdf/PDF32000_2008.pdf}.
Since @code{PostScript} does not support transparency, this feature is
only effective with the @code{-f pdf} output format option; other
formats can be produced from the resulting @acronym{PDF} file with the
@code{ImageMagick} @code{magick} program.
Labels are always drawn with an @code{opacity} of 1.
A simple example of transparent filling is provided in the example file
@code{@uref{
https://asymptote.sourceforge.io/gallery/transparency.svg,,transparency}@uref{
https://asymptote.sourceforge.io/gallery/transparency.asy,,.asy}}.
@cindex patterns
@cindex tilings
@item @code{PostScript} commands within a @code{picture} may be used
to create a tiling pattern, identified by the string @code{name}, for
@code{fill} and @code{draw} operations by adding it to the
global @code{PostScript} frame @code{currentpatterns},
with optional left-bottom margin @code{lb} and right-top margin @code{rt}.
@verbatim
import patterns;
void add(string name, picture pic, pair lb=0, pair rt=0);
@end verbatim
To @code{fill} or @code{draw} using pattern @code{name}, use
the pen @code{pattern("name")}. For example, rectangular tilings
can be constructed using the routines
@code{picture tile(real Hx=5mm, real Hy=0, pen p=currentpen,
filltype filltype=NoFill)},
@code{picture checker(real Hx=5mm, real Hy=0, pen p=currentpen)}, and
@code{picture brick(real Hx=5mm, real Hy=0, pen p=currentpen)} defined in
module @code{patterns}:
@cindex grid
@cindex tile
@cindex checker
@cindex brick
@verbatiminclude tile.asy
@sp 1
@center @image{./tile}
@cindex hatch
@cindex crosshatch
Hatch patterns can be generated with the routines
@code{picture hatch(real H=5mm, pair dir=NE, pen p=currentpen)},
@code{picture crosshatch(real H=5mm, pen p=currentpen)}:
@verbatiminclude hatch.asy
@sp 1
@center @image{./hatch}
You may need to turn off aliasing in your @code{PostScript} viewer for
patterns to appear correctly. Custom patterns can easily be constructed,
following the examples in module @code{patterns}. The tiled pattern can
even incorporate shading (@pxref{gradient shading}), as illustrated
in this example (not included in the manual because not all printers support
@code{PostScript} 3):
@verbatiminclude shadedtiling.asy
@anchor{makepen}
@cindex @code{makepen}
@item One can specify a custom pen nib as an arbitrary polygonal path
with @code{pen makepen(path)}; this path represents the mark to be
drawn for paths containing a single point. This pen nib path can be
recovered from a pen with @code{path nib(pen)}. Unlike in
@code{MetaPost}, the path need not be convex:
@verbatiminclude makepen.asy
@sp 1
@center @image{./makepen}
The value @code{nullpath} represents a circular pen nib (the default);
an elliptical pen can be achieved simply by multiplying the pen by a
transform: @code{yscale(2)*currentpen}.
@anchor{overwrite}
@cindex @code{overwrite}
@item One can prevent labels from overwriting one another by using
the pen attribute @code{overwrite}, which takes a single argument:
@table @code
@cindex @code{Allow}
@cindex @code{defaultpen}
@item Allow
Allow labels to overwrite one another. This is the default behavior (unless
overridden with @code{defaultpen(pen)}.
@cindex @code{Suppress}
@item Suppress
Suppress, with a warning, each label that would overwrite another label.
@cindex @code{SuppressQuiet}
@item SuppressQuiet
Suppress, without warning, each label that would overwrite another label.
@cindex @code{Move}
@item Move
Move a label that would overwrite another out of the way and issue a warning.
As this adjustment is during the final output phase (in @code{PostScript}
coordinates) it could result in a larger figure than requested.
@cindex @code{MoveQuiet}
@item MoveQuiet
Move a label that would overwrite another out of the way, without warning.
As this adjustment is during the final output phase (in @code{PostScript}
coordinates) it could result in a larger figure than requested.
@end table
@end itemize
@cindex @code{defaultpen}
@cindex @code{resetdefaultpen}
The routine @code{defaultpen()} returns the current default pen attributes.
Calling the routine @code{resetdefaultpen()} resets all pen default
attributes to their initial values.
@node Transforms
@section Transforms
@cindex @code{transform}
@code{Asymptote} makes extensive use of affine transforms. A pair
@code{(x,y)} is transformed by the transform
@code{t=(t.x,t.y,t.xx,t.xy,t.yx,t.yy)} to @code{(x',y')}, where
@verbatim
x' = t.x + t.xx * x + t.xy * y
y' = t.y + t.yx * x + t.yy * y
@end verbatim
@noindent
This is equivalent to the @code{PostScript} transformation
@code{[t.xx t.yx t.xy t.yy t.x t.y]}.
Transforms can be applied to pairs, guides, paths, pens, strings,
transforms, frames, and pictures by multiplication (via the binary operator
@code{*}) on the left (@pxref{circle} for an example).
@cindex @code{inverse}
Transforms can be composed with one another and inverted with the
function @code{transform inverse(transform t)}; they can also be raised to any
integer power with the @code{^} operator.
The built-in transforms are:
@table @code
@item transform identity;
@cindex @code{identity}
the identity transform;
@item transform shift(pair z);
@cindex @code{shift}
translates by the pair @code{z};
@item transform shift(real x, real y);
@cindex @code{shift}
translates by the pair @code{(x,y)};
@item transform xscale(real x);
@cindex @code{xscale}
scales by @code{x} in the @math{x} direction;
@item transform yscale(real y);
@cindex @code{yscale}
scales by @code{y} in the @math{y} direction;
@item transform scale(real s);
@cindex @code{scale}
scale by @code{s} in both @math{x} and @math{y} directions;
@item transform scale(real x, real y);
@cindex @code{scale}
scale by @code{x} in the @math{x} direction and by @code{y} in the
@math{y} direction;
@item transform slant(real s);
@cindex @code{slant}
maps @code{(x,y)} --> @code{(x+s*y,y)};
@item transform rotate(real angle, pair z=(0,0));
rotates by @code{angle} in degrees about @code{z};
@item transform reflect(pair a, pair b);
@cindex @code{reflect}
reflects about the line @code{a--b}.
@item transform zeroTransform;
@cindex @code{zeroTransform}
the zero transform;
@end table
@cindex @code{shift}
@cindex @code{shiftless}
The implicit initializer for transforms is @code{identity()}.
The routines @code{shift(transform t)} and @code{shiftless(transform t)}
return the transforms @code{(t.x,t.y,0,0,0,0)} and
@code{(0,0,t.xx,t.xy,t.yx,t.yy)} respectively.
The function @code{bool isometry(transform t)} can be used to test if @code{t}
is an isometry (preserves distance).
@node Frames and pictures
@section Frames and pictures
@table @code
@item frame
@cindex @code{frame}
@cindex @code{newframe}
@cindex @code{empty}
@cindex @code{erase}
@cindex @code{min}
@cindex @code{max}
Frames are canvases for drawing in @code{PostScript} coordinates. While working
with frames directly is occasionally necessary for constructing deferred
drawing routines
The implicit initializer for frames is @code{newframe}. The function
@code{bool empty(frame f)} returns @code{true} only if the frame @code{f}
is empty. A frame may be erased with the @code{erase(frame)} routine.
The functions @code{pair min(frame)} and @code{pair max(frame)}
return the (left,bottom) and (right,top) coordinates of the frame
bounding box, respectively. The contents of frame @code{src} may be
appended to frame @code{dest} with the command
@verbatim
void add(frame dest, frame src);
@end verbatim
or prepended with
@verbatim
void prepend(frame dest, frame src);
@end verbatim
A frame obtained by aligning frame @code{f} in the direction
@code{align}, in a manner analogous to the @code{align} argument of
@code{label} (@pxref{label}), is returned by
@verbatim
frame align(frame f, pair align);
@end verbatim
@item picture
@cindex @code{picture}
Pictures are high-level structures (@pxref{Structures}) defined in
the module @code{plain} that provide canvases for drawing in user coordinates.
The default picture is called @code{currentpicture}. A new picture
can be created like this:
@verbatim
picture pic;
@end verbatim
@noindent
Anonymous pictures can be made by the expression @code{new picture}.
The @code{size} routine specifies the dimensions of the desired picture:
@anchor{size}
@cindex @code{size}
@verbatim
void size(picture pic=currentpicture, real x, real y=x,
bool keepAspect=pic.keepAspect);
@end verbatim
If the @code{x} and @code{y} sizes are both 0, user coordinates will be
interpreted as @code{PostScript} coordinates. In this case, the transform
mapping @code{pic} to the final output frame is @code{identity()}.
If exactly one of @code{x} or @code{y} is 0, no size restriction
is imposed in that direction; it will be scaled the same as the other
direction.
@cindex @code{keepAspect}
@cindex @code{Aspect}
If @code{keepAspect} is set to @code{Aspect} or @code{true} (the default),
the picture will be scaled with its aspect ratio preserved such that
the final width is no more than @code{x} and the final height is
no more than @code{y}.
@cindex @code{keepAspect}
@cindex @code{IgnoreAspect}
If @code{keepAspect} is set to @code{IgnoreAspect} or @code{false},
the picture will be scaled in both directions so that the final width
is @code{x} and the height is @code{y}.
To make the user coordinates of picture @code{pic}
represent multiples of @code{x} units in the @math{x} direction and
@code{y} units in the @math{y} direction, use
@anchor{unitsize}
@cindex @code{unitsize}
@verbatim
void unitsize(picture pic=currentpicture, real x, real y=x);
@end verbatim
When nonzero, these @code{x} and @code{y} values override the
corresponding size parameters of picture @code{pic}.
The routine
@cindex @code{size}
@verbatim
void size(picture pic=currentpicture, real xsize, real ysize,
pair min, pair max);
@end verbatim
forces the final picture scaling to map the user coordinates
@code{box(min,max)} to a region of width @code{xsize} and height @code{ysize}
(when these parameters are nonzero).
Alternatively, calling the routine
@cindex @code{fixedscaling}
@verbatim
transform fixedscaling(picture pic=currentpicture, pair min,
pair max, pen p=nullpen, bool warn=false);
@end verbatim
will cause picture @code{pic} to use a fixed scaling to map user
coordinates in @code{box(min,max)} to the (already specified) picture size,
taking account of the width of pen @code{p}. A warning will be issued if
the final picture exceeds the specified size.
A picture @code{pic} can be fit to a frame and output to a file
@code{prefix}.@code{format} using image format @code{format}
by calling the @code{shipout} function:
@anchor{shipout}
@cindex @code{shipout}
@cindex @code{outprefix}
@verbatim
void shipout(string prefix=defaultfilename, picture pic=currentpicture,
orientation orientation=orientation,
string format="", bool wait=false, bool view=true,
string options="", string script="",
light light=currentlight, projection P=currentprojection)
@end verbatim
@noindent
The default output format, @code{PostScript}, may be changed
with the @code{-f} or @code{-tex} command-line options.
The @code{options}, @code{script}, and @code{projection} parameters
are only relevant for 3D pictures. If @code{defaultfilename} is an
empty string, the prefix @code{outprefix()} will be used.
A @code{shipout()} command is added implicitly at file exit.
Explicit @code{shipout()} commands to the same file as the final implicit
shipout are ignored.
@cindex @code{orientation}
@cindex @code{Portrait}
@cindex @code{Landscape}
@cindex @code{UpsideDown}
The default page orientation is @code{Portrait}; this may be modified
by changing the variable @code{orientation}. To output in landscape
mode, simply set the variable @code{orientation=Landscape} or issue
the command
@verbatim
shipout(Landscape);
@end verbatim
@cindex @code{Seascape}
To rotate the page by @math{-90} degrees, use the orientation @code{Seascape}.
@cindex @code{UpsideDown}
The orientation @code{UpsideDown} rotates the page by 180 degrees.
@cindex subpictures
@cindex @code{picture.fit}
A picture @code{pic} can be explicitly fit to a frame by calling
@verbatim
frame pic.fit(real xsize=pic.xsize, real ysize=pic.ysize,
bool keepAspect=pic.keepAspect);
@end verbatim
The default size and aspect ratio settings are those given to the
@code{size} command (which default to @code{0}, @code{0}, and
@code{true}, respectively).
@cindex @code{picture.calculateTransform}
The transformation that would currently be used to fit a picture
@code{pic} to a frame is returned by the member function
@code{pic.calculateTransform()}.
In certain cases (e.g.@ 2D graphs) where only an approximate size
estimate for @code{pic} is available, the picture fitting routine
@cindex @code{picture.scale}
@verbatim
frame pic.scale(real xsize=this.xsize, real ysize=this.ysize,
bool keepAspect=this.keepAspect);
@end verbatim
(which scales the resulting frame, including labels and fixed-size
objects) will enforce perfect compliance with the requested size
specification, but should not normally be required.
@cindex @code{box}
To draw a bounding box with margins around a picture, fit the
picture to a frame using the function
@verbatim
frame bbox(picture pic=currentpicture, real xmargin=0,
real ymargin=xmargin, pen p=currentpen,
filltype filltype=NoFill);
@end verbatim
@cindex @code{filltype}
@anchor{filltype}
Here @code{filltype} specifies one of the following fill types:
@table @code
@cindex @code{FillDraw}
@item FillDraw
Fill the interior and draw the boundary.
@item FillDraw(real xmargin=0, real ymargin=xmargin, pen fillpen=nullpen,
@code{pen drawpen=nullpen)}
@cindex @code{nullpen}
If @code{fillpen} is @code{nullpen}, fill with the drawing pen;
otherwise fill with pen @code{fillpen}.
If @code{drawpen} is @code{nullpen}, draw the boundary with @code{fillpen};
otherwise with @code{drawpen}. An optional margin of
@code{xmargin} and @code{ymargin} can be specified.
@cindex @code{Fill}
@item Fill
Fill the interior.
@cindex @code{nullpen}
@item Fill(real xmargin=0, real ymargin=xmargin, pen p=nullpen)
If @code{p} is @code{nullpen}, fill with the drawing pen;
otherwise fill with pen @code{p}. An optional margin of
@code{xmargin} and @code{ymargin} can be specified.
@cindex @code{NoFill}
@item NoFill
Do not fill.
@item Draw
Draw only the boundary.
@cindex @code{Draw}
@item Draw(real xmargin=0, real ymargin=xmargin, pen p=nullpen)
If @code{p} is @code{nullpen}, draw the boundary with the drawing pen;
otherwise draw with pen @code{p}. An optional margin of
@code{xmargin} and @code{ymargin} can be specified.
@cindex @code{UnFill}
@item UnFill
Clip the region.
@cindex @code{UnFill}
@item UnFill(real xmargin=0, real ymargin=xmargin)
Clip the region and surrounding margins @code{xmargin} and @code{ymargin}.
@cindex @code{RadialShade}
@item RadialShade(pen penc, pen penr)
Fill varying radially from @code{penc} at the center of the bounding
box to @code{penr} at the edge.
@cindex @code{RadialShadeDraw}
@item RadialShadeDraw(real xmargin=0, real ymargin=xmargin, pen penc,
@code{pen penr, pen drawpen=nullpen)}
Fill with RadialShade and draw the boundary.
@end table
@cindex bounding box
@cindex background color
For example, to draw a bounding box around a picture with a 0.25 cm
margin and output the resulting frame, use the command:
@verbatim
shipout(bbox(0.25cm));
@end verbatim
A @code{picture} may be fit to a frame with the background color
pen @code{p}, using the function @code{bbox(p,Fill)}.
@cindex @code{pad}
To pad a picture to a precise size in both directions, fit the picture
to a frame using the function
@verbatim
frame pad(picture pic=currentpicture, real xsize=pic.xsize,
real ysize=pic.ysize, filltype filltype=NoFill);
@end verbatim
The functions
@verbatim
pair min(picture pic, user=false);
pair max(picture pic, user=false);
pair size(picture pic, user=false);
@end verbatim
calculate the bounds that picture @code{pic} would
have if it were currently fit to a frame using its default size specification.
If @code{user} is @code{false} the returned value is in
@code{PostScript} coordinates, otherwise it is in user coordinates.
The function
@verbatim
pair point(picture pic=currentpicture, pair dir, bool user=true);
@end verbatim
is a convenient way of determining the point on the bounding box of
@code{pic} in the direction @code{dir} relative to its center, ignoring
the contributions from fixed-size objects (such as labels and arrowheads).
If @code{user} is @code{true} the returned value is in user coordinates,
otherwise it is in @code{PostScript} coordinates.
The function
@verbatim
pair truepoint(picture pic=currentpicture, pair dir, bool user=true);
@end verbatim
is identical to @code{point}, except that it also accounts for
fixed-size objects, using the scaling transform that picture @code{pic}
would have if currently fit to a frame using its default size
specification. If @code{user} is @code{true} the returned value is in
user coordinates, otherwise it is in @code{PostScript} coordinates.
@anchor{add}
Sometimes it is useful to draw objects on separate pictures and add one
picture to another using the @code{add} function:
@cindex @code{add}
@verbatim
void add(picture src, bool group=true,
filltype filltype=NoFill, bool above=true);
void add(picture dest, picture src, bool group=true,
filltype filltype=NoFill, bool above=true);
@end verbatim
@noindent
The first example adds @code{src} to @code{currentpicture}; the second
one adds @code{src} to @code{dest}.
The @code{group} option specifies whether or not the graphical user
interface should treat all of the elements of @code{src}
as a single entity (@pxref{GUI}), @code{filltype} requests optional
background filling or clipping, and @code{above} specifies
whether to add @code{src} above or below existing objects.
There are also routines to add a fixed-size picture or frame
@code{src} to another picture @code{dest} (or @code{currentpicture})
about the user coordinate @code{position}:
@anchor{add about}
@cindex @code{add}
@cindex picture alignment
@verbatim
void add(picture src, pair position, bool group=true,
filltype filltype=NoFill, bool above=true);
void add(picture dest, picture src, pair position,
bool group=true, filltype filltype=NoFill, bool above=true);
void add(picture dest=currentpicture, frame src, pair position=0,
bool group=true, filltype filltype=NoFill, bool above=true);
void add(picture dest=currentpicture, frame src, pair position,
pair align, bool group=true, filltype filltype=NoFill,
bool above=true);
@end verbatim
The optional @code{align} argument in the last form specifies a
direction to use for aligning the frame, in a manner analogous to the
@code{align} argument of @code{label} (@pxref{label}). However, one key
difference is that when @code{align} is not specified, labels are
centered, whereas frames and pictures are aligned so that their origin is
at @code{position}. Illustrations of frame alignment can be found in
the examples @ref{errorbars} and @ref{image}. If you want to align three
or more subpictures, group them two at a time:
@verbatiminclude subpictures.asy
@sp 1
@center @image{./subpictures}
Alternatively, one can use @code{attach} to automatically increase the
size of picture @code{dest} to accommodate adding a frame @code{src}
about the user coordinate @code{position}:
@cindex @code{attach}
@verbatim
void attach(picture dest=currentpicture, frame src,
pair position=0, bool group=true,
filltype filltype=NoFill, bool above=true);
void attach(picture dest=currentpicture, frame src,
pair position, pair align, bool group=true,
filltype filltype=NoFill, bool above=true);
@end verbatim
@cindex @code{erase}
To erase the contents of a picture (but not the size specification), use
the function
@verbatim
void erase(picture pic=currentpicture);
@end verbatim
@cindex @code{save}
To save a snapshot of @code{currentpicture}, @code{currentpen}, and
@code{currentprojection}, use the function @code{save()}.
@cindex @code{restore}
To restore a snapshot of @code{currentpicture}, @code{currentpen}, and
@code{currentprojection}, use the function @code{restore()}.
Many further examples of picture and frame operations are provided in
the base module @code{plain}.
@cindex verbatim
@cindex @code{postscript}
It is possible to insert verbatim @code{PostScript} commands in a picture with
one of the routines
@verbatim
void postscript(picture pic=currentpicture, string s);
void postscript(picture pic=currentpicture, string s, pair min,
pair max)
@end verbatim
Here @code{min} and @code{max} can be used to specify explicit bounds
associated with the resulting @code{PostScript} code.
@anchor{tex}
@cindex @code{tex}
Verbatim @TeX{} commands can be inserted in the intermediate
@code{LaTeX} output file with one of the functions
@verbatim
void tex(picture pic=currentpicture, string s);
void tex(picture pic=currentpicture, string s, pair min, pair max)
@end verbatim
Here @code{min} and @code{max} can be used to specify explicit bounds
associated with the resulting @TeX{} code.
To issue a global @TeX{} command (such as a @TeX{} macro definition) in the
@TeX{} preamble (valid for the remainder of the top-level module) use:
@cindex @code{texpreamble}
@verbatim
void texpreamble(string s);
@end verbatim
The @TeX{} environment can be reset to its initial state, clearing all
macro definitions, with the function
@cindex @code{texreset}
@verbatim
void texreset();
@end verbatim
@cindex @code{usepackage}
The routine
@verbatim
void usepackage(string s, string options="");
@end verbatim
provides a convenient abbreviation for
@verbatim
texpreamble("\usepackage["+options+"]{"+s+"}");
@end verbatim
@noindent
that can be used for importing @code{LaTeX} packages.
@end table
@anchor{deferred drawing}
@node Deferred drawing
@section Deferred drawing
@cindex deferred drawing
It is sometimes desirable to have elements of a fixed absolute size,
independent of the picture scaling from user to
@code{PostScript} coordinates.
For example, normally one would want the size of a dot created with
@code{dot}, the size of the arrowheads created with @code{arrow}
(@pxref{arrows}), and labels to be drawn independent of the scaling.
However, because of @code{Asymptote}'s automatic scaling feature (@pxref{Figure size}),
the translation between user coordinate and @code{PostScript} coordinate
is not determined until shipout time:
@verbatim
size(1cm);
dot((0,0));
dot((1,1));
shipout("x"); // at this point, 1 unit coordinate = 1cm
dot((2,2));
shipout("y"); // at this point, 1 unit coordinate = 0.5cm
@end verbatim
@noindent
It is therefore necessary to defer the drawing of these elements until shipout time.
For example, a frame can be added at a specified user coordinate of a
picture with the deferred drawing routine
@code{add(picture dest=currentpicture, frame src, pair position)}:
@verbatim
frame f;
fill(f,circle((0,0),1.5pt));
add(f,position=(1,1),align=(0,0));
@end verbatim
@cindex @code{picture.add}
@cindex @code{drawer}
A deferred drawing routine is an object of type @code{drawer},
which is a function with signature @code{void(frame f, transform t)}.
For example, if the drawing routine
@verbatim
void d(frame f, transform t){
fill(f,shift(3cm,0)*circle(t*(1,1),2pt));
}
@end verbatim
@noindent
is added to @code{currentpicture} with
@verbatim
currentpicture.add(d);
@end verbatim
@noindent
a filled circle of radius 2pt will be drawn on currentpicture centered
3cm to the right of user coordinate @code{(1,1)}. The parameter @code{t} is the
affine transformation from user coordinates to @code{PostScript} coordinates.
Even though the actual drawing is deferred, you still need to specify to the
@code{Asymptote} scaling routines that ultimately a fixed-size circle
of radius 2pt will be drawn 3cm to the right of user-coordinate (1,1),
by adding a frame about (1,1) that extends beyond (1,1) from
@code{(3cm-2pt,-2pt)+min(currentpen)} to
@code{(3cm+2pt,2pt)+max(currentpen)}, where we have even
accounted for the pen linewidth. The following example will then
produce a @acronym{PDF} file 10 cm wide:
@cindex @code{picture.addPoint}
@verbatim
settings.outformat="pdf";
size(10cm);
dot((0,0));
dot((1,1),red);
add(new void(frame f, transform t) {
fill(f,shift(3cm,0)*circle(t*(1,1),2pt));
});
pair trueMin=(3cm-2pt,-2pt)+min(currentpen);
pair trueMax=(3cm+2pt,2pt)+max(currentpen);
currentpicture.addPoint((1,1),trueMin);
currentpicture.addPoint((1,1),trueMax);
@end verbatim
@noindent
Here we specified the minimum and maximum user and truesize (fixed)
coordinates of the drawer with the @code{picture} routine
@verbatim
void addPoint(pair user, pair truesize);
@end verbatim
@noindent
Alternatively, one can use
@verbatim
void addBox(pair userMin, pair userMax, pair trueMin=0, pair trueMax=0) {
@end verbatim
@noindent
to specify a bounding box
with bottom-left corner @code{t*(1,1)+trueMin}
and top-right corner @code{t*(1,1)+trueMax},
where @code{t} is the transformation that transforms
from user coordinates to @code{PostScript} coordinates.
For more details about deferred drawing, see
``Asymptote: A vector graphics language,'' John C. Bowman and Andy
Hammerlindl, TUGBOAT: The Communications of the TeX Users Group, 29:2,
288-294 (2008),
@noindent
@url{
https://www.math.ualberta.ca/~bowman/publications/asyTUG.pdf}.
@node Files
@section Files
@cindex @code{file}
@code{Asymptote} can read and write text files (including comma-separated
value) files and portable @acronym{XDR} (External Data Representation)
binary files.
@cindex @code{input}
An input file can be opened with
@verbatim
input(string name=""
@end verbatim
reading is then done by assignment:
@cindex open
@cindex @code{input}
@cindex reading
@verbatim
file fin=input("test.txt");
real a=fin;
@end verbatim
@cindex comment character
@cindex @code{error}
If the optional boolean argument @code{check} is @code{false}, no check will
be made that the file exists. If the file does not exist or is not
readable, the function @code{bool error(file)} will return @code{true}.
The first character of the string @code{comment} specifies a
comment character. If this character is encountered in a data file,
the remainder of the line is ignored. When reading strings, a comment
character followed immediately by another comment character is treated
as a single literal comment character. If @code{Asymptote} is compiled with
support for @code{libcurl}, @code{name} can be a @acronym{URL}.
@anchor{cd}
@cindex @code{cd}
@cindex @code{noglobalread}
@cindex directory
Unless the @code{-noglobalread} command-line option is specified,
one can change the current working directory for read operations to
the contents of the string @code{s} with the function @code{string
cd(string s)}, which returns the new working directory. If
@code{string s} is empty, the path is reset to the value it had at
program startup.
@cindex @code{getc}
When reading pairs, the enclosing parenthesis are optional.
Strings are also read by assignment, by reading characters up to but not
including a newline. In addition, @code{Asymptote} provides the function
@code{string getc(file)} to read the next character (treating the
comment character as an ordinary character) and return it as a string.
@cindex @code{output}
@cindex @code{update}
@cindex append
A file named @code{name} can be open for output with
@verbatim
file output(string name="", bool update=false, string comment="#", string mode="");
@end verbatim
@noindent
@cindex @code{noglobalread}
@cindex @code{globalwrite}
If @code{update=false}, any existing data in the file will be erased
and only write operations can be used on the file.
If @code{update=true}, any existing data will be preserved, the position
will be set to the end-of-file, and both reading and writing operations
will be enabled. For security reasons, writing to files in directories
other than the current directory is allowed only if the @code{-globalwrite}
(or @code{-nosafe}) command-line option is specified.
Reading from files in other directories is allowed unless the
@code{-noglobalread} command-line option is specified.
@cindex @code{mktemp}
The function @code{string mktemp(string s)} may be used to create and
return the name of a unique temporary file in the current directory
based on the string @code{s}.
@cindex @code{stdin}
@cindex @code{stdout}
There are two special files: @code{stdin}, which reads from the keyboard,
and @code{stdout}, which writes to the terminal. The implicit
initializer for files is @code{null}.
Data of a built-in type @code{T} can be written to an output file by
calling one of the functions
@cindex @code{write}
@verbatim
write(string s="", T x, suffix suffix=endl ... T[]);
write(file file, string s="", T x, suffix suffix=none ... T[]);
write(file file=stdout, string s="", explicit T[] x ... T[][]);
write(file file=stdout, T[][]);
write(file file=stdout, T[][][]);
write(suffix suffix=endl);
write(file file, suffix suffix=none);
@end verbatim
@cindex @code{none}
@cindex @code{flush}
@cindex @code{endl}
@cindex @code{newl}
@cindex @code{DOSendl}
@cindex @code{DOSnewl}
@cindex @code{tab}
@cindex @code{comma}
If @code{file} is not specified, @code{stdout} is used and
terminated by default with a newline. If specified, the optional
identifying string @code{s} is written before the data @code{x}.
An arbitrary number of data values may be listed when writing scalars
or one-dimensional arrays. The @code{suffix} may be one of the following:
@code{none} (do nothing), @code{flush} (output buffered data),
@code{endl} (terminate with a newline and flush),
@code{newl} (terminate with a newline),
@code{DOSendl} (terminate with a DOS newline and flush),
@code{DOSnewl} (terminate with a DOS newline),
@code{tab} (terminate with a tab), or @code{comma} (terminate with a
comma). Here are some simple examples of data output:
@verbatim
file fout=output("test.txt");
write(fout,1); // Writes "1"
write(fout, endl); // Writes a new line
write(fout,"List: ",1,2,3); // Writes "List: 1 2 3"
@end verbatim
@noindent
@cindex binary format
@cindex single precision
@cindex double precision
@cindex @code{singlereal}
@cindex @code{singleint}
@cindex @code{signedint}
@cindex @code{mode}
@cindex @code{binary}
@cindex @code{xdr}
A file may be opened with @code{mode="xdr"} to read or write
double precision (64-bit) reals and single precision (32-bit)
integers in Sun Microsystem's @acronym{XDR} (External
Data Representation) portable binary format.
A file may instead be opened with @code{mode="binary"}
to read or write double precision reals and single
precision integers in the native (nonportable) machine binary format.
The virtual member functions
@code{file singlereal(bool b=true)} and @code{file singleint(bool b=true)}
may be used to change the precision of real and integer I/O
operations, respectively, for an @acronym{XDR} or binary file.
Similarly, the function @code{file signedint(bool b=true)}
can be used to modify the signedness of integer reads and writes for
an @acronym{XDR} or binary file.
Since there are no end-of-line terminators in these formats,
reading a string from an @acronym{XDR} or binary file will by default
read in the remainder of the file as a string.
The virtual member function @code{file word(bool b=true)}
may be used to change this behaviour: a double precision integer
specifying the length of the string is first read or written, followed
by that many characters.
@cindex @code{name}
@cindex @code{mode}
@cindex @code{singlereal}
@cindex @code{singleint}
@cindex @code{signedint}
The virtual fields @code{name}, @code{mode}, @code{singlereal},
@code{singleint}, and @code{signedint} may be used
to query these respective states of a file.
@cindex @code{eof}
@cindex @code{eol}
@cindex @code{error}
@cindex @code{flush}
@cindex @code{clear}
@cindex @code{precision}
@cindex @code{seek}
@cindex @code{tell}
@cindex rewind
@cindex @code{seekeof}
One can test a file for end-of-file with the boolean function @code{eof(file)},
end-of-line with @code{eol(file)}, and for I/O errors with @code{error(file)}.
One can flush the output buffers with @code{flush(file)}, clear a
previous I/O error with @code{clear(file)}, and close the file with
@code{close(file)}. The function
@code{int precision(file file=stdout, int digits=0)}
sets the number of digits of output precision for @code{file} to @code{digits},
provided @code{digits} is nonzero, and returns the previous
precision setting. The function @code{int tell(file)} returns
the current position in a file relative to the beginning.
The routine @code{seek(file file, int pos)} can be used to
change this position, where a negative value for the position @code{pos}
is interpreted as relative to the end-of-file. For example, one can
rewind a file @code{file} with the command @code{seek(file,0)}
and position to the final character in the file with @code{seek(file,-1)}.
The command @code{seekeof(file)} sets the position to the end of the file.
@cindex @code{scroll}
@anchor{scroll}
Assigning @code{settings.scroll=n} for a positive integer @code{n}
requests a pause after every @code{n} output lines to @code{stdout}.
One may then press @code{Enter} to continue to the next @code{n} output lines,
@code{s} followed by @code{Enter} to scroll without further interruption,
or @code{q} followed by @code{Enter} to quit the current output
operation. If @code{n} is negative, the output scrolls a page at a time
(i.e. by one less than the current number of display lines). The default
value, @code{settings.scroll=0}, specifies continuous scrolling.
The routines
@cindex @code{getstring}
@cindex @code{getint}
@cindex @code{getreal}
@cindex @code{getpair}
@cindex @code{gettriple}
@verbatim
string getstring(string name="", string default="", string prompt="",
bool store=true);
int getint(string name="", int default=0, string prompt="",
bool store=true);
real getreal(string name="", real default=0, string prompt="",
bool store=true);
pair getpair(string name="", pair default=0, string prompt="",
bool store=true);
triple gettriple(string name="", triple default=(0,0,0), string prompt="",
bool store=true);
@end verbatim
@noindent
defined in the module @code{plain} may be used to prompt for a value from
@code{stdin} using the @acronym{GNU} @code{readline} library.
If @code{store=true}, the history of values for @code{name} is
stored in the file @code{".asy_history_"+name} (@pxref{history}). The most
recent value in the history will be used to provide a default value
for subsequent runs. The default value (initially @code{default}) is
displayed after @code{prompt}. These functions are based on the internal
routines
@cindex @code{readline}
@cindex @code{saveline}
@verbatim
string readline(string prompt="", string name="", bool tabcompletion=false);
void saveline(string name, string value, bool store=true);
@end verbatim
Here, @code{readline} prompts the user with the default value
formatted according to @code{prompt}, while @code{saveline}
is used to save the string @code{value} in a local history named
@code{name}, optionally storing the local history in a file
@code{".asy_history_"+name}.
@cindex @code{history}
The routine @code{history(string name, int n=1)} can be used to look up
the @code{n} most recent values (or all values up to @code{historylines}
if @code{n=0}) entered for string @code{name}.
The routine @code{history(int n=0)} returns the interactive history.
For example,
@verbatim
write(output("transcript.asy"),history());
@end verbatim
@noindent
outputs the interactive history to the file @code{transcript.asy}.
@cindex @code{delete}
@cindex @code{globalwrite}
The function @code{int delete(string s)} deletes the file named by the
string @code{s}. Unless the @code{-globalwrite} (or @code{-nosafe})
option is enabled, the file must reside in the current directory.
@cindex @code{rename}
The function @code{int rename(string from, string to)} may be used to
rename file @code{from} to file @code{to}.
Unless the @code{-globalwrite} (or @code{-nosafe}) option is enabled,
this operation is restricted to the current directory.
@cindex @code{convert}
@cindex @code{magick}
@cindex @code{animate}
The functions
@verbatim
int convert(string args="", string file="", string format="");
int animate(string args="", string file="", string format="");
@end verbatim
@noindent
call the @code{ImageMagick} commands @code{magick} and @code{animate},
respectively, with the arguments @code{args} and the file name constructed
from the strings @code{file} and @code{format}.
@node Variable initializers
@section Variable initializers
@cindex variable initializers
@cindex @code{operator init}
@cindex initializers
A variable can be assigned a value when it is declared
@code{int x=3;} where the variable @code{x} is assigned the value @code{3}.
As well as literal constants such as @code{3}, arbitary expressions can be used
as initializers, as in @code{real x=2*sin(pi/2);}.
A variable is not added to the namespace until after the initializer is
evaluated, so for example, in
@verbatim
int x=2;
int x=5*x;
@end verbatim
@noindent
the @code{x} in the initializer on the second line refers to the variable
@code{x} declared on the first line. The second line, then, declares a variable
@code{x} shadowing the original @code{x} and initializes it to the value
@code{10}.
Variables of most types can be declared without an explicit initializer and they
will be initialized by the default initializer of that type:
@itemize
@item Variables of the numeric types @code{int}, @code{real}, and @code{pair}
are all initialized to zero; variables of type @code{triple} are
initialized to @code{O=(0,0,0)}.
@item @code{boolean} variables are initialized to @code{false}.
@item @code{string} variables are initialized to the empty string.
@item @code{transform} variables are initialized to the identity transformation.
@item @code{path} and @code{guide} variables are initialized to
@code{nullpath}.
@item @code{pen} variables are initialized to the default pen.
@item @code{frame} and @code{picture} variables are initialized to empty
frames and pictures, respectively.
@item @code{file} variables are initialized to @code{null}.
@end itemize
The default initializers for user-defined array, structure, and function types
are explained in their respective sections. Some types, such as
@code{code}, do not have default initializers. When a variable of such
a type is introduced, the user must initialize it by explicitly giving
it a value.
The default initializer for any type @code{T} can be redeclared by defining the
function @code{T operator init()}. For instance, @code{int} variables are
usually initialized to zero, but in
@verbatim
int operator init() {
return 3;
}
int y;
@end verbatim
@noindent
the variable @code{y} is initialized to @code{3}. This example was given for
illustrative purposes; redeclaring the initializers of built-in types is not
recommended. Typically, @code{operator init} is used to define sensible
defaults for user-defined types.
@cindex @code{var}
The special type @code{var} may be used to infer the type of a variable from
its initializer. If the initializer is an expression of a unique type, then
the variable will be defined with that type. For instance,
@verbatim
var x=5;
var y=4.3;
var reddash=red+dashed;
@end verbatim
@noindent
is equivalent to
@verbatim
int x=5;
real y=4.3;
pen reddash=red+dashed;
@end verbatim
@code{var} may also be used with the extended @code{for} loop syntax.
@verbatim
int[] a = {1,2,3};
for (var x : a)
write(x);
@end verbatim
@node Structures
@section Structures
@cindex @code{struct}
@cindex structures
@cindex @code{public}
@cindex @code{restricted}
@cindex @code{private}
@cindex @code{this}
@cindex @code{new}
@cindex @code{null}
Users may also define their own data types as structures, along with
user-defined operators, much as in C++. By default, structure members
are @code{public} (may be read and modified anywhere in the code), but may be
optionally declared @code{restricted} (readable anywhere but writeable
only inside the structure where they are defined) or @code{private}
(readable and writable only inside the structure). In a structure definition,
the keyword @code{this} can be used as an expression to refer to the enclosing
structure. Any code at the
top-level scope within the structure is executed on initialization.
Variables hold references to structures. That is, in the example:
@verbatim
struct T {
int x;
}
T foo;
T bar=foo;
bar.x=5;
@end verbatim
The variable @code{foo} holds a reference to an instance of the structure
@code{T}. When @code{bar} is assigned the value of @code{foo}, it too
now holds a reference to the same instance as @code{foo} does. The assignment
@code{bar.x=5} changes the value of the field @code{x} in that instance, so
that @code{foo.x} will also be equal to @code{5}.
The expression @code{new T} creates a new instance of the structure @code{T} and
returns a reference to that instance. In creating the new instance, any code in
the body of the record definition is executed. For example:
@verbatim
int Tcount=0;
struct T {
int x;
++Tcount;
}
T foo=new T;
T foo;
@end verbatim
@noindent
Here, @code{new T} produces a new instance of the class, which
causes @code{Tcount} to be incremented, tracking the
number of instances produced. The declarations @code{T foo=new T} and
@code{T foo} are equivalent: the second form implicitly creates a new
instance of @code{T}.
That is, after the definition of a structure @code{T}, a variable of
type @code{T} is initialized to a new instance (@code{new T}) by
default. During the definition of the structure, however, variables
of type @code{T} are initialized to @code{null} by default. This
special behavior is to avoid infinite recursion of creating new
instances in code such as
@verbatim
struct tree {
int value;
tree left;
tree right;
}
@end verbatim
The expression @code{null} can be cast to any structure type to yield a null
reference, a reference that does not actually refer to any instance of the
structure. Trying to use a field of a null reference will cause an error.
@cindex alias
@cindex @code{==}
@cindex @code{!=}
The function @code{bool alias(T,T)} checks to see if two structure references
refer to the same instance of the structure (or both to @code{null}).
In the example at the beginning of this section, @code{alias(foo,bar)}
would return true, but @code{alias(foo,new T)} would return false, as @code{new
T} creates a new instance of the structure @code{T}. The boolean operators
@code{==} and @code{!=} are by default equivalent to @code{alias} and
@code{!alias} respectively, but may be overwritten for a particular type
(for example, to do a deep comparison).
Here is a simple example that illustrates the use of structures:
@verbatim
struct S {
real a=1;
real f(real a) {return a+this.a;}
}
S s; // Initializes s with new S;
write(s.f(2)); // Outputs 3
S operator + (S s1, S s2)
{
S result;
result.a=s1.a+s2.a;
return result;
}
write((s+s).f(0)); // Outputs 2
@end verbatim
@cindex constructors
It is often convenient to have functions that construct new instances of a
structure. Say we have a @code{Person} structure:
@verbatim
struct Person {
string firstname;
string lastname;
}
Person joe;
joe.firstname="Joe";
joe.lastname="Jones";
@end verbatim
@noindent
Creating a new Person is a chore; it takes three lines to create a new instance
and to initialize its fields (that's still considerably less effort than
creating a new person in real life, though).
We can reduce the work by defining @code{operator init}:
@cindex @code{operator init}
@verbatim
struct Person {
string firstname;
string lastname;
void operator init(string firstname, string lastname) {
this.firstname=firstname;
this.lastname=lastname;
}
}
Person joe=Person("Joe", "Jones");
@end verbatim
The use of @code{operator init} to implicitly define constructors should not be
confused with its use to define default values for variables
(@pxref{Variable initializers}). Indeed, in the
first case, the return type of the @code{operator init} must be @code{void}
while in the second, it must be the (non-@code{void}) type of the variable.
Internally, @code{operator init} implicitly defines a constructor function
@code{Person(string,string)} as follows, where @var{args} is
@code{string firstname, string lastname} in this case:
@example
struct Person @{
string firstname;
string lastname;
static Person Person(@var{args}) @{
Person p=new Person;
p.operator init(@var{args});
return p;
@}
@}
@end example
@noindent
which then can be used as:
@verbatim
Person joe=Person.Person("Joe", "Jones");
@end verbatim
The following is also implicitly generated in the enclosing scope,
after the end of the structure definition.
@verbatim
from Person unravel Person;
@end verbatim
@noindent
It allows us to use the constructor without qualification,
otherwise we would have to refer to the constructor by the qualified name
@code{Person.Person}.
@cindex inheritance
@cindex virtual functions
Much like in C++, casting (@pxref{Casts}) provides for an elegant
implementation of structure inheritance, including a virtual function @code{v}:
@verbatim
struct parent {
real x;
void operator init(int x) {this.x=x;}
void v(int) {write(0);}
void f() {v(1);}
}
void write(parent p) {write(p.x);}
struct child {
parent parent;
real y=3;
void operator init(int x) {parent.operator init(x);}
void v(int x) {write(x);}
parent.v=v;
void f()=parent.f;
}
parent operator cast(child child) {return child.parent;}
parent p=parent(1);
child c=child(2);
write(c); // Outputs 2;
p.f(); // Outputs 0;
c.f(); // Outputs 1;
write(c.parent.x); // Outputs 2;
write(c.y); // Outputs 3;
@end verbatim
For further examples of structures, see @code{Legend} and @code{picture} in
the @code{Asymptote} base module @code{plain}.
@node Operators
@section Operators
@cindex operators
@menu
* Arithmetic & logical:: Basic mathematical operators
* Self & prefix operators:: Increment and decrement
* User-defined operators:: Overloading operators
@end menu
@node Arithmetic & logical
@subsection Arithmetic & logical operators
@cindex arithmetic operators
@cindex binary operators
@cindex boolean operators
@cindex logical operators
@cindex @code{quotient}
@code{Asymptote} uses the standard binary arithmetic operators.
However, when one integer is divided by another, both arguments are
converted to real values before dividing and a real quotient is
returned (since this is typically what is intended; otherwise
one can use the function @code{int quotient(int x, int y)}, which returns
greatest integer less than or equal to @code{x/y}). In all other cases both
operands are promoted to the same type, which will also be the
type of the result:
@table @code
@cindex @code{+}
@item +
addition
@cindex @code{-}
@item -
subtraction
@cindex @code{*}
@item *
multiplication
@cindex @code{/}
@item /
division
@cindex integer division
@cindex @code{#}
@item #
integer division; equivalent to @code{quotient(x,y)}. Noting that the
@code{Python3} community adopted our comment symbol (@code{//}) for
integer division, we decided to reciprocate and use their comment
symbol for integer division in @code{Asymptote}!
@cindex @code{%}
@item %
modulo; the result always has the same sign as the divisor.
In particular, this makes @code{q*(p # q)+p % q == p} for all
integers @code{p} and nonzero integers @code{q}.
@cindex @code{^}
@item ^
@cindex @code{**}
power; if the exponent (second argument) is an int, recursive
multiplication is used; otherwise, logarithms and exponentials are used
(@code{**} is a synonym for @code{^}).
@end table
The usual boolean operators are also defined:
@table @code
@cindex @code{==}
@item ==
equals
@cindex @code{!=}
@item !=
not equals
@cindex @code{<}
@item <
less than
@cindex @code{<=}
@item <=
less than or equals
@cindex @code{>=}
@item >=
greater than or equals
@cindex @code{>}
@item >
greater than
@cindex @code{&&}
@item &&
and (with conditional evaluation of right-hand argument)
@cindex @code{&}
@item &
and
@cindex @code{||}
@item ||
or (with conditional evaluation of right-hand argument)
@cindex @code{|}
@item |
or
@cindex @code{^}
@item ^
xor
@cindex @code{!}
@item !
not
@end table
@code{Asymptote} also supports the C-like conditional syntax:
@cindex @code{:}
@cindex @code{?}
@cindex conditional
@verbatim
bool positive=(pi > 0) ? true : false;
@end verbatim
@cindex @code{interp}
The function @code{T interp(T a, T b, real t)} returns @code{(1-t)*a+t*b}
for nonintegral built-in arithmetic types @code{T}. If @code{a} and
@code{b} are pens, they are first promoted to the same color space.
@cindex @code{AND}
@cindex @code{OR}
@cindex @code{XOR}
@cindex @code{NOT}
@cindex @code{CLZ}
@cindex @code{CTZ}
@code{Asymptote} also defines bitwise functions @code{int AND(int,int)},
@code{int OR(int,int)}, @code{int XOR(int,int)}, @code{int NOT(int)},
@code{int CLZ(int)} (count leading zeros),
@code{int CTZ(int)} (count trailing zeros),
@code{int popcount(int)} (count bits populated by ones), and
@code{int bitreverse(int a, int bits)} (reverse bits within a word of
length bits).
@node Self & prefix operators
@subsection Self & prefix operators
@cindex self operators
@cindex prefix operators
@cindex @code{+=}
@cindex @code{-=}
@cindex @code{*=}
@cindex @code{/=}
@cindex @code{%=}
@cindex @code{^=}
@cindex @code{++}
@cindex @code{--}
As in C, each of the arithmetic operators @code{+}, @code{-}, @code{*},
@code{/}, @code{#}, @code{%}, and @code{^} can be used as a self operator.
The prefix operators @code{++} (increment by one) and @code{--} (decrement
by one) are also defined.
For example,
@verbatim
int i=1;
i += 2;
int j=++i;
@end verbatim
@noindent
is equivalent to the code
@verbatim
int i=1;
i=i+2;
int j=i=i+1;
@end verbatim
@cindex postfix operators
However, postfix operators like @code{i++} and @code{i--} are not defined
(because of the inherent ambiguities that would arise with the @code{--}
path-joining operator). In the rare instances where @code{i++}
and @code{i--} are really needed, one can substitute the expressions
@code{(++i-1)} and @code{(--i+1)}, respectively.
@node User-defined operators
@subsection User-defined operators
@cindex user-defined operators
@cindex @code{operator}
The following symbols may be used with @code{operator} to define or redefine
operators on structures and built-in types:
@verbatim
- + * / % ^ ! < > == != <= >= & | ^^ .. :: -- --- ++
<< >> $ $$ @ @@ <>
@end verbatim
@noindent
The operators on the second line have precedence one higher than the
boolean operators @code{<}, @code{>}, @code{<=}, and @code{>=}.
Guide operators like @code{..} may be overloaded, say, to write
a user function that produces a new guide from a given guide:
@verbatim
guide dots(... guide[] g)=operator ..;
guide operator ..(... guide[] g) {
guide G;
if(g.length > 0) {
write(g[0]);
G=g[0];
}
for(int i=1; i < g.length; ++i) {
write(g[i]);
write();
G=dots(G,g[i]);
}
return G;
}
guide g=(0,0){up}..{SW}(100,100){NE}..{curl 3}(50,50)..(10,10);
write("g=",g);
@end verbatim
@xref{Autounravel}, for an example overloading the @code{+} operator.
@node Implicit scaling, Functions, Operators, Programming
@section Implicit scaling
@cindex implicit scaling
If a numeric literal is in front of certain types of expressions, then the two
are multiplied:
@verbatim
int x=2;
real y=2.0;
real cm=72/2.540005;
write(3x);
write(2.5x);
write(3y);
write(-1.602e-19 y);
write(0.5(x,y));
write(2x^2);
write(3x+2y);
write(3(x+2y));
write(3sin(x));
write(3(sin(x))^2);
write(10cm);
@end verbatim
This produces the output
@verbatim
6
5
6
-3.204e-19
(1,1)
8
10
18
2.72789228047704
2.48046543129542
283.464008929116
@end verbatim
@node Functions
@section Functions
@cindex functions
@menu
* Default arguments:: Default values can appear anywhere
* Named arguments:: Assigning function arguments by keyword
* Rest arguments:: Functions with a variable number of arguments
* Mathematical functions:: Standard libm functions
@end menu
@code{Asymptote} functions are treated as variables with a signature
(non-function variables have null signatures). Variables with the
same name are allowed, so long as they have distinct signatures.
Function arguments are passed by value. To pass an argument by
reference, simply enclose it in a structure (@pxref{Structures}).
Here are some significant features of @code{Asymptote} functions:
@enumerate
@item Variables with signatures (functions) and without signatures
(nonfunction variables) are distinct:
@verbatim
int x, x();
x=5;
x=new int() {return 17;};
x=x(); // calls x() and puts the result, 17, in the scalar x
@end verbatim
@item Traditional function definitions are allowed:
@verbatim
int sqr(int x)
{
return x*x;
}
sqr=null; // but the function is still just a variable.
@end verbatim
@item Casting can be used to resolve ambiguities:
@verbatim
int a, a(), b, b(); // Valid: creates four variables.
a=b; // Invalid: assignment is ambiguous.
a=(int) b; // Valid: resolves ambiguity.
(int) (a=b); // Valid: resolves ambiguity.
(int) a=b; // Invalid: cast expressions cannot be L-values.
int c();
c=a; // Valid: only one possible assignment.
@end verbatim
@item ``Higher-order'' functions, in other words functions that return
functions, are allowed.
The return type must be given a signature-free alias with
@code{using} or @code{typedef}:
@cindex @code{using}
@cindex @code{typedef}
@verbatim
using intop = int(int);
// typedef int intop(int); // Equivalent to previous line
intop adder(int m)
{
return new int(int n) {return m+n;};
}
intop addby7=adder(7);
write(addby7(1)); // Writes 8.
@end verbatim
@item
@cindex overloading functions
One may redefine a function @code{f}, even for calls to @code{f} in previously
declared functions, by assigning another (anonymous or named)
function to it. However, if @code{f} is overloaded by a
new function definition, previous calls will still access the original
version of @code{f}, as illustrated in this example:
@verbatim
void f() {
write("hi");
}
void g() {
f();
}
g(); // writes "hi"
f=new void() {write("bye");};
g(); // writes "bye"
void f() {write("overloaded");};
f(); // writes "overloaded"
g(); // writes "bye"
@end verbatim
@cindex function declarations
@item Anonymous functions can be used to redefine a function variable
that has been declared (and implicitly initialized to the null function)
but not yet explicitly defined:
@verbatim
void f(bool b);
void g(bool b) {
if(b) f(b);
else write(b);
}
f=new void(bool b) {
write(b);
g(false);
};
g(true); // Writes true, then writes false.
@end verbatim
@end enumerate
@code{Asymptote} is the only language we know of that treats functions
as variables, but allows overloading by distinguishing variables
based on their signatures.
@cindex @code{libsigsegv}
@cindex stack overflow
@anchor{stack overflow}
@cindex recursion
@cindex stack overflow
Functions are allowed to call themselves recursively. As in C++, infinite
nested recursion will generate a stack overflow (reported as a
segmentation fault, unless a fully working version of the @acronym{GNU}
library @code{libsigsegv} (e.g.@ 2.4 or later) is installed at
configuration time).
@node Default arguments
@subsection Default arguments
@cindex default arguments
@cindex arguments
@code{Asymptote} supports a more flexible mechanism for default function
arguments than C++: they may appear anywhere in the function prototype.
Because certain data types are implicitly cast to more sophisticated
types (@pxref{Casts}) one can often avoid ambiguities by ordering
function arguments from the simplest to the most complicated.
For example, given
@verbatim
real f(int a=1, real b=0) {return a+b;}
@end verbatim
@noindent
then @code{f(1)} returns 1.0, but @code{f(1.0)} returns 2.0.
The value of a default argument is determined by evaluating the
given @code{Asymptote} expression in the scope where the called
function is defined.
@node Named arguments
@subsection Named arguments
@cindex keywords
@cindex named arguments
It is sometimes difficult to remember the order in which arguments
appear in a function declaration. Named (keyword) arguments make calling
functions with multiple arguments easier. Unlike in the C and C++
languages, an assignment in a function argument is interpreted as an
assignment to a parameter of the same name in the function signature,
@emph{not within the local scope}. The command-line option @code{-d}
may be used to check @code{Asymptote} code for cases where a
named argument may be mistaken for a local assignment.
When matching arguments to signatures, first all of the keywords are
matched, then the arguments without names are matched against the
unmatched formals as usual. For example,
@verbatim
int f(int x, int y) {
return 10x+y;
}
write(f(4,x=3));
@end verbatim
@noindent
outputs 34, as @code{x} is already matched when we try to match the
unnamed argument @code{4}, so it gets matched to the next item, @code{y}.
For the rare occasions where it is desirable to assign a value to
local variable within a function argument (generally @emph{not} a good
programming practice), simply enclose the assignment in
parentheses. For example, given the definition of @code{f} in the
previous example,
@verbatim
int x;
write(f(4,(x=3)));
@end verbatim
@noindent
is equivalent to the statements
@verbatim
int x;
x=3;
write(f(4,3));
@end verbatim
@noindent
and outputs 43.
@cindex @code{keyword}
@cindex keyword-only
Parameters can be specified as ``keyword-only'' by putting @code{keyword}
immediately before the parameter name, as in @code{int f(int keyword x)} or
@code{int f(int keyword x=77)}. This forces the caller of the function to use
a named argument to give a value for this parameter. That is, @code{f(x=42)}
is legal, but @code{f(25)} is not. Keyword-only parameters must be listed
after normal parameters in a function definition.
As a technical detail, we point out that, since variables of the same
name but different signatures are allowed in the same scope, the code
@verbatim
int f(int x, int x()) {
return x+x();
}
int seven() {return 7;}
@end verbatim
@noindent
is legal in @code{Asymptote}, with @code{f(2,seven)} returning 9.
A named argument matches the first unmatched formal of the same name, so
@code{f(x=2,x=seven)} is an equivalent call, but @code{f(x=seven,2)}
is not, as the first argument is matched to the first formal, and
@code{int ()} cannot be implicitly cast to @code{int}. Default
arguments do not affect which formal a named argument is matched to,
so if @code{f} were defined as
@verbatim
int f(int x=3, int x()) {
return x+x();
}
@end verbatim
@noindent
then @code{f(x=seven)} would be illegal, even though @code{f(seven)}
obviously would be allowed.
@node Rest arguments
@subsection Rest arguments
@cindex rest arguments
Rest arguments allow one to write functions that take a variable
number of arguments:
@verbatim
// This function sums its arguments.
int sum(... int[] nums) {
int total=0;
for(int i=0; i < nums.length; ++i)
total += nums[i];
return total;
}
sum(1,2,3,4); // returns 10
sum(); // returns 0
// This function subtracts subsequent arguments from the first.
int subtract(int start ... int[] subs) {
for(int i=0; i < subs.length; ++i)
start -= subs[i];
return start;
}
subtract(10,1,2); // returns 7
subtract(10); // returns 10
subtract(); // illegal
@end verbatim
@cindex packing
Putting an argument into a rest array is called @emph{packing}.
One can give an explicit list of arguments for the rest
argument, so @code{subtract} could alternatively be implemented as
@verbatim
int subtract(int start ... int[] subs) {
return start - sum(... subs);
}
@end verbatim
One can even combine normal arguments with rest arguments:
@verbatim
sum(1,2,3 ... new int[] {4,5,6}); // returns 21
@end verbatim
@noindent
@cindex unpacking
This builds a new six-element array that is passed to @code{sum} as
@code{nums}. The opposite operation, @emph{unpacking}, is not allowed:
@verbatim
subtract(... new int[] {10, 1, 2});
@end verbatim
@noindent
is illegal, as the start formal is not matched.
If no arguments are packed, then a zero-length array (as opposed to
@code{null}) is bound to the rest parameter. Note that default
arguments are ignored for rest formals and the rest argument is not
bound to a keyword.
In some cases, keyword-only parameters are helpful to avoid arguments intended
for the rest parameter to be assigned to other parameters. For example, here
the use of @code{keyword} is to avoid @code{pnorm(1.0,2.0,0.3)} matching
@code{1.0} to @code{p}.
@verbatim
real pnorm(real keyword p=2.0 ... real[] v)
{
return sum(v^p)^(1/p);
}
@end verbatim
The overloading resolution in @code{Asymptote} is similar to the
function matching rules used in C++. Every argument match is given a
score. Exact matches score better than matches with casting, and
matches with formals (regardless of casting) score better than packing
an argument into the rest array. A candidate is maximal if all of the
arguments score as well in it as with any other candidate. If there
is one unique maximal candidate, it is chosen; otherwise, there is an
ambiguity error.
@verbatim
int f(path g);
int f(guide g);
f((0,0)--(100,100)); // matches the second; the argument is a guide
int g(int x, real y);
int g(real x, int x);
g(3,4); // ambiguous; the first candidate is better for the first argument,
// but the second candidate is better for the second argument
int h(... int[] rest);
int h(real x ... int[] rest);
h(1,2); // the second definition matches, even though there is a cast,
// because casting is preferred over packing
int i(int x ... int[] rest);
int i(real x, real y ... int[] rest);
i(3,4); // ambiguous; the first candidate is better for the first argument,
// but the second candidate is better for the second one
@end verbatim
@node Mathematical functions
@subsection Mathematical functions
@cindex mathematical functions
@cindex functions
@cindex @code{libm} routines
@cindex @code{sin}
@cindex @code{cos}
@cindex @code{tan}
@cindex @code{asin}
@cindex @code{acos}
@cindex @code{atan}
@cindex @code{exp}
@cindex @code{log}
@cindex @code{pow10}
@cindex @code{log10}
@cindex @code{sinh}
@cindex @code{cosh}
@cindex @code{tanh}
@cindex @code{asinh}
@cindex @code{acosh}
@cindex @code{atanh}
@cindex @code{sqrt}
@cindex @code{cbrt}
@cindex @code{fabs}
@cindex @code{expm1}
@cindex @code{log1p}
@cindex @code{identity}
@cindex @code{J}
@cindex @code{Y}
@cindex @code{gamma}
@cindex @code{erf}
@cindex @code{erfc}
@cindex @code{atan2}
@cindex @code{hypot}
@cindex @code{fmod}
@cindex @code{remainder}
@code{Asymptote} has built-in versions of the standard @code{libm} mathematical
real(real) functions @code{sin}, @code{cos}, @code{tan}, @code{asin},
@code{acos}, @code{atan}, @code{exp}, @code{log}, @code{pow10},
@code{log10}, @code{sinh}, @code{cosh}, @code{tanh}, @code{asinh},
@code{acosh}, @code{atanh}, @code{sqrt}, @code{cbrt}, @code{fabs}, @code{expm1},
@code{log1p}, as well as the identity function @code{identity}.
@code{Asymptote} also defines the order @code{n} Bessel functions of
the first kind @code{Jn(int n, real)} and second kind
@code{Yn(int n, real)}, as well as the gamma function @code{gamma},
the error function @code{erf}, and the complementary error function
@code{erfc}. The standard real(real, real) functions @code{atan2},
@code{hypot}, @code{fmod}, @code{remainder} are also included.
@cindex @code{degrees}
@cindex @code{radians}
@cindex @code{Degrees}
The functions @code{degrees(real radians)} and @code{radians(real degrees)}
can be used to convert between radians and degrees. The function
@code{Degrees(real radians)} returns the angle in degrees in the
interval [0,360).
@cindex @code{Sin}
@cindex @code{Cos}
@cindex @code{Tan}
@cindex @code{aSin}
@cindex @code{aCos}
@cindex @code{aTan}
For convenience, @code{Asymptote} defines variants @code{Sin},
@code{Cos}, @code{Tan}, @code{aSin}, @code{aCos}, and @code{aTan} of
the standard trigonometric functions that use degrees rather than radians.
We also define complex versions of the @code{sqrt}, @code{sin}, @code{cos},
@code{exp}, @code{log}, and @code{gamma} functions.
@cindex @code{floor}
@cindex @code{ceil}
@cindex @code{round}
@cindex @code{sgn}
The functions @code{floor}, @code{ceil}, and @code{round} differ from
their usual definitions in that they all return an int value rather than
a real (since that is normally what one wants).
The functions @code{Floor}, @code{Ceil}, and @code{Round} are
respectively similar, except that if the result cannot be converted
to a valid int, they return @code{intMax}
for positive arguments and @code{intMin} for negative arguments,
rather than generating an integer overflow.
We also define a function @code{sgn}, which returns the sign of its
real argument as an integer (-1, 0, or 1).
@cindex @code{abs}
There is an @code{abs(int)} function, as well as an @code{abs(real)}
function (equivalent to @code{fabs(real)}), an @code{abs(pair)} function
(equivalent to @code{length(pair)}).
@cindex @code{srand}
@cindex @code{rand}
@cindex @code{randMax}
@cindex @code{unitrand}
@cindex @code{Gaussrand}
@cindex @code{histogram}
@cindex @code{factorial}
@cindex @code{choose}
Asymptote's random number generators can be seeded with @code{srand(int)}. If a negative
argument is given to @code{srand}, an internal entropy source is used as a seed.
Random numbers are initially seeded with @code{srand(-1)}.
The function @code{int rand(int a=0, int b=randMax)} returns a random integer in
[a,b]. The @code{unitrand()} function returns
a random number uniformly distributed in the interval [0,1).
A Gaussian random number generator
@code{Gaussrand} and a collection of statistics routines, including
@code{histogram}, are provided in the module @code{stats}.
The functions @code{factorial(int n)}, which returns @math{n!}, and
@code{choose(int n, int k)}, which returns @math{n!/(k!(n-k)!)}, are
also defined.
@cindex @acronym{GNU} Scientific Library
@cindex @code{gsl}
@cindex Airy
@cindex Bessel
@cindex Legendre
@cindex elliptic functions
@cindex exponential integral
@cindex trigonometric integrals
@cindex Riemann zeta function
@cindex @code{Ai}
@cindex @code{Bi}
@cindex @code{Ai_deriv}
@cindex @code{Bi_deriv}
@cindex @code{zero_Ai}
@cindex @code{zero_Bi}
@cindex @code{zero_Ai_deriv}
@cindex @code{zero_Bi_deriv}
@cindex @code{J}
@cindex @code{Y}
@cindex @code{I}
@cindex @code{K}
@cindex @code{i_scaled}
@cindex @code{k_scaled}
@cindex @code{zero_J}
@cindex @code{F}
@cindex @code{E}
@cindex @code{P}
@cindex @code{sncndn}
@cindex @code{Ei}
@cindex @code{Si}
@cindex @code{Ci}
@cindex @code{Pl}
@cindex @code{zeta}
When configured with the @acronym{GNU} Scientific Library (GSL), available from
@url{
https://www.gnu.org/software/gsl/},
@code{Asymptote} contains an internal module @code{gsl} that
defines the airy functions @code{Ai(real)},
@code{Bi(real)}, @code{Ai_deriv(real)}, @code{Bi_deriv(real)},
@code{zero_Ai(int)}, @code{zero_Bi(int)},
@code{zero_Ai_deriv(int)}, @code{zero_Bi_deriv(int)}, the Bessel functions
@code{I(int, real)}, @code{K(int, real)}, @code{j(int, real)},
@code{y(int, real)}, @code{i_scaled(int, real)}, @code{k_scaled(int, real)},
@code{J(real, real)}, @code{Y(real, real)}, @code{I(real, real)},
@code{K(real, real)}, @code{zero_J(real, int)}, the elliptic functions
@code{F(real, real)}, @code{E(real, real)}, and @code{P(real, real)},
the Jacobi elliptic functions @code{real[] sncndn(real,real)},
the exponential/trigonometric integrals @code{Ei}, @code{Si}, and @code{Ci},
the Legendre polynomials @code{Pl(int, real)}, and the Riemann zeta
function @code{zeta(real)}. For example, to compute the sine integral
@code{Si} of 1.0:
@verbatim
import gsl;
write(Si(1.0));
@end verbatim
@code{Asymptote} also provides a few general purpose numerical routines:
@table @code
@cindex @code{newton}
@item @code{real newton(int iterations=100, real f(real), real fprime(real), real x, bool verbose=false);}
Use Newton-Raphson iteration to solve for a root of a real-valued
differentiable function @code{f}, given its derivative @code{fprime} and
an initial guess @code{x}. Diagnostics for
each iteration are printed if @code{verbose=true}.
If the iteration fails after the maximum allowed number of loops
(@code{iterations}), @code{realMax} is returned.
@cindex @code{newton}
@item @code{real newton(int iterations=100, real f(real), real fprime(real), real x1, real x2, bool verbose=false);}
Use bracketed Newton-Raphson bisection to solve for a root of a real-valued
differentiable function @code{f} within an interval
[@code{x1},@code{x2}] (on which the endpoint values of @code{f} have
opposite signs), given its derivative @code{fprime}. Diagnostics for
each iteration are printed if @code{verbose=true}.
If the iteration fails after the maximum allowed number of loops
(@code{iterations}), @code{realMax} is returned.
@cindex integral
@cindex integrate
@cindex @code{simpson}
@item @code{real simpson(real f(real), real a, real b, real acc=realEpsilon, real dxmax=b-a)}
returns the integral of @code{f} from @code{a} to @code{b} using adaptive Simpson integration.
@cindex @code{cputime}
@noindent
@item @code{cputime cputime()}
returns a structure @code{cputime} with cumulative @acronym{CPU} times
broken down into the fields @code{parent.user}, @code{parent.system},
@code{child.user}, and @code{child.system}, along with the cumulative
wall clock time in @code{parent.clock}, all measured in seconds.
For convenience, the incremental fields @code{change.user},
@code{change.system}, and @code{change.clock} indicate the change in
the corresponding fields since the last call to @code{cputime()}. The
function
@verbatim
void write(file file=stdout, string s="", cputime c,
string format=cputimeformat, suffix suffix=none);
@end verbatim
@noindent
displays the incremental user cputime followed by ``u'',
the incremental system cputime followed by ``s'',
the total user cputime followed by ``U'', and
the total system cputime followed by ``S''.
@end table
@node Arrays
@section Arrays
@cindex arrays
@menu
* Slices:: Python-style array slices
@end menu
Appending @code{[]} to a built-in or user-defined type yields an array.
The array element @code{i} of an array @code{A} can be accessed as @code{A[i]}.
By default, attempts to access or assign to an array element using a negative
index generates an error. Reading an array element with an index
beyond the length of the array also generates an error; however,
assignment to an element beyond the length of the array causes the
array to be resized to accommodate the new element.
One can also index an array @code{A} with an integer array @code{B}:
the array @code{A[B]} is formed by indexing array @code{A} with
successive elements of array @code{B}.
A convenient Java-style shorthand exists for iterating over all elements of an
array; see @ref{array iteration}.
The declaration
@verbatim
real[] A;
@end verbatim
@noindent
initializes @code{A} to be an empty (zero-length) array. Empty arrays should be
distinguished from null arrays. If we say
@verbatim
real[] A=null;
@end verbatim
@noindent
then @code{A} cannot be dereferenced at all (null arrays have no length
and cannot be read from or assigned to).
Arrays can be explicitly initialized like this:
@verbatim
real[] A={0,1,2};
@end verbatim
Array assignment in @code{Asymptote} does a shallow copy: only
the pointer is copied (if one copy if modified, the other will be too).
The @code{copy} function listed below provides a deep copy of an array.
@cindex @code{length}
@cindex @code{cyclic}
@cindex @code{keys}
@cindex @code{push}
@cindex @code{append}
@cindex @code{pop}
@cindex @code{insert}
@cindex @code{delete}
@cindex @code{initialized}
Every array @code{A} of type @code{T[]} has the virtual members
@itemize
@item @code{int length},
@item @code{bool cyclic},
@item @code{int[] keys},
@item @code{T push(T x)},
@item @code{void append(T[] a)},
@item @code{T pop()},
@item @code{void insert(int i ... T[] x)},
@item @code{void delete(int i, int j=i)},
@item @code{void delete()}, and
@item @code{bool initialized(int n)}.
@end itemize
The member @code{A.length} evaluates to the length of the array.
Setting @code{A.cyclic=true} signifies that array indices should be reduced
modulo the current array length. Reading from or writing to a nonempty
cyclic array never leads to out-of-bounds errors or array resizing.
The member @code{A.keys} evaluates to an array of integers containing the
indices of initialized entries in the array in ascending order. Hence, for an
array of length @code{n} with all entries initialized, @code{A.keys} evaluates
to @code{@{0,1,...,n-1@}}. A new keys array is produced each time
@code{A.keys} is evaluated.
The functions @code{A.push} and @code{A.append} append their
arguments onto the end of the array, while @code{A.insert(int i ... T[] x)}
inserts @code{x} into the array at index @code{i}.
For convenience @code{A.push} returns the pushed item.
The function @code{A.pop()} pops and returns the last element,
while @code{A.delete(int i, int j=i)} deletes elements with indices in
the range [@code{i},@code{j}], shifting the position of all higher-indexed
elements down. If no arguments are given, @code{A.delete()} provides a
convenient way of deleting all elements of @code{A}. The routine
@code{A.initialized(int n)} can be used to examine whether the element
at index @code{n} is initialized. Like all @code{Asymptote} functions,
@code{push}, @code{append}, @code{pop}, @code{insert},
@code{delete}, and @code{initialized} can be "pulled off" of the array
and used on their own. For example,
@verbatim
int[] A={1};
A.push(2); // A now contains {1,2}.
A.append(A); // A now contains {1,2,1,2}.
int f(int)=A.push;
f(3); // A now contains {1,2,1,2,3}.
int g()=A.pop;
write(g()); // Outputs 3.
A.delete(0); // A now contains {2,1,2}.
A.delete(0,1); // A now contains {2}.
A.insert(1,3); // A now contains {2,3}.
A.insert(1 ... A); // A now contains {2,2,3,3}
A.insert(2,4,5); // A now contains {2,2,4,5,3,3}.
@end verbatim
The @code{[]} suffix can also appear after the variable name; this
is sometimes convenient for declaring a list of variables and arrays
of the same type:
@verbatim
real a,A[];
@end verbatim
@noindent
This declares @code{a} to be @code{real} and implicitly declares @code{A} to
be of type @code{real[]}.
In the following list of built-in array functions, @code{T} represents a
generic type. Note that the internal functions @code{alias}, @code{array},
@code{copy}, @code{concat}, @code{sequence}, @code{map}, and
@code{transpose}, which depend on type @code{T[]}, are defined only after the
first declaration of a variable of type @code{T[]}.
@table @code
@cindex @code{new}
@item new T[]
returns a new empty array of type @code{T[]};
@cindex @code{new}
@item new T[] @{list@}
returns a new array of type @code{T[]} initialized with @code{list} (a comma
delimited list of elements);
@item new T[n]
returns a new array of @code{n} elements of type @code{T[]}.
These @code{n} array elements are not initialized unless they are arrays
themselves (in which case they are each initialized to empty arrays);
@cindex @code{array}
@item T[] array(int n, T value, int depth=intMax)
returns an array consisting of @code{n} copies of @code{value}.
If @code{value} is itself an array, a deep copy of @code{value} is made
for each entry. If @code{depth} is specified, this deep copying only
recurses to the specified number of levels;
@cindex @code{sequence}
@item int[] sequence(int n)
if @code{n >= 1} returns the array @code{@{0,1,...,n-1@}} (otherwise returns
a null array);
@item int[] sequence(int n, int m)
if @code{m >= n} returns an array @code{@{n,n+1,...,m@}} (otherwise
returns a null array);
@item int[] sequence(int n, int m, int skip)
if @code{m >= n} returns an array @code{@{n,n+1,...,m@}} skipping by
@code{skip} (otherwise returns a null array);
@item T[] sequence(T f(int), int n)
if @code{n >= 1} returns the sequence @code{@{f_i :i=0,1,...n-1@}} given a
function @code{T f(int)} and integer @code{int n} (otherwise returns a
null array);
@cindex @code{map}
@item T[] map(T f(T), T[] a)
returns the array obtained by applying the function @code{f} to each
element of the array @code{a}. This is equivalent to
@code{sequence(new T(int i) @{return f(a[i]);@},a.length)};
@cindex @code{map}
@item T2[] map(T2 f(T1), T1[] a)
constructed by running @code{from mapArray(Src=T1, Dst=T2) access map;},
returns the array obtained by applying the function @code{f} to each
element of the array @code{a};
@cindex @code{reverse}
@item int[] reverse(int n)
if @code{n >= 1} returns the array @code{@{n-1,n-2,...,0@}} (otherwise
returns a null array);
@cindex @code{complement}
@item int[] complement(int[] a, int n)
returns the complement of the integer array @code{a} in
@code{@{0,1,2,...,n-1@}}, so that @code{b[complement(a,b.length)]} yields the
complement of @code{b[a]};
@cindex @code{uniform}
@item real[] uniform(real a, real b, int n)
if @code{n >= 1} returns a uniform partition of @code{[a,b]} into
@code{n} subintervals (otherwise returns a null array);
@cindex @code{find}
@item int find(bool[] a, int n=1)
returns the index of the @code{n}th @code{true} value in the boolean array
@code{a} or -1 if not found. If @code{n} is negative, search backwards
from the end of the array for the @code{-n}th value;
@cindex @code{findall}
@item int[] findall(bool[] a)
returns the indices of all @code{true} values in the boolean array @code{a};
@cindex @code{search}
@item int search(T[] a, T key)
For built-in ordered types @code{T}, searches a sorted array
@code{a} of @code{n} elements for @code{key}, returning the index @code{i}
if @code{a[i] <= key < a[i+1]}, @code{-1} if @code{key} is
less than all elements of @code{a}, or @code{n-1} if @code{key} is
greater than or equal to the last element of @code{a};
@cindex @code{search}
@item int search(T[] a, T key, bool less(T i, T j))
searches an array @code{a} for @code{key} sorted in ascending order
such that element @code{i} precedes element @code{j} if
@code{less(i,j)} is true;
@cindex @code{copy}
@item T[] copy(T[] a)
returns a deep copy of the array @code{a};
@cindex @code{concat}
@item T[] concat(... T[][] a)
returns a new array formed by concatenating the given one-dimensional
arrays given as arguments;
@cindex @code{alias}
@item bool alias(T[] a, T[] b)
returns @code{true} if the arrays @code{a} and @code{b} are identical;
@cindex @code{sort}
@item T[] sort(T[] a)
For built-in ordered types @code{T}, returns a copy of @code{a} sorted in
ascending order;
@cindex @code{sort}
@anchor{sort}
@item T[][] sort(T[][] a)
For built-in ordered types @code{T}, returns a copy of @code{a} with the rows
sorted by the first column, breaking ties with successively higher
columns. For example:
@verbatim
string[][] a={{"bob","9"},{"alice","5"},{"pete","7"},
{"alice","4"}};
// Row sort (by column 0, using column 1 to break ties):
write(sort(a));
@end verbatim
produces
@verbatim
alice 4
alice 5
bob 9
pete 7
@end verbatim
@cindex @code{sort}
@item T[] sort(T[] a, bool less(T i, T j), bool stable=true)
returns a copy of @code{a} sorted in ascending order such that
element @code{i} precedes element @code{j} if @code{less(i,j)} is
true, subject to (if @code{stable} is @code{true}) the stability constraint
that the original order of elements @code{i} and @code{j} is preserved if
@code{less(i,j)} and @code{less(j,i)} are both @code{false};
@cindex @code{transpose}
@item T[][] transpose(T[][] a)
returns the transpose of @code{a};
@cindex @code{transpose}
@item T[][][] transpose(T[][][] a, int[] perm)
returns the 3D transpose of @code{a} obtained by applying the permutation
@code{perm} of @code{new int[]@{0,1,2@}} to the indices of each entry;
@cindex @code{sum}
@item T sum(T[] a)
for arithmetic types @code{T}, returns the sum of @code{a}.
In the case where @code{T} is @code{bool}, the number of true elements in
@code{a} is returned;
@cindex @code{min}
@item T min(T[] a)
@item T min(T[][] a)
@item T min(T[][][] a)
for built-in ordered types @code{T}, returns the minimum element of @code{a};
@cindex @code{max}
@item T max(T[] a)
@item T max(T[][] a)
@item T max(T[][][] a)
for built-in ordered types @code{T}, returns the maximum element of @code{a};
@cindex @code{min}
@item T[] min(T[] a, T[] b)
for built-in ordered types @code{T}, and arrays @code{a} and @code{b}
of the same length, returns an array composed of the minimum of the
corresponding elements of @code{a} and @code{b};
@cindex @code{max}
@item T[] max(T[] a, T[] b)
for built-in ordered types @code{T}, and arrays @code{a} and @code{b}
of the same length, returns an array composed of the maximum of the
corresponding elements of @code{a} and @code{b};
@cindex @code{pairs}
@item pair[] pairs(real[] x, real[] y);
for arrays @code{x} and @code{y} of the same length, returns the pair array
@code{sequence(new pair(int i) @{return (x[i],y[i]);@},x.length)};
@cindex @code{fft}
@item pair[] fft(pair[] a, int sign=1)
returns the unnormalized Fast Fourier Transform of @code{a} (if the optional
@code{FFTW} package is installed), using the given @code{sign}. Here
is a simple example:
@verbatim
int n=4;
pair[] f=sequence(n);
write(f);
pair[] g=fft(f,-1);
write();
write(g);
f=fft(g,1);
write();
write(f/n);
@end verbatim
@cindex @code{fft}
@item pair[][] fft(pair[][] a, int sign=1)
returns the unnormalized two-dimensional Fourier transform of @code{a}
using the given @code{sign};
@cindex @code{fft}
@item pair[][][] fft(pair[][][] a, int sign=1)
returns the unnormalized three-dimensional Fourier transform of
@code{a} using the given @code{sign};
@cindex @code{realschur}
@cindex @code{schur}
@item realschur schur(real[][] a)
returns a struct @code{realschur} containing a unitary matrix @code{U} and
a quasitriangular matrix @code{T} such that
@code{a=U*T*transpose(U)};
@cindex @code{schur}
@item schur schur(pair[][] a)
returns a struct @code{schur} containing a unitary matrix @code{U} and
a triangular matrix @code{T} such that
@code{a=U*T*conj(transpose(U))};
@cindex @code{dot}
@item real dot(real[] a, real[] b)
returns the dot product of the vectors @code{a} and @code{b};
@cindex @code{dot}
@item pair dot(pair[] a, pair[] b)
returns the complex dot product @code{sum(a*conj(b))} of the vectors
@code{a} and @code{b};
@anchor{tridiagonal}
@cindex @code{tridiagonal}
@item real[] tridiagonal(real[] a, real[] b, real[] c, real[] f);
Solve the periodic tridiagonal problem @math{L@code{x}=@code{f}} and return the
solution @code{x}, where @code{f}
is an @math{n} vector and @math{L} is the @math{n \times n} matrix
@verbatim
[ b[0] c[0] a[0] ]
[ a[1] b[1] c[1] ]
[ a[2] b[2] c[2] ]
[ ... ]
[ c[n-1] a[n-1] b[n-1] ]
@end verbatim
For Dirichlet boundary conditions (denoted here by @code{u[-1]} and
@code{u[n]}), replace @code{f[0]} by @code{f[0]-a[0]u[-1]} and
@code{f[n-1]-c[n-1]u[n]}; then set @code{a[0]=c[n-1]=0};
@cindex @code{solve}
@item real[] solve(real[][] a, real[] b, bool warn=true)
Solve the linear equation @math{@code{a}x=@code{b}} by LU decomposition
and return the solution @math{x}, where @code{a} is an
@math{n \times n} matrix and @code{b} is an array of length @math{n}.
For example:
@verbatim
import math;
real[][] a={{1,-2,3,0},{4,-5,6,2},{-7,-8,10,5},{1,50,1,-2}};
real[] b={7,19,33,3};
real[] x=solve(a,b);
write(a); write();
write(b); write();
write(x); write();
write(a*x);
@end verbatim
If @code{a} is a singular matrix and @code{warn} is @code{false}, return an
empty array.
If the matrix @code{a} is tridiagonal, the routine @code{tridiagonal} provides
a more efficient algorithm (@pxref{tridiagonal});
@anchor{solve}
@cindex @code{solve}
@item real[][] solve(real[][] a, real[][] b, bool warn=true)
Solve the linear equation @math{@code{a}x=@code{b}} and return the
solution @math{x}, where @code{a} is an @math{n \times n} matrix and
@code{b} is an @math{n \times m} matrix. If @code{a} is a singular
matrix and @code{warn} is @code{false}, return an empty matrix;
@cindex @code{identity}
@item real[][] identity(int n);
returns the @math{n \times n} identity matrix;
@cindex @code{diagonal}
@item real[][] diagonal(... real[] a)
returns the diagonal matrix with diagonal entries given by a;
@cindex @code{inverse}
@item real[][] inverse(real[][] a)
returns the inverse of a square matrix @code{a};
@cindex @code{quadraticroots}
@item @code{real[] quadraticroots(real a, real b, real c);}
This numerically robust solver returns the real roots of the
quadratic equation @math{ax^2+bx+c=0}, in ascending order. Multiple
roots are listed separately;
@cindex @code{quadraticroots}
@item @code{pair[] quadraticroots(explicit pair a, explicit pair b, explicit pair c);}
This numerically robust solver returns the complex roots of the
quadratic equation @math{ax^2+bx+c=0};
@cindex @code{cubicroots}
@item @code{real[] cubicroots(real a, real b, real c, real d);}
This numerically robust solver returns the real roots of the
cubic equation @math{ax^3+bx^2+cx+d=0}. Multiple roots are listed separately.
@end table
@cindex vectorization
@code{Asymptote} includes a full set of vectorized array instructions for
arithmetic (including self) and logical operations. These
element-by-element instructions are implemented in C++ code for speed. Given
@verbatim
real[] a={1,2};
real[] b={3,2};
@end verbatim
@noindent
then @code{a == b} and @code{a >= 2} both evaluate to the vector
@code{@{false, true@}}.
@cindex @code{all}
To test whether all components of @code{a} and @code{b} agree,
use the boolean function @code{all(a == b)}. One can also use conditionals like
@code{(a >= 2) ? a : b}, which returns the array @code{@{3,2@}}, or
@code{write((a >= 2) ? a : null}, which returns the array @code{@{2@}}.
All of the standard built-in @code{libm} functions of signature
@code{real(real)} also take a real array as an argument, effectively like an
implicit call to @code{map}.
As with other built-in types, arrays of the basic data types can be read
in by assignment. In this example, the code
@verbatim
file fin=input("test.txt");
real[] A=fin;
@end verbatim
@cindex @code{eof}
@cindex @code{eol}
@cindex @code{line}
@cindex line mode
@noindent
reads real values into @code{A} until the end-of-file is reached (or an
I/O error occurs).
@cindex @code{line}
@cindex @code{word}
@cindex @code{csv}
@cindex @code{dimension}
@cindex @code{read}
The virtual member functions @code{line()}, @code{word()}, @code{csv()},
@code{dimension()}, and @code{read()} of a file are useful for qualifying
array reads, while the virtual fields @code{line}, @code{word}, @code{csv},
and @code{dimension} may be used to query these respective states.
@cindex @code{line}
If line mode is set with @code{file line(bool b=true)}, then
reading will stop once the end of the line is reached:
@verbatim
file fin=input("test.txt");
real[] A=fin.line();
@end verbatim
@cindex reading string arrays
@cindex @code{word}
@cindex white-space string delimiter mode
Since string reads by default read up to the end of line anyway, line mode
normally has no effect on string array reads.
However, there is a white-space delimiter mode for reading strings,
@code{file word(bool b=true)}, which causes string reads to respect
white-space delimiters, instead of the default end-of-line delimiter:
@verbatim
file fin=input("test.txt").line().word();
real[] A=fin;
@end verbatim
@cindex @code{csv}
@cindex comma-separated-value mode
Another useful mode is comma-separated-value mode,
@code{file csv(bool b=true)}, which causes reads to respect comma delimiters:
@verbatim
file fin=input("test.txt").csv();
real[] A=fin;
@end verbatim
@cindex @code{dimension}
To restrict the number of values read, use the @code{file dimension(int)}
virtual member function:
@verbatim
file fin=input("test.txt");
real[] A=fin.dimension(10);
@end verbatim
This reads 10 values into A, unless end-of-file (or end-of-line in line mode)
occurs first. Attempting to read beyond the end of the file will produce a
runtime error message. Specifying a value of 0 for the integer limit is
equivalent to the previous example of reading until end-of-file (or
end-of-line in line mode) is encountered.
Two- and three-dimensional arrays of the basic data types can be read
in like this:
@verbatim
file fin=input("test.txt");
real[][] A=fin.dimension(2,3);
real[][][] B=fin.dimension(2,3,4);
@end verbatim
@noindent
@cindex @code{read}
Sometimes the array dimensions are stored with the data as integer
fields at the beginning of an array. Such 1, 2, or 3 dimensional
arrays can be read in with the virtual member functions
@code{read(1)}, @code{read(2)}, or @code{read(3)}, respectively:
@verbatim
file fin=input("test.txt");
real[] A=fin.read(1);
real[][] B=fin.read(2);
real[][][] C=fin.read(3);
@end verbatim
@cindex @code{write}
One, two, and three-dimensional arrays of the basic data types can be
output with the functions @code{write(file,T[])},
@code{write(file,T[][])}, @code{write(file,T[][][])}, respectively.
@node Slices
@subsection Slices
@cindex slices
Asymptote allows a section of an array to be addressed as a slice
using a Python-like syntax. If @code{A} is an array, the expression
@code{A[m:n]} returns a new array consisting of the elements of @code{A} with
indices from @code{m} up to but not including @code{n}. For example,
@verbatim
int[] x={0,1,2,3,4,5,6,7,8,9};
int[] y=x[2:6]; // y={2,3,4,5};
int[] z=x[5:10]; // z={5,6,7,8,9};
@end verbatim
If the left index is omitted, it is taken be @code{0}. If the right index is
omitted it is taken to be the length of the array. If both are omitted, the
slice then goes from the start of the array to the end, producing a non-cyclic
deep copy of the array. For example:
@verbatim
int[] x={0,1,2,3,4,5,6,7,8,9};
int[] y=x[:4]; // y={0,1,2,3}
int[] z=x[5:]; // z={5,6,7,8,9}
int[] w=x[:]; // w={0,1,2,3,4,5,6,7,8,9}, distinct from array x.
@end verbatim
If A is a non-cyclic array, it is illegal to use negative values for either of
the indices. If the indices exceed the length of the array, however, they are
politely truncated to that length.
For cyclic arrays, the slice @code{A[m:n]} still consists of the cells with
indices in the set [@code{m},@code{n}), but now negative
values and values beyond the length of the array are allowed. The indices
simply wrap around. For example:
@verbatim
int[] x={0,1,2,3,4,5,6,7,8,9};
x.cyclic=true;
int[] y=x[8:15]; // y={8,9,0,1,2,3,4}.
int[] z=x[-5:5]; // z={5,6,7,8,9,0,1,2,3,4}
int[] w=x[-3:17]; // w={7,8,9,0,1,2,3,4,5,6,7,8,9,0,1,2,3,4,5,6}
@end verbatim
Notice that with cyclic arrays, it is possible to include the same element of
the original array multiple times within a slice. Regardless of the original
array, arrays produced by slices are always non-cyclic.
If the left and right indices of a slice are the same, the result is an empty
array. If the array being sliced is empty, the result is an empty array. Any
slice with a left index greater than its right index will yield an error.
Slices can also be assigned to, changing the value of the original array. If
the array being assigned to the slice has a different length than the
slice itself, elements will be inserted or removed from the array to
accommodate it. For instance:
@verbatim
string[] toppings={"mayo", "salt", "ham", "lettuce"};
toppings[0:2]=new string[] {"mustard", "pepper"};
// Now toppings={"mustard", "pepper", "ham", "lettuce"}
toppings[2:3]=new string[] {"turkey", "bacon" };
// Now toppings={"mustard", "pepper", "turkey", "bacon", "lettuce"}
toppings[0:3]=new string[] {"tomato"};
// Now toppings={"tomato", "bacon", "lettuce"}
@end verbatim
If an array is assigned to a slice of itself, a copy of the original array
is assigned to the slice. That is, code such as @code{x[m:n]=x} is equivalent
to @code{x[m:n]=copy(x)}. One can use the shorthand @code{x[m:m]=y} to insert
the contents of the array @code{y} into the array @code{x} starting at the
location just before @code{x[m]}.
For a cyclic array, a slice is bridging if it addresses cells up to the end of
the array and then continues on to address cells at the start of the array.
For instance, if @code{A} is a cyclic array of length 10, @code{A[8:12]},
@code{A[-3:1]}, and @code{A[5:25]} are bridging slices whereas @code{A[3:7]},
@code{A[7:10]}, @code{A[-3:0]} and @code{A[103:107]} are not. Bridging slices
can only be assigned to if the number of elements in the slice is exactly equal
to the number of elements we are assigning to it. Otherwise, there is no clear
way to decide which of the new entries should be @code{A[0]} and an error is
reported. Non-bridging slices may be assigned an array of any length.
For a cyclic array @code{A} an expression of the form
@code{A[A.length:A.length]} is equivalent to the expression @code{A[0:0]} and
so assigning to this slice will insert values at the start of the array.
@code{A.append()} can be used to insert values at the end of the array.
It is illegal to assign to a slice of a cyclic array that repeats any of the
cells.
@node Casts
@section Casts
@cindex casts
@cindex implicit casts
@cindex @code{explicit}
@code{Asymptote} implicitly casts @code{int} to @code{real}, @code{int} to
@code{pair}, @code{real} to @code{pair}, @code{pair} to @code{path},
@code{pair} to @code{guide}, @code{path} to @code{guide}, @code{guide}
to @code{path}, @code{real} to @code{pen},
@code{pair[]} to @code{guide[]}, @code{pair[]} to @code{path[]},
@code{path} to @code{path[]}, and @code{guide} to @code{path[]},
along with various three-dimensional casts defined in module @code{three}.
Implicit casts are automatically attempted on assignment and when
trying to match function calls with possible function
signatures. Implicit casting can be inhibited by declaring individual
arguments @code{explicit} in the function signature, say to avoid an
ambiguous function call in the following example, which outputs 0:
@verbatim
int f(pair a) {return 0;}
int f(explicit real x) {return 1;}
write(f(0));
@end verbatim
@cindex explicit casts
Other conversions, say @code{real} to @code{int} or
@code{real} to @code{string}, require an explicit cast:
@verbatim
int i=(int) 2.5;
string s=(string) 2.5;
real[] a={2.5,-3.5};
int[] b=(int []) a;
write(stdout,b); // Outputs 2,-3
@end verbatim
In situations where casting from a string to a type @code{T} fails,
an uninitialized variable is returned; this condition can be detected
with the function @code{bool initialized(T);}
@verbatim
int i=(int) "2.5";
assert(initialized(i),"Invalid cast.");
real x=(real) "2.5a";
assert(initialized(x),"Invalid cast.");
@end verbatim
@cindex @code{operator cast}
Casting to user-defined types is also possible using @code{operator cast}:
@verbatim
struct rpair {
real radius;
real angle;
}
pair operator cast(rpair x) {
return (x.radius*cos(x.angle),x.radius*sin(x.angle));
}
rpair x;
x.radius=1;
x.angle=pi/6;
write(x); // Outputs (0.866025403784439,0.5)
@end verbatim
One must use care when defining new cast operators. Suppose that in some
code one wants all integers to represent multiples of 100. To convert them
to reals, one would first want to multiply them by 100. However, the
straightforward implementation
@verbatim
real operator cast(int x) {return x*100;}
@end verbatim
@noindent
is equivalent to an infinite recursion, since the result @code{x*100}
needs itself to be cast from an integer to a real. Instead, we want to
use the standard conversion of int to real:
@verbatim
real convert(int x) {return x*100;}
real operator cast(int x)=convert;
@end verbatim
@cindex @code{operator ecast}
Explicit casts are implemented similarly, with @code{operator ecast}.
@node Import
@section Import
@cindex @code{access}
While @code{Asymptote} provides many features by default,
some applications require specialized features contained in
external @code{Asymptote} modules. For instance, the lines
@verbatim
access graph;
graph.axes();
@end verbatim
@noindent
draw @math{x} and @math{y} axes on a two-dimensional graph. Here, the
command looks up the module under the name @code{graph} in a global dictionary
of modules and puts it in a new variable named @code{graph}.
The module is a structure, and we can refer to its fields as we usually
would with a structure.
@cindex @code{from}
Often, one wants to use module functions without having to specify
the module name. The code
@verbatim
from graph access axes;
@end verbatim
@noindent
adds the @code{axes} field of @code{graph} into the local name space,
so that subsequently, one can just write @code{axes()}. If the given name
is overloaded, all types and variables of that name are added. To add
more than one name, just use a comma-separated list:
@verbatim
from graph access axes, xaxis, yaxis;
@end verbatim
@noindent
Wild card notation can be used to add all non-private fields and types of a
module to the local name space:
@verbatim
from graph access *;
@end verbatim
@cindex @code{unravel}
Similarly, one can add the non-private fields and types of a structure
to the local environment with the @code{unravel} keyword:
@verbatim
struct matrix {
real a,b,c,d;
}
real det(matrix m) {
unravel m;
return a*d-b*c;
}
@end verbatim
Alternatively, one can unravel selective fields:
@verbatim
real det(matrix m) {
from m unravel a,b,c as C,d;
return a*d-b*C;
}
@end verbatim
@cindex @code{import}
@cindex @code{access}
The command
@verbatim
import graph;
@end verbatim
is a convenient abbreviation for the commands
@verbatim
access graph;
unravel graph;
@end verbatim
That is, @code{import graph} first loads a module into a structure called
@code{graph} and then adds its non-private fields and types to the
local environment. This way, if a member variable (or function) is
overwritten with a local variable (or function of the same signature),
the original one can still be accessed by qualifying it with the
module name.
Wild card importing will work fine in most cases, but one does not usually know
all of the internal types and variables of a module, which can also
change as the module writer adds or changes features of the module.
As such, it is prudent to add @code{import} commands at the start of an
@code{Asymptote} file, so that imported names won't shadow locally
defined functions. Still, imported names may shadow other imported
names, depending on the order in which they were imported, and
imported functions may cause overloading resolution problems if they
have the same name as local functions defined later.
@cindex @code{as}
To rename modules or fields when adding them to the local environment, use
@code{as}:
@verbatim
access graph as graph2d;
from graph access xaxis as xline, yaxis as yline;
@end verbatim
The command
@verbatim
import graph as graph2d;
@end verbatim
is a convenient abbreviation for the commands
@verbatim
access graph as graph2d;
unravel graph2d;
@end verbatim
Except for a few built-in modules, such as @code{settings}, all modules
are implemented as @code{Asymptote} files. When looking up a module
that has not yet been loaded, @code{Asymptote} searches the standard
search paths (@pxref{Search paths}) for the matching file. The file
corresponding to that name is read and the code within it is interpreted
as the body of a structure defining the module.
If the file name contains
nonalphanumeric characters, enclose it with quotation marks:
@noindent
@code{access "@value{Datadir}/asymptote/graph.asy" as graph;}
@noindent
@code{from "@value{Datadir}/asymptote/graph.asy" access axes;}
@noindent
@code{import "@value{Datadir}/asymptote/graph.asy" as graph;}
@cindex @acronym{URL}
@cindex @acronym{libcurl}
If @code{Asymptote} is compiled with support for @code{libcurl},
the file name can even be a @acronym{URL}:
@code{import "
https://raw.githubusercontent.com/vectorgraphics/asymptote/HEAD/doc/axis3.asy" as axis3;}
It is an error if modules import themselves (or each other in a cycle).
The module name to be imported must be known at compile time.
@cindex runtime imports
@cindex @code{eval}
However, you can import an @code{Asymptote} module determined by the
string @code{s} at runtime like this:
@verbatim
eval("import "+s,true);
@end verbatim
@cindex @code{asy}
To conditionally execute an array of asy files, use
@verbatim
void asy(string format, bool overwrite ... string[] s);
@end verbatim
The file will only be processed, using output format @code{format}, if
overwrite is @code{true} or the output file is missing.
One can evaluate an @code{Asymptote} expression (without any return
value, however) contained in the string @code{s} with:
@cindex @code{eval}
@verbatim
void eval(string s, bool embedded=false);
@end verbatim
It is not necessary to terminate the string @code{s} with a semicolon.
If @code{embedded} is @code{true}, the string will be evaluated
at the top level of the current environment.
If @code{embedded} is @code{false} (the default), the string
will be evaluated in an independent environment, sharing the same
@code{settings} module (@pxref{settings}).
@cindex @code{quote}
One can evaluate arbitrary @code{Asymptote} code (which may
contain unescaped quotation marks) with the command
@verbatim
void eval(code s, bool embedded=false);
@end verbatim
Here @code{code} is a special type used with @code{quote @{@}}
to enclose @code{Asymptote code} like this:
@verbatim
real a=1;
code s=quote {
write(a);
};
eval(s,true); // Outputs 1
@end verbatim
@cindex @code{include}
To include the contents of an existing file @code{graph} verbatim (as if the
contents of the file were inserted at that point), use one of the forms:
@verbatim
include graph;
@end verbatim
@noindent
@code{include "@value{Datadir}/asymptote/graph.asy";}
To list all global functions and variables defined in a module named
by the contents of the string @code{s}, use the function
@verbatim
void list(string s, bool imports=false);
@end verbatim
@noindent
Imported global functions and variables are also listed if
@code{imports} is @code{true}.
@menu
* Templated imports::
@end menu
@node Templated imports
@subsection Templated imports
@cindex template
@strong{Warning:} This feature is experimental: it has known issues and its behavior may change in the future.
In Asymptote
types are specified when they are imported. The first executable line of any such
module must be of the form @code{typedef import(<types>)}, where
@code{<types>} is a list of required type parameters. For instance,
@verbatim
typedef import(T, S, Number);
@end verbatim
@noindent
could be the first line of a module that requires three type parameters. The
remaining code in the module can then use @code{T}, @code{S}, and @code{Number}
as types.
To import such a module, one must specify the types to be used. For instance,
if the module above were named @code{templatedModule}, it could be accessed
for types @code{string}, @code{int[]}, and @code{real} with the import
command
@verbatim
access templatedModule(T=string, S=int[], Number=real)
as templatedModule_string_int_real;
@end verbatim
@noindent
Note that this is actually an @emph{access} command rather than an
@emph{import} command, so a type, function, or variable @code{A}
defined in @code{templatedModule.asy} would need to be accessed
qualified as @code{templatedModule_string_int_real.A}.
Alternatively, the module could be imported via a command like
@verbatim
from templatedModule(T=string, S=int[], Number=real) access
Wrapper_Number as Wrapper_real,
operator ==;
@end verbatim
@noindent
This command would automatically rename @code{Wrapper_Number} to
@code{Wrapper_real} and would also allow the use of any @code{operator ==}
overloads defined in the module.
Further examples can be found in the @code{tests/template} subdirectory
of the @code{Asymptote} source directory.
Issues: Certain expected operators (such as
@code{operator ==}) may only be available for type arguments that are
builtin or defined in module @code{plain}.
@node Static
@section Static
@cindex @code{static}
Static qualifiers allocate the memory address of a variable in a higher
enclosing level.
For a function body, the variable is allocated in the block where the
function is defined; so in the code
@verbatim
struct s {
int count() {
static int c=0;
++c;
return c;
}
}
@end verbatim
@noindent
there is one instance of the variable @code{c} for each
object @code{s} (as opposed to each call of @code{count}).
Similarly, in
@verbatim
int factorial(int n) {
int helper(int k) {
static int x=1;
x *= k;
return k == 1 ? x : helper(k-1);
}
return helper(n);
}
@end verbatim
@noindent
there is one instance of @code{x} for every call to
@code{factorial} (and not for every call to @code{helper}), so this is
a correct, but ugly, implementation of factorial.
Similarly, a static variable declared within a structure is allocated in
the block where the structure is defined. Thus,
@verbatim
struct A {
struct B {
static pair z;
}
}
@end verbatim
@noindent
creates one object @code{z} for each object of type @code{A} created.
In this example,
@verbatim
int pow(int n, int k) {
struct A {
static int x=1;
void helper() {
x *= n;
}
}
for(int i=0; i < k; ++i) {
A a;
a.helper();
}
return A.x;
}
@end verbatim
@noindent
there is one instance of @code{x} for each call to @code{pow}, so this
is an ugly implementation of exponentiation.
Loop constructs allocate a new frame in every iteration. This is so that
higher-order functions can refer to variables of a specific iteration of a
loop:
@verbatim
void f();
for(int i=0; i < 10; ++i) {
int x=i;
if(x==5) {
f=new void() {write(x);};
}
}
f();
@end verbatim
Here, every iteration of the loop has its own variable @code{x}, so @code{f()}
will write @code{5}. If a variable in a loop is declared static, it will be
allocated where the enclosing function or structure was defined (just as if it
were declared static outside of the loop). For instance, in:
@verbatim
void f() {
static int x;
for(int i=0; i < 10; ++i) {
static int y;
}
}
@end verbatim
@noindent
both @code{x} and @code{y} will be allocated in the same place, which is
also where @code{f} is allocated.
Statements may also be declared static, in which case they are run at the place
where the enclosing function or structure is defined.
Declarations or statements not enclosed in a function or structure definition
are already at the top level, so static modifiers are meaningless. A warning is
given in such a case.
Since structures can have static fields, it is not always clear for a qualified
name whether the qualifier is a variable or a type. For instance, in:
@verbatim
struct A {
static int x;
}
pair A;
int y=A.x;
@end verbatim
@noindent
does the @code{A} in @code{A.x} refer to the structure or to the pair variable.
It is the convention in Asymptote that, if there is a non-function variable with
the same name as the qualifier, the qualifier refers to that variable, and not
to the type. This is regardless of what fields the variable actually possesses.
@node Autounravel
@section Autounravel
@cindex @code{autounravel}
The @code{autounravel} modifier can be used to automatically unravel a field.
This is useful when building an associated library of functions
that operate on a structure. For instance, consider a simple
implementation of the @code{rational} structure defined in @code{rational.asy}:
@verbatim
struct rational {
int p=0, q=1;
void operator init(int p, int q) {
this.p=p;
this.q=q;
}
}
rational operator +(rational a, rational b) {
return rational(a.p*b.q+b.p*a.q, a.q*b.q);
}
@end verbatim
To allow @code{rational} to be used as a type parameter for a templated import
that adds instances of @code{rational}, we should move @code{operator +}
into the body of the @code{rational} structure and add the
@code{autounravel} modifier:
@verbatim
struct rational {
int p=0, q=1;
void operator init(int p, int q) {
this.p=p;
this.q=q;
}
autounravel rational operator +(rational a, rational b) {
return rational(a.p*b.q+b.p*a.q, a.q*b.q);
}
}
@end verbatim
This is almost equivalent to the previous code, but now the @code{+} operator
will be accessible wherever the @code{rational} structure is.
@strong{Currently, types cannot be autounraveled.}
Users who encounter a case where this might be useful can submit a
feature request at @uref{
https://github.com/vectorgraphics/asymptote/issues}.
@node When fields are autounraveled
@subsection When fields are autounraveled
If a @code{struct} contains fields (including functions) that are declared with
@code{autounravel}, these fields will be unraveled from the @code{struct} at:
@itemize
@item
the end of the @code{struct} definition;
@item
a @code{typedef import} statement, if the @code{struct} is the argument for one of
the type parameters;
@item
an @code{unravel} or @code{access} statement that unravels the @code{struct} from
a module or outer @code{struct} (for instance,
@code{from rational access rational;} would make the @code{+} operator available
from the @code{struct} @code{rational} defined in @code{rational.asy});
@item
A @code{typedef} statement like @code{typedef rational.rational rat;}
that renames a @code{struct}.
@end itemize
@node Where autounravel is legal
@subsection Where @code{autounravel} is legal
The @code{autounravel} modifier implies @code{static} and can be used
in many of the same places as @code{static}. However, specifying
@code{autounravel} at the top level of a module (i.e.,
outside of any structure or function) is an error, whereas @code{static}
gives only a warning. @footnote{If top-level @code{autounravel} were allowed,
a user might incorrectly assume that the field would be unraveled
whenever the module is @code{access}ed. The @code{static} modifier
is allowed at the top level because, while it does nothing, it does
not mislead the user.}
In front of a @code{struct} definition or @code{typedef} statement,
@code{autounravel} is forbidden because types cannot be autounraveled.
While @code{static static} results in an error,
@code{static autounravel} and @code{autounravel static} are both legal
and have exactly the same effect as @code{autounravel} alone.
@node LaTeX usage
@chapter @code{LaTeX} usage
@cindex @code{LaTeX} usage
@cindex @code{asymptote.sty}
@code{Asymptote} comes with a convenient @code{LaTeX} style file
@code{asymptote.sty} (v1.36 or later required) that makes @code{LaTeX}
@code{Asymptote}-aware. Entering @code{Asymptote} code
directly into the @code{LaTeX} source file, at the point where it is
needed, keeps figures organized and avoids the need to invent new file
names for each figure. Simply add the line
@code{\usepackage@{asymptote@}} at the beginning of your file
and enclose your @code{Asymptote} code within a
@code{\begin@{asy@}...\end@{asy@}} environment. As with the
@code{LaTeX} @code{comment} environment, the @code{\end@{asy@}} command
must appear on a line by itself, with no trailing commands/comments.
A blank line is not allowed after @code{\begin@{asy@}}.
The sample @code{LaTeX} file below, named @code{latexusage.tex}, can
be run as follows:
@verbatim
latex latexusage
asy latexusage-*.asy
latex latexusage
@end verbatim
@noindent
or
@verbatim
pdflatex latexusage
asy latexusage-*.asy
pdflatex latexusage
@end verbatim
@noindent
To switch between using inline Asymptote code with @code{latex} and
@code{pdflatex} you may first need to remove the files @code{latexusage-*.tex}.
@cindex @code{latexmk}
@cindex @code{perl}
An even better method for processing a @code{LaTeX} file with embedded
@code{Asymptote} code is to use the @code{latexmk} utility from
@quotation
@url{
http://mirror.ctan.org/support/latexmk/}
@end quotation
@noindent
after putting the contents of
@url{
https://raw.githubusercontent.com/vectorgraphics/asymptote/HEAD/doc/latexmkrc}
in a file @code{latexmkrc} in the same directory. The command
@verbatim
latexmk -pdf latexusage
@end verbatim
@noindent
will then call @code{Asymptote} automatically, recompiling only the figures
that have changed. Since each figure is compiled in a separate
system process, this method also tends to use less memory.
To store the figures in a separate directory named @code{asy}, one can define
@verbatim
\def\asydir{asy}
@end verbatim
in @code{latexusage.tex}.
External @code{Asymptote} code can be included with
@cindex @code{asyinclude}
@verbatim
\asyinclude[<options>]{<filename.asy>}
@end verbatim
@noindent
so that @code{latexmk} will recognize when the code is changed. Note that
@code{latexmk} requires @code{perl}, available from @url{
https://www.perl.org/}.
@cindex @code{width}
@cindex @code{height}
@cindex @code{keepAspect}
@cindex @code{viewportwidth}
@cindex @code{viewportheight}
@cindex @code{attach}
@cindex @code{inline}
One can specify @code{width}, @code{height}, @code{keepAspect},
@code{viewportwidth}, @code{viewportheight}, @code{attach}, and @code{inline}.
@code{keyval}-style options to the @code{asy} and @code{asyinclude}
environments.
Three-dimensional @acronym{PRC} files may either be embedded within
the page (the default) or attached as annotated (but printable)
attachments, using the @code{attach} option and the @code{attachfile2}
(or older @code{attachfile}) @code{LaTeX} package.
The @code{inline} option generates
inline @code{LaTeX} code instead of @acronym{EPS} or @acronym{PDF}
files. This makes 2D LaTeX symbols visible to the
@code{\begin@{asy@}...\end@{asy@}} environment. In this mode,
Asymptote correctly aligns 2D LaTeX symbols defined outside of
@code{\begin@{asy@}...\end@{asy@}}, but treats their size as zero; an
optional second string can be given to @code{Label} to provide an
estimate of the unknown label size.
Note that if the @code{latex} @TeX{} engine is used with the
@code{inline} option, labels might not show up in @acronym{DVI}
viewers that cannot handle raw @code{PostScript} code. One can use
@code{dvips}/@code{dvipdf} to produce @code{PostScript}/@acronym{PDF}
output (we recommend using the modified version of @code{dvipdf} in
the @code{Asymptote} patches directory, which accepts the @code{dvips -z}
hyperdvi option).
Here now is @code{latexusage.tex}:
@verbatiminclude latexusage.tex
@page
@image{./latexusage,,25cm}
@node Base modules
@chapter Base modules
@cindex base modules
@code{Asymptote} currently ships with the following base modules:
@menu
* plain:: Default @code{Asymptote} base file
* simplex:: Linear programming: simplex method
* simplex2:: Two-variable simplex method
* math:: Extend @code{Asymptote}'s math capabilities
* interpolate:: Interpolation routines
* geometry:: Geometry routines
* trembling:: Wavy lines
* stats:: Statistics routines and histograms
* patterns:: Custom fill and draw patterns
* markers:: Custom path marker routines
* map:: Map keys to values
* tree:: Dynamic binary search tree
* binarytree:: Binary tree drawing module
* drawtree:: Tree drawing module
* syzygy:: Syzygy and braid drawing module
* feynman:: Feynman diagrams
* roundedpath:: Round the sharp corners of paths
* animation:: Embedded @acronym{PDF} and @acronym{MPEG} movies
* embed:: Embedding movies, sounds, and 3D objects
* slide:: Making presentations with @code{Asymptote}
* MetaPost:: @code{MetaPost} compatibility routines
* babel:: Interface to @code{LaTeX} @code{babel} package
* labelpath:: Drawing curved labels
* labelpath3:: Drawing curved labels in 3D
* annotate:: Annotate your @acronym{PDF} files
* CAD:: 2D CAD pen and measurement functions (DIN 15)
* graph:: 2D linear & logarithmic graphs
* palette:: Color density images and palettes
* three:: 3D vector graphics
* obj:: 3D obj files
* graph3:: 3D linear & logarithmic graphs
* grid3:: 3D grids
* solids:: 3D solid geometry
* tube:: 3D rotation minimizing tubes
* flowchart:: Flowchart drawing routines
* contour:: Contour lines
* contour3:: Contour surfaces
* smoothcontour3:: Smooth implicit surfaces
* slopefield:: Slope fields
* ode:: Ordinary differential equations
@end menu
@node plain
@section @code{plain}
@cindex @code{plain}
This is the default @code{Asymptote} base file
drawing language (such as the @code{picture} structure).
By default, an implicit @code{private import plain;} occurs before
translating a file and before the first command given in interactive
mode. This also applies when translating files for module definitions
(except when translating @code{plain}, of course). This means that
the types and functions defined in @code{plain} are accessible in
almost all @code{Asymptote} code. Use the @code{-noautoplain} command-line
option to disable this feature.
@node simplex
@section @code{simplex}
@cindex @code{simplex}
This module solves the general linear programming problem using the
simplex method.
@node simplex2
@section @code{simplex2}
@cindex @code{simplex2}
@cindex @code{deferred drawing}
This module solves a special case of the two-variable linear programming
problem used by the module @code{plain} for automatic sizing of
pictures (@pxref{deferred drawing}).
@node math
@section @code{math}
@cindex @code{math}
This module extends @code{Asymptote}'s mathematical capabilities with
useful functions such as
@table @code
@cindex @code{drawline}
@item void drawline(picture pic=currentpicture
draw the visible portion of the (infinite) line going through
@code{P} and @code{Q}, without altering the size of picture @code{pic},
using pen @code{p}.
@cindex @code{intersect}
@item real intersect(triple P, triple Q, triple n, triple Z);
returns the intersection time of the extension of the line segment @code{PQ}
with the plane perpendicular to @code{n} and passing through @code{Z}.
@cindex @code{intersectionpoint}
@item triple intersectionpoint(triple n0, triple P0, triple n1, triple P1);
Return any point on the intersection of the two planes with normals
@code{n0} and @code{n1} passing through points @code{P0} and @code{P1},
respectively. If the planes are parallel, return
@code{(infinity,infinity,infinity)}.
@cindex @code{quarticroots}
@item pair[] quarticroots(real a, real b, real c, real d, real e);
returns the four complex roots of the quartic equation
@math{ax^4+bx^3+cx^2+dx+e=0}.
@cindex @code{time}
@item real time(path g, real x, int n=0, real fuzz=-1)
returns the @code{n}th intersection time of path @code{g} with the vertical
line through x.
@cindex @code{time}
@item real time(path g, explicit pair z, int n=0, real fuzz=-1)
returns the @code{n}th intersection time of path @code{g} with the horizontal
line through @code{(0,z.y)}.
@cindex @code{value}
@item real value(path g, real x, int n=0, real fuzz=-1)
returns the @code{n}th @code{y} value of @code{g} at @code{x}.
@cindex @code{value}
@item real value(path g, explicit pair z, int n=0, real fuzz=-1)
returns the @code{n}th @code{x} value of @code{g} at @code{y=z.y}.
@cindex @code{slope}
@item real slope(path g, real x, int n=0, real fuzz=-1)
returns the @code{n}th slope of @code{g} at @code{x}.
@cindex @code{slope}
@item real slope(path g, explicit pair z, int n=0, real fuzz=-1)
returns the @code{n}th slope of @code{g} at @code{y=z.y}.
@cindex @code{segment}
int[][] segment(bool[] b)
returns the indices of consecutive true-element segments of bool[] @code{b}.
@cindex @code{partialsum}
@item real[] partialsum(real[] a)
returns the partial sums of a real array @code{a}.
@cindex @code{partialsum}
@item real[] partialsum(real[] a, real[] dx)
returns the partial @code{dx}-weighted sums of a real array @code{a}.
@cindex @code{increasing}
@item bool increasing(real[] a, bool strict=false)
returns, if @code{strict=false}, whether @code{i > j} implies
@code{a[i] >= a[j]}, or if @code{strict=true}, whether @code{i > j} implies
implies @code{a[i] > a[j]}.
@cindex @code{unique}
@item int unique(real[] a, real x)
if the sorted array @code{a} does not contain @code{x}, insert it
sequentially, returning the index of @code{x} in the resulting array.
@cindex @code{lexorder}
@item bool lexorder(pair a, pair b)
returns the strict lexicographical partial order of @code{a} and @code{b}.
@cindex @code{lexorder}
@item bool lexorder(triple a, triple b)
returns the strict lexicographical partial order of @code{a} and @code{b}.
@end table
@node interpolate
@section @code{interpolate}
@cindex @code{interpolate}
This module implements Lagrange, Hermite, and standard cubic spline
interpolation in @code{Asymptote}, as illustrated in the example
@code{interpolate1.asy}.
@node geometry
@section @code{geometry}
@cindex @code{geometry}
@cindex @code{triangle}
@cindex @code{perpendicular}
This module, written by Philippe Ivaldi, provides an extensive set of
geometry routines, including @code{perpendicular} symbols and a @code{triangle}
structure. Link to the documentation for the @code{geometry} module
are posted here:
@url{
https://asymptote.sourceforge.io/links.html},
including an extensive set of examples,
@url{
https://web.archive.org/web/20201130113133/http://www.piprime.fr/files/asymptote/geometry/}, and an index:
@quotation
@url{
https://web.archive.org/web/20201130113133/http://www.piprime.fr/files/asymptote/geometry/modules/geometry.asy.index.type.html}
@end quotation
@node trembling
@section @code{trembling}
@cindex @code{trembling}
This module, written by Philippe Ivaldi and illustrated in the example
@code{@uref{
https://asymptote.sourceforge.io/gallery/floatingdisk.svg,,floatingdisk}@uref{
https://asymptote.sourceforge.io/gallery/floatingdisk.asy,,.asy}}, allows one to draw wavy lines, as if drawn by
hand.
@node stats
@section @code{stats}
@cindex @code{stats}
@cindex @code{leastsquares}
This module implements a Gaussian random number generator
and a collection of statistics routines, including @code{histogram}
and @code{leastsquares}.
@node patterns
@section @code{patterns}
@cindex @code{patterns}
This module implements @code{PostScript} tiling patterns and includes
several convenient pattern generation routines.
@node markers
@section @code{markers}
@cindex @code{markers}
This module implements specialized routines for marking paths and angles.
The principal mark routine provided by this module is
@verbatim
markroutine markinterval(int n=1, frame f, bool rotated=false);
@end verbatim
@noindent
which centers @code{n} copies of frame @code{f} within uniformly space
intervals in arclength along the path, optionally rotated by the angle of the
local tangent.
The @code{marker} (@pxref{marker}) routine can be used to construct new
markers from these predefined frames:
@cindex @code{stickframe}
@verbatim
frame stickframe(int n=1, real size=0, pair space=0, real angle=0,
pair offset=0, pen p=currentpen);
@end verbatim
@cindex @code{circlebarframe}
@verbatim
frame circlebarframe(int n=1, real barsize=0,
real radius=0,real angle=0,
pair offset=0, pen p=currentpen,
filltype filltype=NoFill, bool above=false);
@end verbatim
@cindex @code{crossframe}
@verbatim
frame crossframe(int n=3, real size=0, pair space=0,
real angle=0, pair offset=0, pen p=currentpen);
@end verbatim
@cindex @code{tildeframe}
@verbatim
frame tildeframe(int n=1, real size=0, pair space=0,
real angle=0, pair offset=0, pen p=currentpen);
@end verbatim
For convenience, this module also constructs the markers
@code{StickIntervalMarker}, @code{CrossIntervalMarker},
@code{CircleBarIntervalMarker}, and @code{TildeIntervalMarker}
from the above frames. The example @code{@uref{
https://asymptote.sourceforge.io/gallery/markers1.svg,,markers1}@uref{
https://asymptote.sourceforge.io/gallery/markers1.asy,,.asy}} illustrates the
use of these markers:
@sp 1
@center @image{./markers1}
This module also provides a routine for marking an angle @math{AOB}:
@cindex @code{markangle}
@verbatim
void markangle(picture pic=currentpicture, Label L="",
int n=1, real radius=0, real space=0,
pair A, pair O, pair B, arrowbar arrow=None,
pen p=currentpen, margin margin=NoMargin,
marker marker=nomarker);
@end verbatim
@noindent
as illustrated in the example @code{@uref{
https://asymptote.sourceforge.io/gallery/markers2.svg,,markers2}@uref{
https://asymptote.sourceforge.io/gallery/markers2.asy,,.asy}}.
@sp 1
@center @image{./markers2}
@node map
@section @code{map}
@cindex @code{map}
This module creates a struct parameterized by the types specified in
strings @code{key} and @code{value}, mapping keys to values with a
specified default:
@verbatim
from map(Key=string, Value=int) access map;
map M=map(Default=-1);
M.add("z",2);
M.add("a",3);
M.add("d",4);
write(M.lookup("a"));
write(M.lookup("y"));
@end verbatim
@node tree
@section @code{tree}
@cindex @code{tree}
This module implements an example of a dynamic binary search tree.
@node binarytree
@section @code{binarytree}
@cindex @code{binarytree}
This module can be used to draw an arbitrary binary tree and includes an
input routine for the special case of a binary search tree, as
illustrated in the example @code{@uref{
https://asymptote.sourceforge.io/gallery/binarytreetest.svg,,binarytreetest}@uref{
https://asymptote.sourceforge.io/gallery/binarytreetest.asy,,.asy}}:
@verbatiminclude binarytreetest.asy
@sp 1
@center @image{./binarytreetest}
@node drawtree
@section @code{drawtree}
@cindex @code{drawtree}
This is a simple tree drawing module used by the example @code{@uref{
https://asymptote.sourceforge.io/gallery/treetest.svg,,treetest}@uref{
https://asymptote.sourceforge.io/gallery/treetest.asy,,.asy}}.
@node syzygy
@section @code{syzygy}
@cindex @code{syzygy}
This module automates the drawing of braids, relations, and syzygies,
along with the corresponding equations, as illustrated in the example
@code{@uref{
https://asymptote.sourceforge.io/gallery/knots.svg,,knots}@uref{
https://asymptote.sourceforge.io/gallery/knots.asy,,.asy}}.
@node feynman
@section @code{feynman}
@cindex @code{feynman}
This module, contributed by Martin Wiebusch, is useful for drawing
Feynman diagrams, as illustrated by the examples @code{@uref{
https://asymptote.sourceforge.io/gallery/eetomumu.svg,,eetomumu}@uref{
https://asymptote.sourceforge.io/gallery/eetomumu.asy,,.asy}}
and @code{@uref{
https://asymptote.sourceforge.io/gallery/fermi.svg,,fermi}@uref{
https://asymptote.sourceforge.io/gallery/fermi.asy,,.asy}}.
@node roundedpath
@section @code{roundedpath}
@cindex @code{roundedpath}
This module, contributed by Stefan Knorr, is useful for rounding the
sharp corners of paths, as illustrated in the example file @code{@uref{
https://asymptote.sourceforge.io/gallery/roundpath.svg,,roundpath}@uref{
https://asymptote.sourceforge.io/gallery/roundpath.asy,,.asy}}.
@node animation
@section @code{animation}
@cindex @code{animation}
@cindex @code{magick}
@cindex animation
@cindex @code{ImageMagick}
This module allows one to generate animations, as illustrated by the
files @code{@uref{
https://asymptote.sourceforge.io/gallery/animations/wheel.gif,,wheel}@uref{
https://asymptote.sourceforge.io/gallery/animations/wheel.asy,,.asy}}, @code{@uref{
https://asymptote.sourceforge.io/gallery/animations/wavepacket.gif,,wavepacket}@uref{
https://asymptote.sourceforge.io/gallery/animations/wavepacket.asy,,.asy}}, and @code{@uref{
https://asymptote.sourceforge.io/gallery/animations/cube.gif,,cube}@uref{
https://asymptote.sourceforge.io/gallery/animations/cube.asy,,.asy}} in
the @code{animations} subdirectory of the examples directory. These
animations use the @code{ImageMagick} @code{magick} program to
merge multiple images into a @acronym{GIF} or @acronym{MPEG}
movie.
@cindex @code{animate}
@anchor{animate}
The related @code{animate} module, derived from the @code{animation}
module, generates higher-quality portable clickable @acronym{PDF} movies, with
optional controls. This requires installing the module
@quotation
@url{
http://mirror.ctan.org/macros/latex/contrib/animate/animate.sty}
@end quotation
@noindent
(version 2007/11/30 or later) in a new directory @code{animate} in the
local @code{LaTeX} directory (for example, in
@code{/usr/local/share/texmf/tex/latex/animate}). On @code{UNIX} systems,
one must then execute the command @code{texhash}.
The example @code{@uref{
https://asymptote.sourceforge.io/gallery/animations/pdfmovie.pdf,,pdfmovie}@uref{
https://asymptote.sourceforge.io/gallery/animations/pdfmovie.asy,,.asy}} in the @code{animations}
directory, along with the slide presentations @code{@uref{
https://asymptote.sourceforge.io/gallery/animations/slidemovies.pdf,,slidemovies}@uref{
https://asymptote.sourceforge.io/gallery/animations/slidemovies.asy,,.asy}}
and @code{@uref{
https://asymptote.sourceforge.io/intro.pdf,,intro}}, illustrate the use of embedded @acronym{PDF} movies.
The examples @code{inlinemovie.tex} and @code{inlinemovie3.tex}
show how to generate and embed @acronym{PDF} movies directly within a
@code{LaTeX} file (@pxref{LaTeX usage}).
The member function
@verbatim
string pdf(fit fit=NoBox, real delay=animationdelay, string options="",
bool keep=settings.keep, bool multipage=true);
@end verbatim
@noindent
of the @code{animate} structure accepts any of the @code{animate.sty} options,
as described here:
@quotation
@url{
http://mirror.ctan.org/macros/latex/contrib/animate/doc/animate.pdf}
@end quotation
@node embed
@section @code{embed}
@cindex @code{embed}
This module provides an interface to the @code{LaTeX} package
(included with @code{MikTeX})
@quotation
@url{
http://mirror.ctan.org/macros/latex/contrib/media9}
@end quotation
@noindent
for embedding movies, sounds, and 3D objects into a @acronym{PDF} document.
@cindex @code{external}
A more portable method for embedding movie files, which should work on any
platform and does not require the @code{media9} package, is provided
by using the @code{external} module instead of @code{embed}.
Examples of the above two interfaces is provided in the file
@code{embeddedmovie.asy} in the @code{animations} subdirectory of the
examples directory and in
@code{@uref{
https://asymptote.sourceforge.io/gallery/animations/externalmovie.pdf,,externalmovie}@uref{
https://asymptote.sourceforge.io/gallery/animations/externalmovie.asy,,.asy}}.
For a higher quality embedded movie generated directly by
@code{Asymptote}, use the @code{animate} module along with the
@code{animate.sty} package to embed a portable @acronym{PDF} animation
(@pxref{animate}).
@cindex @code{U3D}
An example of embedding @code{U3D} code is provided in the file
@code{embeddedu3d}.
@node slide
@section @code{slide}
@cindex @code{slide}
This module provides a simple yet high-quality facility for making
presentation slides, including portable embedded @acronym{PDF} animations (see
the file @code{@uref{
https://asymptote.sourceforge.io/gallery/animations/slidemovies.pdf,,slidemovies}@uref{
https://asymptote.sourceforge.io/gallery/animations/slidemovies.asy,,.asy}}). A simple example is provided in
@code{slidedemo.asy}.
@node MetaPost
@section @code{MetaPost}
@cindex @code{MetaPost}
This module provides some useful routines to help @code{MetaPost} users
migrate old @code{MetaPost} code to @code{Asymptote}. Further
contributions here are welcome.
@cindex @code{implicit linear solver}
@cindex @code{MetaPost whatever}
@cindex @code{extension}
Unlike @code{MetaPost}, @code{Asymptote} does not implicitly solve
linear equations and therefore does not have the notion of a
@code{whatever} unknown. The routine @code{extension} (@pxref{extension})
provides a useful replacement for a common use of @code{whatever}: finding the
intersection point of the lines through @code{P}, @code{Q} and
@code{p}, @code{q}. For less common occurrences of @code{whatever}, one
can use the built-in explicit linear equation solver @code{solve} instead.
@node babel
@section @code{babel}
@cindex @code{babel}
This module implements the @code{LaTeX} @code{babel} package in
@code{Asymptote}. For example:
@verbatim
import babel;
babel("german");
@end verbatim
@node labelpath
@section @code{labelpath}
@cindex @code{labelpath}
This module uses the @code{PSTricks} @code{pstextpath} macro to fit labels
along a path (properly kerned, as illustrated in the example file
@code{@uref{
https://asymptote.sourceforge.io/gallery/curvedlabel.svg,,curvedlabel}@uref{
https://asymptote.sourceforge.io/gallery/curvedlabel.asy,,.asy}}), using the command
@verbatim
void labelpath(picture pic=currentpicture, Label L, path g,
string justify=Centered, pen p=currentpen);
@end verbatim
@noindent
Here @code{justify} is one of @code{LeftJustified}, @code{Centered}, or
@code{RightJustified}. The @math{x} component of a shift transform
applied to the Label is interpreted as a shift along the curve, whereas
the @math{y} component is interpreted as a shift away from the curve.
All other Label transforms are ignored. This module requires the
@code{latex} tex engine and inherits the limitations of the
@code{PSTricks} @code{\pstextpath} macro.
@node labelpath3
@section @code{labelpath3}
@cindex @code{labelpath3}
This module, contributed by Jens Schwaiger, implements a 3D version of
@code{labelpath} that does not require the @code{PSTricks} package.
An example is provided in @code{@uref{
https://asymptote.sourceforge.io/gallery/3Dwebgl/curvedlabel3.html,,curvedlabel3}@uref{
https://asymptote.sourceforge.io/gallery/3Dwebgl/curvedlabel3.asy,,.asy}}.
@node annotate
@section @code{annotate}
@cindex @code{annotate}
This module supports @acronym{PDF} annotations for viewing with
@code{Adobe Reader}, via the function
@verbatim
void annotate(picture pic=currentpicture, string title, string text,
pair position);
@end verbatim
@noindent
Annotations are illustrated in the example file @code{@uref{
https://asymptote.sourceforge.io/gallery/PDFs/annotation.pdf,,annotation}@uref{
https://asymptote.sourceforge.io/gallery/PDFs/annotation.asy,,.asy}}.
Currently, annotations are only implemented for the @code{latex}
(default) and @code{tex} @TeX{} engines.
@node CAD
@section @code{CAD}
@cindex @code{CAD}
This module, contributed by Mark Henning, provides basic pen
definitions and measurement functions for simple 2D CAD drawings
according to DIN 15. It is documented separately, in the file
@code{CAD.pdf}.
@node graph
@section @code{graph}
@cindex @code{graph}
@cindex 2D graphs
This module implements two-dimensional linear and logarithmic graphs,
including automatic scale and tick selection (with the ability to
override manually). A graph is a @code{guide} (that can be drawn with
the draw command, with an optional legend) constructed with one of
the following routines:
@itemize
@item
@verbatim
guide graph(picture pic=currentpicture, real f(real), real a, real b,
int n=ngraph, real T(real)=identity,
interpolate join=operator --);
guide[] graph(picture pic=currentpicture, real f(real), real a, real b,
int n=ngraph, real T(real)=identity, bool3 cond(real),
interpolate join=operator --);
@end verbatim
Returns a graph using the scaling information for picture @code{pic}
(@pxref{automatic scaling}) of the function @code{f} on the interval
[@code{T}(@code{a}),@code{T}(@code{b})], sampling at @code{n} points
evenly spaced in [@code{a},@code{b}], optionally restricted by the
bool3 function @code{cond} on [@code{a},@code{b}]. If @code{cond} is:
@itemize @bullet
@item @code{true}, the point is added to the existing guide;
@item @code{default}, the point is added to a new guide;
@item @code{false}, the point is omitted and a new guide is begun.
@end itemize
The points are connected using the interpolation specified by @code{join}:
@itemize @bullet
@cindex @code{operator --}
@cindex @code{Straight}
@item @code{operator --} (linear interpolation; the abbreviation
@code{Straight} is also accepted);
@cindex @code{operator ..}
@cindex @code{Spline}
@item @code{operator ..} (piecewise Bezier cubic spline interpolation;
the abbreviation @code{Spline} is also accepted);
@cindex @code{linear}
@cindex @code{Hermite}
@cindex @code{notaknot}
@cindex @code{natural}
@cindex @code{periodic}
@cindex @code{clamped}
@cindex @code{monotonic}
@cindex @code{Hermite(splinetype splinetype}
@item @code{linear} (linear interpolation),
@item @code{Hermite} (standard cubic spline interpolation using boundary
condition @code{notaknot}, @code{natural}, @code{periodic},
@code{clamped(real slopea, real slopeb)}), or @code{monotonic}.
The abbreviation @code{Hermite} is equivalent to
@code{Hermite(notaknot)} for nonperiodic data and
@code{Hermite(periodic)} for periodic data).
@end itemize
@item
@verbatim
guide graph(picture pic=currentpicture, real x(real), real y(real),
real a, real b, int n=ngraph, real T(real)=identity,
interpolate join=operator --);
guide[] graph(picture pic=currentpicture, real x(real), real y(real),
real a, real b, int n=ngraph, real T(real)=identity,
bool3 cond(real), interpolate join=operator --);
@end verbatim
Returns a graph using the scaling information for picture @code{pic}
of the parametrized function
(@code{x}(@math{t}),@code{y}(@math{t})) for @math{t} in the interval
[@code{T}(@code{a}),@code{T}(@code{b})], sampling at @code{n} points
evenly spaced in [@code{a},@code{b}], optionally restricted by the
bool3 function @code{cond} on [@code{a},@code{b}], using the given
interpolation type.
@item
@verbatim
guide graph(picture pic=currentpicture, pair z(real), real a, real b,
int n=ngraph, real T(real)=identity,
interpolate join=operator --);
guide[] graph(picture pic=currentpicture, pair z(real), real a, real b,
int n=ngraph, real T(real)=identity, bool3 cond(real),
interpolate join=operator --);
@end verbatim
Returns a graph using the scaling information for picture @code{pic}
of the parametrized function
@code{z}(@math{t}) for @math{t} in the interval
[@code{T}(@code{a}),@code{T}(@code{b})], sampling at @code{n} points
evenly spaced in [@code{a},@code{b}], optionally restricted by the
bool3 function @code{cond} on [@code{a},@code{b}], using the given
interpolation type.
@item
@verbatim
guide graph(picture pic=currentpicture, pair[] z,
interpolate join=operator --);
guide[] graph(picture pic=currentpicture, pair[] z, bool3[] cond,
interpolate join=operator --);
@end verbatim
Returns a graph using the scaling information for picture @code{pic}
of the elements of the array @code{z}, optionally restricted to
those indices for which the elements of the boolean array @code{cond} are
@code{true}, using the given interpolation type.
@item
@verbatim
guide graph(picture pic=currentpicture, real[] x, real[] y,
interpolate join=operator --);
guide[] graph(picture pic=currentpicture, real[] x, real[] y,
bool3[] cond, interpolate join=operator --);
@end verbatim
Returns a graph using the scaling information for picture @code{pic}
of the elements of the arrays (@code{x},@code{y}), optionally
restricted to those indices for which the elements of the boolean
array @code{cond} are @code{true}, using the given interpolation type.
@item
@cindex @code{polargraph}
@verbatim
guide polargraph(picture pic=currentpicture, real f(real), real a,
real b, int n=ngraph, interpolate join=operator --);
@end verbatim
Returns a polar-coordinate graph using the scaling information for
picture @code{pic} of the function @code{f} on the interval
[@code{a},@code{b}], sampling at @code{n} evenly spaced points, with
the given interpolation type.
@item
@verbatim
guide polargraph(picture pic=currentpicture, real[] r, real[] theta,
interpolate join=operator--);
@end verbatim
Returns a polar-coordinate graph using the scaling information for
picture @code{pic} of the elements of the arrays (@code{r},@code{theta}),
using the given interpolation type.
@end itemize
@verbatim
@end verbatim
An axis can be drawn on a picture with one of the following commands:
@itemize
@item
@verbatim
void xaxis(picture pic=currentpicture, Label L="", axis axis=YZero,
real xmin=-infinity, real xmax=infinity, pen p=currentpen,
ticks ticks=NoTicks, arrowbar arrow=None, bool above=false);
@end verbatim
Draw an @math{x} axis on picture @code{pic} from @math{x}=@code{xmin} to
@math{x}=@code{xmax} using pen @code{p}, optionally labelling it with
Label @code{L}. The relative label location along the axis (a real number from
[0,1]) defaults to 1 (@pxref{Label}), so that the label is drawn at the
end of the axis. An infinite value of @code{xmin}
or @code{xmax} specifies that the corresponding axis limit will be
automatically determined from the picture limits.
The optional @code{arrow} argument takes the same values as in the
@code{draw} command (@pxref{arrows}). The axis is drawn before any
existing objects in @code{pic} unless @code{above=true}.
The axis placement is determined by one of the following @code{axis} types:
@table @code
@cindex @code{YZero}
@item YZero(bool extend=true)
Request an @math{x} axis at @math{y}=0 (or @math{y}=1 on a logarithmic axis)
extending to the full dimensions of the picture, unless @code{extend}=false.
@cindex @code{YEquals}
@item YEquals(real Y, bool extend=true)
Request an @math{x} axis at @math{y}=@code{Y} extending to the full
dimensions of the picture, unless @code{extend}=false.
@cindex @code{Bottom}
@item Bottom(bool extend=false)
Request a bottom axis.
@cindex @code{Top}
@item Top(bool extend=false)
Request a top axis.
@cindex @code{BottomTop}
@item BottomTop(bool extend=false)
Request a bottom and top axis.
@end table
@cindex custom axis types
Custom axis types can be created by following the examples in the
module @code{graph.asy}.
One can easily override the default values for the standard axis types:
@verbatim
import graph;
YZero=new axis(bool extend=true) {
return new void(picture pic, axisT axis) {
real y=pic.scale.x.scale.logarithmic ? 1 : 0;
axis.value=I*pic.scale.y.T(y);
axis.position=1;
axis.side=right;
axis.align=2.5E;
axis.value2=Infinity;
axis.extend=extend;
};
};
YZero=YZero();
@end verbatim
@anchor{ticks}
@cindex @code{ticks}
@cindex @code{NoTicks}
@cindex @code{LeftTicks}
@cindex @code{RightTicks}
@cindex @code{Ticks}
The default tick option is @code{NoTicks}.
The options @code{LeftTicks}, @code{RightTicks}, or @code{Ticks} can be
used to draw ticks on the left, right, or both sides of the path,
relative to the direction in which the path is drawn.
These tick routines accept a number of optional arguments:
@verbatim
ticks LeftTicks(Label format="", ticklabel ticklabel=null,
bool beginlabel=true, bool endlabel=true,
int N=0, int n=0, real Step=0, real step=0,
bool begin=true, bool end=true, tickmodifier modify=None,
real Size=0, real size=0, bool extend=false,
pen pTick=nullpen, pen ptick=nullpen);
@end verbatim
If any of these parameters are omitted, reasonable defaults will
be chosen:
@table @code
@item Label format
@cindex @code{defaultformat}
@cindex @code{trailingzero}
override the default tick label format (@code{defaultformat}, initially
"$%.4g$"), rotation, pen, and alignment (for example, @code{LeftSide},
@code{Center}, or @code{RightSide}) relative to the axis. To enable
@code{LaTeX} math mode fonts, the format string should begin and
end with @code{$} @pxref{format}. If the format string is @code{trailingzero},
trailing zeros will be added to the tick labels; if the format string is
@code{"%"}, the tick label will be suppressed;
@item ticklabel
is a function @code{string(real x)} returning the label (by default,
format(format.s,x)) for each major tick value @code{x};
@item bool beginlabel
include the first label;
@item bool endlabel
include the last label;
@item int N
when automatic scaling is enabled (the default; @pxref{automatic scaling}),
divide a linear axis evenly into this many intervals, separated by major ticks;
for a logarithmic axis, this is the number of decades between labelled ticks;
@item int n
divide each interval into this many subintervals, separated by minor ticks;
@item real Step
the tick value spacing between major ticks
(if @code{N}=@code{0});
@item real step
the tick value spacing between minor ticks (if @code{n}=@code{0});
@item bool begin
include the first major tick;
@item bool end
include the last major tick;
@item tickmodifier modify;
an optional function that takes and returns a @code{tickvalue} structure having
real[] members @code{major} and @code{minor} consisting of the tick values
(to allow modification of the automatically generated tick values);
@item real Size
the size of the major ticks (in @code{PostScript} coordinates);
@item real size
the size of the minor ticks (in @code{PostScript} coordinates);
@item bool extend;
extend the ticks between two axes (useful for drawing a grid on the graph);
@item pen pTick
an optional pen used to draw the major ticks;
@item pen ptick
an optional pen used to draw the minor ticks.
@end table
@cindex @code{OmitTick}
@cindex @code{OmitTickInterval}
@cindex @code{OmitTickIntervals}
For convenience, the predefined tickmodifiers @code{OmitTick(... real[] x)},
@code{OmitTickInterval(real a, real b)}, and
@code{OmitTickIntervals(real[] a, real[] b)}
can be used to remove specific auto-generated ticks and
their labels. The @code{OmitFormat(string s=defaultformat ... real[] x)}
ticklabel can be used to remove specific tick labels but not the
corresponding ticks. The tickmodifier @code{NoZero} is an abbreviation for
@code{OmitTick(0)} and the ticklabel @code{NoZeroFormat} is an
abbrevation for @code{OmitFormat(0)}.
@cindex custom tick locations
@cindex @code{LeftTicks}
@cindex @code{RightTicks}
@cindex @code{Ticks}
It is also possible to specify custom tick locations with
@code{LeftTicks}, @code{RightTicks}, and @code{Ticks} by passing explicit real
arrays @code{Ticks} and (optionally) @code{ticks} containing the
locations of the major and minor ticks, respectively:
@verbatim
ticks LeftTicks(Label format="", ticklabel ticklabel=null,
bool beginlabel=true, bool endlabel=true,
real[] Ticks, real[] ticks=new real[],
real Size=0, real size=0, bool extend=false,
pen pTick=nullpen, pen ptick=nullpen)
@end verbatim
@item
@verbatim
void yaxis(picture pic=currentpicture, Label L="", axis axis=XZero,
real ymin=-infinity, real ymax=infinity, pen p=currentpen,
ticks ticks=NoTicks, arrowbar arrow=None, bool above=false,
bool autorotate=true);
@end verbatim
Draw a @math{y} axis on picture @code{pic} from @math{y}=@code{ymin} to
@math{y}=@code{ymax} using pen @code{p}, optionally labelling it with
a Label @code{L} that is autorotated unless @code{autorotate=false}.
The relative location of the label (a real number from
[0,1]) defaults to 1 (@pxref{Label}). An infinite value of @code{ymin}
or @code{ymax} specifies that the corresponding axis limit will be
automatically determined from the picture limits.
The optional @code{arrow} argument takes the same values as in the
@code{draw} command (@pxref{arrows}). The axis is drawn before any
existing objects in @code{pic} unless @code{above=true}.
The tick type is specified by @code{ticks} and the axis placement is
determined by one of the following @code{axis} types:
@table @code
@cindex @code{XZero}
@item XZero(bool extend=true)
Request a @math{y} axis at @math{x}=0 (or @math{x}=1 on a logarithmic axis)
extending to the full dimensions of the picture, unless @code{extend}=false.
@cindex @code{XEquals}
@item XEquals(real X, bool extend=true)
Request a @math{y} axis at @math{x}=@code{X} extending to the full
dimensions of the picture, unless @code{extend}=false.
@cindex @code{Left}
@item Left(bool extend=false)
Request a left axis.
@cindex @code{Right}
@item Right(bool extend=false)
Request a right axis.
@cindex @code{LeftRight}
@item LeftRight(bool extend=false)
Request a left and right axis.
@end table
@item
@cindex @code{xequals}
@cindex @code{yequals}
For convenience, the functions
@verbatim
void xequals(picture pic=currentpicture, Label L="", real x,
bool extend=false, real ymin=-infinity, real ymax=infinity,
pen p=currentpen, ticks ticks=NoTicks, bool above=true,
arrowbar arrow=None);
@end verbatim
and
@verbatim
void yequals(picture pic=currentpicture, Label L="", real y,
bool extend=false, real xmin=-infinity, real xmax=infinity,
pen p=currentpen, ticks ticks=NoTicks, bool above=true,
arrowbar arrow=None);
@end verbatim
can be respectively used to call @code{yaxis} and
@code{xaxis} with the appropriate axis types @code{XEquals(x,extend)} and
@code{YEquals(y,extend)}. This is the recommended way of drawing vertical
or horizontal lines and axes at arbitrary locations.
@item
@verbatim
void axes(picture pic=currentpicture, Label xlabel="", Label ylabel="",
bool extend=true,
pair min=(-infinity,-infinity), pair max=(infinity,infinity),
pen p=currentpen, arrowbar arrow=None, bool above=false);
@end verbatim
This convenience routine draws both @math{x} and @math{y} axes
on picture @code{pic} from @code{min} to @code{max},
with optional labels @code{xlabel} and @code{ylabel}
and any arrows specified by @code{arrow}. The axes are drawn on top of
existing objects in @code{pic} only if @code{above=true}.
@item
@verbatim
void axis(picture pic=currentpicture, Label L="", path g,
pen p=currentpen, ticks ticks, ticklocate locate,
arrowbar arrow=None, int[] divisor=new int[],
bool above=false, bool opposite=false);
@end verbatim
This routine can be used to draw on picture @code{pic} a general axis
based on an arbitrary path @code{g}, using pen @code{p}.
One can optionally label the axis with Label @code{L} and add an arrow
@code{arrow}. The tick type is given by @code{ticks}.
The optional integer array @code{divisor} specifies what tick divisors
to try in the attempt to produce uncrowded tick labels. A @code{true}
value for the flag @code{opposite} identifies an unlabelled secondary
axis (typically drawn opposite a primary axis). The axis is drawn before
any existing objects in @code{pic} unless @code{above=true}.
The tick locator @code{ticklocate} is constructed by the routine
@verbatim
ticklocate ticklocate(real a, real b, autoscaleT S=defaultS,
real tickmin=-infinity, real tickmax=infinity,
real time(real)=null, pair dir(real)=zero);
@end verbatim
@noindent
where @code{a} and @code{b} specify the respective tick values at
@code{point(g,0)} and @code{point(g,length(g))}, @code{S} specifies
the autoscaling transformation, the function @code{real time(real v)}
returns the time corresponding to the value @code{v}, and
@code{pair dir(real t)} returns the absolute tick direction as a
function of @code{t} (zero means draw the tick perpendicular to the axis).
@item These routines are useful for manually putting ticks and labels on axes
(if the variable @code{Label} is given as the @code{Label}
argument, the @code{format} argument will be used to format a string based on
the tick location):
@cindex xtick
@cindex ytick
@cindex labelx
@cindex labely
@cindex tick
@cindex Label
@verbatim
void xtick(picture pic=currentpicture, Label L="", explicit pair z,
pair dir=N, string format="",
real size=Ticksize, pen p=currentpen);
void xtick(picture pic=currentpicture, Label L="", real x,
pair dir=N, string format="",
real size=Ticksize, pen p=currentpen);
void ytick(picture pic=currentpicture, Label L="", explicit pair z,
pair dir=E, string format="",
real size=Ticksize, pen p=currentpen);
void ytick(picture pic=currentpicture, Label L="", real y,
pair dir=E, string format="",
real size=Ticksize, pen p=currentpen);
void tick(picture pic=currentpicture, pair z,
pair dir, real size=Ticksize, pen p=currentpen);
void labelx(picture pic=currentpicture, Label L="", explicit pair z,
align align=S, string format="", pen p=currentpen);
void labelx(picture pic=currentpicture, Label L="", real x,
align align=S, string format="", pen p=currentpen);
void labelx(picture pic=currentpicture, Label L,
string format="", explicit pen p=currentpen);
void labely(picture pic=currentpicture, Label L="", explicit pair z,
align align=W, string format="", pen p=currentpen);
void labely(picture pic=currentpicture, Label L="", real y,
align align=W, string format="", pen p=currentpen);
void labely(picture pic=currentpicture, Label L,
string format="", explicit pen p=currentpen);
@end verbatim
@end itemize
Here are some simple examples of two-dimensional graphs:
@enumerate
@cindex textbook graph
@item This example draws a textbook-style graph of
@math{y=} exp@math{(x)}, with the @math{y} axis starting at @math{y=0}:
@verbatiminclude exp.asy
@sp 1
@center @image{./exp}
@item The next example draws a scientific-style graph with a legend.
The position of the legend can be adjusted either explicitly or by using the
graphical user interface (@pxref{GUI}). If an
@code{UnFill(real xmargin=0, real ymargin=xmargin)} or
@code{Fill(pen)} option is specified to @code{add}, the legend will obscure
any underlying objects. Here we illustrate how to clip the portion of
the picture covered by a label:
@cindex scientific graph
@verbatiminclude lineargraph0.asy
@sp 1
@center @image{./lineargraph0}
@cindex @code{attach}
To specify a fixed size for the graph proper, use @code{attach}:
@verbatiminclude lineargraph.asy
@cindex @code{legend}
A legend can have multiple entries per line:
@verbatiminclude legend.asy
@sp 1
@center @image{./legend}
@item This example draws a graph of one array versus another (both of
the same size) using custom tick locations and a smaller font size for
the tick labels on the @math{y} axis.
@verbatiminclude datagraph.asy
@sp 1
@center @image{./datagraph}
@item This example shows how to graph columns of data read from a file.
@verbatiminclude filegraph.asy
@sp 1
@center @image{./filegraph}
@cindex @code{polygon}
@cindex @code{cross}
@cindex @code{errorbars}
@cindex @code{marker}
@cindex @code{marknodes}
@cindex @code{markuniform}
@cindex @code{mark}
@cindex path markers
@anchor{pathmarkers}
@item The next example draws two graphs of an array of coordinate pairs,
using frame alignment and data markers. In the left-hand graph, the
markers, constructed with
@verbatim
marker marker(path g, markroutine markroutine=marknodes,
pen p=currentpen, filltype filltype=NoFill,
bool above=true);
@end verbatim
using the path @code{unitcircle} (@pxref{filltype}), are drawn
below each node. Any frame can be converted to a marker, using
@anchor{marker}
@verbatim
marker marker(frame f, markroutine markroutine=marknodes,
bool above=true);
@end verbatim
In the right-hand graph, the unit @math{n}-sided regular polygon
@code{polygon(int n)} and the unit @math{n}-point cyclic cross
@code{cross(int n, bool round=true, real r=0)} (where @code{r} is an
optional ``inner'' radius) are used to build a custom marker frame.
@anchor{markuniform}
Here @code{markuniform(bool centered=false, int n, bool rotated=false)}
adds this frame at @code{n} uniformly spaced points along the arclength
of the path, optionally rotated by the angle of the local tangent to the path
(if centered is true, the frames will be centered within @code{n} evenly
spaced arclength intervals). Alternatively, one can use
markroutine @code{marknodes} to request that the marks be placed at each
Bezier node of the path, or
markroutine @code{markuniform(pair z(real t), real a, real b, int n)}
to place marks at points @code{z(t)} for n evenly spaced values of
@code{t} in @code{[a,b]}.
These markers are predefined:
@verbatim
marker[] Mark={
marker(scale(circlescale)*unitcircle),
marker(polygon(3)),marker(polygon(4)),
marker(polygon(5)),marker(invert*polygon(3)),
marker(cross(4)),marker(cross(6)),marker(diamond),marker(plus);
};
marker[] MarkFill={
marker(scale(circlescale)*unitcircle,Fill),marker(polygon(3),Fill),
marker(polygon(4),Fill),marker(polygon(5),Fill),
marker(invert*polygon(3),Fill),marker(diamond,Fill)
};
@end verbatim
The example also illustrates the @code{errorbar} routines:
@verbatim
void errorbars(picture pic=currentpicture, pair[] z, pair[] dp,
pair[] dm={}, bool[] cond={}, pen p=currentpen,
real size=0);
void errorbars(picture pic=currentpicture, real[] x, real[] y,
real[] dpx, real[] dpy, real[] dmx={}, real[] dmy={},
bool[] cond={}, pen p=currentpen, real size=0);
@end verbatim
@noindent
Here, the positive and negative extents of the error are given by the
absolute values of the elements of the pair array @code{dp} and the
optional pair array @code{dm}. If @code{dm} is not specified, the
positive and negative extents of the error are assumed to be equal.
@anchor{errorbars}
@cindex error bars
@verbatiminclude errorbars.asy
@sp 1
@center @image{./errorbars}
@cindex custom mark routine
@item A custom mark routine can be also be specified:
@verbatiminclude graphmarkers.asy
@sp 1
@center @image{./graphmarkers}
@item This example shows how to label an axis with arbitrary strings.
@verbatiminclude monthaxis.asy
@sp 1
@center @image{./monthaxis}
@item The next example draws a graph of a parametrized curve.
@cindex parametrized curve
@cindex cropping graphs
@cindex @code{xlimits}
@cindex @code{ylimits}
@cindex @code{limits}
@cindex @code{crop}
The calls to
@verbatim
xlimits(picture pic=currentpicture, real min=-infinity,
real max=infinity, bool crop=NoCrop);
@end verbatim
@noindent
and the analogous function @code{ylimits} can be uncommented
to set the respective axes limits for picture @code{pic} to the
specified @code{min} and @code{max} values. Alternatively, the function
@verbatim
void limits(picture pic=currentpicture, pair min, pair max, bool crop=NoCrop);
@end verbatim
can be used to limit the axes to the box having opposite vertices at
the given pairs). Existing objects in picture @code{pic} will be cropped to lie
within the given limits if @code{crop}=@code{Crop}. The function
@code{crop(picture pic)} can be used to crop a graph to the current
graph limits.
@verbatiminclude parametricgraph.asy
@sp 1
@center @image{./parametricgraph}
@cindex @code{graphwithderiv}
The function
@verbatim
guide graphwithderiv(pair f(real), pair fprime(real), real a, real b,
int n=ngraph#10);
@end verbatim
can be used to construct the graph of the parametric function @code{f}
on @code{[a,b]} with the control points of the @code{n} Bezier
segments determined by the specified derivative @code{fprime}:
@verbatiminclude graphwithderiv.asy
@sp 1
@center @image{./graphwithderiv}
@cindex scaled graph
The next example illustrates how one can extract a common axis scaling
factor.
@verbatiminclude scaledgraph.asy
@sp 1
@center @image{./scaledgraph}
@anchor{automatic scaling}
@cindex automatic scaling
@cindex @code{scale}
@cindex @code{Linear}
@cindex @code{Log}
@cindex automatic scaling
Axis scaling can be requested and/or automatic selection of the
axis limits can be inhibited with one of these @code{scale} routines:
@verbatim
void scale(picture pic=currentpicture, scaleT x, scaleT y);
void scale(picture pic=currentpicture, bool xautoscale=true,
bool yautoscale=xautoscale, bool zautoscale=yautoscale);
@end verbatim
This sets the scalings for picture @code{pic}. The @code{graph} routines
accept an optional @code{picture} argument for determining the appropriate
scalings to use; if none is given, it uses those set for
@code{currentpicture}.
Two frequently used scaling routines
@code{Linear} and @code{Log} are predefined in @code{graph}.
All picture coordinates (including those in paths and those given
to the @code{label} and @code{limits} functions) are always treated as linear
(post-scaled) coordinates. Use
@cindex @code{Scale}
@verbatim
pair Scale(picture pic=currentpicture, pair z);
@end verbatim
to convert a graph coordinate into a scaled picture coordinate.
The @math{x} and @math{y} components can be individually scaled using
the analogous routines
@verbatim
real ScaleX(picture pic=currentpicture, real x);
real ScaleY(picture pic=currentpicture, real y);
@end verbatim
The predefined scaling routines can be given two optional boolean arguments:
@code{automin=false} and @code{automax=automin}. These default to
@code{false} but can be respectively set to @code{true} to enable
automatic selection of "nice" axis minimum and maximum values. The
@code{Linear} scaling can also take as optional final arguments a
multiplicative scaling factor and intercept (e.g.@ for a depth axis,
@code{Linear(-1)} requests axis reversal).
@cindex logarithmic graph
@cindex log-log graph
For example, to draw a log/log graph of a function, use @code{scale(Log,Log)}:
@verbatiminclude loggraph.asy
@sp 1
@center @image{./loggraph}
@cindex grid
By extending the ticks, one can easily produce a logarithmic grid:
@verbatiminclude loggrid.asy
@sp 1
@center @image{./loggrid}
One can also specify custom tick locations and formats for logarithmic axes:
@verbatiminclude logticks.asy
@sp 1
@center @image{./logticks}
@cindex @code{log2} graph
It is easy to draw logarithmic graphs with respect to other bases:
@verbatiminclude log2graph.asy
@sp 1
@center @image{./log2graph}
@cindex broken axis
Here is an example of "broken" linear @math{x} and logarithmic
@math{y} axes that omit the segments [3,8] and [100,1000], respectively.
In the case of a logarithmic axis, the break endpoints are automatically
rounded to the nearest integral power of the base.
@verbatiminclude brokenaxis.asy
@sp 1
@center @image{./brokenaxis}
@cindex secondary axis
@cindex @code{secondaryX}
@cindex @code{secondaryY}
@item @code{Asymptote} can draw secondary axes with the routines
@verbatim
picture secondaryX(picture primary=currentpicture, void f(picture));
picture secondaryY(picture primary=currentpicture, void f(picture));
@end verbatim
In this example, @code{secondaryY} is used to draw a secondary linear
@math{y} axis against a primary logarithmic @math{y} axis:
@verbatiminclude Bode.asy
@sp 1
@center @image{./Bode}
A secondary logarithmic @math{y} axis can be drawn like this:
@verbatiminclude secondaryaxis.asy
@sp 1
@center @image{./secondaryaxis}
@item Here is a histogram example, which uses the @code{stats} module.
@cindex @code{axis}
@verbatiminclude histogram.asy
@sp 1
@center @image{./histogram}
@item Here is an example of reading column data in from a file and a
least-squares fit, using the @code{stats} module.
@cindex @code{leastsquares}
@verbatiminclude leastsquares.asy
@sp 1
@center @image{./leastsquares}
@item Here is an example that illustrates the general @code{axis} routine.
@cindex @code{axis}
@verbatiminclude generalaxis.asy
@sp 1
@center @image{./generalaxis}
@item To draw a vector field of @code{n} arrows evenly spaced along
the arclength of a path, use the routine
@cindex @code{vectorfield}
@verbatim
picture vectorfield(path vector(real), path g, int n, bool truesize=false,
pen p=currentpen, arrowbar arrow=Arrow);
@end verbatim
as illustrated in this simple example of a flow field:
@verbatiminclude flow.asy
@sp 1
@center @image{./flow}
@item To draw a vector field of @code{nx}@math{\times}@code{ny} arrows
in @code{box(a,b)}, use the routine
@cindex @code{vectorfield}
@verbatim
picture vectorfield(path vector(pair), pair a, pair b,
int nx=nmesh, int ny=nx, bool truesize=false,
real maxlength=truesize ? 0 : maxlength(a,b,nx,ny),
bool cond(pair z)=null, pen p=currentpen,
arrowbar arrow=Arrow, margin margin=PenMargin)
@end verbatim
as illustrated in this example:
@verbatiminclude vectorfield.asy
@sp 1
@center @image{./vectorfield}
@item The following scientific graphs, which illustrate many features of
@code{Asymptote}'s graphics routines, were generated from the examples
@code{@uref{
https://asymptote.sourceforge.io/gallery/2Dgraphs/diatom.svg,,diatom}@uref{
https://asymptote.sourceforge.io/gallery/2Dgraphs/diatom.asy,,.asy}} and @code{@uref{
https://asymptote.sourceforge.io/gallery/2Dgraphs/westnile.svg,,westnile}@uref{
https://asymptote.sourceforge.io/gallery/2Dgraphs/westnile.asy,,.asy}}, using the comma-separated
data in @code{@uref{
https://asymptote.sourceforge.io/gallery/2Dgraphs/diatom.csv,,diatom.csv}} and @code{@uref{
https://asymptote.sourceforge.io/gallery/2Dgraphs/westnile.csv,,westnile.csv}}.
@page
@sp 1
@center @image{./diatom}
@sp 1
@center @image{./westnile,,7.5cm}
@end enumerate
@page
@node palette
@section @code{palette}
@anchor{images}
@cindex images
@code{Asymptote} can also generate color density images
and palettes. The following palettes are predefined in
@code{palette.asy}:
@table @code
@cindex @code{Grayscale}
@item pen[] Grayscale(int NColors=256)
a grayscale palette;
@cindex @code{Rainbow}
@item pen[] Rainbow(int NColors=32766)
a rainbow spectrum;
@cindex @code{BWRainbow}
@item pen[] BWRainbow(int NColors=32761)
a rainbow spectrum tapering off to black/white at the ends;
@cindex @code{BWRainbow2}
@item pen[] BWRainbow2(int NColors=32761)
a double rainbow palette tapering off to black/white at the ends, with
a linearly scaled intensity.
@cindex @code{Wheel}
@item pen[] Wheel(int NColors=32766)
a full color wheel palette;
@cindex @code{Gradient}
@item pen[] Gradient(int NColors=256 ... pen[] p)
a palette varying linearly over the specified array of pens, using
NColors in each interpolation interval;
@end table
The function @code{cmyk(pen[] Palette)} may be used to convert any
of these palettes to the @acronym{CMYK} colorspace.
A color density plot using palette @code{palette} can be generated from
a function @code{f}(@math{x},@math{y}) and added to a picture @code{pic}:
@cindex @code{image}
@verbatim
bounds image(picture pic=currentpicture, real f(real, real),
range range=Full, pair initial, pair final,
int nx=ngraph, int ny=nx, pen[] palette, int divs=0,
bool antialias=false)
@end verbatim
The function @code{f} will be sampled at @code{nx} and @code{ny}
evenly spaced points over a rectangle defined by the points
@code{initial} and @code{final}, respecting the current graphical
scaling of @code{pic}. The color space is scaled according to the
@math{z} axis scaling (@pxref{automatic scaling}). If @math{@code{divs} > 1},
the palette is quantized to @math{@code{divs}-1} values. A @code{bounds} structure
for the function values is returned:
@cindex @code{bounds}
@verbatim
struct bounds {
real min;
real max;
// Possible tick intervals:
int[] divisor;
}
@end verbatim
@noindent
This information can be used for generating an optional palette bar.
The palette color space corresponds to a range of values specified by
the argument @code{range}, which can be @code{Full}, @code{Automatic},
or an explicit range @code{Range(real min, real max)}. (The type @code{range} is
defined in @code{palette.asy}.)
Here @code{Full} specifies a range varying from the
minimum to maximum values of the function over the sampling interval,
while @code{Automatic} selects "nice" limits.
The examples
@code{@uref{
https://asymptote.sourceforge.io/gallery/2Dgraphs/fillcontour.svg,,fillcontour}@uref{
https://asymptote.sourceforge.io/gallery/2Dgraphs/fillcontour.asy,,.asy}}
and
@code{@uref{
https://asymptote.sourceforge.io/gallery/2Dgraphs/imagecontour.svg,,imagecontour}@uref{
https://asymptote.sourceforge.io/gallery/2Dgraphs/imagecontour.asy,,.asy}}
illustrate how level sets (contour lines) can be drawn on a color
density plot (@pxref{contour}).
A color density plot can also be generated from an explicit real[][]
array @code{data}:
@cindex @code{image}
@verbatim
bounds image(picture pic=currentpicture, real[][] f, range range=Full,
pair initial, pair final, pen[] palette, int divs=0,
bool transpose=(initial.x < final.x && initial.y < final.y),
bool copy=true, bool antialias=false);
@end verbatim
@noindent
If the initial point is to the left and below the final point,
by default the array indices are interpreted according to the
Cartesian convention (first index: @math{x}, second index: @math{y})
rather than the usual matrix convention (first index: @math{-y},
second index: @math{x}).
To construct an image from an array of irregularly spaced points
and an array of values @code{f} at these points, use one of the routines
@verbatim
bounds image(picture pic=currentpicture, pair[] z, real[] f,
range range=Full, pen[] palette)
bounds image(picture pic=currentpicture, real[] x, real[] y, real[] f,
range range=Full, pen[] palette)
@end verbatim
An optionally labelled palette bar may be generated with the routine
@verbatim
void palette(picture pic=currentpicture, Label L="", bounds bounds,
pair initial, pair final, axis axis=Right, pen[] palette,
pen p=currentpen, paletteticks ticks=PaletteTicks,
bool copy=true, bool antialias=false);
@end verbatim
The color space of @code{palette} is taken to be over bounds @code{bounds} with
scaling given by the @math{z} scaling of @code{pic}.
The palette orientation is specified by @code{axis}, which may be one of
@code{Right}, @code{Left}, @code{Top}, or @code{Bottom}.
The bar is drawn over the rectangle from @code{initial} to @code{final}.
The argument @code{paletteticks} is a special tick type (@pxref{ticks})
that takes the following arguments:
@verbatim
paletteticks PaletteTicks(Label format="", ticklabel ticklabel=null,
bool beginlabel=true, bool endlabel=true,
int N=0, int n=0, real Step=0, real step=0,
pen pTick=nullpen, pen ptick=nullpen);
@end verbatim
The image and palette bar can be fit to a frame and added and
optionally aligned to a picture at the desired location:
@anchor{image}
@verbatiminclude image.asy
@sp 1
@center @image{./image}
Here is an example that uses logarithmic scaling of the function values:
@anchor{logimage}
@verbatiminclude logimage.asy
@sp 1
@center @image{./logimage}
One can also draw an image directly from a two-dimensional pen array
or a function @code{pen f(int, int)}:
@verbatim
void image(picture pic=currentpicture, pen[][] data,
pair initial, pair final,
bool transpose=(initial.x < final.x && initial.y < final.y),
bool copy=true, bool antialias=false);
void image(picture pic=currentpicture, pen f(int, int), int width, int height,
pair initial, pair final,
bool transpose=(initial.x < final.x && initial.y < final.y),
bool antialias=false);
@end verbatim
@noindent
as illustrated in the following examples:
@anchor{penimage}
@verbatiminclude penimage.asy
@sp 1
@center @image{./penimage}
@anchor{penfunctionimage}
@verbatiminclude penfunctionimage.asy
@sp 1
@center @image{./penfunctionimage}
For convenience, the module @code{palette} also defines functions
that may be used to construct a pen array from a given function and palette:
@verbatim
pen[] palette(real[] f, pen[] palette);
pen[][] palette(real[][] f, pen[] palette);
@end verbatim
@node three
@section @code{three}
@cindex @code{three}
@cindex @code{guide3}
@cindex @code{path3}
@cindex @code{cycle}
@cindex @code{curl}
@cindex @code{tension}
@cindex @code{controls}
This module fully extends the notion of guides and paths in @code{Asymptote}
to three dimensions. It introduces the new types guide3, path3, and surface.
Guides in three dimensions are specified with the same syntax as in two
dimensions except that triples @code{(x,y,z)} are used in place of pairs
@code{(x,y)} for the nodes and direction specifiers. This
generalization of John Hobby's spline algorithm is shape-invariant under
three-dimensional rotation, scaling, and shifting, and reduces in the
planar case to the two-dimensional algorithm used in @code{Asymptote},
@code{MetaPost}, and @code{MetaFont} [see J. C. Bowman, Proceedings in
Applied Mathematics and Mechanics, 7:1, 2010021-2010022 (2007)].
For example, a unit circle in the @math{XY} plane may be filled and
drawn like this:
@verbatiminclude unitcircle3.asy
@sp 1
@center @image{./unitcircle3}
@noindent
and then distorted into a saddle:
@verbatiminclude saddle.asy
@sp 1
@center @image{./saddle}
@noindent
Module @code{three} provides constructors for converting two-dimensional
paths to three-dimensional ones, and vice-versa:
@cindex @code{path3}
@cindex @code{path}
@verbatim
path3 path3(path p, triple plane(pair)=XYplane);
path path(path3 p, pair P(triple)=xypart);
@end verbatim
@cindex @code{surface}
@cindex @code{render}
@cindex @code{defaultrender}
A Bezier surface, the natural two-dimensional generalization of Bezier
curves, is defined in @code{three_surface.asy} as a structure
containing an array of Bezier patches. Surfaces may drawn with one of
the routines
@verbatim
void draw(picture pic=currentpicture, surface s, int nu=1, int nv=1,
material surfacepen=currentpen, pen meshpen=nullpen,
light light=currentlight, light meshlight=nolight, string name="",
render render=defaultrender);
void draw(picture pic=currentpicture, surface s, int nu=1, int nv=1,
material[] surfacepen, pen meshpen,
light light=currentlight, light meshlight=nolight, string name="",
render render=defaultrender);
void draw(picture pic=currentpicture, surface s, int nu=1, int nv=1,
material[] surfacepen, pen[] meshpen=nullpens,
light light=currentlight, light meshlight=nolight, string name="",
render render=defaultrender);
@end verbatim
The parameters @code{nu} and @code{nv} specify the number of subdivisions
for drawing optional mesh lines for each Bezier patch. The optional
@code{name} parameter is used as a prefix for naming the surface
patches in the @acronym{PRC} model tree.
Here material is a structure defined in @code{three_light.asy}:
@cindex @code{material}
@cindex @code{diffusepen}
@cindex @code{emissivepen}
@cindex @code{specularpen}
@cindex @code{opacity}
@cindex @code{shininess}
@cindex @code{metallic}
@cindex @code{freshnel0}
@verbatim
struct material {
pen[] p; // diffusepen,emissivepen,specularpen
real opacity;
real shininess;
real metallic;
real fresnel0;
}
@end verbatim
@noindent
@cindex @code{PBR}
@cindex @code{physically based rendering}
These material properties are used to implement physically based
rendering (PBR) using light properties defined in @code{plain_prethree.asy}
and @code{three_light.asy}:
@cindex @code{light}
@cindex @code{diffuse}
@cindex @code{specular}
@cindex @code{background}
@cindex @code{specularfactor}
@cindex @code{position}
@cindex @code{currentlight}
@cindex @code{Viewport}
@cindex @code{White}
@cindex @code{Headlamp}
@cindex @code{nolight}
@verbatim
struct light {
real[][] diffuse;
real[][] specular;
pen background=nullpen; // Background color of the canvas.
real specularfactor;
triple[] position; // Only directional lights are currently implemented.
}
light Viewport=light(specularfactor=3,(0.25,-0.25,1));
light White=light(new pen[] {rgb(0.38,0.38,0.45),rgb(0.6,0.6,0.67),
rgb(0.5,0.5,0.57)},specularfactor=3,
new triple[] {(-2,-1.5,-0.5),(2,1.1,-2.5),(-0.5,0,2)});
light Headlamp=light(gray(0.8),specular=gray(0.7),
specularfactor=3,dir(42,48));
currentlight=Headlamp;
light nolight;
@end verbatim
@cindex @code{background}
@cindex @code{transparent}
The @code{currentlight.background} (or @code{background} member of the
specified @code{light}) can be used
to set the background color for 2D (or 3D) images. The default
background is white for @code{HTML} images and transparent for all
other formats. One can request a completely transparent background for
3D @code{WebGL} images with
@code{currentlight.background=black+opacity(0.0);}
@code{render}
A function @code{render()} may be assigned to the optional
@code{render} parameter allows one to pass specialized rendering
options to the surface drawing routines, via arguments such as:
@verbatim
bool tessellate; // use tessellated mesh to store straight patches
real margin; // shrink amount for rendered OpenGL viewport, in bp.
bool partnames; // assign part name indices to compound objects
bool defaultnames; // assign default names to unnamed objects
interaction interaction; // billboard interaction mode
@end verbatim
along with the rendering parameters for the legacy @acronym{PRC} format
described in @code{three.asy}.
@cindex image-based lighting
@cindex @code{surface}
@cindex @code{ibl}
Asymptote also supports image-based lighting with the setting
@code{settings.ibl=true}. This uses pre-rendered @acronym{EXR} images from
the directory specified by @code{-imageDir} (which defaults to @code{ibl})
or, for @code{WebGL} rendering, the @acronym{URL} specified by
@code{-imageURL} (which defaults to
@url{
https://vectorgraphics.gitlab.io/asymptote/ibl}).
Additional rendered images can be generated on an @code{NVIDIA} @acronym{GPU}
using the @code{reflect} program in the @code{cudareflect} subdirectory
of the @code{Asymptote} source directory.
Sample Bezier surfaces are
contained in the example files @code{@uref{
https://asymptote.sourceforge.io/gallery/3Dwebgl/BezierSurface.html,,BezierSurface}@uref{
https://asymptote.sourceforge.io/gallery/3Dwebgl/BezierSurface.asy,,.asy}}, @code{@uref{
https://asymptote.sourceforge.io/gallery/3Dwebgl/teapot.html,,teapot}@uref{
https://asymptote.sourceforge.io/gallery/3Dwebgl/teapot.asy,,.asy}},
@code{@uref{
https://asymptote.sourceforge.io/gallery/3Dwebgl/teapotIBL.html,,teapotIBL}@uref{
https://asymptote.sourceforge.io/gallery/3Dwebgl/teapotIBL.asy,,.asy}},
and
@code{@uref{
https://asymptote.sourceforge.io/gallery/3Dwebgl/parametricsurface.html,,parametricsurface}@uref{
https://asymptote.sourceforge.io/gallery/3Dwebgl/parametricsurface.asy,,.asy}}.
The structure @code{render} contains specialized rendering options
documented at the beginning of module @code{three}.
@cindex patch-dependent colors
@cindex vertex-dependent colors
The examples
@code{@uref{
https://asymptote.sourceforge.io/gallery/3Dgraphs/elevation.html,,elevation}@uref{
https://asymptote.sourceforge.io/gallery/3Dgraphs/elevation.asy,,.asy}} and @code{@uref{
https://asymptote.sourceforge.io/gallery/3Dwebgl/sphericalharmonic.html,,sphericalharmonic}@uref{
https://asymptote.sourceforge.io/gallery/3Dwebgl/sphericalharmonic.asy,,.asy}}
illustrate how to draw a surface with patch-dependent colors.
The examples @code{@uref{
https://asymptote.sourceforge.io/gallery/3Dwebgl/vertexshading.html,,vertexshading}@uref{
https://asymptote.sourceforge.io/gallery/3Dwebgl/vertexshading.asy,,.asy}} and @code{@uref{
https://asymptote.sourceforge.io/gallery/3Dgraphs/smoothelevation.html,,smoothelevation}@uref{
https://asymptote.sourceforge.io/gallery/3Dgraphs/smoothelevation.asy,,.asy}} illustrate
vertex-dependent colors, which are supported by
@code{Asymptote}'s native @code{OpenGL}/@code{WebGL} renderers
and the two-dimensional vector output format (@code{settings.render=0}). Since
the legacy @acronym{PRC} output format does not support vertex
shading of Bezier surfaces, @acronym{PRC} patches are shaded with the mean of the four vertex colors.
@cindex @code{surface}
@cindex @code{planar}
@cindex @code{Bezier patch}
@cindex @code{Bezier triangle}
A surface can be constructed from a cyclic @code{path3} with the constructor
@verbatim
surface surface(path3 external, triple[] internal=new triple[],
pen[] colors=new pen[], bool3 planar=default);
@end verbatim
@noindent
and then filled:
@verbatim
draw(surface(unitsquare3,new triple[] {X,Y,Z,O}),red);
draw(surface(O--X{Y}..Y{-X}--cycle,new triple[] {Z}),red);
draw(surface(path3(polygon(5))),red,nolight);
draw(surface(unitcircle3),red,nolight);
draw(surface(unitcircle3,new pen[] {red,green,blue,black}),nolight);
@end verbatim
@noindent
The first example draws a Bezier patch and the second example draws
a Bezier triangle. The third and fourth examples are planar surfaces.
The last example constructs a patch with vertex-specific colors.
A three-dimensional planar surface in the plane @code{plane} can be
constructed from a two-dimensional cyclic path @code{g} with the constructor
@cindex @code{surface}
@verbatim
surface surface(path p, triple plane(pair)=XYplane);
@end verbatim
@noindent
and then filled:
@verbatim
draw(surface((0,0)--E+2N--2E--E+N..0.2E..cycle),red);
@end verbatim
@noindent
@cindex @code{bezulate}
Planar Bezier surfaces patches are constructed using Orest Shardt's
@code{bezulate} routine, which decomposes (possibly nonsimply
connected) regions bounded (according to the @code{zerowinding} fill rule)
by simple cyclic paths (intersecting only at the endpoints)
into subregions bounded by cyclic paths of length @code{4} or less.
A more efficient routine also exists for drawing tessellations
composed of many 3D triangles, with specified vertices, and optional
normals or vertex colors:
@cindex @code{draw}
@cindex @code{triangles}
@cindex @code{tessellation}
@verbatim
void draw(picture pic=currentpicture, triple[] v, int[][] vi,
triple[] n={}, int[][] ni=vi, material m=currentpen, pen[] p={},
int[][] pi=vi, light light=currentlight);
@end verbatim
Here, the triple array @code{v} lists the (typically distinct) vertices, while
the array @code{vi} contains integer arrays of length 3 containing
the indices of the elements in @code{v} that form the vertices of each
triangle. Similarly, the arguments @code{n} and @code{ni} contain
optional normal data and @code{p} and @code{pi} contain optional pen
vertex data. If more than one normal or pen is specified for a vertex, the
last one is used.
An example of this tessellation facility is given in @code{@uref{
https://asymptote.sourceforge.io/gallery/3Dwebgl/triangles.html,,triangles}@uref{
https://asymptote.sourceforge.io/gallery/3Dwebgl/triangles.asy,,.asy}}.
@cindex @code{thin}
@cindex @code{thick}
@cindex @code{tube}
Arbitrary thick three-dimensional curves and line caps (which the
@code{OpenGL} standard does not require implementations to provide) are
constructed with
@verbatim
tube tube(path3 p, real width, render render=defaultrender);
@end verbatim
@noindent
this returns a tube structure representing a tube of diameter @code{width}
centered approximately on @code{g}. The tube structure consists of a
surface @code{s} and the actual tube center, path3 @code{center}.
Drawing thick lines as tubes can be slow to render,
especially with the @code{Adobe Reader} renderer. The setting
@code{thick=false} can be used to disable this feature and force all
lines to be drawn with @code{linewidth(0)} (one pixel wide, regardless
of the resolution). By default, mesh and contour lines in three-dimensions
are always drawn thin, unless an explicit line width is given in the pen
parameter or the setting @code{thin} is set to @code{false}. The pens
@code{thin()} and @code{thick()} defined in @code{plain_pens.asy} can
also be used to override these defaults for specific draw commands.
@noindent
There are six choices for viewing 3D @code{Asymptote} output:
@enumerate
@cindex @code{OpenGL}
@cindex @code{render}
@cindex @code{outformat}
@cindex @code{multisample}
@cindex @code{devicepixelratio}
@cindex @code{position}
@item Use the native @code{Asymptote} adaptive @code{OpenGL}-based
renderer (with the command-line option @code{-V} and the default settings
@code{outformat=""} and @code{render=-1}). On @code{UNIX} systems with
graphics support for multisampling, the sample width can be
controlled with the setting @code{multisample}. The ratio of physical to
logical screen pixels can be specified with the setting @code{devicepixelratio}. An initial screen position can be specified with the pair setting
@code{position}, where negative values are interpreted as relative to the
corresponding maximum screen dimension. The default settings
@cindex mouse bindings
@verbatim
import settings;
leftbutton=new string[] {"rotate","zoom","shift","pan"};
middlebutton=new string[] {""};
rightbutton=new string[] {"zoom","rotateX","rotateY","rotateZ"};
wheelup=new string[] {"zoomin"};
wheeldown=new string[] {"zoomout"};
@end verbatim
bind the mouse buttons as follows:
@itemize
@item Left: rotate
@item Shift Left: zoom
@item Ctrl Left: shift viewport
@item Alt Left: pan
@item Wheel Up: zoom in
@item Wheel Down: zoom out
@item Right: zoom
@item Shift Right: rotate about the X axis
@item Ctrl Right: rotate about the Y axis
@item Alt Right: rotate about the Z axis
@end itemize
The keyboard bindings are:
@cindex keyboard bindings:
@itemize
@item h: home
@item f: toggle fitscreen
@item x: spin about the X axis
@item y: spin about the Y axis
@item z: spin about the Z axis
@item s: stop spinning
@item m: rendering mode (solid/patch/mesh)
@item e: export
@item c: show camera parameters
@item p: play animation
@item r: reverse animation
@item : step animation
@item +: expand
@item =: expand
@item >: expand
@item -: shrink
@item _: shrink
@item <: shrink
@item q: exit
@item Ctrl-q: exit
@end itemize
@cindex @code{WebGL}
@cindex @code{HTML5}
@cindex @code{mobile browser}
@item Generate @code{WebGL} interactive vector graphics
output with the the command-line option and @code{-f html}
(or the setting @code{outformat="html"}). The resulting
3D @acronym{HTML} file can then be viewed directly in any modern desktop or
mobile browser, or even embedded within another web page:
@verbatim
<iframe src="logo3.html" width="561" height="321" frameborder="0">
</iframe>
@end verbatim
@cindex @code{absolute}
Normally, @code{WebGL} files generated by @code{Asymptote} are
dynamically remeshed to fit the browser window dimensions.
However, the setting @code{absolute=true} can be used to force the image to be
rendered at its designed size (accounting for multiple device pixels
per @code{css} pixel).
For specialized applications, the setting @code{keys=true} can be used
to generate an identifying key immediately before the @code{WebGL}
code for each generated object. The default key, the
@code{"line:column"} of the associated function call of the top-level
source code, can be overwritten by adding @code{KEY="x"} as the first
argument of the function call, where @code{x} represents user-supplied
text.
The interactive @code{WebGL} files produced by @code{Asymptote} use the
default mouse and (many of the same) key bindings as the @code{OpenGL}
renderer. Zooming via the mouse wheel of a @code{WebGL} image embedded
within another page is disabled until the image is activated by a
click or touch event and will remain enabled until the @code{ESC} key
is pressed.
By default, viewing the 3D @acronym{HTML} files generated by Asymptote requires
network access to download the @code{AsyGL} rendering library, which
is normally cached by the browser for future use.
However, the setting @code{offline=true} can be used to embed this
small (about 48kB) library within a stand-alone @acronym{HTML} file
that can be viewed offline.
@cindex @code{antialias}
@cindex @code{maxviewport}
@cindex @code{maxtile}
@cindex @code{glOptions}
@cindex @code{iconify}
@cindex @code{black stripes}
@item Render the scene to a specified rasterized format @code{outformat}
at the resolution of @code{n} pixels per @code{bp}, as specified by the
setting @code{render=n}. A negative value of @code{n} is interpreted
as @code{|2n|} for @acronym{EPS} and @acronym{PDF} formats and
@code{|n|} for other formats. The default value of @code{render} is -1.
By default, the scene is internally rendered at twice the specified
resolution; this can be disabled by setting @code{antialias=1}.
High resolution rendering is done by tiling the image. If your
graphics card allows it, the rendering can be made more efficient by
increasing the maximum tile size @code{maxtile} to your screen
dimensions (indicated by @code{maxtile=(0,0)}. If your video card
generates unwanted black stripes in the output, try setting the
horizontal and vertical components of @code{maxtiles} to something
less than your screen dimensions. The tile size is also limited by the
setting @code{maxviewport}, which restricts the maximum width and
height of the viewport. Some graphics drivers support batch mode
(@code{-noV}) rendering in an iconified window; this can be enabled
with the setting @code{iconify=true}.
@cindex @code{prc}
@cindex @code{views}
@item Embed the 3D legacy @acronym{PRC} format in a @acronym{PDF} file
and view the resulting @acronym{PDF} file with
version @code{9.0} or later of @code{Adobe Reader}.
This requires @code{settings.outformat="pdf"} and @code{settings.prc=true},
which can be specified by the command-line options @code{-f pdf}
and @code{-f prc}, put in the @code{Asymptote} configuration
file (@pxref{configuration file}), or specified in the script before
module @code{three} (or @code{graph3}) is imported.
The @code{media9} LaTeX package is also required (@pxref{embed}).
The example @code{@uref{
https://asymptote.sourceforge.io/gallery/3Dwebgl/100d.html,,100d}@uref{
https://asymptote.sourceforge.io/gallery/3Dwebgl/pdb.asy,,.asy}} illustrates
how one can generate a list of predefined views (see @code{100d.views}).
A stationary preview image with a resolution of @code{n} pixels per
@code{bp} can be embedded with the setting @code{render=n}; this allows
the file to be viewed with other @code{PDF} viewers. Alternatively, the
file @code{externalprc.tex} illustrates how the resulting @acronym{PRC} and
rendered image files can be extracted and processed in a separate
@code{LaTeX} file. However, see @ref{LaTeX usage} for an easier way
to embed three-dimensional @code{Asymptote} pictures within @code{LaTeX}.
For specialized applications where only the raw @acronym{PRC} file is
required, specify @code{settings.outformat="prc"}.
The @acronym{PRC} specification is available from
@url{
https://web.archive.org/web/20081204104459/http://livedocs.adobe.com/acrobat_sdk/9/Acrobat9_HTMLHelp/API_References/PRCReference/PRC_Format_Specification/}
@cindex @code{v3d}
@item Output a @acronym{V3D} portable compressed vector graphics file
using @code{settings.outformat="v3d"}, which can be viewed
with an external viewer or converted to an alternate 3D format
using the Python @code{pyv3d} library. @acronym{V3D} content can be automatically embedded within
a @acronym{PDF} file using the options @code{settings.outformat="pdf"} and
@code{settings.v3d=true}. Alternatively, a V3D file @code{file.v3d} may be manually embedded
within a @acronym{PDF} file using the @code{media9} @code{LaTeX} package:
@verbatim
\includemedia[noplaybutton,width=100pt,height=200pt]{}{file.v3d}%
@end verbatim
An online @code{Javascript}-based V3D-aware @code{PDF} viewer is
available at
@url{
https://github.com/vectorgraphics/pdfv3dReader}.
The @acronym{V3D} specification and the
@code{pyv3d} library are available at
@url{
https://github.com/vectorgraphics/v3d}.
A @acronym{V3D} file @code{file.v3d} may be imported and viewed by
@code{Asymptote} either by specifying @code{file.v3d} on the command line
@verbatim
asy -V file.v3d
@end verbatim
or using the @code{v3d} module and @code{importv3d} function in
interactive mode (or within an @code{Asymptote} file):
@cindex @code{importv3d}
@verbatim
import v3d;
importv3d("file.v3d");
@end verbatim
@item Project the scene to a two-dimensional vector (@acronym{EPS} or
@acronym{PDF}) format with @code{render=0}. Only limited support for
hidden surface removal, lighting, and transparency is available with
this approach (@pxref{PostScript3D}).
@end enumerate
@cindex double deferred drawing
Automatic picture sizing in three dimensions is accomplished with double
deferred drawing. The maximal desired dimensions of the scene in each of
the three dimensions can optionally be specified with the routine
@cindex @code{size3}
@verbatim
void size3(picture pic=currentpicture, real x, real y=x, real z=y,
bool keepAspect=pic.keepAspect);
@end verbatim
@noindent
@cindex margins
@cindex @code{viewportmargin}
@cindex @code{viewportsize}
A simplex linear programming problem is then solved to
produce a 3D version of a frame (actually implemented as a 3D picture).
The result is then fit with another application of deferred drawing
to the viewport dimensions corresponding to the usual two-dimensional
picture @code{size} parameters. The global pair @code{viewportmargin}
may be used to add horizontal and vertical margins to the viewport
dimensions. Alternatively, a minimum @code{viewportsize} may be specified.
A 3D picture @code{pic} can be explicitly fit to a 3D frame by calling
@cindex @code{fit3}
@verbatim
frame pic.fit3(projection P=currentprojection);
@end verbatim
@noindent
and then added to picture @code{dest} about @code{position} with
@cindex @code{add}
@verbatim
void add(picture dest=currentpicture, frame src, triple position=(0,0,0));
@end verbatim
@cindex @code{O}
@cindex @code{X}
@cindex @code{Y}
@cindex @code{Z}
@cindex @code{unitcircle}
For convenience, the @code{three} module defines @code{O=(0,0,0)},
@code{X=(1,0,0)}, @code{Y=(0,1,0)}, and @code{Z=(0,0,1)}, along with a
unitcircle in the XY plane:
@verbatim
path3 unitcircle3=X..Y..-X..-Y..cycle;
@end verbatim
@cindex @code{circle}
A general (approximate) circle can be drawn perpendicular to the direction
@code{normal} with the routine
@verbatim
path3 circle(triple c, real r, triple normal=Z);
@end verbatim
@cindex @code{arc}
A circular arc centered at @code{c} with radius @code{r} from
@code{c+r*dir(theta1,phi1)} to @code{c+r*dir(theta2,phi2)},
drawing counterclockwise relative to the normal vector
@code{cross(dir(theta1,phi1),dir(theta2,phi2))} if @code{theta2 > theta1}
or if @code{theta2 == theta1} and @code{phi2 >= phi1}, can be constructed with
@verbatim
path3 arc(triple c, real r, real theta1, real phi1, real theta2, real phi2,
triple normal=O);
@end verbatim
The normal must be explicitly specified if @code{c} and the endpoints
are colinear. If @code{r} < 0, the complementary arc of radius
@code{|r|} is constructed.
For convenience, an arc centered at @code{c} from triple @code{v1} to
@code{v2} (assuming @code{|v2-c|=|v1-c|}) in the direction CCW
(counter-clockwise) or CW (clockwise) may also be constructed with
@verbatim
path3 arc(triple c, triple v1, triple v2, triple normal=O,
bool direction=CCW);
@end verbatim
@noindent
When high accuracy is needed, the routines @code{Circle} and
@code{Arc} defined in @code{graph3} may be used instead.
See @ref{GaussianSurface} for an example of a three-dimensional circular arc.
@cindex @code{plane}
The representation @code{O--O+u--O+u+v--O+v--cycle}
of the plane passing through point @code{O} with normal
@code{cross(u,v)} is returned by
@verbatim
path3 plane(triple u, triple v, triple O=O);
@end verbatim
A three-dimensional box with opposite vertices at triples @code{v1}
and @code{v2} may be drawn with the function
@cindex @code{box}
@verbatim
path3[] box(triple v1, triple v2);
@end verbatim
@noindent
For example, a unit box is predefined as
@cindex @code{box}
@cindex @code{unitbox}
@verbatim
path3[] unitbox=box(O,(1,1,1));
@end verbatim
@code{Asymptote} also provides optimized definitions for the
three-dimensional paths @code{unitsquare3} and @code{unitcircle3},
along with the surfaces @code{unitdisk}, @code{unitplane}, @code{unitcube},
@code{unitcylinder}, @code{unitcone}, @code{unitsolidcone},
@code{unitfrustum(real t1, real t2)}, @code{unitsphere}, and
@code{unithemisphere}.
@noindent
These projections to two dimensions are predefined:
@table @code
@item oblique
@item oblique(real angle)
@cindex @code{oblique}
@cindex @code{obliqueZ}
The point @code{(x,y,z)} is projected to @code{(x-0.5z,y-0.5z)}.
If an optional real argument is given, the
negative @math{z} axis is drawn at this angle in degrees.
The projection @code{obliqueZ} is a synonym for @code{oblique}.
@item obliqueX
@item obliqueX(real angle)
@cindex @code{obliqueX}
The point @code{(x,y,z)} is projected to @code{(y-0.5x,z-0.5x)}.
If an optional real argument is given, the
negative @math{x} axis is drawn at this angle in degrees.
@item obliqueY
@item obliqueY(real angle)
@cindex @code{obliqueY}
The point @code{(x,y,z)} is projected to @code{(x+0.5y,z+0.5y)}.
If an optional real argument is given, the
positive @math{y} axis is drawn at this angle in degrees.
@cindex @code{orthographic}
@cindex @code{up}
@cindex @code{target}
@cindex @code{showtarget}
@cindex @code{center}
@item orthographic(triple camera, triple up=Z, triple target=O, @*@ @ @ @ @ @ @ @ @ @ @ @ @ real zoom=1, pair viewportshift=0, bool showtarget=true, @*@ @ @ @ @ @ @ @ @ @ @ @ @ bool center=true)
This projects from three to two dimensions using the view as seen at a point
infinitely far away in the direction @code{unit(camera)}, orienting the camera
so that, if possible, the vector @code{up} points upwards. Parallel
lines are projected to parallel lines. The bounding volume is expanded
to include @code{target} if @code{showtarget=true}.
If @code{center=true}, the target will be adjusted to the center of the
bounding volume.
@item orthographic(real x, real y, real z, triple up=Z, triple target=O, @*@ @ @ @ @ @ @ @ @ @ @ @ @ real zoom=1, pair viewportshift=0, bool showtarget=true, @*@ @ @ @ @ @ @ @ @ @ @ @ @ bool center=true)
This is equivalent to
@verbatim
orthographic((x,y,z),up,target,zoom,viewportshift,showtarget,center)
@end verbatim
The routine
@cindex @code{camera}
@verbatim
triple camera(real alpha, real beta);
@end verbatim
can be used to compute the camera position with the @math{x} axis below
the horizontal at angle @code{alpha}, the @math{y} axis below the horizontal
at angle @code{beta}, and the @math{z} axis up.
@cindex @code{autoadjust}
@item perspective(triple camera, triple up=Z, triple target=O, @*@ @ @ @ @ @ @ @ @ @ @ @ real zoom=1, real angle=0, pair viewportshift=0, @*@ @ @ @ @ @ @ @ @ @ @ @ bool showtarget=true, bool autoadjust=true, @*@ @ @ @ @ @ @ @ @ @ @ @ bool center=autoadjust)
@cindex @code{perspective}
This projects from three to two dimensions, taking account of
perspective, as seen from the location @code{camera} looking at @code{target},
orienting the camera so that, if possible, the vector @code{up} points upwards.
If @code{autoadjust=true},
the camera will automatically be adjusted to lie outside the bounding volume
for all possible interactive rotations about @code{target}.
If @code{center=true}, the target will be adjusted to the center of the
bounding volume.
@item perspective(real x, real y, real z, triple up=Z, triple target=O, @*@ @ @ @ @ @ @ @ @ @ @ @ real zoom=1, real angle=0, pair viewportshift=0, @*@ @ @ @ @ @ @ @ @ @ @ @ bool showtarget=true, bool autoadjust=true, @*@ @ @ @ @ @ @ @ @ @ @ @ bool center=autoadjust)
This is equivalent to
@verbatim
perspective((x,y,z),up,target,zoom,angle,viewportshift,showtarget,
autoadjust,center)
@end verbatim
@end table
@cindex @code{currentprojection}
@noindent
The default projection, @code{currentprojection}, is initially set to
@code{perspective(5,4,2)}.
@cindex @code{LeftView}
@cindex @code{RightView}
@cindex @code{FrontView}
@cindex @code{BackView}
@cindex @code{BottomView}
@cindex @code{TopView}
We also define standard orthographic views used in technical drawing:
@verbatim
projection LeftView=orthographic(-X,showtarget=true);
projection RightView=orthographic(X,showtarget=true);
projection FrontView=orthographic(-Y,showtarget=true);
projection BackView=orthographic(Y,showtarget=true);
projection BottomView=orthographic(-Z,showtarget=true);
projection TopView=orthographic(Z,showtarget=true);
@end verbatim
@noindent
The function
@cindex @code{addViews}
@verbatim
void addViews(picture dest=currentpicture, picture src,
projection[][] views=SixViewsUS,
bool group=true, filltype filltype=NoFill);
@end verbatim
@noindent
adds to picture @code{dest} an array of views of picture @code{src}
using the layout projection[][] @code{views}. The default layout
@code{SixViewsUS} aligns the projection @code{FrontView} below
@code{TopView} and above @code{BottomView}, to the right of
@code{LeftView} and left of @code{RightView} and @code{BackView}.
The predefined layouts are:
@cindex @code{ThreeViewsUS}
@cindex @code{SixViewsUS}
@cindex @code{ThreeViewsFR}
@cindex @code{SixViewsFR}
@cindex @code{ThreeViews}
@cindex @code{SixViews}
@verbatim
projection[][] ThreeViewsUS={{TopView},
{FrontView,RightView}};
projection[][] SixViewsUS={{null,TopView},
{LeftView,FrontView,RightView,BackView},
{null,BottomView}};
projection[][] ThreeViewsFR={{RightView,FrontView},
{null,TopView}};
projection[][] SixViewsFR={{null,BottomView},
{RightView,FrontView,LeftView,BackView},
{null,TopView}};
projection[][] ThreeViews={{FrontView,TopView,RightView}};
projection[][] SixViews={{FrontView,TopView,RightView},
{BackView,BottomView,LeftView}};
@end verbatim
A triple or path3 can be projected to a pair or path,
with @code{project(triple, projection P=currentprojection)} or
@code{project(path3, projection P=currentprojection)}.
It is occasionally useful to be able to invert a projection, sending
a pair @code{z} onto the plane perpendicular to @code{normal} and passing
through @code{point}:
@cindex @code{invert}
@verbatim
triple invert(pair z, triple normal, triple point,
projection P=currentprojection);
@end verbatim
@noindent
A pair @code{z} on the projection plane can be inverted to a triple
with the routine
@verbatim
triple invert(pair z, projection P=currentprojection);
@end verbatim
@noindent
A pair direction @code{dir} on the projection plane can be inverted to
a triple direction relative to a point @code{v} with the routine
@verbatim
triple invert(pair dir, triple v, projection P=currentprojection).
@end verbatim
@cindex @code{transform3}
@cindex @code{identity4}
Three-dimensional objects may be transformed with one of the following
built-in transform3 types (the identity transformation is @code{identity4}):
@table @code
@item shift(triple v)
@cindex @code{shift}
translates by the triple @code{v};
@item xscale3(real x)
@cindex @code{xscale3}
scales by @code{x} in the @math{x} direction;
@item yscale3(real y)
@cindex @code{yscale3}
scales by @code{y} in the @math{y} direction;
@item zscale3(real z)
@cindex @code{zscale3}
scales by @code{z} in the @math{z} direction;
@item scale3(real s)
@cindex @code{scale3}
scales by @code{s} in the @math{x}, @math{y}, and @math{z} directions;
@item scale(real x, real y, real z)
@cindex @code{scale}
scales by @code{x} in the @math{x} direction,
by @code{y} in the @math{y} direction, and by @code{z} in the @math{z}
direction;
@cindex @code{rotate}
@item rotate(real angle, triple v)
rotates by @code{angle} in degrees about the axis @code{O--v};
@item rotate(real angle, triple u, triple v)
rotates by @code{angle} in degrees about the axis @code{u--v};
@item reflect(triple u, triple v, triple w)
reflects about the plane through @code{u}, @code{v}, and @code{w}.
@cindex @code{XY}
@end table
When not multiplied on the left by a transform3, three-dimensional
@TeX{} Labels are drawn as Bezier surfaces directly on the projection plane:
@cindex @code{label}
@verbatim
void label(picture pic=currentpicture, Label L, triple position,
align align=NoAlign, pen p=currentpen,
light light=nolight, string name="",
render render=defaultrender, interaction interaction=
settings.autobillboard ? Billboard : Embedded)
@end verbatim
@noindent
@cindex @code{Billboard}
@cindex @code{Embedded}
The optional @code{name} parameter is used as a prefix for naming the label
patches in the @acronym{PRC} model tree.
The default interaction is @code{Billboard}, which means that labels
are rotated interactively so that they always face the camera.
The interaction @code{Embedded} means that the label interacts as a
normal @code{3D} surface, as illustrated in the example @code{@uref{
https://asymptote.sourceforge.io/gallery/3Dwebgl/billboard.html,,billboard}@uref{
https://asymptote.sourceforge.io/gallery/3Dwebgl/billboard.asy,,.asy}}.
@cindex @code{transform}
@cindex @code{XY}
@cindex @code{YZ}
@cindex @code{ZX}
@cindex @code{YX}
@cindex @code{ZY}
@cindex @code{ZX}
Alternatively, a label can be transformed from the @code{XY} plane by an
explicit transform3 or mapped to a specified two-dimensional plane with
the predefined transform3 types @code{XY}, @code{YZ}, @code{ZX}, @code{YX},
@code{ZY}, @code{ZX}. There are also modified versions of these
transforms that take an optional argument @code{projection
P=currentprojection} that rotate and/or flip the label so that it is
more readable from the initial viewpoint.
@cindex @code{planeproject}
A transform3 that projects in the direction @code{dir} onto the plane
with normal @code{n} through point @code{O} is returned by
@verbatim
transform3 planeproject(triple n, triple O=O, triple dir=n);
@end verbatim
@noindent
One can use
@cindex @code{normal}
@verbatim
triple normal(path3 p);
@end verbatim
@noindent
to find the unit normal vector to a planar three-dimensional path @code{p}.
As illustrated in the example @code{@uref{
https://asymptote.sourceforge.io/gallery/3Dgraphs/planeproject.html,,planeproject}@uref{
https://asymptote.sourceforge.io/gallery/3Dgraphs/planeproject.asy,,.asy}}, a transform3
that projects in the direction @code{dir} onto the plane defined by a
planar path @code{p} is returned by
@verbatim
transform3 planeproject(path3 p, triple dir=normal(p));
@end verbatim
The functions
@cindex @code{extrude}
@verbatim
surface extrude(path p, triple axis=Z);
surface extrude(Label L, triple axis=Z);
@end verbatim
@noindent
return the surface obtained by extruding path @code{p} or
Label @code{L} along @code{axis}.
@cindex @code{length}
@cindex @code{size}
@cindex @code{point}
@cindex @code{dir}
@cindex @code{accel}
@cindex @code{radius}
@cindex @code{precontrol}
@cindex @code{postcontrol}
@cindex @code{arclength}
@cindex @code{arctime}
@cindex @code{reverse}
@cindex @code{subpath}
@cindex @code{intersect}
@cindex @code{intersections}
@cindex @code{intersectionpoint}
@cindex @code{intersectionpoints}
@cindex @code{min}
@cindex @code{max}
@cindex @code{cyclic}
@cindex @code{straight}
Three-dimensional versions of the path functions @code{length},
@code{size}, @code{point}, @code{dir}, @code{accel}, @code{radius},
@code{precontrol}, @code{postcontrol},
@code{arclength}, @code{arctime}, @code{reverse}, @code{subpath},
@code{intersect}, @code{intersections}, @code{intersectionpoint},
@code{intersectionpoints}, @code{min}, @code{max}, @code{cyclic}, and
@code{straight} are also defined.
The routine
@cindex @code{intersections}
@verbatim
real[] intersect(path3 p, surface s, real fuzz=-1);
@end verbatim
@noindent
returns a real array of length 3 containing the intersection times, if any,
of a path @code{p} with a surface @code{s}.
The routine
@verbatim
real[][] intersections(path3 p, surface s, real fuzz=-1);
@end verbatim
@noindent
returns all (unless there are infinitely many) intersection times of a
path @code{p} with a surface @code{s} as a sorted array of real arrays
of length 3, and
@cindex @code{intersectionpoints}
@verbatim
triple[] intersectionpoints(path3 p, surface s, real fuzz=-1);
@end verbatim
@noindent
returns the corresponding intersection points.
Here, the computations are performed to the absolute error specified by
@code{fuzz}, or if @code{fuzz < 0}, to machine precision.
The routine
@cindex @code{orient}
@verbatim
real orient(triple a, triple b, triple c, triple d);
@end verbatim
@noindent
is a numerically robust computation of @code{dot(cross(a-d,b-d),c-d)},
which is the determinant
@verbatim
|a.x a.y a.z 1|
|b.x b.y b.z 1|
|c.x c.y c.z 1|
|d.x d.y d.z 1|
@end verbatim
The result is negative (positive) if @code{a}, @code{b}, @code{c} appear in
counterclockwise (clockwise) order when viewed from @code{d} or zero
if all four points are coplanar.
The routine
@cindex @code{insphere}
@verbatim
real insphere(triple a, triple b, triple c, triple d, triple e);
@end verbatim
@noindent
returns a positive (negative) value if @code{e} lies inside (outside)
the sphere passing through points @code{a,b,c,d} oriented so that
@code{dot(cross(a-d,b-d),c-d)} is positive,
or zero if all five points are cospherical.
The value returned is the determinant
@verbatim
|a.x a.y a.z a.x^2+a.y^2+a.z^2 1|
|b.x b.y b.z b.x^2+b.y^2+b.z^2 1|
|c.x c.y c.z c.x^2+c.y^2+c.z^2 1|
|d.x d.y d.z d.x^2+d.y^2+d.z^2 1|
|e.x e.y e.z e.x^2+e.y^2+e.z^2 1|
@end verbatim
Here is an example showing all five guide3 connectors:
@verbatiminclude join3.asy
@sp 1
@center @image{./join3}
@cindex @code{BeginBar3}
@cindex @code{EndBar3}
@cindex @code{Bar3}
@cindex @code{Bars3}
@cindex @code{BeginArrow3}
@cindex @code{MidArrow3}
@cindex @code{EndArrow3}
@cindex @code{Arrow3}
@cindex @code{Arrows3}
@cindex @code{BeginArcArrow3}
@cindex @code{MidArcArrow3}
@cindex @code{EndArcArrow3}
@cindex @code{ArcArrow3}
@cindex @code{ArcArrows3}
@cindex @code{DefaultHead3}
@cindex @code{HookHead3}
@cindex @code{TeXHead3}
Three-dimensional versions of bars or arrows can be drawn with one of
the specifiers @code{None}, @code{Blank},
@code{BeginBar3}, @code{EndBar3} (or equivalently @code{Bar3}), @code{Bars3},
@code{BeginArrow3}, @code{MidArrow3},
@code{EndArrow3} (or equivalently @code{Arrow3}), @code{Arrows3},
@code{BeginArcArrow3}, @code{EndArcArrow3} (or equivalently
@code{ArcArrow3}), @code{MidArcArrow3}, and @code{ArcArrows3}.
Three-dimensional bars accept the optional arguments @code{(real size=0,
triple dir=O)}. If @code{size=O}, the default bar length is used; if
@code{dir=O}, the bar is drawn perpendicular to the path
and the initial viewing direction. The predefined three-dimensional
arrowhead styles are @code{DefaultHead3}, @code{HookHead3}, @code{TeXHead3}.
Versions of the two-dimensional arrowheads lifted to three-dimensional
space and aligned according to the initial viewpoint (or an optionally
specified @code{normal} vector) are also defined:
@code{DefaultHead2(triple normal=O)}, @code{HookHead2(triple normal=O)},
@code{TeXHead2(triple normal=O)}. These are illustrated in the example
@code{@uref{
https://asymptote.sourceforge.io/gallery/3Dwebgl/arrows3.html,,arrows3}@uref{
https://asymptote.sourceforge.io/gallery/3Dwebgl/arrows3.asy,,.asy}}.
@cindex @code{NoMargin3}
@cindex @code{BeginMargin3}
@cindex @code{EndMargin3}
@cindex @code{Margin3}
@cindex @code{Margins3}
@cindex @code{BeginPenMargin2}
@cindex @code{EndPenMargin2}
@cindex @code{PenMargin2}
@cindex @code{PenMargins2}
@cindex @code{BeginPenMargin3}
@cindex @code{EndPenMargin3}
@cindex @code{PenMargin3}
@cindex @code{PenMargins3}
@cindex @code{BeginDotMargin3}
@cindex @code{EndDotMargin3}
@cindex @code{DotMargin3}
@cindex @code{DotMargins3}
@cindex @code{Margin3}
@cindex @code{TrueMargin3}
Module @code{three} also defines the three-dimensional margins
@code{NoMargin3}, @code{BeginMargin3}, @code{EndMargin3},
@code{Margin3}, @code{Margins3},
@code{BeginPenMargin2}, @code{EndPenMargin2}, @code{PenMargin2},
@code{PenMargins2},
@code{BeginPenMargin3}, @code{EndPenMargin3}, @code{PenMargin3},
@code{PenMargins3},
@code{BeginDotMargin3}, @code{EndDotMargin3}, @code{DotMargin3},
@code{DotMargins3}, @code{Margin3}, and @code{TrueMargin3}.
@cindex @code{pixel}
The routine
@verbatim
void pixel(picture pic=currentpicture, triple v, pen p=currentpen,
real width=1);
@end verbatim
@noindent
can be used to draw on picture @code{pic} a pixel of width @code{width} at
position @code{v} using pen @code{p}.
Further three-dimensional examples are provided in the files
@code{@uref{
https://asymptote.sourceforge.io/gallery/3Dgraphs/near_earth.html,,near_earth}@uref{
https://asymptote.sourceforge.io/gallery/3Dgraphs/near_earth.asy,,.asy}}, @code{@uref{
https://asymptote.sourceforge.io/gallery/3Dwebgl/conicurv.html,,conicurv}@uref{
https://asymptote.sourceforge.io/gallery/3Dwebgl/conicurv.asy,,.asy}}, and (in the @code{animations}
subdirectory) @code{@uref{
https://asymptote.sourceforge.io/gallery/3Dwebgl/cube.html,,cube}@uref{
https://asymptote.sourceforge.io/gallery/3Dwebgl/cube.asy,,.asy}}.
@anchor{PostScript3D}
@cindex 3D @code{PostScript}
Limited support for projected vector graphics (effectively three-dimensional
nonrendered @code{PostScript}) is available with the setting
@code{render=0}. This currently only works for piecewise planar
surfaces, such as those produced by the parametric @code{surface}
routines in the @code{graph3} module. Surfaces produced by the
@code{solids} module will also be properly rendered if the parameter
@code{nslices} is sufficiently large.
@cindex hidden surface removal
@cindex @code{face}
In the module @code{bsp}, hidden surface removal of planar pictures is
implemented using a binary space partition and picture clipping.
A planar path is first converted to a structure @code{face} derived from
@code{picture}. A @code{face} may be given to a two-dimensional drawing
routine in place of any @code{picture} argument. An array of such faces
may then be drawn, removing hidden surfaces:
@verbatim
void add(picture pic=currentpicture, face[] faces,
projection P=currentprojection);
@end verbatim
Labels may be projected to two dimensions, using projection @code{P},
onto the plane passing through point @code{O} with normal
@code{cross(u,v)} by multiplying it on the left by the transform
@verbatim
transform transform(triple u, triple v, triple O=O,
projection P=currentprojection);
@end verbatim
Here is an example that shows how a binary space partition may be used to draw a
two-dimensional vector graphics projection of three orthogonal
intersecting planes:
@verbatiminclude planes.asy
@sp 1
@center @image{./planes}
@node obj
@section @code{obj}
@cindex @code{obj}
This module allows one to construct surfaces from simple obj files,
as illustrated in the example files @code{@uref{
https://asymptote.sourceforge.io/gallery/3Dwebgl/galleon.html,,galleon}@uref{
https://asymptote.sourceforge.io/gallery/3Dwebgl/galleon.asy,,.asy}} and
@code{@uref{
https://asymptote.sourceforge.io/gallery/3Dwebgl/triceratops.html,,triceratops}@uref{
https://asymptote.sourceforge.io/gallery/3Dwebgl/triceratops.asy,,.asy}}.
@node graph3
@section @code{graph3}
@cindex @code{graph3}
@cindex 3D graphs
This module implements three-dimensional versions of the
functions in @code{graph.asy}.
@cindex @code{xaxis3}
@cindex @code{yaxis3}
@cindex @code{zaxis3}
To draw an @math{x} axis in three dimensions, use the routine
@verbatim
void xaxis3(picture pic=currentpicture, Label L="", axis axis=YZZero,
real xmin=-infinity, real xmax=infinity, pen p=currentpen,
ticks3 ticks=NoTicks3, arrowbar3 arrow=None,
margin3 margin=NoMargin3, bool above=false,
projection P=currentprojection);
@end verbatim
@noindent
Analogous routines @code{yaxis} and @code{zaxis} can be used to draw
@math{y} and @math{z} axes in three dimensions.
There is also a routine for drawing all three axis:
@verbatim
void axes3(picture pic=currentpicture,
Label xlabel="", Label ylabel="", Label zlabel="",
bool extend=false,
triple min=(-infinity,-infinity,-infinity),
triple max=(infinity,infinity,infinity),
pen p=currentpen, arrowbar3 arrow=None,
margin3 margin=NoMargin3, projection P=currentprojection);
@end verbatim
@cindex @code{YZEquals}
@cindex @code{XZEquals}
@cindex @code{XYEquals}
@cindex @code{YZZero}
@cindex @code{XZZero}
@cindex @code{XYZero}
@cindex @code{Bounds}
@noindent
The predefined three-dimensional axis types are
@verbatim
axis YZEquals(real y, real z, triple align=O, bool extend=false);
axis XZEquals(real x, real z, triple align=O, bool extend=false);
axis XYEquals(real x, real y, triple align=O, bool extend=false);
axis YZZero(triple align=O, bool extend=false);
axis XZZero(triple align=O, bool extend=false);
axis XYZero(triple align=O, bool extend=false);
axis Bounds(int type=Both, int type2=Both, triple align=O, bool extend=false);
@end verbatim
@noindent
The optional @code{align} parameter to these routines can be used to
specify the default axis and tick label alignments. The @code{Bounds}
axis accepts two type parameters, each of which must be one of
@code{Min}, @code{Max}, or @code{Both}. These parameters specify which
of the four possible three-dimensional bounding box edges should be drawn.
@cindex @code{NoTicks3}
@cindex @code{InTicks}
@cindex @code{OutTicks}
@cindex @code{InOutTicks}
The three-dimensional tick options are @code{NoTicks3}, @code{InTicks},
@code{OutTicks}, and @code{InOutTicks}. These specify the tick
directions for the @code{Bounds} axis type; other axis types inherit
the direction that would be used for the @code{Bounds(Min,Min)} axis.
Here is an example of a helix and bounding box axes with ticks
and axis labels, using orthographic projection:
@verbatiminclude helix.asy
@sp 1
@center @image{./helix}
The next example illustrates three-dimensional @math{x}, @math{y}, and
@math{z} axes, without autoscaling of the axis limits:
@cindex @code{axis}
@verbatiminclude axis3.asy
@sp 1
@center @image{./axis3}
One can also place ticks along a general three-dimensional axis:
@cindex @code{axis}
@verbatiminclude generalaxis3.asy
@sp 1
@center @image{./generalaxis3}
@cindex @code{surface}
@cindex @code{Spline}
@cindex parametric surface
Surface plots of matrices and functions over the region
@code{box(a,b)} in the @math{XY} plane are also implemented:
@verbatim
surface surface(real[][] f, pair a, pair b, bool[][] cond={});
surface surface(real[][] f, pair a, pair b, splinetype xsplinetype,
splinetype ysplinetype=xsplinetype, bool[][] cond={});
surface surface(real[][] f, real[] x, real[] y,
splinetype xsplinetype=null, splinetype ysplinetype=xsplinetype,
bool[][] cond={})
surface surface(triple[][] f, bool[][] cond={});
surface surface(real f(pair z), pair a, pair b, int nx=nmesh, int ny=nx,
bool cond(pair z)=null);
surface surface(real f(pair z), pair a, pair b, int nx=nmesh, int ny=nx,
splinetype xsplinetype, splinetype ysplinetype=xsplinetype,
bool cond(pair z)=null);
surface surface(triple f(pair z), real[] u, real[] v,
splinetype[] usplinetype, splinetype[] vsplinetype=Spline,
bool cond(pair z)=null);
surface surface(triple f(pair z), pair a, pair b, int nu=nmesh, int nv=nu,
bool cond(pair z)=null);
surface surface(triple f(pair z), pair a, pair b, int nu=nmesh, int nv=nu,
splinetype[] usplinetype, splinetype[] vsplinetype=Spline,
bool cond(pair z)=null);
@end verbatim
@noindent
The final two versions draw parametric surfaces for a function
@math{f(u,v)} over the parameter space @code{box(a,b)},
as illustrated in the example @code{@uref{
https://asymptote.sourceforge.io/gallery/3Dwebgl/parametricsurface.html,,parametricsurface}@uref{
https://asymptote.sourceforge.io/gallery/3Dwebgl/parametricsurface.asy,,.asy}}.
An optional splinetype @code{Spline} may be specified.
The boolean array or function @code{cond} can be used to control which
surface mesh cells are actually drawn (by default all mesh cells over
@code{box(a,b)} are drawn).
@cindex @code{surface}
One can also construct the surface generated by rotating a path @code{g}
between @code{angle1} to @code{angle2} (in degrees) sampled @code{n}
times about the line @code{c--c+axis}:
@verbatim
surface surface(triple c, path3 g, triple axis, int n=nslice,
real angle1=0, real angle2=360, pen color(int i, real j)=null);
@end verbatim
@noindent
@cindex @code{color}
The optional argument @code{color(int i, real j)} can be used to override the
surface color at the point obtained by rotating vertex @code{i} by
angle @code{j} (in degrees).
@noindent
Surface lighting is illustrated in the example files
@code{@uref{
https://asymptote.sourceforge.io/gallery/3Dwebgl/parametricsurface.html,,parametricsurface}@uref{
https://asymptote.sourceforge.io/gallery/3Dwebgl/parametricsurface.asy,,.asy}} and @code{@uref{
https://asymptote.sourceforge.io/gallery/3D graphs/sinc.html,,sinc}@uref{
https://asymptote.sourceforge.io/gallery/3D graphs/sinc.asy,,.asy}}.
Lighting can be disabled by setting @code{light=nolight}, as in this example
of a Gaussian surface:
@anchor{GaussianSurface}
@verbatiminclude GaussianSurface.asy
@sp 1
@center @image{./GaussianSurface}
@noindent
A mesh can be drawn without surface filling by specifying @code{nullpen}
for the surfacepen.
A vector field of @code{nu}@math{\times}@code{nv} arrows on a
parametric surface @code{f} over @code{box(a,b)} can be drawn with the routine
@cindex @code{vectorfield3}
@verbatim
picture vectorfield(path3 vector(pair v), triple f(pair z), pair a, pair b,
int nu=nmesh, int nv=nu, bool truesize=false,
real maxlength=truesize ? 0 : maxlength(f,a,b,nu,nv),
bool cond(pair z)=null, pen p=currentpen,
arrowbar3 arrow=Arrow3, margin3 margin=PenMargin3)
@end verbatim
as illustrated in the examples @code{@uref{
https://asymptote.sourceforge.io/gallery/3Dgraphs/vectorfield3.html,,vectorfield3}@uref{
https://asymptote.sourceforge.io/gallery/3Dgraphs/vectorfield3.asy,,.asy}} and
@code{@uref{
https://asymptote.sourceforge.io/gallery/3Dwebgl/vectorfieldsphere.html,,vectorfieldsphere}@uref{
https://asymptote.sourceforge.io/gallery/3Dwebgl/vectorfieldsphere.asy,,.asy}}.
@node grid3
@section @code{grid3}
@cindex @code{grid3}
@cindex 3D grids
This module, contributed by Philippe Ivaldi, can be used for drawing
3D grids. Here is an example (further examples can be found in
@code{grid3.asy} and at @url{
https://web.archive.org/web/20201130113133/http://www.piprime.fr/files/asymptote/grid3/}):
@verbatiminclude grid3xyz.asy
@sp 1
@center @image{./grid3xyz}
@node solids
@section @code{solids}
@cindex @code{solids}
This solid geometry module defines a structure @code{revolution} that
can be used to fill and draw surfaces of revolution. The following example
uses it to display the outline of a circular cylinder of radius 1
with axis @code{O--1.5unit(Y+Z)} with perspective projection:
@verbatiminclude cylinderskeleton.asy
@sp 1
@center @image{./cylinderskeleton}
Further illustrations are provided in the example files @code{@uref{
https://asymptote.sourceforge.io/gallery/3Dwebgl/cylinder.html,,cylinder}@uref{
https://asymptote.sourceforge.io/gallery/3Dwebgl/cylinder.asy,,.asy}},
@code{@uref{
https://asymptote.sourceforge.io/gallery/3Dwebgl/cones.html,,cones}@uref{
https://asymptote.sourceforge.io/gallery/3Dwebgl/cones.asy,,.asy}}, @code{@uref{
https://asymptote.sourceforge.io/gallery/3Dwebgl/hyperboloid.html,,hyperboloid}@uref{
https://asymptote.sourceforge.io/gallery/3Dwebgl/hyperboloid.asy,,.asy}}, and @code{@uref{
https://asymptote.sourceforge.io/gallery/3Dwebgl/torus.html,,torus}@uref{
https://asymptote.sourceforge.io/gallery/3Dwebgl/torus.asy,,.asy}}.
The structure @code{skeleton} contains the three-dimensional wireframe
used to visualize a volume of revolution:
@verbatim
struct skeleton {
struct curve {
path3[] front;
path3[] back;
}
// transverse skeleton (perpendicular to axis of revolution)
curve transverse;
// longitudinal skeleton (parallel to axis of revolution)
curve longitudinal;
}
@end verbatim
@node tube
@section @code{tube}
@cindex @code{tube}
This module extends the @code{tube} surfaces constructed in
@code{@uref{
https://asymptote.sourceforge.io/gallery/3Dwebgl/three_arrows.html,,three_arrows}@uref{
https://asymptote.sourceforge.io/gallery/3Dwebgl/three_arrows.asy,,.asy}} to arbitrary cross sections, colors, and spine
transformations. The routine
@verbatim
surface tube(path3 g, coloredpath section,
transform T(real)=new transform(real t) {return identity();},
real corner=1, real relstep=0);
@end verbatim
@noindent
draws a tube along @code{g} with cross section @code{section}, after
applying the transformation @code{T(t)} at @code{point(g,t)}.
The parameter @code{corner} controls the number of elementary tubes at
the angular points of @code{g}. A nonzero value of @code{relstep}
specifies a fixed relative time step (in the sense of
@code{relpoint(g,t)}) to use in constructing elementary tubes along @code{g}.
The type @code{coloredpath} is a generalization of @code{path} to
which a @code{path} can be cast:
@cindex @code{coloredpath}
@verbatim
struct coloredpath
{
path p;
pen[] pens(real);
int colortype=coloredSegments;
}
@end verbatim
@noindent
@cindex @code{coloredSegments}
@cindex @code{coloredNodes}
Here @code{p} defines the cross section and
the method @code{pens(real t)} returns an array of pens (interpreted
as a cyclic array) used for shading the tube patches at
@code{relpoint(g,t)}. If @code{colortype=coloredSegments}, the tube patches
are filled as if each segment of the section was colored with the pen
returned by @code{pens(t)}, whereas if @code{colortype=coloredNodes}, the
tube components are vertex shaded as if the nodes of the section were colored.
A @code{coloredpath} can be constructed with one of the routines:
@verbatim
coloredpath coloredpath(path p, pen[] pens(real),
int colortype=coloredSegments);
coloredpath coloredpath(path p, pen[] pens=new pen[] {currentpen},
int colortype=coloredSegments);
coloredpath coloredpath(path p, pen pen(real));
@end verbatim
@noindent
In the second case, the pens are independent of the relative time.
In the third case, the array of pens contains only one pen, which
depends of the relative time.
The casting of @code{path} to @code{coloredpath} allows the
use of a @code{path} instead of a @code{coloredpath}; in this case the
shading behavior is the default shading behavior for a surface.
An example of @code{tube} is provided in the file
@code{@uref{
https://asymptote.sourceforge.io/gallery/3Dwebgl/trefoilknot.html,,trefoilknot}@uref{
https://asymptote.sourceforge.io/gallery/3Dwebgl/trefoilknot.asy,,.asy}}. Further examples can be found at
@url{
https://web.archive.org/web/20201130113133/http://www.piprime.fr/files/asymptote/tube}.
@node flowchart
@section @code{flowchart}
@cindex @code{flowchart}
This module provides routines for drawing flowcharts. The primary
structure is a @code{block}, which represents a single block on the
flowchart. The following eight functions return a position on the appropriate
edge of the block, given picture transform @code{t}:
@verbatim
pair block.top(transform t=identity());
pair block.left(transform t=identity());
pair block.right(transform t=identity());
pair block.bottom(transform t=identity());
pair block.topleft(transform t=identity());
pair block.topright(transform t=identity());
pair block.bottomleft(transform t=identity());
pair block.bottomright(transform t=identity());
@end verbatim
@cindex @code{block.top}
@cindex @code{block.left}
@cindex @code{block.right}
@cindex @code{block.bottom}
@cindex @code{block.topleft}
@cindex @code{block.topright}
@cindex @code{block.bottomleft}
@cindex @code{block.bottomright}
@noindent
To obtain an arbitrary position along the boundary of the block in user
coordinates, use:
@verbatim
pair block.position(real x, transform t=identity());
@end verbatim
@cindex @code{block.position}
@noindent
@cindex @code{block.center}
The center of the block in user coordinates is stored in
@code{block.center} and the block size in @code{PostScript} coordinates
is given by @code{block.size}.
@noindent
A frame containing the block is returned by
@verbatim
frame block.draw(pen p=currentpen);
@end verbatim
@cindex @code{block.draw}
The following block generation routines accept a Label, string, or
frame for their object argument:
@table @dfn
@item rectangular block with an optional header (and padding @code{dx} around header and body):
@cindex @code{rectangle}
@verbatim
block rectangle(object header, object body, pair center=(0,0),
pen headerpen=mediumgray, pen bodypen=invisible,
pen drawpen=currentpen,
real dx=3, real minheaderwidth=minblockwidth,
real minheaderheight=minblockwidth,
real minbodywidth=minblockheight,
real minbodyheight=minblockheight);
block rectangle(object body, pair center=(0,0),
pen fillpen=invisible, pen drawpen=currentpen,
real dx=3, real minwidth=minblockwidth,
real minheight=minblockheight);
@end verbatim
@item parallelogram block:
@cindex @code{parallelogram}
@verbatim
block parallelogram(object body, pair center=(0,0),
pen fillpen=invisible, pen drawpen=currentpen,
real dx=3, real slope=2,
real minwidth=minblockwidth,
real minheight=minblockheight);
@end verbatim
@item diamond-shaped block:
@cindex @code{diamond}
@verbatim
block diamond(object body, pair center=(0,0),
pen fillpen=invisible, pen drawpen=currentpen,
real ds=5, real dw=1,
real height=20, real minwidth=minblockwidth,
real minheight=minblockheight);
@end verbatim
@item circular block:
@cindex @code{circle}
@verbatim
block circle(object body, pair center=(0,0), pen fillpen=invisible,
pen drawpen=currentpen, real dr=3,
real mindiameter=mincirclediameter);
@end verbatim
@item rectangular block with rounded corners:
@cindex @code{roundrectangle}
@verbatim
block roundrectangle(object body, pair center=(0,0),
pen fillpen=invisible, pen drawpen=currentpen,
real ds=5, real dw=0, real minwidth=minblockwidth,
real minheight=minblockheight);
@end verbatim
@item rectangular block with beveled edges:
@cindex @code{bevel}
@verbatim
block bevel(object body, pair center=(0,0), pen fillpen=invisible,
pen drawpen=currentpen, real dh=5, real dw=5,
real minwidth=minblockwidth, real minheight=minblockheight);
@end verbatim
@end table
To draw paths joining the pairs in @code{point} with right-angled lines,
use the routine:
@cindex @code{path}
@cindex @code{Horizontal}
@cindex @code{Vertical}
@verbatim
path path(pair point[] ... flowdir dir[]);
@end verbatim
@noindent
The entries in @code{dir} identify whether successive
segments between the pairs specified by @code{point} should be drawn
in the @code{Horizontal} or @code{Vertical} direction.
Here is a simple flowchart example (see also the example
@code{@uref{
https://asymptote.sourceforge.io/gallery/3Dwebgl/controlsystem.html,,controlsystem}@uref{
https://asymptote.sourceforge.io/gallery/3Dwebgl/controlsystem.asy,,.asy}}):
@verbatiminclude flowchartdemo.asy
@sp 1
@center @image{./flowchartdemo}
@node contour
@section @code{contour}
@cindex @code{contour}
This module draws contour lines.
To construct contours corresponding to the values in a real array @code{c}
for a function @code{f} on @code{box(a,b)}, use the routine
@verbatim
guide[][] contour(real f(real, real), pair a, pair b,
real[] c, int nx=ngraph, int ny=nx,
interpolate join=operator --, int subsample=1);
@end verbatim
@noindent
The integers @code{nx} and @code{ny} define the resolution.
The default resolution, @code{ngraph x ngraph} (here @code{ngraph}
defaults to @code{100}) can be increased for greater accuracy.
The default interpolation operator is @code{operator --} (linear). Spline
interpolation (@code{operator ..}) may produce smoother
contours but it can also lead to overshooting.
The @code{subsample} parameter indicates the number of interior points
that should be used to sample contours within each @code{1 x 1} box;
the default value of @code{1} is usually sufficient.
To construct contours for an array of data values on a uniform
two-dimensional lattice on @code{box(a,b)}, use
@verbatim
guide[][] contour(real[][] f, pair a, pair b, real[] c,
interpolate join=operator --, int subsample=1);
@end verbatim
To construct contours for an array of data values on a nonoverlapping
regular mesh specified by the two-dimensional array @code{z},
@verbatim
guide[][] contour(pair[][] z, real[][] f, real[] c,
interpolate join=operator --, int subsample=1);
@end verbatim
@noindent
To construct contours for an array of values @code{f} specified at
irregularly positioned points @code{z}, use the routine
@verbatim
guide[][] contour(pair[] z, real[] f, real[] c, interpolate join=operator --);
@end verbatim
@noindent
The contours themselves can be drawn with one of the routines
@verbatim
void draw(picture pic=currentpicture, Label[] L=new Label[],
guide[][] g, pen p=currentpen);
void draw(picture pic=currentpicture, Label[] L=new Label[],
guide[][] g, pen[] p);
@end verbatim
The following simple example draws the contour at value @code{1}
for the function @math{z=x^2+y^2}, which is a unit circle:
@verbatiminclude onecontour.asy
@sp 1
@center @image{./onecontour}
The next example draws and labels multiple contours for the function
@math{z=x^2-y^2} with the resolution @code{100 x 100}, using a dashed
pen for negative contours and a solid pen for positive (and zero) contours:
@verbatiminclude multicontour.asy
@sp 1
@center @image{./multicontour}
The next examples illustrates how contour lines can be drawn on color
density images, with and without palette quantization:
@verbatiminclude fillcontour.asy
@sp 1
@center @image{./fillcontour}
@verbatiminclude imagecontour.asy
@sp 1
@center @image{./imagecontour}
Finally, here is an example that illustrates the construction of contours
from irregularly spaced data:
@verbatiminclude irregularcontour.asy
@sp 1
@center @image{./irregularcontour}
In the above example, the contours of irregularly spaced data are constructed by
first creating a triangular mesh from an array @code{z} of pairs:
@cindex @code{triangulate}
@verbatim
int[][] triangulate(pair[] z);
@end verbatim
@verbatiminclude triangulate.asy
@sp 1
@center @image{./triangulate}
The example @code{@uref{
https://asymptote.sourceforge.io/gallery/PDFs/Gouraudcontour.pdf,,Gouraudcontour}@uref{
https://asymptote.sourceforge.io/gallery/PDFs/Gouraudcontour.asy,,.asy}} illustrates how to produce color
density images over such irregular triangular meshes.
@code{Asymptote} uses a robust version of Paul Bourke's Delaunay triangulation
algorithm based on the public-domain exact arithmetic predicates written by
Jonathan Shewchuk.
@node contour3
@section @code{contour3}
@cindex @code{contour3}
This module draws surfaces described as the null space of real-valued
functions of @math{(x,y,z)} or @code{real[][][]} matrices.
Its usage is illustrated in the example file @code{@uref{
https://asymptote.sourceforge.io/gallery/3Dgraphs/magnetic.html,,magnetic}@uref{
https://asymptote.sourceforge.io/gallery/3Dgraphs/magnetic.asy,,.asy}}.
@node smoothcontour3
@section @code{smoothcontour3}
@cindex @code{smoothcontour3}
This module, written by Charles Staats, draws implicitly defined surfaces
with smooth appearance.
The purpose of this module is similar to that of @code{contour3}: given
a real-valued function @math{f(x,y,z)}, construct the surface described by
the equation @math{f(x,y,z) = 0}. The @code{smoothcontour3} module generally produces
nicer results than @code{contour3}, but takes longer to compile. Additionally, the
algorithm assumes that the function and the surface are both smooth; if they are not,
then @code{contour3} may be a better choice.
To construct the null surface of a function @code{f(triple)} or @code{ff(real,real,real)}
over @code{box(a,b)}, use the routine
@cindex @code{implicitsurface}
@verbatim
surface implicitsurface(real f(triple)=null,
real ff(real,real,real)=null,
triple a,
triple b,
int n=nmesh,
bool keyword overlapedges=false,
int keyword nx=n,
int keyword ny=n,
int keyword nz=n,
int keyword maxdepth=8,
bool usetriangles=true);
@end verbatim
@noindent
The optional parameter @code{overlapedges} attempts to compensate for
an artifact that can cause the renderer to ``see through'' the
boundary between patches. Although
it defaults to @code{false}, it should usually be set to @code{true}.
The example @code{@uref{
https://asymptote.sourceforge.io/gallery/3Dwebgl/genustwo.html,,genustwo}@uref{
https://asymptote.sourceforge.io/gallery/3Dwebgl/genustwo.asy,,.asy}} illustrates the use of this function.
Additional examples, together with a more in-depth explanation of
the module's usage and pitfalls, are available at
@url{
https://github.com/charlesstaats/smoothcontour3}.
@node slopefield
@section @code{slopefield}
@cindex @code{slopefield}
To draw a slope field for the differential equation @math{dy/dx=f(x,y)} (or
@math{dy/dx=f(x)}), use:
@verbatim
picture slopefield(real f(real,real), pair a, pair b,
int nx=nmesh, int ny=nx,
real tickfactor=0.5, pen p=currentpen,
arrowbar arrow=None);
@end verbatim
@noindent
Here, the points @code{a} and @code{b} are the lower left and upper
right corners of the rectangle in which the slope field is to be drawn,
@code{nx} and @code{ny} are the respective number of ticks in the
@math{x} and @math{y} directions, @code{tickfactor} is the fraction of
the minimum cell dimension to use for drawing ticks, and @code{p} is
the pen to use for drawing the slope fields.
The return value is a picture that can be added to
@code{currentpicture} via the @code{add(picture)} command.
The function
@cindex @code{curve}
@verbatim
path curve(pair c, real f(real,real), pair a, pair b);
@end verbatim
@noindent
takes a point (@code{c}) and a slope field-defining function @code{f}
and returns, as a path, the curve passing through that point. The points
@code{a} and @code{b} represent the rectangular boundaries over which
the curve is interpolated.
Both @code{slopefield} and @code{curve} alternatively accept a function
@code{real f(real)} that depends on @math{x} only, as seen in this example:
@verbatiminclude slopefield1.asy
@sp 1
@center @image{./slopefield1}
@node ode
@section @code{ode}
@cindex @code{ode}
The @code{ode} module, illustrated in the example @code{@uref{
https://raw.githubusercontent.com/vectorgraphics/asymptote/HEAD/examples/odetest.asy,,odetest.asy}},
implements a number of explicit numerical integration schemes for
ordinary differential equations.
@node Options
@chapter Command-line options
@cindex options
@cindex command-line options
Type @code{asy -h} to see the full list of command-line options
supported by @code{Asymptote}:
@verbatiminclude options
All boolean options can be negated by prepending @code{no} to the option name.
If no arguments are given, @code{Asymptote} runs in interactive mode
(@pxref{Interactive mode}). In this case, the default output file
is @code{out.eps}.
If @code{-} is given as the file argument, @code{Asymptote} reads from
standard input.
If multiple files are specified, they are treated as separate
@code{Asymptote} runs.
@cindex @code{autoimport}
If the string @code{autoimport} is nonempty, a module with this name is
automatically imported for each run as the final step in loading module
@code{plain}.
@anchor{configuration file}
@cindex configuration file
@cindex @code{ASYMPTOTE_CONFIG}
@cindex @code{config}
@cindex @code{settings}
@anchor{settings}
Default option values may be entered as @code{Asymptote} code in a
configuration file named @code{config.asy} (or the file specified by
the environment variable @code{ASYMPTOTE_CONFIG} or @code{-config} option).
@code{Asymptote} will look for this file in its usual search path
(@pxref{Search paths}). Typically the configuration file is placed in the
@code{.asy} directory in the user's home directory
(@code{%USERPROFILE%\.asy} under @code{MSDOS}).
Configuration variables are accessed using the long form of the option names:
@verbatim
import settings;
outformat="pdf";
batchView=false;
interactiveView=true;
batchMask=false;
interactiveMask=true;
@end verbatim
Command-line options override these defaults. Most configuration
variables may also be changed at runtime.
@cindex @code{dvipsOptions}
@cindex @code{dvisvgmOptions}
@cindex @code{hyperrefOptions}
@cindex @code{convertOptions}
@cindex @code{gsOptions}
@cindex @code{htmlviewerOptions}
@cindex @code{psviewerOptions}
@cindex @code{pdfviewerOptions}
@cindex @code{pdfreloadOptions}
@cindex @code{glOptions}
The advanced configuration variables @code{dvipsOptions},
@code{hyperrefOptions}, @code{convertOptions}, @code{gsOptions},
@code{htmlviewerOptions}, @code{psviewerOptions},
@code{pdfviewerOptions}, @code{pdfreloadOptions},
@code{glOptions}, and @code{dvisvgmOptions} allow specialized options
to be passed as a string to the respective applications or
libraries. The default value of @code{hyperrefOptions} is
@code{setpagesize=false,unicode,pdfborder=0 0 0}.
If you insert
@verbatim
import plain;
settings.autoplain=true;
@end verbatim
@noindent
at the beginning of the configuration file, it can contain arbitrary
@code{Asymptote} code.
@cindex @code{magick}
@cindex @code{output}
@cindex @code{format}
@cindex @code{ImageMagick}
@cindex @code{render}
@cindex @code{antialias}
@cindex @code{size}
@cindex @code{latex}
@cindex @code{tex}
@cindex @code{pdflatex}
@cindex @code{xelatex}
@cindex @code{context}
@cindex @code{luatex}
@cindex @code{lualatex}
@cindex @code{EPS}
@cindex @code{PDF}
@anchor{texengines}
@anchor{magick}
The default output format is @acronym{EPS} for the (default)
@code{latex} and @code{tex} tex engine and @acronym{PDF} for the
@code{pdflatex}, @code{xelatex}, @code{context}, @code{luatex}, and
@code{lualatex} tex engines. Alternative output formats may be
produced using the @code{-f} option (or @code{outformat} setting).
@cindex @code{SVG}
@cindex @code{dvisvgm}
@cindex @code{graphic}
To produce @acronym{SVG} output, you will need @code{dvisvgm} (version
3.2.1 or later) from @url{
https://dvisvgm.de},
which can display @acronym{SVG} output (used by the
@code{xasy} editor) for embedded @acronym{EPS}, @acronym{PDF},
@acronym{PNG}, and @acronym{JPEG} images included with the
@code{graphic()} function. The generated output is optimized
with the default setting @code{settings.dvisvgmOptions="--optimize"}.
@code{Asymptote} can also produce any output format supported
by the @code{ImageMagick} @code{magick} program (version 7 or
later.
The optional setting @code{-render n} requests
an output resolution of @code{n} pixels per @code{bp}. Antialiasing is
controlled by the parameter @code{antialias}, which by default
specifies a sampling width of 2 pixels.
To give other options to @code{magick}, use the
@code{convertOptions} setting or call @code{magick convert} manually. This example
emulates how @code{Asymptote} produces antialiased @code{tiff} output at
one pixel per @code{bp}:
@verbatim
asy -o - venn | magick convert -alpha Off -density 144x144 -geometry 50%x eps:- venn.tiff
@end verbatim
@cindex @code{nosafe}
@cindex @code{safe}
@cindex @code{system}
If the option @code{-nosafe} is given, @code{Asymptote} runs
in unsafe mode. This enables the @code{int system(string s)} and
@code{int system(string[] s)} calls, allowing one
to execute arbitrary shell commands. The default mode, @code{-safe},
disables this call.
@cindex offset
@cindex @code{aligndir}
A @code{PostScript} offset may be specified as a pair (in @code{bp}
units) with the @code{-O} option:
@verbatim
asy -O 0,0 file
@end verbatim
@noindent
The default offset is zero. The pair @code{aligndir} specifies
an optional direction on the boundary of the page (mapped to the
rectangle [-1,1]@math{\times}[-1,1]) to which the picture should be aligned; the
default value @code{(0,0)} species center alignment.
@cindex @code{-c}
The @code{-c} (@code{command}) option may be used to execute arbitrary
@code{Asymptote} code on the command line as a string. It is not
necessary to terminate the string with a semicolon. Multiple @code{-c}
options are executed in the order they are given. For example
@verbatim
asy -c 2+2 -c "sin(1)" -c "size(100); draw(unitsquare)"
@end verbatim
@noindent
produces the output
@verbatim
4
0.841470984807897
@end verbatim
@noindent
and draws a unitsquare of size @code{100}.
@cindex @code{-u}
The @code{-u} (@code{user}) option may be used to specify arbitrary
@code{Asymptote} settings on the command line as a string. It is not
necessary to terminate the string with a semicolon. Multiple @code{-u}
options are executed in the order they are given. Command-line code like
@code{-u x=sqrt(2)} can be executed within a module like this:
@verbatim
real x;
usersetting();
write(x);
@end verbatim
@cindex @code{-l}
When the @code{-l} (@code{listvariables}) option is used with file
arguments, only global functions and variables defined in the specified
file(s) are listed.
Additional debugging output is produced with each additional @code{-v} option:
@table @code
@item -v
Display top-level module and final output file names.
@item -vv
Also display imported and included module names and final @code{LaTeX} and
@code{dvips} processing information.
@item -vvv
Also output @code{LaTeX} bidirectional pipe diagnostics.
@item -vvvv
Also output knot guide solver diagnostics.
@item -vvvvv
Also output @code{Asymptote} traceback diagnostics.
@end table
@node Interactive mode
@chapter Interactive mode
@cindex interactive mode
Interactive mode is entered by executing the command @code{asy} with
no file arguments. When the @code{-multiline} option is disabled (the default),
each line must be a complete @code{Asymptote} statement (unless
explicitly continued by a final backslash character @code{\});
it is not necessary to terminate input lines with a semicolon.
If one assigns @code{settings.multiline=true}, interactive code can be
entered over multiple lines; in this mode, the automatic termination of
interactive input lines by a semicolon is inhibited. Multiline mode is useful
for cutting and pasting @code{Asymptote} code directly into the
interactive input buffer.
@cindex @code{%}
Interactive mode can be conveniently used as a calculator: expressions
entered at the interactive prompt (for which a corresponding @code{write}
function exists) are automatically evaluated and written to @code{stdout}.
If the expression is non-writable, its type signature will be printed out
instead. In either case, the expression can be referred to using the symbol
@code{%} in the next line input at the prompt. For example:
@verbatim
> 2+3
5
> %*4
20
> 1/%
0.05
> sin(%)
0.0499791692706783
> currentpicture
<picture currentpicture>
> %.size(200,0)
>
@end verbatim
@cindex @code{operator answer}
The @code{%} symbol, when used as a variable, is shorthand for the identifier
@code{operator answer}, which is set by the prompt after each written
expression evaluation.
The following special commands are supported only in interactive mode
and must be entered immediately after the prompt:
@table @code
@cindex @code{help}
@item help
view the manual;
@item erase
erase @code{currentpicture};
@cindex @code{input}
@item reset
reset the @code{Asymptote} environment to its initial state, except for
changes to the settings module (@pxref{settings}), the current directory
(@pxref{cd}), and breakpoints (@pxref{Debugger});
@cindex @code{input}
@item input FILE
does an interactive reset, followed by the command
@code{include FILE}. If the file name @code{FILE} contains
nonalphanumeric characters, enclose it with quotation marks.
A trailing semi-colon followed by optional @code{Asymptote} commands may
be entered on the same line.
@cindex @code{quit}
@cindex @code{exit}
@cindex @code{history}
@anchor{history}
@item quit
exit interactive mode (@code{exit} is a synonym; the abbreviation
@code{q} is also accepted unless there exists a top-level variable named
@code{q}).
@cindex @code{historylines}
A history of the most recent 1000 (this number can be changed with the
@code{historylines} configuration variable) previous commands will be retained
in the file @code{.asy/history} in the user's home directory (unless
the command-line option @code{-localhistory} was specified, in which case
the history will be stored in the file @code{.asy_history} in the
current directory).
@end table
Typing @code{ctrl-C} interrupts the execution of @code{Asymptote} code
and returns control to the interactive prompt.
Interactive mode is implemented with the @acronym{GNU} @code{readline} library,
with command history and auto-completion. To customize the key bindings, see:
@url{
https://tiswww.case.edu/php/chet/readline/readline.html}
@cindex @code{Python} usage
The file @code{asymptote.py} in the @code{Asymptote} system directory
provides an alternative way of entering @code{Asymptote} commands
interactively, coupled with the full power of @code{Python}. Copy this
file to your @code{Python path} and then execute from within
@code{Python 3} the commands
@verbatim
from asymptote import *
g=asy()
g.size(200)
g.draw("unitcircle")
g.send("draw(unitsquare)")
g.fill("unitsquare, blue")
g.clip("unitcircle")
g.label("\"$O$\", (0,0), SW")
@end verbatim
@node GUI
@chapter Graphical User Interface
@cindex graphical user interface
@cindex @acronym{GUI}
@cindex mouse
@cindex wheel mouse
@cindex @code{Button-1}
@cindex @code{Button-2}
@cindex @code{xasy}
@menu
* GUI installation:: Installing @code{xasy}
* GUI usage:: Using @code{xasy} to edit objects
@end menu
In the event that adjustments to the final figure are required, the
preliminary Graphical User Interface (@acronym{GUI}) @code{xasy} included with
@code{Asymptote} allows you to move graphical objects and draw new ones.
The modified figure can then be saved as a normal @code{Asymptote} file.
@node GUI installation
@section GUI installation
@cindex GUI installation
As @code{xasy} is written in the interactive scripting language
@code{Python/Qt}, it requires @code{Python} (@url{
https://www.python.org}),
along with the @code{Python} packages @code{pyqt5}, @code{cson}, and
@code{numpy}:
@verbatim
pip3 install cson numpy pyqt5 PyQt5.sip
@end verbatim
Pictures are deconstructed into the @acronym{SVG} image format.
Since @code{Qt5} does not support @code{SVG} clipping, you will need
the @code{rsvg-convert} utility, which is part of the
@code{librsvg2-tools} package on @code{UNIX} systems
and the @code{librsvg} package on @code{MacOS X}; under
@code{Microsoft Windows}, it is available as
@url{
https://sourceforge.net/projects/tumagcc/files/rsvg-convert-2.40.20.7z}
Ensure that @code{rsvg-convert} is available in @code{PATH}, or
specify the location of @code{rsvg-convert} in @code{rsvgConverterPath}
option within @code{xasy}'s settings.
@cindex @code{dvisvgmMultipleFiles}
Deconstruction of a picture into its components is fastest when using
the @code{LaTeX} TeX engine. The default setting
@code{dvisvgmMultipleFiles=true} speeds up deconstruction
under @acronym{PDF} TeX engines.
@node GUI usage
@section GUI usage
@cindex GUI usage
@cindex arrow keys
@cindex mouse wheel
@cindex @code{deconstruct}
The arrow keys (or mouse wheel) are convenient for temporarily
raising and lowering objects within @code{xasy}, allowing an object to
be selected. Pressing the arrow keys will pan while the shift key is held
and zoom while the control key is held. The mouse wheel will pan while
the alt or shift keys is held and zoom while the control key is held.
In translate mode, an object can be dragged coarsely with the mouse
or positioned finely with the arrow keys while holding down the mouse button.
Deconstruction of compound objects (such as arrows) can be prevented
by enclosing them within the commands
@verbatim
void begingroup(picture pic=currentpicture);
void endgroup(picture pic=currentpicture);
@end verbatim
By default, the elements of a picture or frame will be grouped
together on adding them to a picture. However, the elements of a frame
added to another frame are not grouped together by default: their
elements will be individually deconstructed (@pxref{add}).
@node Command-Line Interface
@chapter Command-Line Interface
@cindex command-line interface
@code{Asymptote} code may be sent to the
@url{
https://asymptote.ualberta.ca} server directly from the command
line
@itemize @bullet
@item SVG output:
@code{curl --data-binary 'import venn;' 'asymptote.ualberta.ca:10007?f=svg' | display -}
@item HTML output:
@code{curl --data-binary @@/usr/local/share/doc/asymptote/examples/Klein.asy 'asymptote.ualberta.ca:10007' -o Klein.html}
@item V3D output:
@code{curl --data-binary 'import teapot;' 'asymptote.ualberta.ca:10007?f=v3d' -o teapot.v3d}
@item PDF output with rendered bitmap at 2 pixels per bp:
@code{curl --data-binary 'import teapot;' 'asymptote.ualberta.ca:10007?f=pdf' -o teapot.pdf}
@item PDF output with rendered bitmap at 4 pixels per bp:
@code{curl --data-binary 'import teapot;' 'asymptote.ualberta.ca:10007?f=pdf&render=4' -o teapot.pdf}
@item PRC output:
@code{curl --data-binary 'import teapot;' 'asymptote.ualberta.ca:10007?f=pdf&prc' -o teapot.pdf}
@item PRC output with rendered preview bitmap at 4 pixels per bp:
@code{curl --data-binary 'import teapot;' 'asymptote.ualberta.ca:10007?f=pdf&prc&render=4' -o teapot.pdf}
@end itemize
The source code for the command-line interface is available at
@url{
https://github.com/vectorgraphics/asymptote-http-server}.
@node Language server protocol
@chapter Language server protocol
@cindex @acronym{LSP}
@cindex language server protocol
Under @code{UNIX} and @code{MacOS X}, @code{Asymptote} supports features of the
@uref{
https://en.wikipedia.org/wiki/Language_Server_Protocol,Language
Server Protocol (@acronym{LSP})}, including function signature and variable matching.
Under @code{MSWindows}, @code{Asymptote} currently supports
@acronym{LSP} only when compiled within the @code{Windows Subsystem for Linux}.
@code{Emacs} users can enable the @code{Asymptote}
language server protocol by installing @code{lsp-mode} using the
following procedure:
@itemize @bullet
@item Add to the @code{.emacs} initialization file:
@verbatim
(require 'package)
(add-to-list 'package-archives '("melpa" . "
https://melpa.org/packages/") t)
(package-initialize)
@end verbatim
@item Launch emacs and execute
@verbatim
M-x package-refresh-contents
M-x package-install
@end verbatim
and select @code{lsp-mode}.
@item Add to the @code{.emacs} initialization file:
@verbatim
(require 'lsp-mode)
(add-to-list 'lsp-language-id-configuration '(asy-mode . "asymptote"))
(lsp-register-client
(make-lsp-client :new-connection (lsp-stdio-connection '("asy" "-lsp"))
:activation-fn (lsp-activate-on "asymptote")
:major-modes '(asy-mode)
:server-id 'asyls
)
)
@end verbatim
@item Launch emacs and execute
@verbatim
M-x lsp
@end verbatim
@end itemize
@node PostScript to Asymptote
@chapter @code{PostScript} to @code{Asymptote}
@cindex @code{pstoedit}
The excellent @code{PostScript} editor @code{pstoedit} (version 3.50 or later;
available from @url{
https://sourceforge.net/projects/pstoedit/}) includes an
@code{Asymptote} backend. Unlike virtually all other @code{pstoedit}
backends, this driver includes native clipping, even-odd fill rule,
@code{PostScript} subpath, and full image support. Here is an example:
@noindent
@code{asy -V @value{Datadir}/doc/asymptote/examples/venn.asy}
@verbatim
pstoedit -f asy venn.eps test.asy
asy -V test
@end verbatim
@noindent
If the line widths aren't quite correct, try giving @code{pstoedit} the
@code{-dis} option.
If the fonts aren't typeset correctly, try giving @code{pstoedit} the
@code{-dt} option.
@node Help
@chapter Help
@cindex help
@cindex forum
A list of frequently asked questions (@acronym{FAQ}) is maintained at
@quotation
@url{
https://asymptote.sourceforge.io/FAQ}
@end quotation
@noindent
Questions on installing and using @code{Asymptote} that are not
addressed in the @acronym{FAQ} should be sent to the
@code{Asymptote} forum:
@quotation
@url{
https://sourceforge.net/p/asymptote/discussion/409349}
@end quotation
@noindent
Including an example that illustrates what you are trying to do will help
you get useful feedback.
@code{LaTeX} problems can often be diagnosed with the @code{-vv} or
@code{-vvv} command-line options.
Contributions in the form of patches or @code{Asymptote} modules can be
posted here:
@quotation
@url{
https://sourceforge.net/p/asymptote/patches}
@end quotation
@noindent
To receive announcements of upcoming releases, please subscribe to
@code{Asymptote} at
@quotation
@url{
https://sourceforge.net/projects/asymptote/}
@end quotation
@cindex bug reports
@noindent
If you find a bug in @code{Asymptote}, please check (if possible)
whether the bug is still present in the latest @code{git}
developmental code (@pxref{Git}) before submitting a bug
report. New bugs can be reported at
@quotation
@url{
https://github.com/vectorgraphics/asymptote/issues}
@end quotation
@noindent
To see if the bug has already been fixed,
check bugs with Status @code{Closed} and recent lines in
@quotation
@url{
https://asymptote.sourceforge.io/ChangeLog}
@end quotation
@noindent
@cindex stack overflow
@cindex segmentation fault
@cindex @code{libsigsegv}
@code{Asymptote} can be configured with the optional @acronym{GNU} library
@code{libsigsegv}, available from
@url{
https://www.gnu.org/software/libsigsegv/}, which allows one to distinguish
user-generated @code{Asymptote} stack overflows (@pxref{stack overflow})
from true segmentation faults (due to internal C++ programming errors;
please submit the @code{Asymptote} code that generates such segmentation
faults along with your bug report).
@node Debugger
@chapter Debugger
@cindex debugger
Asymptote now includes a line-based (as opposed to code-based)
debugger that can assist the user in following flow control. To set a
break point in file @code{file} at line @code{line}, use the command
@cindex @code{stop}
@verbatim
void stop(string file, int line, code s=quote{});
@end verbatim
@noindent
The optional argument @code{s} may be used to conditionally set the variable
@code{ignore} in @code{plain_debugger.asy} to @code{true}. For example, the
first 10 instances of this breakpoint will be ignored (the
variable @code{int count=0} is defined in @code{plain_debugger.asy}):
@verbatim
stop("test",2,quote{ignore=(++count <= 10);});
@end verbatim
To set a break point in file @code{file} at the first line containing
the string @code{text}, use
@verbatim
void stop(string file, string text, code s=quote{});
@end verbatim
@noindent
To list all breakpoints, use:
@cindex @code{breakpoints}
@verbatim
void breakpoints();
@end verbatim
@noindent
To clear a breakpoint, use:
@cindex @code{clear}
@verbatim
void clear(string file, int line);
@end verbatim
@noindent
To clear all breakpoints, use:
@verbatim
void clear();
@end verbatim
The following commands may be entered at the debugging prompt:
@table @code
@cindex @code{help}
@item @code{h}
help;
@cindex @code{continue}
@item @code{c}
continue execution;
@cindex @code{inst}
@item @code{i}
step to the next instruction;
@cindex @code{step}
@item @code{s}
step to the next executable line;
@cindex @code{next}
@item @code{n}
step to the next executable line in the current file;
@cindex @code{file}
@item @code{f}
step to the next file;
@cindex @code{return}
@item @code{r}
return to the file associated with the most recent breakpoint;
@cindex @code{trace}
@item @code{t}
toggle tracing (@code{-vvvvv}) mode;
@cindex @code{quit}
@item @code{q}
quit debugging and end execution;
@cindex @code{exit}
@item @code{x}
exit the debugger and run to completion.
@end table
@noindent
Arbitrary @code{Asymptote} code may also be entered at the debugging prompt;
however, since the debugger is implemented with @code{eval}, currently
only top-level (global) variables can be displayed or modified.
The debugging prompt may be entered manually with the call
@verbatim
void breakpoint(code s=quote{});
@end verbatim
@node Credits
@chapter Acknowledgments
@cindex acknowledgments
Financial support for the development of @code{Asymptote} was generously
provided by the Natural Sciences and Engineering Research Council of
Canada, the Pacific Institute for Mathematical Sciences, and the
University of Alberta Faculty of Science.
We also would like to acknowledge the previous work of John D. Hobby,
author of the program @code{MetaPost} that inspired the development of
@code{Asymptote}, and Donald E. Knuth, author of @TeX{} and
@code{MetaFont} (on which @code{MetaPost} is based).
The authors of @code{Asymptote} are Andy Hammerlindl, John Bowman, and
Tom Prince. Sean Healy designed the @code{Asymptote} logo. Other
contributors include Orest Shardt, Jesse Frohlich, Michail Vidiassov,
Charles Staats, Philippe Ivaldi, Olivier Guib@'e, Radoslav Marinov,
Jeff Samuelson, Chris Savage, Jacques Pienaar, Mark Henning, Steve Melenchuk,
Martin Wiebusch, Stefan Knorr, Supakorn ``Jamie'' Rassameemasmuang,
Jacob Skitsko, Joseph Chaumont, and Oliver Cheng. Pedram Emami
developed the @code{Asymptote Web Application} hosted at
@url{
https://asymptote.ualberta.ca}:
@url{
https://github.com/vectorgraphics/asymptoteWebApplication}
@node Index
@unnumbered Index
@printindex cp
@bye
@c LocalWords: randMax Gaussrand asy cindex indices resized LaTeX TK latin au
@c LocalWords: latexusage tex bbox PostScript subdirectory gcc emacs ASYDIR
@c LocalWords: documentclass usepackage subpath shipout sqrt xN Mx bw AcroRd
@c LocalWords: xscale xaxis yaxis BeginBar GIF postprocessing fpu de rpair xy
@c LocalWords: ImageMagick cd asymptote Hy 0pt 1filll 's 3D 2D 'asy
@c LocalWords: startup natively xasy tkinter VxN yingyang currentpicture toc
@c LocalWords: MetaPost MetaFont Hammerlindl Healy texinfo autoload setq setf
@c LocalWords: printindex setfilename settitle dircategory direntry titlepage
@c LocalWords: vskip filll insertcopying ifnottex detailmenu alist augroup PQ
@c LocalWords: bool behavior facto zxf login Debian dev filetypedetect
@c LocalWords: FFTW bp readline gv eps args Boehm gc evenoddoverlap png joe
@c LocalWords: boolean initializer expi dir xpart ypart STL substring rfind
@c LocalWords: pos substr strftime typedef pxref unitcircle yscale Bezier iff
@c LocalWords: postcontrol precontrol atleast nullpath arclength arctime rgb
@c LocalWords: dirtime currentpen colorspaces grayscale cmyk defaultpen x cx
@c LocalWords: linetype longdashed dashdotted longdashdotted linewidth y XP
@c LocalWords: fontsize defaultfilename keepAspect IgnoreAspect ise flushleft
@c LocalWords: src dest XDR txt getc fout stdin stdout endl eof js prc ni
@c LocalWords: Microsystem's eol exponentials postfix sayhi th Ubuntu
@c LocalWords: sqr intop addby libm asin acos atan sinh tanh asinh acosh cbrt
@c LocalWords: atanh fabs hypot fmod ceil srand dereferenced alice pete sqrtx
@c LocalWords: eval fft csv runtime nonalphanumeric labely LeftTicks NoTicks
@c LocalWords: RightTicks BottomTop LeftRight Ticksize UTF BufNewFile BufRead
@c LocalWords: ticksize subintervals xlimits filetype plugin setlocal makeprg
@c LocalWords: ylimits uncommented automin automax cp uninstall reals ecast
@c LocalWords: scaleT RightSide yx yy NoAlign legendmargin opic CCW
@c LocalWords: arrowbar LeftSide EndBar BeginArrow lly feynman isi showtarget
@c LocalWords: EndArrow BeginArcArrow EndArcArrow ArcArrow ArcArrows NoFill
@c LocalWords: filldraw fillpen drawpen errorformat bigsquare bezier darkblue
@c LocalWords: quartercircle darkgreen lightblue urx ury texpreamble sgn texi
@c LocalWords: lineargraph datagraph vertices parametricgraph uncomment ggv
@c LocalWords: loggraph generalaxis texhash arrowsize arrowangle arrowlength
@c LocalWords: SuppressQuiet MoveQuiet LIBREADLINE config MacOS prebuilt
@c LocalWords: ghostview SIGHUP PDF acroread xpdf cutbefore strptime
@c LocalWords: libsigsegv intersectionpoint dotfactor vv firstcut pq logticks
@c LocalWords: Unisys dvips vvv vvvv vvvvv traceback lastcut cutafter infodir
@c LocalWords: zxvf xargs cond polargraph xmin xmax plabel YZero labelling ln
@c LocalWords: ymin ymax XZero xequals tickmin tickmax unlabelled se pq pena
@c LocalWords: yequals Nobre Barbarosie Schwaiger nearearth conicurv Wiebusch
@c LocalWords: unfill posterSize ngraph interpolatetype ctrl dt pic getint Ai
@c LocalWords: NNE jxf linecap linejoin unitsquare shadedtiling ei nomarker
@c LocalWords: westnile minipage ra penb paletteticks drawline nV FillDraw uv
@c LocalWords: susceptibleM flushright secondaryX secondaryY secondaryaxis tt
@c LocalWords: titlelabel columnlabel rb xtick ytick labelx XEquals YEquals
@c LocalWords: treetest eetomumu fermi backend pstoedit drawtree xFF MSDOS gz
@c LocalWords: vimrc CFLAGS verbatiminclude online noindent bezier superpath
@c LocalWords: evenodd squarecap roundcap extendcap miterjoin roundjoin NFSS
@c LocalWords: beveljoin fillrule zerowinding insideness lineskip cmr pcrr Hx
@c LocalWords: AvantGarde Bookman Helvetica NewCenturySchoolBook minbound pdf
@c LocalWords: Palatino TimesRoman ZapfChancery ZapfDingbats german basealign
@c LocalWords: nondeconstructed backends usr venn labelsquare nobasealign dp
@c LocalWords: NoMargin BeginMargin EndMargin BeginPenMargin EndPenMargin dm
@c LocalWords: PenMargin PenMargins TrueMargin labelmargin errorbars errorbar
@c LocalWords: dpx dpy dmx dmy barsize arrowsize BeginDotMargin DotMargin acc
@c LocalWords: EndDotMargin DotMargins NColors BWRainbow colorspace labelled
@c LocalWords: PaletteTicks defaultformat leastsquares bjam fprintf endgroup
@c LocalWords: begingroup xmargin ymargin pbox box ellipse wget exe Gouraud
@c LocalWords: multithreaded newframe init emph nums concat xline yline zpart
@c LocalWords: colatitude zscale cosh nullpen MetaFontbook cyclicflag FreeBSD
@c LocalWords: nodeps Ghostgum beginlabel endlabel pTick ptick loggrid SAS dy
@c LocalWords: currentprojection latticeshading subpictures colinear unitcube
@c LocalWords: Autoscaling solveQuadratic MidArrow MidArcArrow Prebuilt url
@c LocalWords: pdftex comment getstring getstringprefix getreal defaultS hsv
@c LocalWords: ticklocate autoscaleT autoscaling vectorfield autolimits dvi
@c LocalWords: zlimits inline dvipdf hyperdvi autoconf gui zerowindingoverlap
@c LocalWords: prepended intMax quadraticroots cubicroots filltype prepend dx
@c LocalWords: ticklabel popup UnFill markroutine marknodes markuniform erf
@c LocalWords: intersectpoint cyrillic mathtext russian brokenaxis Datadir ds
@c LocalWords: resetdefaultpen latticeshade axialshade radialshade erfc det
@c LocalWords: gouraudshade unescaped nmesh surfacepen getpair MikTeX dw YZ
@c LocalWords: meshpen localhistory axisT roundedpath unitsize aSin accel pre
@c LocalWords: fontcommand makepen aCos aTan Knorr roundpath BeginPoint nView
@c LocalWords: MidPoint EndPoint nmask antialiasing autoplain batchMask libgc
@c LocalWords: batchView clearGUI ignoreGUI interactiveMask interactiveView
@c LocalWords: listvariables outformat parseonly prepending psviewer nCircle
@c LocalWords: pdfviewer papertype tabcompletion noautoplain plugins Teixeira
@c LocalWords: embeddedmovie historylines RadialShade penc penr CJK tgz GPL
@c LocalWords: legendlinelength legendskip USERPROFILE LDFLAGS currentlight
@c LocalWords: subsampled sinc kai AtBeginDocument GBK clearpage lasy texpath
@c LocalWords: AtEndDocument zaxis maxbound truepoint paperwidth paperheight
@c LocalWords: GSL deriv texcolors fixedscaling UpsideDown texreset slidedemo
@c LocalWords: subitem newslide realMin realMax realEpsilon realDigits gsl dh
@c LocalWords: obliqueX asycolors monthaxis xautoscale yautoscale zautoscale
@c LocalWords: obliqueZ obliqueY cylinderskeleton block llcorner dr py nx CPU
@c LocalWords: loc topleft topright bottomleft bottomright flowrectangle UTC
@c LocalWords: chartblock flowdiamond flowcircle xlabel BezierSurface el xyz
@c LocalWords: flowroundrectangle flowbevel flowpath drawflow blocks ny cpu
@c LocalWords: multipleView usersetting mediumgray flowchartdemo ylabel nv xf
@c LocalWords: zlabel slopefields cputime roundrectangle slopefield libgccpp
@c LocalWords: tickfactor USERNAME writeable imagecontour logimage Dumoulin's
@c LocalWords: NoCrop parametricsurface realmult SoftLight HardLight interp
@c LocalWords: ColorDodge ColorBurn Ivaldi buildcycle autorotate mexicanhat
@c LocalWords: Gouraudcontour pdflatex preconfigured perline linelength hskip
@c LocalWords: penimage filloutside legendhskip legendvskip maxwidth CDlabel
@c LocalWords: tensorshade MPEG framepoint nonfunction Radoslav Marinov Mepis
@c LocalWords: Pienaar Melenchuk finalout Linspire Dpkg sudo dpkg dtx Tcount
@c LocalWords: windingnumber clickable pdfmovie dfn du animationdelay fprime
@c LocalWords: slidemovies ifdraft embeddedu externalmovie headerpen bodypen
@c LocalWords: GaussianSurface multiline binarytree tridiagonal portably AIX
@c LocalWords: binarytreetest Henning subsample breakpoint locator wireframe
@c LocalWords: labelpath intersectionpoints PSTricks pstextpath curvedlabel
@c LocalWords: LeftJustified RightJustified tickmodifier gunzip gmake IRIX dv
@c LocalWords: texcommand RET SITEDIR filegraph pathmarkers POSIX binput AOB
@c LocalWords: nonportable markinterval stickframe circlebarframe tix
@c LocalWords: crossframe tildeframe markangle StickIntervalMarker gswin expm
@c LocalWords: CrossIntervalMarker CircleBarIntervalMarker Ghostscript syzygy
@c LocalWords: TildeIntervalMarker autoimport calculateTransform bitwise tk
@c LocalWords: headersize bodysize minheaderwidth minheaderheight minwidth ZX
@c LocalWords: minbodywidth minbodyheight minheight mindiameter reltime PNG
@c LocalWords: relpoint Syzygy syzygies seekeof splinetype notaknot slopea ZY
@c LocalWords: slopeb nonperiodic circlescale MarkFill ScaleX ScaleY xformat
@c LocalWords: onecontour multicontour irregularcontour dvipsOptions saveline
@c LocalWords: dirSpecifier controlSpecifier tensionSpecifier atleastflag bsp
@c LocalWords: curlSpecifier cputimeformat initializers arbitary redeclaring
@c LocalWords: firstname lastname multdiagonal Raphson OmitTick OmitFormat sp
@c LocalWords: NoZero NoZeroFormat abbrevation gsOptions namespace redeclared
@c LocalWords: atLeast intMin globalwrite quarticroots deconsruct substrings
@c LocalWords: usleep currentpatterns trailingzero Orest Shardt DefaultHead
@c LocalWords: SimpleHead HookHead TeXHead multipage inlinemovie dxmax
@c LocalWords: simpson NoBox truesize autoscale shadestroke recurses mintimes
@c LocalWords: nonoverlapping texengine maxtimes maxheight pdb TEXMFCONFIG Jn
@c LocalWords: piecewisestraight unitrand graphmarkers antialias nolight newl
@c LocalWords: Delaunay Shewchuk convertOptions APPDATA pdfreload tempFile Yn
@c LocalWords: pdfreloadOptions deferred OpenGL renderer unitbox 's
@c LocalWords: bezulate Shardt's rasterized viewport unitdisk unitplane devel
@c LocalWords: unitcylinder unitcone solidcone unitfrustum unitsphere nslices
@c LocalWords: DPostScript YZZero externalprc nonrendered nosafe KDE
@c LocalWords: unithemisphere versa XYplane xypart unitsolidcone YZEquals xml
@c LocalWords: XZEquals XYEquals XZZero XYZero InTicks OutTicks InOutTicks
@c LocalWords: fitscreen planeproject strokepath meshlight nullpens arrowdir
@c LocalWords: diffusepen emissivepen specularpen arrowbarb keyval
@c LocalWords: hstretch vstretch roundbox nonconvex miterlimit basealign cmd
@c LocalWords: maxviewport maxtile antialiased sphericalharmonic attachfile
@c LocalWords: vertexshading smoothelevation glOptions iconified iconify kate
@c LocalWords: psviewerOptions pdfviewerOptions viewportmargin asyattach SVG
@c LocalWords: multisampling autogen multisample coloredpath relstep flowdir
@c LocalWords: colortype coloredSegments coloredNodes trefoilknot scaledgraph
@c LocalWords: minblockwidth minblockheight mincirclediameter nonassociative
@c LocalWords: nonintegral gettriple enablerepo hexadecimal XeLaTeX xelatex
@c LocalWords: dvipdfmx autoadjust viewportsize viewportwidth viewportheight
@c LocalWords: subregions nonsimply functionshade shader floatingdisk TopView
@c LocalWords: functionshading maxlength LeftView odetest RadialShadeDraw CLZ
@c LocalWords: vectorfieldsphere RightView FrontView BackView BottomView CTZ
@c LocalWords: addViews outprefix addAllViews xsplinetype ysplinetype rotateX
@c LocalWords: usplinetype vsplinetype leftbutton middlebutton rightbutton
@c LocalWords: rotateY rotateZ wheelup zoomin wheeldown zoomout TeXLive pnorm
@c LocalWords: viewportshift signedint signedness psview multiplatform nowarn
@c LocalWords: singlereal singleint writeoverloaded dvisvg reddash lexorder
@c LocalWords: bigdiagonal autobillboard dvisvgm maxtiles hyperrefOptions xdr
@c LocalWords: setpagesize pdfborder controlsystem OmitTickInterval SixViews
@c LocalWords: OmitTickIntervals tickmodifiers autorotated SixViewsUS latexmk
@c LocalWords: ThreeViewsUS ThreeViewsFR SixViewsFR ThreeViews partialsum
@c LocalWords: defaultrender Vidiassov latexmkrc mktemp DOSendl DOSnewl perl
@c LocalWords: filename asyinclude latemk penfunctionimage Affine decrement
@c LocalWords: affine Redisplay redisplay isnan radians defaultseparator Jens
@c LocalWords: ascii piecewise arcpoint spacings tilings sncndn resizing
@c LocalWords: differentiable vectorization vectorized asydir normals quartic
@c LocalWords: wavepacket kerned parametrized specular hyperboloid Bourke's
@c LocalWords: Michail 0pt 1filll 's 3D labelpath3 2D graph3 0pt 3D
@c LocalWords: grid3 contour3 x86_64 psv a4 freeglut 'load ' 0pt 's
@c LocalWords: 'asy 'lasy 'auto 5bp 1cm sqrtx01 4g extenda extendb
@c LocalWords: bb llx 2S 100pt 3t bezier2 bool3 x0 angle1 angle2 z1
@c LocalWords: z2 before' struct X11 x11colors type1cm 12pt OT1 5mm
@c LocalWords: cmr12 x' y' xsize ysize 25cm s1 s2 neighbourhood u''
@c LocalWords: s'' 3x 5x 3y 602e 2x 2y 3sin 10cm 204e addby7 10x 's
@c LocalWords: only'' pow10 log10 expm1 log1p atan2 0pt 1filll 's '
@c LocalWords: x1 x2 graph2d attachfile2 n0 P0 n1 P1 markers1 3D 2D
@c LocalWords: interpolate1 markers2 inlinemovie3 media9 U3D T2A 5E
@c LocalWords: embeddedu3d curvedlabel3 value2 tickvalue inner'' 2N
@c LocalWords: lineargraph0 scalings log2 log2graph 5cm BWRainbow2
@c LocalWords: guide3 path3 unitcircle3 2E 2n noV 100d PostScript3D
@c LocalWords: size3 fit3 theta1 phi1 theta2 phi2 v1 v2 unitsquare3
@c LocalWords: t1 t2 5z 5y transform3 identity4 xscale3 yscale3 0pt
@c LocalWords: zscale3 scale3 join3 BeginBar3 EndBar3 Bar3 Bars3 's
@c LocalWords: BeginArrow3 MidArrow3 EndArrow3 Arrow3 Arrows3 axes3
@c LocalWords: BeginArcArrow3 MidArcArrow3 EndArcArrow3 ArcArrow3 '
@c LocalWords: ArcArrows3 DefaultHead3 HookHead3 TeXHead3 HookHead2
@c LocalWords: DefaultHead2 TeXHead2 arrows3 NoMargin3 BeginMargin3
@c LocalWords: EndMargin3 Margin3 Margins3 BeginPenMargin2 xaxis3 '
@c LocalWords: EndPenMargin2 PenMargin2 PenMargins2 BeginPenMargin3
@c LocalWords: EndPenMargin3 PenMargin3 PenMargins3 BeginDotMargin3
@c LocalWords: EndDotMargin3 DotMargin3 DotMargins3 TrueMargin3 3D
@c LocalWords: yaxis3 zaxis3 ticks3 NoTicks3 arrowbar3 type2 axis3
@c LocalWords: generalaxis3 vectorfield3 margin3 grid3xyz 5unit 2D
@c LocalWords: slopefield1 144x144 1filll 'load 'asy 'lasy 'auto 4g
@c LocalWords: libgs 'load 'asy 'lasy 'auto 5bp 1cm 2S 100pt 3t 5mm
@c LocalWords: bracedefaultratio incircle 12pt 25cm 3x 5x 3y 602e '
@c LocalWords: 2x 2y 3sin 10cm 204e 10x 5E offaxis 'load 'lasy ' 3D
@c LocalWords: 5cm 2N 2E 2n 100d 5z 5y 5unit dvisvgmOptions 144x144
@c LocalWords: 4g texengines coplanar 0pt 1filll 's 3D 2D 'load 5bp
@c LocalWords: insphere cospherical 5unit luatex lualatex 'asy 1cm
@c LocalWords: 'lasy 'auto 4g 2S 100pt 3t 12pt 5mm 25cm 3x 5x 3y 2x
@c LocalWords: 602e 2y 3sin 10cm 204e 10x 0pt 1filll 2D DCMAKE CXX
@c LocalWords: unnormalized 5E 5cm 2N 2E 2n 100d 5z 5y 0pt 1filll '
@c LocalWords: 5unit 144x144 aligndir smoothcontour3 's 3D 2D cmake
@c LocalWords: 'load 'asy 'lasy 'auto 5bp 1cm 4g 2S 100pt 3t nan 3x
@c LocalWords: 12pt 5mm 25cm 5x 3y 602e 2x 2y 3sin 10cm 204e 10x 4g
@c LocalWords: 5E 5cm 2N 2E 2n 100d 5z 5y nz fcommon 'load 'asy 5bp
@c LocalWords: 5unit Staats implicitsurface overlapedges maxdepth '
@c LocalWords: through'' genustwo 144x144 0pt 1filll 's 3D 2D 'load
@c LocalWords: 'asy 'lasy 'auto 5bp 1cm 4g 2S 100pt 3t 12pt 5mm 3x
@c LocalWords: 25cm 5x 3y 602e 2x 2y 3sin 10cm 204e 10x 'lasy 'auto
@c LocalWords: 5E 5cm 2N 2E 2n 100d 5z 5y 5unit 144x144 1cm newpage
@c LocalWords: Frohlich codequoteundirected center 0pt 1filll 's 3D
@c LocalWords: acknowledgments Colors 2D Color WebGL uref x86 dnf
@c LocalWords: htmlviewer asygl CPPFLAGS 'load 'asy 'lasy 'auto 5bp
@c LocalWords: 1cm labeling dotfilltype 4g color colors centered 2S
@c LocalWords: 100pt 3t forcemath gray colorless miter 12pt 5mm 3x
@c LocalWords: zeroTransform 25cm Python3 popcount bitreverse 5x 3y
@c LocalWords: 602e 2x 2y 3sin 10cm 204e 10x 2S 100pt 3t 12pt 5mm
@c LocalWords: findall ax 5a centers 5E 5cm 2N 2E 2n HTML5 html 3x
@c LocalWords: logo3 remeshed css 42kB 100d 5z 5y 5unit colored Qt5
@c LocalWords: behavior beveled usetriangles htmlviewerOptions cson
@c LocalWords: 144x144 pyqt5 numpy pip3 PyQt5 rsvg librsvg2 1filll
@c LocalWords: librsvg Supakorn Jamie'' Rassameemasmuang 2D Docdir
@c LocalWords: microsoft 'load 'asy 'lasy 'auto dep 4g isometry 5x
@c LocalWords: 5bp 1cm BezierPatch 2S 100pt 3t abs2 12pt cp1251 5mm
@c LocalWords: anttor fontenc inputenc 25cm noglobalread 3x 25cm 3y
@c LocalWords: 5x 3y 602e 2x 2y 3sin 10cm 204e 10x libcurl 602e 2x
@c LocalWords: mapArray 5a parameterized mapTemplate 5E 2N 2y 3sin
@c LocalWords: 5cm freshnel0 fresnel0 PBR prethree specularfactor
@c LocalWords: renderers 2E ESC AsyGL 48kB 2n 100d 5z 5y 5unit 10cm
@c LocalWords: unicode 144x144 Pedram Emami 204e 10x Ai Ai Ai Ai Ai
@c LocalWords: Ai Ai Ai 5a 5E 5cm 2N 2E devicepixelratio 48kB 2n 5z
@c LocalWords: 100d 5y 5unit 144x144 2004-23 2004-24 top-level 3D
@c LocalWords: 1filll Command-line Command-Line command-line 2D 15
@c LocalWords: higher-order User-defined Python-style Templated V3D
@c LocalWords: coordinate-based high-quality high-level de-facto 56
@c LocalWords: command-driven graphical-user-interface full-fledged
@c LocalWords: script-generated script-based fixed-sized ASYMPTOTE_
@c LocalWords: user-written Debian-based self-extracting disable-gc
@c LocalWords: google-chrome installation-dependent microsoft-edge
@c LocalWords: ASYMPTOTE_PAPERTYPE Right-click ASYMPTOTE_DIR C-c 72
@c LocalWords: ASYMPTOTE_HOME asymptote-x DCMAKE_INSTALL_PREFIX M-x
@c LocalWords: DCMAKE_C_FLAGS texinfo-tex system-wide asy-mode C-h
@c LocalWords: lasy-mode add-to-list 'load-path 'asy-mode asy-kate
@c LocalWords: 'lasy-mode 'asy-insinuate-latex 'auto-mode-alist 100
@c LocalWords: two-mode-mode latex-mode space-separated apt-get 5bp
@c LocalWords: ASYMPTOTE_SITEDIR build-dep Vector_Graphics_Language
@c LocalWords: 1cm double-quoted 06 left-hand right-hand even-odd
@c LocalWords: two-dimensional three-dimensional 4g fixed-size a--b
@c LocalWords: bottom-left 45 10 picture-transformed plain_Label 2S
@c LocalWords: comma-separated boundary-drawing plain_boxes 100pt
@c LocalWords: z_0 c_0 z_1 c_1 1-t 3t third-order m_5 first-order
@c LocalWords: m_0 m_1 m_2 m_3 m_4 second-order 14 75 1986 x-I 360
@c LocalWords: inflection-free Java-style user-defined built-in a-c
@c LocalWords: highest-precision floating-point element-by-element
@c LocalWords: a--b--c--cycle b-c counterclockwise-oriented 377 01
@c LocalWords: C-style 1970 02 2007 24 60 non-zero z2-c z1-c b-a 68
@c LocalWords: counter-clockwise t-floor 137 P--Q p--q cubic-spline
@c LocalWords: two-element non-default 255 6-character 140 180 375
@c LocalWords: plain_pens z--z 12pt 2018 UTF-8 CJKfamily right-top
@c LocalWords: foreground--background left-bottom 5mm 90 25 25cm 50
@c LocalWords: end-of-file one-dimensional 64-bit 32-bit C-like i-1
@c LocalWords: end-of-line asy_history_ path-joining 3x 5x 3y 2x 2y
@c LocalWords: 602e-19 3sin 10cm 204e-19 non-function 17 L-values
@c LocalWords: so-called 10x 34 43 keyword-only 77 42 Keyword-only
@c LocalWords: 21 six-element zero-length n-k Ai_deriv Bi_deriv n-1
@c LocalWords: zero_Ai zero_Bi zero_Ai_deriv zero_Bi_deriv i_scaled
@c LocalWords: k_scaled zero_J Newton-Raphson real-valued f_i T2 T1
@c LocalWords: out-of-bounds higher-indexed Dst n-2 realschur schur
@c LocalWords: quasitriangular 19 33 white-space Python-like 12 103
@c LocalWords: comma-separated-value non-cyclic 107 Non-bridging 5a
@c LocalWords: 866025403784439 non-private d-b templatedModule k-1
@c LocalWords: templatedModule_string_int_real Wrapper_Number 36 5E
@c LocalWords: Wrapper_real higher-order Three-dimensional log-log
@c LocalWords: two-variable true-element higher-quality post-scaled
@c LocalWords: polar-coordinate auto-generated textbook-style 1000
@c LocalWords: scientific-style graphwithderiv least-squares 5cm 38
@c LocalWords: 256 32766 32761 divs quantized fillcontour 67 57 48
@c LocalWords: shape-invariant 2010021-2010022 vice-versa ibl EXR
@c LocalWords: three_surface three_light plain_prethree image-based
@c LocalWords: pre-rendered imageDir imageURL cudareflect teapotIBL
@c LocalWords: patch-dependent vertex-dependent O--X 2N--2E--E 561
@c LocalWords: vertex-specific three-dimensions Ctrl-q iframe 321
@c LocalWords: frameborder 48kB stand-alone 2n 100d v3d pyv3d v2-c
@c LocalWords: importv3d v1-c O--O u--O v--O v--cycle x-0 5z y-0 5y
@c LocalWords: z-0 O--v u--v a-d b-d c-d near_earth c--c nslice 20
@c LocalWords: O--1 5unit three_arrows diamond-shaped right-angled
@c LocalWords: 2-y public-domain in-depth field-defining 144x144 'e
@c LocalWords: ASYMPTOTE_CONFIG non-writable 200 semi-colon ctrl-C
@c LocalWords: asy_history auto-completion Button-1 Button-2 LSP 's
@c LocalWords: rsvg-convert librsvg2-tools dvisvgmMultipleFiles lsp
@c LocalWords: data-binary 'import lsp-mode 'package melpa 'asyls
@c LocalWords: 'package-archives package-initialize package-install
@c LocalWords: package-refresh-contents 'lsp-mode make-lsp-client
@c LocalWords: 'lsp-language-id-configuration lsp-register-client
@c LocalWords: new-connection lsp-stdio-connection activation-fn 3D
@c LocalWords: lsp-activate-on major-modes server-id user-generated
@c LocalWords: line-based code-based plain_debugger Guib Skitsko 2D
@c LocalWords: Chaumont Cheng using 0pt 1filll Witholding simplex2
@c LocalWords: magick 'load 'asy 'lasy 'auto 5bp 1cm 3mm 4g abcdefg
@c LocalWords: 2S 100pt 3t multipath nondegenerate 12pt 5mm 25cm 3x
@c LocalWords: 5cm 5pt 3cm 2pt addPoint 10cm trueMin trueMax addBox
@c LocalWords: userMin userMax 5x 3y 602e 2x 2y 3sin 204e 10x 1e9
@c LocalWords: 5a 5E partnames defaultnames 2N 2E 48kB 2n 100d 5z
@c LocalWords: includemedia noplaybutton 200pt Javascript 5y 5unit
@c LocalWords: 144x144 rsvgConverterPath 'import MSWindows 'package
@c LocalWords: 'lsp fn 'asyls 'e
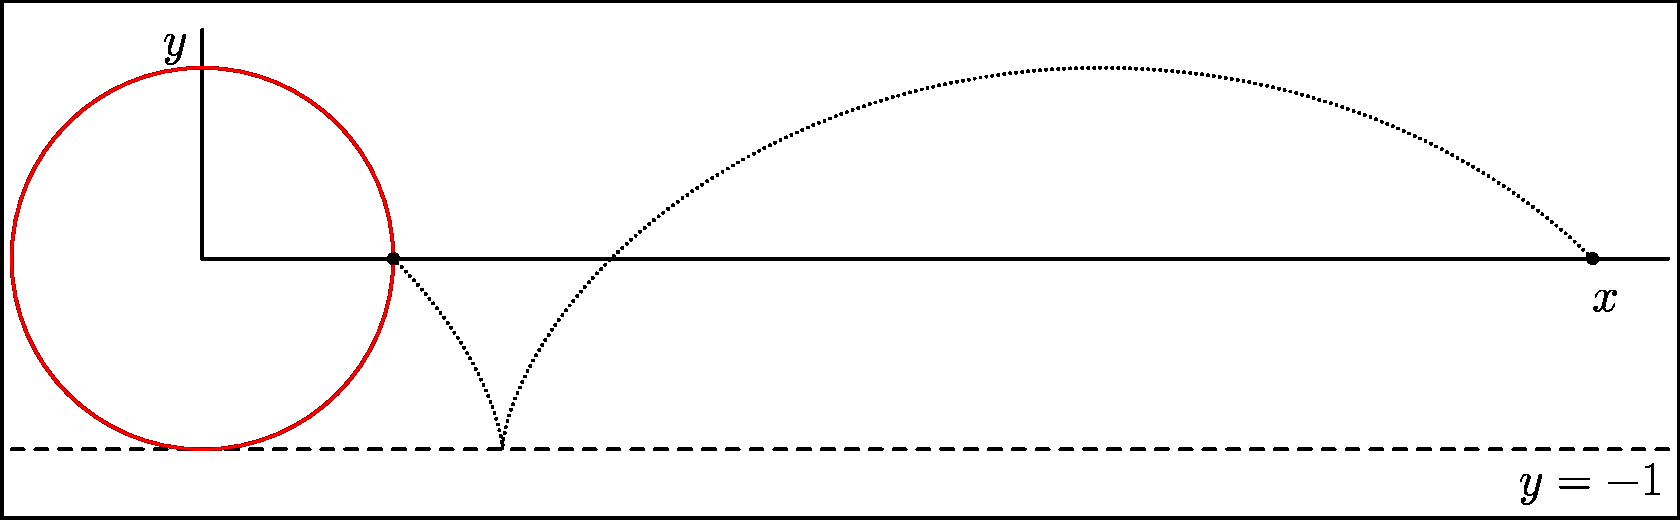