OpenBSD 5.7 on BeagleBone Black
-------------------------------
Last edited: $Date: 2015/06/28 10:34:59 $
## BeagleBone Black
The BeagleBone Black (
http://beagleboard.org/BLACK) is an Arm-7
development board with a AM335x 1GHz ARM Cortex-A8processor, 512 Mb
DDR3 RAM, ethernet, microD slot, 4GB 8-bit eMMC on-board flash
storage and a lof other nice goodies. This board is capable of
running OpenBSD :)
In order to install OpenBSD on this board, you will need to access
the serial console. This is a 3.3 Volt RS232 serial console, and
connecting this with a 12 or even 5 Volt serial port will be fatal
for the board. You need an USB F-cable to connect the BeagleBone
Black serial port to your laptop or computer.
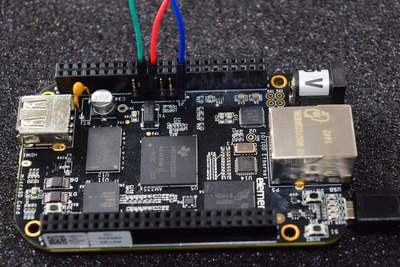
## Connecting the Serial Port
Locate the pins of the serial board on the BeagleBone Black. The
white dot is next to pin 1.
Use the following pins:
* pin 1: Ground
* pin 4: Receive
* pin 5: Transmit
On this photo:
http://box.matto.nl/ftx/bbb-serial.jpg you
can see the USB F-cable connected to the serial console.
I connected the other end (with the USB-connector) with my Debian
Linux laptop and started minicom. In minicom, choose for
* Baud 115,200
* Bits 8
* Parity N
* Stop Bits 1
* Handshake None
Boot the board and check that you see the startup-messages.
Bring the board down.
## OpenBSD Installation image
For the BeagleBone Black you need the miniroot-am335x-57.fs
installfile from one of the OpenBSD ftp-mirrors.
You can copy this file with dd to a micro SD-card. I did this on a
Debian Linux laptop with:
dd if=miniroot-am335x-57.fs of=/dev/mmcblk0 bs=16k
Funny thing is that you can use the same micro SD-card to install
OpenBSD on :)
So you dd the install image to a micro SD-card, start the installer
from there and install OpenBSD on the same card...
## Get the sets
This step is optional, just to make things easier.
I downloaded the setfiles from one of the OpenBSD ftp-mirrors:
* base57.tgz
* bsd.OMAP
* bsd.OMAP.umg
* bsd.rd.IMX
* bsd.rd.OMAP
* bsd.rd.OMAP.umg
* comp57.tgz
* game57.tgz
* index.txt
* man57.tgz
* SHA256
* SHA256.sig
I put these files on a local webserver, so during the install the
installation program can fetch these files from the local network.
I didn't bother to download any x-sets, this board will be running
headless.
## Start the installer
Now the hard work is done. Put the micro SD-card in the slot on the
board. Locate the small switch on to top-side of the board, close to
the micro SD-card slot (on the bottom-side). Keep this switch
pressed while putting power on the board. The board will now attempt
to install from the external micro SD-card and not from the internal
eMMC-flash storage.
The OpenBSD installer will start. Just follow the installation
procedure, I choose the defaults for the partitioning of the SD-card
(it is sd-card 0). After the installation is done reboot.
## Reboot into the installed system
After the reboot, login again via the serial cable and have a look
around your fresh OpenBSD system.
## Protect the micro SD card by mounting it readonly
To protect the life of the SD-card, we are going to make it
readonly.
Make sure your network configuration is right, ssh is hardened and
your ~/.ssh/authorized_keys has the right contents.
Make a directory /proto and copy /var and /home to it.
mkdir /proto
cp -rp /var /proto
cp -rp /home /proto
Now, create a template for /dev
mkdir /proto/dev
cd /proto/dev
cp /dev/MAKEDEV .
./MAKEDEV all
Now edit /etc/fstab, comment the entries for /dev, /var and /home out
and make the other entries readonly with noatime option:
4a6b4c0ba6c86953.b none swap sw
4a6b4c0ba6c86953.a / ffs ro,noatime 1 1
4a6b4c0ba6c86953.f /usr ffs ro,noatime,nodev 1 2
4a6b4c0ba6c86953.g /usr/X11R6 ffs ro,noatime,nodev 1 2
4a6b4c0ba6c86953.h /usr/local ffs ro,noatime,nodev 1 2
4a6b4c0ba6c86953.k /usr/obj ffs ro,noatime,nodev,nosuid 1 2
4a6b4c0ba6c86953.j /usr/src ffs ro,noatime,nodev,nosuid 1 2
# 4a6b4c0ba6c86953.d /tmp ffs rw,noatime,nodev,nosuid 1 2
# 4a6b4c0ba6c86953.e /var ffs rw,noatime,nodev,nosuid 1 2
# 4a6b4c0ba6c86953.l /home ffs rw,noatime,nodev,nosuid 1 2
swap /dev mfs rw,nosuid,noexec,-P=/proto/dev,-i=128,-s=4096 0 0
swap /var mfs rw,nosuid,noexec,-P=/proto/var,-s=8192 0 0
swap /home mfs rw,nosuid,noexec,-P=/proto/home,-s=8192 0 0
Above, 4a6b4c0ba6c86953 is the uuid of the micro SD-card.
Each of the last three lines will make a memory file system (MFS) and
populate that with the corresponding subdirectory from the /proto
diretory.
Reboot and check everything works fine.
## Remounting read/write
In case you want to make some changes. install additional stuff, etc.
you can remount a partition by:
mount -uw /
In this case / gets remounted read-write.
## Resources
The following pages where helpfull during the installation of OpenBSD
5.7 on the BeagleBone Black:
* OpenBSD on BeagleBone Black Everything I wish I knew before
installing the newly renamed armv7 port on a BeagleBone Black by
Ted Unangst:
http://www.tedunangst.com/flak/post/OpenBSD-on-BeagleBone-Black
* Running OpenBSD off a USB Stick by Volker Roth:
http://www.volkerroth.com/tecn-obsd-diskless.html
* OpenBSD on Soekris by John Hart:
http://blog.spoofed.org/2007/12/openbsd-on-soekris-cheaters-guide.html
$Id: openbsdbeagleblack.txt,v 1.2 2015/06/28 10:34:59 matto Exp $